


Setting up your in-ceiling speakers I Installation de vos haut-parleurs encastrables au
plafond | Instalación de sus altavoces empotrados en cielo raso |
NS-C6500 |
|
Required tools |
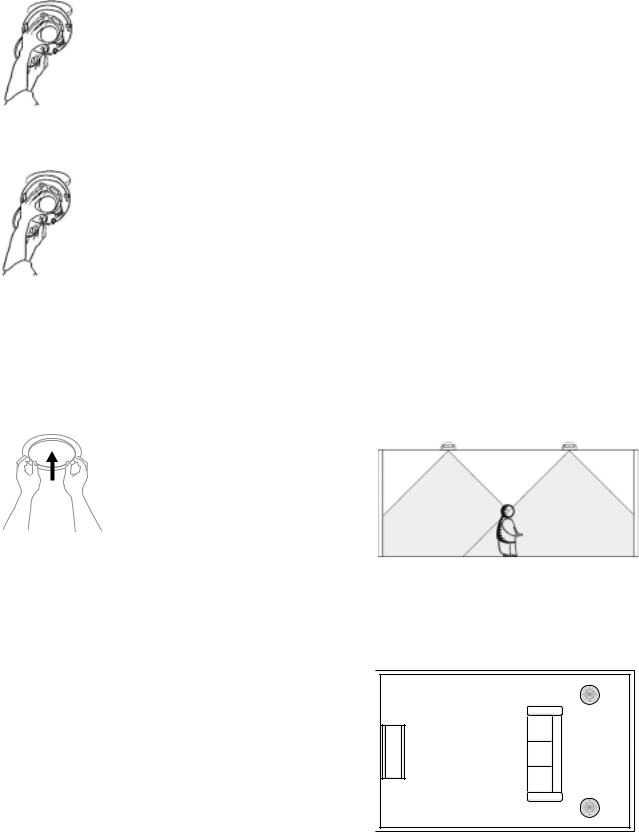
2 Position the cardboard mounting template on the ceiling where |
|
Pencil |
you want to mount a speaker, then trace around the template. |
|
|
|
|
Keyhole or drywall saw |
|
|
Phillips screwdriver |
|
|
Small level |
|
|
Fish tape or coat hanger |
|
|
Wire strippers |
|
|
Gloves |
|
|
Safety goggles |
|
|
Drill |
3 Drill a small hole in the center of the template outline you drew on |
|
1-inch flat drill bit (if drilling through studs) |
||
¼-inch to ½-inch drill bit (for drilling test hole) |
the ceiling. |
|
Package contents
Insignia speakers (2)
Paint plugs (2)
Grills (2)
Template (1)
Mounting speakers in the ceiling
For stereo sound
Mount the speakers 6 to 10 feet apart. Each speaker should be the same distance from the listening area. For detailed mounting instructions, see “Ceiling mount instructions.”
For home theater sound
Mount the speakers 6 to 10 feet apart and 3 to 6 feet behind the listening area. For detailed mounting instructions, see“Ceiling mount instructions.”
Ceiling mount instructions
To mount the speakers in the ceiling:
1Determine where you want to mount the speakers. The speakers must be mounted in areas where there are no obstructions like studs (joists). Tap the ceiling to find a“hollow” space, or use a stud finder to locate the studs.
Note: Make sure that your speaker wires are long enough to run from the speakers to your audio equipment. If you plan to run the speaker wires through the walls or ceiling, the wires must be UL or CL rated to ensure your safety and to meet building code compliance.
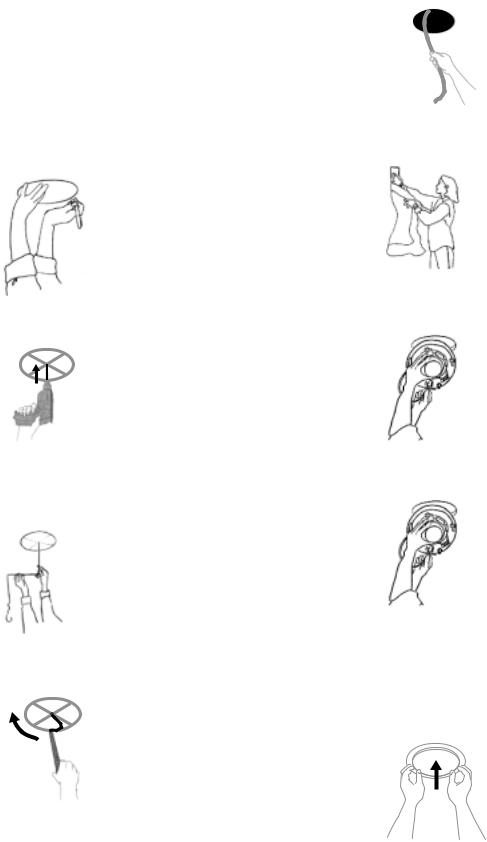
4Bend a piece of coat hanger wire, then insert the wire into the hole. Slowly rotate the wire to check for any obstructions. If you find an obstruction, patch the hole and find a new location for the speaker.
5Using a keyhole or drywall saw, carefully cut the ceiling section you outlined, then remove the section.
6Run the wires from the speaker outputs on your audio equipment to your speakers. Allow a few extra feet of wire so you will have enough wire to strip the insulation and splice the wires.
Note: Use high quality wire such as 16/4 speaker wire. If you need to run the wires a long distance, you can splice one or more lengths of wires together.
7(Optional) To improve speaker performance, insert unbacked fiberglass insulation behind and around the speaker.
Warning: To avoid personal injury, wear gloves when inserting the insulation.
8Pull the wires through the hole in the ceiling. Strip o the end of the outer wire jacket, then strip about ½ inch of the insulation from the ends of the wires.
9Connect the positive wire on your audio equipment to the red terminal on the speaker, then connect the negative wire on your audio equipment to the black terminal on the speaker.
Warning: Make sure that your audio equipment is turned o before you connect the speaker wires.
10Remove the speaker grill by pushing one of the Roto-Lock™ screws towards the front of the speaker, then insert the speaker into the hole in the ceiling.
11Tighten the screws evenly until the speaker is flat against the ceiling.
Caution: If you use a drill to tighten the screws, make sure that you set the drill to its lowest torque speed. Do not overtighten screws.
12Reinstall the speaker grill.
Painting the speakers and grills
The speakers have a weather resistant, ABS finish that you can paint.
To paint the speakers and grills:
1Remove the grills from the speakers.
2Make sure that the interior of the speaker is covered so no paint will get inside.
3Insert one of the supplied paint plugs into the speaker to protect the speaker.
4Carefully paint the exposed part of the speaker. Remove the plug when you have finished painting.
5Spray the grill with thin paint (5 parts thinning agent to 1 part paint). Make sure that you do not plug the screw holes on the grill with paint. Too much paint may adversely a ect the speaker sound.
Specifications
Woofer 6 1/2” |
Gold aluminum cone with a rubber |
|
surrounding |
Tweeter |
¾” pivoting gold aluminum dome |
Frequency |
50 Hz to 20 kHz ± 3dB |
response |
|
E ciency |
90 dB 1w 1m |
Power |
5 watts minimum to 100 watts maximum |
Impedance |
8 ohms nominal |
Grill metal |
8.98” (228 mm) diameter × 3.70” (94 mm) |
dimensions |
depth |
Cut-out dimension |
7.68” (195 mm) diameter |
Weight |
6.9 lbs (3.12 kg) per pair |
Outils requis
Crayon
Scie à guichet ou pour cloison sèche Tournevis cruciforme
Petit niveau
Câble de suspension ou cintre Outil à dénuder
Gants
Lunettes étanches Perceuse
Mèche plate de 1 po (si des poutres doivent être percées) Mèche de ¼ à ½ po (pour percer des trous d’essai)
Contenu de l’emballage
2 haut-parleurs Insignia
2cache-peinture
2grilles
1 gabarit
Installation des haut-parleurs au plafond
Pour un son stéréo
Installez les haut-parleurs avec un écartement de 6 à 10 pieds (1,8 à 3 m). Chaque haut-parleur doit être à la même distance de la zone d’écoute. Pour toutes instructions détaillées sur l’installation, voir « Instructions sur l’installation au plafond ».
Pour un son de cinéma maison
Installez les haut-parleurs avec un écartement de 6 à 10 pieds (1,8 à 3 m) et en arrière de 3 à 6 pieds (0,9 à 1,8 m) par rapport à la zone d’écoute. Pour toutes instructions détaillées sur l’installation, voire « Instructions sur l’installation au plafond ».
2
Instructions sur l’installation au plafond
Pour installer les haut-parleurs au plafond:
1Déterminez l’emplacement d’installation de haut-parleurs. Les hautparleurs doivent être installés dans des zones sans obstructions telles que des poutres (solives). Sondez le plafond pour localiser des espaces « creux » ou utilisez un détecteur de poutres pour les localiser.
Remarque: Vérifiez que les câbles des haut-parleurs sont su samment longs pour atteindre l’équipement audio. Si vous acheminez les câbles des haut-parleurs à travers les murs ou le plafond, les câbles doivent être à la norme UL ou CL pour une meilleure sécurité et être en conformité avec le
code du bâtiment.
2Positionnez le gabarit d’installation en carton sur le plafond à l’endroit choisi pour le haut-parleur, puis tracez un rond autour du gabarit.
3Percez un petit orifice au centre du modèle tracé au plafond à l’aide du gabarit.
4Recourbez un morceau de fil de fer de cintre, puis insérez le fil de fer dans l’orifice. Faites-le pivoter doucement pour vérifier l’existence éventuelle d’obstructions. S’il existe une obstruction, bouchez l’orifice et choisissez un nouvel emplacement pour le haut-parleur.
5À l’aide d’une scie à guichet ou pour cloison sèche, découpez soigneusement la section du plafond qui a été dessinée, puis retirez la section.
6Acheminez les câbles de sortie haut-parleurs de l’équipement audio jusqu’à vos haut-parleurs. Prévoyez quelques pieds supplémentaires de câbles pour pouvoir les dénuder et les raccorder.
Remarque: Utilisez des câbles de haute qualité tels que des câbles pour haut-parleurs de 16/4. Si vous devez acheminer les câbles sur une longue distance, vous pouvez raccorder une ou plusieurs portions de câbles.
7(Optionnel) pour améliorer la performance du haut-parleur, insérez un isolant revêtu de fibre de verre sur un côté à l’arrière et autour du hautparleur.
Avertissement: Pour éviter les blessures, mettez des gants pour insérer l’isolant.
8Passez les câbles par l’orifice dans le plafond. Sectionnez l’extrémité de la gaine du câble, puis dénudez ce dernier d’environ ½ po (1,3 cm) à chaque extrémité.
9Connectez le câble positif de l’équipement audio à la borne rouge du hautparleur, puis le câble négatif de l’équipement audio à la borne noire du haut-parleur.
Avertissement: Vérifiez que votre équipement audio est hors tension avant la connexion des câbles des hautparleurs.
10Retirez la grille du haut parleur en appuyant sur l’une des vis Roto-LockMC vers l’avant du haut-parleur, puis insérez le haut-parleur dans le plafond.
11Serrez les vis de façon égale jusqu’à ce que le haut-parleur soit uniformément plaqué au plafond.
Attention: Si vous utilisez une perceuse pour serrer les vis, vérifiez que celle-ci est réglée à la vitesse minimale. Ne serrez par les vis excessivement.
12Remettez la grille du haut-parleur.
3
 Loading...