


FOREWORD
Thank you for purchasing an INFINITI vehicle.
This user’s manual is for the navigation system only. This manual contains operating instructions for the INFINITI Navigation System offered in your INFINITI vehicle.
Please read this manual carefully to ensure safe operation of the navigation system.
.Because of possible specification changes and optional equipment, sections of this manual may not apply to your vehicle.
.All information, specifications and illustrations in this manual are those in effect at the time of printing. INFINITI reserves the right to change specifications or design at any time without notice.
.Do not remove this manual from the vehicle when selling this vehicle. The next user of this navigation system may need the manual.
Table of Contents
1 Introduction
How to use this manual................... |
1-2 |
For safe operation............................ |
1-2 |
Safety information ........................... |
1-3 |
Laser product .................................. |
1-4 |
2. Getting started
Control buttons and functions.......... |
2-2 |
Start-up screen................................ |
2-4 |
Navigation system status screen...... |
2-5 |
Functions disabled while driving ...... |
2-6 |
Menu screen and how to operate..... |
2-7 |
Touch panel operation ................... |
2-10 |
Map menu screen.......................... |
2-11 |
Storing your home location/ |
|
address ......................................... |
2-13 |
Setting a destination ..................... |
2-15 |
Operating maps............................. |
2-18 |
Setting the voice guidance............. |
2-19 |
How to input letters and |
|
numbers........................................ |
2-21 |
INFINITI Voice Recognition .............. |
2-23 |
3 Map settings
Map types ....................................... |
3-2 |
Returning to the current vehicle |
|
location ........................................... |
3-4 |
Moving a map ................................. |
3-5 |
Changing the scale of a map ........... |
3-9 |
Other settings for the map |
|
screen ........................................... |
3-12 |
Looking at information on the |
|
map .............................................. |
3-19 |
4 Setting a destination
Destination screen........................... |
4-2 |
Operations after setting a |
|
destination .................................... |
4-26 |
5 Route guidance
Procedures after setting a |
|
destination ...................................... |
5-2 |
Route screen ................................... |
5-5 |
About route guidance .................... |
5-24 |
6 Storing a location/route
Storing a location ............................ |
6-2 |
Storing a route ................................ |
6-5 |
Storing a tracked route .................... |
6-6 |
Storing an avoid area ...................... |
6-7 |
Editing the address book................. |
6-9 |
Deleting a stored item ................... |
6-21 |
|
|
7 Viewing technical information |
|
|
|
Information screen........................... |
7-2 |
Viewing traffic information ............... |
7-3 |
Viewing information about current |
|
vehicle location ............................... |
7-8 |

Viewing GPS current location |
|
information...................................... |
7-9 |
Viewing navigation system version |
|
information...................................... |
7-9 |
Route guidance............................ |
10-10 |
Notes on traffic information ......... |
10-14 |
Map data..................................... |
10-16 |
How to handle the display ........... |
10-19 |
8 Other settings
Settings screen................................ |
8-2 |
Display settings............................... |
8-2 |
Navigation setting............................ |
8-4 |
Volume adjustment.......................... |
8-9 |
Clock settings................................ |
8-10 |
Language and unit settings............ |
8-11 |
9 Voice recognition
INFINITI Voice Recognition ................ |
9-2 |
Displaying how to operate the |
|
voice recognition system.................. |
9-2 |
|
|
10 General system information |
|
|
|
Features of this navigation |
|
system .......................................... |
10-2 |
Current vehicle location ................. |
10-4 |
Route calculation ........................... |
10-8 |
11 Troubleshooting guide
Customer assistance...................... |
11-2 |
Basic operations............................ |
11-3 |
Vehicle icon................................... |
11-4 |
Route calculation and visual |
|
guidance ....................................... |
11-6 |
Voice guidance .............................. |
11-8 |
Voice recognition ........................... |
11-9 |
Traffic information........................ |
11-10 |
1 Introduction
How to use this manual |
1-2 |
Safety information |
1-3 |
|
|
||||
For safe operation ........................................... |
1-2 |
Laser product .................................................. |
1-4 |
|
Reference symbols....................................... |
1-2 |
|
|
|
1. Introduction
HOW TO USE THIS MANUAL
This manual uses special words, symbols and icons, organized by function.
Please refer to the following items and familiarize yourself with them.
FOR SAFE OPERATION
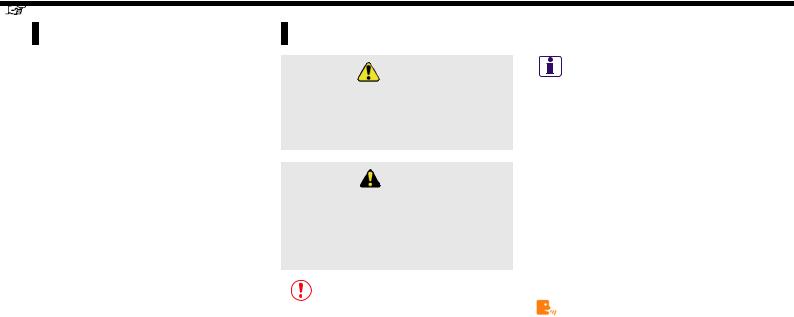
WARNING!
This is used to indicate the presence of a hazard that could cause death or serious p- ersonal injury. To avoid or reduce the risk, the procedures must be followed precisely.
CAUTION!
This is used to indicate the presence of a hazard that could cause minor or moderate personal injury or damage to your vehicle. To avoid or reduce the risk, the procedures must be followed carefully.
NOTE:
This indicates an item to help you understand and maximize the performance of your vehicle. If ignored, it may lead to a malfunction or poor performance.
REFERENCE SYMBOLS
INFO:
This indicates information that is necessary for efficient use of your vehicle or accessories.
Reference page:
This indicates the title and page that you should refer to.
<>:
This indicates a button on the control panel.
[ ]:
This indicates a key/item displayed on the screen.
Voice Command:
This indicates an operation by voice command.
1-2

1. Introduction
SAFETY INFORMATION
This system is primarily designed to help you reach your destination, and it also performs other functions as outlined in this manual. However, you, the driver, must use the system safely and properly. Information concerning road conditions, traffic signs and the availability of services may not always be up-to-date. The system is not a substitute for safe, proper and legal driving.
Before using the navigation system, please read the following safety information. Always use the system as outlined in this manual.
WARNING!
.When the driver wants to operate the navigation system or use the INFINITI controller, first park the vehicle in a safe location and set the parking brake. Operating the system while driving can distract the driver and may result in a serious accident.
.Do not rely on route guidance alone. Always be sure that all driving maneuvers are legal and safe in order to avoid
accidents.
.Do not disassemble or modify this system. If you do, it may result in accidents, fire or electrical shock.
.Do not use this system if you notice any malfunctions such as a frozen screen or the lack of sound. Continued use of the system may result in accidents, fire or electrical shock.
.If you notice any foreign objects in the system hardware, spill liquid on the system or notice smoke or a smell coming from it, stop using the system immediately and contact an INFINITI dealer. Ignoring such conditions may lead to accidents, fire or electrical shock.
CAUTION!
.Do not keep the navigation system running with the engine stopped. Doing so may discharge the vehicle battery. When you use the navigation system, always keep the engine running.
.Some states/provinces may have laws limiting the use of video screens while driving. Use this system only where it is legal to do so.
.Extreme temperature conditions [below – 48F (–208C) and above 1588F (708C)] could affect the performance of the hard disk.
1-3

1. Introduction
LASER PRODUCT
This navigation system is certified as a Class 1 laser product.
The navigation system complies with DHHS Rules 21 CFR Chapter 1, Subchapter J.
WARNING!
.Do not disassemble or modify this system. There are no user serviceable parts in this navigation system.
.If maintenance, adjustments and operations other than those specified in this manual are attempted, injury due to laser radiation and exposure could occur.
1-4

1. Introduction
MEMO
1-5

1. Introduction
MEMO
1-6
2 Getting started
Control buttons and functions........................... |
2-2 |
Control panel .............................................. |
2-2 |
INFINITI controller ........................................ |
2-3 |
Steering switch............................................ |
2-3 |
Start-up screen................................................ |
2-4 |
Navigation system status screen ....................... |
2-5 |
Functions disabled while driving ....................... |
2-6 |
Menu screen and how to operate...................... |
2-7 |
Menu screens and their purposes ................. |
2-7 |
Using controls to adjust values, levels, etc. ... |
2-8 |
Start menu.................................................. |
2-8 |
List screen .................................................. |
2-9 |
Touch panel operation.................................... |
2-10 |
Example of touch panel operation ............... |
2-10 |
Map menu screen .......................................... |
2-11 |
Current location map screen ....................... |
2-11 |
Scrolled location map screen ...................... |
2-12 |
Storing your home location/address |
2-13 |
|
|
||
How to store your home............................. |
2-13 |
|
Setting a destination...................................... |
2-15 |
|
Searching for a destination......................... |
2-15 |
|
Starting route guidance.............................. |
2-16 |
|
Deleting a route ........................................ |
2-17 |
|
Operating maps............................................. |
2-18 |
|
How to view map screen ............................ |
2-18 |
|
Setting the voice guidance ............................. |
2-19 |
|
Turning voice guidance on/off..................... |
2-19 |
|
Adjusting voice guidance volume ................ |
2-20 |
|
How to input letters and numbers ................... |
2-21 |
|
Character (letter and number) input |
|
|
screen ...................................................... |
2-21 |
|
Phone number input screen........................ |
2-22 |
|
INFINITI Voice Recognition............................... |
2-23 |
|
Confirming voice commands ....................... |
2-23 |
|
Before starting .......................................... |
2-24 |
|
Voice command examples .......................... |
2-24 |
|
2. Getting started
CONTROL BUTTONS AND FUNCTIONS
CONTROL PANEL
&1 <STATUS>:
Push to display the current status of the air conditioner, radio, audio, vehicle information (driveable distance and average fuel economy) and navigation systems.
&2 <DEST>:
Push to enter a destination. Various
INI0261
methods for entering a destination are available.
 “4. Setting a destination”
&3 <ROUTE>:
Push to access guidance control functions (guidance cancellation, route priority, waypoint setting on the route, etc.).
&4 INFINITI Controller:
Push to highlight an item on the
screen, select the highlighted item, move on the map, etc.
&5 <INFO>:
Push to display the vehicle information and the navigation information, such as GPS and version information, etc.
6 |
: |
& <DAY/NIGHT OFF> |
Push to switch between the day screen (bright) and the night screen (dark). Push and hold to turn off the display. Push again to turn on the display.
&7 <SETTING>:
Push to access the system settings.
&8 <VOICE>:
Push to repeat voice guidance for a guide point.
&9 <BACK>:
Push to return to the previous screen. In a settings screen, this button can also be used to apply the setting.
In a character input screen, this button can also delete the characters that have been entered.
&10 <MAP>:
Push to display the current location map screen.
2-2
2. Getting started
&11 <ZOOM IN>, <ZOOM OUT>:
Push to switch to the zoom mode to change the map scale.
INFO:
If <BACK> needs to be pushed to apply the setting in a settings screen, this manual will explicitly include a step for this procedure. Otherwise, pushing <BACK> returns you to the previous screen.
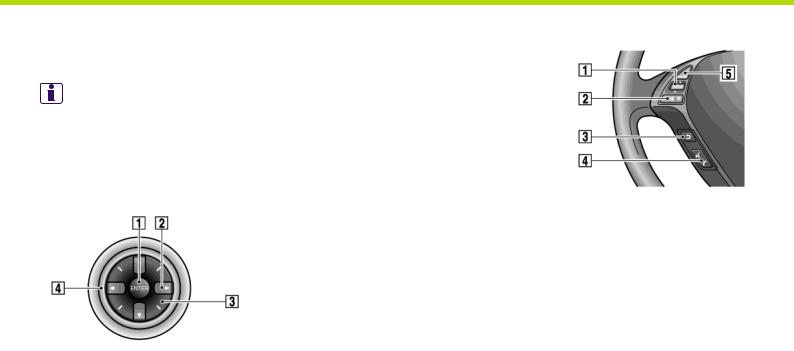
INFINITI CONTROLLER
displayed, the map menu screen is displayed.
&2 Main directional buttons:
Use to move across the map, highlight an item on the screen or adjust a setting (volume, brightness, etc.).
&3 Additional directional buttons:
Use to move across the map or highlight an item on the character input screen.
&4 Center dial:
Turn to highlight an item on the screen or adjust a setting.
If the scale bar is displayed on the map screen, the map scale can be changed.
INI0262
&1 <ENTER>:
Push to select the highlighted item on the screen.
If this button is pushed while a map is
STEERING SWITCH
INI0263
&1 <ENTER>:
Tilt to highlight an item on the screen or adjust a setting. Push to select the highlighted item.
If this button is pushed while a map is displayed, the map menu screen is displayed.
 “MAP MENU SCREEN” (page 2-11) Push and hold to display the start menu.
 “START MENU” (page 2-8)
If this button is tilted up while the audio function is activated and the map or status screen is displayed, the audio system can be operated.
2-3

2. Getting started
&2  :
:
Use to adjust the volume. These buttons have the same function as that of the volume knob. Refer to the Owner’s Manual of your vehicle.
&3  :
:
Push this button during a setting operation to return to the previous screen. In a settings screen, this button can also be used to apply the setting.
&4 <TALK>  :
:
Push to start the voice recognition mode. Push and hold for 1 second to cancel voice commands when in the voice recognition mode.
&5 <SOURCE>:
Use to switch the audio mode (source). Refer to the Owner’s Manual of your vehicle.
START-UP SCREEN
INV3051
1.The navigation system starts when the ignition switch is pushed to the ACC or ON position.
INV3052
2.As the start-up screen is displayed, read the precautions carefully, highlight [OK] and push <ENTER> or touch [OK].
INFO:
If you do not push <ENTER> for more than 30 seconds, the status screen will be displayed. Push <DEST>, <MAP>, <ROUTE>, <INFO>, <SETTING>, <STATUS> or <TALK> to return to the start-up screen.
2-4
2. Getting started
NAVIGATION SYSTEM STATUS SCREEN
By pushing <STATUS> while the current location map screen is displayed, you can display the current status of the navigation system.
Each time <STATUS> is pushed, displayed information is switched in the order of audio, air conditioner, vehicle information and navigation route information.
INFO:
There are different status screens displayed depending on various factors, such as the currently active mode, whether a destination has been set or not, etc.
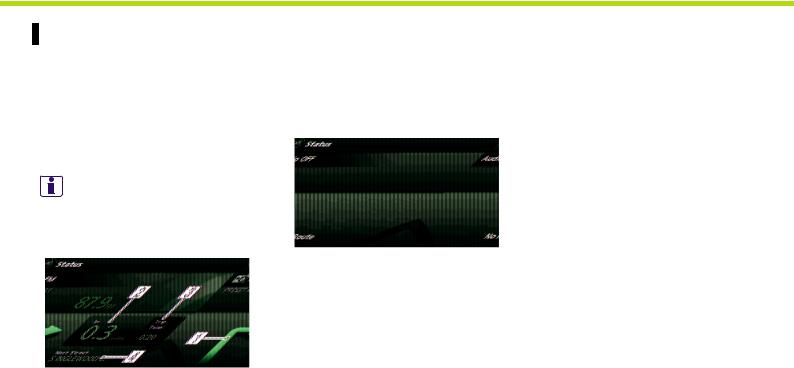
INV3053
When a route to the destination is set and the audio system is on, a screen similar to the one above appears.
&1 Turning direction at the next intersection
&2 Distance to the next intersection
&3 Remaining time to the destination
&4 Name of the next street
INV3054
When a route to the destination is not set and the audio system is off, a screen similar to the one above appears.
2-5
2. Getting started
|
FUNCTIONS DISABLED WHILE DRIVING |
To ensure safe driving, some functions |
|
|
cannot be operated while driving. |
|
|
|
|
|
The on-screen functions that are not |
|
|
available while driving will be “grayed- |
|
|
out” or muted. |
|
|
In some cases, certain text will not be |
|
|
displayed on the screen. |
|
|
Park the vehicle in a safe location and then |
|
|
operate the navigation system. |
INV3055
2-6
2. Getting started
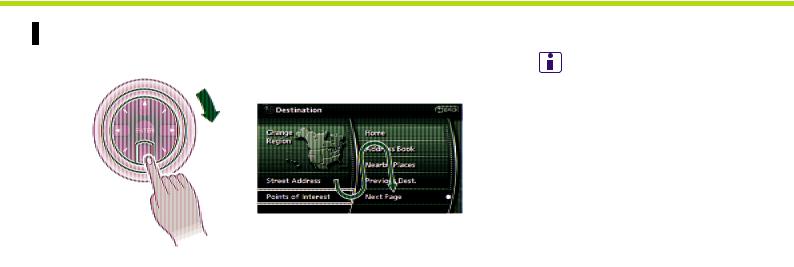
MENU SCREEN AND HOW TO OPERATE
MENU SCREENS AND THEIR PURPOSES
Push <DEST>, <ROUTE>, <PHONE>, <INFO> or
<SETTING> to display the corresponding menu screen.
How to select a menu item
Example: <DEST> screen
1.Turn the center dial clockwise or counterclockwise or push the up or
INV3056
down button of the main directional buttons. An item is highlighted accordingly.
2.To select the preferred menu item, highlight the item and push <ENTER>. The next screen is displayed.
3.Push <BACK> to return to the previous screen without applying any changes.
Push <MAP> to return to the current location map screen without applying
any changes.
INFO:
.Some items in the menu contain further details, which are displayed on the right side of the screen when the menu item is highlighted. This allows you to preview details of the item. These details appear only on the menu screen displayed by pushing <DEST>.
.Depending on the menu selected, pushing <MAP> may not return you to the current location map screen.
.You can also select an item by tilting the steering switch up and down.
2-7
2. Getting started
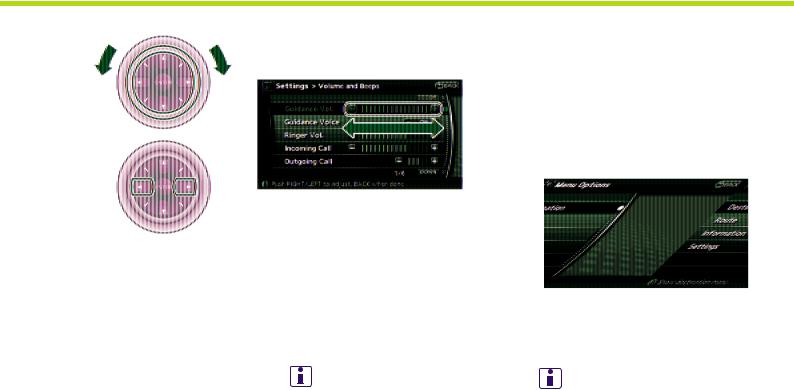
USING CONTROLS TO ADJUST VALUES, LEVELS, ETC.
There are two main methods you can use to control the navigation system: the center dial, the main directional buttons the touch panel and the steering switch. Use these controls to adjust the volume of phone and voice guidance, the display brightness, etc.
How to adjust
1. Highlight the preferred setting item and
INV3057
push <ENTER>. The color of the corresponding adjustment item changes.
2.Use one of the controls, and the value or bar indicating levels increases or decreases accordingly.
3.Push <ENTER> or <BACK> to apply the setting.
INFO:
.You can also adjust the volume of phone and voice guidance, the display brightness,
etc. by tilting the steering switch up and down.
.This same adjustment can also be made by
the touch panel operation.
 “Adjusting the volume and others” (page 2-10)
START MENU
The start menu can be displayed using the steering switch.
INV3058
1.Push and hold <ENTER> on the steering switch.
2.Highlight the preferred item and push
<ENTER>.
INFO:
<ENTER> on the steering switch can be used to display the start menu only when the map or
2-8

2. Getting started
status screen is displayed.
Available items
.Destination:
Displays the destination screen. It is the same screen that appears when you
push <DEST>.
 “4. Setting a destination”
.Route:
Displays the route screen. It is the same screen that appears when you
push <ROUTE>.
 “5. Route guidance”
.Information:
Displays the information screen. It is the same screen that appears when you
push <INFO>.
 “7. Viewing technical information”
.Settings:
Displays the settings screen. It is the same screen that appears when you
push <SETTING>.
 “8. Other settings”
LIST SCREEN
After searching for a point of interest, a list screen is displayed.
Depending on the list displayed, it can be sorted.
Items displayed in a list
&1 Highlight the preferred item from the list and push <ENTER> to select it.
If a location or facility name is not completely displayed (due to length),
INV3059
highlight the item and push the right button of the main directional buttons to show the hidden part of the name. You can also display the hidden part of the name by touching  .
.
&2 Distance from the current location
&3 Direction to the point of interest
&4 If the entire list cannot be displayed on the screen, the system displays the total number of items in the list and
2-9
2. Getting started
the entry number of the selected item. Turn the center dial or push the up or down buttons of the main directional buttons to scroll the list.
&5 Highlight and push <ENTER> to sort the list by shortest distance.
&6 Highlight and push <ENTER> to sort the list in the original order.
&7 When the list is sorted by the shortest distance, you can confirm the selected location in the preview on the right side of the screen.
TOUCH PANEL OPERATION
With this system, the same operations as those for the INFINITI controller are possible using the touch panel operation.
This manual describes the operations using the INFINITI controller.
For the operations that differ from those of the INFINITI controller and for useful methods for using the touch panel operation, refer to each section.
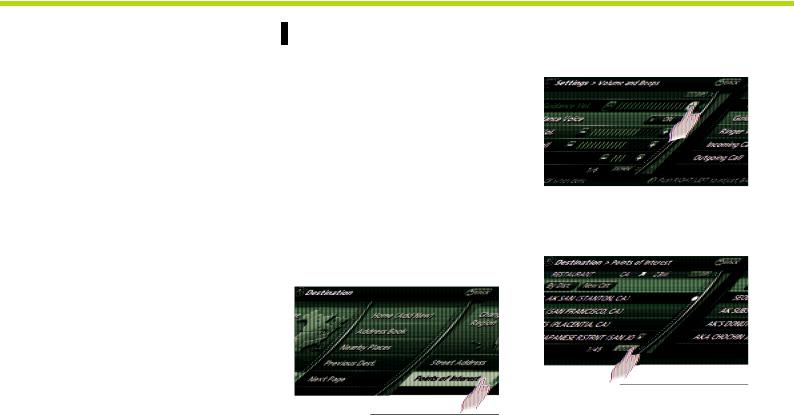
EXAMPLE OF TOUCH PANEL OPERATION
Here, the operation examples performed with the touch panel operation are described.
Selecting the item
INV3060
When the item is touched, the following screen is displayed.
Adjusting the volume and others
INV3061
Touch [+] or [–] located on the right and left of the bar graph to perform the adjustment.
Scrolling the message or list
INV3062
Touching [UP] or [DOWN] allows you to scroll the message or list.
2-10
2. Getting started
Inputting letters and numbers |
|
MAP MENU SCREEN |
CURRENT LOCATION MAP SCREEN |
|
|
|
|
INV3063
1.Touch the letter or number.
2.When you desire to delete a character, touch [Delete]. Push and hold [Delete] to delete all of the characters.
Push <ENTER> while the current location map screen or a scrolled map screen is displayed to display the menu corresponding to that screen.
This menu allows you to quickly use helpful functions, such as setting a destination easily and searching for Points of Interest nearby.
To select a menu item, use the method described in “Menu screen types and how to operate”.
INFO:
With the touch operation, the same screen can be displayed by touching [Map Menu] located on the map screen.
INV3064
If <ENTER> is pushed while the current location map screen is displayed, the following options are available.
.Store Location:
Allows you to store the current vehicle location in the Address Book. The stored location can be retrieved as necessary to set it as a destination (waypoint).
 “STORING A LOCATION” (page 6-2)
.Nearby:
Allows you to search for points of interest near the current vehicle location, such as restaurants and gas
stations, etc.
 “SETTING A NEARBY PLACE” (page 4-15)
2-11
2. Getting started
.Map Settings:
Performs the map operations such as the switching of map type and the
setting of map orientation and scale.
 “OTHER SETTINGS FOR THE MAP SCREEN” (page 3-12)
.Landmark Icons:
Allows you to display certain points of interest near the current vehicle location on the map, such as restaurants
and gas stations, etc.
 “DISPLAYING LANDMARK ICONS” (page 3-19)
.Store Tracking:
Allows you to store in the Address Book the route that you have travelled from the starting point to the current loca-
tion.
 “STORING A TRACKED ROUTE” (page 6-6)
.Guide Screen:
Set the default display screen for route
guidance.
 “Visual guidance settings” (page 5-19)
SCROLLED LOCATION MAP SCREEN
INV3065
If <ENTER> is pushed while a scrolled map screen is displayed, the following options are available.
.New Dest.:
Allows you to set the destination to the location where you pushed <ENTER>. If a destination is already set, the loca-
tion will be set as the new destination.  “SETTING FROM MAP” (page 4-25)
.Add to Route:
Allows you to set the location where you pushed <ENTER> as the destination or a waypoint.
This is available only when the sug-
gested route is already set.
 “Setting a destination or waypoint” (page 5-8)
.Nearby:
Allows you to search for points of interest near the location where you pushed <ENTER> and set it as a destination or waypoint.
Use the same search method as the
one for POI.
 “SETTING A NEARBY PLACE” (page 4-15)
.Store Location:
Allows you to store the location where you pushed <ENTER> in the Address Book. The stored location can be retrieved to set it as a destination or
waypoint.
 “STORING A LOCATION” (page 6-2)
.Delete:
Allows you to delete a stored location, destination or waypoint. To delete it, place the cross pointer over the corresponding icon.
.Incident Details:
Can be selected only when the traffic information icon is displayed. Displays the details of the traffic information icon that is being displayed.
Place the cross pointer over the icon
2-12
2. Getting started
you desire to check. |
|
STORING YOUR HOME LOCATION/AD- |
|
|
DRESS |
|
|
|
|
HOW TO STORE YOUR HOME |
|
|
If your home location is already stored in |
|
|
the Address Book, it can be easily retrieved |
|
|
to set the route to your home. |
|
|
The procedure to store your home location |
|
|
is the same as for storing any other |
|
|
location. |
|
|
|
“4. Setting a destination” |
|
As an example, the procedure for storing |
|
|
your home location by searching for a |
|
|
destination by address is described here. |
|
INV3068
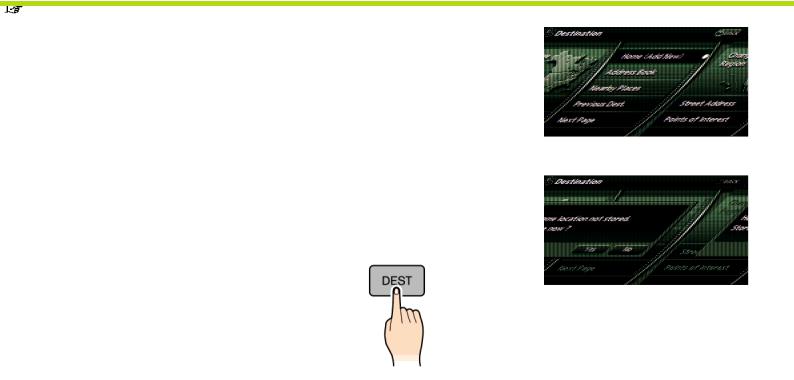
2.Highlight [Home Location (Add New)] and push <ENTER>.
INV3069
3. A confirmation message is displayed. Confirm the contents of the message, highlight [Yes] and push <ENTER>.
INI0208
1. Push <DEST>.
2-13
2. Getting started
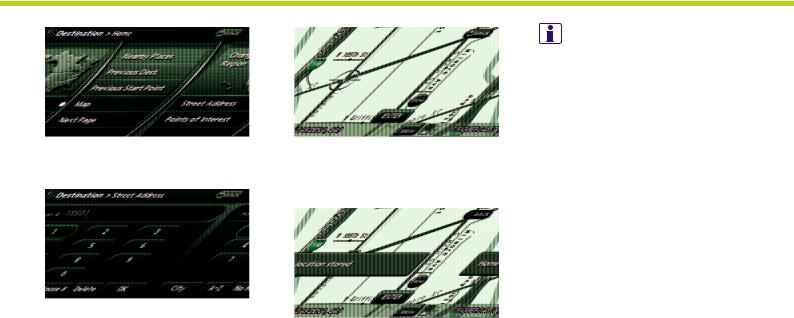
INV3070
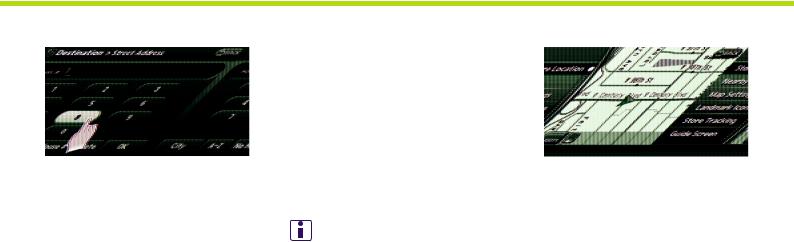
4.Highlight [Street Address] and push <ENTER>. A character input screen is displayed.
INV3071
5.Enter the address of your home, highlight [OK] and push <ENTER>.
The map screen is displayed.
 “SETTING A STREET ADDRESS” (page 4-4)
INFO:
You can also perform the same setting by pushing <SETTING> and selecting [Navigation].  “STORING A LOCATION BY SEARCHING”
(page 6-2)
INV3072
6.Pushing the directional buttons, adjust your home location if necessary.
7.After adjusting the location, push
<ENTER>.
INV3073
8.A message is displayed and your home location is stored.
9.Push <MAP> to return to the current location map screen.
The home icon is displayed on the map.
2-14

2. Getting started
|
SETTING A DESTINATION |
<ENTER>. |
|
|
|
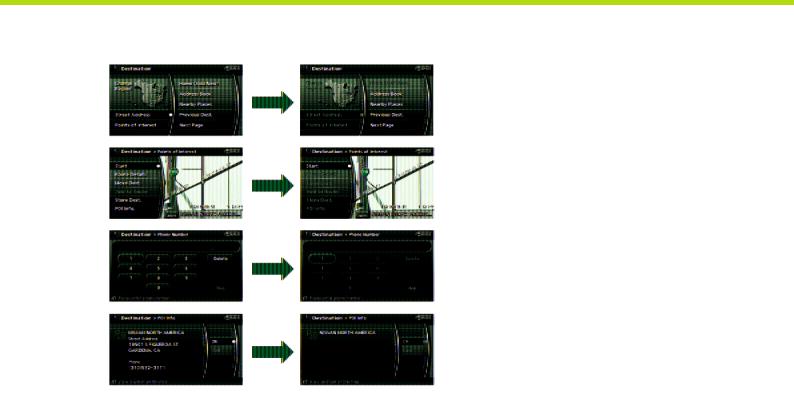
SEARCHING FOR A DESTINATION
As an example, the method for setting an airport as the destination using [Points of Interest] is described here.
INV3077
3. Highlight [Travel] and push <ENTER>.
INI0208
1. Push <DEST>.
INV3076
4. From the category list, highlight [AIRPORT] and push <ENTER>.
INV3075
2. Highlight [Points of Interest] and push
INV3193
5.Highlight [By Name] and push <ENTER>. A character input screen is displayed.
INV3078
6.Highlight [List] and push <ENTER>. A list screen is displayed.
2-15

2. Getting started
INFO:
You can enter the city name and facility name to narrow down your search.
The number of narrowed down points are displayed in the “Matches” column.
STARTING ROUTE GUIDANCE
After setting the destination and performing route calculation, the suggested route is displayed.
INV3079
7.Highlight the preferred airport from the list and push <ENTER>.
INFO:
.By selecting [By Dist.], you can sort the list by the shortest distance.
.The position of the selected location is displayed in the preview on the right side of the screen.
INV3080
8.The selected destination is displayed at the center of the map. Highlight [Start] after confirming the location of the displayed destination, and push
<ENTER>.
INFO:
.The system sets the destination to the selected location and starts calculating a route.
.Even after setting a destination, you can adjust the location of the destination,
store the route, etc. if necessary.  “OPERATIONS AFTER SETTING A DESTINATION” (page 4-26)
INV3081
1. Highlight [Start] and push <ENTER>.
INV3082
2.Once route guidance is started, the system navigates you through the guide points using visual and voice guidance.
2-16
2. Getting started
DELETING A ROUTE
To delete a route already set, use the following procedure. If you delete a route, the destination is also deleted.
INV3083
3.When approaching a guide point, the system automatically changes to the split screen and shows an enlarged view of the intersection in the left screen.
Push <MAP> to switch to the full map screen.
INV3084
4.When arriving at the destination, route guidance automatically ends.
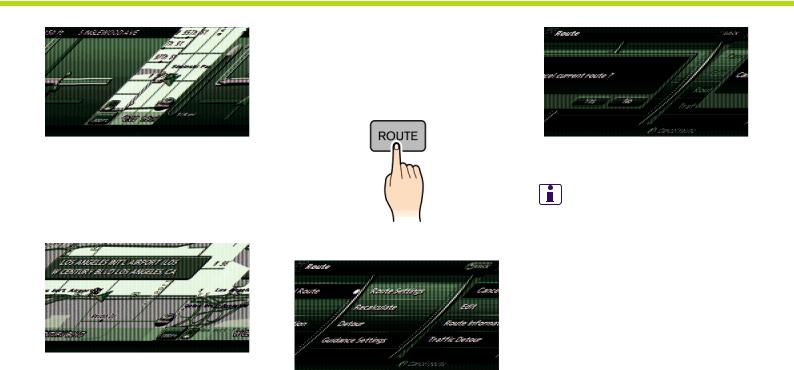
INI0209
1. Push <ROUTE>.
INV3086
2.Highlight [Cancel Route] and push
<ENTER>.
INV3087
3.A confirmation message is displayed. Highlight [Yes] and push <ENTER>.
INFO:
If a route is cancelled, [Cancel Route] changes to [Resume Route].
Highlight [Resume Route] and push <ENTER> to reactivate the cancelled route.
This is available only until a new route is set.
2-17
2. Getting started
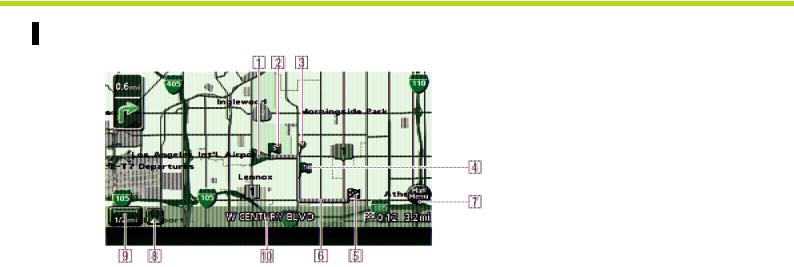
OPERATING MAPS
HOW TO VIEW MAP SCREEN
The navigation system displays various information on the map screen.
Screen information
&1  Vehicle icon:
Indicates the current vehicle location and the direction that you are traveling.
INV3088
&2  Starting point:
Displays the vehicle location, with which the route is set, as the starting point.
&3  Guide point:
Indicates a guide point on the route.
&4  Waypoint:
Displays the locations that you travel past when going to the destination. A maximum of 5 waypoints can be set.
&5  Destination:
Indicates the destination location of the route guidance.
When the map scale is 300 ft or less in Plan View, or 1/4 mile or less in Birdview: The name is displayed on the map screen.
&6 Suggested route:
Appears in bold yellow during route guidance.
&7  Map Menu icon:
Touch the icon to display the Map Menu screen.
 “MAP MENU SCREEN” (page 2-11)
&8  /
/  Direction indicator: Indicates the direction of the map. Touch the icon to switch the direction of the map.
 “SETTINGS OF HEADING/LONG RANGE MAP VIEW” (page 3-14)
2-18
2. Getting started
&9  Scale indicator: Indicates the scale of the map.
Touch the icon to display the scale bar. This allows the map scale to be adjusted.
 “OPERATING WITH THE TOUCH OPERATION” (page 3-10)
&10 Street name:
Displays the name of the street that you are currently driving on.
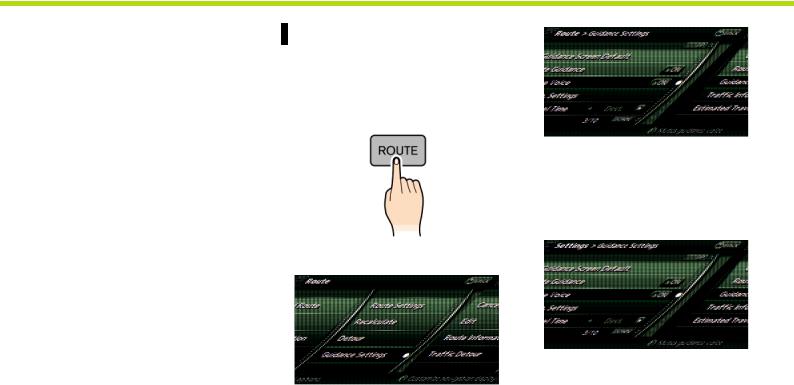
SETTING THE VOICE GUIDANCE
TURNING VOICE GUIDANCE ON/OFF
You can activate or deactivate voice guidance and adjust the volume.
INV3091
3.Highlight [Guidance Voice] and push <ENTER>. The indicator illuminates if voice guidance is activated.
Other settings
You can also activate or deactivate voice guidance using the following procedure.
INI0209
1. Push <ROUTE>.
|
1) |
INV3092 |
|
|
Push <SETTING>. |
||
|
2) |
Highlight [Volume and Beeps] and push |
|
INV3090 |
|
<ENTER>. |
|
2. Highlight [Guidance Settings] and push |
|
||
3) |
Highlight [Guidance Voice] and push |
||
<ENTER>. |
2-19

2. Getting started
<ENTER>.
ADJUSTING VOICE GUIDANCE VO-
LUME
You can adjust the volume of voice guidance.
INV3095
3. Highlight [Guidance Vol.] and push
<ENTER>.
INI0211
1. Push <SETTING>.
INV3096
4. Adjust the voice guidance volume by using the center dial or main directional buttons.
INV3094
2.Highlight [Volume and Beeps] and push
<ENTER>.
INI0269
INFO:
You can also adjust the volume by turning the audio system volume knob or pushing  on the steering switch while voice guidance is being announced.
2-20
2. Getting started
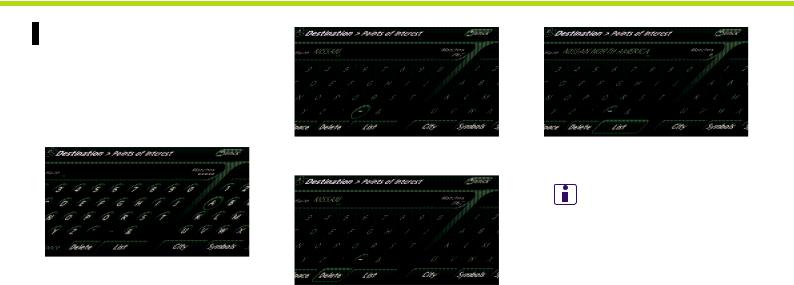
HOW TO INPUT LETTERS AND NUMBERS
CHARACTER (letter and number) INPUT SCREEN
You will have to enter alphanumeric characters when setting a destination, searching for a facility or editing the stored locations, etc.
INV3098
1.Use the touch panel, center dial, main directional buttons or additional directional buttons to highlight a character on the displayed keyboard.
INV3099
2.Push <ENTER>. The highlighted character is entered.
INV3100
3.Push <BACK>, or highlight [Delete] and push <ENTER> to delete the last character entered.
Push and hold <BACK> to delete all the characters entered.
Push [Space] to enter a space.
INV3101
4.After finishing the entry, highlight [List] and push <ENTER>.
INFO:
.You can push <BACK> on the control panel to return to the previous screen, but only after deleting all the characters entered.
.When you touch [BACK] on the screen, the screen returns to the previous screen even when characters have been entered.
.When the character that you have entered can only be followed by one other character, that character is entered automatically.
.When you have entered text and narrowed down the matching list items to a number that will fit on the screen, the list screen appears automatically.
2-21
 Loading...