


Instruction booklet
WASHING MACHINE
GB
English
Contents |
GB |
|
Installation, 2-3
Unpacking, 2
Remove the transit fixings, 2
Levelling, 2
Water connections, 2
Drainage and electrical connections, 3
Technical Details, 3
WIXXL 86
Washing machine description, 4-5
Control panel, 4 LEDs, 5
Starting and programmes, 6
Briefly: starting a programme, 6 Programme table, 6
Personalisations, 7
Setting the temperature, 7
Setting the spin speed, 7
Options, 7
Detergents and laundry, 8
Detergent dispenser, 8 Maximum load size, 8
Precautions and advice, 9
General safety, 9 Disposal, 9
Saving energy and respecting the environment, 9
Care and Maintenance, 10
Switching off the water or electricity supply, 10 Cleaning, 10
Caring for your appliance door and drum, 10 Checking the water inlet hose, 10
Troubleshooting, 11
Service, 12
Before calling for assistance, 12
1
Tr9231gb_WIXXL86-Indesit.p65 |
1 |
20/01/05, 14.39 |
Installation
Keep this instruction manual in a safe place for future GB reference. Should the appliance be sold, transferred or
moved, make sure the instruction manual accompanies the washing machine to inform the new owner as to its operation and features.
! Read these instructions carefully: they contain vital information on installation, use and safety.
Unpacking
1.Unpack the washing machine.
2.Check whether the washing machine has been damaged during transport. If this is the case, do not install it and contact your retailer.
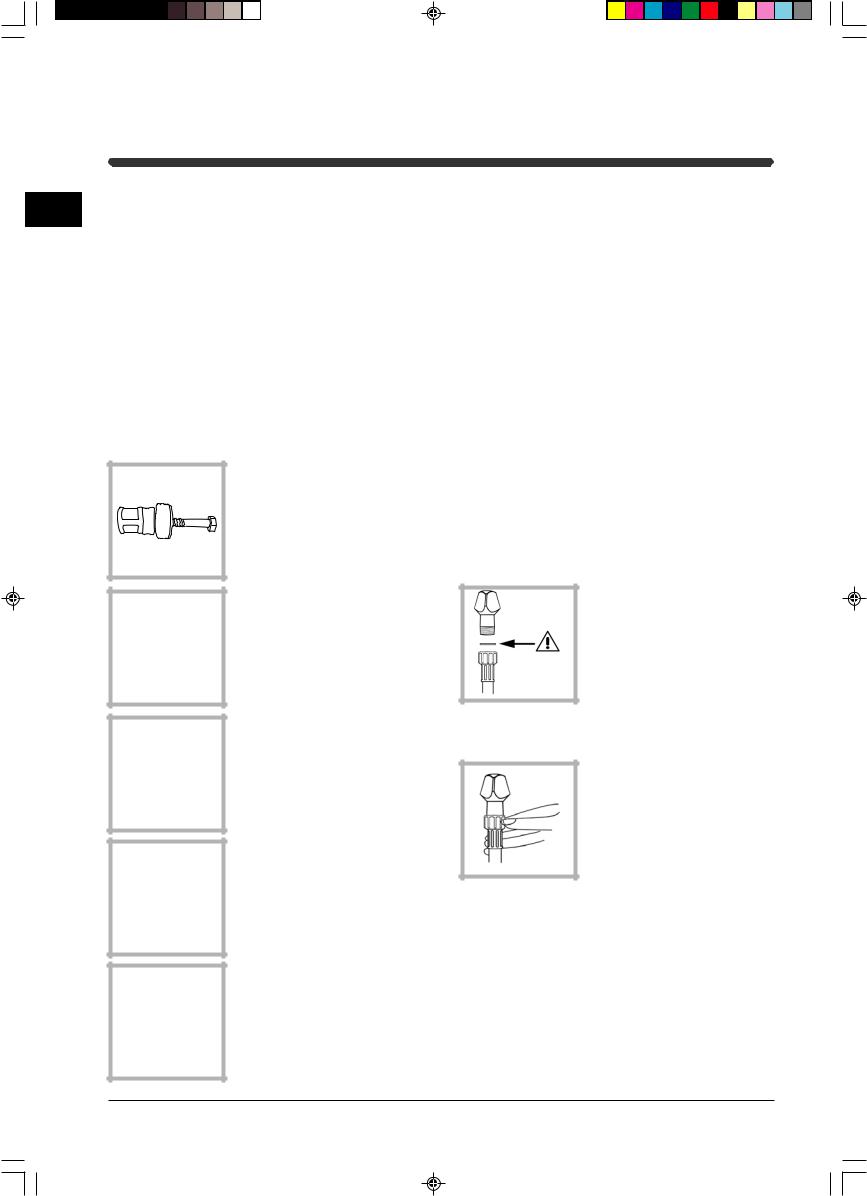
Remove the transit fixings
IMPORTANT: Follow these instructions to remove the TWO transit fixings.
Situated one either side of the rear panel, BOTH transit bolts MUST be removed before use. ! Failure to do so may cause damage to your machine.
It is important the transit bolt and spacer come out intact (see pic).
1.Use a crosshead screwdriver to remove the yellow plastic cover.
2.Unscrew the bolt using a 13mm spanner.
3.STOP when 3 threads can be seen.
4.Hold, slide and pull to remove.
For safety, replace both plastic covers over the holes left by removing the two bolts.
! Packaging materials are not children’s toys.
Levelling
1.Install the washing machine on a flat sturdy floor, without resting it up against walls, cabinets etc.
2.Compensate for any unevenness by tightening or loosening the adjustable front feet. The angle of inclination, measured according to the worktop must not exceed 2°.
Levelling your appliance correctly will provide it with stability and avoid any vibrations, noise and shifting during operation. If it is placed on a fitted or loose carpet, adjust the feet in such a way as to allow enough room for ventilation beneath the washing machine.
Water connection
Connecting the water inlet hose. Remember that this is a cold-fill machine.
! Check that seal is in place inside the hose end cap.
Before making the water connections to gas ¾ thread, allow the water to run freely from the supply tap until it is perfectly clear.
Screw the inlet end with the blue cap onto the cold water supply tap.
Turn the taps on and check for leaks: tighten if necessary.
!Make sure there are no kinks or bends in the hose.
!The water pressure at the tap must be within the values indicated in the Technical details table (next page).
!If the water inlet hose is not long enough, contact a specialist store or an authorised serviceman.
!Always use new hoses.
!Check the water hose at least once a year, replace any that are cracked as worn hoses could split under water pressure.
2
Tr9231gb_WIXXL86-Indesit.p65 |
2 |
20/01/05, 14.39 |
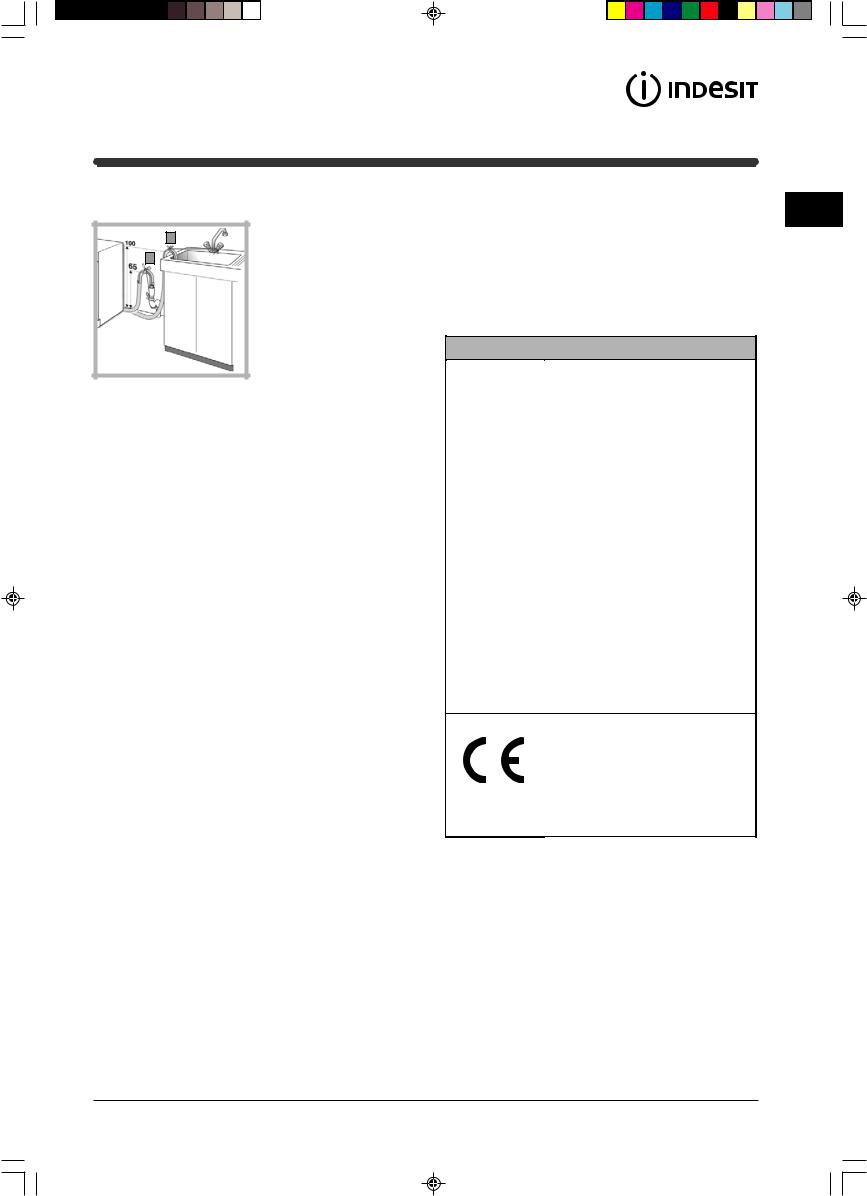
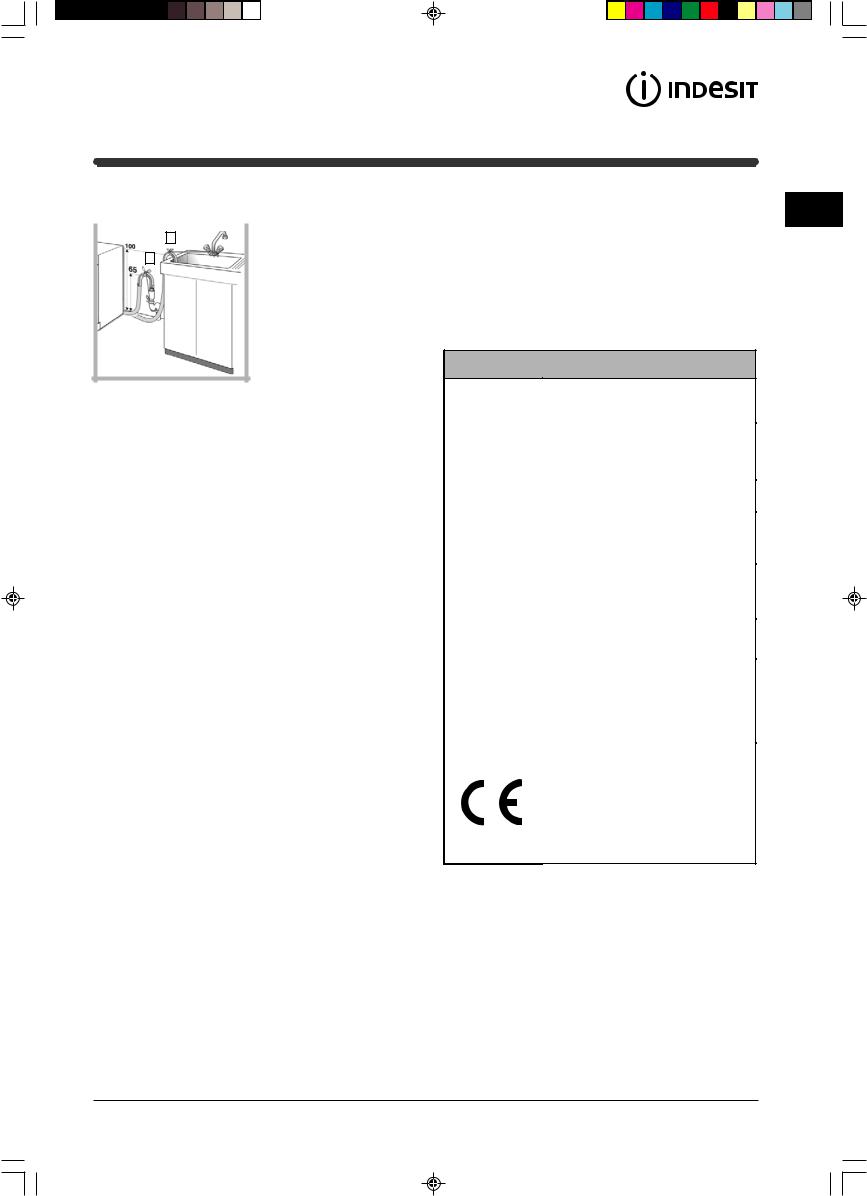
Drainage connections
B
A. Connect the drain
hose, without kinking it, A to a draining duct or a
wall drain fixed at a height between 65 and 100cm from the floor.
B. Alternatively, place it over the edge of a basin, sink or tub, fastening the hose supplied to the tap.
The free end of the hose should not be under water.
! We advise against the use of hose extensions. In case of absolute need, the extension must have the same diameter as the original hose and must not exceed 150cm in length.
Electrical connections
Before plugging the appliance into the mains socket, make sure that:
•the socket is earthed and in compliance with the applicable law.
•the socket is able to sustain the appliances maximum power load indicated in the Technical Details table (on the right).
•the supply voltage is included within the values indicated in the Technical Details table (on the right).
•the socket is compatible with the washing machines plug. If this is not the case, replace the socket or the plug.
!The washing machine should not be installed in an outdoor environment, not even when the area is sheltered, because it may be very dangerous to leave it exposed to rain and thunderstorms.
!When the washing machine is installed, the mains socket must be within easy reach and should be connected to a suitable electrical supply.
!Do not use extensions or multiple sockets.
!The power supply cable must never be bent or dangerously compressed.
!The power supply cable must only be replaced by an authorised serviceman.
!The company denies all liability if and when these norms are not respected.
The first wash cycle
GB
Once the appliance has been installed and before you use it for the first time, run a wash cycle without detergent and no laundry, setting the 90°C programme without a pre-wash cycle.
TECHNICAL DETAILS
Model |
WIXXL 86 |
|
|
|
|
|
59.5 cm wide |
|
Dimensions |
85 cm high |
|
|
52.5 cm deep |
|
|
|
|
Capacity |
from 1 to 7 kg |
|
|
|
|
Electric |
voltage 220/230 volts 50 Hz |
|
connections |
maximum absorbed power 1850 W |
|
|
|
|
Water |
maximum pressure 1 MPa (10 bar) |
|
minimum pressure 0,05 MPa (0,5 bar) |
||
connection |
||
drum capacity 53 litres |
||
|
||
|
|
|
Spin speed |
up to 800 rpm |
|
|
|
|
Control |
|
|
programmes |
programme 2 with temperature set to |
|
according to |
||
60°C run with a load of 7 kg. |
||
the IEC456 |
||
|
||
directive |
|
This appliance is compliant with the following European Community directives:
-73/23/CEE of 19/02/73 (Low Voltage) and subsequent amendments
-89/336/CEE of 03/05/89 (Electromagnetic Compatibility) and subsequent amendments
3
Tr9231gb_WIXXL86-Indesit.p65 |
3 |
20/01/05, 14.39 |
Washing Machine Description
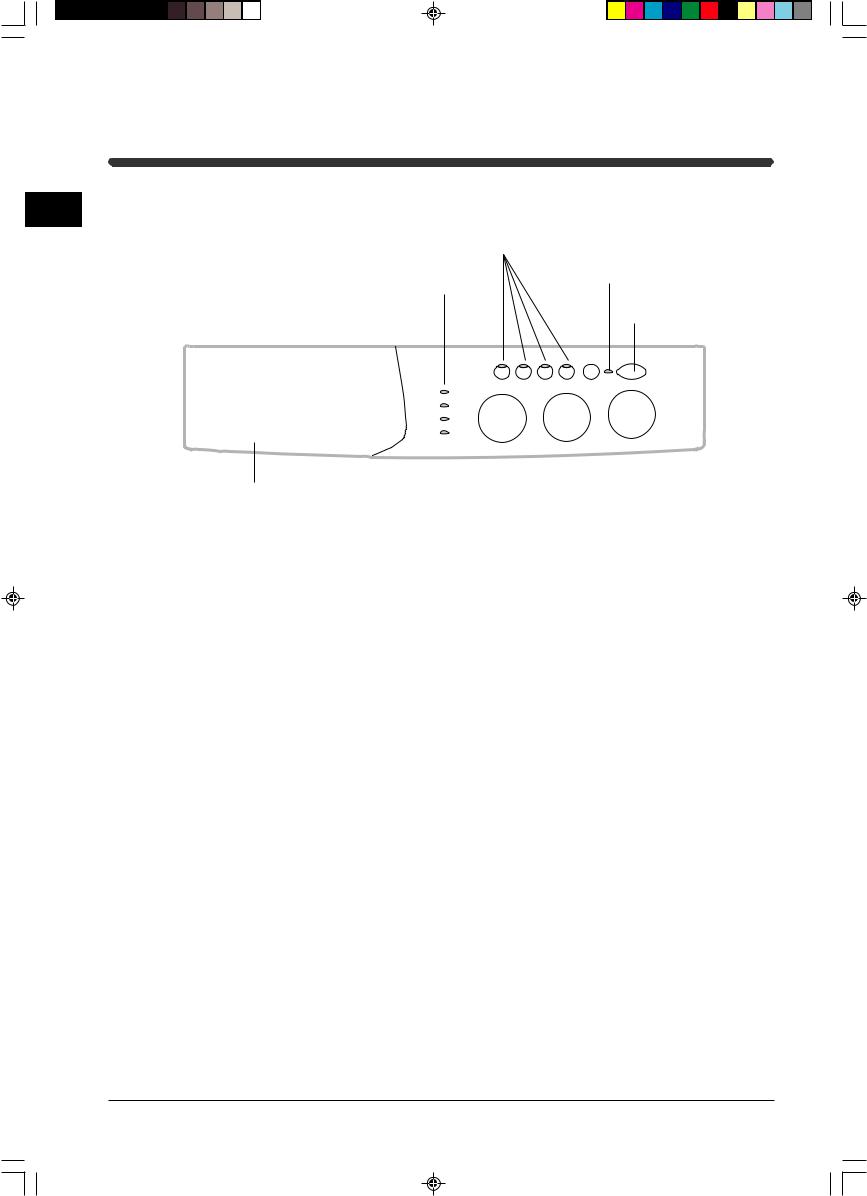
Control panel
GB
OPTION
Buttons
ON-OFF/DOOR
LOCK LED
LEDs
ON/OFF
Button
Detergent dispenser |
|
|
|
|
|
|
|
|
|
|
|
|
|
|
PROGRAMME |
||
|
|
|
|
||
|
|
|
|
Knob |
|
|
|
|
START/RESET |
||
|
|
|
Button |
||
|
|
|
|
||
|
|
|
TEMPERATURE |
||
|
SPIN SPEED |
Knob |
|||
|
|
|
|
||
|
Knob |
|
|
|
|
Detergent dispenser: to add detergent and fabric softener (see page 8).
LEDS: to find out which wash cycle phase is under way.
If the Delay Timer option has been set, the time left until programme starts will be indicated (see page 5).
SPIN SPEED knob: to set the spin speed or exclude the spin cycle completely (see page 7).
OPTION buttons: to select the options available. The button corresponding to the selected option will remain on.
TEMPERATURE knob: to set the temperature or the cold wash cycle (see page 7).
START/RESET button: to start the programmes or cancel any incorrect settings.
ON-OFF/DOOR LOCK LED: to find out whether the washing machine is on and if the appliance door can be opened (see page 5).
ON/OFF button: to turn the washing machine on and off.
PROGRAMME knob: to select the wash programmes. The knob stays still during the cycle.
4
Tr9231gb_WIXXL86-Indesit.p65 |
4 |
20/01/05, 14.39 |
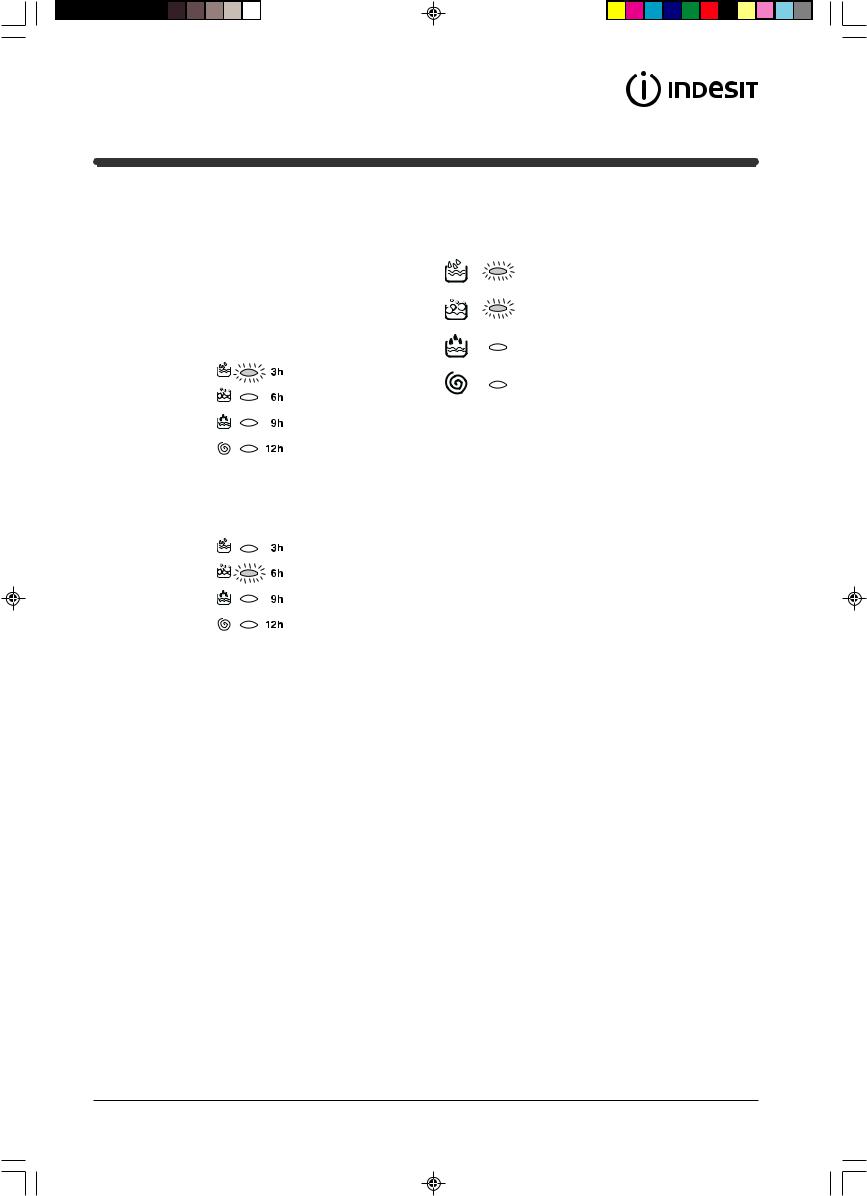
LEDs
The LEDs provide important information. This is what they can tell you:
Delay set:
If the Delay Timer option has been enabled (see page 7), once you have started the programme, the LED corresponding to the delay set will begin to flash:
As time passes, the remaining delay will be displayed, and the corresponding LED will flash:
Once the set delay is complete, the flashing LED will turn off and the programme set will start.
Cycle phase under way: |
|
|
GB |
||
During the wash cycle, the LEDs gradually illuminate |
||
|
||
on to indicate the cycle phase under way: |
|
|
|
Prewash
Wash
Rinse
Spin cycle
Note: during draining, the LED corresponding to the
Spin cycle phase will be turned on.
Option buttons:
The OPTION buttons also act like LEDs.
When an option is selected, the corresponding button is illuminated.
If the option selected is incompatible with the programme set, the button will flash and the option will not be enabled.
If you set an option that is incompatible with another option you selected previously, only the last one selected will be enabled.
 ON-OFF / DOOR LOCK LED:
If the LED is on, the appliance door is locked to prevent it from being opened accidentally; to avoid any damages, wait for the LED to flash before you open the appliance door.
! The rapid flashing of the ON-OFF/DOOR LOCK LED together with the flashing of at least one other LED indicates there is an abnormality. Call for Technical Assistance.
5
Tr9231gb_WIXXL86-Indesit.p65 |
5 |
24/01/05, 14.01 |
Starting and Programmes
Briefly: starting a programme
GB
1.Switch the washing machine on by pressing button  . All the LEDs will light up for a few seconds and the ONOFF / DOOR LOCK LED will begin to flash.
2.Load your laundry into the washing machine and shut the appliance door.
3.Set the PROGRAMME knob to the programme required.
4.Set the wash temperature (see page 7).
Programme table
5.Set the spin speed (see page 7).
6.Add the detergent and any fabric softener (see page 8).
7.Start the programme by pressing the START/RESET button for at least 2 seconds.
8.When the programme is finished, the ON-OFF / DOOR LOCK LED will flash to indicate that the appliance door can be opened. Take out your laundry and leave the appliance door ajar to allow the drum to dry thoroughly. Turn the washing machine off by pressing the button  .
.
T y p e o f fa b r ic a n d d e g re e o f s o il |
P r o g r a m m e s |
T e m p e - |
D e te rg e n t |
F a b r ic |
C y c le |
D e s c rip tio n o f w a sh c y c le |
|
|
|
le n g th |
|||||
|
|
r a tu r e |
P r e - |
w a s h |
s o fte n e r |
(m in u te s ) |
|
|
|
|
|
|
|||
|
|
|
w a s h |
|
|
|
|
|
|
|
|
|
|
|
|
S ta n d a rd |
|
|
|
|
|
|
|
E x tre m e ly s o ile d w h ite s |
1 |
9 0 ° |
|
|
|
1 3 5 |
P re -w a sh , w as h c y c le, rin s e cy c le s , |
(s h e e ts, ta b le c lo ths , e tc . ) |
|
|
|
in te rm e d ia te a n d fin a l s p in c y c les |
|||
|
|
|
|
|
|
||
|
|
|
|
|
|
|
|
E x tre m e ly s o ile d w h ite s |
2 |
9 0 ° |
|
|
|
1 5 0 |
W a s h c yc le , rin s e c y cle s , |
(s h e e ts, ta b le c lo ths , e tc . ) |
|
|
|
in te rm e d ia te a n d fin a l s p in c y c les |
|||
|
|
|
|
|
|
||
|
|
|
|
|
|
|
|
H e a v ily s o il e d w h ite s a n d fa s t co l ou rs |
2 |
6 0 ° * |
|
|
|
1 4 0 |
W a s h c yc le , rin s e c y cl e s, |
|
|
|
in te rm e d ia te a n d fin a l s p in c y c les |
||||
|
|
|
|
|
|
|
|
H e a v ily s o il e d w h ite s a n d d e lica te c o lo u rs |
2 |
4 0 ° * |
|
|
|
1 0 5 |
W a s h c yc le , rin s e c y cle s , |
|
|
|
in te rm e d ia te a n d fin a l s p in c y c les |
||||
|
|
|
|
|
|
|
|
|
|
|
|
|
|
|
|
S li g h tly s o ile d w h i te s a n d d e lic a te c o lo u rs |
3 |
4 0 ° |
|
|
|
7 0 |
W a s h c yc le , rin s e c yc le s , |
(s h irts , ju m p e rs , e tc . ) |
|
|
|
in te rm e d ia te a n d fin a l s p in c y c les |
|||
|
|
|
|
|
|
||
|
|
|
|
|
|
|
|
H e a v ily s o il e d fa st c o lo u rs (b a b y lin e n , e tc .) |
4 |
6 0 ° |
|
|
|
7 5 |
W a s h c yc le , rin s e c y cle s , a n ti-c re a s e |
|
|
|
o r d e lic a te s p in c yc le |
||||
|
|
|
|
|
|
|
|
|
|
|
|
|
|
|
|
H e a v ily s o il e d fa st c o lo u rs (b a b y lin e n , e tc .) |
4 |
4 0 ° |
|
|
|
6 0 |
W a s h c yc le , rin s e c y cl e s, a n ti-c re a s e |
|
|
|
o r d e lic a te s p in c yc le |
||||
|
|
|
|
|
|
|
|
|
|
|
|
|
|
|
|
D e lic a te c o lo u rs (a ll ty p e s o f s lig h tly so ile d |
5 |
4 0 ° |
|
|
|
6 0 |
W a s h c yc le , rin s e c y cle s , a n ti-c re a s e |
g a rm e n ts ) |
|
|
|
o r d e lic a te s p in c yc le |
|||
|
|
|
|
|
|
||
W o o l |
6 |
4 0 ° |
|
|
|
5 0 |
W a s h c yc le , rin s e c y cle s , a n ti-c re a s e |
|
|
|
a n d d e lic a te s p in c y cl e |
||||
|
|
|
|
|
|
|
|
|
|
|
|
|
|
|
|
V e ry d e li ca te fa b ric s (cu rta in s , s il k, v isc o s e , |
7 |
3 0 ° |
|
|
|
4 5 |
W a s h c yc le , rin s e c y cle s , a n ti-c re a s e |
e tc . ) |
|
|
|
o r d ra in in g cy c le |
|||
|
|
|
|
|
|
||
T im e fo r Y o u |
|
|
|
|
|
|
|
H e a v ily s o il e d w h ite s a n d fa s t co l ou rs |
8 |
6 0 ° |
|
|
|
6 0 |
W a s h c yc le , rin s e c y cle s , |
|
|
|
in te rm e d ia te a n d fin a l s p in c y c les |
||||
|
|
|
|
|
|
|
|
|
|
|
|
|
|
|
|
S lig h tly s o ile d w h ites a n d d e lic ate c o lo u rs |
9 |
4 0 ° |
|
|
|
5 0 |
W a s h c yc le , rin s e c y cle s , |
(s h irts , ju m p e rs , e tc . ) |
|
|
|
in te rm e d ia te a n d fin a l s p in c y c les |
|||
|
|
|
|
|
|
||
|
|
|
|
|
|
|
|
D e lic a te c o lo u rs (a ll ty p e s o f s lig h tly so ile d |
1 0 |
4 0 ° |
|
|
|
4 0 |
W a s h c yc le , rin s e c y cle s , d e lic a te |
g a rm e n ts ) |
|
|
|
s p in c y c le |
|||
|
|
|
|
|
|
||
|
|
|
|
|
|
|
|
D e lic a te c o lo u rs (a ll ty p e s o f s lig h tly so ile d |
1 1 |
3 0 ° |
|
|
|
3 0 |
W a s h c yc le , rin s e c y cle s a n d d e li ca te |
g a rm e n ts ) |
|
|
|
s p in c y c le |
|||
|
|
|
|
|
|
||
|
|
|
|
|
|
|
|
S p o rt |
|
|
|
|
|
|
|
|
|
|
|
|
|
|
C o ld w a s h (w ith o u t d e te rg e n ts ), |
S p o rts s h o e s (M A X 2 p a irs ) |
1 2 |
3 0 ° |
|
|
|
5 0 |
w a sh c yc le , rin s e c yc le s a n d d e lic a te |
|
|
|
|
|
|
|
s p in c y c le |
|
|
|
|
|
|
|
|
F a b ric s fo r s p o rts w e a r (T ra c ks u its , s h o rts , e tc .) |
1 3 |
3 0 ° |
|
|
|
6 0 |
W a s h c yc le , rin s e c y cle s , |
|
|
|
in te rm e d ia te a n d fin a l s p in c y c les |
||||
|
|
|
|
|
|
|
|
|
|
|
|
|
|
|
|
P A R T IA L P R O G R A M M E S |
|
|
|
|
|
|
|
R in s e |
|
|
|
|
|
|
R in s e c yc le s a n d s p in c yc le . |
|
|
|
|
|
|
|
|
S p in c yc le |
|
|
|
|
|
|
D ra in in g a n d sp in cy c le |
|
|
|
|
|
|
|
|
D ra in |
|
|
|
|
|
|
D ra in in g |
|
|
|
|
|
|
|
|
Notes
-For Programmes 8 and 10, we advise against exceeding a wash load of 3.5 kg.
-For Programmes 13 and 9, we advise against exceeding a wash load of 2 kg.
-For the anti-crease option: see Easy Iron (opposite page). The information contained in the table is purely indicative.
Special programme
Daily (programme 11 for Synthetics) is designed to wash lightly soiled garments in a short amount of time: it only lasts 30 minutes and allows you to save on both time and energy. By setting this programme (11 at 30°C), you can wash different fabrics together (except for woollen and silk items), with a maximum load of 3 kg.
We recommend the use of liquid detergent.
* To select a lower temperature (60° or 40°), the temperature reduction rotary is to be used.
6
Tr9231gb_WIXXL86-Indesit.p65 |
6 |
20/01/05, 14.39 |
Personalisations
Setting the temperature
GB
Turn the TEMPERATURE knob to set the wash temperature (see Programme table on page 6). The temperature can be lowered, or even set to cold wash ( ).
).
Setting the spin speed
Turn the SPIN SPEED knob to set the spin speed for the programme selected.
The maximum spin speeds for each programme are as follows:
Programmes |
Maximum spin speed |
Cotton |
800 r.p.m. |
Synthetics |
800 r.p.m. |
Wool |
600 r.p.m. |
Silk |
no |
The spin speed can be lowered, or the spin cycle can be excluded altogether by selecting the symbol  .
.
The washing machine will automatically prevent you from selecting a spin speed higher than the maximum speed for each programme.
Options
To enable an option:
1.press the button corresponding to the desired option, according to the table below.
2.the option is enabled when the corresponding button is illuminated.
Note: The rapid flashing of the button indicates that the corresponding option cannot be selected for the programme set.
Option |
Effect |
Comments |
|
Enabled with |
|
|||
|
programmes |
|
||||||
|
|
|
|
|
|
|
|
|
|
|
|
|
|
|
|
|
|
|
|
|
|
|
Press the button repeatedly until the LED corresponding |
|
|
|
|
|
|
|
Delays the start of the |
to the delay is turned off. |
|
|
|
|
|
|
|
|
|
|||
|
|
|
|
The fifth time the button is pressed, the option will be |
|
|
||
|
|
|
|
wash by up to 9 |
All |
|
||
|
|
|
|
disabled. |
|
|
||
|
|
|
|
hours. |
|
|
|
|
|
|
|
|
N.B. Once you have pressed the Start/Reset button, the |
|
|
||
|
|
|
|
|
|
|
||
Delay Timer |
|
delay can only be decreased if you wish to modify it. |
|
|
||||
|
|
|
|
|
|
|
|
|
|
|
|
|
|
In addition to reducing actual washing time, this option will |
|
|
|
|
|
|
|
For washing a smaller |
reduce water and energy consumption by up to 50%. |
1, 2, 3, 4, 5 |
|
|
|
|
|
|
load. |
Note: You can reduce the amount of detergent you use |
Rinse cycle |
|
|
|
|
|
|
|
with this wash. |
|
|
|
Mini Load |
|
|
|
|
|
|||
|
|
|
|
|
|
|
|
|
|
|
|
|
This option reduces |
When this option is set, programmes 4, 5, 6 and 7 will end |
|
|
|
|
|
|
|
with the laundry left to soak (Anti-crease) and the Rinse |
|
|
||
|
|
|
|
the amount of |
3, 4, 5, 6, 7, |
|
||
|
|
|
|
cycle phase LED |
will flash. |
|
||
|
|
|
|
creasing on fabrics, |
8, 9, 10, |
|
||
|
|
|
|
- to conclude the cycle, press the START/RESET button. |
|
|||
|
|
|
|
making them easier |
Rinse cycle |
|
||
|
|
|
|
- to run the draining cycle alone, set the knob to the |
|
|||
|
|
|
|
to iron. |
|
|
||
Easy Iron |
relative symbol |
and press the START/RESET button. |
|
|
||||
|
|
|
||||||
|
|
|
|
|
|
|
|
|
|
|
|
|
Increases the |
Recommended when the appliance has a full load or with |
1, 2, 3, 4, 5, |
|
|
|
|
|
|
8, 9, 10, 12, 13 |
|
|||
|
|
|
|
efficiency of the rinse. |
large quantities of detergent. |
|
||
|
|
|
|
Rinse cycle |
|
|||
|
|
|
|
|
|
|
|
|
Extra Rinse |
|
|
|
|
|
|||
|
|
|
|
|
|
|
|
|
|
|
|
|
|
|
|
|
|
7
Tr9231gb_WIXXL86-Indesit.p65 |
7 |
20/01/05, 14.39 |
Detergents and Laundry
|
|
|
|
|
|
|
|
|
|
|
|
|
|
Detergent dispenser |
|
How much does your laundry weigh? |
|||||||||
GB |
|
|||||||||||
|
|
|
|
|
|
|
|
|
|
|
|
|
|
! Do not put any items into the drawer, other than |
1 sheet 400-500g |
||||||||||
|
||||||||||||
|
detergents designed to be released from the drawer, |
1 pillow case 150-200g |
||||||||||
|
as they may cause damage or blockage. |
1 tablecloth 400-500g |
||||||||||
|
|
|
|
|
|
|
|
|
|
|
|
1 bathrobe 900-1200g |
|
|
|
|
|
|
|
|
|
|
|
1. Pre-wash detergent |
1 towel 150-250g |
|
|
|
|
|
|
|
|
|
|
|
||
|
|
|
|
|
|
|
|
|
|
|
||
|
|
|
|
|
|
|
|
|
|
|
compartment. |
|
|
|
|
1 |
|
|
|
|
|
Maximum 200 ml |
|
||
|
|
|
|
|
|
|
|
|
||||
|
|
|
|
|
|
|
|
|
|
|
powder or 100 ml liquid |
|
|
|
|
|
|
|
|
2 |
|
|
|
|
|
|
|
|
|
|
|
|
2. Main wash detergent |
|
||||
|
|
|
|
|
|
|
|
|
|
|
|
|
|
|
|
3 |
|
|
|
|
|
|
|
compartment. |
|
|
|
|
|
|
|
|
|
|
|
|
||
|
|
|
|
|
|
|
|
|
|
|
Maximum 400 ml |
|
|
|
|
|
|
|
|
|
|
|
|
powder or 200 ml liquid |
|
|
|
|
|
|
|
|
|
|
|
|
3. Fabric conditioner |
|
|
|
|
|
|
|
|
|
|
|
|
compartment. |
|
|
|
|
|
|
|
|
|
|
|
|
|
|
|
|
|
|
|
|
|
|
|
|
|
Maximum 120 ml. |
|
Dispensing powder detergent
To achieve the best wash results the manufacturer’s recommended amount of detergent should be measured and added to the main detergent compartment.
Dispensing liquid detergent
We recommend the use of a detergent dosing ball, as provided by your detergent manufacturer.
Adding fabric conditioner
Pour the recommended amount of fabric conditioner into the compartment. Do not exceed the maximum fill line.
Pre-wash (Programme 1)
When selecting programme 1 add detergent to both the pre-wash and the main wash compartment.
! Do not use in drum dosing devices with pre-wash programme 1.
Maximum load size
•Divide your laundry according to:
-the type of fabric/the symbol on the label.
-the colours: separate coloured garments from whites.
•Empty all pockets and check for loose buttons.
•Do not exceed the weight limits stated below, which refer to the weight when dry:
Sturdy fabrics : max. 7kg
Synthetic fabrics : max. 3kg
Delicate fabrics |
: max. 2kg |
Wool |
: max. 1kg |
! DO NOT overload the machine as this could result in reduced performance.
8
Tr9231gb_WIXXL86-Indesit.p65 |
8 |
20/01/05, 14.39 |

Precautions and advice
! The washing machine was designed and built in compliance with the applicable international safety regulations. The following information is provided for your safety and should consequently be read carefully.
General safety
•This appliance has been designed for nonprofessional, household use and its functions must not be changed.
•This washing machine should only be used by adults and in accordance with the instructions provided in this manual.
•Never touch the washing machine when barefoot or with wet or damp hands or feet.
•Do not pull on the power supply cable to unplug the appliance from the electricity socket. Pull the plug out yourself.
•Do not open the detergent dispenser while the appliance is in operation.
•Do not touch the drain water as it could reach very high temperatures.
•Never force the washing machine door: this could damage the safety lock mechanism designed to prevent accidental openings.
•In the event of a malfunction, do not under any circumstances touch internal parts in order to attempt repairs.
•Always keep children well away from the appliance while in operation.
•The appliance door tends to get quite hot during the wash cycle.
•Should it have to be moved, proceed with the help of two or three people and handle it with the utmost care. Never try to do this alone, because the appliance is very heavy.
•Before loading your laundry into the washing machine, make sure the drum is empty.
Disposal
GB
•Disposing of the packaging material:
observe local regulations, so the packaging can be re-used.
•Disposing of an old washing machine:
before scrapping your appliance, cut the power supply cable and remove the appliance door.
Saving energy and respecting the environment
Environmentally-friendly technology
If you only see a little water through your appliance door, this is because thanks to the latest Indesit technology, your washing machine only needs less than half the amount of water to get the best results: an objective reached to respect the environment.
Saving on detergent, water, energy and time
•To avoid wasting resources, the washing machine should be used with a full load. A full load instead of two half loads allows you to save up to 50% on energy.
•The pre-wash cycle is only necessary on extremely soiled garments. Avoiding it will save on detergent, time, water and between 5 and 15% energy.
•Treating stains with a stain remover or leaving them to soak before washing will cut down the need to wash them at high temperatures.
A programme at 60°C instead of 90°C or one at 40°C instead of 60°C will save up to 50% on energy.
•Use the correct quantity of detergent, depending on the water hardness, how soiled the garments are and the amount of laundry you have, to avoid wastage and to protect the environment: despite being biodegradable, detergents do contain ingredients that alter the natural balance of the environment. In addition, avoid using fabric softener as much as possible.
•If you use your washing machine between late in the afternoon and the early hours of the morning, you will help reduce the electricity board’s peak load. The Delay Timer option (see page 7) helps to organise your wash cycles accordingly.
•If your laundry has to be dried in a tumble dryer, select a high spin speed. Having the least water possible in your laundry will save you time and energy in the drying process.
9
Tr9231gb_WIXXL86-Indesit.p65 |
9 |
20/01/05, 14.39 |
Care and Maintenance
Switching off the electricity
GB
•Turn off the water tap after every wash. This will limit the wear of your appliance’s water system and also prevent leaks.
•Unplug your appliance when cleaning it and during all maintenance operations.
Cleaning
Cleaning the exterior
Use a damp cloth or silicon polish to clean the exterior surfaces of the appliance.
Cleaning the door bowl
Clean the internal surface of the door bowl regularly with a soft cloth. A build up of soap powder and water hardness residue may result in water leaking from the door.
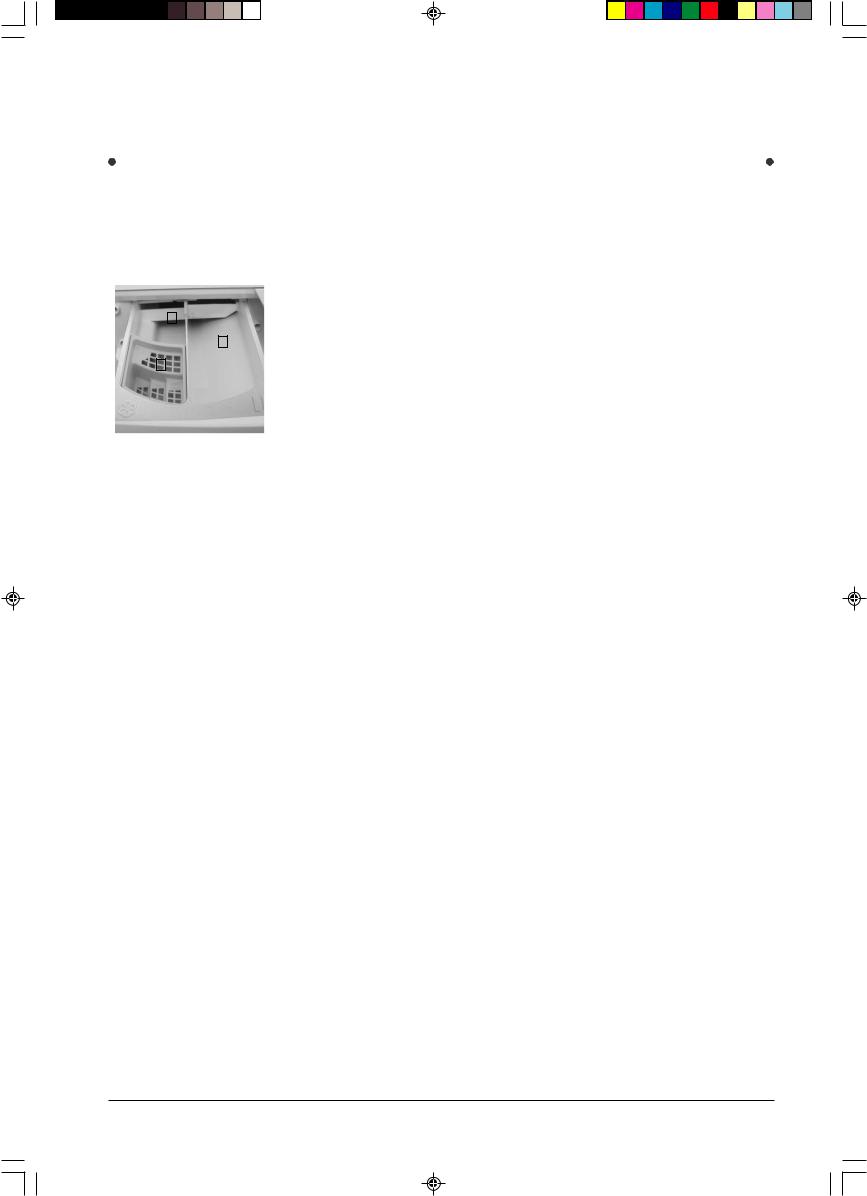
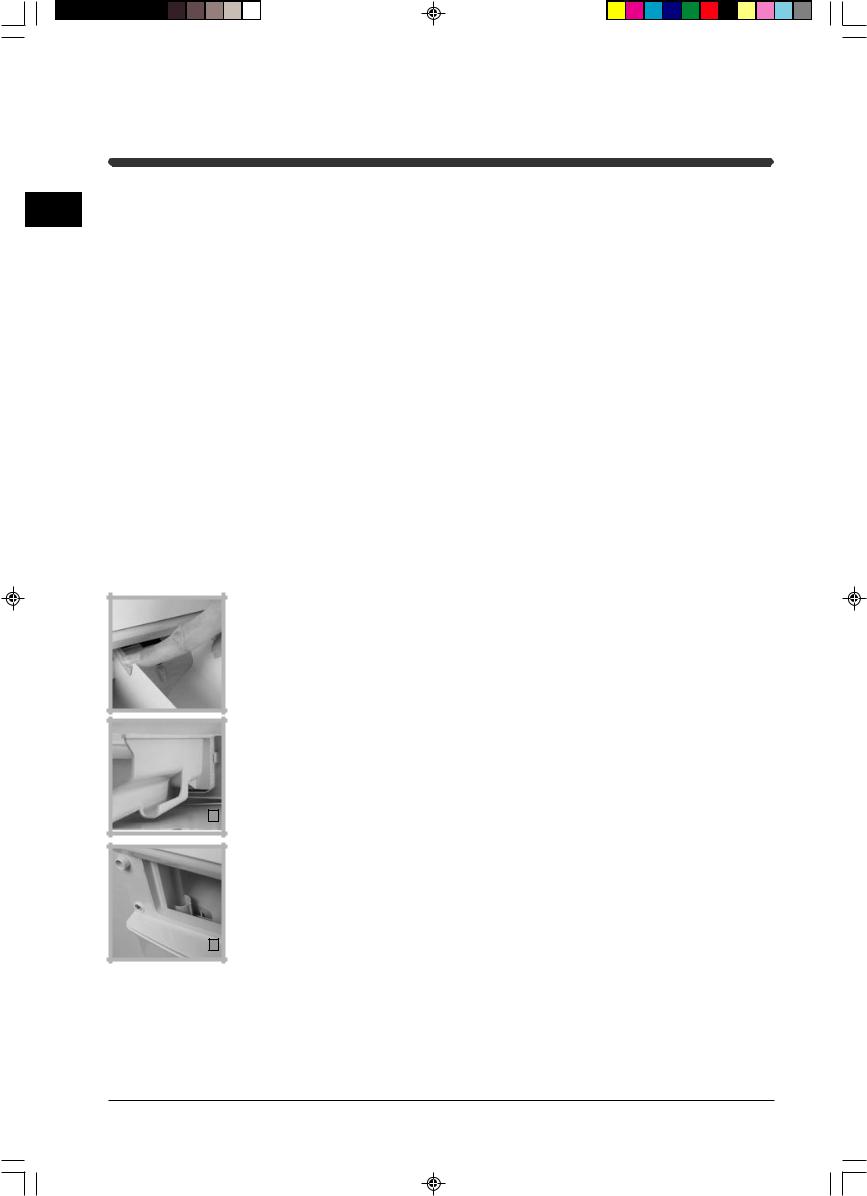
Cleaning the dispenser drawer and compartments
It is advisable to clean the dispenser drawer regularly. ! Do not try to clean any part of the dispenser drawer while the machine is running.
1. Pull out the drawer until it reaches its stop.
2. Press the drawer release button to remove the dispenser drawer (see figure).
3. Clean and dry the dispenser drawer, syphons, grate and fabric conditioner exit channel (A). Also regularly clean the outlet pipe area (B).
A
B
4. Relocate the dispenser drawer and push it firmly back into place.
! Do not clean any part of the machine with abrasive cleaners, scouring agents, acids, any bleach or metal polish as they may cause damage.
Caring for your appliance door and drum
•Always leave the appliance door ajar to prevent unpleasant odours from forming.
Checking the water inlet hose
Check the water inlet hose at least once a year. If you see any cracks, replace it immediately. During the wash cycles, high water pressure could cause a cracked hose to split open.
! Never use hoses that have already been used.
10
Tr9231gb_WIXXL86-Indesit.p65 |
10 |
20/01/05, 14.39 |
Troubleshooting
|
|
|
|
|
|
Your washing machine could fail to work. Before calling for Assistance (see page 12), make sure the problem can’t |
|
||||
GB |
|||||
easily be solved by consulting the following list: |
|||||
Problem: |
Possible causes / Solution: |
|
|||
|
|||||
The washing machine won’t start.
The wash cycle won’t start.
The washing machine fails to load water.
•The appliance is not plugged into the socket, or not enough to make contact.
•There has been a power failure.
•The appliance door is not shut properly.
•The  button has not been pressed.
•The START/RESET button has not been pressed.
•The water tap is not turned on.
•A delayed start has been set (using the Delay Timer. see page 7)
•The water inlet hose is not connected to the tap.
•The hose is bent.
•The water tap is not turned on.
•There is a water shortage.
•The water pressure is insufficient.
•The START/RESET button has not been pressed.
The washing machine continuously loads and unloads water.
•The drain hose is not fitted between 65 and 100cm from the floor (see page 3).
•The free end of the hose is underwater (see page 3).
•The wall drainage system doesn’t have a breather pipe.
If the problem persists even after these checks, turn off the water tap, switch the appliance off and call for Assistance. If the dwelling is on one of the upper floors of a building, there may be drain trap problems causing the washing machine to load and unload water continuously. In order to avoid such an inconvenience, special anti-drain trap valves are available in shops.
The washing machine does not drain or spin.
•The programme does not foresee the draining. Some programmes require enabling the draining manually (see page 6).
•The Easy Iron option is enabled: to complete the programme, press the START/RESET button (see page 7).
•The drain hose is bent (see page 3).
•The drain duct is clogged.
The washing machine vibrates too much during the spin cycle.
•The drum was not unblocked correctly during installation (see page 2).
•The washing machine is not level (see page 2).
•The washing machine is closed in between furniture cabinets and the wall (see page 2).
The washing machine leaks. |
• |
The water inlet hose is not screwed on correctly (see page 2). |
|
• |
The detergent dispenser is obstructed, (to clean it see page 10). |
|
• |
The drain hose is not secured properly (see page 3). |
The ON-OFF/DOOR LOCK LED flashes rapidly at the same time as at least one other LED.
There is too much foam.
•Call for Assistance because this means there is an abnormality.
•The detergent is not suitable for machine washing (it should bear the definition “for washing machines” or “hand and machine wash”, or the like.)
•You used too much detergent.
11
Tr9231gb_WIXXL86-Indesit.p65 |
11 |
20/01/05, 14.39 |

Service
195048183.00
03/2005 - SIMLEX. Four Ashes, Wolverhampton
Before calling for Assistance:
GB
•Check whether you can solve the problem on your own (see page 11);
•Restart the programme to check whether the problem has been solved;
•If this is not the case, contact an authorised Technical Assistance Centre on the telephone number provided on the guarantee certificate.
! Always request the assistance of authorised servicemen.
Notify the operator of:
•the type of problem.
•the appliance model (Mod.).
•the serial number (S/N).
This information can be found on the data plate situated on the rear of the washing machine.
12
Tr9231gb_WIXXL86-Indesit.p65 |
12 |
20/01/05, 14.39 |

Manual de instrucciones
SP
Español
|
|
|
|
|
|
LAVADORA |
|
||
Índice |
|
|||
SP |
||||
|
|
|
||
Instalación, 14-15 |
|
|||
|
||||
Desembalaje, 14 |
|
|||
Quitar los dispositivos de fijación para el transporte, 14 |
|
|||
Nivelación, 14 |
|
|||
Conexión a las tomas de agua, 14 |
|
|||
Descarga y conexiones eléctricas, 15 |
|
|||
Características técnicas, 15 |
|
|||
WIXXL 86
Descripción de la lavadora, 16-17
Panel de control, 16 LOS PILOTOS, 17
Puesta en marcha y programas, 18
Brevemente: cómo poner en marcha un programa, 18 Tabla de programas, 18
Personalizaciones, 19
Regulación de la temperatura, 19
Regulación de la velocidad de centrifugado, 19 Opciones, 19
Los detergentes y la ropa, 20
Contenedor de detergente, 20
Máximas dimensiones de la carga, 20
Precauciones y advertencias, 21
Seguridad general, 21 Eliminaciones, 21
Ahorro energético y respeto por el medio ambiente, 21
Cuidados y mantenimiento, 22
Cierre del agua e interrupción de la alimentación eléctrica, 22 Limpieza, 22
Cuidados de la puerta y del cesto de la máquina, 22 Control del tubo de carga de agua, 22
Problemas y soluciones, 23
Asistencia, 24
Antes de llamar al Servicio de Asistencia Técnica, 24
13
Tr9234sp_WIXXL86-Indesit.p65 |
13 |
18/01/05, 16.03 |

Instalación
Conserve este manual de instrucciones en un lugar SP seguro para realizar futuras consultas. En el caso de
venta, mudanza o traslado de la máquina, controle que el manual de instrucciones acompañe siempre a la lavadora, para que el nuevo propietario pueda aprender su funcionamiento y sus características.
! Lea atentamente estas instrucciones porque contienen indicaciones muy importantes sobre la instalación, el uso y la seguridad.
Desembalaje
1.Desembale la lavadora.
2.Verifique que la lavadora no haya sido dañada durante el transporte. Si estuviera dañada no la instale y llame al revendedor.
Quitar los dispositivos de fijación para el transporte
IMPORTANTE: Siga estas instrucciones para quitar los DOS dispositivos de fijación utilizados para el transporte.
Los pernos para el transporte están ubicados de un lado o del otro del panel posterior y AMBOS DEBEN ser quitados antes del uso.
! Si esto no se realiza, la máquina podría sufrir graves daños.
Es fundamental que el perno y el distanciador utilizados para el
transporte estén perfectamente íntegros en el momento en que se quitan (ver la fig.).
1. Utilice un destornillador cruciforme para quitar el tapón amarillo de plástico.
2. Desenrosque el perno utilizando una llave de 13 mm.
3. DETENGA la operación cuando se observan 3 roscas.
4. Para quitar el dispositivo, sujete el perno, hágalo deslizar y luego tire.
Por razones de seguridad, vuelva a colocar ambos tapones de plástico en los orificios que quedan luego de quitar los pernos.
! Los materiales del embalaje no son juguetes para los niños.
Nivelación
1.Instale la lavadora sobre una superficie plana y resistente evitando apoyarla en paredes, muebles, etc.
2.Compense las irregularidades de la superficie de apoyo apretando o aflojando las patas delanteras regulables. El ángulo de inclinación, medido con respecto a la superficie de trabajo, no debe superar los 2º.
Con una correcta operación de nivelación se garantiza la estabilidad del aparato y se evitan vibraciones, ruidos y desplazamientos durante el uso. Si la máquina se coloca sobre una alfombra o moqueta, regule las patas dejando el espacio suficiente para una buena aireación debajo de la lavadora.
Conexión a las tomas de agua
Conexión del tubo de carga de agua.
Recuerde que esta es una máquina de llenado en frío. ! Controle que en el interior del
tapón del extremo del tubo exista una junta.
Antes de efectuar las conexiones hídricas a la boca roscada de ¾ gas, permita que el agua fluya libremente desde el grifo de alimentación hasta que salga perfectamente limpia.
Enrosque el extremo de carga con el tapón azul en el grifo de alimentación de agua fría.
Abra el grifo y verifique que no existan pérdidas: si es necesario, apriete la unión.
!Controle que el tubo no esté sometido a pliegues ni compresiones.
!La presión de agua en el grifo debe estar comprendida entre los valores indicados en la tabla de características técnicas (página siguiente).
!Si el tubo de carga de agua no es suficientemente largo, llame a un técnico cualificado o diríjase a un negocio especializado.
!Utilice siempre tubos nuevos.
!Controle el tubo de agua al menos una vez al año y sustitúyalo cuando detecte grietas o rajaduras porque los tubos desgastados pueden partirse bajo la presión del agua.
14
Tr9234sp_WIXXL86-Indesit.p65 |
14 |
18/01/05, 16.03 |
Conexiones de la descarga
|
|
|
|
|
A. Conecte el tubo de |
|
|
|
|
|
|
|
|
|
|
|
|
|
|
|
B |
|
|
|
|
|
|
descarga, sin enroscarlo, |
|
|
|
|
|
|
|
|
|
|
|
|
a una tubería de descarga |
|
A |
|
|
||
|
|
|
|
|
o a una descarga de |
|
|
|
|
|
pared fijada a una altura |
|
|
|
|
|
del piso comprendida |
|
|
|
|
|
entre 65 y 100 cm. |
B. Como alternativa, apóyelo en el borde de un fregadero, lavamanos o bañera, fijando el tubo suministrado, al grifo.
El extremo libre del tubo nunca debe quedar sumergido en agua.
! No se aconseja recurrir a prolongaciones. Si no se puede evitar su uso, la prolongación debe tener el mismo diámetro del tubo original y no debe superar los 150 cm de longitud.
Conexión eléctrica
Antes de conectar la máquina a la toma de corriente eléctrica, verifique que:
•la toma de corriente posea una eficaz conexión a tierra conforme con las normas legales.
•la toma sea capaz de soportar la carga máxima de potencia de la máquina indicada en la tabla de características técnicas (a la derecha).
•la tensión de alimentación esté comprendida entre los valores contenidos en la tabla de características técnicas (a la derecha).
•la toma sea compatible con el enchufe de la lavadora. Si no es así, sustituya la toma o el enchufe.
!La lavadora no debe ser instalada al aire libre, ni siquiera si el lugar está protegido ya que es muy peligroso dejarla expuesta a la lluvia o a las tormentas.
!Una vez completada la instalación de la máquina, la toma de corriente debe ser fácilmente accesible y debe estar conectada a una red de alimentación eléctrica adecuada.
!No utilice prolongaciones o tomas múltiples.
!El cable de alimentación no debe sufrir dobladuras ni compresiones peligrosas.
!El cable de alimentación eléctrica debe ser sustituido únicamente por un técnico especializado.
!La empresa fabricante declina toda responsabilidad en caso de que estas normas no sean respetadas.
El primer ciclo de lavado
SP
Una vez que la máquina fue instalada y antes de utilizarla por primera vez, ponga en marcha un ciclo de lavado sin detergente y sin ropa, seleccionando el programa 90ºC sin prelavado.
CARACTERÍSTICAS TÉCNICAS
Modelo |
WIXXL 86 |
|
|
|
|
Dimensiones |
ancho 59,5 cm |
|
altura 85 cm |
||
|
profundidad 52,5 cm |
|
|
|
|
Capacidad |
De 1 a 7 kg. |
|
|
|
|
Conexiones |
Voltaje de 220/230 voltios 50 Hz |
|
eléctricas |
potencia máxima consumida 1850 W |
|
|
|
|
Conexión a las |
presión máxima 1 MPa (10 bar) |
|
presión mínima 0,05 MPa (0,5 bar) |
||
tomas de agua |
||
capacidad del cesto 53 litros |
||
|
||
|
|
|
Velocidad de |
Máxima 800 r.p.m. |
|
centrifugado |
||
|
||
|
|
|
Programas de |
|
|
control según |
programa 2 con temperatura fijada en |
|
la norma |
60ºC y una carga de 7 kg. |
|
IEC456 |
|
|
|
|
|
|
Esta máquina cumple con lo |
|
|
establecido por las siguientes |
|
|
Directivas de la Comunidad: |
|
|
-73/23/CEE del 19/02/73 |
|
|
(BajasTensiones) y sucesivas |
|
|
modificaciones |
|
|
- 89/336/CEE del 03/05/89 |
|
|
(Compatibilidad Electromagnética) y |
|
|
sucesivas modificaciones |
15
Tr9234sp_WIXXL86-Indesit.p65 |
15 |
18/01/05, 16.03 |
 Loading...