


Instructions for use
GB |
|
ES |
|
IT |
|
|
|
|
|
|
|
English,1 |
Espanol,13 |
Italiano,25 |
|||
|
|
|
|
|
|
FR |
|
DE |
|
PT |
|
|
|
|
|
|
|
Français,37 |
Deutsch,49 |
Português,61 |
|||
WIDXL 106
WASHER-DRYER
Contents
GB
Installation, 2-3
Unpacking and levelling Electric and water connections The first wash cycle
Technical details
Washer-dryer description, 4-5
Control panel
Leds
Starting and Programmes, 6
Briefly: how to start a programme
Programme table
Personalisations, 7
Setting the temperature
Setting the drying cycle
Functions
Detergents and laundry, 8
Detergent dispenser
Preparing your laundry
Special items
Precautions and advice, 9
General safety Disposal
Saving energy and respecting the environment
Care and maintenance, 10
Cutting off the water or electricity supply
Cleaning your appliance
Cleaning the detergent dispenser
Caring for your appliance door and drum
Cleaning the pump
Checking the water inlet hose
Troubleshooting, 11
Service, 12
Before calling for Assistance
1

Installation
Keep this instruction manual in a safe place for GB future reference. Should the appliance be sold,
transferred or moved, make sure the instruction manual accompanies the Washer-dryer to inform the new owner as to its operation and features.
Read these instructions carefully: they contain vital information on installation, use and safety.
Unpacking and levelling
Unpacking
1.Unpack the Washer-dryer.
2.Check whether the Washer-dryer has been damaged during transport. If this is the case, do not install it and contact your retailer.
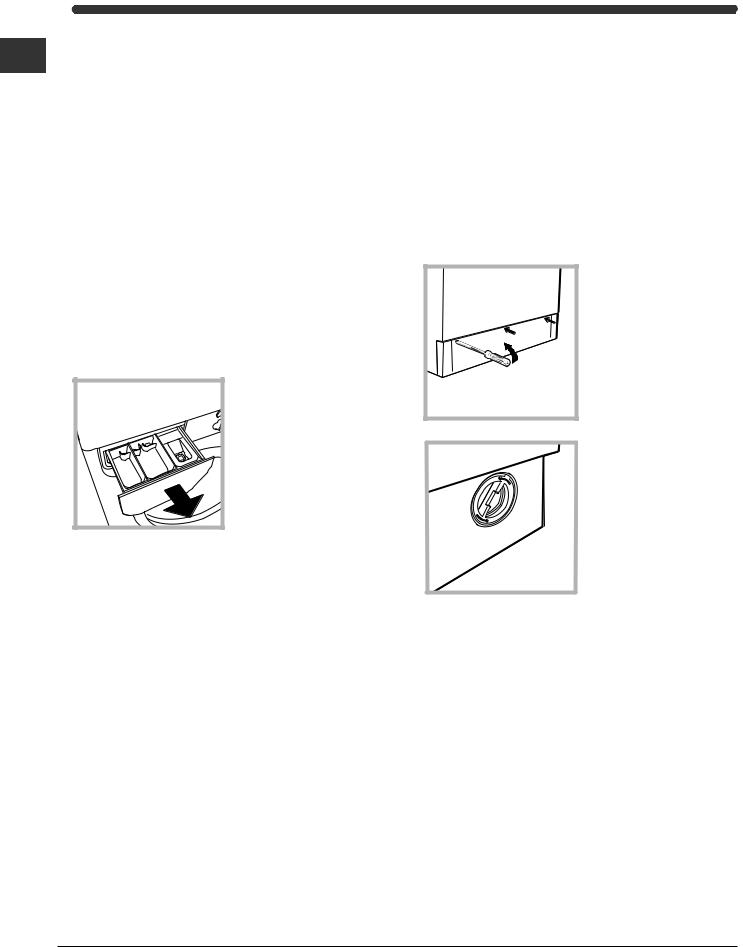
3. Remove the four protective screws and the rubber washer with the respective spacer, situated on the rear of the appliance (see figure).
4.Seal the gaps using the plastic plugs provided.
5.Keep all the parts: you will need them again if the Washer-dryer needs to be moved to another location.
Packaging materials are not children's toys.
Levelling
1. Install the Washer-dryer on a flat sturdy floor, without resting it up against walls, furniture cabinets or other.
2. If the floor is not perfectly level, compensate for any unevenness by tightening or
loosening the adjustable front feet (see figure); the angle of inclination, measured according to the worktop, must not exceed 2°.
Levelling your appliance correctly will provide it with stability and avoid any vibrations, noise and shifting during operation. If it is placed on a fitted or loose carpet, adjust the feet in such a way as to allow enough room for ventilation beneath the Washerdryer.
Electric and water connections
Connecting the water inlet hose
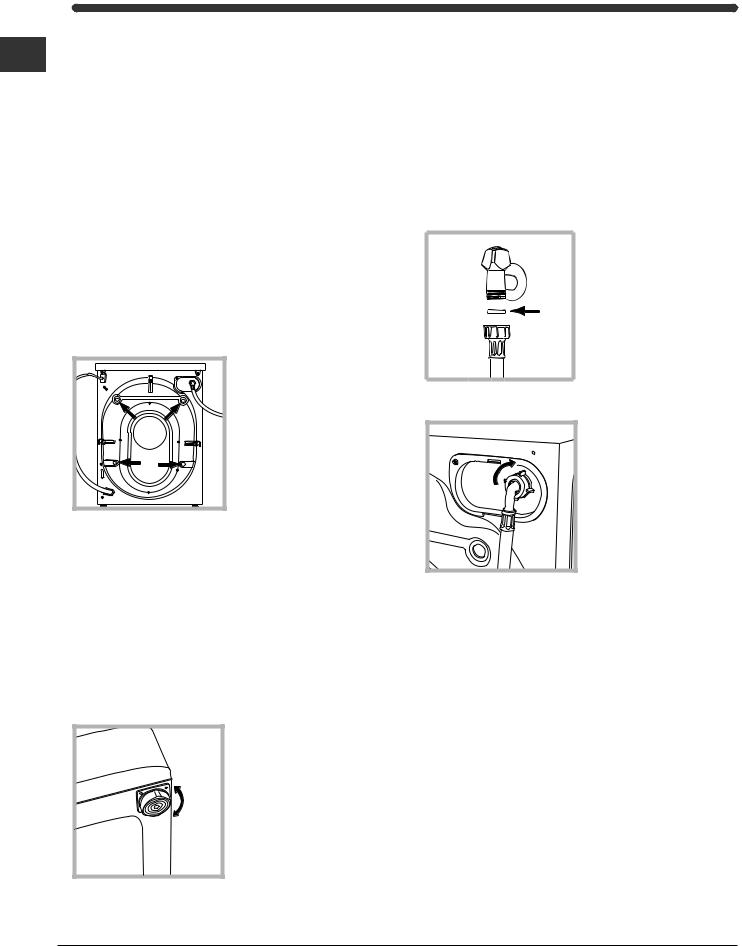
1. Insert seal A into the end of the inlet hose and screw the latter onto a cold water tap with a 3/4 gas threaded
A |
mouth (see figure). |
|
|
|
Before making the |
|
connection, allow the |
|
water to run freely until |
|
it is perfectly clear. |
|
2. Connect the other end |
|
of the water inlet hose to |
|
the Washer-dryer, |
|
screwing it onto the |
|
appliance's cold water |
|
inlet, situated on the top |
|
right-hand side on the |
|
rear of the appliance |
|
(see figure). |
3. Make sure there are no kinks or bends in the hose.
The water pressure at the tap must be within the values indicated in the Technical details table
(on the next page).
If the water inlet hose is not long enough, contact a specialist store or an authorised serviceman.
Never use hoses that have already been used.
2
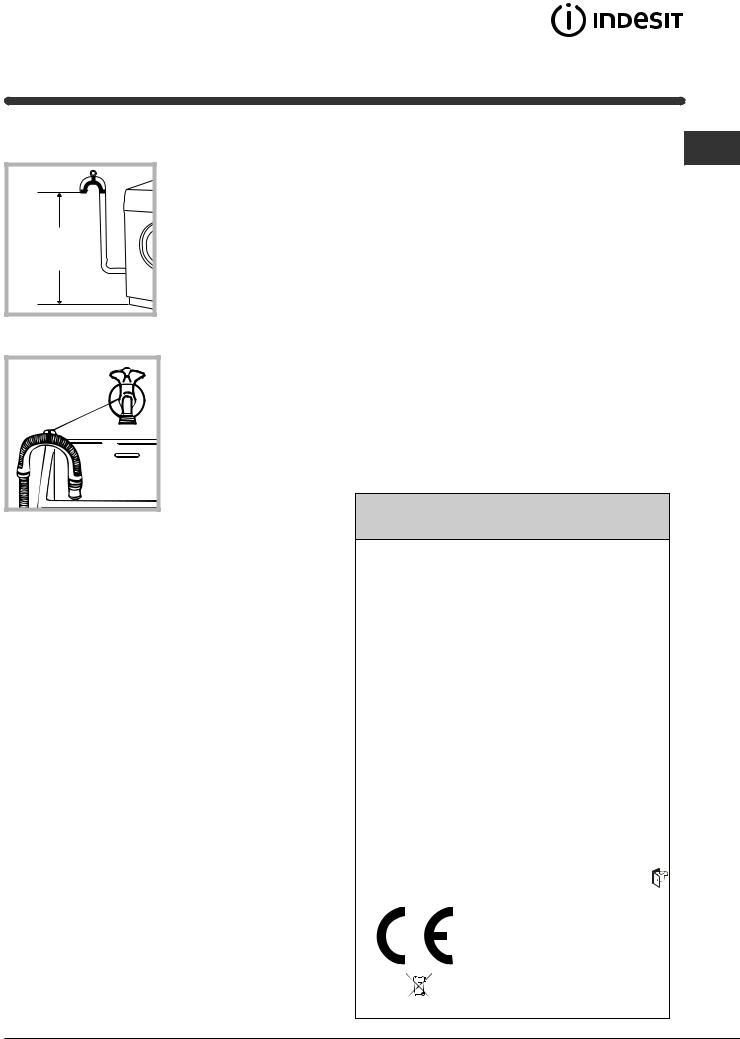
Connecting the drain hose
65 - 100 cm |
Connect the drain hose, without bending it, to a draining duct or a wall drain situated between 65 and 100 cm from the floor;
alternatively, place it over the edge of a basin, sink or tub, fastening the duct supplied to the tap (see figure). The free end of the hose should not be underwater.
We advise against the use of hose extensions; in case of absolute need, the extension must have the same diameter as the original hose and must not exceed 150 cm in length.
Electric connection
Before plugging the appliance into the mains socket, make sure that:
•the socket is earthed and in compliance with the applicable law;
•the socket is able to sustain the appliance's maximum power load indicated in the Technical details table (on the right);
•the supply voltage is included within the values i ndicated on the Technical details table
(on the right);
•the socket is compatible with the washing machine's plug. If this is not the case, replace the socket or the plug.
The washing machine should not be installed in an outdoor environment, not even when the area is sheltered, because it may be very dangerous to leave it exposed to rain and thunderstorms.
When the washing machine is installed, the mains socket must be within easy reach.
Do not use extensions or multiple sockets.
GB
The power supply cable must never be bent or dangerously compressed.
The power supply cable must only be replaced by an authorised serviceman.
Warning! The company denies all liability if and when these norms are not respected.
The first wash cycle
Once the appliance has been installed, and before you use it for the first time, run a wash cycle with detergent and no laundry, setting the 90°C programme without a pre-wash cycle.
Technical details
Model |
WIDXL 106 |
|||
|
|
|
|
|
|
|
|
59.5 cm wide |
|
Dimensions |
85 cm high |
|||
|
|
|
53.5 cm deep |
|
|
|
|
|
|
Capacity |
from 1 to 6 kg for the wash programme; |
|||
from 1 to 5 kg for the drying programme |
||||
|
|
|
||
|
|
|
|
|
Electric |
please refer to the technical data plate |
|||
connections |
fixed to the machine |
|||
|
|
|
|
|
Water |
maximum pressure 1 MPa (10 bar) |
|||
minimum pressure 0.05 MPa (0.5 bar) |
||||
connections |
||||
drum capacity 52 litres |
||||
|
|
|
||
|
|
|
|
|
Spin speed |
up to 1000 rpm |
|||
|
|
|
|
|
|
|
|
Wash: programme 2; temperature 60°C; |
|
Control |
run with a load of 6 kg. |
|||
Drying: first drying cycle performed with |
||||
programmes |
||||
a 1 kg load, by selecting a drying time |
||||
according to |
||||
of 60 min; |
||||
EN 50229 |
||||
Second drying cycle performed with a 5 |
||||
directive |
||||
kg load and the DRYING knob on the |
||||
|
|
|
||
|
|
|
setting. |
|
|
|
|
|
|
|
|
|
This appliance is compliant with the |
|
|
|
|
following European Community |
|
|
|
|
Directives: |
|
|
|
|
- 89/336/CEE of 03/05/89 |
|
|
|
|
(Electromagnetic Compatibility) and |
|
|
|
|
subsequent amendments |
|
|
|
|
- 2002/96/CE |
|
|
|
|
- 2006/95/CE (Low Voltage) |
|
|
|
|
||
|
|
|
||
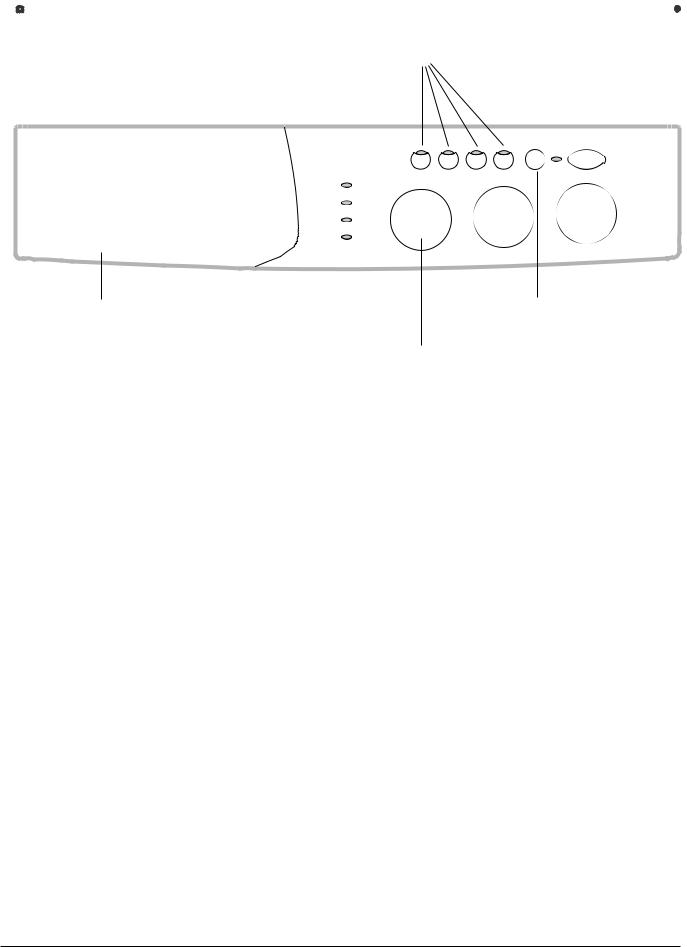
Washer-dryer description
|
|
|
|
|
|
|
|
|
|
|
Control panel |
|
|
FUNCTION |
|
|
|||
|
|
|
|
|
|||||
|
|
|
|
|
|
|
|||
GB |
|
|
|
|
Buttons |
|
|
||
|
|
|
Leds |
|
ON-OFF/ |
|
|
||
|
|
|
|
|
|
||||
|
|
|
|
|
|
|
|
||
|
|
|
|
|
|
|
|
||
|
|
|
|
|
|
DOOR |
|
ON-OFF |
|
|
|
|
|
|
|
|
|||
|
|
|
|
|
|
LOCK |
|
Button |
|
|
|
|
|
|
|
Led |
|
|
|
|
|
|
|
|
|
|
|
|
|
|
|
|
|
|
|
|
|
|
|
|
|
|
|
|
|
|
|
|
|
|
|
PROGRAMME |
|
|
|
Detergent dispenser |
|
Knob |
|
||
|
START/RESET |
|
|
Button |
|
DRYING |
TEMPERATURE |
|
Knob |
||
Knob
Detergent dispenser: to add detergent and fabric softener (see page 8).
LEDS: to find out which wash cycle phase is under way.
If the Delay Timer function has been set, the time left until the programme starts will be indicated (see page 5).
DRYING knob: to set the desired drying cycle
(see page 7).
FUNCTION buttons: to select the functions available. The button corresponding to the function selected will remain on.
TEMPERATURE knob: to set the temperature or the cold wash cycle (see page 7).
START/RESET button: to start the programmes or cancel any incorrect settings.
ON-OFF/DOOR LOCK Led: to find out whether the Washer-dryer is on and if the appliance door can be opened (see page 5).
ON/OFF button: to turn the Washer-dryer on and off.
PROGRAMME knob: to select the wash programmes. The knob stays still during the cycle.
Note: to avoid excessive vibrations, before every spin cycle the machine distributes the load in a uniform manner by continuously rotating the drum at a speed which is slightly faster than the normal washing speed.
When, despite repeated attempts, the load is still not evenly distributed, the machine spins at a lower speed than the set frequency.
If the load is excessively unbalanced, the machine attempts to distribute it instead of spinning.
The balancing attempts may extend the total duration of the cycle, up to a maximum of 10 minutes.
4
Leds
The LEDS provide important information. This is what they can tell you:
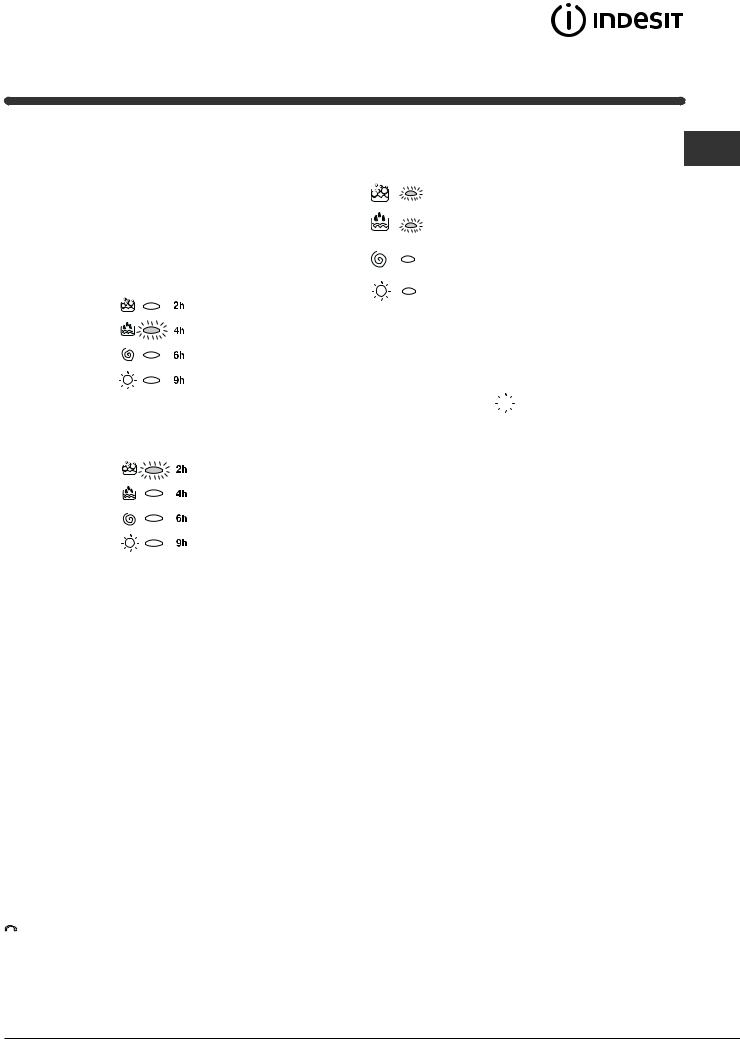
Delay set:
If the Delay Timer function has been enabled (see page. 7), once you have started the programme, the LED corresponding to the delay set will begin to flash:
As time passes, the remaining delay will be displayed, and the corresponding LED will flash:
Once the set delay is complete, the flashing LED will turn off and the programme set will start.
Cycle phase under way:
During the wash cycle, the LEDs gradually illumina- GB te on to indicate the cycle phase under way:
Prewash / Wash
Rinse
Spin cycle
Drying
Note:
-during draining, the LED corresponding to the Spin cycle phase will be turned on.
-when the drying cycle is complete, the indicator
light relative to phase  will flash, to indicate that the DRYING knob needs to be set back to the 0 setting.
Function buttons
The FUNCTION BUTTONS also act like LEDS. When a function is selected, the corresponding button is illuminated.
If the function selected is incompatible with the programme set, the button will flash and the function will not be enabled.
If you set a function that is incompatible with another function you selected previously, only the last one selected will be enabled.
 ON-OFF/DOOR LOCK led:
If this LED is on, the appliance door is locked to prevent it from being opened accidentally; to avoid any damages, wait for the LED to flash before you open the appliance door.
The rapid flashing of the ON-OFF/DOOR LOCK Led together with the flashing of at least one other LED indicates there is an abnormality (see page 11).

Starting and Programmes
Briefly: starting a programme
GB |
1. Switch the Washer-dryer on by pressing button . |
|
|
|
All the LEDS will light up for a few seconds and |
|
the ON-OFF/DOOR LOCK Led will begin to flash. |
2.Load your laundry into the washing machine and shut the appliance door.
3.Set the PROGRAMME knob to the programme required.
4.Set the wash temperature (see page 7).
5.Set the drying cycle if necessary (see page 7).
Programme table
6.Add the detergent and any fabric softener (see page 8).
7.Start he programme by pressing the START/RESET button.
To cancel it, keep the START/RESET button pressed for at least 2 seconds.
8.When the programme is finished, the ON-OFF/ DOOR LOCK Led will flash to indicate that the appliance door can be opened. Take out your laundry and leave the appliance door ajar to allow
the drum to dry thoroughly. Turn the Washer-dryer off by pressing button  .
.
Type of fabric and |
|
|
Drying |
Detergent |
Fabric |
Cycle |
|
||
Prog. |
Temp. |
length |
Description of wash cycle |
||||||
|
|
||||||||
degree of soil |
Cycle |
|
|
softener |
|||||
|
|
|
|
pre-w ash |
w ash |
|
(minutes) |
|
|
|
|
|
|
|
|
|
|||
|
|
|
|
|
|
|
|
|
|
Standard |
|
|
|
|
|
|
|
|
|
Extremely soiled whites (sheets, |
1 |
90°C |
• |
• |
• |
• |
155 |
Pre-wash, wash cycle, rinse cycles, |
|
tablecloths, etc.) |
intermediate and final spin cycles |
||||||||
|
|
|
|
|
|
|
|||
|
|
|
|
|
|
|
|
|
|
Extremely soiled whites (sheets, |
2 |
90°C |
• |
|
• |
• |
150 |
Wash cycle, rinse cycles, intermediate |
|
tablecloths, etc.) |
|
and final spin cycles |
|||||||
|
|
|
|
|
|
|
|||
|
|
|
|
|
|
|
|
|
|
Heavily soiled whites and fast colours |
2 |
60°C |
• |
|
• |
• |
140 |
Wash cycle, rinse cycles, intermediate |
|
|
and final spin cycles |
||||||||
|
|
|
|
|
|
|
|
||
|
|
|
|
|
|
|
|
|
|
Heavily soiled whites and delicate colours |
2 |
40°C |
• |
|
• |
• |
125 |
Wash cycle, rinse cycles, intermediate |
|
|
and final spin cycles |
||||||||
|
|
|
|
|
|
|
|
||
|
|
|
|
|
|
|
|
|
|
Slightly soiled whites and delicate colours |
3 |
40°C |
• |
|
• |
• |
85 |
Wash cycle, rinse cycles, intermediate |
|
(shirts, jumpers, etc.) |
|
and final spin cycles |
|||||||
|
|
|
|
|
|
|
|||
|
|
|
|
|
|
|
|
|
|
Heavily soiled fast colours (baby linen, etc.) |
4 |
60°C |
• |
|
• |
• |
83 |
Wash cycle, rinse cycles, anti- |
|
|
crease or delicate spin cycle |
||||||||
|
|
|
|
|
|
|
|
||
|
|
|
|
|
|
|
|
|
|
Heavily soiled fast colours (baby linen, etc.) |
4 |
40°C |
• |
|
• |
• |
70 |
Wash cycle, rinse cycles, anti- |
|
|
crease or delicate spin cycle |
||||||||
|
|
|
|
|
|
|
|
||
|
|
|
|
|
|
|
|
|
|
W ool |
5 |
40°C |
|
|
• |
• |
50 |
Wash cycle, rinse cycles, delicate |
|
|
|
spin cycle |
|||||||
|
|
|
|
|
|
|
|
||
Very delicate fabrics (curtains, silk, |
6 |
30°C |
|
|
• |
• |
45 |
Wash cycle, rinse cycles, anti- |
|
viscose, etc.) |
|
|
crease or draining cycle |
||||||
|
|
|
|
|
|
|
|||
Drying cotton |
7 |
|
• |
|
|
|
|
|
|
|
|
|
|
|
|
|
|
|
|
Drying delicates |
8 |
|
• |
|
|
|
|
|
|
|
|
|
|
|
|
|
|
|
|
Time 4 you |
|
|
|
|
|
|
|
|
|
Heavily soiled whites and fast colours |
9 |
60°C |
|
|
• |
• |
60 |
Wash cycle, rinse cycles, intermediate |
|
|
|
and final spin cycles |
|||||||
|
|
|
|
|
|
|
|
||
|
|
|
|
|
|
|
|
|
|
Delicate colours (all types of slightly soiled |
10 |
40°C |
|
|
• |
• |
40 |
Wash cycle, rinse cycles, delicate |
|
garments) |
|
|
spin cycle |
||||||
|
|
|
|
|
|
|
|||
|
|
|
|
|
|
|
|
|
|
Delicate colours (all types of slightly soiled |
11 |
30°C |
• |
|
• |
• |
30 |
Wash cycle, rinse cycles and |
|
garments) |
|
delicate spin cycle |
|||||||
|
|
|
|
|
|
|
|||
|
|
|
|
|
|
|
|
|
|
Sport |
|
|
|
|
|
|
|
|
|
|
|
|
|
|
|
|
|
Cold wash (without detergents), |
|
Sports shoes (MAX. 2 pairs) |
12 |
30°C |
|
|
• |
• |
50 |
wash cycle, rinse cycles, and delicate |
|
|
|
|
|
|
|
|
|
spin cycle |
|
Fabrics for sportswear |
13 |
30°C |
|
|
• |
• |
60 |
Wash cycle, rinse cycles, intermediate |
|
(Tracksuits, shorts, etc.) |
|
|
and final spin cycles |
||||||
|
|
|
|
|
|
|
|||
PARTIAL PROGRAMMES |
|
|
|
|
|
|
|
|
|
Rinse |
|
|
• |
|
|
• |
|
Rinse cycles and spin cycle |
|
|
|
|
|
|
|
|
|
|
|
Spin cycle |
|
|
• |
|
|
|
|
Draining and spin cycle |
|
|
|
|
|
|
|
|
|
|
|
Drain |
|
|
|
|
|
|
|
Drain |
|
|
|
|
|
|
|
|
|
|
|
Notes
-For programme 9, we advise against exceeding a wash load of 3.5 kg. -For programme 13 we advise against exceeding a wash load of 2 kg.
-For the anti-crease function: see Easy iron, opposite page. The information contained in the table is purely indicative.
Special programme
Daily (programme 11 for Synthetics) is designed to wash lightly soiled garments in a short amount of time: it only lasts 30 minutes and allows you to save on both time and energy. By setting this programme (11 at 30°C), you can wash different fabrics together (except for woollen and silk items), with a maximum load of 3 kg.
We recommend the use of liquid detergent.
6

Personalisations
C Setting the temperature
Turn the TEMPERATURE knob to set the wash temperature (see Programme table on page 6). |
|
|
|
GB |
|||||
The temperature can be lowered, or even set to a cold wash ( |
). |
|
|
|
|
|
|||
|
|
The data contained in the |
|||||||
|
|
|
|
|
|
||||
|
Set the drying cycle |
Table of drying times |
|
table are purely indicative. |
|||||
|
|
|
|
|
|
|
|
||
|
Fabric |
Load type |
Max. |
|
|
|
|
||
Turn the DRYING knob to set the desired drying type. |
|
|
|
|
|||||
type |
|
load |
|
|
|
|
|||
Two options are available: |
|
|
(kg) |
Cup- |
Hanger |
Iron |
|
||
|
|
|
board |
|
|
|
|||
|
|
|
|
|
|
|
|
|
|
A - Based on time: From 40 minutes to 180. |
|
|
|
|
|
|
|
||
Cotton, |
Clothing of different sizes |
|
|
|
|
|
|||
B - Based on the damp level of the dry clothes: |
5 |
180 |
170 |
140 |
|
||||
Linen |
|
|
|||||||
|
|
|
|
|
|
|
|
|
|
Iron |
: slightly damp clothes, easy to iron. |
|
|
|
|
|
|
|
|
|
|
|
|
|
|
|
|||
Hanger : dry clothes to put away. |
Cotton |
Terry towels |
5 |
180 |
170 |
140 |
|
||
Cupboard |
: very dry clothes, recommended for towelling |
|
|
|
|
|
|
|
|
Terital, |
Sheets, Shirts |
2,5 |
140 |
120 |
100 |
|
|||
and bathrobes. |
|
||||||||
Cotton |
|
|
|||||||
A cooling stage is foreseen at the end of the drying cycle. |
|
|
|
|
|
|
|
||
Acrylics |
Pyjamas, socks, etc. |
1 |
70 |
65 |
60 |
|
|||
|
|
|
|
||||||
If your laundry load to wash and dry is exceptionally in excess |
|
|
|
|
|
|
|
||
Nylon |
Slips, tights, stockings, etc. |
1 |
70 |
65 |
60 |
|
|||
of the maximum load foreseen (see table opposite), perform |
|
|
|
|
|
|
|
||
|
|
|
|
|
|
|
|||
the wash cycle, and when the programme is complete, divide up the garments and put part of them back in the |
|
|
|||||||
drum. Now follow the instructions provided for a dry only cycle. Repeat this procedure for the remainder of the load. |
|||||||||
Dry only
Turn the PROGRAMME knob to one of the drying settings (7-8) depending on the type of fabric, then select the desired drying type using the DRYING knob.
Important: - A spin cycle is carried out during the drying if you have set a cotton programme and a level of dryness (Cupboard  , Hanger
  , Iron
  ).
).
- For cotton loads of less than 1 Kg, use the drying programme designed for delicate fabrics.
Functions
To enable a function:
1.press the button corresponding to the desired function, according to the table below;
2.the function is enabled when the corresponding button is illuminated.
Note: The rapid flashing of the button indicates that the corresponding function cannot be selected for the programme set.
Function |
Effect |
Comments |
|
Enabled with |
|
|||
|
programmes: |
|
||||||
|
|
|
|
|
|
|
|
|
|
|
|
|
|
|
|
||
|
|
|
|
Press the button repeatedly until the LED corresponding to the |
|
|
||
|
|
|
Delays the start |
desired delay is turned on. |
|
All |
|
|
Delay |
of the wash by |
The fifth time the button is pressed, the function will be disabled. |
|
|||||
up to 9 hours. |
N.B.: Once you have pressed the Start/Reset button, the delay |
|
|
|||||
Timer |
|
can only be decreased if you wish to modify it. |
|
|
||||
|
|
|
|
|
|
|
||
|
|
|
|
When this function is set, programmes 4, 6 will end with the |
|
|
||
|
|
|
This option |
laundry left to soak (Anti-crease) and the Rinse cycle phase |
|
|
||
|
|
|
LED |
will flash. |
|
|
|
|
|
|
|
reduces the |
|
|
|
||
|
|
|
- to conclude the cycle, press the START/RESET button; |
3, 4, 6, |
|
|||
|
|
|
amount of |
|
||||
|
|
|
- to run the draining cycle alone, set the knob to the relative |
|
||||
|
|
|
creasing on |
9, 10, |
|
|||
|
|
|
symbol |
and press the START/RESET button. |
|
|||
|
|
|
fabrics, making |
Rinse cycle. |
|
|||
|
|
|
This function is incompatible with the STAIN REMOVAL function. |
|
||||
|
|
|
them easier to |
|
|
|||
|
|
|
|
|
|
|
|
|
|
|
|
iron. |
If you also want to run the drying cycle, this button is enabled |
|
|
||
Easy iron |
|
|
|
|||||
|
only if combined with level |
(Iron). |
|
|
||||
|
|
|
|
|
|
|
|
|
Extra |
Increases the |
Recommended when the appliance has a full load or with large |
1, 2, 3, 4, 9, |
|
||||
efficiency of the |
10, 12, 13, |
|
||||||
quantities of detergent. |
|
|
||||||
Rinse |
rinse. |
|
Rinse cycle. |
|
||||
|
|
|
|
|||||
|
|
|
|
|
|
|
|
|
|
|
|
|
|
|
|
All |
|
|
|
|
Reduces the |
|
|
|
programmes |
|
1000-500 |
spin speed. |
|
|
|
except for 6, 7, |
|
||
|
|
|
|
8 and draining. |
|
|||
|
|
|
|
|
|
|
|
|
|
|
|
|
|
|
|
|
|
Detergents and laundry
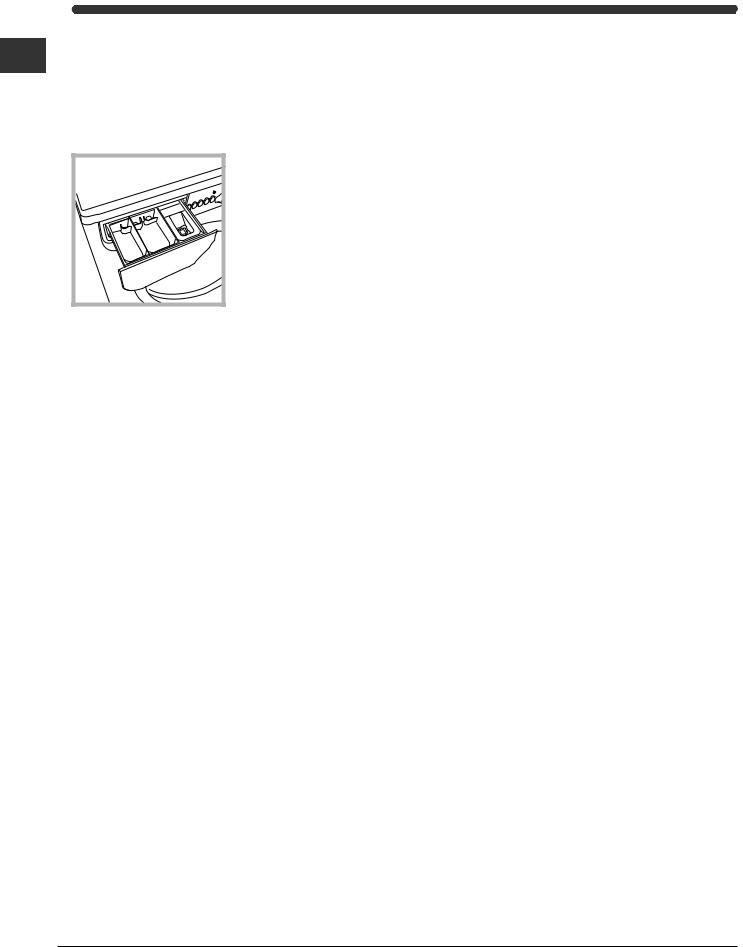
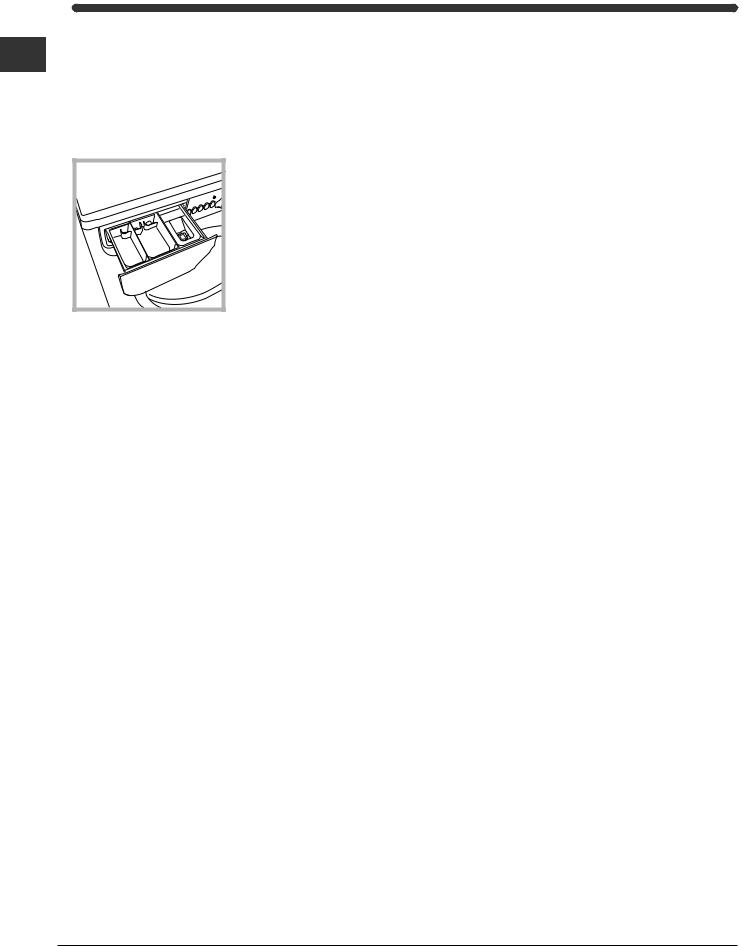
Detergent dispenser
GB |
Good washing results also depend on the correct |
|
|
|
dose of detergent: adding too much detergent won't |
|
necessarily make for a more efficient wash, and may |
|
in fact cause build up on the interior of your |
|
appliance and even pollute the environment. |
|
3 |
1 |
2 |
Open up the detergent dispenser and pour in the detergent and fabric softener, as follows.
compartment 1: Detergent for pre-wash (powder)
compartment 2: Detergent for the wash cycle (powder or liquid)
Liquid detergent should only be poured in immediately prior to the wash cycle start. compartment 3: Additives (fabric softeners, etc.)
The fabric softener should not overflow from the grid.
Do not use hand wash detergent because it may form too much foam.
Special items
Curtains: fold curtains and place them in a pillow case or mesh bag. Wash them separately without exceeding half the appliance load. Use programme 6 which excludes the spin cycle automatically.
Quilted coats and windbreakers: if they are padded with goose or duck down, they can be machine-washed. Turn the garments inside out and load a maximum of 2-3 kg, repeating the rinse cycle once or twice and using the delicate spin cycle. Wool: for best results, use a specific detergent, taking care not to exceed a load of 1,5 kg.
Preparing your laundry
•Divide your laundry according to:
-the type of fabric/the symbol on the label.
-the colours: separate coloured garments from whites.
•Empty all pockets and check for loose buttons.
•Do not exceed the weight limits stated below, which refer to the weight when dry:
Sturdy fabrics: max 6 kg Synthetic fabrics: max 2.5 kg Delicate fabrics: max 2 kg Wool: max 1,5 kg
How much does your laundry weigh?
1sheet 400-500 g
1pillow case 150-200 g
1tablecloth 400-500 g
1bathrobe 900-1,200 g
1towel 150-250 g
8

Precautions and advice
The Washer-dryer was designed and built in compliance with the applicable international safety regulations. The following information is provided for your safety and should consequently be read carefully.
General safety
•This appliance has been designed for nonprofessional, household use and its functions must not be changed.
•This washing machine should only be used by adults and in accordance with the instructions provided in this manual.
•Never touch the washing machine when barefoot or with wet or damp hands or feet.
•Do not pull on the power supply cable to unplug the appliance from the electricity socket. Pull the plug out yourself.
•Do not open the detergent dispenser while the appliance is in operation.
•Do not touch the drain water as it could reach very high temperatures.
•Never force the washing machine door: this could damage the safety lock mechanism designed to prevent any accidental openings.
•In the event of a malfunction, do not under any circumstances touch internal parts in order to attempt repairs.
•Always keep children well away from the appliance while in operation.
•The appliance door tends to get quite hot during the wash cycle.
•Should it have to be moved, proceed with the help of two or three people and handle it with the utmost care. Never try to do this alone, because the appliance is very heavy.
•Before loading your laundry into the washing machine, make sure the drum is empty.
•During the drying phase, the door tends to get quite hot.
•Do not use the appliance to dry clothes that have been washed with flammable solvents (e.g. trichlorethylene).
•Do not use the appliance to dry foam rubber or similar elastomers.
•Make sure that the water tap is turned on during the drying cycles.
•This washer-dryer can only be used to dry clothes which have been pre-washed in water.
Disposal
•Disposing of the packaging material:
observe local regulations, so the packaging can be re-used.
•The European Directive 2002/96/EC on Waste Electrical and Electronic Equipment, requires that
old household electrical appliances must not be
disposed of in the normal unsorted municipal waste GB stream. Old appliances must be collected
separately in order to optimise the recovery and recycling of the materials they contain and reduce the impact on human health and the environment. The crossed out "wheeled bin" symbol on the product reminds you of your obligation, that when you dispose of the appliance it must be separately collected.
Consumers should contact their local authority or retailer for information concerning the correct disposal of their old appliance.
Saving energy and respecting the environment
Environmentally-friendly technology
If you only see a little water through your appliance door, this is because thanks to the latest Indesit technology, your washing machine only needs less than half the amount of water to get the best results: an objective reached to respect the environment.
Saving on detergent, water, energy and time
•To avoid wasting resources, the Washer-dryer should be used with a full load. A full load instead of two half loads allows you to save up to 50% on energy.
•The pre-wash cycle is only necessary on extremely soiled garments. Avoiding it will save on detergent, time, water and between 5 and 15% energy.
•Treating stains with a stain remover or leaving them to soak before washing will cut down the need to wash them at high temperatures. A programme at 60°C instead of 90°C or one at 40°C instead of 60°C will save up to 50% on energy.
•Use the correct quantity of detergent depending on the water hardness, how soiled the garments are and the amount of laundry you have, to avoid wastage and to protect the environment: despite being biodegradable, detergents do contain ingredients that alter the natural balance of the environment. In addition, avoid using fabric softener as much as possible.
•If you use your washing machine from late in the afternoon until the early hours of the morning, you will help reduce the electricity board's peak load. The Delay Timer option (see page 7) helps to organise your wash cycles accordingly.
•If your laundry has to be dried in a tumble dryer, select a high spin speed. Having the least water possible in your laundry will save you time and energy in the drying process.
9
Care and maintenance
Cutting off the water or electricity GB supply
•Turn off the water tap after every wash. This will limit the wear of your appliance's water system and also prevent leaks.
•Unplug your appliance when cleaning it and during all maintenance operations.
Cleaning your appliance
The exterior and rubber parts of your appliance can be cleaned with a soft cloth soaked in lukewarm soapy water. Do not use solvents or abrasives.
Cleaning the detergent dispenser
Remove the dispenser by raising it and pulling it out (see figure).
Wash it under running water; this operation should be repeated frequently.
Caring for your appliance door and drum
•Always leave the appliance door ajar to prevent unpleasant odours from forming.
Cleaning the pump
The Washer-dryer is fitted with a self-cleaning pump that does not require any maintenance. Sometimes, small items (such as coins or buttons) may fall into the pre-chamber that protects the pump, situated in the lower part of the same.
Make sure the wash cycle has ended and unplug the appliance.
To access the pre-chamber:
1. using a screwdriver, remove the cover panel on the lower front of the Washer-dryer (see figure);
2. unscrew the lid rotating it anticlockwise (see figure): a little water may trickle out. This is perfectly normal;
3.clean the interior thoroughly;
4.screw the lid back on;
5.reposition the panel, making sure the hooks are securely in place before you push it onto the appliance.
Checking the water inlet hose
Check the water inlet hose at least once a year. If you see any cracks, replace it immediately: during the wash cycles, water pressure is very strong and a cracked hose could easily split open.
Never use hoses that have already been used.
10
Troubleshooting
Your Washer-dryer could fail to work. Before calling for Assistance (see page 12), make sure the problem can't
easily be solved by consulting the following list. |
GB |
|
Problem
The washer-dryer won't start.
The wash cycle won't start.
The washer-dryer fails to load water.
The washer-dryer continuously loads and unloads water.
The washer-dryer does not drain or spin.
The washer-dryer vibrates too much during the spin cycle.
The washer-dryer leaks.
The ON-OFF/DOOR LOCK Led flashes rapidly at the same time as at least one other LED.
There is too much foam.
The washer-dryer does not dry.
Possible causes/Solution:
•The appliance is not plugged into the socket, or not enough to make contact.
•There has been a power failure.
•The appliance door is not shut properly.
• The  button has not been pressed.
•The START/RESET button has not been pressed.
•The water tap is not turned on.
•A delayed start has been set (using the Delay Timer, see page 7).
•The water inlet hose is not connected to the tap.
•The hose is bent.
•The water tap is not turned on.
•There is a water shortage.
•The water pressure is insufficient.
•The START/RESET button has not been pressed.
•The drain hose is not fitted between 65 and 100 cm from the floor
(see page 3).
•The free end of the hose is underwater (see page 3).
•The wall drainage system doesn't have a breather pipe.
If the problem persists even after these checks, turn off the water tap, switch the appliance off and call for Assistance. If the dwelling is on one of the upper floors of a building, there may be drain trap problems causing the Washer-dryer to load and unload water continuously. In order to avoid such an inconvenience, special anti-drain trap valves are available in shops.
•The programme does not foresee the draining: some programmes require enabling the draining manually (see page 6).
•The Easy iron option is enabled: to complete the programme, press the START/RESET button (see page 7).
•The drain hose is bent (see page 3).
•The drain duct is clogged.
•The drum was not unblocked correctly during installation (see page 2).
•The Washer-dryer is not level (see page 2).
•The Washer-dryer is closed in between furniture cabinets and the wall (see page 2).
•The water inlet hose is not screwed on correctly (see page 2).
•The detergent dispenser is obstructed (to clean it, see page 10).
•The drain hose is not secured properly (see page 3).
•Switch off the machine and unplug the appliance; wait for approximately 1 minute then switch it on again.
If the problem persists, contact Assistance.
•The detergent is not suitable for machine washing (it should bear the definition "for washing machines" or "hand and machine wash", or the like).
•You used too much detergent.
•The appliance is not plugged into the socket, or not enough to make contact.
•There has been a power failure.
•The appliance door is not shut properly.
•A delayed start has been set (using the Delay Timer, see page 7).
•the DRYING knob is on the 0 setting.
11

Service
Before calling for Assistance:
GB |
• |
Check whether you can solve the problem on your own (see page 11); |
|
||
|
• |
Restart the programme to check whether the problem has been solved; |
|
• |
If this is not the case, contact an authorised Technical Service Centre on the telephone number |
|
|
provided on the guarantee certificate. |
|
|
Always request the assistance of authorised servicemen. |
Notify the operator of:
•the type of problem;
•the appliance model (Mod.);
•the serial number (S/N).
This information can be found on the data plate situated on the rear of the washer-dryer.
12

Instrucciones para el uso
LAVASECADORA
|
|
|
|
|
|
|
|
|
Sumario |
|
|
|
|
|
ES |
||
|
|
|
|
|
|
|
|
|
Instalación, 14-15 |
|
|
|
ES |
|
|
||
|
|
Desembalaje y nivelación |
|||
|
|
|
Conexiones hidráulicas y eléctricas |
||
|
|
|
|||
|
Espanol |
Primer ciclo de lavado |
|||
|
|
|
Datos técnicos |
||
|
|
|
Descripción de la lavasecadora, 16-17 |
||
|
|
|
Panel de control |
||
|
|
|
Luces testigo |
||
|
|
|
Puesta en marcha y Programas, 18 |
||
|
|
|
En la práctica: poner en marcha un programa |
||
|
|
|
Tabla de programas |
||
WIDXL 106
Personalizaciones, 19
Seleccione la temperatura
Seleccione el secado
Funciones
Detergentes y ropa, 20
Cajón de detergentes Preparar la ropa Prendas especiales
Precauciones y consejos, 21
Seguridad general Eliminaciones
Ahorrar y respetar el ambiente
Mantenimiento y cuidados, 22
Excluir el agua y la corriente eléctrica Limpiar la lavasecadora
Limpiar el contenedor de detergentes Cuidar la puerta y el cesto
Limpiar la bomba
Controlar el tubo de alimentación de agua
Anomalías y soluciones, 23
Asistencia, 24
Antes de llamar a la Asistencia Técnica
13
Instalación
Es importante conservar este manual para poder ES consultarlo en cualquier momento. En caso de venta,
de cesión o de traslado, verifique que permanezca junto con la lavasecadora para informar al nuevo propietario sobre el funcionamiento y brindar las correspondientes advertencias.
Lea atentamente las instrucciones: ellas contienen importante información sobre la instalación, el uso y la seguridad.
Desembalaje y nivelación
Desembalaje
1.Desembale la lavasecadora.
2.Controle que la lavasecadora no haya sufrido daños durante el transporte. Si estuviera dañada no la conecte y llame al revendedor.
3. Quite los 4 tornillos de protección para el transporte y la arandela de goma con el correspondiente distanciador, ubicados en la parte posterior (ver la figura).
4.Cierre los orificios con los tapones de plástico suministrados con el aparato.
5.Conserve todas las piezas: cuando la lavasecadora deba ser transportada nuevamente, deberán volver a colocarse.
Los embalajes no son juguetes para los niños.
Nivelación
1. Instale la lavasecadora sobre un piso plano y rígido, sin apoyarla en las paredes, muebles ni en ningún otro aparato.
2. Si el piso no está perfectamente horizontal, compense las irregularidades desenroscando o enroscando los pies delanteros (véase la figura); el ángulo de inclinación medido sobre la superficie de trabajo, no debe superar los 2º.
Una cuidadosa nivelación brinda estabilidad a la máquina y evita vibraciones, ruidos y desplazamientos durante el funcionamiento. Cuando se instala sobre moquetas o alfombras, regule los pies para conservar debajo de la lavasecadora un espacio suficiente para la ventilación.
Conexiones hidráulicas y eléctricas
Conexión del tubo de alimentación de agua
|
1. Introduzca la junta A |
|
en el extremo del tubo |
|
de alimentación y |
|
enrósquelo a un grifo de |
A |
agua fría con boca |
roscada de 3/4 gas |
|
|
(véase la figura). |
|
Antes de conectarlo, |
|
haga correr el agua |
|
hasta que salga limpia. |
2. Conecte el tubo de alimentación a la lavasecadora enroscándolo en la toma de agua correspondiente ubicada en la parte posterior arriba y a la derecha
(véase la figura).
3. Verifique que el tubo no tenga pliegues ni estrangulaciones.
La presión de agua del grifo debe estar comprendida dentro de los valores contenidos en la tabla de Datos técnicos (ver la página del costado).
Si la longitud del tubo de alimentación no fuera suficiente, diríjase a una tienda especializada o a un técnico autorizado.
No utilice nunca tubos ya usados.
14

Conexión del tubo de descarga
65 - 100 cm |
Conecte el tubo de descarga, sin plegarlo, a un desagüe de pared ubicado a una distancia del piso comprendida entre 65 y 100 cm;
o apóyelo al borde de un lavabo o de una bañera, uniendo la guía suministrada con el aparato, al grifo (véase la figura). El extremo libre del tubo de descarga no debe permanecer sumergido en el agua.
No se aconseja utilizar tubos de prolongación, de todos modos, si es indispensable, la prolongación debe tener el mismo diámetro del tubo original y no superar los 150 cm.
Conexión eléctrica
Antes de enchufar el aparato, verifique que:
•la toma tenga la conexión a tierra y haya sido hecha según las normas legales;
•la toma sea capaz de soportar la carga máxima de potencia de la máquina indicada en la tabla de Datos técnicos (ver al costado);
•la tensión de alimentación esté comprendida dentro de los valores indicados en la tabla de Datos técnicos (ver al costado);
•la toma sea compatible con el enchufe de la lavadora. Si no es así, sustituya la toma o el enchufe.
La lavadora no debe ser instalada al aire libre, ni siquiera si el lugar está preparado, ya que es muy peligroso dejarla expuesta a la lluvia o a las tormentas.
Una vez instalada la lavadora, la toma de corriente debe ser fácilmente accesible.
No utilice alargadores ni conexiones múltiples.
ES
El cable no debe estar plegado ni sufrir compresiones.
El cable de alimentación debe ser sustituido sólo por técnicos autorizados.
¡Atención! La empresa fabricante declina toda responsabilidad en caso de que estas normas no sean respetadas.
Primer ciclo de lavado
Después de la instalación y antes del uso, realice un ciclo de lavado con detergente y sin ropa, seleccionando el programa a 90ºC sin prelavado.
Datos técnicos
Modelo |
WIDXL 106 |
|
|
|
|
||
|
ancho 59,5 cm. |
||
Dimensiones |
altura 85 cm. |
|
|
|
profundidad 53,5 cm. |
||
|
|
||
Capacidad |
de 1 a 6 kg para el lavado; |
||
de 1 a 5 kg para el secado. |
|||
|
|||
|
|
||
Conexiones |
ver la placa de características |
||
eléctricas |
técnicas aplicada en la máquina |
||
|
|
||
Conexiones |
presión máxima 1 MPa (10 bar) |
||
presión mínima 0,05 MPa (0,5 bar) |
|||
hídricas |
|||
capacidad del cesto 52 litros |
|||
|
|||
|
|
|
|
Velocidad de |
máxima 1000 r.p.m. |
||
centrifugado |
|||
|
|
||
|
|
||
|
lavado: programa 2; temperatura |
||
|
60ºC; efectuado con 6 kg. de carga. |
||
Programas de |
secado: primer secado realizado |
||
con 1 kg de carga seleccionando un |
|||
control según la |
|||
tiempo de 60 min; |
|||
norma EN 50229 |
|||
segundo secado realizado con 5 kg |
|||
|
|||
|
de carga y el mando de SECADO en |
||
|
la posición |
. |
|
Esta máquina cumple con lo establecido por las siguientes Directivas de la Comunidad: - 89/336/CEE del 03/05/89
(Compatibilidad Electromagnética) y sucesivas modificaciones
- 2002/96/CE
- 2006/95/CE (Baja Tensión)
15

Descripción de la lavasecadora
Panel de control
ES |
Botones de |
Luz indicadora de |
||
|
FUNCIÓN |
ENCENDIDO/PUERTA |
||
|
Luces |
BLOQUEADA |
||
|
testigo |
|
|
Botón de |
|
|
|
|
ENCENDIDO/ |
|
|
|
|
APAGADO |
|
|
|
|
|
|
|
|
|
|
|
|
|
|
|
Mando de |
|
|
|
|
|
|
|
|
|
|
|
|
|
|
|
|
|
|
Cajón de detergentes |
|
|
|
|
PROGRAMAS |
|
|
Botón de |
|||
|
|
|
|||
|
|
|
START/RESET |
||
|
|
|
Mando de |
||
|
Mando de |
TEMPERATURA |
|||
|
|
|
|
||
|
SECADO |
|
|
|
|
Cajón de detergentes: para cargar detergentes y aditivos (véase la pág. 20).
Luces testigo: para seguir el estado de avance del programa de lavado.
Si se seleccionó la función Delay Timer, indicarán el tiempo que falta para la puesta en marcha del programa (ver la pág. 17).
Mando de SECADO: para seleccionar el secado deseado (ver la pág. 19).
Botones de FUNCIÓN: para seleccionar las funciones disponibles. El botón correspondiente a la función seleccionada permanecerá encendido.
Mando de TEMPERATURA: para seleccionar la temperatura o el lavado en frío (ver la pág. 19).
Botón de START/RESET: para poner en marcha los programas o anular las selecciones incorrectas.
Luz indicadora de ENCENDIDO/PUERTA BLOQUEADA: para saber si la lavasecadora está encendida y si la puerta se puede abrir (ver la pág. 17).
Botón de ENCENDIDO/APAGADO: para encender y apagar la lavasecadora.
Mando de PROGRAMAS: para elegir los programas. Durante el programa el mando no se mueve.
Notas: Para evitar vibraciones excesivas, antes de cada centrifugado, la máquina distribuye la carga de modo uniforme, esto se produce efectuando rotaciones continuas del cesto a una velocidad ligeramente superior a la del lavado.
Aún cuando después de repetidos intentos, la carga no se distribuye perfectamente, la máquina realiza el centrifugado a una velocidad inferior a la prevista.
Cuando existe un excesivo desequilibrado, la máquina efectúa la distribución en lugar del centrifugado. Los intentos de equilibrado pueden aumentar la duración total del ciclo hasta un máximo de 10 minutos.
16

Luces testigo
Las luces testigo suministran información importante. He aquí lo que nos dicen:
Retraso seleccionado:
Si fue activada la función Delay Timer (ver la pág. 19), después de haber puesto en marcha el programa, comenzará a centellear la luz testigo correspondiente al retraso fijado:
Con el transcurrir del tiempo se visualizará el retraso residual y el centelleo de la luz testigo correspondiente:
Una vez transcurrido el tiempo de retraso fijado, la luz testigo centelleante se apagará y comenzará el programa seleccionado.
Fase en curso:
Durante el ciclo de lavado, las luces testigo se ES encenderán progresivamente para indicar su
estado de avance.
Prelavado / Lavado
Aclarado
Centrifugado
Secado
Nota:
-durante la fase de descarga se iluminará la luz testigo correspondiente a la fase de Centrifugado.
-al finalizar el ciclo de secado, la luz testigo co-
rrespondiente a la fase  centelleará para indicar que es necesario llevar el mando de SECADO a la posición 0.
Botones de FUNCIÓN
Los BOTONES DE FUNCIÓN también actúan como luces testigo.
Al seleccionar una función, el botón correspondiente se iluminará.
Si la función seleccionada no es compatible con el programa elegido, el botón centelleará y la función no se activará.
Cuando se seleccione una función incompatible con otra seleccionada precedentemente, permanecerá activa sólo la última selección realizada.
 Luz indicadora de ENCENDIDO/PUERTA BLOQUEADA
La luz testigo encendida indica que la puerta está bloqueada para impedir aperturas accidentales; para evitar daños es necesario esperar que la luz testigo centellee antes de abrir la puerta.
El centelleo rápido de la luz indicadora de ENCENDIDO/PUERTA BLOQUEADA simultáneamente con, al menos, el de otra luz testigo, indica una anomalía (ver la pág. 23).
17

Puesta en marcha y Programas
En la práctica: poner en marcha un ES programa
1. Encienda la lavasecadora pulsando el botón . Todas las luces testigo se encenderán durante algunos segundos, luego se apagarán y la luz indicadora de ENCENDIDO/PUERTA BLOQUEADA comenzará a centellear.
2.Cargue la ropa y cierre la puerta.
3.Seleccione el programa deseado con el mando de PROGRAMAS.
Tabla de programas
4.Fije la temperatura de lavado (ver la pág. 19).
5.Seleccione el secado si es necesario (ver la pág. 19).
6.Vierta el detergente y los aditivos (véase la pág. 20).
7.Ponga en marcha el programa pulsando el botón START/RESET.
Para anular, mantenga presionado el botón START/RESET durante 2 segundos como mínimo.
8.Al finalizar el programa, la luz indicadora de ENCENDIDO/PUERTA BLOQUEADA centelleará indicando que la puerta se puede abrir. Extraiga la ropa y deje la puerta semicerrada para permitir que el cesto se seque. Apague la lavasecadora pulsando el botón  .
.
|
|
Tem p e - |
|
D etergente |
Suavi- |
D uración |
|
||
Tip os de tejid os y d e sucied ad |
Programas |
Secad o |
del ciclo |
D escrip ción d el ciclo d e lavad o |
|||||
|
|
||||||||
|
|
ratura |
|
|
|
zante |
(m inutos) |
|
|
|
|
|
p relav. |
lavado |
|
||||
|
|
|
|
|
|
||||
|
|
|
|
|
|
|
|
|
|
E stándar |
|
|
|
|
|
|
|
|
|
A lgod ón : B lancos sum am ente |
1 |
90°C |
• |
• |
• |
• |
155 |
Prelavado, lavado, aclarados, |
|
sucio s (sábanas, m anteles, etc.) |
centrífugas interm edias y final |
||||||||
|
|
|
|
|
|
|
|||
A lgod ón : B lancos sum am ente |
2 |
90°C |
• |
|
• |
• |
150 |
Lavado, aclarado s, centrífugas |
|
sucio s (sábanas, m anteles, etc.) |
|
intermedias y final |
|||||||
|
|
|
|
|
|
|
|||
A lgod ón : B lancos y colo reados |
2 |
60°C |
• |
|
• |
• |
140 |
Lavado, aclarado s, centrífugas |
|
resistentes muy sucios |
|
intermedias y final |
|||||||
|
|
|
|
|
|
|
|||
A lgod ón : B lancos y colo reados |
2 |
40°C |
• |
|
• |
• |
125 |
Lavado, aclarado s, centrífugas |
|
delicados muy sucios |
|
intermedias y final |
|||||||
|
|
|
|
|
|
|
|||
A lgod ón : B lancos poco sucios y |
|
|
|
|
|
|
|
Lavado, aclarado s, centrífugas |
|
colores delicados |
3 |
40°C |
• |
|
• |
• |
85 |
||
|
intermedias y final |
||||||||
(camisas, camisetas, etc.) |
|
|
|
|
|
|
|
||
|
|
|
|
|
|
|
|
||
Sinté ticos: Colores resisten tes |
|
60°C |
• |
|
• |
• |
83 |
Lavado, aclarado s, antiarrugas o |
|
muy sucios (ro pa para recién |
4 |
|
|||||||
|
centrífuga delicada |
||||||||
nacidos, etc.) |
|
|
|
|
|
|
|
||
|
|
|
|
|
|
|
|
||
Sinté ticos: Colores resisten tes |
|
40°C |
• |
|
• |
• |
70 |
Lavado, aclarado s, antiarrugas o |
|
muy sucios (ro pa para recién |
4 |
|
|||||||
|
centrífuga delicada |
||||||||
nacidos, etc.) |
|
|
|
|
|
|
|
||
|
|
|
|
|
|
|
|
||
Lana |
5 |
40°C |
|
|
• |
• |
50 |
Lavado, aclarado s y |
|
|
|
centrifugación delicada |
|||||||
|
|
|
|
|
|
|
|
||
Tejidos muy delicados |
6 |
30°C |
|
|
• |
• |
45 |
Lavado, aclarado s, antiarrugas o |
|
(cortinas, seda, viscosa, etc.) |
|
|
desague |
||||||
|
|
|
|
|
|
|
|||
Secado para telas de algodón |
7 |
|
• |
|
|
|
|
|
|
|
|
|
|
|
|
|
|
|
|
Secado para tejido s delicados |
8 |
|
• |
|
|
|
|
|
|
|
|
|
|
|
|
|
|
|
|
Tim e 4 you |
|
|
|
|
|
|
|
|
|
A lgodón : B lancos y colo reados |
9 |
60°C |
|
|
• |
• |
60 |
Lavado, aclarado s, centrífugas |
|
resistentes muy sucios |
|
|
intermedias y final |
||||||
|
|
|
|
|
|
|
|||
|
|
|
|
|
|
|
|
|
|
Sinté ticos: Colores delicados (ropa |
1 0 |
40 °C |
|
|
• |
• |
40 |
Lavado, aclarado s y centrífuga |
|
de todo tipo ligeramente sucia) |
|
|
delicada |
||||||
|
|
|
|
|
|
|
|||
Sintéticos: Colores delicados (ropa |
1 1 |
30°C |
• |
|
• |
• |
30 |
Lavado, aclarado s y centrífuga |
|
de todo tipo ligeramente sucia) |
|
delicada |
|||||||
|
|
|
|
|
|
|
|||
S port |
|
|
|
|
|
|
|
|
|
Calzado deportivo |
|
30°C |
|
|
|
|
|
Lavado en frío (sin detergente), |
|
1 2 |
|
|
• |
• |
50 |
lavado, aclarados y centrifugación |
|||
(MAX. 2 pares.) |
|
|
|||||||
|
|
|
|
|
|
|
delicada |
||
|
|
|
|
|
|
|
|
||
Tejidos para ropa deportiva |
1 3 |
30°C |
|
|
• |
• |
60 |
Lavado, aclarado s, centrífugas |
|
(chandal, pantalón corto, etc.) |
|
|
intermedias y final |
||||||
|
|
|
|
|
|
|
|||
PR OGR AM AS PAR CIALES |
|
|
|
|
|
|
|
|
|
Aclarado |
|
|
• |
|
|
• |
|
Aclarados y centrifugación |
|
|
|
|
|
|
|
|
|
|
|
Centrifugación |
|
|
• |
|
|
|
|
Desague y centrifu gación |
|
|
|
|
|
|
|
|
|
|
|
Desague |
|
|
|
|
|
|
|
Desague |
|
|
|
|
|
|
|
|
|
|
|
Notas
-En el programa 9 es aconsejable no superar una carga de ropa de 3,5 kg. -En el programa 13 se aconseja no superar una carga de ropa de 2 kg.
-Para la descripción del antiarrugas: consulte Plancha fácil, página siguiente. Los datos contenidos en la tabla tienen un valor indicativo.
Programa especial
Diario 30' (programa 11 para Sintéticos) fue estudiado para lavar prendas ligeramente sucias y en poco tiempo: dura sólo 30 minutos y de esa manera hace ahorrar energía y tiempo. Seleccionando el programa (11 a 30ºC) es posible lavar conjuntamente tejidos de distinto tipo (excluidas lana y seda), con una carga máxima de 3 kg.
Se aconseja el uso de detergente líquido.
18
Personalizaciones
C Seleccione la temperatura
Girando el mando de la TEMPERATURA se selecciona la temperatura de lavado (ver la Tabla de programas en la pág. 18). ES La temperatura se puede disminuir hasta el lavado en frío ( ).
).
|
|
|
Tabla de tiempos de secado |
Los datos contenidos en la |
|||||
Seleccione el secado |
tabla tienen un valor indicativo. |
||||||||
Girando el mando de SECADO se selecciona el tipo de |
Tipo de |
Tipo de carga |
Carga |
|
|
|
|||
secado deseado. Se han previsto dos posibilidades: |
tela |
|
máx. |
|
|
|
|||
|
|
(kg) |
Ropero |
Seque y |
Planchado |
||||
A - En base al tiempo: De 40 a 180 minutos. |
|
|
|
|
cuelgue |
|
|||
|
|
|
|
|
|
||||
B - En base al nivel de humedad de las prendas secadas: |
Algodón, |
Ropa de distintas |
5 |
180 |
170 |
140 |
|||
Lino |
dimensiones |
||||||||
Planchado |
: prendas ligera-mente húmedas, fáciles de |
|
|
|
|
||||
|
|
|
|
|
|
||||
planchar. |
|
|
Algodón |
Toallas |
5 |
180 |
170 |
140 |
|
Seque y cuelgue |
: prendas secas, listas para guardar. |
|
|
|
|
|
|
||
Terilene, |
Sábanas, Camisas |
2,5 |
140 |
120 |
100 |
||||
Ropero |
: prendas muy secas, aconsejado para toallas y |
Algodón |
|
||||||
|
|
|
|
|
|||||
batas. |
|
|
|
|
|
|
|
|
|
|
|
Acrílicos |
Pijamas, |
1 |
70 |
65 |
60 |
||
|
|
|
|||||||
Al finalizar el secado continúa un período de enfriamiento. |
|
calcetines, etc. |
|||||||
|
|
|
|
|
|||||
|
|
|
|
|
|
||||
|
|
|
Nylon |
Combinaciones, |
1 |
70 |
65 |
60 |
|
Si excepcionalmente la carga de ropa para lavar y secar es |
|
medias, etc. |
|||||||
|
|
|
|
|
|||||
|
|
|
|
|
|
||||
superior al máximo previsto (ver la tabla ubicada al costado), realice el lavado, y una vez finalizado el programa, divida la carga y vuelva a colocar una parte en el cesto. A partir de ese momento, siga las instrucciones para efectuar sólo el secado. Repita las mismas operaciones para la carga restante.
Sólo secado
Gire el mando de PROGRAMAS hasta una de las posiciones de secado (7-8) de acuerdo al tipo de tejido, luego seleccione el tipo de secado deseado con el mando de SECADO.
Importante: - Durante el secado se efectuará un centrifugado si Ud. ha seleccionado uno de los programas de algodón y uno de los niveles de secado (Ropero  , Seque y cuelgue
  , Planchado
  ).
).
- Para cargas de telas de algodón inferiores a 1 Kg, utilice el programa de secado correspondiente a los tejidos delicados.
Funciones
Las distintas funciones de lavado previstas por la lavasecadora permiten obtener la limpieza y el blanco deseados. Para activar las funciones:
1.pulse el botón correspondiente a la función deseada de acuerdo con la tabla que se encuentra debajo;
2.el encendido del botón correspondiente indica que la función está activa.
Nota: El centelleo rápido del botón indica que la función correspondiente no se puede seleccionar para el programa elegido.
|
|
|
|
|
|
|
Activa con |
|
Funciones |
Efecto |
Notas para el uso |
|
los |
|
|||
|
|
|
|
|
|
|
programas: |
|
|
|
|
|
|
|
|
||
|
|
|
Retrasa la puesta |
Pulse varias veces el botón hasta encender la luz testigo |
|
|
||
|
|
|
correspondiente al retraso deseado. |
|
|
|||
|
|
|
en marcha de la |
|
|
|||
|
|
|
La quinta vez que se presione el botón, la función se desactivará. |
Todos |
|
|||
|
|
|
máquina hasta 9 |
|
||||
|
|
|
Nota: Una vez pulsado el botón Start/Reset, se puede modificar el |
|
|
|||
|
|
|
horas. |
|
|
|||
Delay timer |
valor del retraso sólo disminuyéndolo. |
|
|
|||||
|
|
|
||||||
|
|
|
|
|
|
|
||
|
|
|
|
Seleccionando esta función, los programas 4, 6 se interrumpirán |
|
|
||
|
|
|
|
con la ropa en remojo (Antiarrugas) y la luz indicadora de la fase |
|
|
||
|
|
|
Reduce las |
de Aclarado |
centelleará: |
|
|
|
|
|
|
arrugas en los |
- para completar el ciclo pulse el botón START/RESET; |
3, 4, 6, |
|
||
|
|
|
|
|||||
|
|
|
tejidos, |
- para efectuar sólo la descarga coloque la perilla en el símbolo |
9, 10, |
|
||
|
|
|
facilitando el |
correspondiente |
y pulse el botón START/RESET. |
Aclarado. |
|
|
Plancha |
planchado. |
Si desea realizar también el secado, este botón funciona sólo |
|
|
||||
|
|
|
||||||
fácil |
|
conjuntamente con el nivel |
(Planchado). |
|
|
|||
|
|
|
|
|
|
|
|
|
|
|
|
Aumenta la |
Es aconsejable con la lavadora a plena carga o con dosis elevadas |
1, 2, 3, 4, 9, |
|
||
Aclarado |
eficacia del |
10, 12, 13 |
|
|||||
de detergente. |
|
|
|
|||||
Extra |
aclarado. |
|
|
Aclarado. |
|
|||
|
|
|
|
|||||
|
|
|
|
|
|
|
|
|
|
|
|
Disminuye la |
|
|
|
Todos |
|
|
|
|
|
|
|
excepto el |
|
|
|
|
|
velocidad de |
|
|
|
|
|
|
|
|
|
|
|
6, 7, 8 y la |
|
|
|
|
|
centrifugado. |
|
|
|
|
|
1000-500 |
|
|
|
descarga. |
|
|||
|
|
|
|
|
||||
|
|
|
|
|
|
|
|
|
|
|
|
|
|
|
|
|
|
19
Detergentes y ropa
Cajón de detergentes
ES
El buen resultado del lavado depende también de la correcta dosificación del detergente: si se excede la cantidad, no se lava de manera más eficaz, sino que se contribuye a encostrar las partes internas de la lavasecadora y a contaminar el ambiente.
|
3 |
1 |
2 |
Extraiga el cajón de detergentes e introduzca el detergente o el aditivo de la siguiente manera:
cubeta 1: Detergente para prelavado (en polvo) cubeta 2: Detergente para lavado
(en polvo o líquido)
El detergente líquido se debe verter sólo antes de la puesta en marcha.
cubeta 3: Aditivos (suavizante, etc.)
El suavizante no se debe volcar fuera de la rejilla.
No use detergentes para el lavado a mano ya que producen demasiada espuma.
Preparar la ropa
•Subdivida la ropa según:
-el tipo de tejido / el símbolo en la etiqueta.
-los colores: separe las prendas de color y las blancas.
•Vacíe los bolsillos y controle los botones.
•No supere los valores indicados, referidos al peso de la ropa seca:
Tejidos resistentes: max 6 kg. Tejidos sintéticos: max 2,5 kg. Tejidos delicados: max 2 kg.
Lana: max 1,5 kg.
¿Cuánto pesa la ropa?
1 sábana 400/500 g
1 funda 150/200 g
1 mantel 400/500 g
1 albornoz 900/1.200 g
1 toalla 150/250 g
Prendas especiales
Cortinas: pliéguelas y colóquelas dentro de una funda o de una bolsa de red. Lávelas solas sin superar la media carga. Utilice el programa 6 que excluye automáticamente el centrifugado.
Cazadoras acolchadas con plumas y anoraks: si el relleno es de pluma de ganso o de pato, se pueden lavar en la lavasecadora. Poner las prendas del revés y realizar una carga máxima de 2-3 kg. repitiendo el enjuague una o dos veces y utilizando el centrifugado delicado.
Lana: para obtener los mejores resultados, utilice un detergente específico y no supere 1,5 kg. de carga.
20
Precauciones y consejos
La Lavasecadora fue proyectada y fabricada en conformidad con las normas internacionales de seguridad. Estas advertencias se suministran por razones de seguridad y deben ser leídas atentamente.
Seguridad general
•Este aparato fue fabricado para uso doméstico.
•La Lavasecadora debe ser utilizada sólo por personas adultas y siguiendo las instrucciones contenidas en este manual.
•No toque la máquina con los pies desnudos ni con las manos o los pies mojados o húmedos.
•No desenchufe la máquina tirando del cable, sino tomando el enchufe.
•No abra el contenedor de detergentes mientras la máquina está en funcionamiento.
•No toque el agua de desagüe ya que puede alcanzar temperaturas elevadas.
•En ningún caso fuerce la puerta: podría dañarse el mecanismo de seguridad que la protege de aperturas accidentales.
•En caso de avería, no acceda nunca a los mecanismos internos para intentar una reparación.
•Controle siempre que los niños no se acerquen a la máquina cuando está en funcionamiento.
•Durante el lavado, la puerta tiende a calentarse.
•Si debe ser trasladada, deberán intervenir dos o más personas, procediendo con el máximo cuidado. La máquina no debe ser desplazada nunca por una persona sola ya que es muy pesada.
•Antes de introducir la ropa controle que el cesto esté vacío.
•Durante el secado la puerta tiende a calentarse.
•No seque ropa lavada con solventes inflamables (por ej. tricloroetileno).
•No seque gomaespuma o elastómeros análogos.
•Verifique que, durante las fases de secado, el grifo de agua esté abierto.
•Esta lavasecadora se puede utilizar solamente para secar ropa prelavada con agua.
Eliminaciones
•Eliminación del material de embalaje:
respete las normas locales, de ese modo, los embalajes podrán volver a ser utilizados.
•En base a la Norma europea 2002/96/CE de Residuos de aparatos Eléctricos y Electrónicos, los electrodomésticos viejos no pueden ser arrojados en los contenedores municipales habituales; tienen que ser recogidos selectivamente para optimizar la recuperación y reciclado de los
componentes y materiales que los constituyen, y reducir el impacto en la salud humana y el ES medioambiente. El símbolo del cubo de basura
tachado se marca sobre todos los productos para recordar al consumidor la obligación de separarlos para la recogida selectiva.
El consumidor debe contactar con la autoridad local o con el vendedor para informarse en relación a la correcta eleminación de su electrodoméstico viejo.
Ahorrar y respetar el medio ambiente
Tecnología a servicio del medio ambiente
Si en la puerta se ve poca agua es porque con la nueva tecnología Indesit basta menos de la mitad del agua para alcanzar la mayor limpieza: un objetivo alcanzado para respetar el medio ambiente.
Ahorrar detergente, agua, energía y tiempo
•Para no derrochar recursos es necesario utilizar la Lavasecadora con la máxima carga. Una carga completa en lugar de dos medias cargas permite ahorrar hasta el 50% de energía.
•El prelavado es necesario sólo para ropa muy sucia. Evitarlo permite ahorrar detergente, tiempo, agua y entre el 5 y el 15% de energía.
•Tratar las manchas con un quitamanchas o dejarlas en remojo antes del lavado, disminuye la necesidad de lavar a altas temperaturas. Un programa a 60ºC en vez de 90ºC o uno a 40ºC en vez de 60ºC, permite ahorrar hasta un 50% de energía.
•Dosificar bien el detergente en base a la dureza del agua, al grado de suciedad y a la cantidad de ropa evita derroches y protege el ambiente: aún siendo biodegradables, los detergentes contienen elementos que alteran el equilibrio de la naturaleza. Además, si es posible, evite utilizar el suavizante.
•Realizando los lavados desde el atardecer hasta las primeras horas de la mañana se colabora para reducir la carga de absorción de las empresas eléctricas.
La opción Delay Timer (ver la pág. 19) ayuda mucho a organizar los lavados en ese sentido.
•Si el lavado debe ser secado en una secadora, seleccione una velocidad de centrifugado alta. Poca agua en el lavado, permite ahorrar tiempo y energía en el programa de secado.
21
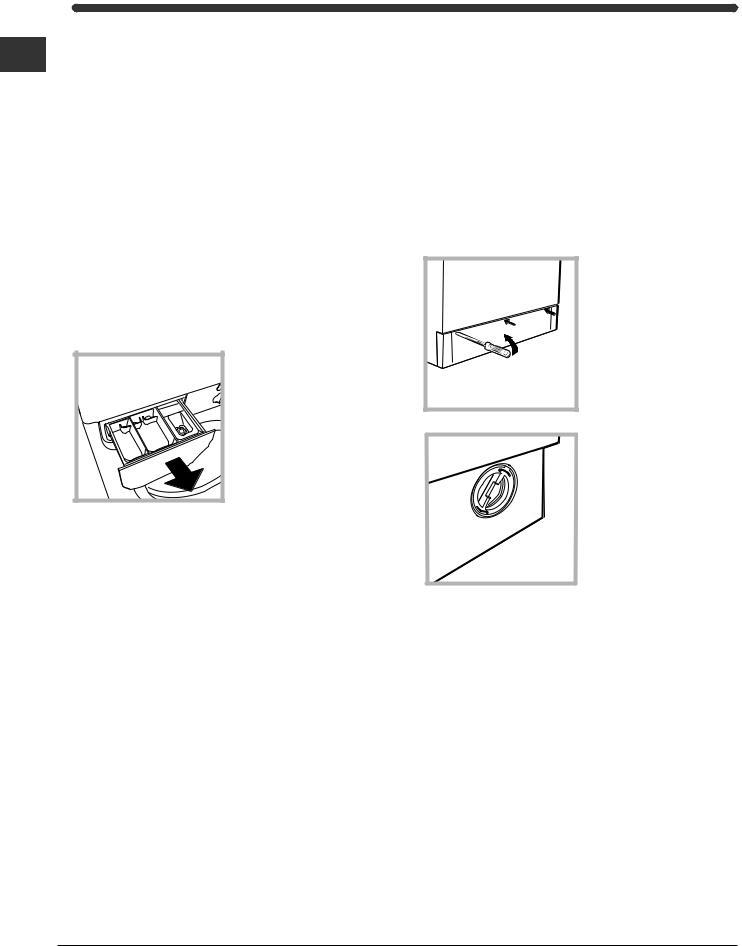
Mantenimiento y cuidados
Excluir agua y corriente eléctrica
ES
•Cierre el grifo de agua después de cada lavado. De este modo se limita el desgaste de la instalación hidráulica de la lavasecadora y se elimina el peligro de pérdidas.
•Desenchufe la máquina cuando la deba limpiar y durante los trabajos de mantenimiento.
Limpiar la lavasecadora
La parte externa y las partes de goma se pueden limpiar con un paño embebido en agua tibia y jabón. No use solventes ni productos abrasivos.
Limpiar el cajón de los detergentes
Extraiga el contenedor tirando hacia fuera (ver
la figura).
Lávelo debajo del agua corriente, esta limpieza se debe realizar frecuentemente.
Cuidar la puerta y el cesto
•Deje siempre semicerrada la puerta para evitar que se formen malos olores.
Limpiar la bomba
La lavasecadora posee una bomba autolimpiante que no necesita mantenimiento. Pero puede suceder que objetos pequeños (monedas, botones) caigan en la precámara que protege la bomba, situada en la parte inferior de la misma.
Verifique que el ciclo de lavado haya terminado y desenchufe la máquina.
Para acceder a la precámara:
1. quite el panel de cobertura delantero de la lavasecadora con la ayuda de un destornilla-
dor (ver la figura);
2. desenrosque la tapa girándola en sentido antihorario (ver la figura); es normal que se vuelque un poco de agua;
3.limpie con cuidado el interior;
4.vuelva a enroscar la tapa;
5.vuelva a montar el panel verificando, antes de empujarlo hacia la máquina, que los ganchos se hayan introducido en las correspondientes ranuras.
Controle el tubo de alimentación de agua
Controle el tubo de alimentación al menos una vez al año. Si presenta grietas o rozaduras se debe sustituir: durante los lavados, las fuertes presiones podrían provocar roturas imprevistas.
No utilice nunca tubos ya usados.
22
 Loading...