


Instructions for use
WASHER-DRYER
Contents
GB
|
|
|
|
|
|
Installation, 2-3 |
|
|
|
|
|
|
|
GB |
|
ES |
|
BG |
|
Unpacking and levelling |
|
|
|
Connecting the electricity and water supplies |
|||
|
|
|
|
|
|
|
English,1 |
Español,13 |
Български,25 |
The first wash cycle |
|||
|
||||||
Technical data
PT
Português,37
Description of the Washer-dryer, 4-5
Control panel Display
How to run a wash cycle or a drying cycle, 6
Wash cycles and options, 7
Table of wash cycles Wash options
IWDE 7125 S
Detergents and laundry, 8
Detergent dispenser drawer Preparing the laundry Special wash cycles
Load balancing system
Precautions and tips, 9
General safety Disposal
Opening the porthole door manually
Care and maintenance, 10
Cutting off the water or electricity supply Cleaning the Washer-dryer
Cleaning the detergent dispenser drawer Caring for the door and drum of your appliance Cleaning the pump
Checking the water inlet hose
Troubleshooting, 11
Service, 12
1
Installation
This instruction manual should be kept in a safe GB place for future reference. If the Washer-dryer is sold,
transferred or moved, make sure that the instruction manual remains with the machine so that the new owner is able to familiarise himself/herself with its operation and features.
Read these instructions carefully: they contain vital information relating to the safe installation and operation of the appliance.
Unpacking and levelling
Unpacking
1.Remove the Washer-dryer from its packaging.
2.Make sure that the Washer-dryer has not been damaged during the transportation process. If it has been damaged, contact the retailer and do not proceed any further with the installation process.
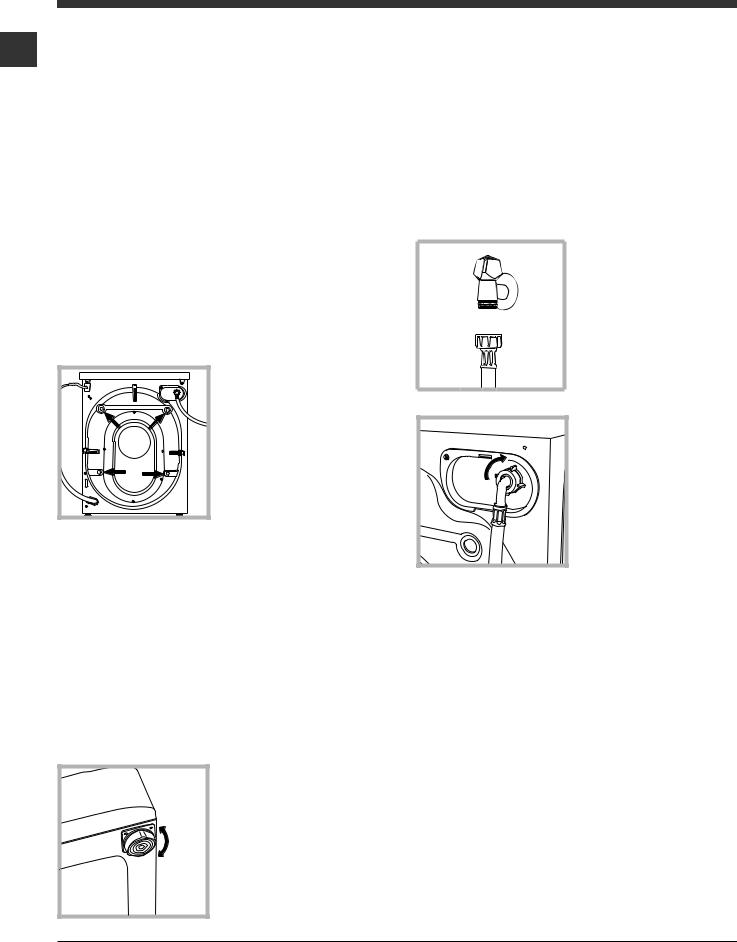
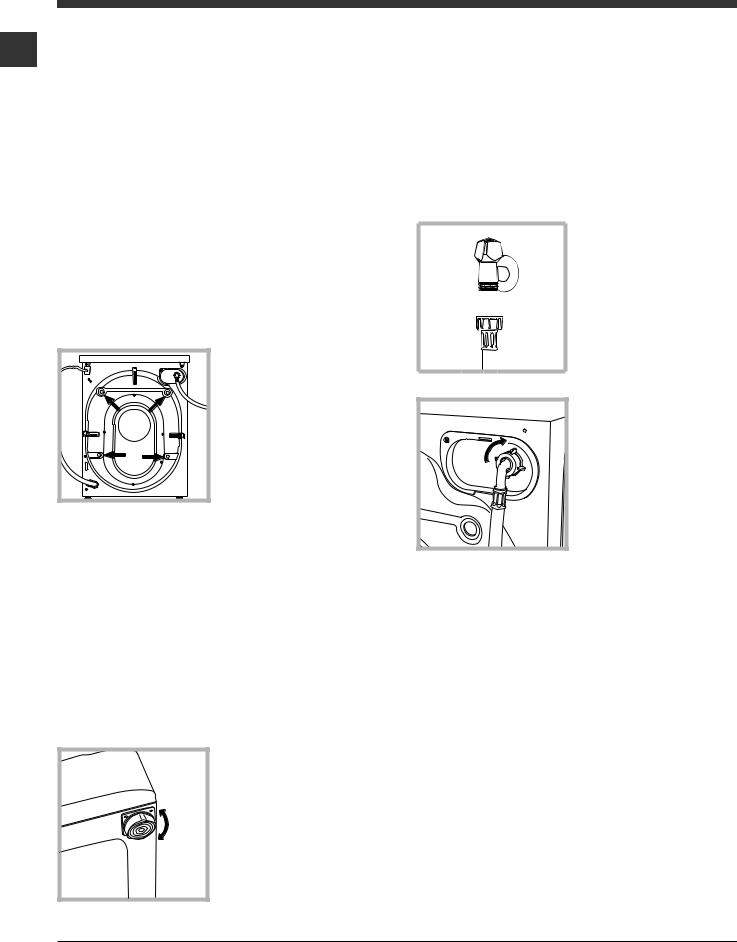
3. Remove the 4 protective screws (used during transportation) and the rubber washer with the corresponding spacer, located on the rear part of the appliance (see figure).
4.Close off the holes using the plastic plugs provided.
5.Keep all the parts in a safe place: you will need them again if the Washer-dryer needs to be moved to another location.
Packaging materials should not be used as toys for children.
Levelling
1. Install the Washer-dryer on a flat sturdy floor, without resting it up against walls, furniture cabinets or anything else.
2. If the floor is not perfectly level, compensate for any unevenness by tightening or loosening the adjustable front feet (see figure); the angle of inclination, measured in relation to the worktop, must not exceed 2°.
Levelling the machine correctly will provide it with stability, help to avoid vibrations and excessive noise and prevent it from shifting while it is operating. If it is placed on carpet or a rug, adjust the feet in such a way as to allow a sufficient ventilation space underneath the Washer-dryer.
Connecting the electricity and water supplies
Connecting the water inlet hose
1. Connect the supply pipe by screwing it to a cold water tab using a ¾ gas threaded connection
(see figure).
Before performing the connection, allow the water to run freely until it is perfectly clear.
2. Connect the inlet hose to the Washer-dryer by screwing it onto the corresponding water inlet of the appliance, which is situated on the top righthand side of the rear part of the appliance (see figure).
3. Make sure that the hose is not folded over or bent.
The water pressure at the tap must fall within the values indicated in the Technical details table (see next page).
If the inlet hose is not long enough, contact a specialised shop or an authorised technician.
Never use second-hand hoses.
Use the ones supplied with the machine.
2
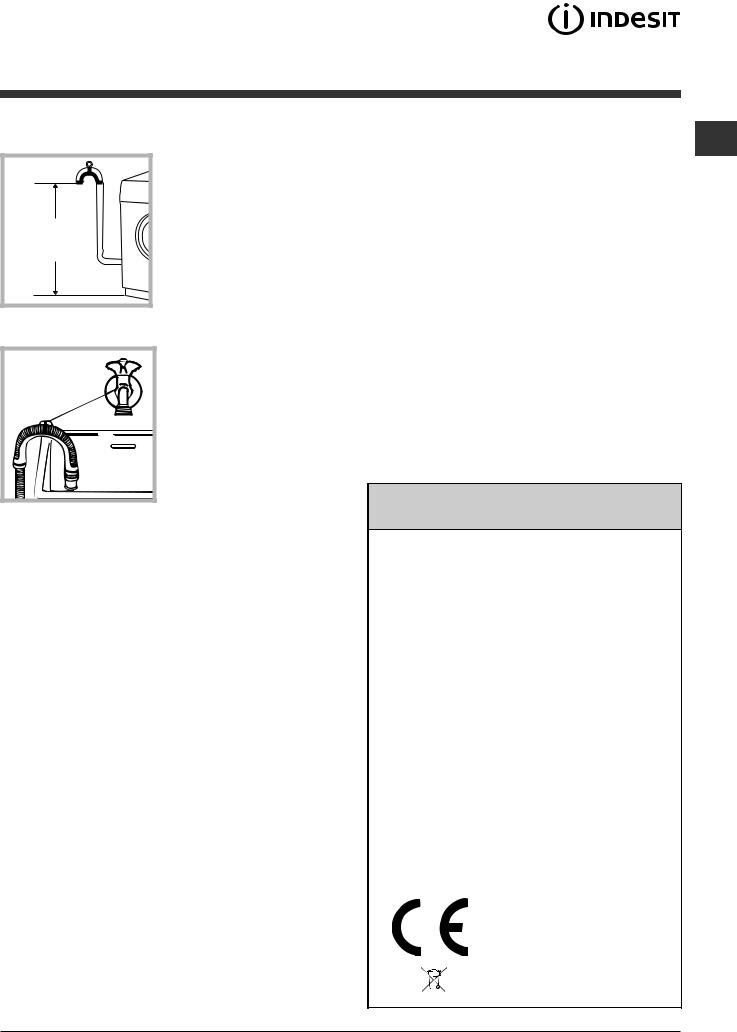
Connecting the drain hose
65 - 100 cm |
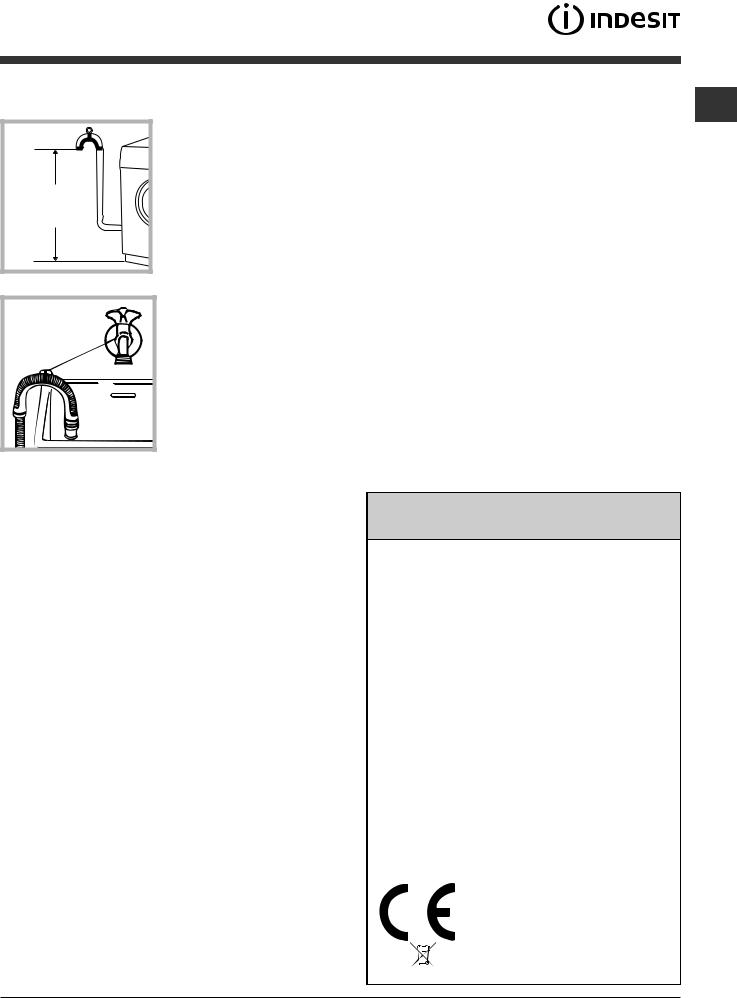
Connect the drain hose, without bending it, to a drainage duct or a wall drain located at a height between 65 and 100 cm from the floor;
alternatively, rest it on the side of a washbasin or bathtub, fastening the duct supplied to the tap (see figure). The free end of the hose should not be underwater.
We advise against the use of hose extensions; if it is absolutely necessary, the extension must have the same diameter as the original hose and must not exceed 150 cm in length.
Electrical connections
Before plugging the appliance into the electricity socket, make sure that:
•the socket is earthed and complies with all applicable laws;
•the socket is able to withstand the maximum power load of the appliance as indicated in the Technical data table (see opposite);
•the power supply voltage falls within the values indicated in the Technical data table (see opposite);
•the socket is compatible with the plug of the Washer-dryer. If this is not the case, replace the socket or the plug.
The Washer-dryer must not be installed outdoors, even in covered areas. It is extremely dangerous to leave the appliance exposed to rain, storms and other weather conditions.
When the Washer-dryer has been installed, the electricity socket must be within easy reach.
Do not use extension cords or multiple sockets.
GB
The cable should not be bent or compressed.
The power supply cable must only be replaced by authorised technicians.
Warning! The company shall not be held responsible in the event that these regulations are not respected.
The first wash cycle
Once the appliance has been installed, and before you use it for the first time, run a wash cycle with detergent and no laundry, using the wash cycle 2.
Technical data
Model |
IWDE 7125 S |
|||
|
|
|
|
|
|
|
|
width 59.5 cm |
|
Dimensions |
height 85 cm |
|||
|
|
|
depth 53,5 cm |
|
|
|
|
|
|
Capacity |
from 1 to 7 kg for the wash programme; |
|||
from 1 to 5 kg for the drying programme |
||||
|
|
|
||
|
|
|
|
|
Electrical |
please refer to the technical data plate |
|||
connections |
fixed to the machine |
|||
|
|
|
|
|
Water |
maximum pressure 1 MPa (10 bar) |
|||
minimum pressure 0.05 MPa (0.5 bar) |
||||
connections |
||||
drum capacity 52 litres |
||||
|
|
|
||
|
|
|
|
|
Spin speed |
up to 1200 rotations per minute |
|||
|
|
|
|
|
|
|
|
Wash: programme 2; temperature 60°C; |
|
Energy rated |
using a load of 7 kg. |
|||
|
|
|
||
programmes |
Drying: first drying cycle performed with |
|||
|
|
|
||
according to |
a 2 kg load, selecting drying level "A1" |
|||
regulation |
(IRON DRY); second drying cycle |
|||
EN 50229 |
performed with a 5 kg load, selecting |
|||
|
|
|
drying level "A4" (EXTRA DRY). |
|
|
|
|
|
|
|
|
|
This appliance conforms to the following |
|
|
|
|
EC Directives: |
|
|
|
|
- 89/336/EEC dated 03/05/89 |
|
|
|
|
(Electromagnetic Compatibility) and |
|
|
|
|
subsequent modifications |
|
|
|
|
- 2002/96/EC |
|
|
|
|
- 2006/95/EC (Low Voltage) |
|
|
|
|
||
|
|
|
||
3
Description of the Washer-dryer
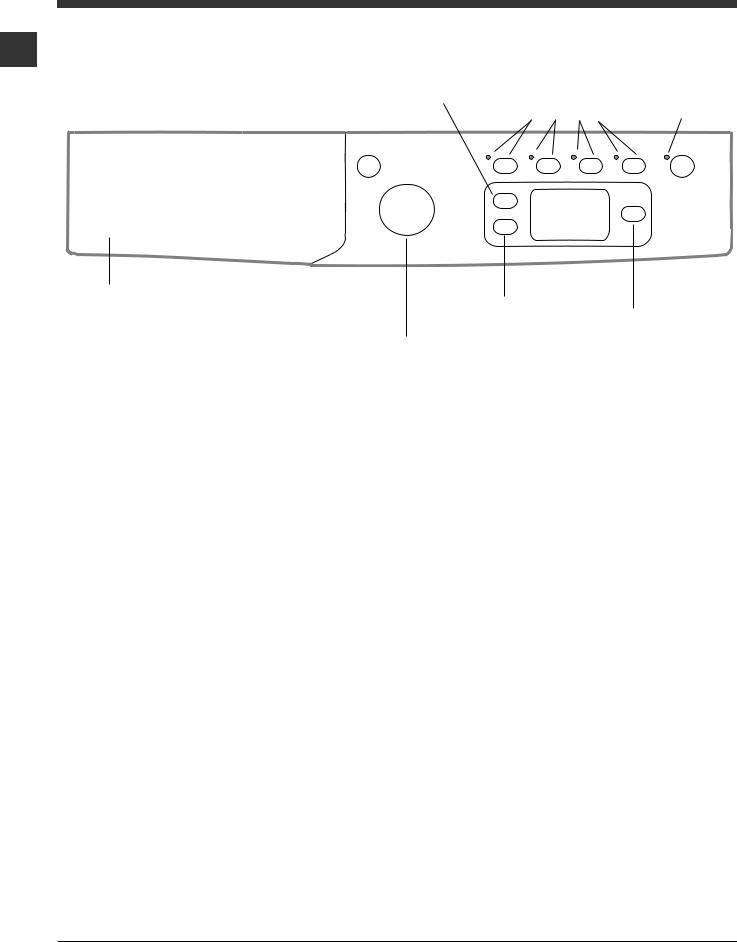
Control panel
GB
ON/OFF |
|
TEMPERATURE |
OPTION |
START/PAUSE |
|
|
|||||
|
buttons with |
||||
button |
|
Button |
button with indicator light |
||
|
indicator lights |
||||
|
|
|
|
|
|
|
|
|
|
|
|
DISPLAY
Detergent dispenser drawer
|
|
DRYING |
|
SPIN SPEED |
Button |
WASH CYCLE |
Button |
|
knob |
|
|
Detergent dispenser drawer: used to dispense detergents and washing additives (see “Detergents and laundry”).
ON/OFF button  : press this briefly to switch the machine on or off. The START/PAUSE indicator light, which flashes slowly in a green colour shows that the machine is switched on. To switch off the Washerdryer during the wash cycle, press and hold the button for approximately 2 seconds; if the button is pressed briefly or accidentally the machine will not switch off. If the machine is switched off during a wash cycle, this wash cycle will be cancelled.
WASH CYCLE knob: used to set the desired wash cycle (see "Table of wash cycles").
OPTION buttons with indicator light: used to select the available options. The indicator light corresponding to the selected option will remain lit.
SPIN button  : press to reduce or completely exclude the spin cycle - the value is indicated on the display.
TEMPERATURE button  : press to decrease or completely exclude the temperature: the value will be shown on the display.
DRYING button  : press to decrease or exclude drying; the selected drying level or time will appear on the display (see "How to run a wash cycle or a drying cycle").
START/PAUSE button  with indicator light: when the green indicator light flashes slowly, press the button to start a wash cycle. Once the cycle has begun the indicator light will remain lit in a fixed manner. To pause the wash cycle, press the button again; the indicator light will flash in an orange colour. If the symbol
  is not illuminated, the door may be opened. To start the wash cycle from the point at which it was interrupted, press the button again.
Standby mode
This washing machine, in compliance with new energy saving regulations, is fitted with an automatic standby system which is enabled after a few minutes if no activity is detected. Press the ON-OFF button briefly and wait for the machine to start up again.
4
Display
GB
B
A C
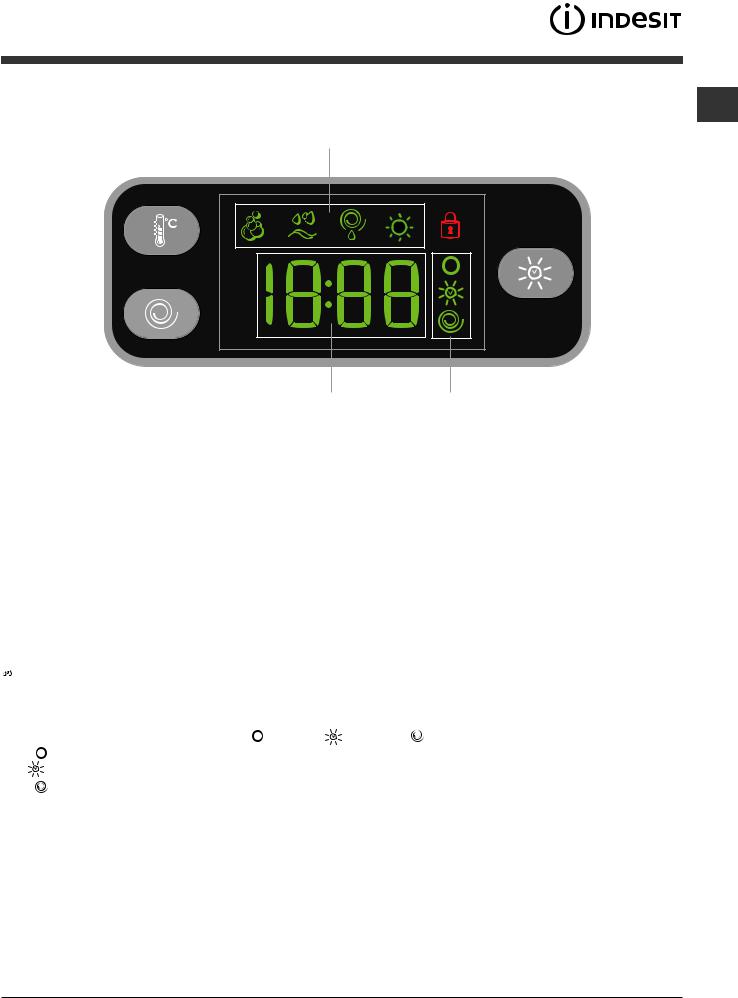
The display is useful when programming the machine and provides a great deal of information.
The duration of the available programmes and the remaining time of a running cycle appear in section A; if the DELAY START option has been set, the countdown to the start of the selected programme will appear. Furthermore, pressing the corresponding button allows you to view the maximum temperature, spin speed and drying level or time values attained by the machine during the selected cycle.
The phases scheduled for the selected cycle and, once the cycle has begun, the current phase of the wash cycle (and drying cycle, if applicable) appear in section B.
 Wash
Wash
 Rinse
Rinse
 Spin / Drain
  Drying
The icons corresponding to "temperature" , "Drying" |
and "spin" |
appear in section C from top to bottom: |
|
If the |
symbol lights up, the display will visualise the set "temperature" value. |
||
The |
symbol lights up while the drying settings are being adjusted. |
|
|
If the |
symbol lights up, the display will visualise the set "spin" value. |
|
|
Door locked symbol 
The lit symbol indicates that the door is locked. To prevent any damage, wait until the symbol turns off before opening the door.
To open the door while a cycle is in progress, press the START/PAUSE button; if the DOOR LOCKED  symbol is switched off the door may be opened.
5

How to run a wash cycle or a drying cycle
GB |
1. SWITCH THE MACHINE ON. Press the |
|
|
|
|||
button; the START/PAUSE indicator light will flash |
|||
slowly in a green colour.
2.LOAD THE LAUNDRY. Open the porthole door. Load the laundry, making sure you do not exceed the maximum load value indicated in the table of programmes on the following page.
3.MEASURE OUT THE DETERGENT. Pull out the detergent dispenser drawer and pour the detergent into the relevant compartments as described in
"Detergents and laundry".
4.CLOSE THE DOOR.
5.SELECT THE WASH CYCLE. Set the WASH CYCLE knob to the desired programme; a temperature and spin speed is set for each wash cycle; these may be adjusted. The duration of the cycle will appear on the display.
6.CUSTOMISE THE WASH CYCLE. Use the relevant buttons:
 Modifying the temperature and/or spin speed. The machine automatically displays the maximum temperature and spin speed values set for the selected cycle, or the most recently-used settings if they are compatible with the selected cycle. The temperature can be decreased by pressing the button, until the cold wash "OFF" setting is reached. The spin speed may be progressively reduced by pressing the
  button, until it is completely excluded (the "OFF" setting). If these buttons are pressed again, the maximum values are restored.
 Setting the drying cycle
The first time the button is pressed, the machine will automatically select the maximum drying cycle which is compatible with the selected wash cycle. Subsequent presses will decrease the drying level and then the drying time, until the cycle is excluded completely ("OFF").
Drying may be set as follows:
A- Based on the desired laundry dryness level: Iron dry: suitable for clothes which will need ironing afterwards. the remaining dampness softens creases, making them easier to remove; "A1" appears on the display.
Hanger dry: ideal for clothes which do not need to be dried fully; "A2" appears on the display. Cupboard dry: suitable for laundry which can be put back in a cupboard without being ironed; "A3" appears on the display.
Extra dry: suitable for garments which need to be dried completely, such as sponges and bathrobes; "A4" appears on the display.
B - Based on a set time period: between 30 and 180 minutes.
If your laundry load to be washed and dried is much greater than the maximum stated load (see adjacent table), perform the wash cycle, and when the cycle is complete, divide the garments into groups and put some of them back in the drum. At this point, follow the instructions provided for a "Drying only" cycle. Repeat this procedure for the remainder of the load.
N.B: a cooling-down period is always added to the end of each drying cycle.
Drying only
Use the cycle selector knob to select a drying cycle (11-12) in accordance with the type of fabric. The desired drying level or time may also be set using the DRYING button  .
.


 Modifying the cycle settings.
•Press the button to enable the option; the indicator light corresponding to the button will switch on.
•Press the button again to disable the option; the indicator light will switch off.
If the selected option is not compatible with the programmed wash cycle, the indicator light will flash and the option will not be activated.
If the selected option is not compatible with another option which has been selected previously, the indicator light corresponding to the first option selected will flash and only the second option will be activated; the indicator light corresponding to the enabled option will remain lit.
The options may affect the recommended load value and/or the duration of the cycle.
7.START THE PROGRAMME. Press the START/ PAUSE button. The corresponding indicator light will become green, remaining lit in a fixed manner, and
the door will be locked (the DOOR LOCKED symbol  will be on). To change a wash cycle while it is in progress, pause the Washer-dryer using the START/PAUSE button (the START/PAUSE indicator light will flash slowly in an orange colour); then select the desired cycle and press the START/ PAUSE button again. To open the door while a
cycle is in progress, press the START/PAUSE button; if the DOOR LOCKED  symbol is switched off the door may be opened. Press the START/ PAUSE button again to restart the wash cycle from the point at which it was interrupted.
8.THE END OF THE WASH CYCLE. This will be
indicated by the text "End" on the display; when the DOOR LOCKED  symbol switches off the door may be opened. Open the door, unload the laundry and switch off the machine.
If you wish to cancel a cycle which has already begun, press and hold the  button. The cycle will be stopped and the machine will switch off.
6
Wash cycles and options
Table of wash cycles
|
|
|
|
|
|
|
|
|
|
|
|
GB |
cycles |
|
Max. |
Max. |
|
Detergents |
Max. load (kg) |
Cycle |
|||||
|
|
|
||||||||||
|
|
|
|
|
|
|||||||
|
|
|
|
|
|
|
|
|
|
|
||
Wash |
Description of the wash cycle |
temp. |
speed |
Drying |
|
|
|
|
|
duration |
|
|
|
|
Fabric |
|
Eco |
|
|||||||
|
(°C) |
(rpm) |
|
Prewash |
Wash |
Normal |
|
|||||
|
|
|
|
softener |
Time |
|
|
|
||||
|
|
|
|
|
|
|
|
|
|
|
|
|
|
Daily |
|
|
|
|
|
|
|
|
|
|
|
1 |
Cotton with prewash: extremely soiled whites. |
90° |
1200 |
l |
l |
l |
l |
7 |
- |
|
|
|
2 |
Cotton: extremely soiled whites. |
90° |
1200 |
l |
- |
l |
l |
7 |
- |
|
|
|
2 |
Cotton (1): heavily soiled whites and resistant colours. |
60° |
1200 |
l |
- |
l |
l |
7 |
- |
|
The |
|
2 |
Cotton (2): heavily soiled whites and delicate colours. |
40° |
1200 |
l |
- |
l |
l |
7 |
- |
|
|
|
5 |
Synthetics: lightly soiled resistant colours. |
60° |
800 |
l |
- |
l |
l |
3 |
2 |
|
duration |
|
3 |
Cotton: heavily soiled whites and resistant colours. |
60° |
1200 |
l |
- |
l |
l |
7 |
3,5 |
|
|
|
4 |
Coloured Cottons (3): lightly soiled whites and delicate colours. |
40° |
1200 |
l |
- |
l |
l |
7 |
3,5 |
|
|
|
|
|
|
|
|
|
|
|
|
|
|
of |
|
|
Special |
|
|
|
|
|
|
|
|
|
|
|
|
|
|
|
|
|
|
|
|
|
the |
|
|
6 |
Wool: for wool, cashmere, etc. |
40° |
600 |
- |
- |
l |
l |
1,5 |
- |
on |
|
|
7 |
Silk/Curtains: for garments in silk and viscose, lingerie. |
30° |
0 |
- |
- |
l |
l |
1 |
- |
.displaythe |
cycleswash |
|
|
|
|
||||||||||
8 |
Jeans |
40° |
800 |
l |
- |
l |
l |
3 |
- |
|
|
|
9 |
Sport Light |
30° |
600 |
- |
- |
l |
l |
3 |
- |
|
|
|
10 |
Sport Shoes |
30° |
600 |
|
|
l |
l |
Max. 2 |
- |
|
|
|
- |
- |
pairs |
|
can |
|
|||||||
|
|
|
|
|
|
|
|
|
|
|
||
|
Drying |
|
|
|
|
|
|
|
|
|
|
|
11 |
Cotton dry |
- |
- |
l |
- |
- |
- |
5 |
- |
|
be |
|
12 |
Synthetics dry |
- |
- |
l |
- |
- |
- |
3 |
- |
|
checked |
|
|
|
|
||||||||||
13 |
Express Wash & Dry |
30° |
1200 |
l |
- |
l |
l |
0,5 |
- |
|
|
|
|
|
|
|
|
|
|
|
|
|
|
|
|
|
Partial wash cycles |
|
|
|
|
|
|
|
|
|
|
|
|
Rinse |
- |
1200 |
l |
- |
- |
l |
7 |
- |
|
|
|
|
Spin |
- |
1200 |
l |
- |
- |
- |
7 |
- |
|
|
|
|
Drain |
- |
0 |
- |
- |
- |
- |
7 |
- |
|
|
|
The information contained in the table is intended as a guide only.
For all Test Institutes:
1)Test wash cycle in compliance with regulation EN 50229: set wash cycle 2 with a temperature of 60°C.
2)Long wash cycle for cottons: set wash cycle 2 with a temperature of 40°C.
3)Short wash cycle for cottons: set wash cycle 4 with a temperature of 40°C.
Wash options
Selecting this option enables you to suitably adjust drum rotation, temperature and water to a reduced load of lightly soiled cotton and synthetic fabrics (refer to the "Table of wash cycles"). “


 ” enables you to wash in less time thereby saving water and electricity. We suggest using a liquid detergent suitably measured out to the load quantity.
This function may not be used in conjunction with cycles 1, 2, 6, 7, 8, 9, 10, 11, 12, 13,  ,
,  ,
,  .
.
 Easy iron
By selecting this function, the wash and spin cycles will be modified in order to reduce the formation of creases. At the end of the cycle the Washer-dryer will perform slow rotations of the drum; the indicator lights for the EASY IRON and START/PAUSE options will flash (the first one green, the second orange).
To end the cycle, press the START/PAUSE button or the EASY IRON button.
For the 7 wash cycle, the machine will end the cycle while the laundry is soaking and the EASY IRON and START/PAUSE indicator lights will flash.
To drain the water so that the laundry may be removed, press the START/PAUSE button or the EASY IRON button.
This function may not be used in conjunction with cycles 6, 9, 10, 11, 12, 13,  ,
,  .
.
Note: If you also want to run the drying cycle, this option is enabled only if combined with level “A1” (Iron dry).
 Extra rinse
By selecting this option, the efficiency of the rinse is increased and optimal detergent removal is guaranteed. It is particularly useful for sensitive skin.
This function may not be used in conjunction with cycles 11,12, 13,  ,
,  .
.
 Delay start
To set a delayed start for the selected cycle, press the corresponding button repeatedly until the required delay period has been reached. When this option is enabled, the corresponding indicator light will remain lit. To remove the delayed start setting, press the button until the text "OFF" appears on the display.
This option can be used in conjunction with all cycles.
7
Detergents and laundry
Detergent dispenser drawer
GB
Good washing results also depend on the correct dose of detergent: adding too much detergent will not necessarily result in a more efficient wash, and may in fact cause build up on the inside of your appliance and contribute to environmental pollution.
Do not use hand washing detergents because these create too much foam.
|
3 |
1 |
2 |
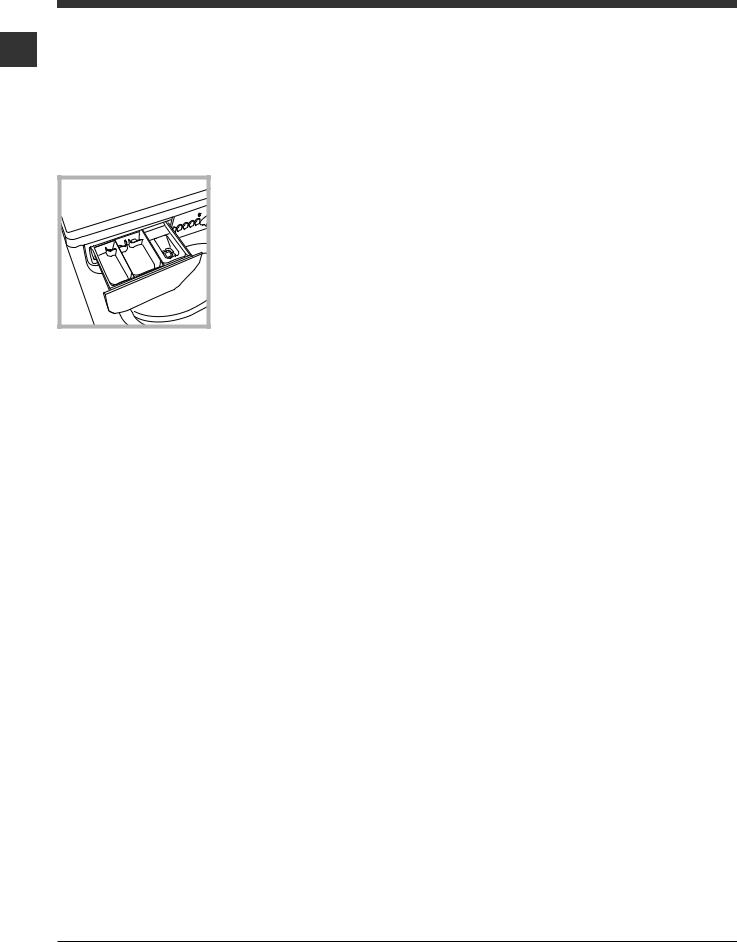
Open the detergent dispenser drawer and pour in the detergent or washing additive, as follows.
compartment 1: Pre-wash detergent (powder) compartment 2: Detergent for the wash cycle (powder or liquid)
Liquid detergent should only be poured in immediately prior to the start of the wash cycle.
compartment 3: Additives (fabric softeners, etc.)
The fabric softener should not overflow the grid.
Preparing the laundry
•Divide the laundry according to:
-the type of fabric/the symbol on the label
-the colours: separate coloured garments from whites.
•Empty all garment pockets and check the buttons.
•Do not exceed the listed values, which refer to the weight of the laundry when dry:
Durable fabrics: max. 7 kg Synthetic fabrics: max. 3 kg Delicate fabrics: max. 2 kg Wool: max. 1,5 kg
Silk: max. 1 kg
How much does your laundry weigh?
1sheet 400-500 g
1pillow case 150-200 g
1tablecloth 400-500 g
1bathrobe 900-1200 g
1towel 150-250 g
Special wash cycles
Wool: all wool garments can be washed using programme 6, even those carrying the "hand-wash only"  label. For best results, use special detergents and do not exceed 1,5 kg of laundry. Silk: use special wash cycle 7 to wash all silk garments. We recommend the use of special detergent which has been designed to wash delicate clothes.
Curtains: fold curtains and place them in a pillow case or mesh bag. Use wash cycle 7.
Jeans: Turn garments inside-out before washing and use a liquid detergent. Use programme 8.
Sport Light (wash cycle 9): is for washing lightly soiled sports clothing fabrics (tracksuits, shorts, etc.); for best results, we recommend not exceeding the maximum load indicated in the "Table of wash cycles". We recommend using a liquid detergent and dosage suitable for a half-load.
Sport Shoes (wash cycle 10): is for washing sports shoes; for best results, do not wash more than 2 pairs simultaneously.
Express Wash & Dry (wash cycle 13) was designed to wash and dry lightly soiled garments quickly. This cycle may be used to wash and dry a laundry load of up to 0.5 kg in just 35 minutes.
To achieve optimum results, use liquid detergent and pre-treat cuffs, collars and stains.
Load balancing system
Before every spin cycle, to avoid excessive vibrations and to distribute the load in a uniform manner, the drum rotates continuously at a speed which is slightly greater than the washing rotation speed. If, after several attempts, the load is not balanced correctly, the machine spins at a reduced spin speed. If the load is excessively unbalanced, the Washer-dryer performs the distribution process instead of spinning. To encourage improved load distribution and balance, we recommend small and large garments are mixed in the load.
8

Precautions and tips
This Washer-dryer was designed and constructed in accordance with international safety regulations. The following information is provided for safety reasons and must therefore be read carefully.
General safety
•This appliance was designed for domestic use only.
•The Washer-dryer must only be used by adults, in accordance with the instructions provided in this manual.
•Do not touch the machine when barefoot or with wet or damp hands or feet.
•Do not pull on the power supply cable when unplugging the appliance from the electricity socket. Hold the plug and pull.
•Do not open the detergent dispenser drawer while the machine is in operation.
•Do not touch the drained water as it may reach extremely high temperatures.
•Never force the porthole door. This could damage the safety lock mechanism designed to prevent accidental opening.
•If the appliance breaks down, do not under any circumstances access the internal mechanisms in an attempt to repair it yourself.
•Always keep children well away from the appliance while it is operating.
•The door can become quite hot during the wash cycle.
•If the appliance has to be moved, work in a group of two or three people and handle it with the utmost care. Never try to do this alone, because the appliance is very heavy.
•Before loading laundry into the Washer-dryer, make sure the drum is empty.
•During the drying phase, the door tends to get quite hot.
•Do not use the appliance to dry clothes that have been washed with flammable solvents (e.g. trichlorethylene).
•Do not use the appliance to dry foam rubber or similar elastomers.
•Make sure that the water tap is turned on during the drying cycles.
Disposal
•Disposing of the packaging materials: observe local regulations so that the packaging may be re-used.
•The European Directive 2002/96/EC on Waste Electrical and Electronic Equipment, requires that old household electrical appliances must not be disposed of in the normal unsorted municipal waste stream. Old appliances must be collected
separately in order to optimise the recovery and
recycling of the materials they contain and reduce GB the impact on human health and the environment.
The crossed out "wheeled bin" symbol on the product reminds you of your obligation, that when you dispose of the appliance it must be separately collected.
Consumers should contact their local authority or retailer for information concerning the correct disposal of their old appliance.
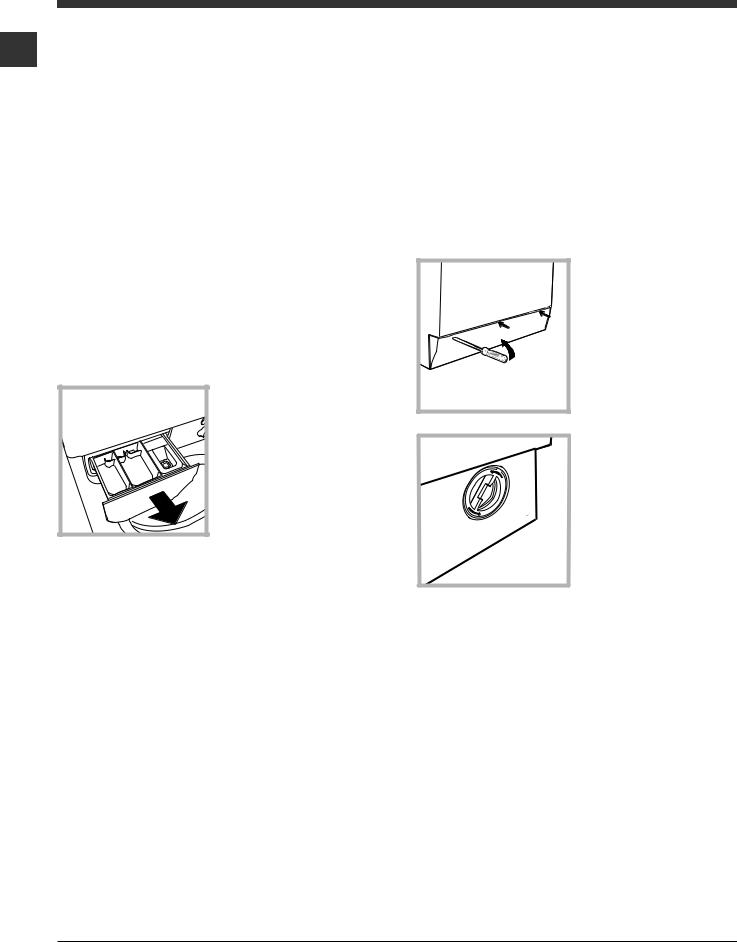
Opening the porthole door manually
In the event that it is not possible to open the porthole door due to a powercut, and if you wish to remove the laundry, proceed as follows:
1. remove the plug from the electrical socket.
2. make sure the water
level inside the machine is
 lower than the door 20
 opening; if it is not, remove
excess water using the drain hose, collecting it in a
bucket as indicated in the figure.
3. using a screwdriver, remove the cover panel on the lower front part of the Washer-dryer (see figure).
4. pull outwards using the tab as indicated in the figure, until the plastic tie-rod is freed from its stop
position; pull downwards and open the door at the same time.
5. reposition the panel, making sure the hooks are securely in place before you push it onto the appliance.
9
Care and maintenance
Cutting off the water and electricity GB supplies
•Turn off the water tap after every wash cycle. This will limit wear on the hydraulic system inside the Washer-dryer and help to prevent leaks.
•Unplug the Washer-dryer when cleaning it and during all maintenance work.
Cleaning the Washer-dryer
The outer parts and rubber components of the appliance can be cleaned using a soft cloth soaked in lukewarm soapy water. Do not use solvents or abrasives.
Cleaning the detergent dispenser drawer
Remove the dispenser by raising it and pulling it out (see figure).
Wash it under running water; this operation should be repeated frequently.
Caring for the door and drum of your appliance
•Always leave the porthole door ajar in order to prevent unpleasant odours from forming.
Cleaning the pump
The Washer-dryer is fitted with a self-cleaning pump which does not require any maintenance. Sometimes, small items (such as coins or buttons) may fall into the pre-chamber which protects the pump, situated in its bottom part.
Make sure the wash cycle has finished and unplug the appliance.
To access the pre-chamber:
1. using a screwdriver, remove the cover panel on the lower front part of the Washer-dryer (see figure);
2. unscrew the lid by rotating it anti-clockwise (see figure): a little water may trickle out. This is perfectly normal;
3.clean the inside thoroughly;
4.screw the lid back on;
5.reposition the panel, making sure the hooks are securely in place before you push it onto the appliance.
Checking the water inlet hose
Check the inlet hose at least once a year. If there are any cracks, it should be replaced immediately: during the wash cycles, water pressure is very strong and a cracked hose could easily split open.
Never use second-hand hoses.
10
Troubleshooting
Your Washer-dryer could fail to work. Before contacting the Technical Assistance Centre (see “Assistance”), make
sure that the problem cannot be not solved easily using the following list. |
GB |
|
Problem:
The Washer-dryer does not switch on.
The wash cycle does not start.
The Washer-dryer does not take in water ("H2O" will flash on the display).
The Washer-dryer continuously takes in and
drains water.
The Washer-dryer does not drain or spin.
Possible causes / Solutions:
•The appliance is not plugged into the socket fully, or is not making contact.
•There is no power in the house.
•The Washer-dryer door is not closed properly.
•The ON/OFF button has not been pressed.
•The START/PAUSE button has not been pressed.
•The water tap has not been opened.
•A delayed start has been set.
•The water inlet hose is not connected to the tap.
•The hose is bent.
•The water tap has not been opened.
•There is no water supply in the house.
•The pressure is too low.
•The START/PAUSE button has not been pressed.
•The drain hose is not fitted at a height between 65 and 100 cm from the floor (see “Installation”).
•The free end of the hose is under water (see “Installation”).
•The wall drainage system is not fitted with a breather pipe.
If the problem persists even after these checks, turn off the water tap, switch the appliance off and contact the Assistance Service. If the dwelling is on one of the upper floors of a building, there may be problems relating to water drainage, causing the Washer-dryer to fill with water and drain continuously. Special anti-draining valves are available in shops and help to avoid this inconvenience.
•The wash cycle does not include draining: some wash cycles require the drain phase to be started manually.
•The “Easy iron” option has been activated: To complete the wash cycle, press the START/PAUSE button (see “Wash cycles and options”).
•The drain hose is bent (see “Installation”).
•The drainage duct is clogged.
The Washer-dryer vibrates a lot during the spin cycle.
•The drum was not unlocked correctly during installation (see “Installation”).
•The Washer-dryer is not level (see “Installation”).
•The Washer-dryer is trapped between cabinets and walls (see “Installation”).
The Washer-dryer leaks.
•The water inlet hose is not screwed on properly (see “Installation”).
•The detergent dispenser drawer is blocked (for cleaning instructions, see “Care and maintenance”).
•The drain hose is not fixed properly (see “Installation”).
The "option" indicator lights and the "start/pause" indicator light flash and an error code appears on the display (e.g.: F-01, F-..).
•Switch off the machine and unplug it, wait for approximately 1 minute and then switch it back on again.
If the problem persists, contact the Technical Assistance Service.
There is too much foam.
The washer-dryer does not dry.
•The detergent is not suitable for machine washing (it should display the text “for Washer-dryers” or “hand and machine wash”, or the like).
•Too much detergent was used.
•The appliance is not plugged into the socket, or not enough to make contact.
•There has been a power failure.
•The appliance door is not shut properly.
•A delayed start has been set.
•DRYING is in the OFF position.
11

Service
Before calling for Assistance:
GB |
• Check whether you can solve the problem alone (see “Troubleshooting”); |
|
|
|
• Restart the programme to check whether the problem has been solved; |
|
• If this is not the case, contact an authorised Technical Assistance Centre using the telephone number |
|
provided on the guarantee certificate. |
|
Always request the assistance of authorised technicians. |
Have the following information to hand:
•the type of problem;
•the appliance model (Mod.);
•the serial number (S/N).
This information can be found on the data plate applied to the rear of the Washer-dryer, and can also be found on the front of the appliance by opening the door.
12

Manual de instrucciones
LAVASECADORA
Sumario
ES
|
|
Instalación, 14-15 |
ES |
|
|
|
Desembalaje y nivelación |
|
|
|
Conexiones hidráulicas y eléctricas |
|
|
|
Español |
Primer ciclo de lavado |
|
|
|
Datos técnicos |
IWDE 7125 S
Descripción de la lavasecadora, 16-17
Panel de control Pantalla
Cómo efectuar un ciclo de lavado o de secado, 18
Programas y funciones, 19
Tabla de programas
Funciones de lavado
Detergentes y ropa, 20
Contenedor de detergentes
Preparar la ropa
Programas particulares
Sistema de equilibrado de la carga
Precauciones y consejos, 21
Seguridad general
Eliminaciones
Apertura manual de la puerta
Mantenimiento y cuidados, 22
Interrumpir el agua y la corriente eléctrica Limpiar la lavasecadora
Limpiar el contenedor de detergentes Cuidar la puerta y el cesto
Limpiar la bomba
Controlar el tubo de alimentación de agua
Anomalías y soluciones, 23
Asistencia, 24
13
Instalación
Es importante conservar este manual para poder ES consultarlo en cualquier momento. En caso de venta,
de cesión o de traslado, verifique que permanezca junto con la lavasecadora para informar al nuevo propietario sobre el funcionamiento y brindar las correspondientes advertencias.
Lea atentamente las instrucciones: ellas contienen importante información sobre la instalación, el uso y la seguridad.
Desembalaje y nivelación
Desembalaje
1.Desembale la lavasecadora.
2.Controle que la lavasecadora no haya sufrido daños durante el transporte. Si estuviera dañada no la conecte y llame al revendedor.
3. Quite los 4 tornillos de protección para el transporte y la arandela de goma con el correspondiente distanciador ubicados en la parte posterior (ver la
figura).
4.Cubra los orificios con los tapones de plástico suministrados con el aparato.
5.Conserve todas las piezas: cuando la lavasecadora deba ser transportada nuevamente, deberán volver a colocarse.
Los embalajes no son juguetes para los niños.
Nivelación
1. Instale la lavasecadora sobre un piso plano y rígido, sin apoyarla en las paredes, muebles ni en ningún otro aparato.
2. Si el piso no está perfectamente horizontal, compense las irregularidades desenroscando o enroscando las patas delanteras (ver la figura); el ángulo de inclinación medido sobre la superficie de trabajo, no debe superar los 2º.
Una cuidadosa nivelación brinda estabilidad a la máquina y evita vibraciones, ruidos y desplazamientos durante el funcionamiento. Cuando se instala sobre moquetas o alfombras, regule los pies para conservar debajo de la lavasecadora un espacio suficiente para la ventilación.
Conexiones hidráulicas y eléctricas
Conexión del tubo de alimentación de agua
1. Conectar el tubo de tubo enroscándolo a un grifo de agua fría con la boca roscada de 3/4 gas
(ver la figura).
Antes de conectarlo, haga correr el agua hasta que esté límpida.
2. Conecte el tubo de alimentación a la lavasecadora enroscándolo en la toma de agua correspondiente ubicada en la parte posterior derecha (arriba)
(ver la figura).
3. Controle que en el tubo no hayan pliegues ni estrangulaciones.
La presión de agua del grifo debe estar comprendida dentro de los valores contenidos en la tabla de Datos técnicos (ver la página
correspondiente).
Si la longitud del tubo de alimentación no es la suficiente, diríjase a un negocio especializado o a un técnico autorizado.
No utilice nunca tubos ya usados.
Utilice los suministrados con la máquina.
14
Conexión del tubo de descarga
65 - 100 cm |
Conecte el tubo de descarga, sin plegarlo, a una tubería de descarga o a una descarga de pared colocadas a una altura del piso entre 65 y 100 cm;
o apóyelo en el borde de un lavamanos o de una bañera, uniendo la guía suministrada con el aparato, al grifo (ver la figura). El extremo libre del tubo de descarga no debe permanecer sumergido en el agua.
No se aconseja utilizar tubos de prolongación, si fuera indispensable hacerlo, la prolongación debe tener el mismo diámetro del tubo original y no superar los 150 cm.
Conexión eléctrica
Antes de enchufar el aparato, verifique que:
•la toma tenga la conexión a tierra y haya sido hecha según las normas legales;
•la toma sea capaz de soportar la carga máxima de potencia de la máquina indicada en la tabla de Datos técnicos (ver al costado);
•la tensión de alimentación esté comprendida dentro de los valores indicados en la tabla de Datos técnicos (ver al costado);
•la toma sea compatible con el enchufe de la lavasecadora. Si no es así, sustituya la toma o el enchufe.
La lavasecadora no debe ser instalada al aire libre, ni siquiera si el lugar está reparado, ya que es muy peligroso dejarla expuesta a la lluvia o a las tormentas.
Una vez instalada la lavasecadora, la toma de corriente debe ser fácilmente accesible.
No utilice prolongaciones ni conexiones múltiples.
ES
El cable no debe estar plegado ni sufrir compresiones.
El cable de alimentación debe ser sustituido sólo por técnicos autorizados.
¡Atención! La empresa fabricante declina toda responsabilidad en caso de que estas normas no sean respetadas.
Primer ciclo de lavado
Después de la instalación y antes del uso, realice un ciclo de lavado con detergente y sin ropa, seleccionando el programa 2.
Datos técnicos
Modelo |
IWDE 7125 S |
|||
|
|
|
|
|
|
|
|
ancho 59,5 cm. |
|
Dimensiones |
altura 85 cm. |
|||
|
|
|
profundidad 53,5 cm. |
|
|
|
|
|
|
Capacidad |
de 1 a 7 kg para el lavado |
|||
de 1 a 5 kg para el secado. |
||||
|
|
|
||
|
|
|||
Conexiones |
ver la placa de características |
|||
eléctricas |
técnicas aplicada en la máquina |
|||
|
|
|
|
|
Conexiones |
presión máxima 1 MPa (10 bar) |
|||
presión mínima 0,05 MPa (0,5 bar) |
||||
hídricas |
||||
capacidad del cesto 52 litros |
||||
|
|
|
||
|
|
|||
Velocidad de |
máxima 1200 r.p.m. |
|||
centrifugado |
||||
|
||||
|
|
|
|
|
|
|
|
lavado: programa 2; temperatura |
|
|
|
|
60ºC; efectuado con 7 kg. de carga. |
|
Programas de |
secado: primer secado realizado |
|||
con 2 kg de carga seleccionando el |
||||
control según la |
||||
nivel de secado "A1" (PLANCHAR); |
||||
norma EN 50229 |
||||
Segundo secado realizado con 5 kg. |
||||
|
|
|
||
|
|
|
de carga seleccionando el nivel de |
|
|
|
|
secado "A4" (EXTRA). |
|
|
|
|
|
|
|
|
|
Esta máquina cumple con lo |
|
|
|
|
establecido por las siguientes |
|
|
|
|
Directivas de la Comunidad: |
|
|
|
|
- 89/336/CEE del 03/05/89 |
|
|
|
|
(Compatibilidad Electromagnética) y |
|
|
|
|
sucesivas modificaciones |
|
|
|
|
- 2002/96/CE |
|
|
|
|
- 2006/95/CE (Baja Tensión) |
|
|
|
|
||
|
|
|
||
15
 Loading...