


Instructions for use
WASHING MACHINE
GB RO CZ
English, 1 |
Română, 13 |
Česky, 25 |
Contents |
GB |
|
Installation, 2-3
Unpacking and levelling
Connecting the electricity and water supplies
The first wash cycle
Technical data
SK HU
Slovensky, 37 Magyar, 49
Care and maintenance, 4
Cutting off the water or electricity supply Cleaning the washing machine Cleaning the detergent dispenser drawer
Caring for the door and drum of your appliance Cleaning the pump
Checking the water inlet hose
IWCN 61051X9
Precautions and tips, 5
General safety
Disposal
Description of the washing machine and starting a wash cycle, 6-7
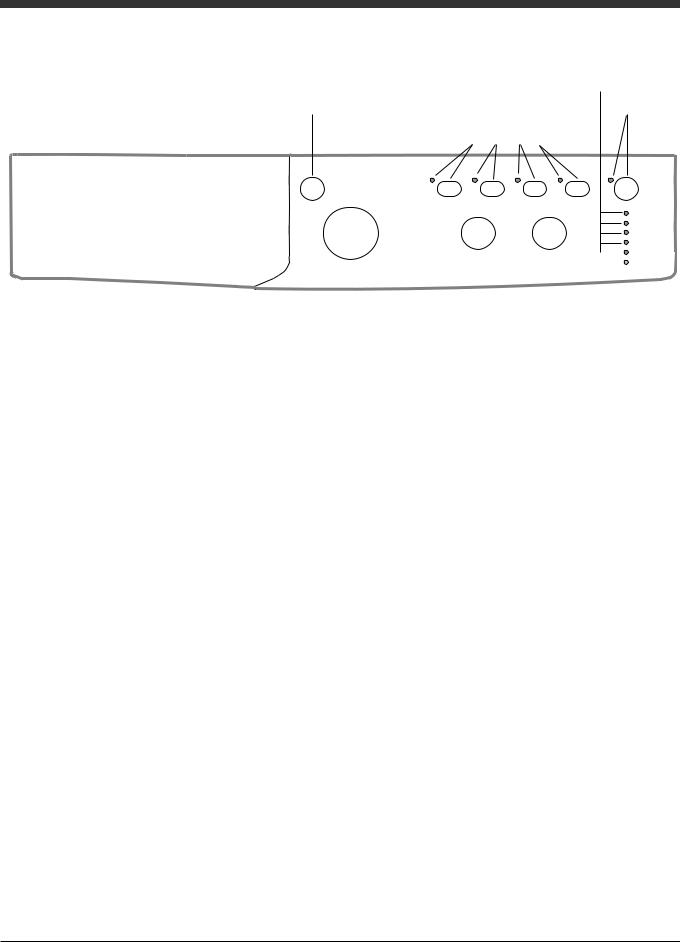
Control panel Indicator lights Starting a wash cycle
Wash cycles, 8
Table of wash cycles
Personalisation, 9
Setting the temperature
Setting the spin speed
Functions
Detergents and laundry, 10
Detergent dispenser drawer Bleach cycle
Preparing the laundry Garments requiring special care Load balancing system
Troubleshooting, 11
Service, 12
1
Installation
|
! This instruction manual should be kept in a safe |
|
GB |
||
place for future reference. If the washing machi- |
||
|
||
|
ne is sold, transferred or moved, make sure that |
|
|
||
|
the instruction manual remains with the machine |
|
|
so that the new owner is able to familiarise him- |
|
|
self/herself with its operation and features. |
|
|
! Read these instructions carefully: they con- |
|
|
tain vital information relating to the safe instal- |
|
|
lation and operation of the appliance. |
|
|
Unpacking and levelling |
Unpacking
1.Remove the washing machine from its packaging.
2.Make sure that the washing machine has not been damaged during the transportation process. If it has been damaged, contact the retailer and do not proceed any further with the installation process.
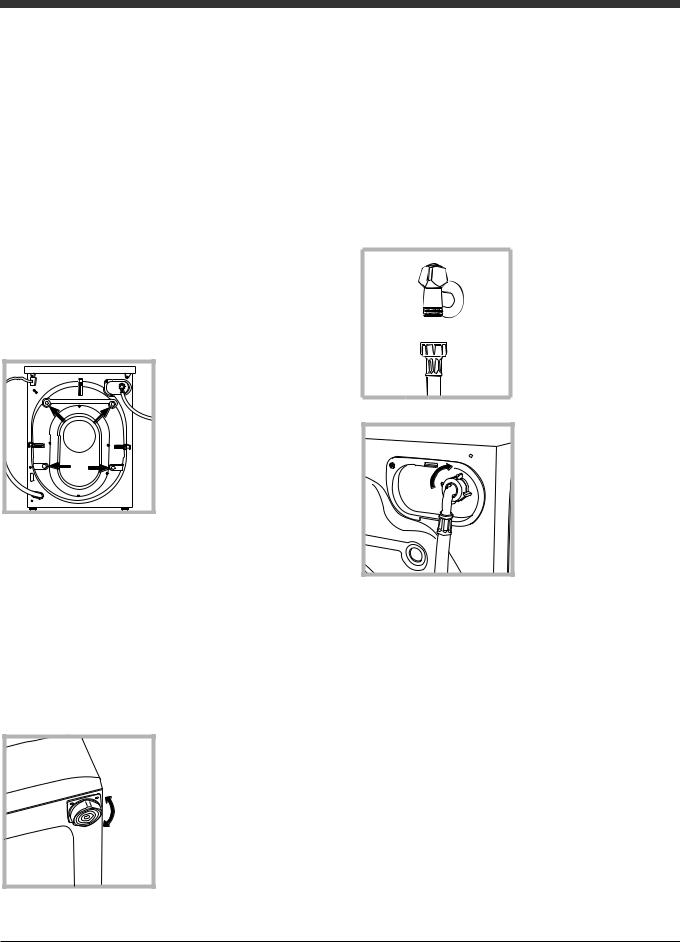
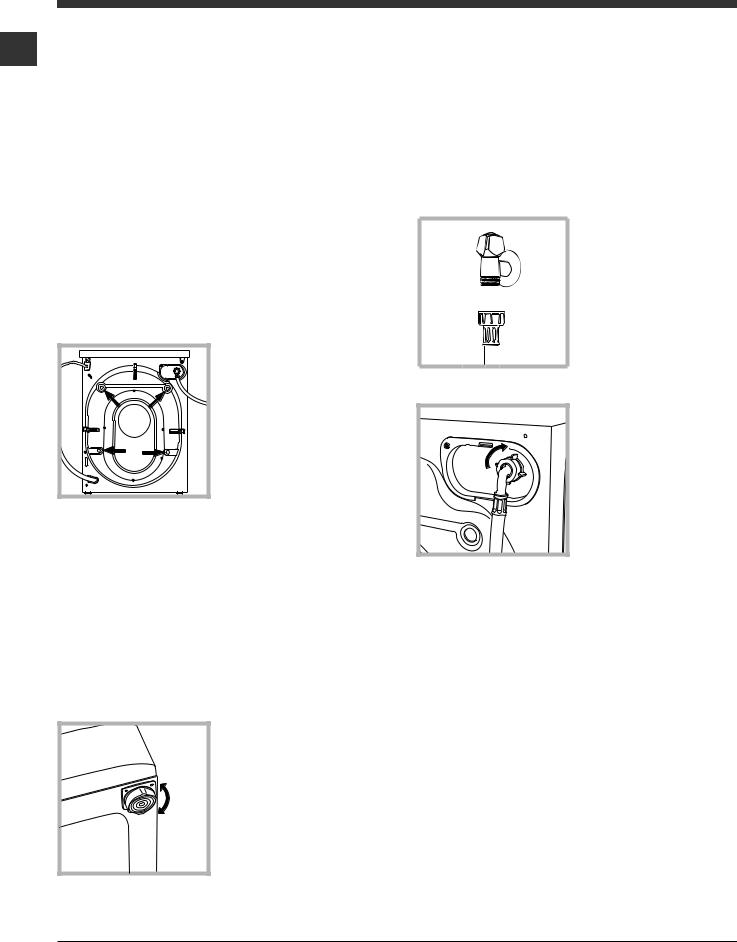
3.Remove the 4 pro-
tective screws (used during transportation) and the rubber washer with the corresponding spacer, located on the rear part of the appliance (see figure).
4.Close off the holes using the plastic plugs provided.
5.Keep all the parts in a safe place: you will need them again if the washing machine needs to be moved to another location.
! Packaging materials should not be used as toys for children.
Levelling
1. Install the washing machine on a flat sturdy floor, without resting it up against walls, furniture cabinets or anything else.
2. If the floor is not perfectly level, compensate for any unevenness by tightening
or loosening the adjustable front feet (see figure); the angle of inclination, measured in relation to the worktop, must not exceed 2°.
Levelling the machine correctly will provide it with stability, help to avoid vibrations and excessive noise and prevent it from shifting
while it is operating. If it is placed on carpet or a rug, adjust the feet in such a way as to allow a sufficient ventilation space underneath the washing machine.
Connecting the electricity and water supplies
Connecting the water inlet hose
1. Connect the supply pipe by screwing it to a cold water tab using a ¾ gas threaded connection (see
figure).
Before performing the connection, allow the water to run freely until it is perfectly clear.
2. Connect the inlet hose to the washing machine by screwing it onto the corresponding water inlet of the appliance, which is situated on the top right-hand side of the rear part of the appliance (see figure).
3. Make sure that the hose is not folded over or bent.
!The water pressure at the tap must fall within the values indicated in the Technical details table (see next page).
!If the inlet hose is not long enough, contact a specialised shop or an authorised technician.
!Never use second-hand hoses.
!Use the ones supplied with the machine.
2
Connecting the drain hose
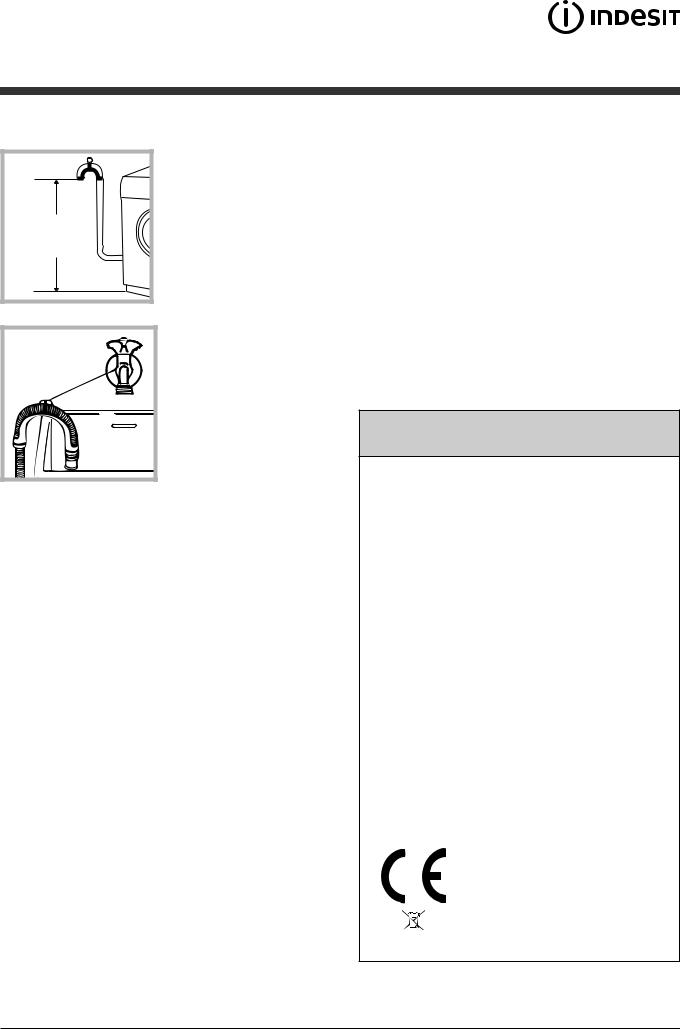
65 - 100 cm |
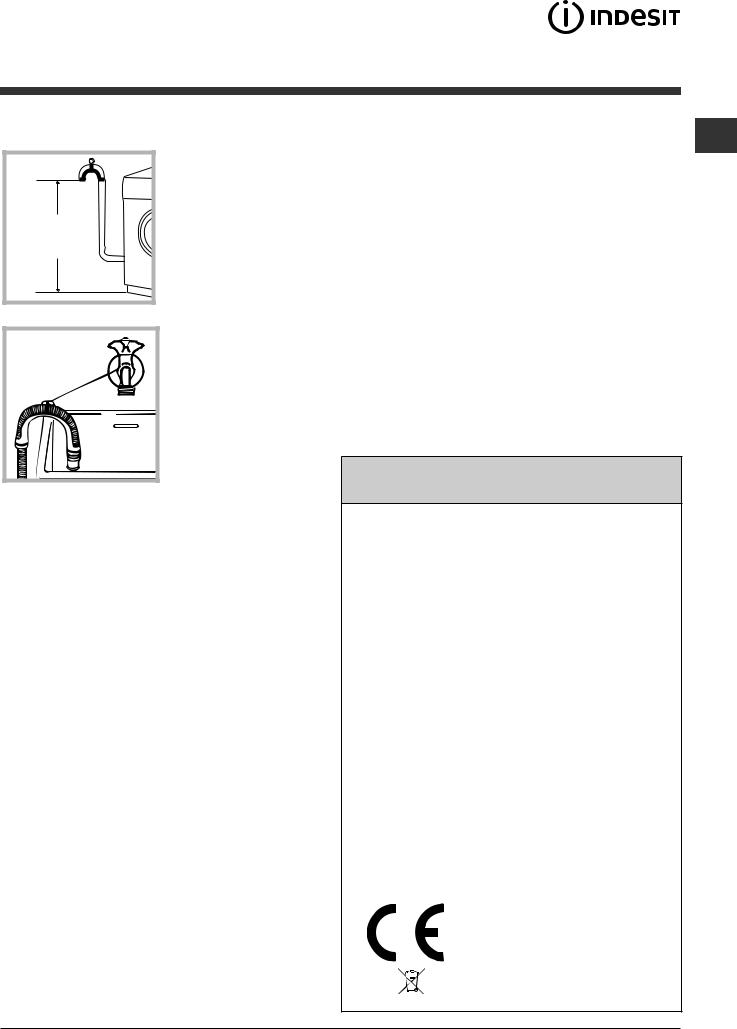
Connect the drain hose, without bending it, to a drainage duct or a wall drain located at a height between 65 and 100 cm from the floor;
alternatively, rest it on the side of a washbasin or bathtub, fastening the duct supplied to the tap (see figure). The free end of the hose should not be underwater.
! We advise against the use of hose extensions; if it is absolutely necessary, the extension must have the same diameter as the original hose and must not exceed 150 cm in length.
Electrical connections
Before plugging the appliance into the electricity socket, make sure that:
•the socket is earthed and complies with all applicable laws;
•the socket is able to withstand the maximum power load of the appliance as indicated in the Technical data table (see opposite);
•the power supply voltage falls within the values indicated in the Technical data table
(see opposite);
•the socket is compatible with the plug of the washing machine. If this is not the case, replace the socket or the plug.
!The washing machine must not be installed outdoors, even in covered areas. It is extremely dangerous to leave the appliance exposed to rain, storms and other weather conditions.
!When the washing machine has been installed, the electricity socket must be within easy reach.
! Do not use extension cords or multiple sockets. GB
!The cable should not be bent or compressed.
!The power supply cable must only be replaced by authorised technicians.
Warning! The company shall not be held responsible in the event that these regulations are not respected.
The first wash cycle
Once the appliance has been installed, and before you use it for the first time, run a wash cycle with detergent and no laundry, using the wash cycle 2.
Technical data
Model |
IWCN 61051X9 |
|||
|
|
|
|
|
Dimensions |
width 59,5 cm |
|||
height 85 cm |
||||
|
|
|
depth 53,5 cm |
|
Capacity |
from 1 to 6 kg |
|||
|
|
|
|
|
Electrical |
please refer to the technical |
|||
connections |
data plate fixed to the machine |
|||
|
|
|
|
|
|
|
|
maximum pressure |
|
Water connec- |
1 MPa (10 bar) |
|||
tion |
minimum pressure |
|||
0.05 MPa (0.5 bar) |
||||
|
|
|
drum capacity 52 litres |
|
Spin speed |
up to 1000 rotations per |
|||
minute |
||||
|
|
|
||
Test wash |
Programme 3: |
|||
cycles in |
||||
accordance |
Cotton standard 60°C. |
|||
with directives |
Programme 4: |
|||
1061/2010 and |
Cotton standard 40°C. |
|||
1015/2010 |
|
|||
|
|
|
This appliance conforms to |
|
|
|
|
the following EC Directives: |
|
|
|
|
- 2004/108/CE (Electroma- |
|
|
|
|
gnetic Compatibility) |
|
|
|
|
- 2012/19/EU |
|
|
|
|
- 2006/95/EC Low Voltage) |
|
|
|
|
|
|
3
Care and maintenance
GB |
Cutting off the water and electri- |
|
city supplies |
||
|
||
|
• Turn off the water tap after every wash cycle. |
|
|
This will limit wear on the hydraulic system |
|
|
inside the washing machine and help to pre- |
|
|
vent leaks. |
|
|
• Unplug the washing machine when cleaning |
|
|
it and during all maintenance work. |
|
|
Cleaning the washing machine |
|
|
The outer parts and rubber components of the |
|
|
appliance can be cleaned using a soft cloth |
|
|
soaked in lukewarm soapy water. Do not use |
|
|
solvents or abrasives. |
|
|
Cleaning the detergent dispenser |
|
|
drawer |
|
|
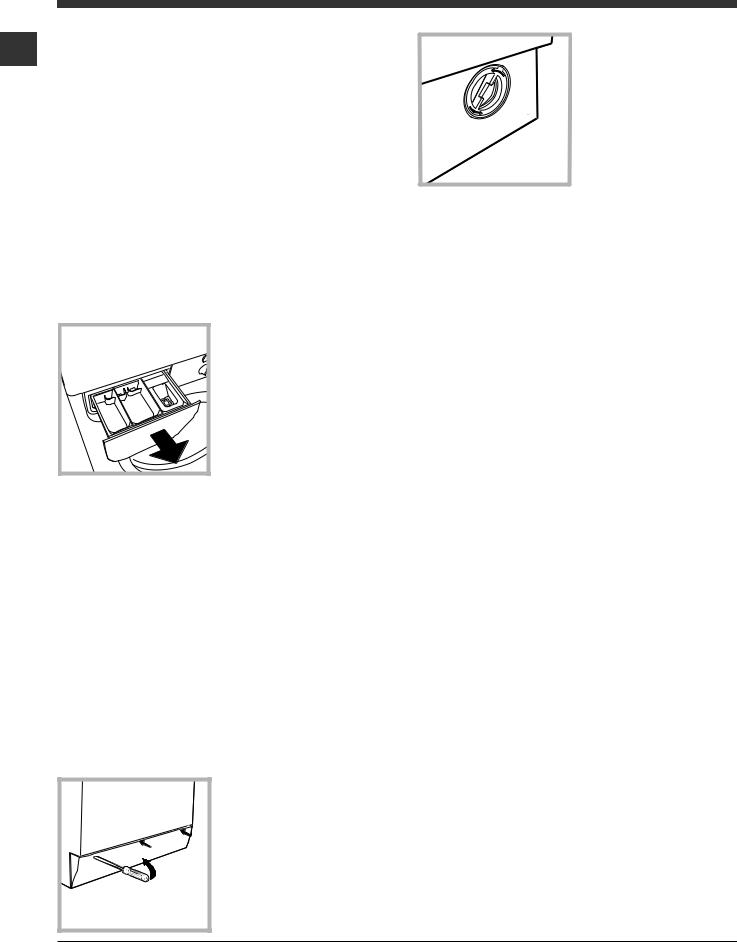
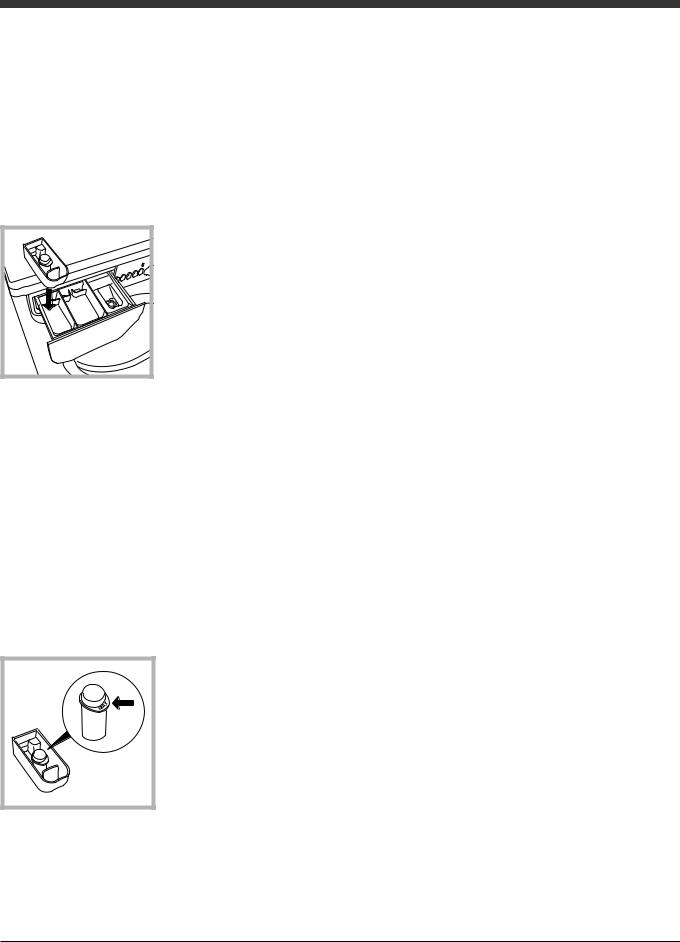
Remove the dispenser |
|
|
by raising it and pul- |
|
|
ling it out (see figure). |
|
|
Wash it under running |
|
|
water; this operation |
|
|
should be repeated |
|
|
frequently. |
2. unscrew the lid by rotating it anticlockwise (see figure): a little water may trickle out. This is perfectly normal;
3.clean the inside thoroughly;
4.screw the lid back on;
5.reposition the panel, making sure the hooks are securely in place before you push it onto the appliance.
Checking the water inlet hose
Check the inlet hose at least once a year. If there are any cracks, it should be replaced immediately: during the wash cycles, water pressure is very strong and a cracked hose could easily split open.
! Never use second-hand hoses.
Caring for the door and drum of your appliance
•Always leave the porthole door ajar in order to prevent unpleasant odours from forming.
Cleaning the pump
The washing machine is fitted with a self-cle- aning pump which does not require any maintenance. Sometimes, small items (such as coins or buttons) may fall into the pre-chamber which protects the pump, situated in its bottom part.
! Make sure the wash cycle has finished and unplug the appliance.
To access the prechamber:
1. using a screwdriver, remove the cover panel on the lower front part of the washing machine (see figure);
4

Precautions and tips
! This washing machine was designed and constructed in accordance with international safety regulations. The following information is provided for safety reasons and must therefore be read carefully.
Consumers should contact their local authority or
retailer for information concerning the correct GB disposal of their old appliance.
General safety
•This appliance was designed for domestic use only.
•This appliance can be used by children aged
from 8 years and above and persons with reduced physical, sensory or mental capabilities or lack of experience and knowledge if they have been given supervision or instruction concerning use of the appliance in a safe way and understand the hazards involved. Children shall not play with the appliance. Cleaning and user maintenance shall not be made by children without supervision.
•Do not touch the machine when barefoot or with wet or damp hands or feet.
•Do not pull on the power supply cable when unplugging the appliance from the electricity socket. Hold the plug and pull.
•Do not open the detergent dispenser drawer while the machine is in operation.
•Do not touch the drained water as it may reach extremely high temperatures.
•Never force the porthole door. This could damage the safety lock mechanism designed to prevent accidental opening.
•If the appliance breaks down, do not under any circumstances access the internal mechanisms in an attempt to repair it yourself.
•Always keep children well away from the appliance while it is operating.
•The door can become quite hot during the wash cycle.
•If the appliance has to be moved, work in a group of two or three people and handle it with the utmost care. Never try to do this alone, because the appliance is very heavy.
•Before loading laundry into the washing machine, make sure the drum is empty.
Disposal
•Disposing of the packaging materials: observe local regulations so that the packaging may be re-used.
•The European Directive 2012/19/EU on Waste Electrical and Electronic Equipment, requires that old household electrical appliances must not be disposed of in the normal unsorted municipal waste stream. Old appliances must be collected separately in order to optimise the recovery and recycling of the
materials they contain and reduce the impact on human health and the environment. The crossed out “wheeled bin” symbol on the product reminds you of your obligation, that when you dispose of the appliance it must be separately collected.
5
|
|
Description of the washing |
|
|
|||
|
|
machine and starting a wash cycle |
|||||
|
|
|
|
|
|
|
|
|
|
|
|
|
|
|
|
|
|
Control panel |
|
|
|
|
|
GB |
|
|
|
|
|
||
|
|
|
|
|
|
|
|
|
|
|
WASH CYCLE PROGRESS/ |
||||
|
|
|
|||||
|
|
|
DELAY TIMER indicator lights |
||||
|
|
|
FUNCTION |
|
|
START/ |
|
|
|
|
|
|
|||
|
|
ON/OFF button |
|
|
PAUSE |
||
|
|
buttons with |
|
|
|||
|
|
|
indicator lights |
|
|
button with |
|
|
|
|
|
|
indicator light |
||
|
|
|
|
|
|
||
|
|
|
|
|
|
|
|
|
|
|
|
|
|
|
|
|
|
|
|
|
|
|
|
|
|
|
|
|
|
|
|
|
|
|
|
|
|
|
|
|
|
|
|
|
|
|
|
|
|
|
TEMPERATURE |
|
|
|
|
|
|
|
|
|
|
|
|
|
|
DOOR LOCKED |
||
|
|
|
knob |
|
||
Detergent dispenser drawer |
|
|
||||
WASH CYCLE |
SPIN SPEED |
indicator light |
||||
|
|
|
|
|||
|
|
knob |
|
knob |
|
|
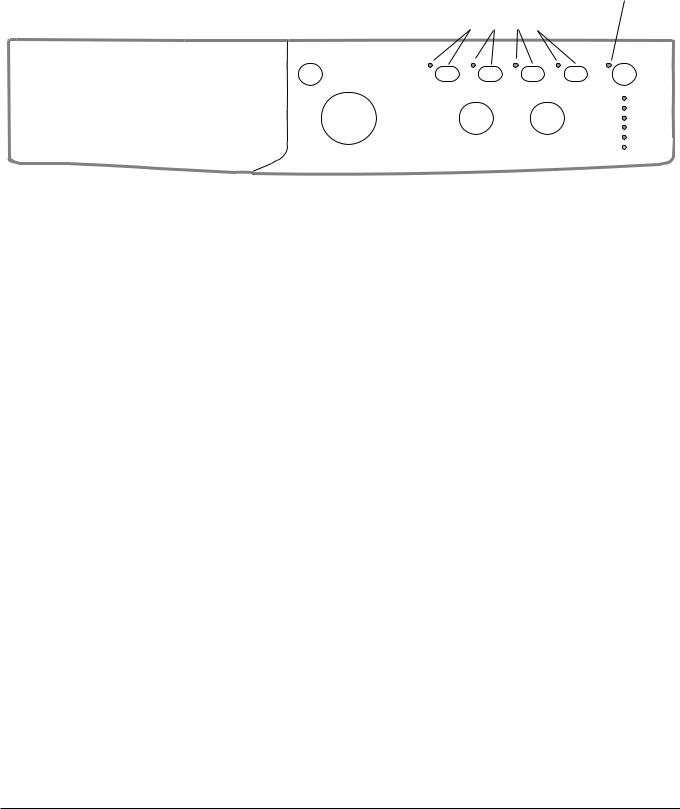
Detergent dispenser drawer: used to dispense detergents and washing additives (see “Detergents and laundry”).
ON/OFF button: switches the washing machine on and off.
WASH CYCLE knob: programmes the wash cycles. During the wash cycle, the knob does not move.
FUNCTION buttons with indicator light: used to select the available functions. The indicator light corresponding to the selected function will remain lit.
TEMPERATURE knob: sets the temperature or the cold wash cycle (see “Personalisation”).
SPIN SPEED knob: sets the spin speed or exclude the spin cycle completely (see “Personalisation”).
WASH CYCLE PROGRESS/DELAY TIMER indicator lights: used to monitor the progress of the wash cycle. The illuminated indicator light shows which phase is in progress.
If the Delay Timer function has been set, the time remaining until the wash cycle starts will be indicated (see next page).
DOOR LOCKED indicator light: indicates whether the door may be opened or not (see next page).
START/PAUSE button with indicator light: starts or temporarily interrupts the wash cycles.
N.B. To pause the wash cycle in progress, press this button; the corresponding indicator light will flash orange, while the indicator light for the current wash cycle phase will remain lit in a fixed manner. If the DOOR LOCKED  indicator light is switched off, the door may be opened. To start the wash cycle from the point at which it was interrupted, press this button again.
Standby mode
This washing machine, in compliance with new energy saving regulations, is fitted with an automatic standby system which is enabled after about 30 minutes if no activity is detected. Press the ON-OFF button briefly and wait for the machine to start up again.
6
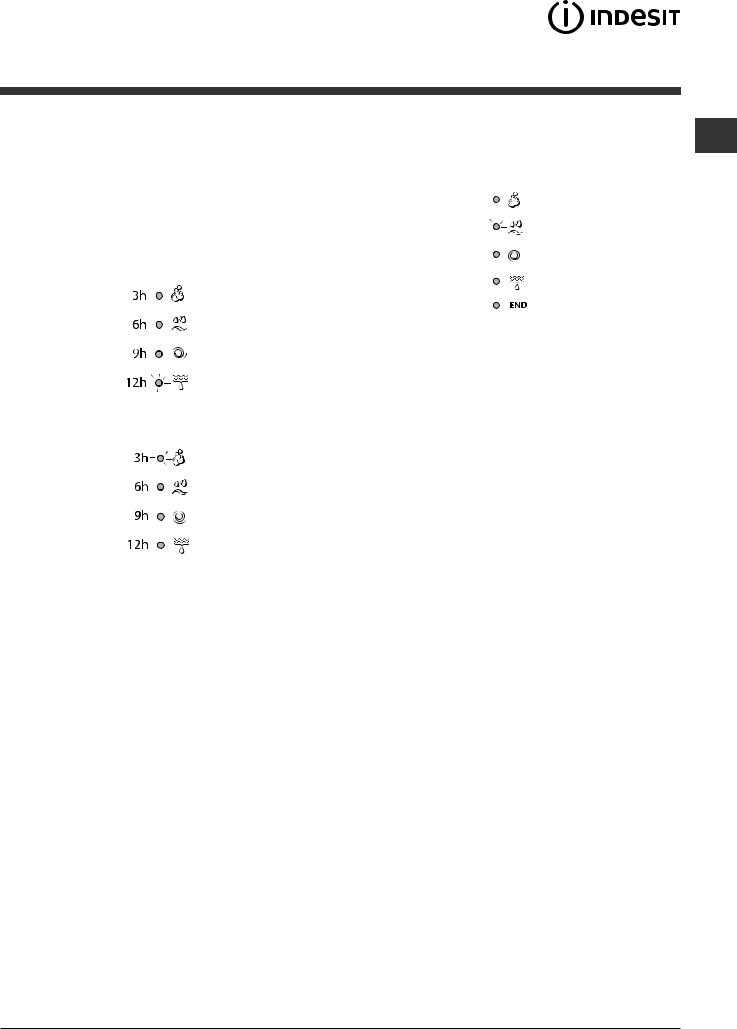
Indicator lights
The indicator lights provide important information. This is what they can tell you:
Delayed start
If the DELAY TIMER function has been activated (see “Personalisation”), after the wash cycle has been started the indicator light corresponding to the selected delay period will begin to flash:
As time passes, the remaining delay will be displayed and the corresponding indicator light will flash:
The set programme will start once the selected time delay has expired.
Wash cycle phase indicator lights
Once the desired wash cycle has been selected and has be- GB gun, the indicator lights switch on one by one to indicate which
phase of the cycle is currently in progress.
Wash
Rinse
Spin
Drain
End of wash cycle
Function buttons and corresponding indicator lights
When a function is selected, the corresponding indicator light will illuminate.
If the selected function is not compatible with the programmed wash cycle, the corresponding indicator light will flash and the function will not be activated.
If the selected function is not compatible with another function which has been selected previously, the indicator light corresponding to the first function selected will
flash and only the second function will be activated; the indicator light corresponding to the enabled option will
remain lit.
 Door locked indicator light
When the indicator light is on, the porthole door is locked to prevent it from being opened; make sure the indicator light is off before opening the door (wait approximately 3 minutes). To open the door during a running wash cycle, press the START/PAUSE button; the door may be opened once the DOOR LOCKED indicator light turns off.
Starting a wash cycle
1.Switch the washing machine on by pressing the ON/OFF button. All indicator lights will switch on for a few seconds, then they will switch off and the START/PAUSE indicator light will pulse.
2.Load the laundry and close the door.
3.Set the WASH CYCLE knob to the desired programme.
4.Set the washing temperature (see “Personalisation”).
5.Set the spin speed (see “Personalisation”).
6.Measure out the detergent and washing additives (see “Detergents and laundry”).
7.Select the desired functions.
8.Start the wash cycle by pressing the START/PAUSE button and the corresponding indicator light will remain lit in a fixed manner, in green.
To cancel the set wash cycle, pause the machine by pressing the START/PAUSE button and select a new cycle.
9. At the end of the wash cycle the
 indicator light will switch on. The door can be opened once the DOOR LOCK
  indicator light turns off. Take out your laundry and leave the appliance door ajar to make sure the drum dries completely. Switch the washing machine off by pressing the ON/OFF button.
7

Wash cycles
|
Table of wash cycles |
||
GB |
|||
|
|
||
|
cycles |
Description of the wash cycle |
|
|
|||
|
Wash |
||
|
|
||
|
|
|
|
Daily
1 Cotton with prewash: extremely soiled whites.
2 Cotton: extremely soiled whites.
3 Cotton Standard 60° (1): heavily soiled whites and resistant colours.
4 Cotton Standard 40° (2): lightly soiled whites and delicate colours.
5 Coloured Cottons: lightly soiled whites and delicate colours.
6Synthetics: heavily soiled resistant colours.
6Synthetics (3): lightly soiled resistant colours.
7Cotton Standard 20°: lightly soiled whites and delicate colours.
Special
8 |
Wool: for wool, cashmere, etc. |
9 |
Silk/Curtains: for garments in silk and viscose, lingerie. |
10 |
Jeans |
11 |
Outwear |
|
Sport |
12 |
Sport Intensive |
13 |
Sport Light |
14 |
Special Shoes |
|
Partial wash cycles |
|
|
|
Rinse |
|
Spin + Drain |
|
|
Max. |
Max. |
Prewash |
|
Detergents |
|
Bleach |
loadMax.(kg) |
Residual dampness% |
Energy consumption kWh |
waterTotallt |
Cycle duration |
||
|
Wash |
|
Fabric softener |
|
|||||||||
temp. |
speed |
|
|
|
|
|
|
|
|
|
|
|
|
(°C) |
(rpm) |
|
|
|
|
|
|
|
|
|
|
|
|
90° |
|
|
|
|
|
|
|
|
|
|
|
|
170’ |
|
|
|
|
|
|
|
|
||||||
1000 |
|
|
|
- |
6 |
62 |
2,18 |
75 |
|||||
90° |
1000 |
- |
|
|
|
|
|
|
6 |
62 |
2,10 |
70 |
125’ |
60° |
1000 |
- |
|
|
|
|
|
|
6 |
62 |
1,03 |
49 |
190’ |
40° |
1000 |
- |
|
|
|
|
|
|
6 |
62 |
1,09 |
69 |
180’ |
40° |
1000 |
- |
|
|
|
|
|
|
6 |
62 |
0,60 |
50 |
85‘ |
60° |
800 |
- |
|
|
|
|
|
|
3,5 |
44 |
0,93 |
47 |
115‘ |
40° |
800 |
- |
|
|
|
|
|
|
3,5 |
44 |
0,57 |
46 |
100‘ |
20° |
1000 |
- |
|
|
|
|
|
|
6 |
- |
- |
- |
170‘ |
40° |
|
|
|
|
|
|
|
|
|
|
|
70‘ |
|
800 |
- |
|
|
|
- |
1,5 |
- |
- |
- |
||||
30° |
0 |
- |
|
|
|
|
|
- |
1 |
- |
- |
- |
55‘ |
40° |
800 |
- |
|
|
|
|
|
- |
3,5 |
- |
- |
- |
75‘ |
30° |
400 |
- |
|
|
|
- |
|
- |
2 |
- |
- |
- |
60’ |
30° |
|
|
|
|
|
|
|
|
|
|
|
85’ |
|
600 |
- |
|
|
|
- |
3 |
- |
- |
- |
||||
30° |
600 |
- |
|
|
|
|
|
- |
3 |
- |
- |
- |
60’ |
30° |
600 |
- |
|
|
|
|
|
- |
Max. |
- |
- |
- |
60’ |
|
|
|
2 pairs |
||||||||||
- |
|
|
|
|
|
|
|
|
|
|
|
36’ |
|
1000 |
- |
|
- |
|
|
6 |
- |
- |
- |
||||
- |
1000 |
- |
|
- |
|
- |
|
- |
6 |
- |
- |
- |
16’ |
|
|
|
|
|
|
|
|
|
|
|
|
|
|
The length of cycle shown on the display or in this booklet is an estimation only and is calculated assuming standard working conditions. The actual duration can vary according to factors such as water temperature and pressure, the amount of detergent used, the amount and type of load inserted, load balancing and any wash options selected.
1) Test wash cycle in compliance with directive 1061/2010: set wash cycle 3 with a temperature of 60°C.
This cycle is designed for cotton loads with a normal soil level and is the most efficient in terms of both electricity and water consumption; it should be used for garments which can be washed at 60°C. The actual washing temperature may differ from the indicated value.
2) Test wash cycle in compliance with directive 1061/2010: set wash cycle 4 with a temperature of 40°C.
This cycle is designed for cotton loads with a normal soil level and is the most efficient in terms of both electricity and water consumption; it should be used for garments which can be washed at 40°C. The actual washing temperature may differ from the indicated value.
For all Test Institutes:
2)Long wash cycle for cottons: set wash cycle 4 with a temperature of 40°C.
3)Long wash cycle for synthetics: set wash cycle 6; with a temperature of 40°C.
Cotton Standard 20° (wash cycle 7) ideal for lightly soiled cotton loads. The effective performance levels achieved at cold temperatures, which are comparable to washing at 40°, are guaranteed by a mechanical action which operates at varying speed, with repeated and frequent peaks.
Outwear (wash cycle 11): is studied for washing water-repellent fabrics and winter jackets (e.g. Gore-Tex, polyester, nylon); for best results, use a liquid detergent and dosage suitable for a half-load; pre-treat necks, cuffs and stains if necessary; do not use softeners or detergents containing softeners. Stuffed duvets cannot be washed with this programme.
Sport Intensive (wash cycle 12) is for washing heavily soiled sports clothing fabrics (tracksuits, shorts, etc.); for best results, we recommend not exceeding the maximum load indicated in the “Table of wash cycles”.
Sport Light (wash cycle 13) is for washing lightly soiled sports clothing fabrics (tracksuits, shorts, etc.); for best results, we recommend not exceeding the maximum load indicated in the “Table of wash cycles”. We recommend using a liquid detergent and dosage suitable for a half-load.
Special Shoes (wash cycle 14) is for washing sports shoes; for best results, do not wash more than 2 pairs simultaneously.
8

Personalisation
|
|
|
|
|
Setting the temperature |
|
|||
GB |
||||
Turn the TEMPERATURE knob to set the wash temperature (see Table of wash cycles). |
||||
|
||||
The temperature may be lowered, or even set to a cold wash . |
|
|||
The washing machine will automatically prevent you from selecting a temperature which is higher than the maximum value |
|
|||
set for each wash cycle. |
|
|||
Setting the spin speed |
|
|||
Turn the SPIN SPEED knob to set the spin speed for the selected wash cycle. |
|
|||
The maximum spin speeds available for each wash cycle are as follows: |
|
|||
Wash cycles |
Maximum spin speed |
|
||
Cottons |
1000 rpm |
|
||
Synthetics |
800 rpm |
|
||
Wool |
800 rpm |
|
||
Silk |
drain only |
|
||
The spin speed may be lowered, or the spin cycle can be excluded altogether by selecting the symbol  .
.
The washing machine will automatically prevent you from selecting a spin speed which is higher than the maximum speed set for each wash cycle.
Functions
The various wash functions available with this washing machine will help to achieve the desired results, every time. To activate the functions:
1.Press the button corresponding to the desired function;
2.the function is enabled when the corresponding indicator light is illuminated.
Note: If the indicator light flashes rapidly, this signals that this particular function may not be selected in conjunction with the selected wash cycle.
Selecting this option enables you to suitably adjust drum rotation, temperature and water to a reduced load of lightly soiled cotton and synthetic fabrics (refer to the ““Table of wash cycles”). “


 ” enables you to wash in less time thereby saving water and electricity. We suggest using a liquid detergent suitably measured out to the load quantity.
! This function may not be used in conjunction with wash cycles 1, 2, 7, 8, 9, 10, 11, 12, 13, 14,  ,
,  .
.
 Stain removal
Bleaching cycle designed to remove the toughest stains. Please remember to pour the bleach into extra compartment 4 (see “Bleach cycle”).
! This function may not be used in conjunction with wash cycles 1, 8, 9, 10, 11, 12, 13, 14,  .
.


 Extra rinse
By selecting this option, the efficiency of the rinse is increased and optimal detergent removal is guaranteed. It is particularly useful for sensitive skin.
! This function may not be used in conjunction with wash cycle  .
.
 Delay timer
This timer delays the start time of the wash cycle by up to 12 hours.
Press the button repeatedly until the indicator light corresponding to the desired delay time switches on. The fifth time the button is pressed, the function will be disabled.
N.B. Once the START/PAUSE button has been pressed, the delay time can only be modified by decreasing it until launching the set programme.
! This option is enabled with all programmes.
9
Detergents and laundry
|
Detergent dispenser drawer |
|
GB |
||
|
||
|
Good washing results also depend on the correct dose of |
|
|
||
|
detergent: adding too much detergent will not necessa- |
|
|
rily result in a more efficient wash, and may in fact cause |
|
|
build up on the inside of your appliance and contribute to |
|
|
environmental pollution. |
!Do not use hand washing detergents because these create too much foam.
!Use powder detergent for white cotton garments, for prewashing, and for washing at temperatures over 60°C.
!Follow the instructions given on the detergent packaging.
Open the detergent di-
4spenser drawer and pour in the detergent or washing additive, as follows.
3
1 2
compartment 1: Pre-wash detergent (powder)
Before pouring in the detergent, make sure that extra compartment 4 has been removed.
compartment 2: Detergent for the wash cycle (powder or liquid)
Liquid detergent should only be poured in immediately prior to the start of the wash cycle.
compartment 3: Additives (fabric softeners, etc.)
The fabric softener should not overflow the grid. extra compartment 4: Bleach
Bleach cycle
! Traditional bleach should be used on sturdy white fabrics, and delicate bleach for coloured fabrics, synthetics and for wool.
compartment4, set the “Rinse”  “Stain removal”
  option.
To bleach during a wash cycle, pour in the detergent and any fabric softener you wish to use, set the desired wash cycle and enable the “Stain removal”  option. Theuseofextracompartment4excludesthe“Pre-wash”option.
Preparing the laundry
•Divide the laundry according to:
-the type of fabric/the symbol on the label
-the colours: separate coloured garments from whites.
•Empty all garment pockets and check the buttons.
•Do not exceed the values listed in the “Table of wash cycles”, which refer to the weight of the laundry when dry.
How much does your laundry weigh?
1 sheet 400-500 g
1 pillow case 150-200 g
1 tablecloth 400-500 g
1 bathrobe 900-1200 g
1 towel 150-250 g
Garments requiring special care
Wool: all wool garments can be washed using programme 8, even those carrying the “hand-wash only”  label. For best results, use special detergents and do not exceed 1,5 kg of laundry.
Silk: use special wash cycle 9 to wash all silk garments. We recommend the use of special detergent which has been designed to wash delicate clothes.
Curtains: fold curtains and place them in a pillow case or mesh bag. Use wash cycle 9.
Jeans: Turn garments inside-out before washing and use a liquid detergent. Use programme 10.
Load balancing system
Before every spin cycle, to avoid excessive vibrations and to distribute the load in a uniform manner, the drum rotates continuously at a speed which is slightly greater than the washing rotation speed. If, after several attempts, the load is not balanced correctly, the machine spins at a reduced spin speed. If the load is excessively unbalanced, the washing machine performs the distribution process instead of spinning. To encourage improved load distribution and balance, we recommend small and large garments are mixed in the load.
10
Troubleshooting
|
|
|
|
|
Your washing machine could fail to work. Before contacting the Technical Assistance Centre (see “Assistance”), make sure |
|
|||
GB |
||||
that the problem cannot be solved easily using the following list. |
||||
|
||||
Problem: |
Possible causes / Solutions: |
|
||
|
||||
The washing machine does not switch on.
The wash cycle does not start.
•The appliance is not plugged into the socket fully, or is not making contact.
•There is no power in the house.
•The washing machine door is not closed properly.
•The ON/OFF button has not been pressed.
•The START/PAUSE button has not been pressed.
•The water tap has not been opened.
•A delayed start has been set (see “Personalisation”).
The washing machine does not take in water (the indicator light for the first wash cycle stage flashes rapidly).
•The water inlet hose is not connected to the tap.
•The hose is bent.
•The water tap has not been opened.
•There is no water supply in the house.
•The pressure is too low.
•The START/PAUSE button has not been pressed.
The washing machine continuously • The drain hose is not fitted at a height between 65 and 100 cm from the floor takes in and drains water. (see “Installation”).
•The free end of the hose is under water (see “Installation”).
•The wall drainage system is not fitted with a breather pipe.
If the problem persists even after these checks, turn off the water tap, switch the appliance off and contact the Assistance Service. If the dwelling is on one of the upper floors of a building, there may be problems relating to water drainage, causing the washing machine to fill with water and drain continuously. Special anti-draining valves are available in shops and help to avoid this inconvenience.
The washing machine does not drain or spin.
•The wash cycle does not include draining: some wash cycles require the drain phase to be started manually.
•The drain hose is bent (see “Installation”).
•The drainage duct is clogged.
The washing machine vibrates a lot • The drum was not unlocked correctly during installation (see “Installation”). during the spin cycle. • The washing machine is not level (see “Installation”).
• The washing machine is trapped between cabinets and walls (see “Installation”).
The washing machine leaks. • The water inlet hose is not screwed on properly (see “Installation”).
•The detergent dispenser drawer is blocked (for cleaning instructions, see “Care and maintenance”).
•The drain hose is not fixed properly (see “Installation”).
The “Functions” indicator lights and the “start/pause” indicator light flash, while one of the “phase in progress” indicator lights and the “door locked” indicator light will remain lit in a fixed manner.
•Switch off the machine and unplug it, wait for approximately 1 minute and then switch it back on again.
If the problem persists, contact the Technical Assistance Service.
There is too much foam.
•The detergent is not suitable for machine washing (it should display the text “for washing machines” or “hand and machine wash”, or the like).
•Too much detergent was used.
11

Service
|
|
|
|
|
|
Before calling for Assistance: |
|
GB |
|||
|
• Check whether you can solve the problem alone (see “Troubleshooting”); |
||
|
|
||
|
|
• Restart the programme to check whether the problem has been solved; |
|
|
|||
|
|
• If this is not the case, contact an authorised Technical Assistance Centre using the telephone number provided on the |
|
|
|
guarantee certificate. |
|
|
|
! Always request the assistance of authorised technicians. |
Have the following information to hand:
•the type of problem;
•the appliance model (Mod.);
•the serial number (S/N).
This information can be found on the data plate applied to the rear of the washing machine, and can also be found on the front of the appliance by opening the door.
12

Instrucţiuni de folosire
MAŞINĂ DE SPĂLAT RUFE
RO
Română
Sumar |
|
|
RO |
||
|
||
Instalare, 14-15 |
|
|
|
||
Despachetare şi punere la nivel |
|
|
Racorduri hidraulice şi electrice |
|
|
Primul ciclu de spălare |
|
|
Date tehnice |
|
Întreţinere şi curăţare, 16
Întreruperea alimentării cu apă şi curent electric Curăţarea maşinii de spălat
Curăţarea compartimentului pentru detergent Îngrijirea uşii şi a tamburului
Curăţarea pompei
Controlarea furtunului de alimentare cu apă
IWCN 61051X9
Precauţii şi sfaturi, 17
Norme de protecţie şi siguranţă generale
Aruncarea reziduurilor
Descrierea maşinii de spălat şi activarea unui program, 18-19
Panoul de control Indicatoare luminoase Activarea unui program
Programe, 20
Tabel de programe
Personalizare, 21
Reglarea temperaturii
Reglarea centrifugării
Funcţii
Detergenţi şi rufe albe, 22
Compartimentul pentru detergenţi
Ciclu de albire
Pregătirea rufelor
Articole delicate
Sistemul de echilibrare a încărcăturii
Anomalii şi remedii, 23
Asistenţă, 24
13
Instalare
! Este important să păstraţi acest manual RO pentru a-l putea consulta în orice moment.
În caz de vânzare, de cesiune sau de schimbare a locuinţei, acesta trebuie să rămână împreună cu maşina de spălat pentru a informa noul proprietar cu privire la funcţionare şi la respectivele avertismente.
! Citiţi cu atenţie instrucţiunile: veţi găsi informaţii importante cu privire la instalare, la folosire şi la siguranţă.
Despachetare şi punere la nivel
Despachetare
1. Scoaterea din ambalaj a maşinii de spălat. 2. Controlaţi ca maşina de spălat să nu fi fost deteriorată în timpul transportului. Dacă este deteriorată nu o conectaţi şi luaţi legătura cu vânzătorul.
3. Scoateţi cele 4 şuruburi de protecţie
pentru transport şi
cauciucul cu respectivul distanţier, situate în partea posterioară
(a se vedea figura).
4.Închideţi orificiile cu dopurile din plastic aflate în dotare.
5.Păstraţi toate piesele: pentru cazul în care maşina de spălat va trebui să fie transportată, piesele vor trebui montante din nou.
! Ambalajele nu sunt jucării pentru copii!
Punere la nivel
1. Instalaţi maşina de spălat pe o suprafaţă plană şi rigidă, fără a o sprijini de ziduri, mobilă sau altceva.
2. Dacă podeaua nu este perfect
orizontală, compensaţi neregularităţile
deşurubând sau înşurubând
picioruşele anterioare
(a se vedea figura); unghiul de înclinare, măsurat pe planul de
lucru, nu trebuie să depăşească 2°.
O nivelare precisă conferă stabilitate maşinii şi evită vibraţii, zgomote şi deplasări pe timpul funcţionării. În cazul mochetelor sau a unui covor, reglaţi picioruşele astfel încât să menţineţi sub maşina de spălat un spaţiu suficient pentru ventilare.
Racorduri hidraulice şi electrice
Racordarea furtunului de alimentare cu apă
3. Fiţi atenţi ca furtunul să nu fie nici pliat nici îndoit.
!Presiunea apei de la robinet trebuie să fie cuprinsă în valorile din tabelul Date tehnice
(a se vedea pagina alăturată).
!Dacă lungimea furtunului de alimentare nu este suficientă, adresaţi-vă unui magazin specializat sau unui instalator autorizat.
!Nu folosiţi niciodată tuburi folosite deja.
!Utilizaţi tuburile furnizate împreună cu maşina.
14
Conectarea furtunului de golire
65 - 100 cm |
Conectaţi furtunul de golire - fără a-l îndoi - la canalizare sau la racordul de golire prevăzut pe perete, la o înălţime de 65 - 100 cm de sol;
Sprijiniţi-l de marginea căzii sau chiuvetei şi racordaţi şina de ghidare din dotare la robinet (a se vedea figura). Capătul liber al furtunului de golire nu trebuie să rămână cufundat în apă.
! Nu se recomandă folosirea furtunurilor prelungitoare; dacă este indispensabil, acestea trebuie să aibă acelaşi diametru ca şi furtunul original şi nu trebuie să depăşească 150 cm lungime.
Racordarea electrică
Înainte de a introduce stecherul în priză, asiguraţi-vă ca:
•priza să fie cu împământare şi conform prevederilor legale;
•priza să poată suporta sarcina maximă de putere a maşinii, indicată în tabelul Date Tehnice (a se vedea alături);
•tensiunea de alimentare să fie cuprinsă în valorile indicate în tabelul Date Tehnice (a se vedea alături);
•priza să fie compatibilă cu stecherul maşinii de spălat. În caz contrar înlocuiţi stecherul.
!Maşina de spălat nu trebuie instalată afară, nici chiar în cazul în care spaţiul este adăpostit, deoarece este foarte periculoasă expunerea maşinii la ploi şi furtuni.
!După instalarea maşinii de spălat, priza de curent trebuie să fie uşor accesibilă.
!Nu folosiţi prelungitoare şi prize multiple.
! Cablul nu trebuie să fie îndoit sau comprimat. |
|
|
RO |
||
|
||
! Cablul de alimentare trebuie să fie înlocuit |
|
|
|
||
doar de tehnicieni autorizaţi ai centrului de |
|
|
service ce apare scris pe certificatul de ga- |
|
|
rantie emis de producator. |
|
|
Atenţie! Producătorul îşi declină orice re- |
|
|
sponsabilitate în cazul în care aceste norme |
|
|
nu se respectă. |
|
|
Primul ciclu de spălare |
|
|
După instalare, înainte de folosire, efectuaţi |
|
|
un ciclu de spălare cu detergent şi fără rufe, |
|
|
selectând programul 2. |
|
Date tehnice
Model |
IWCN 61051X9 |
|||
Dimensiuni |
lãrgime 59,5 cm |
|||
înãlþime 85 cm |
||||
|
|
|
profunzime 53,5 cm |
|
Capacitate |
de la 1 la 6 kg |
|||
Legãturi |
Vezi placuta cu caracteri- |
|||
sticile tehnice, aplicata pe |
||||
electrice |
||||
masina. |
||||
|
|
|
||
|
|
|
presiune maximã |
|
Legãturi |
1 MPa (10 bari) |
|||
presiune minimã |
||||
hidrice |
||||
0,05 MPa (0,5 bari) |
||||
|
|
|
||
|
|
|
capacitatea cuvei 52 litri |
|
Viteza de |
pânã la 1000 de rotaþii pe |
|||
centrifugare |
minut |
|||
Programe |
Programul 3: program |
|||
de control |
||||
standard la 60°C pentru |
||||
conform |
||||
rufe din bumbac. |
||||
directivelor |
||||
Programul 4: program |
||||
1061/2010 |
standard la 40°C pentru |
|||
şi |
rufe din bumbac. |
|||
1015/2010 |
||||
|
|
|
Acest aparat este con- |
|
|
|
|
form cu urmãtoarele |
|
|
|
|
Directive Comunitare: |
|
|
|
|
- 2004/108/CE (Compatibi- |
|
|
|
|
litate Electromagneticã) |
|
|
|
|
- 2006/95/CE (Tensiuni |
|
|
|
|
Joase) |
|
|
|
|
||
|
|
|
||
|
|
|
-2012/19/EU |
|
15

Întreţinere şi curăţare
|
Întreruperea alimentării cu apă şi |
|
RO |
||
curent electric |
||
|
• Închideţi robinetul de apă după fiecare |
spălare. Se limitează astfel uzura instalaţiei hidraulice a maşinii de spălat şi se elimină pericolul scurgerilor.
• Scoateţi stecherul din priza de curent atunci când curăţaţi maşina de spălat şi când se efectuează lucrări de întreţinere.
Curăţarea maşinii de spălat
Partea externă şi părţile din cauciuc pot fi curăţate cu o lavetă înmuiată în apă călduţă şi săpun. Nu folosiţi solvenţi sau substanţe abrazive.
Curăţarea compartimentului pentru detergent
Trageti afara compatimentul ridicându-l
si tragându-l spre exterior (a se vedea figura).
Spălaţi-l sub un jet de apă; această operaţie trebuie efectuată cât mai des posibil.
Îngrijirea uşii şi a tamburului
• Lăsaţi mereu uşa întredeschisă pentru a evita formarea de mirosuri neplăcute.
Curăţarea pompei
Maşina de spălat este dotată cu o pompă de autocurăţare care nu are nevoie de întreţinere. Se poate întâmpla însă ca unele obiecte mici (monede, nasturi) să cadă în anticamera care protejează pompa, situată în partea inferioară a acesteia.
! Verificaţi ca ciclul de spălare să fie încheiat şi scoateţi stecherul din priză.
Pentru a avea acces la anticameră:
1. scoateţi panoul de acoperire din partea din faţă a maşinii
de spălat folosind o
şurubelniţă
(a se vedea figura);
2. deşurubaţi capacul rotindu-l în sens invers acelor de ceasornic (a se vedea figura). Este normal să iasă puţină apă;
3.curăţaţi cu grijă interiorul;
4.înşurubaţi la loc capacul;
5.montaţi din nou panoul verificând, înainte de a-l împinge spre maşină, de a fi introdus cârligele în orificiile respective.
Controlarea furtunului de alimentare cu apă
Controlaţi tubul de alimentare cel puţin o dată pe an. Dacă prezintă crăpături sau fisuri trebuie înlocuit: pe parcursul spălărilor, presiunea puternică ar putea provoca crăpături neaşteptate.
! Nu folosiţi niciodată tuburi folosite deja.
16

Precauţii şi sfaturi
! Maşina de spălat a fost proiectată şi construită conform normelorinternaţionaledeprotecţie.Acesteavertizărisuntfurnizatedinmotivedesiguranţăşitrebuiesăfiecititecuatenţie.
Norme de protecţie şi siguranţă generale
• Acest aparat a fost conceput exclusiv pentru utilizarea în locuinţe unifamiliale.
• Aparat aparat poate fi folosit de copii începând cu vârsta de 8 ani şi de persoane cu capacităţi fizice, senzoriale sau mentale reduse sau cu experienţă şi cunoştinţe insuficiente dacă sunt supravegheate sau dacă au primit o pregătire adecvată privind folosirea aparatului în mod sigur şi înţelegând pericolele respective. Copiii nu trebuie să se joace cu aparatul. Întreţinerea şi curăţarea nu trebuie să fie efectuate de copii fără supraveghere.
•Nu atingeţi maşina când sunteţi desculţi sau cu mâinile sau picioarele ude sau umede.
•Nu scoateţi stecherul din priză trăgând de cablu.
•Nu deschideţi compartimentul pentru detergent în timp ce maşina se află în funcţiune.
•Nu atingeţi apa golită din maşină: poate avea o temperatură ridicată.
•Nu forţaţi în nici un caz uşa: s-ar putea deteriora mecanismul de siguranţă care evită deschiderea accidentală.
•În caz de defecţiune, nu umblaţi în nici un caz la mecanismele din interior şi nu încercaţi să o reparaţi singuri.
•Controlaţi mereu ca în apropierea maşinii aflate în funcţiune, să nu se afle copii.
•Pe durata spălării uşa se poate încălzi.
•Dacă trebuie să deplasaţi maşina, cereţi ajutor unei alte (sau2)persoaneşifiţifoarteatenţi.Niciodatănudeplasaţi maşina singuri deoarece aceasta este foarte grea.
•Înainte de a introduce rufele, controlaţi cuva să fie goală.
Aruncarea reziduurilor
•Eliminarea ambalajelor: respectaţi normele locale, în acest fel ambalajele vor putea fi utilizate din nou.
•Directiva Europeană 2012/19/EU cu privire la deşeurile care provin de la aparatura electrică sau electronică prevede ca aparatele electrocasnice să nu fie colectate împreună cu deşeurile urbane solide, obişnuite. Aparatele scoase din uz trebuie să fie colectate separat atât pentru a optimiza rata de recuperare şi de reciclare a materialelor componente cât şi pentru a evita pericolele care pot duce la dăunarea sănătăţii omului sau poluarea mediului înconjurător. Simbolul tomberonului tăiat care apare pe toate produsele vă aminteşte tocmai obligaţia de a le colecta separat.
Pentru informaţii suplimentare cu privire la scoaterea din uz
a electrocasnicelor, deţinătorii acestora pot apela la centrele RO de colectare a deşeurilor sau la vânzătorii de la care au achiziţionat produsele respective.
Atenţionãri în conformitate cu legislaţia în vigoare
•Conform prevederilor legislaţiei privind gestionarea deşeurilor, este interzisã eliminarea deşeurilor de echipamente electrice şi electronice (DEEE) alãturi de deşeurile municipale nesortate. Ele trebuie predate la punctele municipale de colectare, societãţile autorizate
de colectare/reciclare sau distribuitori (în cazul în care se achiziţioneazã echipamente noi de acelaşi tip).
•Autoritãţile locale trebuie sã asigure spaţiile nece-
sare pentru colectarea selectivã a deşeurilor precum şi funcţionalitatea acestora. Contactaţi societatea de salubrizare sau compartimentul specializat din cadrul primãriei pentru informaţii detaliate.
•Deşeurile de echipamente electrice şi electronice pot fi predate şi distribuitorilor, la achiziţionarea de echipamente noi de acelaşi tip (schimb 1 la 1).
•Predarea, de cãtre utilizatori, a deşeurilor de echipamente electrice şi electronice, la punctele de colectare municipale, societãţile autorizate de colectare/reciclare sau distribuitori (în cazul în care se achiziţioneazã echipamente noi de acelaşi tip) faciliteazã refolosirea, reciclarea sau alte forme de valorificare a acestora.
•Deşeurile de echipamente electrice şi electronice pot conţine substanţe periculoase care pot avea un impact negativ asupra mediului şi sãnãtãţii umane în cazul în care DEEE nu sunt colectate selectiv şi gestionate conform prevederilor legale.
•Simbolul alãturat (o pubela cu roţi, barata cu
douã linii în forma de X), aplicat pe un echipament electric sau electronic, semnificã faptul cã acesta  face obiectul unei colectãri separate şi nu poate fi
  eliminat împreunã cu deşeurile municipale nesortate.
17
Descrierea maşinii de spălat şi activarea unui program
|
Panoul de control |
|
RO |
||
|
||
|
|
Indicatoare
DESFĂŞURARE
CICLU/PORNIRE
ÎNTÂRZIATĂ
|
Tastă cu led |
Tasta |
START/PAUSE |
Taste cu led |
|
ON/OFF |
FUNCŢII |
|
|
|
Selector |
|
|
|
|
|
|
|
|
|
|
|
|
|
|
|
|
|
|
Indicator |
||||
|
|
|
TEMPERATURĂ |
|
||||
Sertarul detergenţilor |
|
|
UŞĂ BLOCATĂ |
|||||
|
|
|
||||||
|
Selector |
|
|
Selector |
|
|
|
|
|
PROGRAME |
|
CENTRIFUGARE |
|
|
|
|
|
|
|
|
|
|
|
|||
Sertarul detergenţilor: pentru a introduce detergenţi sau aditivi (a se vedea “Detergenţi şi rufe albe”).
Tasta ON/OFF: pentru a porni şi opri maşina.
Selector PROGRAME: pentru a selecta programele. Pe durata desfăşurării programului selectorul rămâne în aceeaşi poziţie.
Taste cu led FUNCŢII: pentru a selecta funcţiile disponibile. Indicatorul corespunzător funcţiei alese va rămâne aprins.
Selector CENTRIFUGARE: pentru a activa / anula centrifugarea (a se vedea “Personalizare”).
Selector TEMPERATURĂ: pentru a selecta temperatura sau spălarea la rece (a se vedea “Personalizare”).
Indicatoare DESFĂŞURARE CICLU/PORNIRE ÎNTÂRZIATĂ: pentru a putea urmări avansarea programului de spălare.
Indicatorul aprins arată faza în curs de desfăşurare. Dacă a fost selectată funcţia “Pornire întârziată”, va fi indicat timpul care lipseşte până la pornirea programului
(a se vedea pag. alăturată).
Indicator UŞĂ BLOCATĂ: pentru a înţelege dacă uşa se poate deschide sau nu (a se vedea pag. alăturată).
Tastă cu led START/PAUSE: pentru a activa / opri momentan programele.
N.B.: pentru a întrerupe momentan un ciclu apăsaţi această tastă; ledul se va aprinde intermitent (culoare portocalie) în timp ce ledul corespunzător fazei în curs de desfăşurare va rămâne aprins. Dacă indicatorul UŞĂ BLOCATĂ  este stins, atunci uşa se poate deschide. Pentru a continua spălarea, de unde a fost întreruptă, apăsaţi din nou tasta.
Modalitatea de stand by
Aceasta masina de spalat rufe, conform noilor norme legate de economia de curent electric, este dotata cu un sistem de oprire automat (stand-by) care intra în functiune dupa câteva minute de neutilizare. Apasati scurt tasta ON-OFF si asteptati repunerea în functiune a masinii.
18
 Loading...