


IBS350DS01

BUILT-IN ELECTRIC SINGLE
AND DOUBLE OVEN
USER INSTRUCTIONS
THANK YOU for purchasing this high-quality product. If you should experience a problem not covered in PROBLEM SOLVER, call us at
1-866-664-2449.
You will need your product model and serial numbers. These can be located under the control panel on single ovens and under the control
panel on the upper oven cavity on double ovens.
For warranty concerns, do not take the appliance back to the store. Please contact us in the U.S.A. or Canada at 1-866-664-2449.
This product features a Limited Warranty - See the “Warranty” section for complete details. IKEA® appliances carry a 5-year warranty
(excludes LAGAN family - see warranty for coverage details).
NOTE: Proof of Purchase is required to obtain warranty service.
Para una versión de estas instrucciones en español, visite: www.whirlpool.com.
Necesitará tener a mano los números de modelo y serie, que se encuentran en el lado inferior derecho del marco del horno, dentro
de la puerta.
Si tiene dudas acerca de la garantía, no devuelva el aparato a la tienda. Póngase en contacto con nosotros en los EE.UU. o en
Canadá al 1-866-664-2449.
Este producto tiene una garantía limitada - Consulte la sección “Garantía” para obtener todos los detalles. Los aparatos IKEA®
tienen una garantía de 5 años (excluyendo los de la familia LAGAN - consulte la garantía para ver los detalles acerca de la cobertura).
NOTA: Se requiere la prueba de compra para obtener servicio bajo la garantía.
Table of Contents
OVEN SAFETY ................................................................................2
FEATURE GUIDE ............................................................................3
OVEN USE .......................................................................................5
Electronic Oven Controls .............................................................5
Sabbath Mode..............................................................................6
Aluminum Foil ...............................................................................6
Positioning Racks and Bakeware ................................................6
Oven Vent(s) .................................................................................7
Baking and Roasting ....................................................................7
Broiling..........................................................................................8
Convection Cooking - Single Oven Only .....................................8
Keep Warm ...................................................................................9
Favorite .........................................................................................9
Cook & Hold ...............................................................................10
Cook Time ..................................................................................10
OVEN CARE ..................................................................................11
Self-Cleaning Cycle ....................................................................11
General Cleaning ........................................................................12
Oven Lights ................................................................................12
PROBLEM SOLVER ......................................................................13
ACCESSORIES .............................................................................13
WARRANTY ..................................................................................14
W10796005B
OVEN SAFETY
Your safety and the safety of others are very important.
We have provided many important safety messages in this manual and on your appliance. Always read and obey all safety
messages.
This is the safety alert symbol.
This symbol alerts you to potential hazards that can kill or hurt you and others.
All safety messages will follow the safety alert symbol and either the word “DANGER” or “WARNING.”
These words mean:
You can be killed or seriously injured if you don't immediately
DANGER
WARNING
All safety messages will tell you what the potential hazard is, tell you how to reduce the chance of injury, and tell you what can
happen if the instructions are not followed.
IMPORTANT SAFETY INSTRUCTIONS
follow instructions.
You
can be killed or seriously injured if you don't
instructions.
follow
WARNING: To reduce the risk of fire, electrical shock,
injury to persons, or damage when using the oven, follow
basic precautions, including the following:
■ Proper Installation – Be sure the oven is properly installed
and grounded by a qualified technician.
Never Use the Oven for Warming or Heating the Room.
■
Do Not Leave Children Alone – Children should not be left
■
alone or unattended in area where oven is in use. They
should never be allowed to sit or stand on any part of the
oven.
■ Wear Proper Apparel – Loose-fitting or hanging garments
should never be worn while using the oven.
■ User Servicing – Do not repair or replace any part of the
oven unless specifically recommended in the manual. All
other servicing should be referred to a qualified technician.
■ Storage in Oven – Flammable materials should not be
stored in an oven.
■ Do Not Use Water on Grease Fires – Smother fire or flame
or use dry chemical or foam-type extinguisher.
■ Use Only Dry Potholders – Moist or damp potholders on
hot surfaces may result in burns from steam. Do not let
potholder touch hot heating elements. Do not use a towel
or other bulky cloth.
■ Use Care When Opening Door – Let hot air or steam
escape before removing or replacing food.
■ Do Not Heat Unopened Food Containers – Build-up of
pressure may cause container to burst and result in injury.
■ Keep Oven Vent Ducts Unobstructed.
Placement of Oven Racks – Always place oven racks in
■
desired location while oven is cool. If rack must be moved
while oven is hot, do not let potholder contact hot heating
element in oven.
DO NOT TOUCH HEATING ELEMENTS OR INTERIOR
■
SURFACES OF OVEN – Heating elements may be hot
even though they are dark in color. Interior surfaces of an
oven become hot enough to cause burns. During and after
use, do not touch, or let clothing or other flammable
materials contact heating elements or interior surfaces of
oven until they have had sufficient time to cool. Other
surfaces of the oven may become hot enough to cause
burns – among these surfaces are oven vent openings and
surfaces near these openings, oven doors, and
oven doors.
For self-cleaning ovens:
Do Not Clean Gasket – The gasket is essential for a good
■
seal. Care should be taken not to rub, damage, or move
the gasket.
Do Not Use Oven Cleaners – No commercial oven cleaner
■
or oven liner protective coating of any kind should be used
in or around any part of the oven.
■ Clean Only Parts Listed in Manual.
■ Before Self-Cleaning the Oven – Remove broiler pan and
other utensils.
windows of
SAVE THESE INSTRUCTIONS
State of California Proposition 65 Warnings:
WARNING: This product contains one or more chemicals known to the State of California to cause cancer.
WARNING: This product contains one or more chemicals known to the State of California to cause birth defects or other
reproductive harm.
2
FEATURE GUIDE
This manual covers several models. Your model may have some or all of the items listed. Refer to this manual or Frequently Asked
Questions (FAQs) section of our website at www.whirlpool.com for more detailed instructions. In Canada, reference the Customer
Service section at www.whirlpool.ca. For more specific details on a feature and the steps to use the features listed, refer to the titled
section for that feature.
WARNING
Food Poisoning Hazard
Do not let food sit in oven more than one hour before
or after cooking.
Doing so can result in food poisoning or sickness.
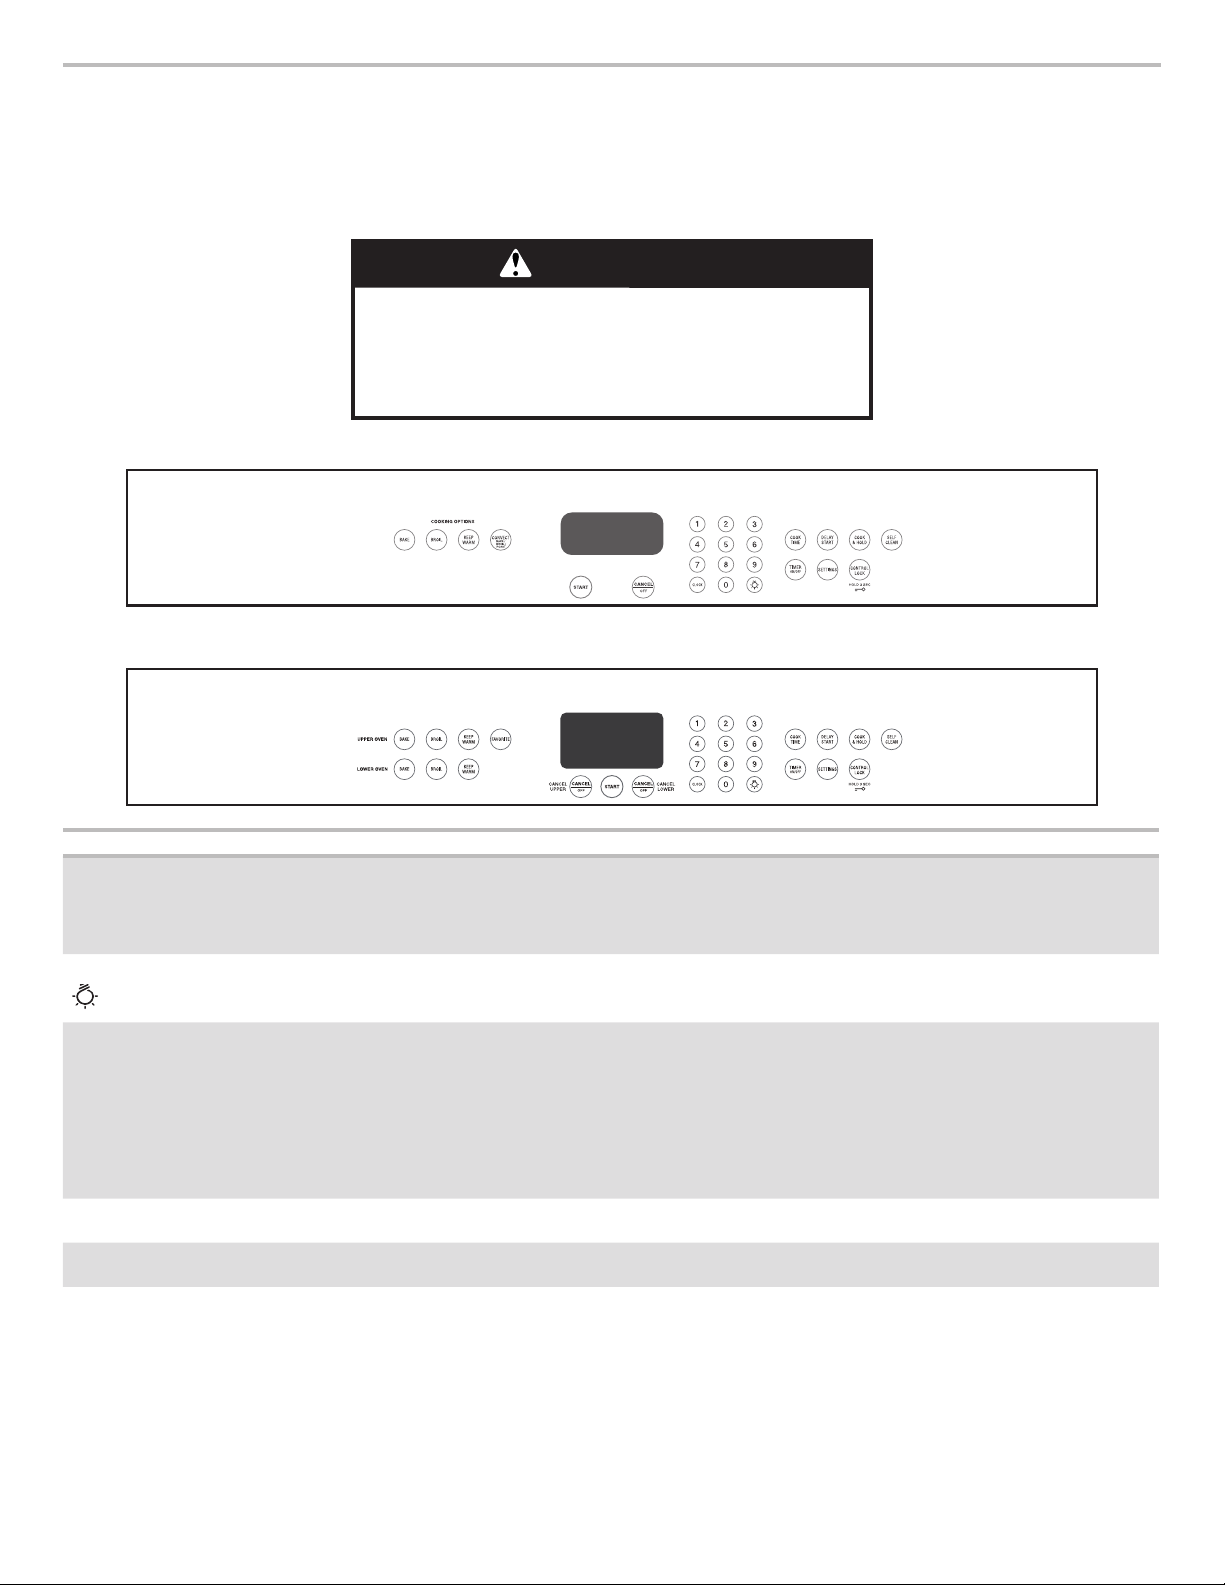
Single
Double
KEYPAD FEATURE INSTRUCTIONS
CLOCK Clock
Oven Light Oven cavity light
TIMER ON/OFF Oven timer
START Cooking start
CANCEL/OFF Oven function
This clock can use a 12- or 24-hour cycle. See “Electronic Oven Controls” section.
1. Press CLOCK until “Clock” is displayed.
2. Press the number keypads to set the time of day.
3. Press START.
While the oven door(s) are closed, press the Oven Light keypad to turn the light(s) on
and off. The oven light(s) will come on when an oven door is opened.
The Timer can be set in hours or minutes up to 9 hours and 59 minutes.
1. Press TIMER ON/OFF.
2. Press the number keypads to set the length of time in hr-min. Leading zeros do not
have to be entered. For example, for 2 minutes, enter “2.”
3. Press TIMER ON/OFF to begin the countdown. If enabled, timer tone(s) will sound at
the end of countdown.
4. Press TIMER ON/OFF to cancel the Timer and return to the time of day. Do not press
the Cancel keypad because the oven will turn off.
The Start keypad begins any oven function. If Start is not pressed within 2 minutes after
pressing a keypad, the function is canceled and the time of day is displayed.
The Cancel keypad stops any oven function except the Clock, Timer and Control Lock
in the selected oven.
3

KEYPAD FEATURE INSTRUCTIONS
BAKE Baking and roasting
BROIL Broiling
CONVECT
(Single oven only)
(on some models)
FAVORITE
(on some models)
KEEP WARM Hold warm
DELAY START Delayed start
COOK TIME Timed cooking
COOK & HOLD Timed cooking and
SELF CLEAN Self-clean cycle
CONTROL LOCK
hold 3 sec.
SETTINGS Oven use functions
Convection cooking
Saved favorite
keep warm
Oven control
lockout
1. Press BAKE for the desired oven.
2. Press the number keypads to set the desired temperature. If the temperature entered
is not in the range of the temperatures allowed, the minimum or maximum allowed
temperature will be displayed. Enter a temperature in the allowable range.
3. (Lower oven, single rack baking only) Press START. Rapid preheat will begin.
IMPORTANT: Rapid Preheat should be used only for single-rack baking.
4. (Multiple rack baking) Press START for the desired oven. Press START for the desired
oven again to cancel Rapid Preheat. To change the temperature when one oven is in
use, repeat steps 2 and 3. To change the temperature when two ovens are in use, press
“1” for the upper oven or press “2” for the lower oven, and then repeat steps 2 and 3.
For double ovens only: To change the temperature when both ovens are in use, touch
any number keypad and then press “1” for the upper oven or press “2” for the lower
oven and repeat steps 2 and 3.
5. Press CANCEL for the selected oven when finished.
1. Press BROIL for the desired oven.
2. Press the number keypads to set the desired temperature. If the temperature entered
is not in the range of the temperatures allowed, the minimum or maximum allowed
temperature will be displayed. Enter a temperature in the allowable range.
3. Press START for the selected oven, and then allow the oven to preheat for 5 minutes.
4. Position the cookware in the oven and close the door.
5. To change the temperature when one oven is in use, repeat steps 2 and 3. To change
the temperature when two ovens are in use, press “1” for the upper oven or press “2”
for the lower oven, and then repeat steps 2 and 3.
For double ovens only: To change the temperature when both ovens are in use, touch
any number keypad and then press “1” for the upper oven or press “2” for the lower
oven and repeat steps 2 and 3.
6. Press CANCEL for the selected oven when finished.
1. Press CONVECT until the desired mode is displayed. Follow the scrolling text directions
for the desired mode or see the specific directions for the desired mode in the
“Convection Cooking” section.
2. Press START.
3. Press the number keypads to set the desired temperature. If the temperature entered
is not in the range of the temperatures allowed, the minimum or maximum allowed
temperature will be displayed. Enter a temperature in the allowable range.
4. Press START.
5. To change the temperature, repeat steps 3 and 4.
6. Press CANCEL for the selected oven when finished.
The Favorite feature allows you to save the time and temperature settings from any active
cook function. To save or use favorite, see the “Favorite” section.
Food must be at serving temperature before placing it in the warmed oven.
1. Press KEEP WARM for the desired oven.
2. Press the number keypads to set the desired temperature. If the temperature entered
is not in the range of the temperatures allowed, the minimum or maximum allowed
temperature will be displayed. Enter a temperature in the allowable range.
3. Press START for the selected oven.
4. To change the temperature, repeat steps 2 and 3.
5. Press CANCEL for the selected oven when finished.
The Delay Start keypad is used to enter the starting time for an oven function with a delayed
start. Delay Start should not be used for foods such as breads and cakes because they may
not bake properly.
To set a Timed Cook or a Delayed Timed Cook, see the “Cook Time” section.
Cook Time allows the oven to be set to turn on at a certain time of day, cook for a set length
of time, and/or shut off automatically.
To set a Timed Cook or a Delayed Timed Cook, see the “Cook Time” section.
Cook & Hold allows the oven to be set to cook for a set length of time, followed by a 1-hour
Keep Warm cycle.
To set a Cook & Hold or a Delayed Cook & Hold, see the “Cook & Hold” section.
See the “Self-Clean Cycle” section.
1. Check that the ovens and timers are off.
2. Press and hold START or START LOWER for 3 seconds.
3. If enabled, a tone will sound, and the controls will be locked.
4. Repeat to unlock. No keypads will function with the controls locked.
Enables you to personalize the audible tones and oven operation to suit your needs. See the
“Oven Use” section.
4

OVEN USE
Odors and smoke are normal when the oven is used the first few
times or when it is heavily soiled.
Electronic Oven Controls
IMPORTANT: The health of some birds is extremely sensitive to
the fumes given off. Exposure to the fumes may result in death
to certain birds. Always move birds to another closed and wellventilated room.
Control Display
The display will light up when first powered up or after a power
loss. When oven is not in use, the time of day is displayed.
Tones
Tones are audible signals, indicating the following:
One Tone
■ Valid keypad press.
■ Oven is preheated (long tone).
■ Kitchen timer (long tone with reminder tone every 60 seconds).
■ Function has been entered.
Three Tone
■ Invalid keypad press.
Four Tone
■ End of cycle (with reminder tone every 60 seconds).
Use the Settings keypad to change the tone settings.
Settings
Many features of the oven control can be adjusted to meet
your personal needs. These changes are made using the
Settings keypad.
Use the Settings keypad to scroll through the features that
can be changed. Each press of the Settings keypad will
advance the display to the next setting. After selecting the
feature to be changed, the control will prompt you for the
required input. Details of all of the feature changes are
explained in the following sections.
Press CANCEL to exit Settings.
Fahrenheit and Celsius
The temperature is preset to Fahrenheit but can be changed
to Celsius.
1. Press SETTINGS until “TEMP UNIT” is displayed.
2. The current setting will be displayed.
3. Press the “1” keypad to adjust the setting.
4. Press CANCEL to exit and display the time of day.
Audible Tones Disable
Turns off all tones, including the end of cycle tone and key press
tones, except reminder tones. Reminder tones remain enabled
when audible tones are disabled.
1. Press SETTINGS until “SOUND” is displayed.
2. The current setting will be displayed.
3. Press the “1” keypad to adjust the setting.
4. Press CANCEL to exit and display the time of day.
Sound Volume
Sets the pitch of the tone to either high or low.
1. Press SETTINGS until “SOUND VOLUME” is displayed.
2. The current setting will be displayed.
3. Press the “1” keypad to adjust the setting.
4. Press CANCEL to exit and display the time of day.
End of Cycle Tone
Activates or turns off the tones that sound at the end of a cycle.
1. Press SETTINGS until “END TONE” is displayed.
2. The current setting will be displayed.
3. Press the “1” keypad to adjust the setting.
4. Press CANCEL to exit and display the time of day.
Key Press Tones
Activates or turns off the tones when a keypad is pressed.
1. Press SETTINGS until “KEYPRESS TONE”
is displayed.
2. The current setting will be displayed.
3. Press the “1” keypad to adjust the setting.
4. Press CANCEL to exit and display the time of day.
Reminder Tones Disable
Turns off the short repeating tone that sounds every 1 minute
after the end of cycle tones.
1. Press SETTINGS until “REMINDER TONE”
is displayed.
2. The current setting will be displayed.
3. Press the “1” keypad to adjust the setting.
4. Press CANCEL to exit and display the time of day.
12/24 Hour Clock
1. Press SETTINGS until “12/24 HOUR” is displayed.
2. The current setting will be displayed.
3. Press the “1” keypad to adjust the setting.
4. Press CANCEL to exit and display the time of day.
12-Hour Shutoff
The oven control is set to automatically shut off the oven
12 hours after the oven initiates a cook or clean function.
This will not interfere with any timed or delay cook functions.
1. Press SETTINGS until “12 HR AUTO OFF”
is displayed.
2. The current setting will be displayed.
3. Press the “1” keypad to adjust the setting.
4. Press CANCEL to exit and display the time of day.
Languages - Scrolling Display Text
Language options are English and French.
1. Press SETTINGS until “LANGUAGE” is displayed.
2. The current setting will be displayed.
3. Press the number keypad as instructed by the
scrolling text to select the new language.
4. Press CANCEL to exit and display the time of day.
5

Demo Mode
IMPORTANT: This feature is intended for use on the sales floor
with 120V power connection and permits the control features
to be demonstrated without heating elements turning on. If this
feature is activated, the oven will not work.
1. Press SETTINGS until “DEMO MODE” is displayed.
2. The current setting will be displayed.
3. Press the “1” keypad to adjust the setting.
4. Press CANCEL to exit and display the time of day.
Oven Temperature Offset Control
IMPORTANT: Do not use a thermometer to measure oven
temperature. Elements will cycle on and off as needed to provide
consistent temperature, but they may run slightly hot or cool at
any point in time due to this cycling. Most thermometers are slow
to react to temperature change and will not provide an accurate
reading due to this cycling.
The oven provides accurate temperatures; however, it may cook
faster or slower than your previous oven, so the temperature can
be adjusted to personalize it for your cooking needs. It can be
changed to Fahrenheit or Celsius.
To Adjust Oven Temperature:
1. Press SETTINGS until “TEMP CALIB” is displayed.
2. The current setting will be displayed. For double ovens
only: Press the “1” keypad to toggle between the upper
and lower ovens.
3. Press START for the selected oven to select the choice
displayed in Step 2. Wait several seconds for the display
to change or press START for the selected oven, and then
continue with Step 4.
4. Press the “3” keypad to increase the temperature in 5°F
(3°C) increments, or press the “6” keypad to decrease the
temperature in 5°F (3°C) increments. The range is from -30°F
to +30°F (-18°C to +18°C).
5. Press START for the selected oven.
6. Press CANCEL for the selected oven to exit and display
the time of day.
To Activate Sabbath Mode:
1. Press BAKE for the desired oven.
2. Press the number keypads to set the desired temperature. If
the temperature entered is not in the range of the temperatures
allowed, the minimum or maximum allowed temperature will
be displayed. Enter a temperature in the allowable range.
3. Press START for the selected oven.
For timed cooking in Sabbath Mode, press COOK TIME, and
then press the number keypads to set the desired cook time.
Press START for the selected oven.
4. (Optional) If Sabbath Mode is to be used for both ovens,
repeat steps 1 through 3 for the second oven.
5. Press SETTINGS. Three tones will sound. Then press “7.”
“SAb” will appear in the display.
To Adjust Temperature (when Sabbath Mode is running
in only one oven):
1. Press the number keypad as instructed by the scrolling
text to select the new temperature.
NOTE: The temperature adjustment will not appear on
the display, and no tones will sound. The scrolling text
will be shown on the display as it was before the keypad
was pressed.
2. Press START for the selected oven.
To Adjust Temperature (when Sabbath Mode is running
in both ovens):
1. Press BAKE for the desired oven.
2. Press the number keypad as instructed by the scrolling
text to select the new temperature.
NOTE: The temperature adjustment will not appear on
the display, and no tones will sound. The scrolling text
will be shown on the display as it was before the keypad
was pressed.
3. Press START for the selected oven.
To Deactivate Sabbath Mode:
Press SETTINGS, and then press “7” to return to regular baking,
or press CANCEL for the desired oven to turn off the oven(s).
Sabbath Mode
The Sabbath Mode sets the oven to remain on in a bake setting
until turned off.
When the Sabbath Mode is set, only the Bake cycle will operate.
All other cooking and cleaning cycles are disabled. No tones will
sound, and the displays will not indicate temperature changes.
When the oven door is opened or closed, the oven light will not
turn on or off, and the heating elements will not turn on or off
immediately.
NOTE: If a power failure happens while Sabbath Mode is running,
the oven will show Sabbath Mode is on, but the Bake cycle will not
be on. If the oven door is opened during this time, the oven light
will turn on.
To Enable Sabbath Mode Capability (One Time Only):
1. Press SETTINGS until “SABBATH” is displayed.
2. Press the “1” keypad. Sabbath Mode can be activated
for baking.
3. Press CANCEL to save the setting and exit to display
the time of day.
NOTE: To disable the Sabbath Mode, repeat steps 1 through 3
to change the status from “SABBATH ON” to “SABBATH OFF.”
Aluminum Foil
IMPORTANT: To avoid permanent damage to the oven bottom
finish, do not line the oven bottom with any type of foil or liner.
For best cooking results, do not cover entire oven rack with foil
because air must be able to move freely.
Positioning Racks and Bakeware
IMPORTANT: To avoid permanent damage to the porcelain
finish, do not place food or bakeware directly on the oven
door or bottom.
Racks
■ Position racks before turning on the oven.
■ Do not position racks with bakeware on them.
■ Make sure racks are level.
■ Place food so it will not rise into the broil element. Allow
at least ¹⁄₂" (1.3 cm) between pans and the broil element.
To move a rack, pull it out to the stop position, raise the front
edge, and then lift it out. Use the following illustrations and
charts as a guide for positioning racks.
6
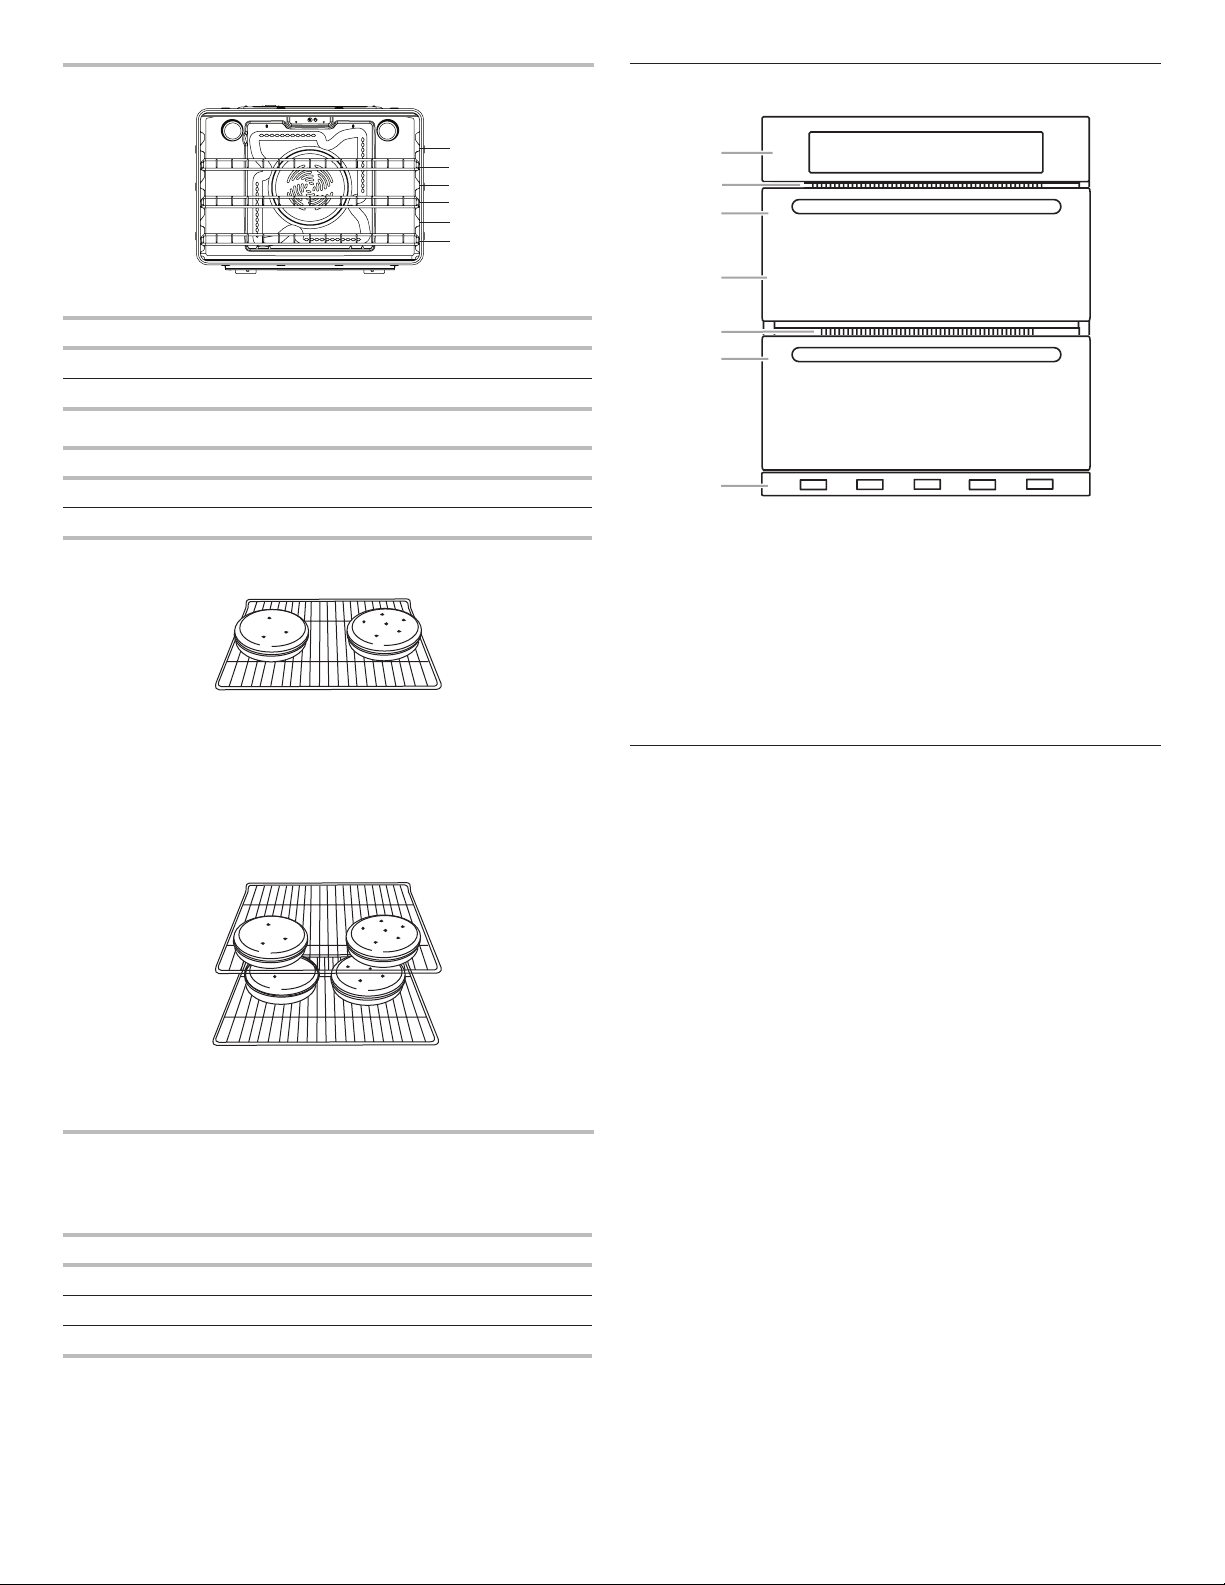
Rack Positions
6
5
4
3
2
1
D
G
Oven Vent(s)
A
B
C
Broiling
Food Rack Position
Broiled meats, poultry, fish 6
Broiling/searing meats, hamburgers, steaks 6
E
F
Baking
Food Rack Position
Large roasts, roasted meats or poultry 1 or 2
Most baked goods, casseroles 2 or 3
Baking Layer Cakes on 1 Rack
Place the cakes on the rack as shown.
Multiple Rack Cooking
2-rack: Use rack positions 2 and 5 for regular baking.
2-rack (convection only): Use rack positions 2 and 5
for convection baking.
Baking Layer Cakes on 2 Racks
For best results when baking cakes on 2 racks, use rack
positions 2 and 5 with the Bake function. Place the cakes
on the racks as shown.
Single and Double Oven
A. Control panel
B. Oven vent
C. Single oven or upper double oven
G. Bottom vent
The oven vent(s) should not be blocked or covered since they
allow the inlet of fresh air into the cooling system. Also, the bottom
vent should not be blocked or covered since it allows the inlet
of fresh air into the cooling system and the outlet of hot air from
the cooling system. Blocking or covering vents will cause poor
air circulation, affecting cooking, cleaning and cooling results.
Double Oven
D. Upper oven
E. Oven vent
F. Lower oven
G. Bottom vent
Baking and Roasting
Preheating
When beginning a Bake cycle, the oven will begin preheating
after Start is pressed. The oven will take approximately 13 to
19 minutes to reach 350°F (177°C) with all of the oven racks
provided with your oven inside the oven cavity. Higher
temperatures will take longer to preheat. The preheat cycle rapidly
increases the oven temperature. The actual oven temperature
will go above your set temperature to offset the heat lost when
your oven door is opened to insert food. This ensures that when
you place your food in the oven, the oven will begin at the proper
temperature. Insert your food when the preheat tone sounds.
Do not open the door during preheat before the tone sounds.
Rapid Preheat
Baking Cookies on 2 Racks
For best results when baking cookies on 2 racks, use rack
positions 2 and 5 with the Convection Bake function.
Bakeware
To cook food evenly, hot air must be able to circulate.
Allow 2" (5.0 cm) of space around bakeware and oven
walls. Use the following chart as a guide.
Number of Pan(s) Position on Rack
1 Center of rack
2 Side by side
3 or 4 Refer to the previous illustration
NOTE: Bakeware materials and color may affect results.
Dark, dull, non-stick or glass pans may require shorter
baking times, in contrast insulated or stainless steel
pans may require longer baking times. Follow bakeware
manufacturer's recommendations.
Rapid Preheat can be used to shorten the preheating time.
Only one standard flat oven rack should be in the oven during
Rapid Preheat. Extra racks should be removed prior to starting
Rapid Preheat. The preheating cycle should be completed
before placing food in the oven. When the Rapid Preheat
cycle is complete, the oven starts a normal Bake cycle.
IMPORTANT: Rapid Preheat should be used only
for single-rack baking.
Oven Temperature
While in use, the oven elements will cycle on and off as needed
to maintain a consistent temperature, but they may run slightly
hot or cool at any point in time due to this cycling. Opening the
oven door while in use will release the hot air and cool the oven,
which could impact the cooking time and performance. It is
recommended to use the oven light to monitor cooking progress.
NOTE: On models with convection, the convection fan may run
in the non-convection bake mode to improve oven performance.
7
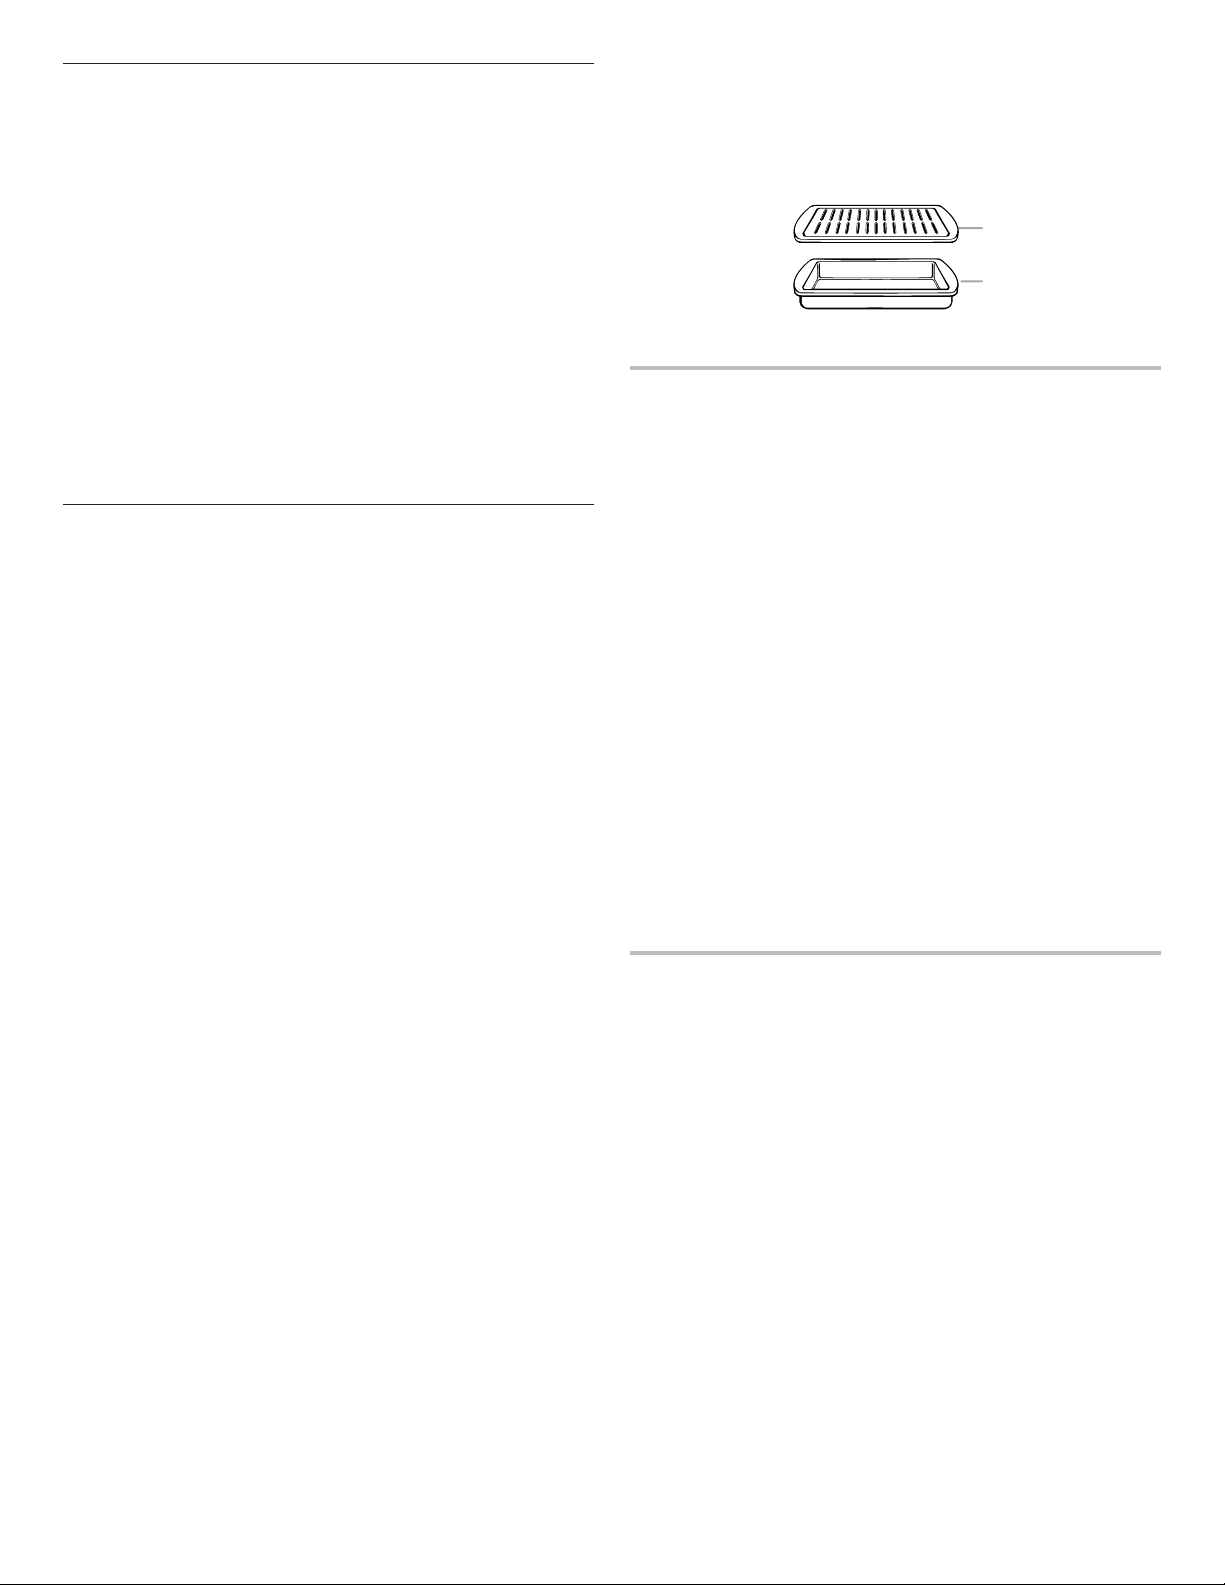
Broiling
A
B
When broiling, preheat the oven for 5 minutes before putting food
in unless recommended otherwise in the recipe. Position food
on grid in a broiler pan, and then place it in the center of the oven
rack. Close the oven door to ensure proper broiling temperature.
NOTE: Odors and smoke are normal the first few times the oven
is used or if the oven is heavily soiled.
Changing the temperature when broiling allows more precise
control when cooking. The lower the broil setting, the slower
the cooking. Thicker cuts and unevenly shaped pieces of meat,
fish and poultry may cook better at lower broil settings. Place
the food in the upper or lower oven. Refer to the “Positioning
Racks and Bakeware” section for more information.
On lower settings, the broil element will cycle On and Off
to maintain the proper temperature.
■ For best results, use a broiler pan and grid. It is designed
to drain juices and help avoid spatter and smoke.
If you would like to purchase a broiler pan, one may be
ordered. Please refer to the “Accessories” section for more
information.
Convection Cooking - Single
Oven Only
(on some models)
During convection cooking, the fan provides hot air circulation
throughout the oven. The movement of heated air around the
food can help to speed up cooking by penetrating the cooler
outer surfaces. Food cooks more evenly, browning and crisping
outer surfaces while sealing moisture inside.
During the Convect function, the ring element, bake and broil
elements, and the fan operate to heat the oven cavity. If the
oven door is opened during convection cooking or preheating,
the fan turns off immediately and the element(s) will turn off
after 30 seconds. Once the door is closed, the element(s) will
turn back on.
NOTE: It is normal for the convection fan to run during
non-convection cycles as well as during preheat.
■ It is important not to cover foods so that surface areas remain
exposed to the circulating air, allowing browning and crisping.
■ Keep heat loss to a minimum by only opening the oven door
when necessary. It is recommended to use the oven light to
monitor cooking progress.
■ Choose cookie sheets without sides and roasting pans with
lower sides to allow air to move freely around the food.
■ Test baked goods for doneness a few minutes before the
minimum cooking time with a method such as a toothpick.
■ Use a meat thermometer to determine the doneness of meats
and poultry. Check the temperature of pork and poultry in 2 or
3 different places, including the thickest part.
■ Before convection cooking, position the rack(s) according to
the “Positioning Racks and Bakeware” section.
■ When using more than one rack, position bakeware/cookware
on the racks to allow movement of the fan circulated air
around the food. See the “Positioning Racks and Bakeware”
section.
■ If the oven is full, extra cooking time may be needed.
■ For optimal cooking results, do not cover food.
■ When roasting poultry and meat, use a broiler pan and grid.
It is not necessary to wait for the oven to preheat, unless
recommended in the recipe.
To order a broiler pan, see the “Assistance or Service” section.
A. Broiler grid
B. Broiler pan
Convection Baking
Use Convect Bake for single or multiple rack baking. When
convection baking, reduce your recipe baking temperature
by 25°F (15°C).
To Set Convect Bake:
1. Press CONVECT until “CONVECT BAKE” is displayed.
2. Press START.
3. Press the number keypads to set the desired temperature.
If the temperature entered is not in the range of the
temperatures allowed, the minimum or maximum allowed
temperature will be displayed. Enter a temperature in the
allowable range.
4. Press START. The oven will begin preheating. There are
two preheat modes on Convect Bake function. Use Rapid
Preheating when using a single rack only, and use the standard
Preheating when using multiple racks. It is possible to switch
between “Rapid Preheating” and “Preheating” by pressing
Start for the selected oven during the preheating.
5. Place the food in the oven and close the oven door when
preheat is completed.
6. Press CANCEL when finished.
7. Remove food from the oven.
NOTE: The temperature may be changed at any time by
pressing the number keypads to enter the desired temperature
and then pressing START for the selected oven. Changing the
temperature once food is placed in the oven could affect the
performance.
Convection Broil
When convection broiling, enter your normal broiling temperature.
The oven door must be closed when using Convect Broil.
It is not necessary to preheat the oven for Convect Broil.
1. Place the food in the oven and close the oven door.
2. Press CONVECT until “CONVECT BROIL” is displayed.
3. Press START.
4. Press the number keypads to set the desired temperature.
If the temperature entered is not in the range of the
temperatures allowed, the minimum or maximum allowed
temperature will be displayed. Enter a temperature in the
allowable range.
5. Press START.
6. Press CANCEL when finished.
7. Remove food from the oven.
NOTE: The temperature may be changed at any time by
pressing the number keypads to enter the desired temperature
and then pressing START for the selected oven. Changing the
temperature once food is placed in the oven could affect the
performance.
8
Convection Roasting
When convection roasting, enter your normal roasting
temperature. The roasting time should be 15-30% less
than in conventional cooking.
It is not necessary to preheat the oven for Convect Roast.
1. Place the food in the oven and close the oven door.
2. Press CONVECT until “CONVECT ROAST” is displayed.
3. Press START.
4. Press the number keypads to set the desired temperature.
If the temperature entered is not in the range of the
temperatures allowed, the minimum or maximum allowed
temperature will be displayed. Enter a temperature in the
allowable range.
5. Press START.
6. Press CANCEL when finished.
7. Remove food from the oven.
NOTE: The temperature may be changed at any time
by pressing the number keypads to enter the desired
temperature and then pressing START for the selected
oven. Changing the temperature once food is placed in
the oven could affect the performance.
Convection Recipe
When using Convection Recipe, enter your normal cooking
temperature. The oven door must be closed when using
Convection Recipe.
It is not necessary to preheat the oven for Convection Recipe
MEATS option.
1. For Convection Recipe MEATS only: Place food in the oven
and close the oven door.
2. Press CONVECT until “CONVECT RECIPE” is displayed.
3. Press START.
4. Press CONVECT to cycle between the options. Press START
to select the displayed option.
5. Press the number keypads to set the desired temperature. If
the temperature entered is not in the range of the temperatures
allowed, the minimum or maximum allowed temperature will
be displayed. Enter a temperature in the allowable range.
6. Press START.
7. Press the number keypads to enter the desired cook time,
and then press START.
NOTE: For BAKED FOODS and OTHERS options only: The
temperature will automatically be adjusted by decreasing the
temperature entered by 25°F (15°C). For baked foods only, do
not decrease the temperature on the recipe by 25°F (15°C); the
oven will automatically decrease the temperature entered by
25°F (15°C).
For MEATS and OTHERS options only: The cook time will
automatically be adjusted to 80% of the time entered and the
adjusted cook time will appear on the display, but temperature
will not be adjusted.
NOTE: Preheating can cause overcooking. If preheat is
required for the recipe, add 15 minutes to the cook time. Place
food in the oven at appropriate time.
8. For BAKED FOODS and OTHERS options only: The preheating
will start and once complete the unit will sound a tone. Place
the food in the oven and close the oven door.
9. At the end of the cooking time set, the oven will turn off
automatically, the end of cycle tone will sound and “Cooking
Complete” will appear in the text area. It's also possible to
press CANCEL for the selected oven to finish the cycle.
10. Remove food from the oven.
Keep Warm
WARNING
Food Poisoning Hazard
Do not let food sit in oven more than one hour before
or after cooking.
Doing so can result in food poisoning or sickness.
IMPORTANT: Food must be at serving temperature before placing
it in the warmed oven. Food may be held up to 1 hour; however,
breads and casseroles may become too dry if left in the oven
during the Keep Warm function. For best results, cover food.
The Keep Warm feature allows hot cooked foods to stay at serving
temperature.
To Use:
1. Press KEEP WARM.
2. Press the number keypads to set the desired temperature.
If the temperature entered is not in the range of the
temperatures allowed, the minimum or maximum allowed
temperature will be displayed. Enter a temperature in the
allowable range.
NOTE: The temperature may be changed at any time
by pressing the number keypads to enter the desired
temperature and then START for the selected oven.
For double ovens only: To change the temperature when both
ovens are in use, touch any number keypad, then press “1” for
the upper oven or press “2” for the lower oven, then press the
number keypads to enter the desired temperature, and then
press START for the selected oven.
3. Press START for the selected oven.
4. Place food in the oven.
5. Press CANCEL for the selected oven when finished.
6. Remove food from the oven.
To Cancel Keep Warm:
1. Press CANCEL for the selected oven.
2. Remove food from oven.
Favorite
(on some models)
WARNING
Food Poisoning Hazard
Do not let food sit in oven more than one hour before
or after cooking.
Doing so can result in food poisoning or sickness.
The Favorite feature allows you to save the time and temperature
settings from any active cook function.
To Save a Cooking Function as a Favorite:
1. Press FAVORITE.
For double ovens only: Press the “1” or “2” number keypad
to select the desired oven.
2. Press “2” to save the last performed cooking function.
A confirmation message will appear.
9
To Recall and Start a Favorite:
WARNING
1. Press FAVORITE.
2. Press “1.” The last saved function will appear onscreen. If no
functions have ever been saved, “No Favorite Saved” will appear.
NOTE: The set temperature can be changed by using the number
keypad to enter the desired value and then pressing START.
For double ovens only: To change the temperature when
both ovens are in use, touch any number keypad, and then
press “1” for the upper oven or press “2” for the lower oven
and press START.
The Cook Time (if available) can be changed by pressing COOK
TIME, and then using the number keypad to enter desired time
and pressing START.
For double ovens only: To change the Cook Time when both
ovens are in use, touch any number keypad, and then press “1”
for the upper oven or press “2” for the lower oven and press
START.
The temperature and time can be changed after the function
has started.
3. Place food in the oven when required.
4. Press CANCEL for the oven that is being used when finished.
5. Remove food from the oven.
8. At the end of the time set, the oven will keep warm
automatically, the end of cycle tone will sound.
NOTE: The Set Cooking Time can be changed at any time
during the cooking cycle by: pressing COOK TIME, entering
the desired time using the number keypads, pressing START,
and then pressing COOK & HOLD.
For double ovens only: To change the Cook Time when
both ovens are in use, touch any number keypad, and then
press “1” for the upper oven or press “2” for the lower oven.
Press COOK TIME, enter the desired time using the number
keypads, press START, and then press COOK & HOLD.
Once the cook time countdown is complete, “Cooking
complete - Holding warm” will scroll in the text are until the
door is opened, Cancel is pressed, or 1 hour has passed.
9. Press CANCEL for the selected oven to complete the cycle.
10. Remove food from the oven.
NOTE: To cancel the hold function without cancelling the
cooking cycle, press COOK & HOLD after the cook & hold
function is enabled. The display will not display anything.
Once the cook time count down is complete, “Cooking
complete” will scroll in the text area.
Cook Time
Cook & Hold
Food Poisoning Hazard
Do not let food sit in oven more than one hour before
or after cooking.
Doing so can result in food poisoning or sickness.
Cook & Hold allows the oven to be set to cook for a set length
of time, followed by a 1-hour Keep Warm cycle.
Delay Cook & Hold allows the oven to be set to start cooking after
a length of time you set, cook for a set length of time, followed by a
1-hour Keep Warm cycle.
Delay start should not be used for food such as breads and cakes
because they may not bake properly. Do not use delayed baking if
oven is already hot.
NOTE: During the Cook & Hold function, the Delay Start and
Cook Time are applied to the baking itself and not for the
“Holding Warm” phase.
1. Press BAKE for the desired oven.
2. Use the number keypad to enter the desired temperature.
NOTE: The temperature may be changed at any time by
using the number keypad to enter the desired temperature,
and then pressing START for the selected oven. Changing the
temperature once food is placed in the oven could affect the
performance.
3. Press COOK & HOLD.
For double ovens only: While both ovens are in use, press
the “1” or “2” number keypad to select the desired oven.
4. Use the number keypads to enter the desired cook time.
5. (Optional) If a Delay Start is desired, press DELAY START. Use
the number keypad to enter the desired time for delay. Repeat
steps 1-3.
6. Press START for the selected oven. The oven will preheat,
and a beep will sound when the preheat is done.
7. Place the food in the oven and close the oven door when
preheat is complete.
WARNING
Food Poisoning Hazard
Do not let food sit in oven more than one hour before
or after cooking.
Doing so can result in food poisoning or sickness.
To Set a Timed Cook:
1. Press the keypad for any cooking function except Broil,
Convect Broil or Keep Warm.
2. Press the number keypads to set the desired temperature.
If the temperature entered is not in the range of the
temperatures allowed, the minimum or maximum allowed
temperature will be displayed. Enter a temperature in the
allowable range.
3. Press COOK TIME.
4. Press the number keypads to enter the length of time to cook.
5. Press START for the selected oven. The display will count
down the time. When the time ends, the oven will shut off
automatically.
The temperature and/or time setting can be changed
at any time.
To change the temperature, repeat steps 2 through 5
and press START.
For double ovens only: To change the temperature when both
ovens are in use, touch any number keypad, and then press
“1” for the upper oven or press “2” for the lower oven and
repeat steps 2 through 5.
The Cook Time (if available) can be changed by pressing
COOK TIME, and then using the number keypad to enter
desired time and pressing START.
For double ovens only: To change the Cook Time when both
ovens are in use, touch any number keypad, and then press
“1” for the upper oven or press “2” for the lower oven and
repeat steps 3 through 5.
To change the time setting, repeat steps 3 through 5.
For double ovens only: To change the time setting when both
ovens are in use, touch any number keypad, and then press
“1” for the upper oven or press “2” for the lower oven and
repeat steps 3 through 5.
6. Press CANCEL for the selected oven to clear the display.
10
 Loading...