


Model iP90
The Home System For Your iPhone® or iPod®
Questions? Visit www.ihomeaudio.com

Table of Contents |
|
Quick Start ........................................................................................................................................................................ |
1 |
Controls and Indicators / iP90 Display.......................................................................................................................... |
2 |
Setting Up the iP90........................................................................................................................................................... |
3 |
Using the iP90................................................................................................................................................................... |
4 |
Replacing iP90 Backup Batteries / Battery Warning..................................................................................................... |
5 |
A Consumer Guide to Product Safety ........................................................................................................................... |
6 |
Troubleshooting............................................................................................................................................................... |
7 |
Solucionando problemas ................................................................................................................................................ |
9 |
Warranty Information..................................................................................................................................................... |
11 |
A Consumer Guide to Product Safety
This device complies with Part 15 of the FCC Rules. Operation is subject to the following two conditions: (1) This device may not cause harmful interference, and (2) this device must accept any interference received, including interference that may cause undesired operation.
This equipment complies with the limits for a Class B digital device as specified in Part 15 of FCC Rules. These limits provide reasonable protection against radio and TV interference in a residential area.
However, your equipment might cause TV or radio interference even when it is operating properly. To eliminate interference you can try one or more of the following corrective measures:
•Reorient or relocate the receiving antenna.
•Increase the distance between the equipment and the radio or TV.
•Use outlets on different electrical circuits for the equipment and the radio or TV.
•Consult your dealer or an experienced radio/television technician if the problem still exists.
Modifying or tampering with your system’s internal components can cause a malfunction and might invalidate the system’s warranty and void your FCC authorization to operate it.
This Class B digital apparatus complies with Canadian ICES-003.
Cet appareil numérique de la classe B est conforme à la norme NMB-003 du Canada.
Maintenance
•Place the unit on a level surface away from sources of direct sunlight or excessive heat.
•Protect your furniture when placing your unit on a natural wood and lacquered finish. A cloth or other protective material should be placed between it and the furniture.
•Clean your unit with a soft cloth moistened only with mild soap and water. Stronger cleaning agents, such as Benzene, thinner or similar materials can damage the surface of the unit.

quick start
1: power |
2: antennas |
3: inserts |
RESET |
RESET |
TEST |
TEST |
Attach AC adaptor cable to DC jack on back of the iP90 and plug the other end into a wall socket.
Snap AM antenna into provided stand, then plug antenna cable into socket on back of iP90.
Move antenna 12” away. Extend FM antenna.
Select the dock insert for your iPhone or iPod® model from the table below and place insert in dock. Never dock an iPhone/ iPod without an insert in place.
NOTE: If you do not have an insert for your iPhone/iPod, please visit www.ihomeaudio.com or call iHome toll free at 877-446-6301 to purchase one.
Use this insert |
iPhone 3G |
iPod touch 2G |
nano 5G |
|
insert 15 |
insert 16 |
insert 18 |
||
|
||||
For this iPhone / iPod iPhone 3G/3GS |
iPod touch 2G |
nano 5G |
||
4: time zone |
5: iPhone/ |
6: radio |
|
iPod |
|
•Move the DST switch on back of unit to +1 or -1 (adds or subtracts an hour)
•Press & hold the Time Zone button on back until the display flashes
•Press the + or - pad to select your time zone
•Press the Time Zone button again.
Gently dock an iPhone or iPod into dock with proper insert (iPhone/iPod must not be in a skin or case). The iPhone/iPod will charge while docked. Press the 
 Button to play your iPhone/iPod.
Press the Radio button and press again to select AM/FM band. Press the + or - to tune in a station. See page 4 for programming presets.
1
|
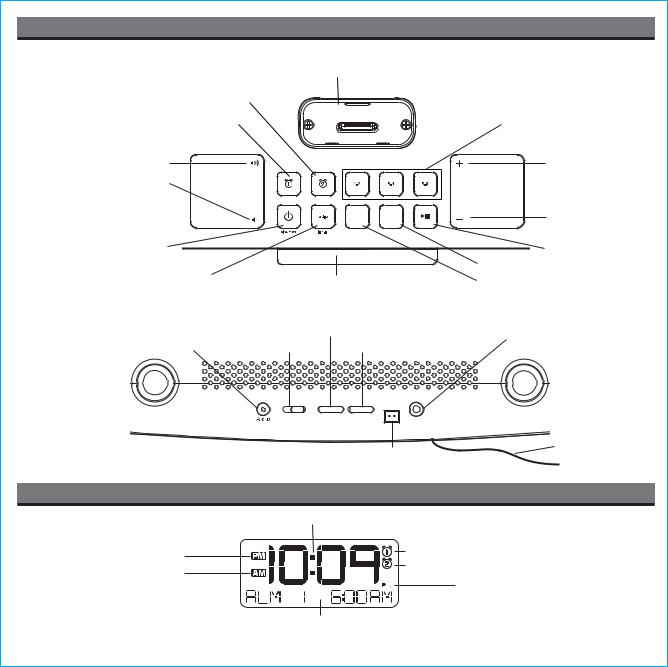
Controls and Indicators |
|||||
Top Panel |
|
|
Dock |
|
|
|
|
|
|
|
|
||
Alarm 2 Button |
|
|
|
|
|
|
Alarm 1 Button |
|
|
|
|
Preset Buttons 1-6 |
|
Volume + Button |
|
|
|
|
Set + Button, |
|
Volume - Button |
|
|
|
|
skip/search FWD |
|
|
|
|
|
|
||
|
|
|
eq |
sleep |
Set - Button, |
|
|
|
|
|
|
skip/search REV |
|
Alarm Reset / Power Button |
|
|
|
|
Play/Pause Button |
|
|
|
|
snooze/dimmer |
|
||
Radio/line-in Button |
|
|
|
|
Sleep Button |
|
Snooze/Dimmer Button |
EQ Button |
|||||
|
||||||
Rear Panel |
Clock Adjust /Time Sync Button |
|
||||
|
Line-in Jack |
|||||
AC Adaptor Jack |
DST switch |
|
|
|||
Time Zone Button |
||||||
|
DC 7.5V |
DST |
clock adj./time sync time zone |
am antenna |
line-in |
|
|
-1 |
+1 |
|
|
|
|
FM Antenna
AM Loop Antenna socket
iP90 Display
PM Indicator
AM Indicator
NOTE: AM/PM indicators will not appear when clock is set to 24 hour display mode
Time Display
 Alarm Indicators
Battery Low Indicator
Radio / Alarm Time / iPod Display
2
 Loading...