


 Loading...
SurePOS 700 Series |
|
SurePOS 700-723/743/783 Operating
System Installation Guide
GA27-5002-01
SurePOS 700 Series |
|
SurePOS 700-723/743/783 Operating
System Installation Guide
GA27-5002-01

Note
Before using this information and the product it supports, be sure to read the general information under Appendix A, “Safety information,” on page 27 and Appendix B, “Notices,” on page 33.
October 2008
This edition applies to the Models 723, 743, C43, and 783.
Current versions of Retail Store Solutions documentation are available on the IBM Retail Store Solutions Web site at http://www.ibm.com/solutions/retail/store/support. Click Publications.
A form for reader’s comments is also provided at the back of this publication. If the form has been removed, address your comments to:
IBM Corporation
Retail Store Solutions Information Development
Department ZBDA
PO Box 12195
Research Triangle Park, North Carolina 27709 USA
When you send information to IBM, you grant IBM a nonexclusive right to use or distribute whatever information you supply in any way it believes appropriate without incurring any obligation to you.
© Copyright International Business Machines Corporation 2007, 2008.
US Government Users Restricted Rights – Use, duplication or disclosure restricted by GSA ADP Schedule Contract with IBM Corp.

Contents
About this guide . . . . . . . . . . . . . . |
. . . . . . . . . |
. |
v |
Who should read this guide . . . . . . . . . . . |
. . . . . . . . . |
. |
v |
How this guide is organized. . . . . . . . . . . |
. . . . . . . . . |
. |
v |
Related publications . . . . . . . . . . . . . |
. . . . . . . . . |
. |
v |
Locating the IBM SurePOS 700 support web site . . . |
. . . . . . . . . |
. |
v |
Publications accessibility . . . . . . . . . . . . . . . . . . . . . . v Providing feedback. . . . . . . . . . . . . . . . . . . . . . . . vi
Summary of changes . . . . . . . . . . . . . . . . . . . . . . vii
Chapter 1. Preparing for the installation . . . . . . . . . . . . . . . 1 Important driver information. . . . . . . . . . . . . . . . . . . . . 1
Changing the first boot device . . . . . . . . . . . . |
. . . . . |
. |
. |
. |
1 |
Updating the system BIOS . . . . . . . . . . . . . |
. . . . . |
. |
. |
. |
1 |
Using a USB floppy disk drive . . . . . . . . . . . |
. . . . . |
. |
. |
. |
1 |
Using a USB memory key . . . . . . . . . . . . |
. . . . . |
. |
. |
. |
2 |
Enabling the enhanced Serial ATA hard disk driver interface . |
. . . . . |
. |
. |
. |
2 |
AHCI and Native Command Queueing. . . . . . . . |
. . . . . |
. |
. |
. |
3 |
RAID 0 and RAID 1 . . . . . . . . . . . . . . |
. . . . . |
. |
. |
. |
3 |
Enabling RAID or the AHCI mode . . . . . . . . . |
. . . . . |
. |
. |
. |
3 |
Creating a VIA V-RAID Storage Controller Driver Diskette |
. . . . . |
. |
. |
. |
4 |
Chapter 2. Installing Windows 2000 . . . . . . . . . |
. . . . . |
. |
. |
. |
7 |
Hardware and software requirements . . . . . . . . . |
. . . . . |
. |
. |
. |
7 |
CD-ROM preinstallation steps . . . . . . . . . . . . . . . . . . . . 7
Option A . . . . . . . . . . . . . . . |
. . |
. . . . . . . |
. |
. |
. |
7 |
Option B. . . . . . . . . . . . . . . |
. . |
. . . . . . . |
. |
. |
. |
7 |
CD-ROM installation . . . . . . . . . . . . . . . . . . . . . . . 9
Chapter 3. Installing Windows XP . . . . . . . . . . . . . . . . . 11 Hardware and software requirements . . . . . . . . . . . . . . . . . 11 CD-ROM installation . . . . . . . . . . . . . . . . . . . . . . . 11
Chapter 4. |
Installing system drivers on Windows OS |
. . . . |
. . . . |
. |
13 |
Chapter 5. |
Installing PC DOS 2000 . . . . . . . . |
. . . . |
. . . . |
. |
15 |
Diskette installation . . . . . . . . . . . . . . |
. . . . |
. . . . |
. |
15 |
|
PCI serial port configuration . . . . . . . . . . . |
. . . . |
. . . . |
. |
15 |
|
Prerequisites. . . . . . . . . . . . . . . . . . . . . . . . . 15 Power management . . . . . . . . . . . . . . . . . . . . . . . 17
Chapter 6. Using the RAID application . . . . . . . . . . . . . . |
. |
19 |
VIA RAID User’s Guide for IBM SurePOS 700-xx3 . . . . . . . . . . . |
. |
19 |
Requirements/Prerequisites . . . . . . . . . . . . . . . . . . . 19 |
||
Introduction . . . . . . . . . . . . . . . . . . . . . . . . |
. |
19 |
Using the V-RAID Utility and Features . . . . . . . . . . . . . . |
. |
19 |
Opening the V-RAID Utility . . . . . . . . . . . . . . . . . . |
. |
19 |
VIA V-RAID Main Screen . . . . . . . . . . . . . . . . . . . |
. |
21 |
Diagnosing and Handling RAID Events . . . . . . . . . . . . . . |
. |
23 |
Diagnosing RAID Events . . . . . . . . . . . . . . . . . . . . 23 |
||
Windows Application Event Log . . . . . . . . . . . . . . . . . |
. |
23 |
Repairing a Broken RAID Mirror . . . . . . . . . . . . . . . . |
. |
24 |
Replacing and rebuilding a hard drive . . . . . . . . . . . . . . . |
. |
25 |
© Copyright IBM Corp. 2007, 2008 |
iii |
Accessing the RAID setup menu . . . . . . . . . . . . . . . . . . 25
Appendix A. Safety information . . . . . . . . . . . . . . . . . . 27
Appendix B. Notices . . . . . . . . . . . . . . . . . . . . . . 33 Electronic emission notices . . . . . . . . . . . . . . . . . . . . 35
Federal Communications Commission (FCC) statement . . . . . . |
. . |
. |
35 |
European Union EMC Directive conformance statement . . . . . . |
. . |
. |
35 |
Industry Canada Class A Emission Compliance statement . . . . . |
. . |
. |
36 |
Avis de conformité aux normes d’Industrie Canada . . . . . . . |
. . |
. |
36 |
Germany . . . . . . . . . . . . . . . . . . . . . . . . . . 36 |
|||
Australia and New Zealand . . . . . . . . . . . . . . . . |
. . |
. |
36 |
Chinese Class A warning statement . . . . . . . . . . . . . |
. . |
. |
37 |
Japanese power line harmonics compliance statement . . . . . . |
. . |
. |
37 |
Japanese Voluntary Control Council for Interference (VCCI) statement |
. . |
. |
37 |
Korean communications statement . . . . . . . . . . . . . |
. . |
. |
37 |
Taiwanese Class A warning statement . . . . . . . . . . . . |
. . |
. |
38 |
Taiwan contact information . . . . . . . . . . . . . . . . . |
. . |
. |
38 |
Cable ferrite requirement . . |
. . . . . . . . . . . . . . . . . |
. |
. |
38 |
Electrostatic Discharge (ESD) |
. . . . . . . . . . . . . . . . . |
. |
. |
38 |
Product Recycling and disposal . . . . . . . . . . . . . . . |
. . |
. |
. |
39 |
Battery return program . . . . . . . . . . . . . . . . . . |
. . |
. |
. |
40 |
For Taiwan: . . . . . . . . . . . . . . . . . . . . . |
. . |
. |
. |
40 |
For the European Union: . . . . . . . . . . . . . . . . |
. . |
. |
. |
41 |
For California: . . . . . . . . . . . . . . . . . . . . |
. . |
. |
. |
41 |
Flat panel displays . . . . . . . . . . . . . . . . . . . |
. . |
. |
. |
42 |
Monitors and workstations . . . . . . . . . . . . . . . . . . . . . 42 Trademarks . . . . . . . . . . . . . . . . . . . . . . . . . . 42
Appendix C. Intel software license agreement (final, single user) . . . . . 43 Important - read before copying, installing or using. . . . . . . . . . . . 43 Copyright license . . . . . . . . . . . . . . . . . . . . . . . 43 Ownership of software and copyrights . . . . . . . . . . . . . . . 43 Limited media warranty . . . . . . . . . . . . . . . . . . . . . 43 Exclusion of other warranties. . . . . . . . . . . . . . . . . . . 43 Limitation of liability . . . . . . . . . . . . . . . . . . . . . . 44
Termination of this agreement . . . . . . . . . . . . . . . |
. |
. |
. |
44 |
||||||||||
Applicable laws. . . |
. |
. |
. . . . . . . |
. . |
. . |
. |
. |
. |
. |
. . . . 44 |
||||
Government restricted rights . . . . . . . |
. . |
. . |
. |
. |
. |
. |
. . . . 44 |
|||||||
Index . . . . . . . |
. |
. |
. . . . . . . . . . . . . . . . |
. |
. |
. |
45 |
|||||||
iv SurePOS 700-723/743/783 Operating System Installation Guide

About this guide
Who should read this guide
This guide is intended for the person who will install the operating environment for the IBM® SurePOS™ Models 723, 743, C43, and 783.
How this guide is organized
This guide is organized as follows:
vChapter 1, “Preparing for the installation,” on page 1 describes what is needed before you begin your installation.
vInstallation procedures are described in these sections:
–Chapter 2, “Installing Windows 2000,” on page 7
–Chapter 3, “Installing Windows XP,” on page 11
–Chapter 4, “Installing system drivers on Windows OS,” on page 13
–Chapter 5, “Installing PC DOS 2000,” on page 15
Related publications
These IBM publications are also available from the IBM Retail Store Solutions Web site at http://www.ibm.com/solutions/retail/store/support.
vSafety Information – Read This First, GA27-4004
vSurePOS 700 Series: SurePOS 700-723/743/783 Systems, Installation, and Operations Guide, GA27-4998
vSurePOS 700 Series: SurePOS 700-723/743/783 Hardware Service Guide, GY27-0424
vPoint of Sale: Options and I/O Devices Service Guide, GC30-9737
v4610 SureMark Printers: User’s Guide, GA27-4151
v4610 SureMark Printers: Hardware Service Guide, GY27-0355
vPoint of Sale Subsystem: Programming Reference and User’s Guide, SC30-3560
vPoint of Sale Subsystem: Installation, Operation and Keyboards, GC30-3623
v4820 SurePoint Solution: Installation and Service Guide, GA27-4231
v4820 SurePoint Solution: System Reference, SA27-4249
Diagnostic programs that are media independent are downloadable from the IBM Retail Store Solutions Web site at http://www.ibm.com/solutions/retail/store/support. The use of generic drivers from manufacturer web sites is not recommended.
Locating the IBM SurePOS 700 support web site
Throughout this document, you are referred to go to the IBM Retail Store Solutions Web site at http://www.ibm.com/solutions/retail/store/support. On this web site, click IBM SurePOS 700 Series to open the support information available for the IBM SurePOS 700.
Publications accessibility
The softcopy version of this guide and other related publications are accessibility enabled.
© Copyright IBM Corp. 2007, 2008 |
v |

Providing feedback
Your feedback is important in helping IBM provide accurate and high-quality information.
To provide feedback:
vGo to http://www.ibm.com/solutions/retail/store. Click Support, then click Publications. Click the publication comments within the introductory text. Provide the requested information and your comments. Be sure to include the name and form number of the document in the [Publication ID] field.
vYou can mail your comments to:
IBM Corporation Retail Store Solutions Information Development Department ZBDA P.O. Box 12195 Research Triangle Park, North Carolina 27709 USA
Be sure to include the name and form number of the document.
If applicable, include a reference to the specific location of the text (for example, the page or table number) on which you are commenting.
Between major revisions of this document, there might be minor technical updates. The latest version of this document is available on the Retail Store Solutions Web site at www.ibm.com/solutions/retail/store/support/publications/.
vi SurePOS 700-723/743/783 Operating System Installation Guide

Summary of changes
October 2008
The following changes have been made to the second edition of the Operating System Installation Guide:
vGraphics have been added.
vDescriptions have been added to tables.
vInstructions have been added.
© Copyright IBM Corp. 2007, 2008 |
vii |
viii SurePOS 700-723/743/783 Operating System Installation Guide
Chapter 1. Preparing for the installation
This section provides information and required procedures to prepare for your installation.
Important driver information
The IBM SurePOS 700 Models 723, 743, C43, and 783 require new POS I/O and LAN drivers. Existing drivers for Models 4694 and Models 4800 will not work properly with these products. This notice applies to every supported operating system (OS): DOS, 4690 OS, Windows®, and Linux®. Additionally, a hard drive image for a predecessor product will not work properly. You must download the appropriate drivers from the IBM Retail Store Solutions Web site at http://www.ibm.com/solutions/retail/store/support.
Changing the first boot device
Follow these steps to change your system’s first boot device:
1.Power on the system unit. When prompted, press the Delete key and then continue.
2.Select Advanced BIOS Features.
3.Select First Boot Device setting.
4.Select the required boot device (USB-FDD, or CD-ROM) for first boot device.
5.Press the F10 key to save your selections and exit.
Your new settings will take effect upon the next reboot.
Updating the system BIOS
One of your first installation steps is to ensure that the BIOS for your system is current. Locate the current BIOS for your system from the IBM Retail Store Solutions Web site at http://www.ibm.com/solutions/retail/store/support. If your BIOS is not current, download the current one and update your system. Follow the procedures in this section to install a BIOS update using either a USB floppy disk drive (FDD) or a USB memory key.
Using a USB floppy disk drive
To install a current BIOS level using a USB floppy disk drive:
1.Download the BIOS Update file from the IBM Retail Store Solutions Web site at http://www.ibm.com/solutions/retail/store/support.
2.Fully format a 1.44 MB floppy diskette. If bad sectors are reported, use another diskette. Use this command for best results:
format a: /f:1.44
3.Do not write-protect the diskette.
4.With the formatted diskette in the floppy drive, execute the downloaded image file.
5.Follow the on-screen instructions to create the bootable BIOS diskette.
© Copyright IBM Corp. 2007, 2008 |
1 |

Notes:
If problems are encountered while creating the diskette:
a.Try another diskette or another PC to create it.
b.Try downloading the image file again.
6.Attach an external USB floppy disk drive to the target system and insert the diskette.
7.Turn on or restart the target system, and allow it to boot from the diskette.
Note: If you encounter problems getting the diskette to boot the system, follow the procedure in “Changing the first boot device” on page 1 to ensure that the FDD is enabled as a boot device.
The system will automatically turn off or restart when the BIOS update is complete.
Using a USB memory key
Follow the steps in this section to install a current BIOS level using a USB memory key.
Note: A Windows 2000 or Windows XP system is required to extract the memory key image.
1.Download the BIOS Update memory key image file from the IBM Retail Store Solutions Web site at http://www.ibm.com/solutions/retail/store/support.
2.Log in as the system administrator.
3.Run the self-extracting memory key image.
4.Read the BIOS update information screen.
5.Press OK to dismiss the text.
6.Select Extract Image from the application menu.
7.Follow the on-screen instructions to create the bootable USB memory key.
Notes:
If problems are encountered while creating the memory key:
a.Try another memory key or another PC to create it.
b.Try downloading the image file again.
8.Insert the USB memory key into a USB port on the target system.
9.Turn on or restart the target system, and allow it to boot the memory key.
Note: If you encounter problems getting the memory key to boot the system, follow the procedure in “Changing the first boot device” on page 1 to ensure that the FDD is enabled as a boot device.
The system will automatically power off or restart when the BIOS update is complete.
Enabling the enhanced Serial ATA hard disk driver interface
IBM SurePOS 700 Models 723, 743, C43, and 783 have an embedded Serial ATA (SATA) controller with Advanced Host Controller Interface (AHCI) and Redundant Array of Independent Disks (RAID) support. To take advantage of either of these features, they must be enabled prior to operating system installation and the driver must be installed during the installation of the operating system. Once the operating system is installed, the mode of operation can not be changed without reinstalling the operating system.
2 SurePOS 700-723/743/783 Operating System Installation Guide

AHCI and Native Command Queueing
If a hard drive is installed, the AHCI mode of operation can be enabled. NCQ may provide a performance benefit depending on the host operating system and application.
IBM will not provide a replacement or an upgrade of customer hard disk drives should this feature become standard. If the application requires a drive with NCQ support, you should submit an RPQ through your IBM Sales Representative. This information is provided to allow customers to prepare OS/Application images properly for future use.
RAID 0 and RAID 1
To take full advantage of the RAID function, you must install two drives. With two drives installed, the native RAID function supports both RAID 0 and RAID 1. For two drive implementations, RAID 1 is the recommended mode of operation.
Enabling RAID and using the RAID driver is the recommended mode of operation for one and two drive configurations. The RAID mode of operation will take advantage of NCQ1 with single drive systems. Also, single drive systems with RAID enabled can be later upgraded to two drive systems by just adding the second hard disk drive, booting the OS and using the RAID utility to create an array without requiring the OS or applications to be reinstalled.
RAID 0 (striping)
Increases the system hard disk performance, however the overall reliability is reduced as a single drive failure will result in total data loss.
RAID 1 (mirroring)
Does not increase performance, but the drives are maintained as identical copies. If one hard disk drive experiences a hardware failure, the system will continue to function until the failing drive can be serviced.
Note: RAID does not prevent or eliminate errors caused by OS issues, application failures, corrupt files, viruses and other software induced problems that are often perceived as hard drive failures. RAID 1 can only minimize the impact of a single hard drive hardware failure.
Enabling RAID or the AHCI mode
These procedures are for the Windows XP or 2000 installation.
1.Press Delete during BIOS power-on self-test (POST).
2.Select Integrated Peripherals and press Enter.
3.Select VIA OnChip IDE Device and press Enter.
4.Select SATA Controller Mode and press Enter.
5.Select AHCI or RAID.
6.Select Save & Exit.
Note: If you selected RAID mode, continue with these steps:
7.Follow the on-screen instructions to enter the RAID configuration utility during BIOS POST.
8.Select Create Array and press Enter.
9.Follow the on-screen instructions to configure and create your RAID.
1.Dependant upon the NCQ feature becoming the standard in the industry.
Chapter 1. Preparing for the installation 3
Creating a VIA V-RAID Storage Controller Driver Diskette
The VIA V-RAID driver package provides a tool which enables the creation of a RAID storage controller driver diskette. Follow the directions below to create the required driver diskette. It is recommended that an empty diskette be used as any data on the diskette will be destroyed durin g the driver diskette creation process.
1.Download the latest VIA V-RAID driver package from the IBM Retail Store Solutions Web site at http://www.ibm.com/solutions/retail/store/support.
2.Unzip the package to any Windows 2000, Windows XP, or Windows Vista system.
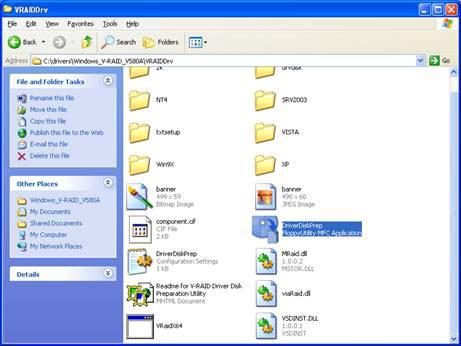
3.Browse to the VraidDrv folder within the extracted zip file (see Figure 1).
Figure 1. VraidDrv Folder
4. Execute the DriverDiskPrep utility.
4 SurePOS 700-723/743/783 Operating System Installation Guide
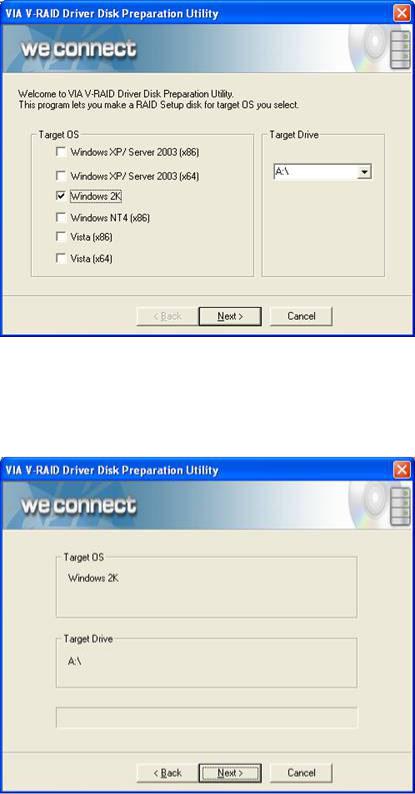
5. Select the desired target operating system (see Figure 2).
Figure 2. Select Operation System
6.Upon selecting the operating system, the “Target Drive” field will show the target disk drive. Confirm the correct drive is shown and click “Next”.
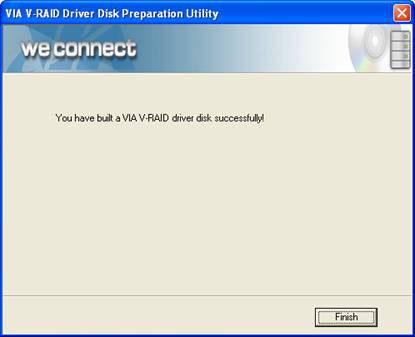
7.Click “Next” again to initiate the diskette creation process (see Figure 3).
Figure 3. Disk Creation
Chapter 1. Preparing for the installation 5
8.Upon completion (see Figure 4), the diskette may be used to install the RAID storage driver during a Windows installation.
Figure 4. V-RAID Complete
6 SurePOS 700-723/743/783 Operating System Installation Guide

Chapter 2. Installing Windows 2000
This section describes the installation steps for Windows 2000.
Hardware and software requirements
This installation requires a SurePOS 723, 743, C43, and 783 with a minimum configuration as follows:
v128 MB read access memory (RAM)
v40 GB minimum, partitioned and formatted hard disk drive
vUSB or PS/2 keyboard
vInternal optical or external USB CD-ROM
vExternal USB floppy disk drive for certain installation configurations
vWindows 2000 Professional installation CD
vCreating a VIA V-RAID Storage Controller Driver Diskette (see “Creating a VIA V-RAID Storage Controller Driver Diskette” on page 4).
CD-ROM preinstallation steps
If you are installing from an external USB CD-ROM drive, be aware that some USB CD-ROM drives are not supported by the Windows 2000 installation process. Unsupported CD-ROM drives may cause a STOP 7B message during installation. To test if your CD-ROM drive is supported, boot from the Windows 2000 CD. If the STOP message is displayed, follow the steps in this section to work around the issue.
The resolution for the STOP message is to add the USB CD-ROM drive’s Vendor and Product ID to the TXTSETUP.SIF file. However, because the CD-ROM is read-only, this modification must be done to TXTSETUP.SIF on the Setup Boot Diskettes. Follow the instructions for either Option A or B below to assist with these modifications.
Option A
1.Attach the USB CD-ROM drive to any computer. Wait until the system has detected the drive and it is functional.
2.Run usbview.exe (available freely on the Internet), select the CD-ROM drive, and note the idVendor and idProduct.
3.Add the USB CD-ROM Drive Vendor (VID) and Product ID (PID) to the {HardwareIdsDatabase} section of txtsetup.sif; for example:
USB\VID_04B3&PID_4427 = "usbstor";IBM USB CD-ROM VID/PID P/N 22l5151
Option B
1.Attach the USB CD-ROM drive to any computer.
2.Wait until the system has detected the drive and it is functional.
3.Open System Information and look for the CD-ROM under Components > USB.
© Copyright IBM Corp. 2007, 2008 |
7 |
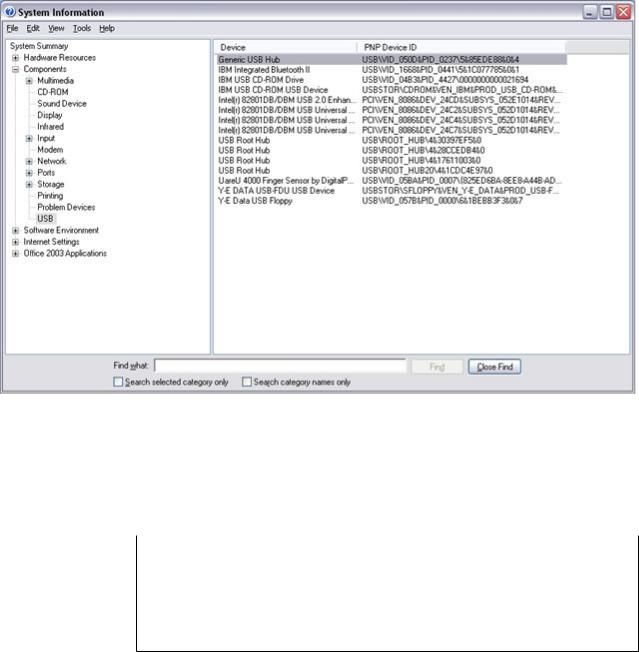
Figure 5. System Information window
4.Record the value for the PNP Device ID of your CD-ROM.
5.Modify TXTSETUP.SIF and add the Vendor (VID) and Product (PID) ID into the TXTSETUP.SIF file using this format:
"MatchingDeviceId" = "usbstor" ;Drive Description
Table 1. Vendor/product ID for Windows 2000 Professional setup
″MatchingDeviceID″ |
Value from PNP Device ID |
|
|
="usbstore" |
Leave as is, including quotes and spaces |
|
|
;Drive Description |
May be any text you would like to identify |
|
your device. |
|
|
Example:
USB\VID_04B3&PID_4427 = "usbstor";IBM USB CD-ROM VID/PID
6.Begin the installation of Windows 2000 by booting from the floppy diskettes rather than from the CD-ROM. The CD-ROM will still be required to continue installation.
This modification could be made for any USB CD-ROM drive that is not supported by the Windows 2000 Setup.
8 SurePOS 700-723/743/783 Operating System Installation Guide
Loading...