


OWNER'S MANUAL
Operation
Maintenance
Specifications
All information in this Owner's Manual is current at the time of publication. However, Hyundai reserves the right to make changes at any time so that our policy of continual product improvement may be carried out.
This manual applies to all Hyundai models and includes descriptions and explanations of optional as well as standard equipment. As a result, you may find material in this manual that does not apply to your specific vehicle.

CAUTION: MODIFICATIONS TO YOUR HYUNDAI
Your Hyundai should not be modified in any way. Such modifications may adversely affect the performance, safety or durability of your Hyundai and may, in addition, violate conditions of the limited warranties covering the vehicle. Certain modifications may also be in violation of regulations established by the Department of Transportation and other government agencies in your country.
TWO-WAY RADIO OR CELLULAR TELEPHONE INSTALLATION
Your vehicle is equipped with electronic fuel injection and other electronic components. It is possible for an improperly installed/adjusted two-way radio or cellular telephone to adversely affect electronic systems. For this reason, we recommend that you carefully follow the radio manufacturer's instructions or consult your Hyundai dealer for precautionary measures or special instructions if you choose to install one of these devices.
F2
SAFETY AND VEHICLE DAMAGE WARNING
This manual includes information titled as WARNING, CAUTION and NOTICE.
These titles indicate the following:
 WARNING
This indicates that a condition may result in harm, serious injury or death to you or other persons if the warning is not heeded. Follow the advice provided with the warning.
 CAUTION
This indicates that a condition may result in damage to your vehicle or its equipment if the caution is not heeded. Follow the advice provided with the caution.
NOTICE
This indicates that interesting or helpful information is being provided.
F3

FOREWORD
Thank you for choosing Hyundai. We are pleased to welcome you to the growing number of discriminating people who drive Hyundais. The advanced engineering and high-quality construction of each Hyundai we build is something of which we're very proud.
Your Owner's Manual will introduce you to the features and operation of your new Hyundai. It is suggested that you read it carefully because the information it contains can contribute greatly to the satisfaction you receive from your new car.
The manufacturer also recommends that service and maintenance on your vehicle be performed by an authorized Hyundai dealer.
HYUNDAI MOTOR INDIA
Note : Because future owners will also need the information included in this manual, if you sell this Hyundai, please leave the manual in the vehicle for their use. Thank you.
 CAUTION
Severe engine and transaxle damage may result from the use of poor quality fuels and lubricants that do not meet Hyundai specifications. You must always use high quality fuels and lubricants that meet the specifications listed on Page 8-4 in the Vehicle Specifications chapter of the Owner's Manual.
Copyright 2013 Hyundai Motor India Ltd. All rights reserved. No part of this publication may be reproduced, stored in any retrieval system or transmitted in any form or by any means without the prior written permission of Hyundai Motor India Ltd.
F4

|
|
|
Introduction |
|
1 |
|
|
|
|
|
|
|
|
|
|
|
|
|
|
|
Your vehicle at a glance |
|
2 |
|
|
|
|
|
|
|
|
|
|
|
|
|
|
|
Safety features of your vehicle |
|
3 |
|
|
|
|
|
|
|
|
|
|
|
|
|
|
|
Features of your vehicle |
|
4 |
table of contents |
|
|
|
|
|
|
|
|
|
|
|
|
Driving your vehicle |
|
5 |
||
|
|
|
|
||
|
|
|
|
|
|
|
|
|
|
|
|
|
|
|
What to do in an emergency |
|
6 |
|
|
|
|
|
|
|
|
|
|
|
|
|
|
|
Maintenance |
|
7 |
|
|
|
|
|
|
|
|
|
|
|
|
|
|
|
Specifications & Consumer information |
|
8 |
|
|
|
|
|
|
|
|
|
|
|
|
|
|
|
Index |
|
I |
|
|
|
|
|
|
|
|
|
|
|
|

Introduction
. . . . . . . . . . . . . . .HOW TO USE THIS MANUAL |
1-2 |
1 |
FUEL REQUIREMENTS . . . . . . . . . . . . . . . . . . . . |
1-3 |
|
|
||
VEHICLE BREAK-IN PROCESS . . . . . . . . . . . . . |
1-5 |
|
|
|
|
Introduction
HOW TO USE THIS MANUAL
We want to help you get the greatest possible driving pleasure from your vehicle. Your Owner’s Manual can assist you in many ways. We strongly recommend that you read the entire manual. In order to minimize the chance of death or injury, you must read the WARNING and CAUTION sections in the manual.
Illustrations complement the words in this manual to best explain how to enjoy your vehicle. By reading your manual, you learn about features, important safety information, and driving tips under various road conditions.
The general layout of the manual is provided in the Table of Contents. Use the index when looking for a specific area or subject; it has an alphabetical listing of all information in your manual.
Chapters: This manual has eight chapters plus an index. Each section begins with a brief list of contents so you can tell at a glance if that section has the information you want.
You’ll find various WARNING’s, CAUTION’s, and NOTICE’s in this manual. These were prepared to enhance your personal safety. You should carefully read and follow ALL procedures and recommendations provided in these WARNING’s, CAUTION’s and NOTICE’s.
 WARNING
WARNING indicates a situation in which harm, serious bodily injury or death could result if the warning is ignored.
 CAUTION
CAUTION indicates a situation in which damage to your vehicle could result if the caution is ignored.
NOTICE
NOTICE indicates interesting or helpful information is being provided.
1 2
FUEL REQUIREMENTS
Unleaded
Your new vehicle is designed to use only unleaded fuel having an Octane Rating of RON (Research Octane Number) 91 / AKI (Anti-Knock Index) 87 or higher.
Your new vehicle is designed to obtain maximum performance with UNLEADED FUEL, as well as minimize exhaust emissions and spark plug fouling.
 CAUTION
NEVER USE LEADED FUEL. The use of leaded fuel is detrimental to the catalytic converter and will damage the engine control system’s oxygen sensor and affect emission control.
Never add any fuel system cleaning agents to the fuel tank other than what has been specified. (We recommend that you contact an authorized HYUNDAI dealer for details)
 WARNING
•Do not "top off" after the nozzle automatically shuts off when refueling.
•Always check that the fuel cap is installed securely to prevent fuel spillage in the event of an accident.
Introduction
Leaded (if equipped)
For some countries, your vehicle is designed to use leaded gasoline. When you are going to use leaded gasoline, we recommend that you ask an authorzied HYUNDAI dealer whether leaded gasoline in your vehicle is available or not.
Octane Rating of leaded gasoline is same with unleaded one.
1 3

Introduction
Gasoline containing alcohol and methanol
Gasohol, a mixture of gasoline and ethanol (also known as grain alcohol), and gasoline or gasohol containing methanol (also known as wood alcohol) are being marketed along with or instead of leaded or unleaded gasoline.
Do not use gasohol containing more than 10% ethanol, and do not use gasoline or gasohol containing any methanol. Either of these fuels may cause drivability problems and damage the fuel system. Discontinue using gasohol of any kind if drivability problems occur. Vehicle damage or driveability problems may not be covered by the manufacturer’s warranty if they result from the use of:
1.Gasohol containing more than 10% ethanol.
2.Gasoline or gasohol containing methanol.
3.Leaded fuel or leaded gasohol. (Except for vehicle designed to use leaded gasoline for some countries)
 CAUTION
Never use gasohol which contains methanol. Discontinue use of any gasohol product which impairs drivability.
Use of MTBE
HYUNDAI recommends avoiding fuels containing MTBE (Methyl Tertiary Butyl Ether) over 15.0% vol. (Oxygen Content 2.7% weight) in your vehicle.
Fuel containing MTBE over 15.0% vol. (Oxygen Content 2.7% weight) may reduce vehicle performance and produce vapor lock or hard starting.
 CAUTION
Your New Vehicle Limited Warranty may not cover damage to the fuel system and any performance problems that are caused by the use of fuels containing methanol or fuels containing MTBE (Methyl Tertiary Butyl Ether) over 15.0% vol. (Oxygen Content 2.7% weight.)
Do not use methanol
Fuels containing methanol (wood alcohol) should not be used in your vehicle. This type of fuel can reduce vehicle performance and damage components of the fuel system.
 CAUTION
Your New Vehicle Limited Warranty may not cover damage to the fuel system and performance problems that are caused by the use of methanol or fuels containing methanol.
1 4

Introduction
Gasolines for cleaner air
To help contribute to cleaner air, HYUNDAI recommends that you use gasolines treated with detergent additives, which help prevent deposit formation in the engine. These gasolines will help the engine run cleaner and enhance performance of the Emission Control System.
Operation in foreign countries
If you are going to drive your vehicle in another country, be sure to:
•Observe all regulations regarding registration and insurance.
•Determine that acceptable fuel is available.
VEHICLE BREAK-IN PROCESS
No special break-in period is needed. By following a few simple precautions for the first 1,000 km (600 miles) you may add to the performance, economy and life of your vehicle.
•Do not race the engine.
•While driving, keep your engine speed (rpm, or revolutions per minute) between 2,000 rpm and 4,000 rpm.
•Do not maintain a single speed for long periods of time, either fast or slow. Varying engine speed is needed to properly break-in the engine.
•Avoid hard stops, except in emergencies, to allow the brakes to seat properly.
•Don't let the engine idle longer than 3 minutes at one time.
1 5
Your vehicle at a glance
. . . . . . . . . . . . . . . . . . . .INTERIOR OVERVIEW |
2-2 |
|
INSTRUMENT PANEL OVERVIEW . . . . . . . . . . |
2-4 |
|
. . . . . . . . . . . . . . . . . .ENGINE COMPARTMENT |
2-6 |
2 |
|
|
|
|
|
|
|
|
|
Your vehicle at a glance
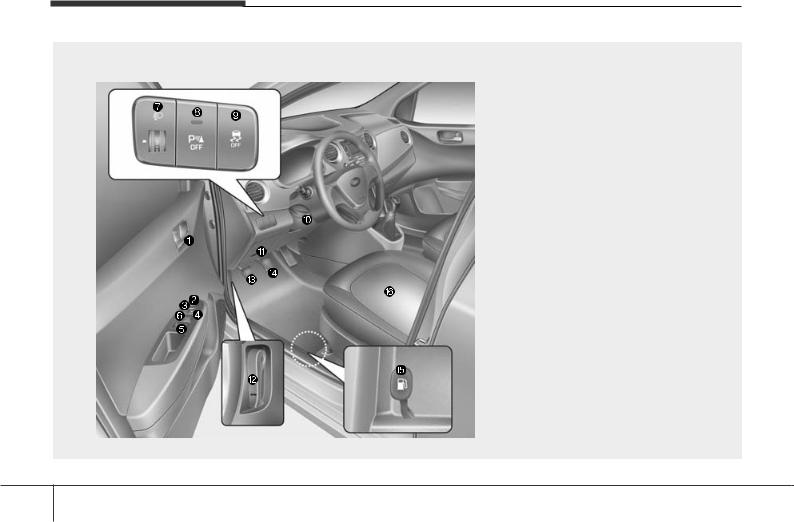
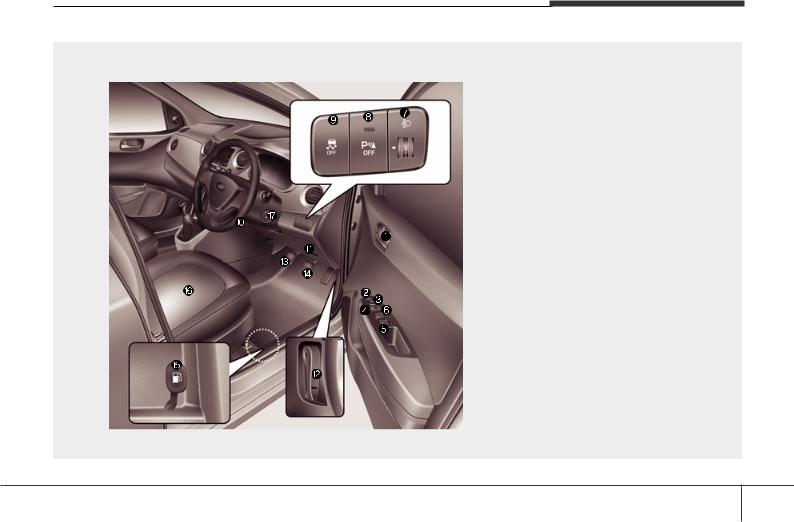
INTERIOR OVERVIEW
■ Left-hand drive
1. |
Door lock/unlock button .................... |
4-17 |
|
2. |
Outside rearview mirror folding |
|
|
|
button* .............................................. |
4-39 |
|
3. |
Outside rearview mirror control |
|
|
|
switch* .............................................. |
4-38 |
|
4. Power window lock button*................ |
4-28 |
||
5. Power window switches* .................. |
4-26 |
||
6. |
Central door lock switch* .................. |
4-18 |
|
7. |
Headlight leveling device* ................ |
4-64 |
|
8. Rear parking assist system OFF |
|
||
|
button* .............................................. |
5-33 |
|
9. ESC OFF button* .............................. |
5-26 |
||
10. |
Steering wheel tilt lever*.................. |
4-35 |
|
11. Fuse box.......................................... |
7-49 |
||
12. |
Hood release lever .......................... |
4-30 |
|
13. Clutch pedal* .................................. |
5-11 |
||
14. Brake pedal .................................... |
5-20 |
||
15. |
Fuel filler lid opener ........................ |
4-32 |
|
16. |
Seats ................................................ |
3-2 |
|
17. |
Key ignition switch/ |
|
|
|
|
Engine start/stop button .............. |
5-4/5-6 |
* : if equipped
OBA013003L
2 2
Your vehicle at a glance
■ Right-hand drive
1. |
Door lock/unlock button .................... |
4-17 |
|
2. |
Outside rearview mirror folding |
|
|
|
button* .............................................. |
4-39 |
|
3. |
Outside rearview mirror control |
|
|
|
switch* .............................................. |
4-38 |
|
4. Power window lock button*................ |
4-28 |
||
5. Power window switches* .................. |
4-26 |
||
6. |
Central door lock switch* .................. |
4-18 |
|
7. |
Headlight leveling device* ................ |
4-64 |
|
8. Rear parking assist system OFF |
|
||
|
button* .............................................. |
5-33 |
|
9. ESC OFF button* .............................. |
5-26 |
||
10. |
Steering wheel tilt lever*.................. |
4-35 |
|
11. Fuse box.......................................... |
7-49 |
||
12. |
Hood release lever .......................... |
4-30 |
|
13. Clutch pedal* .................................. |
5-11 |
||
14. Brake pedal .................................... |
5-20 |
||
15. |
Fuel filler lid opener ........................ |
4-32 |
|
16. |
Seats ................................................ |
3-2 |
|
17. |
Key ignition switch/ |
|
|
|
|
Engine start/stop button .............. |
5-4/5-6 |
* : if equipped
OBA013003R
2 3
Your vehicle at a glance
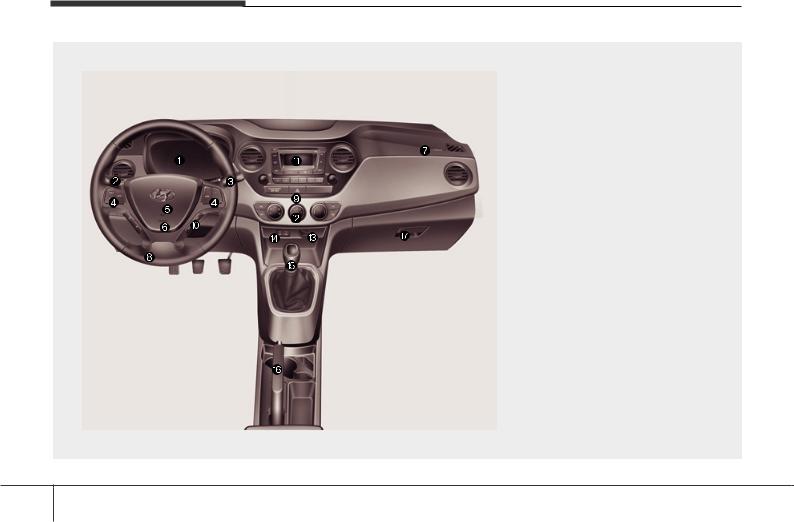
INSTRUMENT PANEL OVERVIEW
■ Left-hand drive
1. |
Instrument cluster ........................... |
4-41 |
2. |
Light control / Turn signals .............. |
4-59 |
3. Wiper/Washer.................................. |
4-65 |
|
4. |
Audio remote control* .................... |
4-89 |
5. Horn ................................................ |
4-36 |
|
6. |
Driver’s front air bag* ...................... |
3-30 |
7. |
Passenger’s front air bag*............... |
3-30 |
8. |
Steering wheel ................................ |
4-35 |
9. |
Hazard warning flasher |
|
|
button....................................... |
4-58, 6-2 |
10. Trip computer switch ..................... |
4-45 |
|
11. Audio system*.................. |
4-100, 4-105 |
|
12. Climate control system* ................ |
4-71 |
|
13. Cigarette lighter*/ |
|
|
|
Power outlet*........................ |
4-83, 4-85 |
14. AUX, USB and iPod port* |
.............4-90 |
|
15. Shift lever .............................. |
5-11/5-14 |
|
16. Parking brake lever ....................... |
5-21 |
|
17. Glove box ...................................... |
4-81 |
|
* : if equipped
OBA013004L
2 4
Your vehicle at a glance
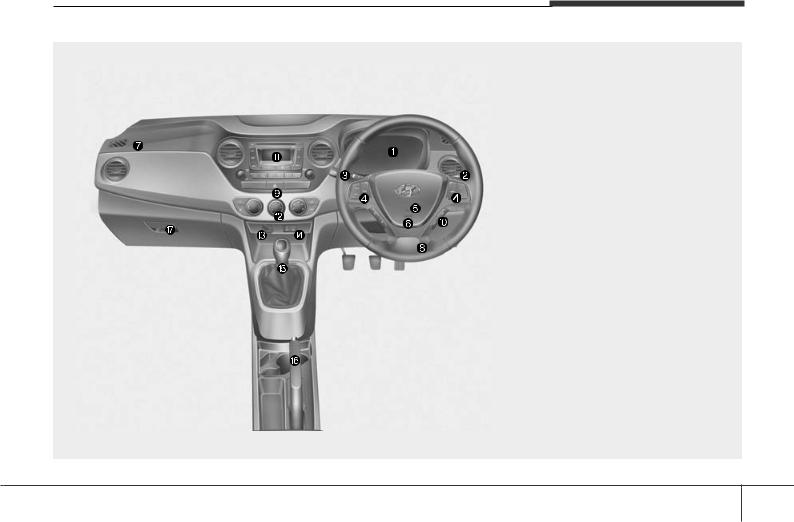
■ Right-hand drive
1. |
Instrument cluster ........................... |
4-41 |
2. |
Light control / Turn signals .............. |
4-59 |
3. Wiper/Washer.................................. |
4-65 |
|
4. |
Audio remote control* .................... |
4-89 |
5. Horn ................................................ |
4-36 |
|
6. |
Driver’s front air bag* ...................... |
3-30 |
7. |
Passenger’s front air bag*............... |
3-30 |
8. |
Steering wheel ................................ |
4-35 |
9. |
Hazard warning flasher |
|
|
button....................................... |
4-58, 6-2 |
10. Trip computer switch ..................... |
4-45 |
|
11. Audio system*.................. |
4-100, 4-105 |
|
12. Climate control system* ................ |
4-71 |
|
13. Cigarette lighter*/ |
|
|
|
Power outlet*........................ |
4-83, 4-85 |
14. AUX, USB and iPod port* |
.............4-90 |
|
15. Shift lever .............................. |
5-11/5-14 |
|
16. Parking brake lever ....................... |
5-21 |
|
17. Glove box ...................................... |
4-81 |
|
* : if equipped
OBA013004
2 5

Your vehicle at a glance
ENGINE COMPARTMENT
■ Left-hand drive
■ Right-hand drive
The actual engine compartment in the vehicle may differ from the illustration.
1. |
Engine coolant reservoir ................... |
7-20 |
2. |
Engine oil filler cap ........................... |
7-18 |
3. |
Brake/clutch fluid reservoir ............... |
7-22 |
4. |
Air cleaner......................................... |
7-26 |
5. Fuse box ........................................... |
7-49 |
|
6. |
Positive battery terminal ................... |
7-34 |
7. |
Negative battery terminal.................. |
7-34 |
8. Windshield washer fluid reservoir ..... |
7-25 |
|
9. |
Radiator cap ..................................... |
7-21 |
10. Engine oil dipstick ........................... |
7-18 |
|
11. Automatic transaxle dipstick* .......... |
7-23 |
|
* : if equipped
OBA013006/OBA013006R
2 6

Safety features of your vehicle
SEAT . . . . . . . . . . . . . . . . . . . . . . . . . . . . . . . . . . . . . 3-2
• Front seat adjustment . . . . . . . . . . . . . . . . . . . . . . . . . . 3-5
• Rear seat adjustment . . . . . . . . . . . . . . . . . . . . . . . . . . 3-8
SEAT BELTS . . . . . . . . . . . . . . . . . . . . . . . . . . . . . 3-11
• Seat belt restraint system . . . . . . . . . . . . . . . . . . . . . . 3-11
• Pre-tensioner seat belt. . . . . . . . . . . . . . . . . . . . . . . . . 3-15
• Additional seat belt safety precautions . . . . . . . . . . 3-18 3
• Care of seat belts . . . . . . . . . . . . . . . . . . . . . . . . . . . . 3-20
CHILD RESTRAINT SYSTEM (CRS) . . . . . . . |
3-21 |
• Selecting a Child Restraint System (CRS) . . . . . . . |
3-22 |
• Installing a Child Restraint System (CRS) . . . . . . . |
3-24 |
AIR BAG
- SUPPLEMENTAL RESTRAINT SYSTEM . . 3-27
• Where are the air bags? . . . . . . . . . . . . . . . . . . . . . . . |
3-30 |
• How does the air bags system operate? . . . . . . . . . . |
3-31 |
• What to expect after an air bag inflates . . . . . . . . . |
3-35 |
• Passenger’s front air bag ON/OFF switch . . . . . . . . |
3-35 |
• Do not install a child restraint on the front |
|
passenger seat . . . . . . . . . . . . . . . . . . . . . . . . . . . . . . |
3-37 |
• Why didn’t my air bag go off in a collision? . . . . . . |
3-38 |
• SRS care . . . . . . . . . . . . . . . . . . . . . . . . . . . . . . . . . . . |
3-44 |
• Additional safety precautions . . . . . . . . . . . . . . . . . . |
3-45 |
• Air bag warning labels . . . . . . . . . . . . . . . . . . . . . . . . |
3-45 |

Safety features of your vehicle
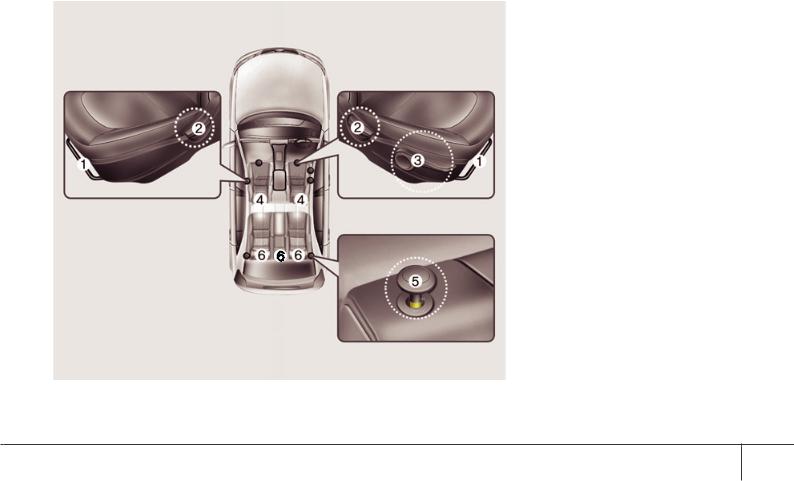
SEAT
■ Left-hand drive |
Front seats |
|
|
(1) |
Forward and rearward |
|
(2) |
Seatback angle |
|
(3) |
Seat cushion height (driver’s seat)* |
|
(4) |
Headrest |
Rear seats
(5) Seat folding*
(6) Headrest (outboard and/or center*)
* : if equipped
OBA033001
3 2
|
|
|
Safety features of your vehicle |
|
|
|
|
■ Right-hand drive |
Front seats |
||
|
(1) |
Forward and rearward |
|
|
(2) |
Seatback angle |
|
|
(3) |
Seat cushion height (driver’s seat)* |
|
|
(4) |
Headrest |
|
Rear seats
(5) Seat folding*
(6) Headrest (outboard and/or center*)
* : if equipped
OBA033001R/Q
3 3

Safety features of your vehicle
 WARNING - Loose objects
Loose objects in the driver’s foot area could interfere with the operation of the foot pedals, possibly causing an accident. Do not place anything under the front seats.
 WARNING - Uprighting seat
When you return the seatback to its upright position, hold the seatback and return it slowly and be sure there are no other occupants around the seat. If the seatback is returned without being held and controlled, the back of the seat could spring forward resulting in accidental injury to a person struck by the seatback.
 WARNING - Driver responsibility for front seat passenger
Riding in a vehicle with a front seatback reclined could lead to serious or fatal injury in an accident. If a front seat is reclined during an accident, the occupant’s hips may slide under the lap portion of the seat belt applying great force to the unprotected abdomen. Serious or fatal internal injuries could result. The driver must advise the front passenger to keep the seatback in an upright position whenever the vehicle is in motion.
 WARNING - Driver’s seat
•Never attempt to adjust seat while the vehicle is moving. This could result in loss of control, and an accident causing death, serious injury, or property damage.
•Do not allow anything to interfere with the normal position of the seatback. Storing items against a seatback or in any other way interfering with proper locking of a seatback could result in serious or fatal injury in a sudden stop or collision.
•Always drive and ride with your seatback upright and the lap portion of the seat belt snug and low across the hips. This is the best position to protect you in case of an accident.
•In order to avoid unnecessary and perhaps severe air bag injuries, always sit as far back as possible from the steering wheel while maintaining comfortable control of the vehicle. It is recommended that drivers allow at least 25 cm (10 in.) between the center of the steering wheel and their chest.
3 4
Safety system of your vehicle
OBA033002
Front seat adjustment
Forward and rearward
To move the seat forward or rearward:
1.Pull the seat slide adjustment lever up and hold it.
2.Slide the seat to the position you desire.
3.Release the lever and make sure the seat is locked in place.
Adjust the seat before driving, and make sure the seat is locked securely by trying to move forward and rearward without using the lever. If the seat moves, it is not locked properly.
OBA033003
Seatback angle
To recline the seatback:
1.Lean forward slightly and lift up the seatback recline lever.
2.Carefully lean back on the seat and adjust the seatback of the seat to the position you desire.
3.Release the lever and make sure the seatback is locked in place. (The lever MUST return to its original position for the seatback to lock.)
OBA033004
Seat cushion height (for driver’s seat) (if equipped)
To change the height of the seat cushion, move the lever upwards or downwards.
•To lower the seat cushion, push down the lever several times.
•To raise the seat cushion, pull up the lever several times.
3 5
Safety features of your vehicle
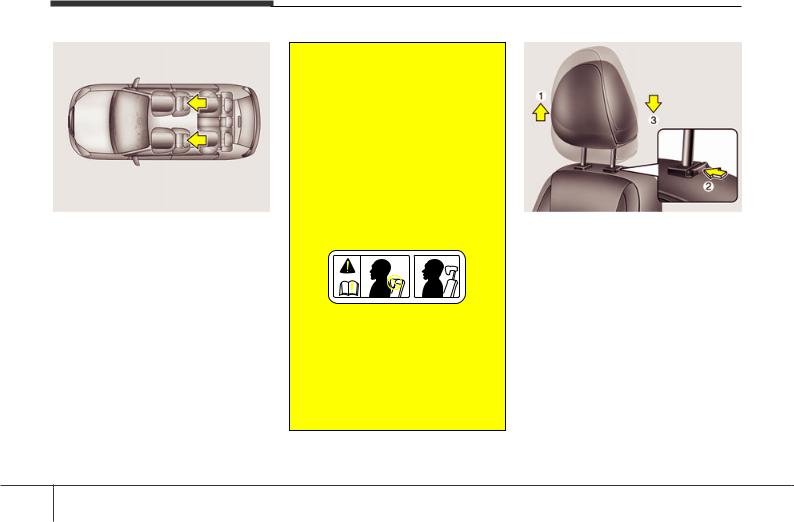
OPA039052
Headrest
The driver's and front passenger's seats are equipped with a headrest for the occupant's safety and comfort.
The headrest not only provides comfort for the driver and front passenger, but also helps protect the head and neck in the event of a collision.
 WARNING
To reduce the risk of serious injury or death in an accident, take the following precautions when adjusting your headrests:
•Always properly adjust the headrests for all passengers BEFORE starting the vehicle.
•NEVER let anyone ride in a seat with the headrest removed.
•Adjust the headrests so the middle of the headrests is at the same height as the height of the top of the eyes (see diagram).
•NEVER adjust the headrest position of the driver's seat when the vehicle is in motion.
•Adjust the headrest as close to the passenger's head as possible. Do not use a seat cushion that holds the body away from the seatback.
OBA033005
Adjusting the height up and down (if equipped)
To raise the headrest, pull it up to the desired position (1). To lower the headrest, push and hold the release button (2) on the headrest support and lower the headrest to the desired position (3).
3 6
Safety features of your vehicle
OBA033006
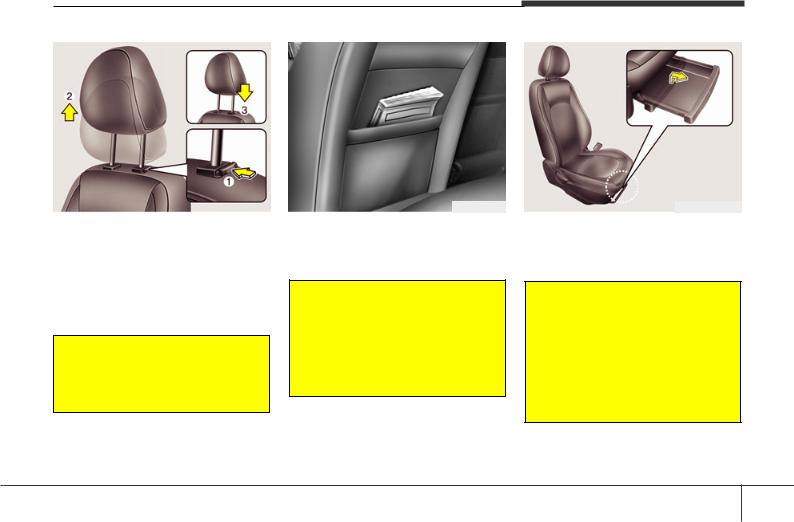
Removal/Reinstall (if equipped)
To remove the headrest, raise it as far as it can go then press the release button (1) while pulling the headrest up (2).
To reinstall the headrest, put the headrest poles (3) into the holes while pressing the release button (1). Then adjust it to the appropriate height.
 WARNING
Always make sure the headrest locks into position after reinstalling and adjusting it properly.
OPA037007
Seatback pocket (if equipped)
The seatback pocket is provided on the back of the driver’s and/or front passenger’s seatback.
 WARNING - Seatback pocket
Do not put heavy or sharp objects in the seatback pocket. In an accident they could come loose from the pocket and injure vehicle occupants.
OBA033031L
Passenger seat under tray (if equipped)
To open the tray, pull up the tray and then pull it out forward.
 WARNING - Flammable materials
Do not store cigarette lighters, propane cylinders, or other flammable/explosive materials in the tray. These items may catch fire and/or explode if the vehicle is exposed to hot temperatures for extended periods.
3 7
Safety features of your vehicle
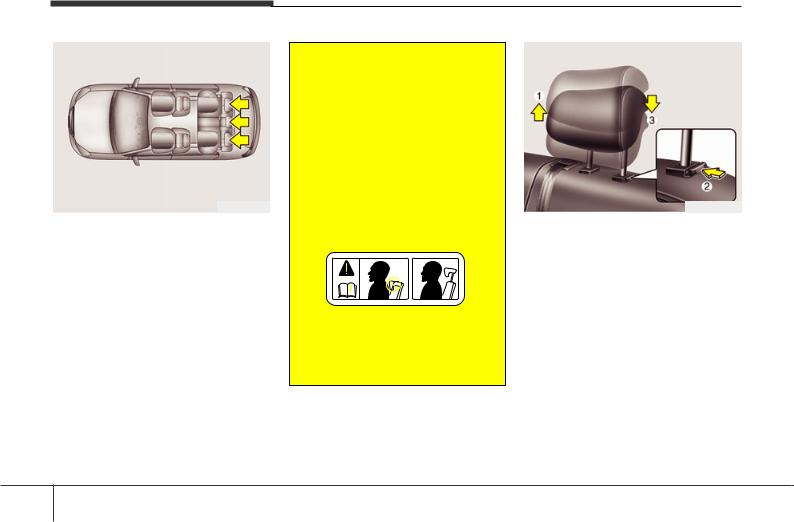
OPA039053
Rear seat adjustment
Headrest
The rear seat(s) is equipped with headrests in the outboard seating positions (and/or center seating position) for the occupant's safety and comfort.
The headrest not only provides comfort for passengers, but also helps protect the head and neck in the event of a collision.
 WARNING
To reduce the risk of serious injury or death in an accident, take the following precautions when adjusting your headrests:
•Always properly adjust the headrests for all passengers BEFORE starting the vehicle.
•NEVER let anyone ride in a seat with the headrest removed.
•Adjust the headrests so the middle of the headrests is at the same height as the height of the top of the eyes (see diagram).
•Adjust the headrest as close to the passenger's head as possible. Do not use a seat cushion that holds the body away from the seatback.
OBA033025
Adjusting the height up and down (if equipped)
To raise the headrest, pull it up to the desired position (1). To lower the headrest, push and hold the release button (2) on the headrest support and lower the headrest to the desired position (3).
3 8
Safety features of your vehicle
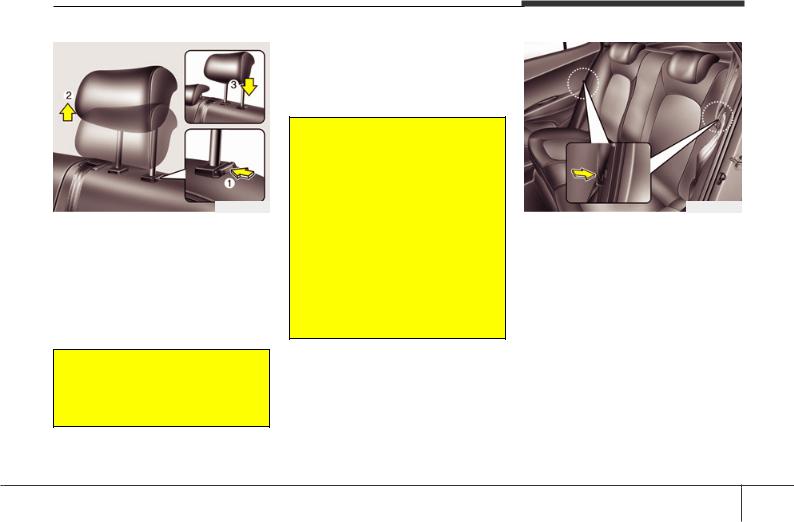
OBA033026
Removal/Reinstall (if equipped)
To remove the headrest, slightly fold the rear seatback, raise the headrest as far as it can go then press the release button
(1) while pulling upward (2).
To reinstall the headrest, put the headrest poles (3) into the holes while pressing the release button (1). Then adjust it to the appropriate height.
 WARNING
Always make sure the headrest locks into position after reinstalling and adjusting it properly.
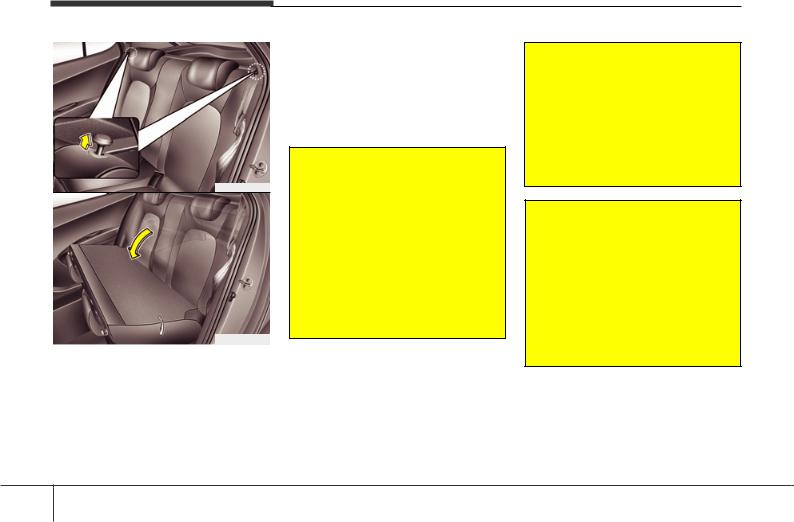
Folding the rear seat
The rear seatbacks (or cushions) may be folded to facilitate carrying long items or to increase the luggage capacity of the vehicle.
 WARNING
•Never allow passengers to sit on top of the folded down seatback while the vehicle is moving as this is not a proper seating position and no seat belts are available for use. This could result in serious injury or death in case of an accident or sudden stop.
•Objects carried on the folded down seatback should not extend higher than the top of the front seats. This could allow cargo to slide forward and cause injury or damage during sudden stops.
1.Set the front seatback to the upright position and if necessary, slide the front seat forward.
2.Lower the rear headrests to the lowest position (if equipped with adjustable headrests).
OBA033027
3.Insert the rear lap/shoulder belt plate into the holder on the side trim. It will prevent the lap/shoulder belt from interfering with the seatback when folding.
3 9
Safety system of your vehicle
OBA033028
OBA033029
4.Pull up both sides of the seatback lever and fold the seatback toward the front of the vehicle.
To use the rear seat, lift and push up the seatback backward. Push the seatback firmly until it clicks into place. Make sure the seatback is locked in place.
When returning the rear seatbacks to the upright position, remember to return the rear shoulder belts to their proper position.
 WARNING
When returning the rear seatback from a folded to an upright position, hold the seatback and return it slowly. Ensure that the seatback is completely locked into its upright position by pushing on the top of the seatback. In an accident or sudden stop, the unlocked seatback could allow cargo to move forward with great force and enter the passenger compartment, which could result in serious injury or death.
 WARNING - Cargo
Cargo should always be secured to prevent it from being thrown about the vehicle in a collision and causing injury to the vehicle occupants. Do not place objects in the rear seats, since they cannot be properly secured and may hit the front seat occupants in a collision.
 WARNING - Cargo loading
Make sure the engine is off, the shift lever is in P (Park, for automatic transaxle vehicle ) or neutral (for manual transaxle vehicle), and the parking brake is securely applied whenever loading or unloading cargo. Failure to take these steps may allow the vehicle to move if the shift lever is inadvertently moved to another position.
3 10
SEAT BELTS
Seat belt restraint system
 WARNING
•For maximum restraint system protection, the seat belts must always be used whenever the vehicle is moving.
•Seat belts are most effective when seatbacks are in the upright position.
•Children age 12 and under must always be properly restrained in the rear seat. Never allow children to ride in the front passenger seat. If a child over 12 must be seated in the front seat, he/she must be properly belted and the seat should be moved as far back as possible.
•Never wear the shoulder belt under your arm or behind your back. An improperly positioned shoulder belt can cause serious injuries in a crash. The shoulder belt should be positioned midway over your shoulder across your collarbone.
(Continued)
(Continued)
•Avoid wearing twisted seat belts. A twisted seat belt will not protect you properly in an accident. Be sure the belt webbing is straight and not twisted.
•Each belt assembly must only be used by one occupant; it is dangerous to put a belt around a child being carried on a occupant's lap.
•Be careful not to damage the belt webbing or hardware. If the belt webbing or hardware is damaged, replace it.
Safety system of your vehicle
 WARNING
Damaged seat belts and seat belt assemblies will not operate properly. Always replace:
•Frayed, contaminated, or damaged webbing
•Damaged hardware
•The entire seat belt assembly after it has been worn in an accident, even if damage to webbing or assembly is not apparent
 WARNING
No modifications or additions should be made by the user which will either prevent the seat belt adjusting devices from operating to remove slack.
3 11
Safety system of your vehicle
1GQA2083
Seat belt warning
As a reminder to the driver, the seat belt warning light on the instrument cluster will blink for approximately 6 seconds each time you place the ignition switch in the ON position regardless of belt fastening.
If the driver's seat belt is unfastened after the ignition switch is in the ON position, the seat belt warning light will blink again for approximately 6 seconds.
If the driver's seat belt is unfastened when the ignition switch is in the ON position or if it is unfastened after the ignition switch is in the ON position, the seat belt warning chime will sound for approximately 6 seconds. At this time, if the seat belt is fastened, the chime will stop at once. (if equipped)
1
2
B180A01NF
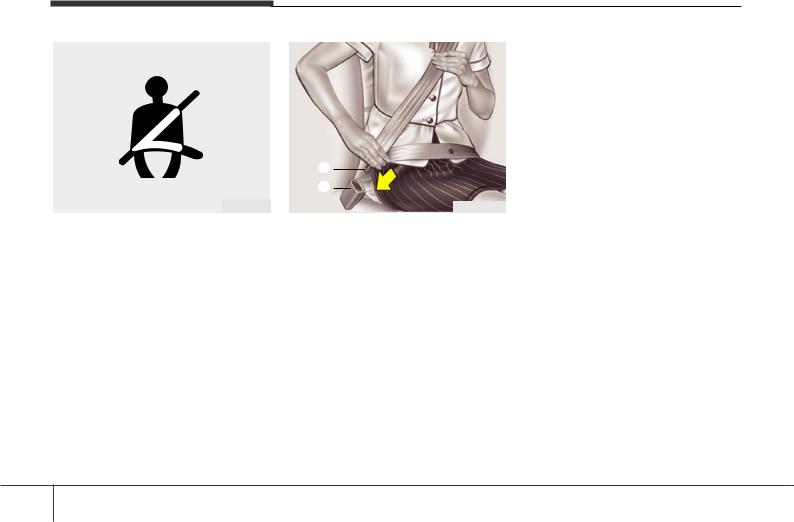
Lap/shoulder belt
To fasten your seat belt:
Pull the seat belt out of the retractor and insert the metal tab (1) into the buckle
(2). There will be an audible "click" when the tab locks into the buckle.
The seat belt automatically adjusts to the proper length only after the lap belt portion is adjusted manually so that it fits snugly around your hips. If you lean forward in a slow, easy motion, the belt will extend and let you move around. If there is a sudden stop or impact, however, the belt will lock into position. It will also lock if you try to lean forward too quickly.
NOTICE
If you are not able to smoothly pull enough of the seat belt out from the retractor, firmly pull the seat belt out and release it. After release, you will be able to pull the belt out smoothly.
3 12
OBA033024R
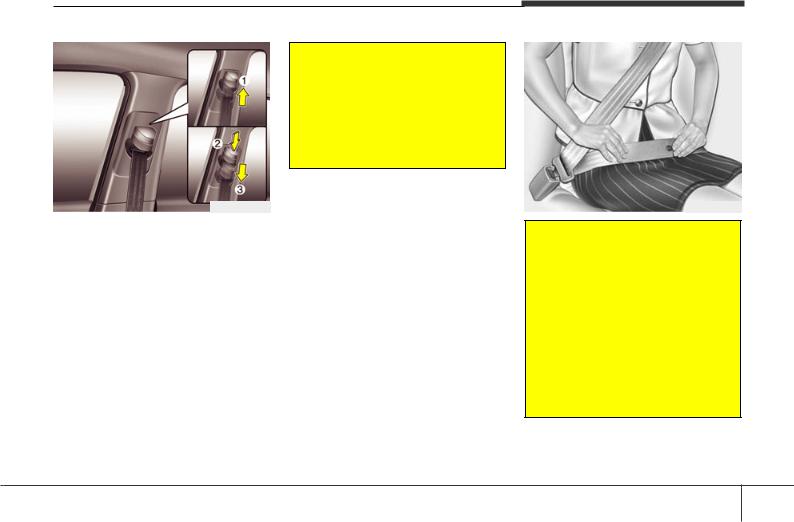
Height adjustment (if equipped)
You can adjust the height of the shoulder belt anchor to one of the 4 positions for maximum comfort and safety.
The shoulder portion should be adjusted so it lies across your chest and midway over your shoulder nearest the door, not over your neck.
To adjust the height of the seat belt anchor, lower or raise the height adjuster into an appropriate position.
To raise the height adjuster, pull it up (1). To lower it, push it down (3) while pressing the height adjuster button (2).
Release the button to lock the anchor into position. Try sliding the height adjuster to make sure that it has locked into position.
 WARNING
Always position the shoulder belt anchor into locked position at the appropriate height. Never position the shoulder belt across your neck or face. Improperly positioned seat belts can cause serious injuries in an accident.
Safety system of your vehicle
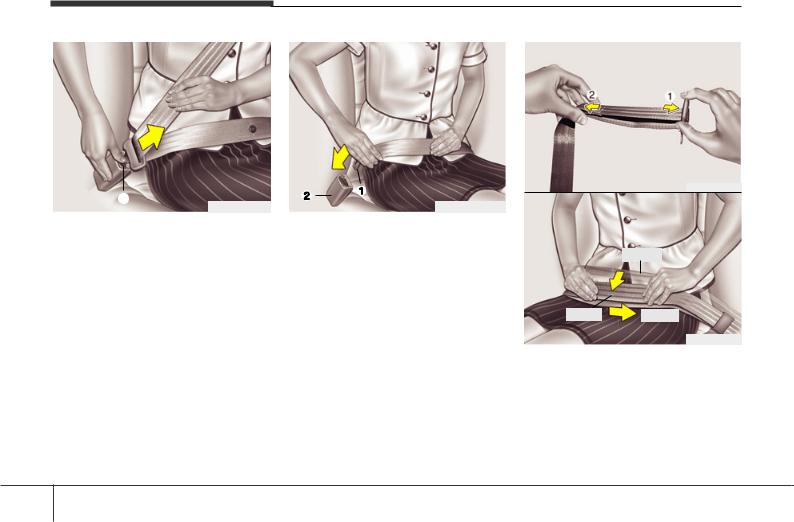
B200A01NF
 WARNING
Improperly positioned seat belts may increase the risk of serious injury in an accident. Take the following precautions when adjusting the seat belt:
•Position the lap portion of the seat belt as low as possible across your hips, not on your waist, so that it fits snugly.
•Position one arm under the shoulder belt and the other over the belt, as shown in the illustration.
3 13
Safety system of your vehicle
1
B210A01NF/Q
To release the seat belt:
The seat belt is released by pressing the release button (1) in the locking buckle. When it is released, the belt should automatically draw back into the retractor.
If this does not happen, check the belt to be sure it is not twisted, then try again.
B220A04NF-1/Q
Lap belt (if equipped)
To fasten your seat belt:
To fasten a 2-point static type belt, insert the metal tab (1) into the locking buckle
(2). There will be an audible "click" when the tab locks into the buckle. Make sure the belt is properly locked and that the belt is not twisted.
OEN036030
Too high
Correct Shorten
B220B01NF
With a 2-point static type seat belt, the length must be adjusted manually so it fits snugly around your hip. Fasten the belt and pull on the loose end to tighten the belt. The belt should be placed as low as possible on your hips, not on your waist. If the belt is too high, it could increase the possibility of injury in an accident.
3 14
 Loading...