


Hyundai H-HV5-10-UI609, H-HV5-15-UI610, H-HV5-20-UI611, H-HV6-10-UI614, H-HV6-15-UI615 User Manual [ru]
...Электрический конвектор
RU
Руководство по эксплуатации. Гарантийный талон.
Electric convector
|
EN |
|
Instruction manual. |
|
Warranty card. |
Модели / Models |
H-HV5-10-UI609 |
|
|
|
H-HV5-15-UI610 |
|
H-HV5-20-UI611 |
|
H-HV6-10-UI614 |
|
H-HV6-15-UI615 |
|
H-HV6-20-UI616 |
|
H-HV7-10-UI639 |
|
H-HV7-15-UI641 |
|
H-HV7-20-UI643 |
|
H-HV9-10-UI646 |
|
H-HV9-15-UI648 |
|
H-HV9-20-UI650 |
www.hyundai-hvac.com
2. |
|
Electric convector |
EN
Table of contents
Introduction |
3 |
|
1. |
General |
3 |
|
Description |
3 |
|
Stock number interpretation |
3 |
|
Appearance |
4 |
|
Package contents |
5 |
|
Technical speciications |
5 |
|
Overall and installation dimensions |
6 |
2. |
Safe operation and installation of electric convector |
6 |
|
General safety rules |
6 |
3. |
Wall instalation |
8 |
|
Installing castors on the convector |
8 |
4. |
Connectins to the mains |
8 |
5. |
Operation |
9 |
6. |
Service |
12 |
|
|
|
Electric convector |
|
|
3. |
|
|||||||||
INTRODUCTION |
|
|
|||||||||||
Before installing and using the appliance, please very carefully read this instruction manual and |
|
||||||||||||
manufacturer’s warranty liabilities. Keep the instruction manual for future reference. If you hand |
|
||||||||||||
over the appliance to another user, please hand over the instruction manual as well. |
|
|
|||||||||||
For more details or resolution of any occurred problems, please visit Hyundai website at www. |
|
||||||||||||
hyundai-hvac.com. You can also contact the nearest regional service center of the manufacturer. |
|
||||||||||||
If there are no service centers of the manufacturer in your region, please contact the regional |
|
||||||||||||
dealer of Hyundai. |
|
|
|||||||||||
The content of this instruction manual has been checked and approved. The manufacturer is not |
|
||||||||||||
responsible for any spelling mistakes in the text and incorrect interpretation of the instruction |
|
||||||||||||
manual content. |
|
|
|||||||||||
The appearance, speciications, and package contents of the appliance can be modiied by the |
|
||||||||||||
manufacturer without preliminary notiication. |
|
|
|||||||||||
1. GENERAL |
|
|
|||||||||||
Description |
|
|
|||||||||||
Convector heaters are intended for primary or secondary space heating. Depending on the mod- |
EN |
||||||||||||
el, electric heaters can used in residential, oice, industrial and warehouse premises. The main |
|
||||||||||||
advantage of the electrical convectors is that their primary function is based on the principle of |
|
||||||||||||
natural convection, thus providing a fast and eicient space heating. |
|
|
|||||||||||
Stock number interpretation |
|
|
|||||||||||
Appliance |
|
|
|||||||||||
series |
|
|
|||||||||||
H-HV5-10-UI609 |
|
|
|||||||||||
|
|
|
|
|
|
|
|
|
|
|
|
||
|
|
|
|
|
|
|
|
Individual model code |
|
|
|||
|
|
|
|
|
|
|
|
|
|
||||
|
|
|
|
|
|
Nominal power consomption |
|
|
|||||
|
|
|
|
|
|
|
|
||||||
|
|
|
|
|
|
|
|
10 - Nominal power consomption 1000 Вт |
|
|
|||
|
|
|
|
|
|
|
|
15 - Nominal power consomption 1500 Вт |
|
|
|||
|
|
|
|
|
|
|
|
20 - Nominal power consomption 2000 Вт |
|
|
|||
|
|
|
Number of series |
|
|
||||||||
|
|
|
|
|
|||||||||
|
|
Appliance type |
|
|
|||||||||
|
|
|
|
||||||||||

4.
Appearance
Models H-HV5/H-HV6
1.Front Panel
2.Rear panel
3. |
Thermostat |
4 |
|
4. |
Power Switch |
3 |
|
5. |
Wall Mount |
||
|
|||
6. |
Supporting feet |
|
2
1
6
EN
Fig. 1
Models H-HV7/H-HV9
1. Front cover |
3 |
2.Rear Cover
3.Operation Board
4.Hooks
5.Feet
2
1
5
Fig. 2
Electric convector
5
4
Electric convector |
|
5. |
Package contents
1.Convector -1pc.
2.Supporting feet -2 pc.
3.Wall mounting set – 1 pc.
4.Operating manual and warranty card – 1 pc.
Technical speciications
|
|
H-HV5-10-UI609 |
H-HV5-15-UI610 |
H-HV5-20-UI611 |
|
|
|
|
|
|
|
Rated power |
W |
1000 |
1500 |
2000 |
|
consumption |
|||||
|
|
|
|
||
Power supply |
V/Hz |
220-240~/50 |
220-240~/50 |
220-240~/50 |
|
Rated current |
А |
4,5 |
6,8 |
9,1 |
|
Protection class |
|
IP24 |
IP24 |
IP24 |
|
Electrical protection |
|
Class I |
Class I |
Class I |
|
class |
|
||||
|
|
|
|
||
Heating area |
m² |
14-16 |
18-20 |
22-26 |
|
Net weight |
kg |
2,95 |
3,46 |
4,15 |
|
Device dimensions |
mm |
440х90х403 |
610х90х403 |
760х90х403 |
|
|
|
H-HV6-10-UI614/ |
H-HV6-15-UI615/ |
H-HV6-20-UI616/ |
|
|
|
H-HV7-10-UI639/ |
H-HV7-15-UI641/ |
H-HV7-20-UI643/ |
|
|
|
H-HV9-10-UI646 |
H-HV9-15-UI648 |
H-HV9-20-UI650 |
|
|
|
|
|
|
|
Rated power |
W |
1000 |
1500 |
2000 |
|
consumption |
|||||
|
|
|
|
||
Power supply |
V/Hz |
220-240~/50 |
220-240~/50 |
220-240~/50 |
|
Rated current |
А |
4,5 |
6,8 |
9,1 |
|
Protection class |
|
IP24 |
IP24 |
IP24 |
|
Electrical protection |
|
Class I |
Class I |
Class I |
|
class |
|
||||
|
|
|
|
||
Heating area |
m² |
14-16 |
18-20 |
22-26 |
|
Net weight |
kg |
3,5 |
4,5 |
5,3 |
|
Device dimensions |
mm |
440х90х403 |
610х90х403 |
760х90х403 |
EN
6. |
|
Electric convector |
For more detailed description of technical parameters and speciications please refer to our website www.hyundai-hvac.com or ask from the oicial dealers of Hyundai.
ATTENTION!
The manufacturer reserves the right to change the set-list of the device
(including liquid and powder components) for diferent supplies without prior notice. The changes either in no way inluence the basic technical pa-
rameters of the device or may improve them, and also not violate the legislation or quality standards of the countries of manufacture, transit and selling. The changes in the set-list may result in changing of the weight and dimensions of the device, but not more than by +\- 5-20% (depending on the product category)
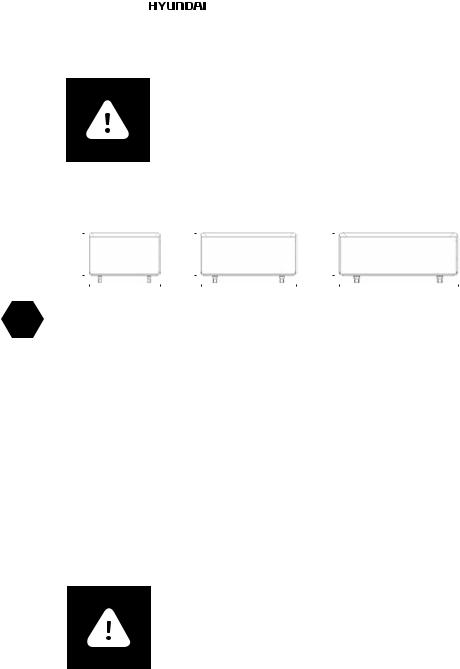
Overall and installation dimensions
403 |
|
|
403 |
|
|
403 |
|
|
|
|
|
|
|
|
|
|
|
|
|
|
|
|
||||
440 |
610 |
760 |
||||||
Fig. 3
EN
2. SAFE OPERATION AND INSTALLATION OF ELECTRIC CONVECTOR
When operating convector please observe safety rules. Improper operation or ignoring these rules can lead to harming health of the user and other people as well as damage to their property. The manufacturer is not liable for personal injury and damage property resulting from improper installation and operation of the device.
GENERAL SAFETY RULES
1.Read all instructions before using the convector.
2.Convector surface can become very hot. To avoid burns, do not touch it with your hands and other body parts.
3.Appliance should not be situated in vicinity of lammable and objects.
4.Ensure that the heater’s casing and heating element to cool down before unit will be dismantled and packed in long-term storage.
5.When not in use for a long time, store it in a cool dry place in factory carton.
6.Device should always be supervised, especially when far away from the appliance near children. Be careful that children do not touch the appliance with hands.
7.Do not cover the appliance when it is running. Do not dry clothes on it and any other fabric materials. This can lead to overheating and damage or cause signiicant damage to you and/or
your property.
ATTENTION!
The manufacturer considers this type of failure a non-guaranteed event.
Electric convector |
|
7. |
8.Always disconnect unit from the electric plug when not in use.
9.Device is equipped with a standard plug grounding prong. The plug must it standard European wall socket. If the plug does not it in outlet or included tight, turn it vertically 180 degrees and repeat try. If ater that you can not easily insert the plug into the outlet, call electrician to replace
the outlet. Never use the appliance if the plug is inserted into outlet is not until the end.
10.Never connect the appliance to the plug, if the surface is wet.
11.Never use the device in a situation where it may come into contact with water.
12.When the unit is operating, do not touch the surface and the surface of the control block with wet hands and any body parts.
13.Do not switch on the unit if the power cord or plug are damaged. To avoid the risk of electric shock, damaged power cord must be changed only at authorized service centers.
14.Never try to repair the unit yourself. This can cause damage to your health and afect the
warranty of the device.
15.Convector should not be used in open spaces or outdoors.
16.Forbidden to install and use the device in bathrooms, showers or pools, in those places where there is a risk of direct contact with the jets and drops of water on the surface.
17.Do not route the power cord under carpets or pieces of furniture.
18.Never pull the cord and do not unplug the plug abruptly.
19.Do not insert your ingers and not put any objects in air outlet or air inlet as it may cause elec-
tric shock or damage to the convector.
20.To prevent a possible ire, do not block air inlet and outlet. Do not hang or dry things on the convector. Use convector on a level surface only.
21.Do not use the convector in areas of use or storage of gasoline, paint or other lammable
liquids.
22.Use convector only as described in this manual. Any other use not recommended by the man- ufacturer and may cause ire, electric shock or injury to persons.
23.Do not attempt to clean the convector when plugged into an outlet. Not allow convector immerse in water. Never pull the power cord.
24.To avoid overheating and the risk of ire and damage internal electrical network, do not change the length of the power cord and do not connect device through an electrical extenders. However, you can use an extension if its parameters correspond to the performance of the device and if it is not used by other power consumers.
25.For normal operation of the device power voltage level must be suicient, and its technical
parameters must be in strict accordance with technical data given on the unit. If necessary, ask network provider for characteristics of their electricity.
26.Install and operate the appliance in upright position. Prohibited to operate the device in a horizontal or inclined positions.
27.The device must be installed so that the panel could not be available for a person who is directly in the bathroom (in contact with water) or take a shower.
28.Do not install the unit directly under the wall outlet or allow the hot air from the outlet touch power cord. This can cause them to overheat , creating an emergency situation.
29.The device is not intended for use by persons (including children) with reduced physical, senso- ry or mental capabilities, with insuicient experience and knowledge, unless they are under super -
vision and have not received instructions on the use of appliance by a person responsible for their safety. Necessary to make sure that children do not play with convector.
EN
IMPORTANT SAFEGUARDS
•Please read all the instruction manual before use and save it for future references.
•Before irst switching on check that the voltage indicated on the rating label corresponds with the mains voltage in your home.
•For home use only. Do not use for industrial purposes. Use the appliance only for its intended use.
8.
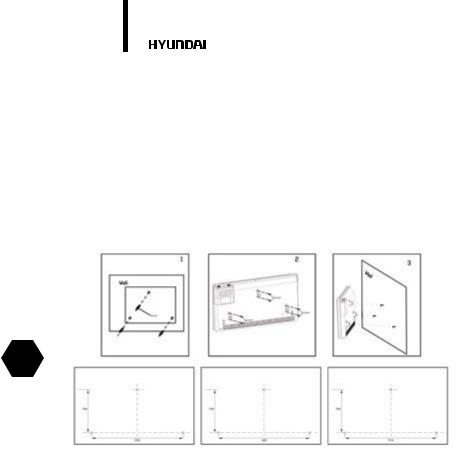
3. WALL INSTALLATION
Electric convector
1.Uncover the original packaging and carefully remove device from it.
2.Remove any foam seals on the edges of the device and release it from polyethylene.
3.Determine the location for the convector in compliance with the minimum distance from the object and the loor.
4.Mark the height at which you must install the convector and put labels in visible ixing holes.
5.Drill holes in the wall of the required diameter, insert the dowels*, tighten the set screws*.
6.Attach the mounting brackets to the cover of the unit with the mounting screws.
7.Perform installation on the wall convector, setting the screws installed in the wall brackets with the holes that are installed on the device.
8.Check the installation. Convector should it snugly against the wall.
* May not be included in delivery set
EN
Fig. 4
Installing castors on the convector
1.Remove the two support legs from the packaging of the convector.
2.Turn the unit so that its bottom was in easy access.
3.Attach the support legs to the bottom of the device to the let and right sides so that the fastening holes align with the holes on the ixture.
4.Tighten the screws in the existing holes.
4.CONNECTING TO THE MAINS
1.Convector is designed for connection to the plug with single-phase на 220-240~V, 50Hz.
2.Before connecting, make sure that the voltage is correct as speciied on the nameplate with the
technical data of the device.
3.Convector when connected to the plug must comply with applicable electrical codes.
4.Electric outlet must be properly grounded. The receptacle must be rated for at least 10A. Electrical plug and socket must always be kept dry to prevent electrical leakage. Regularly check that the electrical plug is irmly connected to the outlet. Veriication is performed in the following order: Insert the mains plug into the socket. Ater half an hour, turn of the convector and unplug
the power cord, check with the hand , whether the plug is not heated.
If the plug is heated to a temperature above 50 °C, in order to avoid damage, accidents, ire, due to poor electrical contact replace the socket with help of a specialist.
Electric convector |
|
9. |
WARNING!
The power outlet should be rated at least 10A for models with a maximum capacity of up to 2000 W and at least 12 A for models with a maximum capacity of 2500 watt
5. OPERATION
For models:
H-HV5
H-HV6
1. Inclusion
1.1 Connect the convector to the mains by inserting the plug into the outlet.
2. Selecting the heating power
2.1 Turn the knob in the heating mode position «I» to select low power heating.
2.2 Turn the selector knob to position the heating mode «II» to select the average heating power. 2.3 Turn the selector knob to position the heating mode «III» to select a high heating power.
3. Setting the temperature
3.1 Turn the thermostat knob clockwise until it stops. When the room temperature reaches the de- sired level, turn the thermostat knob counter-clockwise to turn of the meter. Now the thermostat will maintain the set temperature, periodically enabling and disabling convector.
4. Shutdown
4.1 Set the mode switch «OFF» and disconnect the appliance from the mains.
EN
ATTENTION!
In order to increase the operational life of the convector is recom- mended to note the order unit is switched of. Shutting down the output
without pre-cooling of the heating elements can cause overheating and premature failure.
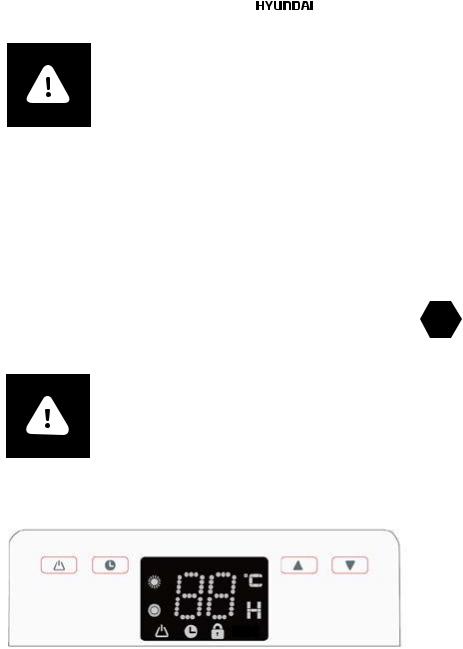
For models:
H-HV7
H-HV9
SMT
Fig. 5
10. |
|
Electric convector |
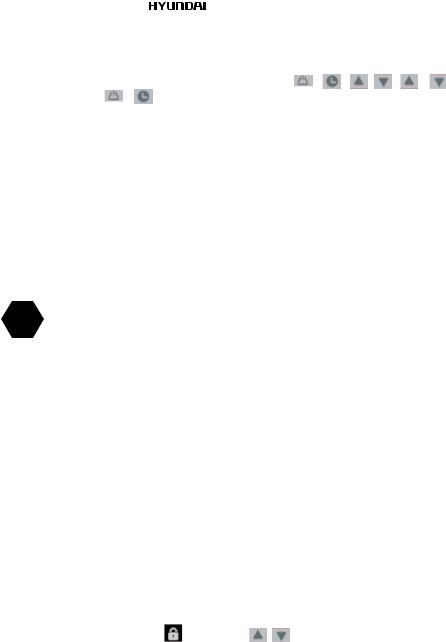
Display and button
1. Display: LED display, Use Number to show the to use symbols to show other status.
2. Button: the product with 4 single buttons a button: |
/ |
/ |
/ |
/ |
+ |
for |
||
Lock/ |
+ |
screen fade out |
|
|
|
|
|
|
3. Button: Power on, the product would be Press Power button for standby, Low, Middle, hig setting.
4. Button: set timer
5. Button: set the temperature and time in
6. Button: set the temperature and time d
Temperature setting function
Temperature setting range 5 ~ 35 default is temperature setting time,  lights, LED number is 1Hz, ater set the temperature 3 seconds no more keep the temperature setting, LED number stop la temperature 1 over the setting temperature, it when sensor temperature 1 below the setting to start heating.
Press  or
or  button to enter temperature setting function, it will show default or last time setting temperature, user can set the required temperature by pressing
  and
and  button.
EN
Timer setting function
Under standby status, user can set the boot time, under the power on (power is set) status, user can set the shut down time.
Boot time setting:
When the product is under stand-by status, Symbol  lashes press timer button, the product would be in boot time mode, symbol
  lashes,
  lights, LED shows the number (which was set last time press
  or
or  set time from 1 to 24h, 3s no more operation, the product works with setting time, symbol
  on, if set timer to be 0,it means cancel the timer, timer symbol
 of. Then user se power and required temperature.
Shut down time setting:
When the product is under on status, Symbol  lights, press timer button, the product would be in shut down time mode,
  lights, L shows the number (which was set last time), press
  or
or
 set time from 1 to 24h, 3s no more operation, the product works with setting time, symbol
 stop lashing, if set timer to be 0,it means can the timer, Then user set power and required temperature. Timer function would be invalid under Smart mode.
Lock function:
Press  /
/  together 3s, Lock function starts, (
  lights on) the screen lashes, 3s later to be former status, when the lock function works, user press any other buttons, it will not working.
Remove Lock function ( |
lights of): press |
/ |
together 3s, Lock function stops working. |
Electric convector |
|
|
|
11. |
|
SMT mode |
|
|
|
|
|
Press |
button, symbol |
|
|||
SMT |
lights, Set required temperature and compared it with room |
||||
|
|
|
|
|
|
temperature, if setting temperature and room temperature diference is 5 degrees or over 5 degrees, the product works with high power (2000W), if setting temperature and room tempera- ture diference is over 3 degrees but not more than 5 degrees, the product works with middle power (1200W), if setting temperature and room temperature diference is less 3 degrees, the product works with low power (800W), if setting temperature is higher than room temperature,
the product stops heating.
Power adjustment
Low power  lights,
  of;
of;
Middle power,  lights,
  of;
of;
High power, 
 both on.
Protection function
Sensor problem protection: Sensor of or other problem, LED shows E1, heating element stops heating output Tip-over protection: the products tip-over 45 degrees, it stops working,  lash- es, and the product would be under standby status.
EN
Over-heating protection: once the whole product is overheating, thermal limiter works, the prod-
uct would be power of, LED of.
Operation voice
When valid operate any button once, buzzer ring once, ater connection of power, buzzer ring
once.
Screen fade out Function
If no pressing of « » button together, all the symbols on LED would be on status.
Press «  » button together,
  shows status of the product, other symbols of, press any button to show working status.
Mandatory power functions
Within 2 minutes ater power on of the product for the irst time, SMART mode and temperature setting function invalid, the whole product works under setting power for PCB checking of production line.
Memory function
Thermo-limiter of and rework, tip-over switch rework and accidently electricity of, the product
will memory working status of last time.
12. |
|
Electric convector |
6. SERVICE
ATTENTION!
See “Rules for safe operation and installation of electric convector”
EN
In the process of using an electric convector on the intake, outlet grill or on the device may appear dust or other contamination. To preserve the health and appearance of the device must be regularly cleaned from dust and dirt. Before cleaning the external surfaces of the electric convector, disconnect the appliance from the mains and allow it to cool completely. Clean the outside of the appliance with a damp, sot cloth and then wipe dry and allow the device to dry completely. Do not use abrasive cleaning agents. Do not damage the appliance with a sharp object, as scratches on painted surfaces can cause rust.
Troubleshooting |
Possible causes |
Removal |
||
|
|
|
|
|
Electric convector is connect- |
• |
No power. |
• |
Check whether the power |
ed to the mains, switch handle |
• |
Violated contacts in the wir- |
|
supply is disconnected from |
Mode is set to heating but con- |
|
ing diagram of the circuit. |
|
the device and, if necessary, |
vector does not work. |
• |
Defective switch modes |
• |
post power to the appliance. |
|
|
|
Restore reliable connection |
|
|
|
|
|
contacts. |
|
|
|
• |
Refer to a specialist repair |
|
|
|
|
service center Hyundai. |
Electric convector is connected to the mains, switch handle modes of operation is set to the heating, but the heating is not going on.
•The thermostat is set to temperature lower than in the room.
•Temperature limiter parted
electrical circuit and shut the heating elements.
•Defective switch modes.
•Defective power relay.
•Faulty thermostat.
•Defective heating element.
•Faulty temperature limiter.
•Set the thermostat to a higher temperature heat the room, turning the thermostat
knob clockwise.
•ofEnsure that the air inlet or outlet grill is not blocked by foreign objects and wait for
the inclusion of the tempera- ture limiter, ater the body of
the device to cool.
•Refer to a specialist repair service center Hyundai.
 Loading...