


Hyundai H-HV1-10-UI562, H-HV1-15-UI563, H-HV2-10-UI565, H-HV2-15-UI566, H-HV2-20-UI567 User Manual [ru]
...Электрический конвектор
RU
Руководство по эксплуатации. Гарантийный талон.
Electric convector
EN
Instruction manual.
Warranty card.
Модели / Models |
H-HV1-10-UI562 |
|
|
|
H-HV1-15-UI563 |
|
H-HV1-20-UI564 |
|
H-HV2-10-UI565 |
|
H-HV2-15-UI566 |
|
H-HV2-20-UI567 |
|
H-HV3-10-UI568 |
|
H-HV3-15-UI569 |
|
H-HV3-20-UI570 |
www.hyundai-hvac.com
2. |
|
Electric convector |
EN
Table of contents
Introduction |
3 |
|
1. |
General |
3 |
|
Description |
3 |
|
Stock number interpretation |
3 |
|
Appearance |
4 |
|
Package contents |
4 |
|
Technical speciications |
4-5 |
|
Overall and installation dimensions |
5 |
2. |
Safe operation and installation of electric convector |
6 |
|
General safety rules |
6 |
3. |
Disposal |
7 |
4. |
Assembly and installation |
7 |
|
Wall installation |
7 |
|
Floor installation |
7 |
5. |
Connectins to the mains |
8 |
6. |
Operation |
8 |
7. |
Service |
10 |
8. |
Electrical circuit diagram |
11 |
|
|
|
Electric convector |
|
|
3. |
|
||||||||||||
INTRODUCTION |
|
|
||||||||||||||
Before installing and using the appliance, please very carefully read this instruction manual and |
|
|||||||||||||||
manufacturer’s warranty liabilities. Keep the instruction manual for future reference. If you hand |
|
|||||||||||||||
over the appliance to another user, please hand over the instruction manual as well. |
|
|
||||||||||||||
For more details or resolution of any occurred problems, please visit Hyundai website at www. |
|
|||||||||||||||
hyundai-hvac.com. You can also contact the nearest regional service center of the manufacturer. |
|
|||||||||||||||
If there are no service centers of the manufacturer in your region, please contact the regional |
|
|||||||||||||||
dealer of Hyundai. |
|
|
||||||||||||||
The content of this instruction manual has been checked and approved. The manufacturer is not |
|
|||||||||||||||
responsible for any spelling mistakes in the text and incorrect interpretation of the instruction |
|
|||||||||||||||
manual content. |
|
|
||||||||||||||
The appearance, speciications, and package contents of the appliance can be modiied by the |
|
|||||||||||||||
manufacturer without preliminary notiication. |
|
|
||||||||||||||
1. GENERAL |
|
|
||||||||||||||
Description |
|
|
||||||||||||||
Convector heaters are intended for primary or secondary space heating. Depending on the mod- |
|
|||||||||||||||
el, electric heaters can used in residential, oice, industrial and warehouse premises. The main |
EN |
|||||||||||||||
advantage of the electrical convectors is that their primary function is based on the principle of |
|
|||||||||||||||
natural convection, thus providing a fast and eicient space heating. |
|
|
||||||||||||||
Stock number interpretation |
|
|
||||||||||||||
Appliance |
|
|
||||||||||||||
series |
|
|
||||||||||||||
H-HVX-XX-UIXXX |
|
|
||||||||||||||
|
|
|
|
|
|
|
|
|
|
|
|
|
|
|
||
|
|
|
|
|
|
|
|
|
|
|
Individual model code |
|
|
|||
|
|
|
|
|
|
|
|
|
|
|
|
|
||||
|
|
|
|
|
|
|
|
|
Nominal power consumption |
|
|
|||||
|
|
|
|
|
|
|
|
|
|
|
||||||
|
|
|
|
|
|
|
|
|
|
|
10 - Nominal power consumption 1000 Вт |
|
|
|||
|
|
|
|
|
|
|
|
|
|
|
15 - Nominal power consumption 1500 Вт |
|
|
|||
|
|
|
|
|
|
|
|
|
|
|
20 - Nominal power consumption 2000 Вт |
|
|
|||
|
|
|
|
|
|
Number of series |
|
|
||||||||
|
|
|
|
|
|
|
|
|||||||||
|
|
|
|
Appliance type – electric convector |
|
|
||||||||||
|
|
|
|
|
|
|||||||||||
4. |
|
Electric convector |
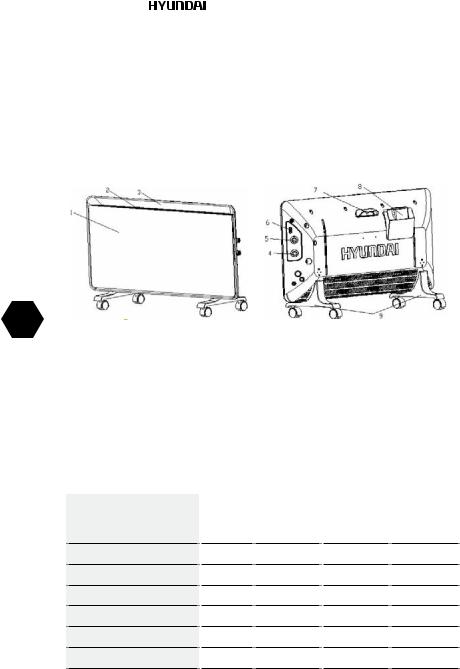
Appearance
1.Front panel
2.Air outlet
3.Rear panel
4.Thermostat switch
5.Power switch
6.Indicator
7.Handle
8.Water box
9.Wheels assembly
EN
Fig. 1
Package contents
1.Convector - 1 pc.
2.Supporting feet - 2 pc.
3.Wall mounting set - 1 pc.
4.Operating manual and warranty card - 1 pc.
Technical speciications
Table 1
|
|
H-HV1-10- H-HV1-15- H-HV1-20- |
||
|
|
UI562 |
UI563 |
UI564 |
Nominal power consumption |
W |
1000 |
1500 |
2000 |
Rated current |
А |
4,5 |
6,8 |
9,1 |
Rated voltage |
V/Hz |
~220/50 |
~220/50 |
~220/50 |
Protection class |
|
IP24 |
IP24 |
IP24 |
Electric protection class |
|
Class I |
Class I |
Class I |
Weight |
Kg |
5,4 |
6,6 |
7,6 |
Dimensions |
mm |
613X88X450 |
770X88X450 |
890X88X450 |
Electric convector |
|
|
|
|
5. |
|
|
|
H-HV2-10- H-HV2-15- H-HV2-20- |
||||
|
|
UI565 |
UI566 |
|
UI567 |
|
Nominal power consumption |
W |
1000 |
1500 |
2000 |
|
|
Nominal current |
А |
4,5 |
6,8 |
9,1 |
|
|
Rated voltage |
V/Hz |
~220/50 |
~220/50 |
~220/50 |
|
|
Protection class |
|
IP24 |
IP24 |
|
IP24 |
|
Electric protection class |
|
Class I |
Class I |
|
Class I |
|
Weight |
Kg |
5,4 |
6,6 |
7,6 |
|
|
Dimensions |
mm |
613X88X450 |
770X88X450 |
890X88X450 |
||
|
|
H-HV3-10- H-HV3-15- H-HV3-20- |
||||
|
|
UI568 |
UI569 |
|
UI570 |
|
|
|
|
|
|
|
|
Nominal power consumption |
W |
1000 |
1500 |
2000 |
Nominal current |
А |
4,5 |
6,8 |
9,1 |
Rated voltage |
V/Hz |
~220/50 |
~220/50 |
~220/50 |
Protection class |
|
IP24 |
IP24 |
IP24 |
Electric protection class |
|
Class I |
Class I |
Class I |
Weight |
Kg |
7,2 |
9,8 |
10,2 |
Dimensions |
mm |
613X95X450 |
770X95X450 |
890X95X450 |
EN
For more detailed description of technical parameters and speciications please refer to our website www.hyundai-hvac.com or ask from the oicial dealers of Hyundai.
ATTENTION!
The manufacturer reserves the right to change the set-list of the device
(including liquid and powder components) for diferent supplies without prior notice. The changes either in no way inluence the basic technical pa-
rameters of the device or may improve them, and also not violate the legislation or quality standards of the countries of manufacture, transit and selling. The changes in the set-list may result in changing of the weight and dimensions of the device, but not more than by +\- 5-20% (depending on the product category)
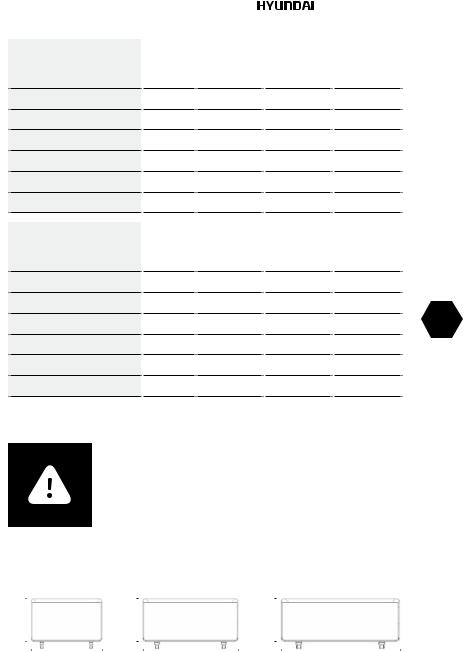
Overall and installation dimensions
450 |
|
|
450 |
|
|
450 |
|
|
|
|
|
|
|
|
|
|
|
|
|
|
|
|
||||
613 |
770 |
890 |
||||||
Fig. 2
6. |
|
Electric convector |
2. SAFE OPERATION AND INSTALLATION OF ELECTRIC CONVECTOR
When operating convector please observe safety rules. Improper operation or ignoring these rules can lead to harming health of the user and other people as well as damage to their property. The manufacturer is not liable for personal injury and damage property resulting from improper installation and operation of the device.
GENERAL SAFETY RULES
1.Read all instructions before using the convector.
2.Convector surface can become very hot. To avoid burns, do not touch it with your hands and other body parts.
3.Appliance should not be situated in vicinity of lammable and objects.
4.Ensure that the heater’s casing and heating element to cool down before unit will be dismantled and packed in long-term storage.
5.When not in use for a long time, store it in a cool dry place in factory carton.
6.Device should always be supervised, especially when far away from the appliance near children. Be careful that children do not touch the appliance with hands.
7.Do not cover the appliance when it is running. Do not dry clothes on it and any other fabric materials. This can lead to overheating and damage or cause signiicant damage to you and/or
your property.
EN |
|
ATTENTION! |
|
The manufacturer considers this type of failure a non-guaranteed |
|
|
|
|
|
|
event. |
|
|
|
8.Always disconnect unit from the electric plug when not in use.
9.Device is equipped with a standard plug grounding prong. The plug must it standard European wall socket. If the plug does not it in outlet or included tight, turn it vertically 180 degrees and repeat try. If ater that you cannot easily insert the plug into the outlet, call electrician to replace
the outlet. Never use the appliance if the plug is inserted into outlet is not until the end.
10.Never connect the appliance to the plug, if the surface is wet.
11.Never use the device in a situation where it may come into contact with water.
12.When the unit is operating, do not touch the surface and the surface of the control block with wet hands and any body parts.
13.Do not switch on the unit if the power cord or plug are damaged. To avoid the risk of electric shock, damaged power cord must be changed only at authorized service centers.
14.Never try to repair the unit yourself. This can cause damage to your health and afect the
warranty of the device.
15.Convector should not be used in open spaces or outdoors.
16.Forbidden to install and use the device in bathrooms, showers or pools, in those places where there is a risk of direct contact with the jets and drops of water on the surface.
17.Do not route the power cord under carpets or pieces of furniture.
18.Never pull the cord and do not unplug the plug abruptly.
19.Do not insert your ingers and not put any objects in air outlet or air inlet as it may cause elec-
tric shock or damage to the convector.
20.To prevent a possible ire, do not block air inlet and outlet. Do not hang or dry things on the convector. Use convector on a level surface only.
21.Do not use the convector in areas of use or storage of gasoline, paint or other lammable
liquids.
Electric convector |
|
7. |
22.Use convector only as described in this manual. Any other use not recommended by the man- ufacturer and may cause ire, electric shock or injury to persons.
23.Do not attempt to clean the convector when plugged into an outlet. Not allow convector immerse in water. Never pull the power cord.
24.To avoid overheating and the risk of ire and damage internal electrical network, do not change
the length of the power cord and do not connect device through an electrical extenders. However, you can use an extension if its parameters correspond to the performance of the device and if it is not used by other power consumers.
25.For normal operation of the device power voltage level must be suicient, and its technical parameters must be in strict accordance with technical data given on the unit. If necessary, ask network provider for characteristics of their electricity.
26.Install and operate the appliance in upright position. Prohibited to operate the device in a horizontal or inclined position.
27.The device must be installed so that the panel could not be available for a person who is directly in the bathroom (in contact with water) or take a shower.
28.Do not install the unit directly under the wall outlet or allow the hot air from the outlet touch power cord. This can cause them to overheat, creating an emergency situation.
29.The device is not intended for use by persons (including children) with reduced physical, senso- ry or mental capabilities, with insuicient experience and knowledge, unless they are under super -
vision and have not received instructions on the use of appliance by a person responsible for their safety. Necessary to make sure that children do not play with convector.
3. DISPOSAL
Detailed information on the recycling can be obtained from representative of the local authority. |
EN |
Service life of the device speciied in the warranty card. |
|
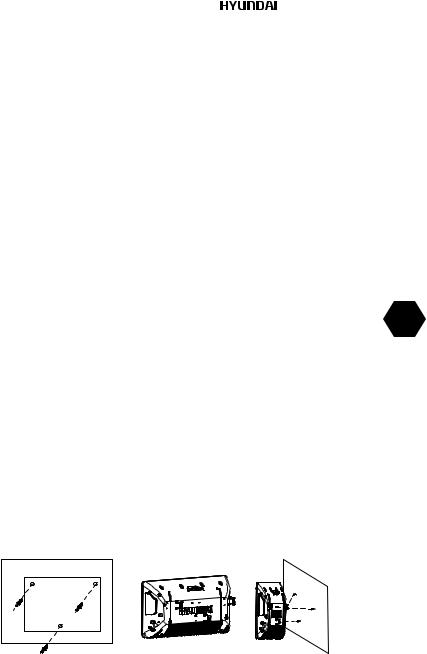
4. ASSEMBLY AND INSTALLATION
Wall installation
1.Uncover the original packaging and carefully remove device from it.
2.Remove any foam seals on the edges of the device and release it from polyethylene.
3.Determine the location for the convector in compliance with the minimum distance from the object and the loor.
4.Mark the height at which you must install the convector and put labels in visible ixing holes.
5.Drill holes in the wall of the required diameter, insert the dowels*, tighten the set screws*.
6.Attach the mounting brackets to the cover of the unit with the mounting screws.
7.Perform installation on the wall convector, setting the screws installed in the wall brackets with the holes that are installed on the device.
8.Check the installation. Convector should it snugly against the wall.
* May not be included in delivery set
Fig. 3 |
Fig. 4 |
Fig. 5 |
8. |
|
Electric convector |
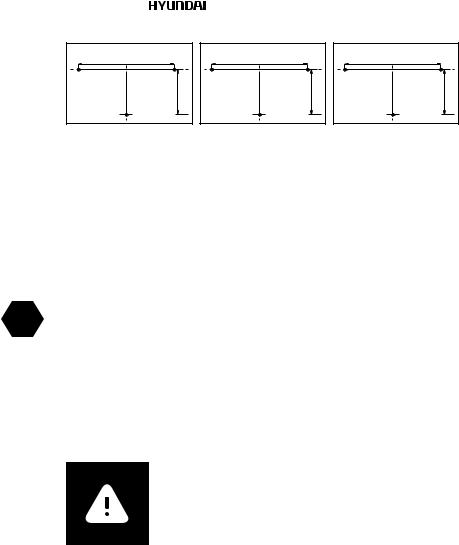
1000 W |
300 |
119 |
Fig. 6
1500 W |
494 |
110 |
2000 W |
600 |
118 |
Floor installation
1.Carefully remove the heater from the package.
2.Make sure that the parts of the appliance have no remaining crumbles of packing foam plastic or other debris.
3.Remove the two support legs from the packaging of the convector.
4.Turn the unit so that its bottom was in easy access.
5.Attach the support legs to the bottom of the device to the let and right sides so that the fastening holes align with the holes on the ixture.
6.Tighten the screws in the existing holes.
5. CONNECTING TO THE MAINS
EN
1. Convector is designed for connection to the plug with single-phase ~220 V, 50 Hz.
2.Before connecting, make sure that the voltage is correct as speciied on the nameplate with the technical data of the device.
3.Convector when connected to the plug must comply with applicable electrical codes.
4.Electric outlet must be properly grounded. The receptacle must be rated for at least 10A. Electrical plug and socket must always be kept dry to prevent electrical leakage. Regularly check that the electrical plug is irmly connected to the outlet. Veriication is performed in the following order: Insert the mains plug into the socket. Ater half an hour, turn of the convector and unplug
the power cord, check with the hand, whether the plug is not heated.
If the plug is heated to a temperature above 50 °C, in order to avoid damage, accidents, ire, due to poor electrical contact replace the socket with help of a specialist.
WARNING!
The power outlet should be rated at least 10A for models with a maximum capacity of up to 2000 W and at least 12 A for models with a maximum capacity of 2500 watt.
6. OPERATION
For models:
H-HV1-10-UI562 H-HV1-15-UI563 H-HV1-20-UI564
Electric convector |
|
|
9. |
||
1. |
Inclusion |
|
|||
1.1 |
Connect the convector to the mains by inserting the plug into the outlet. |
|
|||
2. |
Selecting the heating power |
|
|||
2.1 |
Turn the knob in the heating mode position «I» to select low power heating. |
|
|||
2.2 |
Turn the selector knob to position the heating mode «II» to select the average heating power. |
||||
2.3 |
Turn the selector knob to position the heating mode «III» to select a high heating power. |
|
|||
3. |
Setting the temperature |
|
|||
3.1 |
Turn the thermostat knob clockwise until it stops. When the room temperature reaches the |
||||
desired level, turn the thermostat knob counter-clockwise to turn of the meter. Now the thermo- stat will maintain the set temperature, periodically enabling and disabling convector.
4. Shutdown
4.1 Set the mode switch «OFF» and disconnect the appliance from the mains.
For models:
H-HV2-10-UI565 H-HV2-15-UI566 H-HV2-20-UI567 H-HV3-10-UI568 H-HV3-15-UI569 H-HV3-20-UI570
ATTENTION!
In order to increase the operational life of the convector is recom- mended to note the order unit is switched of. Shutting down the output
without pre-cooling of the heating elements can cause overheating and premature failure.
EN
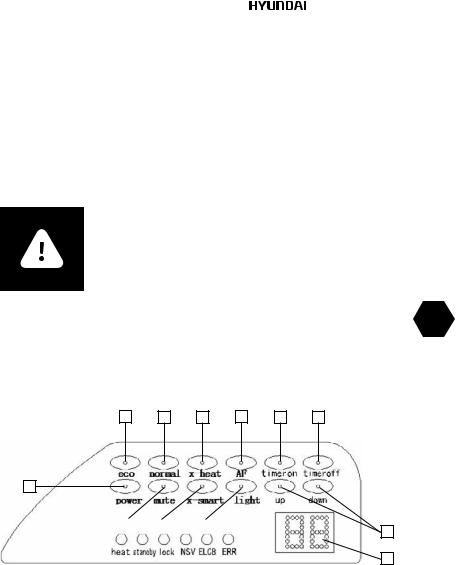
Control panel |
4 |
2 |
3 |
5 |
10 |
11 |
1
6 |
|
7 |
|
8 |
|
|
|
|
|
9
13
Fig. 7
1. Button «power»
Press the button «power», when the appliance is not working, it starts working by default in Low power.
2. Button «normal»
Press the button «normal», when the appliance is working, it starts working in middle power. 3. Button «x-heat»

10. |
|
Electric convector |
EN
Press the button «x-heat», when the appliance is working, it starts working in high power. 4. Button «eco»
Press the button «eco», when the appliance is working, it starts working in low power. 5. Button «AF»
Press the «AF» button, the light is working, the appliance would be in anti-freeze mode. Press the button «AF» again, the appliance would be out of Anti-freeze mode.
6. Button «mute»
Press the «mute», the warning tone is of. Press the button «mute» again, the warning tone is on.
7. Button «x-smart»
Press the button «x-smart», the appliance would be on smart mode:
•When the setting temperature is higher than current temperature of 5 degrees, it starts working in high power.
•When the setting temperature is higher than current temperature 3 degrees or the setting temperature is lower than current temperature 5 degrees, it starts working in middle power.
•When the setting temperature is lower than current temperature 3 degrees, it starts working
in low power. 8. Button «light»
Press the button «light», the appliance would be on night mode. The light display, display screen will turn of.
Press the button «light» again, the appliance would be out of night mode.
9.Button «up» and «down»
•Press the button «up» or «down», it would increase or decrease the temperature settings
(default settings are 25 degrees).
•When set a temperature or timer, if no any setting action in 3 seconds, the timer would be
conirmed.
•When the current temperature is higher than setting temperature of 1 degree, the appliance will be power of.
•When the current temperature is lower than setting temperature of 1 degree, the appliance
will be power on. 10. Button «timer on»
When in standby, press the button of «timer on», the display screen show number 1 for power on, press the button «up» again, the display screen would show number 2, the max timer is 24 hours, press the button of «down», the number would be decrease 1.
11. Button «timer of»
When in power on, press the button of «timer of», the display screen show number 1 for power of by alarm, the light would be of in the same time, press the button «up» again, the display screen would show number 2, the max timer is 24 hours, and press the button of «down», the number would decrease 1.
12.Function «Child lock»
• Press the button «up»/«down» for 3 second, the keyboard lock will be on, the light of «lock»
would be on, the screen would be lashing, it will become to be the previous setting ater 5 seconds; when the keyboard is on, any key is no working.
• For unlock press «up»/«down» for 3 seconds again, the appliance would be unlocked.
13.LED-display
Displays the current temperature value or time settings. 14. «Power» indicator
Lights up when starts heating mode 15. «Standby» indicator
Lights up when convector connecting to electric main 16. «Lock» indicator
Lights up when control panel is locked 17. «NSV» indicator
Lights up when it tests the voltage when the product starts working, if the voltage below ~180V or over ~240V, the lamp are light.
18. «ELCB» indicator
Lights up when it tests the grounding function when the product starts working, if it isn’t connect
Electric convector |
|
11. |
the ground, the lamp are light. 19. «ERR» indicator
Lights up when if there is something wrong in the product, the lamp are light.
7. SERVICE
ATTENTION!
See “Rules for safe operation and installation of electric convector”
In the process of using an electric convector on the intake, outlet grill or on the device may appear dust or other contamination. To preserve the health and appearance of the device must be regularly cleaned from dust and dirt. Before cleaning the external surfaces of the electric convector, disconnect the appliance from the mains and allow it to cool completely. Clean the
outside of the appliance with a damp, sot cloth and then wipe dry and allow the device to dry completely. Do not use abrasive cleaning agents. Do not damage the appliance with a sharp object,
as scratches on painted surfaces can cause rust.
Table 2 |
|
|
|
|
Troubleshooting |
Possible causes |
Removal |
||
|
|
|
|
|
Electric convector is connect- |
• |
No power. |
• |
Check whether the power |
ed to the mains, switch handle |
• |
Violated contacts in the wir- |
|
supply is disconnected from |
Mode is set to heating but con- |
|
ing diagram of the circuit. |
|
the device and, if necessary, |
vector does not work. |
• |
Defective switch modes |
• |
post power to the appliance. |
|
|
|
Restore reliable connection |
|
|
|
|
|
contacts. |
|
|
|
• |
Refer to a specialist repair |
|
|
|
|
service center Hyundai. |
Electric convector is connected to the mains, switch handle modes of operation is set to the heating, but the heating is not going on.
•The thermostat is set to temperature lower than in the room.
•Temperature limiter parted
electrical circuit and shut the heating elements.
•Defective switch modes.
•Defective power relay.
•Faulty thermostat.
•Defective heating element.
•Faulty temperature limiter.
•Set the thermostat to a higher temperature heat the room, turning the thermostat
knob clockwise.
•ofEnsure that the air inlet or outlet grill is not blocked by foreign objects and wait for
the inclusion of the tempera- ture limiter, ater the body of
the device to cool.
•Refer to a specialist repair service center Hyundai.
If you are not able to remedy a malfunction according to the recommendations or other malfunctions occur, contact the authorized service center of Hyundai.
EN
12.
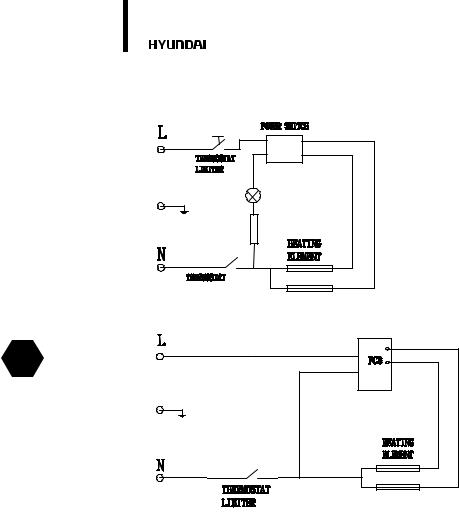
8. ELECTRICAL CIRCUIT DIAGRAM
H-HV1-10-UI562
H-HV1-15-UI563
H-HV1-20-UI564
Fig. 8
EN H-HV2-10-UI565
H-HV2-15-UI566
H-HV2-20-UI567
H-HV3-10-UI568
H-HV3-15-UI569
H-HV3-20-UI570
Fig. 9
Electric convector
Электрический конвектор |
|
13. |
|
Содержание
Введение |
13 |
|
1. |
Обзор |
13 |
|
Описание |
13 |
|
Расшифровка артикула |
13 |
|
Внешний вид |
14 |
|
Комплектация |
14 |
|
Технические параметры |
14-15 |
|
Габаритные размеры |
15 |
2. |
Правила безопасной эксплуатации и установки |
16 |
|
электрического конвектора |
|
Общие правила безопасности |
16 |
|
3. |
Утилизация |
17 |
4. |
Cборка и установка |
18 |
|
Настенная установка |
18 |
|
Напольная установка |
18 |
5. |
Подключение к электрической сети |
18 |
6. |
Эксплуатация |
19 |
7. |
Обслуживание |
21 |
8. |
Поиск и устранение неисправностей |
22 |
9. |
Электрическая принципиальная схема |
23 |
10. Транспортировка и хранение |
24 |
|
11. Сертификация |
24 |
|
|
|
|
RU
14. |
|
Электрический конвектор |
Уважаемый покупатель!
Благодарим Вас за удачный выбор и приобретение электрического конвектора Hyundai. Он прослужит Вам долго.
ВВЕДЕНИЕ
Перед установкой и использованием прибора очень внимательно изучите данное руковод-
ство и гарантийные обязательства производителя. Сохраните руководство для дальнейшего использования в качестве справочного материала. В случае передачи другому пользовате-
лю передайте ему прибор вместе с данным руководством. Для получения дополнительной информации или в случае возникновения проблем посетите сайт Hyundai www.hyundai-hvac. com. Можно также обратиться в ближайший региональный сервисный центр производителя. Если в Вашем регионе не представлен сервисный центр производителя, обратитесь к реги-
ональному дилеру Hyundai. Содержание данного руководства было проверено и одобрено. Производитель не несёт ответственности за любые орфографические ошибки в тексте и не-
верное толкование содержания руководства. Внешний вид, характеристики и комплектация прибора могут быть изменены производителем без предварительного уведомления об этом.
1. ОБЗОР
Описание
RU Электрические конвекторы предназначены для основного или дополнительного обогрева
помещений. В зависимости от мощности электрические конвекторы могут применяться в бытовых, служебных, производственных и складских помещениях малого метража. Основ-
ное преимущество электрических конвекторов в сравнении с другими типа обогревателей в том, что принцип работы основан на естественной конвекции воздуха, что позволяет бы- стрее и эффективнее обогревать обслуживаемое помещение. В зависимости от класса вла-
гозащиты (см. раздел технические характеристики), допускается эксплуатация конвекторов в помещении с высокой влажностью.
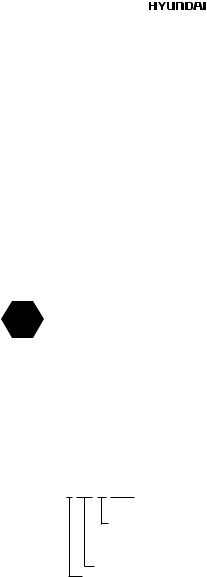
Расшифровка артикула
серия
прибора
H-HVX-X X-UIXXX
 Индивидуальный код модели Номинальная потребляемая мощность
10 - номинальная потребляемая мощность 1000 Вт
15 - номинальная потребляемая мощность 1500 Вт
20 - номинальная потребляемая мощность 2000 Вт Номер серии
Тип прибора – электрический конвектор

Электрический конвектор
Внешний вид
1.Лицевая панель
2.Решетка выхода горячего воздуха
3.Задняя панель
4.Терморегулятор
5.Переключатель режимов мощности
6.Индикатор
7.Ручка для переноски
8.Увлажнитель
9.Опорные ножки с колесиками
Рис. 1
Комплектация
15.
RU
1.Конвектор - 1 шт.
2.Опорные ножки - 2 шт.
3.Комплект настенной установки – 1 шт.
4.Комплект винтов.
5.Руководство по эксплуатации и гарантийный талон - 1 шт.
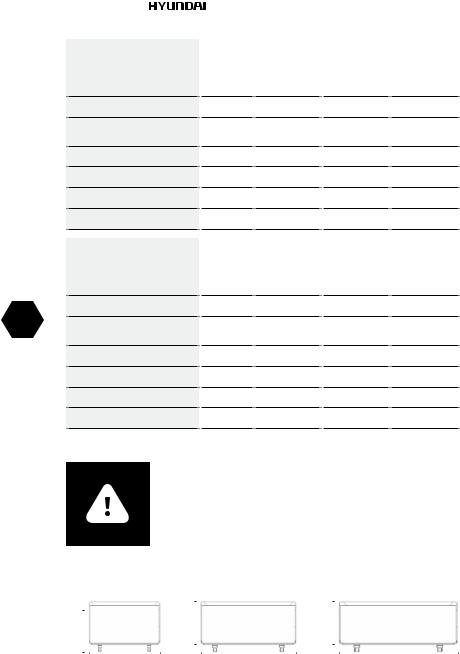
Технические параметры
Таблица 1
|
|
H-HV1-10- H-HV1-15- H-HV1-20- |
|||
|
|
UI562 |
UI563 |
UI564 |
|
Номинальная потребляемая |
Вт |
1000 |
1500 |
2000 |
|
мощность |
|||||
|
|
|
|
||
Номинальная сила тока |
А |
4,5 |
6,8 |
9,1 |
|
Номинальное напряжение |
В/Гц |
~220/50 |
~220/50 |
~220/50 |
|
питания |
|||||
|
|
|
|
||
Класс защиты |
|
IP24 |
IP24 |
IP24 |
|
Класс электрозащиты |
|
Class I |
Class I |
Class I |
|
Вес нетто |
Кг |
5,4 |
6,6 |
7,6 |
|
Размеры |
мм |
613X88X450 |
770X88X450 |
890X88X450 |
|
16. |
|
|
|
|
Электрический конвектор |
||
|
|
|
|
|
H-HV2-10- H-HV2-15- H-HV2-20- |
||
|
|
|
|
|
UI565 |
UI566 |
UI567 |
|
Номинальная потребляемая |
Вт |
1000 |
1500 |
2000 |
||
|
мощность |
||||||
|
|
|
|
|
|||
|
Номинальная сила тока |
А |
4,5 |
6,8 |
9,1 |
||
|
Номинальное напряжение |
В/Гц |
~220/50 |
~220/50 |
~220/50 |
||
|
питания |
||||||
|
|
|
|
|
|||
|
Класс защиты |
|
IP24 |
IP24 |
IP24 |
||
|
Класс электрозащиты |
|
Class I |
Class I |
Class I |
||
|
Вес нетто |
Кг |
5,4 |
6,6 |
7,6 |
||
|
Размеры |
мм |
613X88X450 |
770X88X450 |
890X88X450 |
||
|
|
|
|
|
H-HV3-10- H-HV3-15- H-HV3-20- |
||
|
|
|
|
|
UI568 |
UI569 |
UI570 |
|
|
|
|
|
|
|
|
RU
Номинальная потребляемая |
Вт |
1000 |
1500 |
2000 |
|
мощность |
|||||
|
|
|
|
||
Номинальная сила тока |
А |
4,5 |
6,8 |
9,1 |
|
Номинальное напряжение |
В/Гц |
~220/50 |
~220/50 |
~220/50 |
|
питания |
|||||
|
|
|
|
||
Класс защиты |
|
IP24 |
IP24 |
IP24 |
|
Класс электрозащиты |
|
Class I |
Class I |
Class I |
|
Вес нетто |
Кг |
7,2 |
9,8 |
10,2 |
|
Размеры |
мм |
613X95X450 |
770X95X450 |
890X95X450 |
Более подробное описание технических параметров и характеристик смотрите на сайте www.hyundai-hvac.com или спрашивайте у официальных дилеров Hyundai.
ВНИМАНИЕ!
Производитель оставляет за собой право для разных партий поста-
вок без предварительного уведомления изменять комплектующие части изделия (включая заливаемые \ засыпаемые составляющие), не влияя при этом на основные технические параметры изделия или улучшая их, а также не нарушая изменениями принятые на территории страны производства \ транзита \ реализации стандарты качества и нормы законодательства. Это может повлечь за собой изменение веса и габаритов изделия, но не более чем на +\- 5-20% (могут отличаться для разного вида изделий).
Габаритные размеры:
450 |
|
|
|
450 |
|
|
450 |
|
|
|
|
|
|
|
|
|
|||
|
|
|
|
|
|
|
|
|
|
|
|
|
|
|
|
|
|
|
|
Рис. 2 |
613 |
770 |
890 |
||||||
|
|
|
|
|
|
|
|||
 Loading...