


 Loading...
EN |
Operator´s manual p.3 |
|
Please read the operator’s manual carefully and make sure you |
|
understand the instructions before using the machine. |
DE |
Bedienungsanweisung p. 21 |
|
Lesen Sie die Bedienungsanweisung sorgfältig durch und machen Sie |
|
sich mit dem Inhalt vertraut, bevor Sie das Gerät benutzen. |
NL |
Gebruiksaanwijzing p. 39 |
Neem de gebruiksaanwijzing grondig door en gebruik de machine |
|
|
niet voor u alles duidelijk heeft begrepen. |
IT |
Istruzioni per l’uso p. 61 |
Prima di usare la macchina, leggere per intero le istruzioni per l’uso |
|
|
e accertarsi di averne compreso il contenuto. |
FS 700 EX
EN DE NL IT
HUSQVARNA CONSTRUCTION PRODUCTS

Operator’s Manual |
Contents |
English
Contents |
|
Key to symbols.............................................................. |
5 |
Safety Instructions ...................................................... |
6 |
Introduction...................................................................... |
7 |
Technical data ............................................................. |
10 |
Operation........................................................................ |
11 |
Before cutting.............................................................. |
11 |
Assembling/Replacing the blade....................... |
11 |
Connecting the machine ....................................... |
12 |
Sawing ........................................................................... |
13 |
Stop cutting.................................................................. |
14 |
Transport ........................................................................ |
15 |
Maintenance ................................................................. |
16 |
Trouble shooting ....................................................... |
17 |
EU declaration of conformity............................. |
19 |
English - 3

Contents |
Operator’s Manual |
4 - English
Operator’s Manual FS 700EX
Key to symbols
The symbols below are used on the machine and in this Operator's Manual. It is important that the user understands the significance of these in order to work with the machine safely.
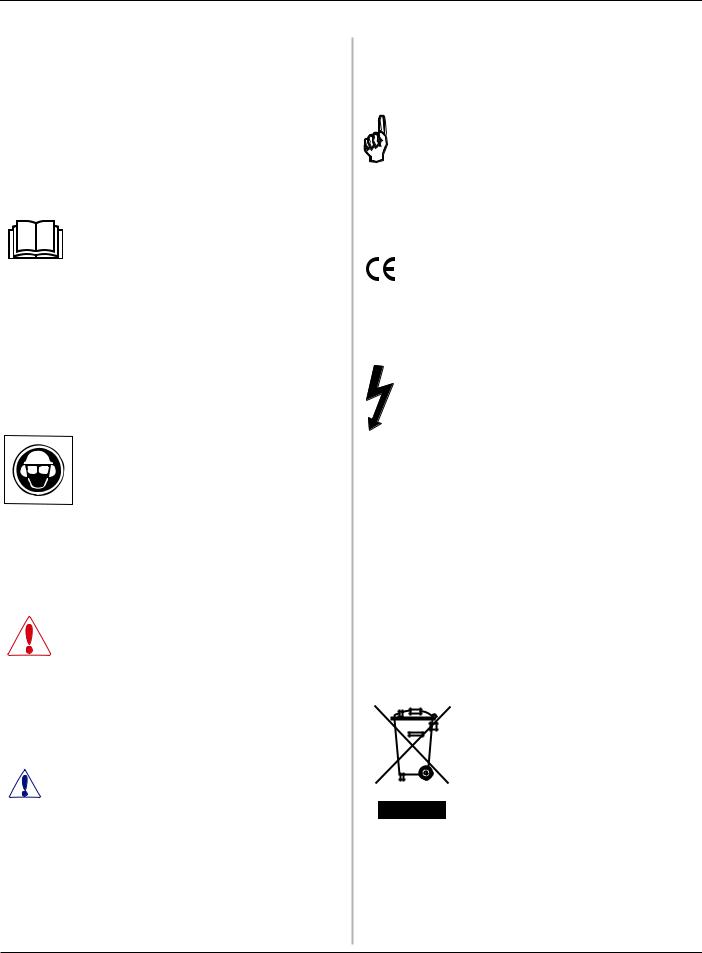
Manual
Please read the Operator's Manual carefully and understand the contents before the machine is started.
Protective equipment
Always wear:
•Approved protective helmet.
•Approved hearing protection.
•Approved protective glasses or a visor, and other essential safety equipment.
Warning
A large warning triangle with the text “Warning” signifies that there is a risk of serious personal injury or even death.
Note
A smaller warning triangle with the text “Note” signifies that there is a risk of minor personal injury or damage to the machine.
Attention
A hand with a raised index finger with the text “Attention” signifies that a described element demands extra attention.
CE
This symbol indicates that the machine conforms to applicable EU directives.
Electrical Warning
This symbol warns that there is high voltage present
Environmental Information
The symbol on the product or on its packaging indicates that this product may not be treated as household waste. Instead it shall be handed over to the applicable collection point for the recycling of electrical and electronic equipment.
By ensuring this product is disposed of correctly, you will help prevent potential negative consequences for the environment and human health, which could otherwise be caused by inappropriate waste handling of this product.
For more detailed information about recycling of this product, please contact your local council office, your household waste disposal service or the shop where you purchased the product.
English - 5

Operator’s Manual FS 700EX
Safety Instructions
During the design and production of Husqvarna products, great importance is placed on safety, as well as effectiveness and ease of use. To ensure that the machine remains safe you must pay attention to the following points:
•Note that under no circumstances may the machine be started without following the safety instructions. Should the user fail to comply with these, Husqvarna Construction Products Sweden AB or its representatives are free from all liability both directly and indirectly.
Read through these operating instructions and make sure that you understand the contents before starting to use the machine. Should you, after reading these safety instructions, still feel uncertain about the safety risks involved you must not use the machine
Please contact your dealer for more information.
•Check that all couplings, connections and the blade guard are in full working order.
•Make sure that all hoses and electrical cables are connected to the machine correctly before you start the machine.
•The safety distance is 4 metres in front of and to the side of the saw.
•Make sure that there are no persons or animals in the working area.
•Check that the blade guard and blade flange guard are fitted correctly.
•Always saw in a manner that permits easy access to the emergency stop.
•Never leave the machine unsupervised with the engine running.
•Clearly mark out all cuts to be made on the floor before you start sawing, plan these so they can be carried out without danger to persons or the machine.
•Check with the construction drawings whether there are electrical cables, water mains, gas pipes or drainage pipes within the working area.
•Check that electrical cables within the working area are not live.
•Observe care when lifting. You are handling heavy parts, which implies the risk of crush injuries or other injuries.
•Personal protective equipment according to the Operator's Manual must always be used and you should use protective clothing too. Never wear loose fitting clothes that can catch in moving parts.
•People that need to be in close proximity of the machine must wear hearing protection.
•The machine must not be turned, swung or moved laterally with the blade rotating.
•Only use blades recommended by the manufacturer.
•Never saw without a blade guard.
•Never saw without coolant. A poorly cooled blade can cause segments to come loose from the blade. The water coolant also binds concrete dust.
•Never use a damaged or worn blade.
•Do not use the machine if it is not working properly.
•Regulations for the prevention of accidents, and other general safety and occupational health regulations, must always be followed.
•Store the machine in a locked space away from children and adults untrained in use of the machine.
•Firmly secure or anchor concrete blocks that have been cut loose. The heavy weight of cut material can cause extensive damage if it is not moved under controlled conditions.
•Make sure that there is always another person close at hand when you use the machines, so that you can call for help if an accident should occur.
WARNING!
Always use approved protective clothing and approved protective equipment when using the machine. Protective clothing and protective equipment cannot eliminate accident risks, but by using the right clothes and equipment you can reduce the seriousness if an accident should occur. Ask your dealer about approved and recommended protective clothing and protective equipment.
6 - English
Operator’s Manual FS 700EX
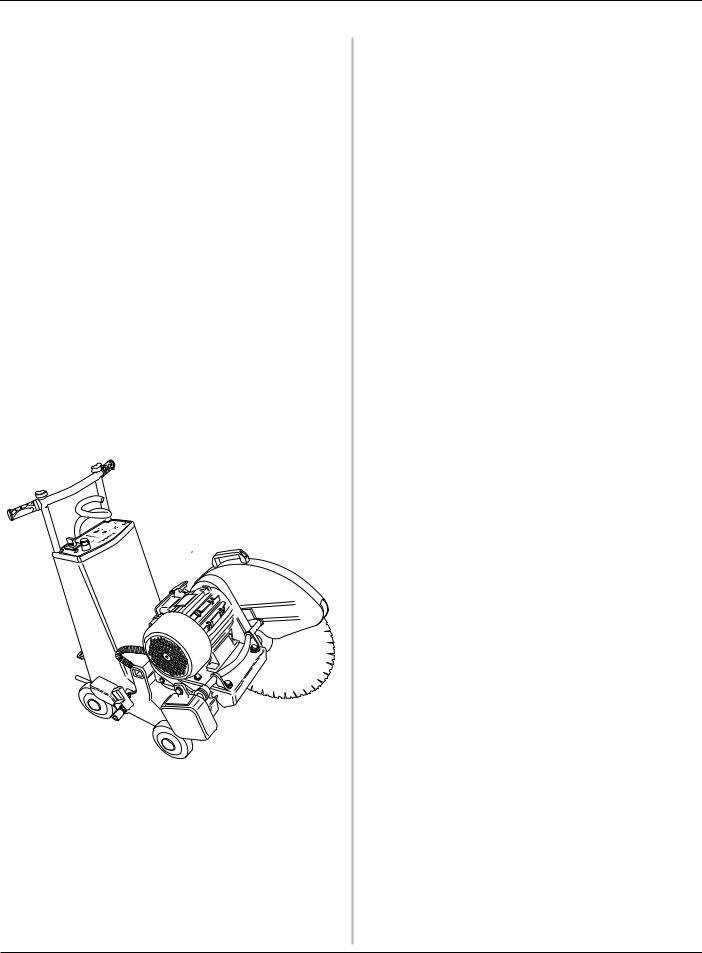
Introduction
The FS series is a new series of electrically powered floor saws from Husqvarna. The aim during development has been to create a powerful, yet easy to handle machine for cutting reinforced concrete, brick and other stone material. The machine should also be easy to use for one person.
The FS series features electrical trolley feed and blade feed. These are both controlled by a lever fitted on the adjustable handle.
The handle can be folded down into the saw and the cutting bridge can easily be removed to facilitate transport. This means it is easier to lift the saw, and it takes up less space.
A saw is supplied with a flange and blade guard. A flush cutting blade flange and a flush cutting blade guard are available as accessories.
In order to use this machine as effectively as possible, it is important that as the user you read through this Manual carefully. In the event of uncertainty concerning any details these should be discussed with your dealer before you start to use the machine.
English - 7
Operator’s Manual FS 700EX
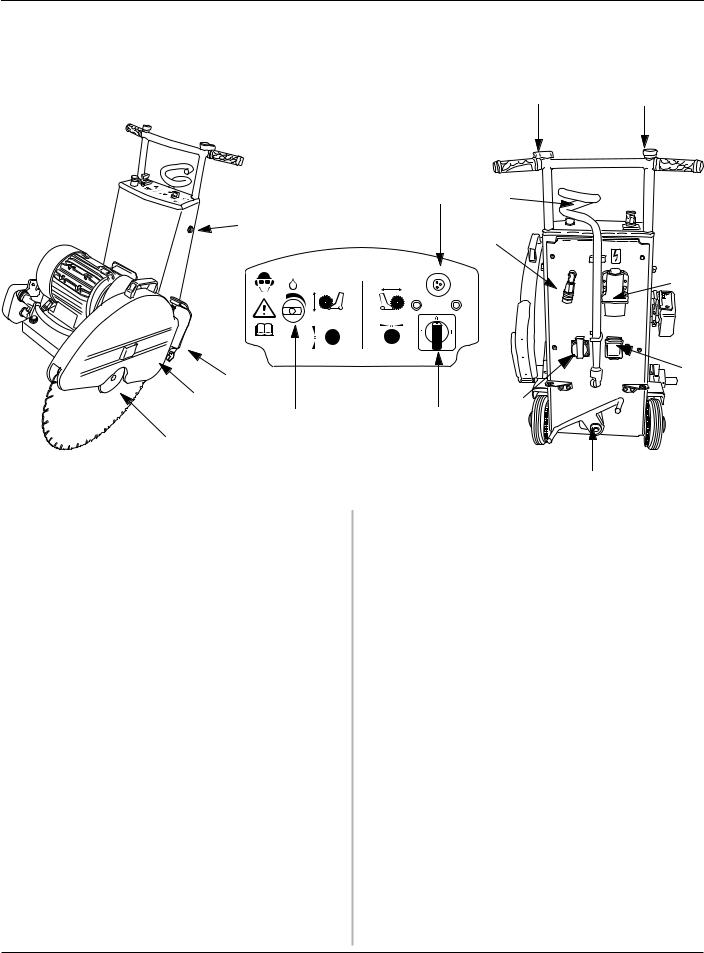
What is what
2 |
1 |
5 |
11 |
13 |
|
|
7 |
6
|
11 |
9 |
|
|
|
10 |
|
8 |
|
|
3 4
12
10
1.Trolley feed lever
The machine's propulsion is controlled using this lever. The machine is driven forwards by turning the lever clockwise. When the lever is turned anticlockwise, the machine reverses. When lever is in the neutral position the machine stands still. This function works as soon as the machine is connected to the power and the machine's propulsion is engaged.
2.Blade feed lever
This lever is used to raise and lower the cutting bridge. The blade is fed downwards when the lever is turned anticlockwise. When the required cutting depth is achieved the lever is turned to the neutral position. The blade is raised by turning the lever clockwise. This function works as soon as the machine is connected to the power.
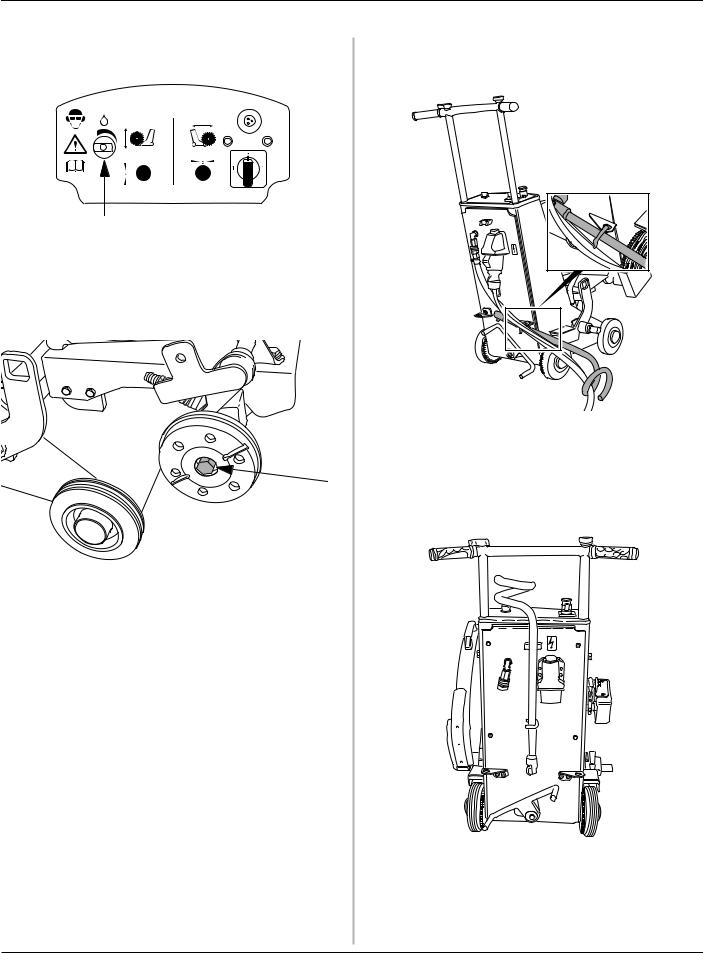
3.Water selector
Turn this knob anticlockwise to open the water valve. Water is led through the blade spindle and out to the blade flange, where the water cools the blade and prevents dust build-up.
4.Start knob
Used to start the blade.
5.Emergency stop
Cuts all power to the machine. No functions can be activated until the emergency stop has been reset. The emergency stop is reset by pulling out the button.
6.Power supply
For connecting an electrical connector of the type: 5-way 400 V/16A
4-way 480V/16 A.
4-way 600V/16A
7.Water connector
Water coolant is connected to the machine here.
8.1-Phase 230V outlet Socket
To connect a 230V tool to the machine.
9.Personel protection
Will cut the power to the 1-phase outlet socket at 30 mA earth fault.
10.Propulsion/Parking brake
When the foot lever is in the illustrated position the drive is engaged. When the foot lever is in this position
8 - English
Operator’s Manual FS 700EX
and the trolley feed lever is in the neutral position or the machine is not voltage fed, this position acts as a parking brake.
If the foot lever is switched to the other position no gear is engaged and the machine is easy to move. Use this position when the machine needs to be transported over long distances.
11.Hose holder
The user can use the hose holder to prevent hoses and cables trailing behind the machine. These will lie to the side of the machine instead.
12.Blade guard
Can be fitted on either the right or left-hand side of the machine as required. The guard can be secured in the upright position by using the lever on the rear edge of the guard.
13.Splash guard
The machine is equipped with a folding splash guard to minimise water spray and dirtying. When the machine is transported over long distances the splash guard should be folded up and secured using the spring on the blade guard. The splash guard should always be folded down when cutting.
14.Blade flange
The blade flange fits on either side of the machine to allow the blade to be easily fitted on both sides of the machine
The blade flange should be covered with the blade flange guard when a blade is not fitted The blade flange guard is fitted on the right-hand side on delivery.
The machine is supplied with a standard blade flange. A flush cutting blade flange can be purchased as an option. Fit the blade on the flush cutting blade flange when the cut is to be made next to a wall. A special flush cutting blade guard must be used when cutting flush.
15.Handle setting
The height of the handle can be adjusted by loosening these two screws to the most suitable height.
16.Adjuster screw
Adjust this screw to tension the drive belt.
14
English - 9

Operator’s Manual FS 700EX
Technical data
Weight (excl. blade): _____________ 155 kg
150 kg Power: ___________________________ 7.5 kW
Voltage: __________________________ 400V/3 phase/50 Hz 480V/3 phase/60 Hz 600V/3 phase/60 Hz
Type of current _____________________ 16 A Max. speed drive shaft: ______________ 1780 rpm Periphery speed, saw blade ___________ 56 m/s Maximum blade diameter _____________ 725 mm max. cutting depth __________________ 298 mm
Max. cutting depth:
600 mm (23") blade diameter__________ 235 mm (9.25")
625 mm (24") blade diameter__________ 248 mm (9.76")
700 mm (28.6") blade diameter ________ 285 mm (11.2")
725 mm (29") blade diameter__________ 298 mm (11.7")
We recommend that Husqvarna W1100 series blades are used together with the machine
NOTE
When unsure about the significance of the technical specifications or when ordering spare parts please contact your dealer.
WARNING!
Under no circumstance may the machine be modified without written permission from Husqvarna Construction Products Sweden AB. Non approved modifications put you and others at risk of serious or fatal injuries. Husqvarna Construction Products Sweden AB bears no responsibility for operations or measures that do not follow these instructions.
10 - English
Operator’s Manual FS 700EX
Operation
Before cutting
NOTE!
Follow the safety precautions.
Check that the correct power cable is connected to the saw.
Check that the coolant water coupling on the hose is the same as the type fitted on the machine.
Enclose the area to be cut so that unauthorised persons can not be injured or disturb the operator while working.
Clearly mark out all cuts to be made on the floor before you start sawing, plan these so they can be carried out without danger to persons or the machine.
In order to prevent stoppages and sources of irritation while cutting, plan the work so that you fit the blade to the most appropriate side of the machine from the outset.
Check that you have the right saw blade for the machine and the material to be cut. See the technical data.
Check that the saw blade is not worn. The blade is worn when only a few millimetres of the diamond segment remains or when the diamond segment is not wider than the body of the blade.
Check that the blade guard is not damaged or broken. A broken or damaged blade guard must never be used.
Ensure you are fully conversant with how machine's control levers work before starting the machine.
Make sure that the emergency stop is not blocked. The emergency stop must not be blocked or covered while working.
Check that the trolley feed, and blade feed levers are in the neutral position.
Remove all foreign objects in the path of the machine that can damage the machine or the surroundings.
Check that there are no unauthorised persons within the safety zone, i.e. 4 metres in front of or to the side of the machine.
Make sure that persons in the vicinity of the machine wear hearing protection and protective glasses.
Move the machine so the blade follows the pre-drawn cutting line.
Check your safety equipment and any protective clothing.
WARNING!
Carefully check that all electrical power cables, water pipes and gas pipes are marked out within the cutting area. To cut into a gas pipe that has not been emptied is directly associated with mortal danger.
Assembling/Replacing the blade
•Lift up the cutting bridge to its highest position.
•Disconnect the incoming electrical connection.
•Engage the machine's propulsion by moving the foot lever as illustrated below.
•Fold up the blade guard and secure it in the raised position by using the blade guard holder.
•Clean the blade flanges and check that they are not damaged.
•Assemble the saw blade and check that the direction of rotation corresponds with the arrow on the blade guard. If the direction of rotation is not marked on the body of the blade, the blade's direction of rotation must be determined with the help of the wear on the diamond segments, the exposed part of the diamond should then be in the direction of rotation.
•Tighten the blade flange using the supplied spanner so hard that it is well secured. At least 70 Nm.
•Fold down the blade guard.
•Check that the saw blade rotates freely and easily by turning it by hand, and that no abnormal noise occurs when the saw blade is rotated. Also check that the saw blade is straight. Never cut with a damaged saw blade.
English - 11

|
|
|
|
Operator’s Manual FS 700EX |
|
|
|
|
Connecting the machine |
|
|
|
|
|
|
|
Attention |
Connect the power cable to the electrical socket. |
|
|
|
|
3 x 380-420 V |
|
16 A |
50 Hz |
Remember that the screw securing the righthand blade flange has a left-hand thread.
Attention
Connect the coolant hose to the right coupling.
The blade should be assembled on the machine's left-hand side when possible. This
is because assembly on the right-hand side affects motor cooling.
3 x 380-420 V |
|
16 A |
50 Hz |
12 - English
Operator’s Manual FS 700EX
Turn on the water coolant so that sufficient cooling is obtained and dust build-up is prevented.
Check that the water supply is ample and that the nozzles are not clogged. Also check that the set screw is fitted in the end of the blade spindle where no blade is fitted
.
Make sure that the saw blade rotates freely before starting the machine.
Make sure that the machine's power cable and water supply can not end up under the machine or are in the way by using the hose holder.
Sawing
Activate the propulsion by moving the foot lever as illustrated with your foot. The machine will not start to move until the trolley feed lever is moved from the neutral position.
English - 13

Operator’s Manual FS 700EX
Start blade rotation by turning the switch towards the lamp that is on. If the switch is turned in the opposite direction the blade will rotate in the wrong direction.
0
1 1
Feed the saw blade by turning the blade feed lever towards you, so that a cutting depth adapted to the floor material, however at least 20 mm, is realized.
Make a pilot cut at an even speed at this depth along the pre-drawn line. When the complete pilot cut has been made, raise the blade, shut off the water coolant and stop the blade rotating. Reverse the machine to the starting point.
Align the machine with the pilot cut again and start the machine as above.
Lower the saw blade to a suitable cutting depth (5-10 cm). A suitable cutting depth varies depending on the floor material and the speed.
A simple rule is if the machine tends to “climb up” out of the pilot cut the cutting depth is too large and/or the speed too high.
The machine must not be driven faster than that it cuts without “climbing” i.e. that the machine's front wheels lift off from the ground. If the machine “climbs”, decrease the trolley feed by turning the lever for the travel feed anticlockwise or raise the blade by turning the blade feed lever clockwise
NOTE!
The operator must always be behind the machine when cutting and within reach of the levers and stop.
WARNING!
Contact with the rotating saw blade can result in serious, physical injury or even death.
Stop cutting
Lift up the cutting bridge to its highest position.
Shut down blade rotation by turning the switch the neutral position.
Turn both the travel feed and blade feed to their neutral positions.
Shut off the water coolant.
NOTE!
The protective devices are for your own safety, consequently, it is extremely important to check all safety equipment regularly. Should a fault be discovered, please contact your dealer.
14 - English
Operator’s Manual FS 700EX
Transport
The blade must be removed from the saw during all transport and lifting. If the blade is not removed, there is a risk it will be damaged.
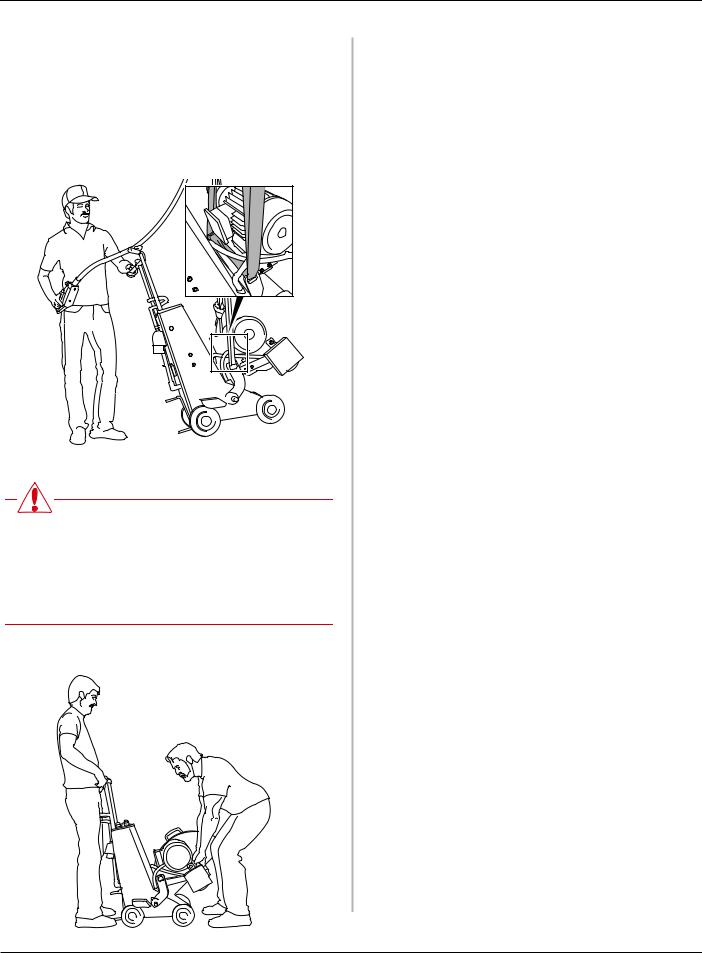
The saw can be lifted in several different ways during transport. When the saw is lifted using a crane, secure the lifting strap in the lifting eyes.
WARNING!
Pay attention to ensure that you or anyone else never stands under a free hanging machine. Should you be hit by a falling machine, this can result in death or serious physical injury.
When the saw is only lifted a little, it can be lifted from the handles and the front lifting stay.
English - 15
Operator’s Manual FS 700EX
Maintenance
Once cutting has been completed the machine should be cleaned. Make sure that the electrical connection has been disconnected before washing. Avoid spraying water against the electric motor and electrical connections. Use a dish-brush or sponge to clean the machine.
Attention
Avoid cleaning the machine with a high pressure washer.
Check the condition of the saw blade regularly for signs of wear or damage. When segments are worn or the width of the segments is nearly the same as the body of the blade, it should be replaced.
Check regularly that electrical cables, couplings, drive belt and screw joints are not damaged.
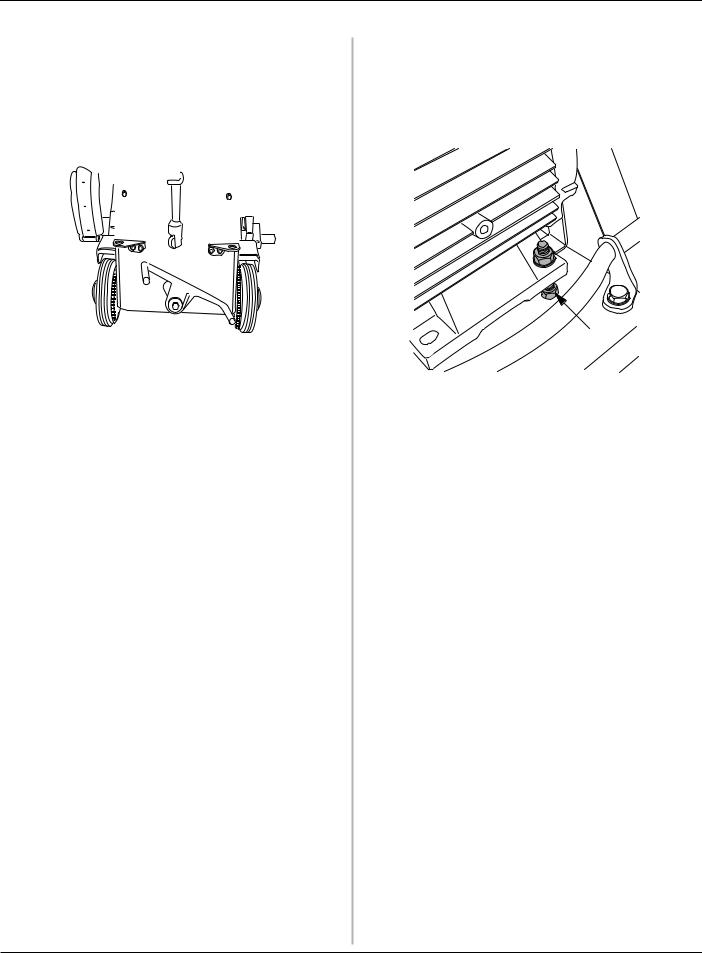
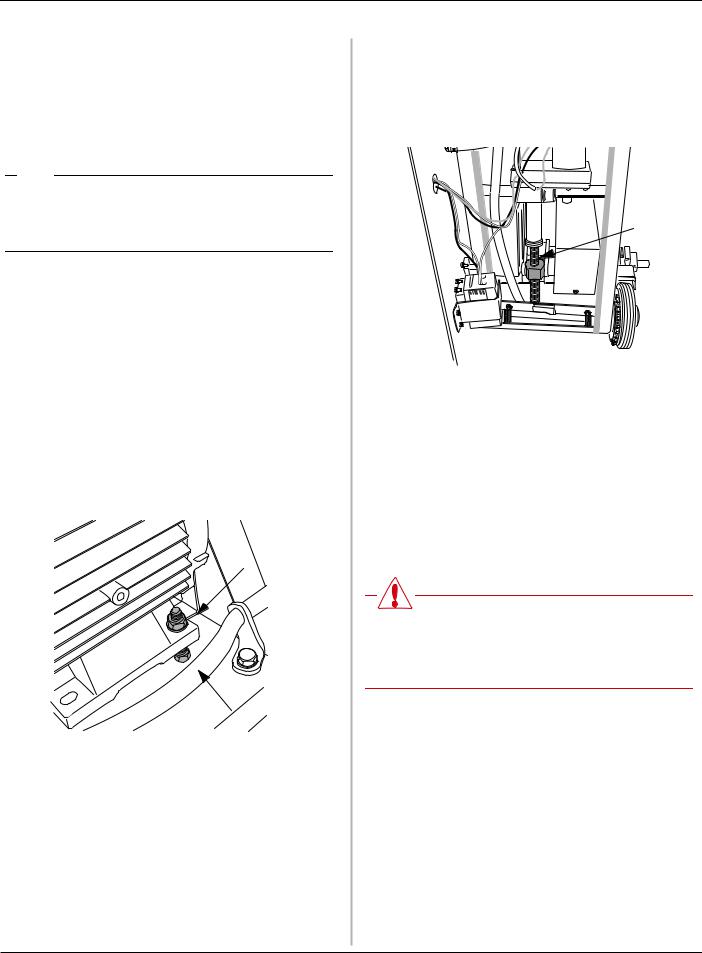
Check regularly that the drive belt and couplings are not dirty and that the drive belt is not tensioned too little or too much. The guard around the drive belt must be removed in order to check the drive belt tension.
Tension the drive belt, if necessary, by first loosening the nut (a), hold the nut under the base with a spanner and then turn the bolt (b) until the belt is tensioned. When the belt is tensioned, lock by screwing back the nut.
a
b
When storing the machine for long periods it must be cleaned carefully and the water tank emptied.
Periodically lubricate the nut for the blade feed. The rear of the machine must be dismantled first to gain access to the nut.
Once the rear has been removed, grease the feed screw a few centimetres above and under the nut.
Refit the rear as follows:
1.Hang the cover from the top edge.
2.Pull a part the cogs that drive the saw forwards by inserting a screwdriver between the cogs and carefully pressing the screwdriver downwards.
At the same time press the rear against the saw's chassis.
3.Refit the screws that hold the rear in position.
WARNING!
The electrical connection must be disconnected before carrying out maintenance repairs and service-work
16 - English

Operator’s Manual FS 700EX
Trouble shooting
NOTE
Before rectifying a fault, check that all electrical connections are disconnected to prevent the machine from starting during the course of the work.
If a fault occurs, first check whether it coincides with any of the possible faults in the trouble shooting guide below.
If the fault coincides with one of the fault possibilities in the trouble shooting guide, contact your dealer for further information.
|
|
|
|
|
|
|
|
|
|
|
|
|
|
|
|
|
|
|
|
|
Fault |
Cause |
Action |
||||||
|
|
|
|
|
|
|
|||
|
The blade rotates in the wrong direction. |
The starter knob is defective. |
Turn the starter knob in the direction |
||||||
|
|
|
|
|
|
|
|
|
indicated by the lit lamp. |
|
|
|
|
|
|
|
|||
|
The blade jams. |
Drive belt slips. |
Tension the drive belt. |
||||||
|
|
Drive belt dirty. |
Clean the drive belt. |
||||||
|
|
Drive belt worn. |
Replace the drive belt. |
||||||
|
|
|
|
|
|
|
|
||
|
No water is produced or too little water |
The blade flange is |
dirty |
Clean the blade flange. |
|||||
|
reaches the blade. |
|
|
|
|
|
|
|
Increase the water pressure by opening |
|
|
|
|
|
|
|
|
|
the water tap a little more. |
|
|
|
|
|
|
|
|
||
|
The blade jams. |
The blade is worn. |
|
|
|
Replace the blade. |
|||
|
|
The saw blade is |
clamped. |
Support the saw block with braces or a |
|||||
|
|
|
|
|
|
|
|
|
jack. |
|
|
The saw has been |
fed too hard. |
Run with either a lower feed rate or |
|||||
|
|
|
|
|
|
|
|
|
shallower cutting depth. |
|
|
|
|
|
|
|
|
||
|
The motor does not start. |
The emergency stop has been switched |
Reset the emergency stop. |
||||||
|
|
on. |
Contact your dealer. |
||||||
|
|
Electrical fault. |
|
||||||
|
|
|
|
|
|
|
|||
|
There is no trolley feed. |
The drive shaft is not engaged. |
Change the foot lever for propulsion so |
||||||
|
|
|
|
|
|
|
|
|
that the drive shaft is engaged. |
|
|
|
|
|
|
|
|||
|
There is no trolley feed/blade feed. |
The feed levers were not reset when the |
Reset the machine by turning off the |
||||||
|
|
power was connected. |
blade rotation, pressing down the |
||||||
|
|
|
|
|
|
|
|
|
emergency stop and turning the levers to |
|
|
|
|
|
|
|
|
|
the neutral position. Wait 3 seconds and |
|
|
|
|
|
|
|
|
|
then reset the emergency stop button. |
|
|
|
|
|
|
|
|||
|
There is no blade feed up or down. |
The feeder nut has jammed at the end |
Remove the rear cover and carefully |
||||||
|
|
position. |
loosen the feed nut by turning the nut at |
||||||
|
|
|
|
|
|
|
|
|
the bottom of the feed screw. |
|
|
|
|
|
|
|
|
|
Grease the feed axle. |
|
|
The feed nut is dry. |
|
||||||
|
|
|
|
|
|
|
|
|
|
|
The machine cuts out / does not start |
The thermal cut-out on the motor has |
Wait until the motor has cooled. Once the |
||||||
|
blade rotation. |
tripped. |
temperature of the motor has dropped |
||||||
|
|
|
|
|
|
|
|
|
the saw is started again as normal. |
|
|
|
|
|
|
|
|||
|
Both status lamps for blade rotation are |
A phase is down. |
Check the fuses and electrical power |
||||||
|
on. |
|
|
|
|
|
|
|
cable. |
|
|
|
|
|
|
|
|||
|
|
|
|
|
|
|
|
|
|
|
|
|
|
|
|
|
|
|
|
|
|
|
|
|
|
|
|
|
|
English - 17

Operator’s Manual FS 700EX
18 - English

Operator’s Manual FS 700EX
EU declaration of conformity
Husqvarna Construction Products Sweden AB, Box 2098, 550 02 Jönköping, Sweden, tel: 036-570 60 00, hereby declares that its FS 700E floor saw, from serial number 01001 onwards, is manufactured in compliance with the Council's machinery directive 98/37/EC, low-voltage directive 73/23/EEC and EMC directive 89/336/EEC, including subsequent amendments, and that the following standards have been used for guidance: EN 55 014-1, EN 55 014-2, EN 61 000-3-2, EN 50 144-1, EN 13 862.
Jönköping 2005-01-01
Christer Carlberg
Managing Director
English - 19

Operator’s Manual FS 700EX
20 - English
Bedienungsanleitung FS 700EX |
Inhalt |
Deutsch
Inhalt |
|
Erklärung der Symbole.......................................... |
23 |
Sicherheitsvorschriften......................................... |
24 |
Einleitung ....................................................................... |
25 |
Was ist was? ................................................................ |
26 |
Technische Daten ..................................................... |
28 |
Bedienung...................................................................... |
29 |
Vor dem Sägen.......................................................... |
29 |
Einbau/Austausch der Trennscheibe.............. |
29 |
Maschine anschließen ........................................... |
30 |
Schneiden .................................................................... |
31 |
Schneiden beenden ................................................ |
32 |
Transport ........................................................................ |
33 |
Wartung........................................................................... |
34 |
Fehlersuche................................................................. |
35 |
EU-Erklärung................................................................ |
38 |
Deutsch - 21

Inhalt |
Bedienungsanleitung FS 700EX |
22 - Deutsch
Bedienungsanleitung FS 700EX
Erklärung der Symbole
Diese Symbole sind auf der Maschine und in der Bedienungsanleitung angegeben. Um sicher mit der Maschine arbeiten zu können, muss der Bediener ihre Bedeutung verstehen.
Anleitung
Vor der Inbetriebnahme der Maschine lesen Sie die Bedienungsanleitung aufmerksam durch und machen Sie sich mit dem Inhalt vertraut.
Schutzausrüstung
Stets verwenden:
•Zugelassener Schutzhelm
•Zugelassener Gehörschutz
•Zugelassene Schutzbrille oder Gesichtsschutz sowie sonstige erforderliche Schutzausrüstung.
Warnung
Ein großes Warndreieck mit dem Zusatz "Warnung" bedeutet, dass die Gefahr von schweren, sogar lebensgefährlichen Verletzungen besteht..
Achtung
Ein kleines Warndreieck mit dem Zusatz "Achtung" bedeutet, dass die Gefahr von leichteren Verletzungen oder Maschinenschäden besteht.
Anmerkung
Eine Hand mit erhobenem Zeigefinger mit dem Zusatz "Anmerkung" bedeutet, dass ein beschriebener Vorgang zusätzliche Aufmerksamkeit erfordert.
CE
Dieses Symbol weißt darauf hin, dass die Maschine den geltenden EG-Richtlinien entspricht.
Stromwarnung
Dieses Symbol warnt vor Hochspannung.
Umweltinformation
Das Symbol auf dem Produkt bzw. auf der Produktverpackung gibt an, dass dieses Produkt nicht als Hausmüll behandelt werden darf. Zur Entsorgung ist es an einen entsprechenden Recycling-Punkt für elektrische und elektronische Geräte zu bringen.
Durch die umweltgerechte Entsorgung dieses Produkts tragen Sie dazu bei, potentielle Folgeschäden an der Umwelt und Gesundheitsschäden zu verhindern.
Ausführlichere Informationen über das Recycling dieses Produkts erhalten Sie auf Wunsch von Ihrem Stadtoder Gemeinderat, den für die Hausmüllentsorgung zuständigen Behörden oder dem Geschäft, in dem Sie dieses Produkt gekauft haben.
Deutsch - 23
Bedienungsanleitung FS 700EX
Sicherheitsvorschriften
Bei der Konstruktion und Herstellung von HusqvarnaProdukten wurde neben der Leistungsfähigkeit und Benutzerfreundlichkeit größtes Gewicht auf die Sicherheit gelegt. Folgende Punkte sind zu beachten, um einen sicheren Maschinenbetrieb zu gewährleisten:
•Die Maschine darf ausschließlich unter Befolgung der Sicherheitsvorschriften gestartet werden. Bei Missachtung der Vorschriften seitens des Bedieners haftet Husqvarna Construction Products Sweden AB oder ihre Vertreter weder direkt noch indirekt.
Lesen Sie die Bedienungsanleitung aufmerksam durch und machen Sie sich mit dem Inhalt vertraut, bevor Sie die Maschine benutzen. Sollten Sie sich auch nach Lektüre der Sicherheitsvorschriften nicht über die vorliegenden Sicherheitsrisiken im Klaren sein, dürfen Sie die Maschine nicht benutzen.
Ihr Fachhändler erteilt auf Anfrage gerne weitere Informationen.
•Sicherstellen, dass alle Verbindungen, Anschlüsse und der Trennscheibenschutz unbeschädigt sind.
•Vor der Inbetriebnahme sicherstellen, dass alle Schläuche und Stromkabel korrekt an der Maschine angeschlossen sind.
•Vor und seitlich der Trennscheibe muss ein Sicherheitsabstand von 4 m eingehalten werden.
•Sicherstellen, dass sich im Arbeitsbereich keine Personen oder Tiere aufhalten.
•Sicherstellen, dass Trennscheibenschutz bzw. Trennscheiben-Flanschschutz korrekt montiert sind.
•Stets so arbeiten, dass der Nothalt schnell und einfach zu erreichen ist.
•Niemals die Maschine unbeaufsichtigt mit laufendem Motor stehen lassen.
•Vor dem Schneiden sind alle auszuführenden Schnitte deutlich auf dem Boden zu markieren und zu planen, sodass sie ohne Gefahr für Mensch oder Maschine durchgeführt werden können.
•Anhand von Bauzeichnungen prüfen, ob Stromkabel, Wasser-, Gasoder Abflussleitungen im Arbeitsbereich verlegt sind.
•Sicherstellen, dass die Stromkabel im Arbeitsbereich nicht stromführend sind.
•Vorsicht beim Heben. Schweres Gerät bedeutet Klemmgefahr und Gefahr für andere Verletzungen.
•Niemals ohne eine persönliche Schutzausrüstung (siehe Bedienungsanleitung) und Schutzkleidung
arbeiten. Keine Kleidung tragen, die sich in den beweglichen Teilen der Maschine verfangen kann.
•Personen, die sich in der Umgebung aufhalten, müssen einen Gehörschutz tragen.
•Mit rotierender Trennscheibe darf die Maschine nicht gedreht, gewendet oder seitlich bewegt werden.
•Nur vom Hersteller empfohlene Trennscheiben verwenden.
•Niemals ohne Trennscheibenschutz schneiden.
•Niemals ohne Kühlwasser schneiden. Von einer unzureichend gekühlten Trennscheibe können sich Segmente lösen. Das Kühlwasser bindet darüber hinaus Betonstaub.
•Niemals beschädigte oder verschlissene Trennscheiben verwenden.
•Die Maschine nur verwenden, wenn sie einwandfrei funktioniert.
•Unfallverhütungsvorschriften, sonstige Sicherheitsund arbeitsmedizinische Vorschriften sind jederzeit zu beachten.
•Die Maschine in einem verschlossenen Raum abstellen, der für Kinder sowie für Erwachsene ohne besondere Ausbildung für die Verwendung der Maschine unzugänglich ist.
•Abgesägte Betonblöcke ausreichend sichern oder verankern. Freigesägte Materialien mit hohem Gewicht können schwere Schäden verursachen, wenn sie nicht kontrolliert bewegt werden können.
•Beim Arbeiten mit den Maschinen muss stets eine weitere Person anwesend sein, die bei Unfällen Hilfestellung leisten kann.
WARNUNG!
Bei Benutzung der Maschine stets zugelassene Schutzkleidung und zugelassene Schutzausrüstung tragen. Schutzkleidung und Schutzausrüstung können die Verletzungsgefahr nicht völlig eliminieren, doch lässt sich im Unglücksfall der Ernst eventueller Verletzungen durch die richtige Kleidung und angemessene Ausrüstung reduzieren. Ihr Händler informiert Sie über empfehlenswerte, zugelassene Schutzausrüstung und -kleidung.
24 - Deutsch
Loading...