


PIRANHA 3, 4 & 5 OPERATION GUIDE
Thank You
Thank you for purchasing a Piranha fishfinder from Humminbird, America’s #1 Manufacturer of quality consumer marine electronics
WARNING! This device should not be used as a navigational aid to prevent collision, grounding, boat damage, or personal injury. When the boat is moving, water depth may change too quickly to allow time for you to react. Always operate the boat at very slow speeds if you suspect shallow water or submerged objects.
Installation Overview
Use the included installation guide to properly install your new Piranha. Installation must be done correctly to ensure best performance.
Using the Piranha
The Piranha is the easiest to use fishfinder ever. For most anglers, all you’ll ever need to do is Power On & Fish! The Piranha automatically determines depth and makes adjustments to keep the bottom and fish visible on the display.
The Piranha uses sonar technology to send sound waves from the transducer into the water. The returned “echoes” are plotted on the Piranha’s LCD display and create a very accurate picture of the underwater world with distance to underwater objects such as the bottom, fish and structure.
Powering ON and OFF
Press and release POWER-MENU to power the Piranha on. Press and hold POWER-MENU until the unit shuts down to power off.
When Piranha powers on, the Start Up menu temporarily appears. From this menu, select either Start-Up for on-the-water use, or Simulator for learning to use
the system with simulated sonar data.
The Start-Up menu disappears after several seconds and the Piranha
begins operation.
Screen
Left Arrow Button
Power/Menu Button
Right Arrow Button
What You See On Screen
The Piranha displays underwater information in an easy-to- understand format. The top of the display corresponds to the water surface, and the bottom of the display corresponds to the Depth Range automatically selected for the current water depth. The Bottom Contour varies between the two as the depth under the boat changes. Digital readouts provide precise information for depth, fish and water temperature (separate purchase may be required).
Water Surface Line 
Depth –
Water (Optional
Fish Icons
Fish ID Symbol w/ Fish Depth
Structure ID™ Bottom Contour
Depth Range*
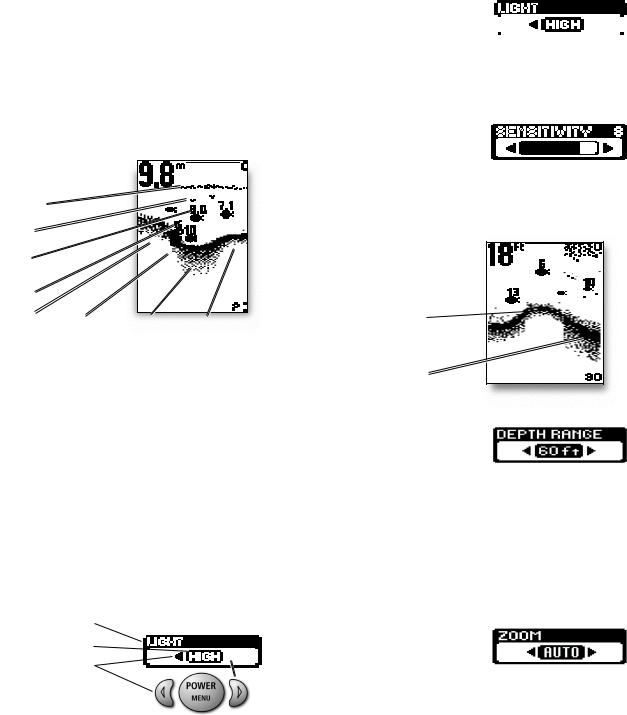
Understanding the On-screen Images
As the boat moves, terrain and bottom composition variations are displayed on-screen. Fish, bait fish and thermoclines (underwater temperature changes) are displayed when detected. Underwater conditions vary greatly, so some experience and interpretation is needed to realize all the benefits of the Piranha
– use the picture below as a guide to the most common conditions and practice using the Piranha over known bottom types.
Water Surface Line 
Depth – Measured at the Transducer 
Thermocline |
Bait fish
Fish ID+
Structure
Rocky Bottom |
Depth Contour |
Soft Bottom |
Hard Bottom |
|
|
|
|
Accessing Menu Features
A simple menu system accesses Piranha’s adjustable features. To activate the menu system, press POWER-MENU and a menu appears. Press POWER-MENU repeatedly to access other Piranha menus one at a time. When a menu is on the display, use the right and left arrow keys to adjust the menu. Menus automatically are removed from the screen after several seconds.
Note: Each time POWER-MENU is pressed, the backlight momentarily illuminates for easy viewing at night. Adjust the Light menu setting to keep the light on.
Note: If Simulator Mode is selected from the Startup Menu and a transducer is plugged in, menu settings are saved in memory. Menu settings are not saved from Simulator mode without a transducer connected.
Light
(Setting Not Saved in memory, Defaults to OFF)
Press POWER-MENU until the LIGHT menu appears. Select either OFF, LOW or HIGH to activate the backlight at the desired level.
Note: Continuous backlight operation significantly decreases battery life on Piranha Portables.
Sensitivity
(Setting Saved in Memory, )
Press POWER-MENU until the
SENSITIVITY menu appears. Select a higher number to show smaller sonar returns on-screen, or a lower number to remove clutter from the screen. Adjusting Sensitivity also affects how sonar returns are identified as
Fish ID Symbols - more fish will be detected at a higher setting, fewer at a lower setting. 5 is the Factory Setting.
Low Sensitivity  Normal Sensitivity
High Sensitivity
Depth Range Menu
(Setting Not Saved in Memory, Defaults to Auto)
Press POWER-MENU until the Depth Range menu appears. Select AUTO to have the Piranha automatically select the Depth Range or manually select 15, 30, 60, 120, 180, 240, 360, 480 and 600 ft. This locks the depth range to a specific setting.
Note: In manual operation, if the depth is greater than the depth range setting, the bottom will not be visible onscreen. Select AUTO to return to automatic operation.
Menu Title
Setting |
Button Changes |
A button has no function when the menu arrow is not displayed.
Zoom
(Setting Not Saved in Memory, Defaults to OFF)
Press POWER-MENU until the Zoom menu appears. Select AUTO to magnify the area around the bottom thus revealing fish and structure close to the bottom that may not be visible in typical operation. In AUTO, the Piranha continually changes the upper and lower Depth Range to keep area just above and below the bottom on the display. Select OFF to return to normal operation.
(illustration top of page O-13)
O-12
 Loading...