


p1130
www.hp.com/go/monitorsupport
hp 21-inch color
monitor
p4819a
user’s guide
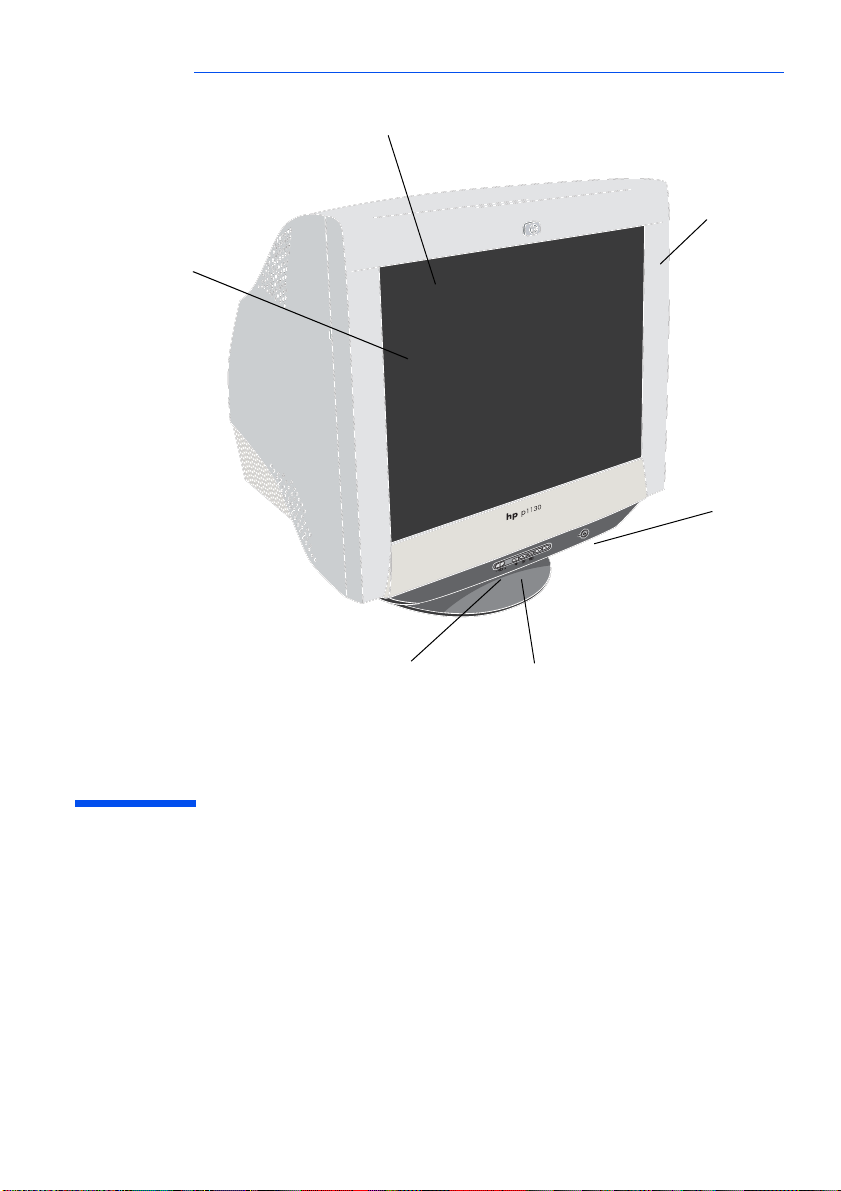
Full scan screen
that gives an
edge-to-edge
image
0.24 mm Aperture Grill Pitch
F D Trinitron®,
anti-reflective and
anti-static screen
coating
Power: On/Off
switch & LED
Status Indicator
Input Switch lets you
connect two computers
through Input 1 and
Input 2
Brightness and
Contrast controls
for easy image
adjustment
User’s Guide
hp p1130
P4819A
21-inch Color Monitor
(19.8-inch Viewable Image)

HP 21” Color Monitor User’s Guide
Notice
Notice
The information contained in the documents accompanying this
product is subject to change without notice.
Hewlett-Packard makes no warranty of any kind with regard to
this material, including, but not limited to, the implied warranties
of merchantability and fitness for a particular purpose.
HP shall not be liable for errors contained herein or for incidental
or consequential damages in connection with the furnishing,
performance, or use of this material.
HP assumes no responsibility for the use or reliability of its software
on equipment that is not furnished by HP.
These documents contain proprietary information that is protected
by copyright. All rights are reserved. No part of these documents may
be photocopied, reproduced, or translated to another language
without the prior written consent of HP.
F D Trinitron
© Copyright Hewlett-Packard Company, 2001. All rights reserved.
® is a registered trademark of Sony Corporation.
2 EnglishEnglish

Important Safety Instructions
HP 21” Color Monitor User’s Guide
Important Safety Instructions
WARNING For your safety always connect equipment to a grounded wall outlet.
Working in
Comfort
CAUTION The monitor is quite heavy (the weight is shown in the technical
Always use a power cord with a properly grounded plug, such as the
one provided with the equipment, or one in compliance with your
national safety standards. This equipment can be disconnected from
the power by removing the power cord from the power outlet. This
means the equipment must be located close to an easily accessible
power outlet.
To avoid electrical shock, do not open the monitor's cover. There are
no user-serviceable parts inside. Only qualified service personnel
should service these parts.
Make sure your PC is powered off before connecting or
disconnecting a display peripheral.
Thank you for selecting HP monitor equipment.
To optimize your comfort and productivity, it's important that you
set up your work area correctly and use your HP equipment properly.
With that in mind, we have developed some setup and use
recommendations for you to follow based on established ergonomic
principles.
You can consult the online version of Working in Comfort preloaded
on the hard disk of HP computers, or visit HP's Working in Comfort
web site at:
http://www.hp.com/ergo/
specifications). We recommend you ask the assistance of a second
person when lifting or moving it.
The lightning flash with arrowhead symbol, situated within an
equilateral triangle, is intended to alert the user to the presence of
uninsulated dangerous voltage which may be of sufficient magnitude
to constitute a risk of electric shock.
The exclamation point within an equilateral triangle is intended to
alert the user to the presence of important operating and servicing
instructions in the literature accompanying the appliance.
EnglishEnglish 3

HP 21” Color Monitor User’s Guide
Important Safety Instructions
Minimizing Eye Strain
To avoid screen flicker and minimize eye strain, use the highest
supported image refresh rate for the chosen resolution. It is
recommended that you use a refresh rate of 85 Hz. The image refresh
rate is the number of times per second that the image is refreshed.
Minimizing Energy Consumption
If your computer supports VESA monitor power management
(available on many HP computers), you can minimize the power
consumed by the monitor. There is one power saving mode:
• Active off mode
monitor's front panel indicator light is amber.
To set these power saving modes, refer to the manual that came with
your computer. If your screen is not displaying an image, check the
front panel indicator light first as your monitor may be in a power
saving mode.
1
(uses less than or equal to 3W). In this mode, the
1. Unique power saving mode which is activated if SYNC, H SYNC or V SYNC inactive.
4 EnglishEnglish

HP 21” Color Monitor User’s Guide
What Your New Monitor Offers
What Your New Monitor Offers
Your HP monitor is an FD Trinitron 21-inch (19.8-inch viewable
image), high resolution, multi-synchronous color monitor. Multisynchronous means that the monitor supports a range of video
modes. It is optimized for use with all Hewlett-Packard computers.
Your HP color monitor has the following features:
• A 21-inch FD Trinitron tube with a 19.8-inch viewable image, 0.24
mm aperture grill pitch for excellent graphics and an anti-glare
coating to minimize reflection
• Support of video modes up to 2048 x 1536 at 75 Hz refresh rates
• Image adjustment using on-screen display menus. Includes color
temperature adjustment and image manipulation controls to
optimize the quality and position of the image
• Monitor power management system (VESA
from suitably equipped HP computers to automatically reduce the
power consumption of the monitor. As an ENERGY
has determined that this product meets the ENERGY STAR
guidelines for energy efficiency
• Monitor Plug and Play capability (VESA DDC1/2B standard) that
enables the monitor to identify itself to suitably equipped HP
computers
• Two video inputs to connect to two PCs
• Compliance with ISO 9241-3/-7/-8 ergonomic standards
• Complies with MPRII guidelines for upper limits of electrostatic
and magnetic field emissions, from the Swedish National Board for
Measurement and Testing
• Your HP monitor complies with TCO99 requirements. (Refer to
“TCO99 Ecology Energy Emissions Ergonomics” on page 40).
1
standard) controlled
2
partner, HP
1. VESA is the Video Electronics Standards Association
2. ENERGY STAR is a trademark of United States Environmental Protection Agency (EPA)
EnglishEnglish 5
HP 21” Color Monitor User’s Guide
Setting Up Your Monitor
Setting Up Your Monitor
Where to Place the Monitor
Place your monitor on a flat sturdy surface. Ensure the operating site
is free from excessive heat, moisture, and sources of electromagnetic
fields. Sources of electromagnetic fields include transformers, motors
and other monitors.
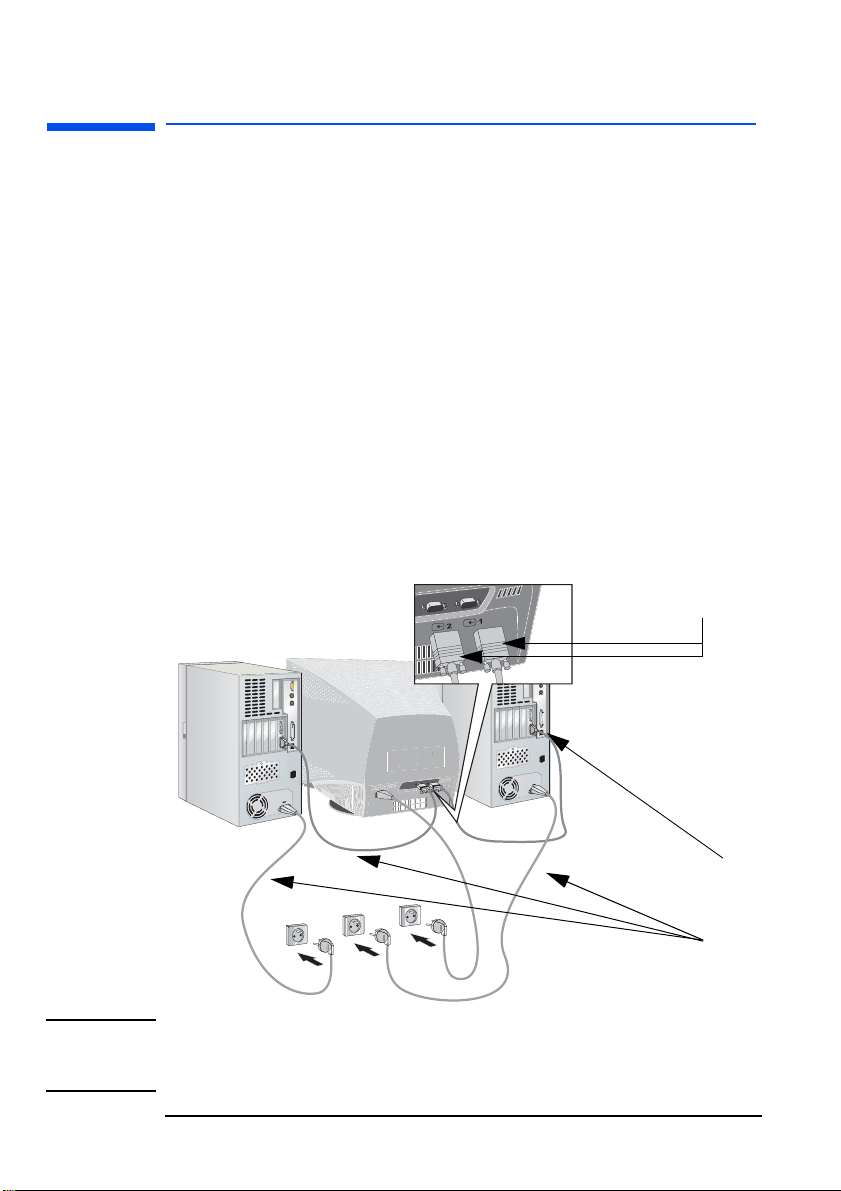
Connecting the Cables
1 Before you connect any cables, refer to the safety instructions at
the beginning of this manual. Make sure your computer and
monitor are switched off.
2 Connect the video input cable (it has a 15-pin plug) to one of the
video outlets on your computer. You can use both outlets to
connect two computers.
3 Tighten the thumbscrews on the plug.
4 Connect the power cord to the monitor.
5 Plug the power cord into the power outlet.
Video Cables
Video Cable
Power Cords
NOTE The location of your computer's video cable connector may be
different to the one shown. Refer to the manual that came with your
computer, if necessary.
6 EnglishEnglish

HP 21” Color Monitor User’s Guide
How To Install The Drivers
How To Install The Drivers
Windows 2000:
To install the driver:
1 Click Start, select Settings, then click Control Panel.
2 Double-click Display and select the Settings tab.
3 Click Advanced Properties or Advanced, and select the Monitor
tab.
4 Click Properties.
5 Select the Driver tab.
6 Click Update Driver and click Next.
7 Select the recommended option and click Next.
8 Select the Specify a Location box.
9 Find and open the *.inf file.
10 Click Next to install the selected monitor driver.
Windows XP:
To install the driver:
1 Click Start, then click Control Panel.
2 Click Appearance and Themes.
3 Select Display and then Settings.
4 Click Advanced and select the Monitor tab.
5 Click Properties and select the Drivers tab.
6 Click update Driver.
7 Insert the Windows CD-ROM.
8 Select ‘Install from a list’ option for automatic selection or
manually specify the path yourself.
9 Click Next.
10 If you are using a CD-ROM, select the ‘Search removable media’
option. If you are not using a CD-ROM, select the ‘Include this
location in the search’ option to browse.
EnglishEnglish 7

HP 21” Color Monitor User’s Guide
How To Install The Drivers
Windows 95 or Windows 98:
In order to take advantage of the Plug & Play functionality of your
Windows 95/98 operating system, HP Monitors come with a driver
that lets you gain full optimization of your monitor.
To install this driver follow these steps:
1 Click the Start button, select Settings, then click Control Panel.
2 Double-click the Display icon and select the Settings tab.
3 Click Advanced Properties or Advanced, and select the Monitor
tab.
4 Click the Change button in order to select the model of HP Monitor
you are using.
5 Click the Have Disk... button.
6 Click the Browse... button.
7 Find and select the *.inf file.
8 Press the OK button and select your monitor type in the Models
box.
Your operating system and your HP Monitor are now set up to work
in optimum conditions.
If your Windows 95/98 version is different or you need more detailed
installation information, please refer to Windows 95/98 user's
manual.
HP regularly updates the driver each time a new monitor is released.
To download the latest up-to-date version, visit our HP Monitors
Support web site at:
http://www.hp.com/go/monitorsupport
8 EnglishEnglish
HP 21” Color Monitor User’s Guide
Using Your Monitor
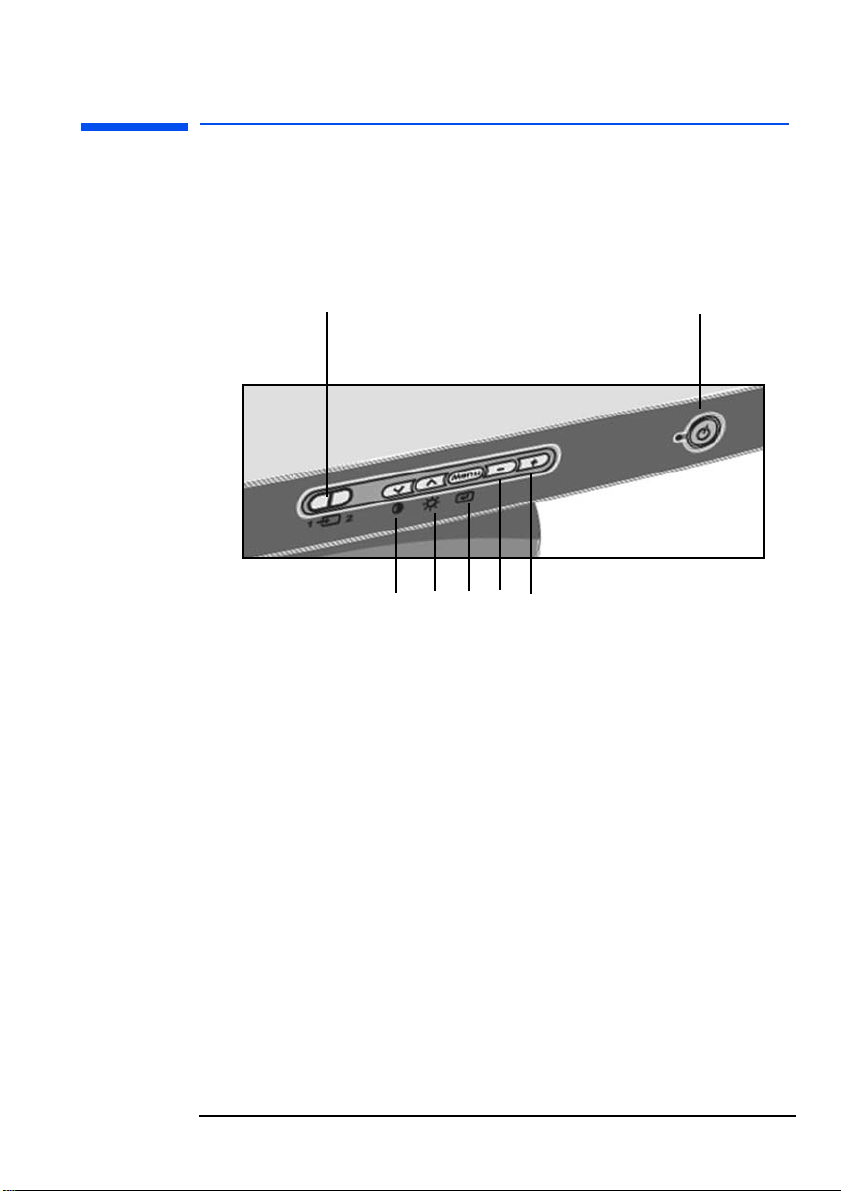
Using Your Monitor
The illustration below shows the location of the function keys which
operate the monitor.
&
'
Power Switch
!
This button switches the monitor on and off.
Adjustment Button +
"
This button increases the level of the selected function.
"#$%
!
Adjustment Button -
#
This button decreases the level of the selected function.
Menu Button
$
Use this button to select the menu and select the highlighted
function.
EnglishEnglish 9

HP 21” Color Monitor User’s Guide
Using Your Monitor
Brightness and Scroll Up Button
%
This button selects the Brightness menu and scrolls up in
menus.
Contrast and Scroll Down Button
'
This button selects the Contrast menu and scrolls down in
menus.
Input Switch
&
This button selects INPUT 1 (video input 1 connector) or
INPUT 2 (video input 2 connector).
NOTE If the power management function of your computer is working
properly, you do not need to switch the monitor off or on. This occurs
automatically.
10 EnglishEnglish

HP 21” Color Monitor User’s Guide
Using the On-Screen Menu
Using the On-Screen Menu
The following is an overview showing how to use the On-Screen
Menu facility using the
buttons.
, / and /
To display the MENU.
Press the button to display the MENU on your screen.
To select the menu you want to adjust.
Press the / buttons to highlight the desired menu. Press
the button to select the menu item.
To adjust the menu.
1 Press / the buttons to select the item you want to
adjust.
2 Press the / buttons to make the adjustment.
To close the menu.
Use the / buttons to select EXIT. If no buttons are
pressed, the menu closes automatically after about 30 seconds.
EnglishEnglish 11
HP 21” Color Monitor User’s Guide
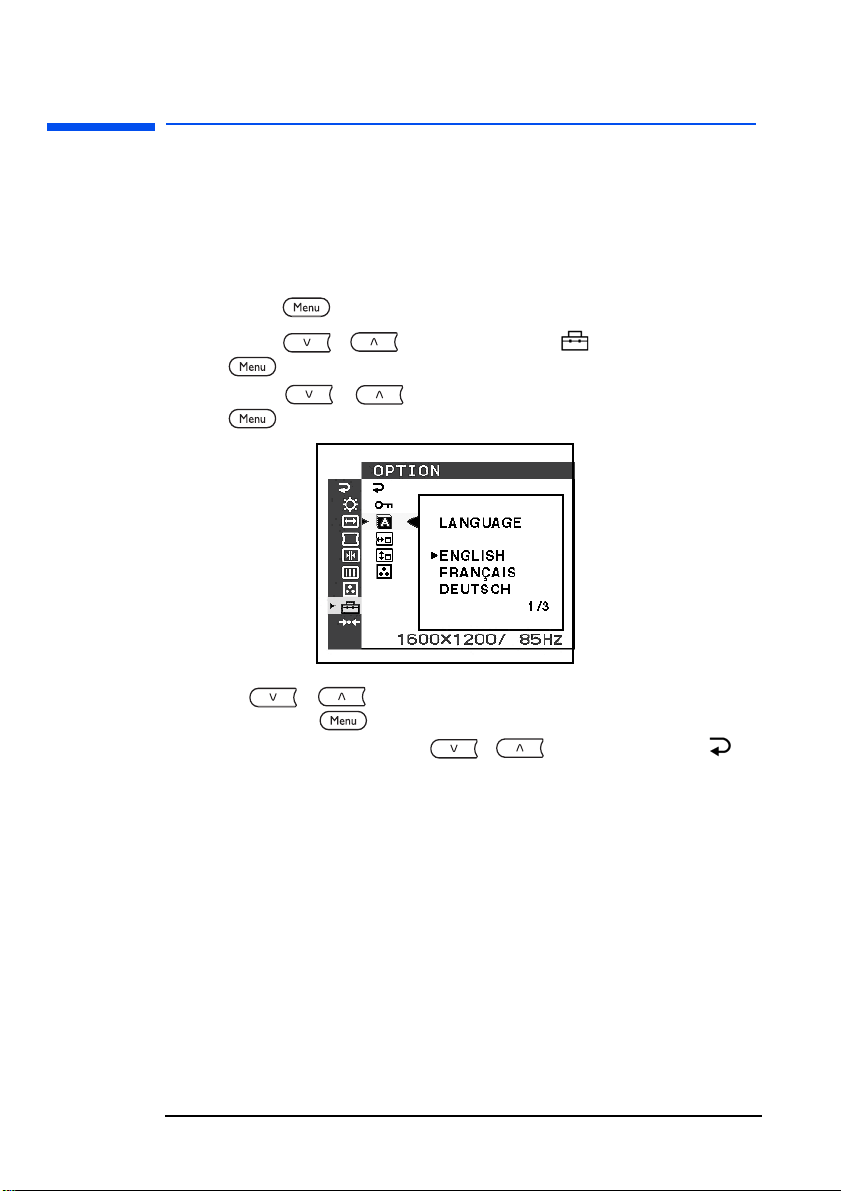
Selecting the On-Screen Menu Language
Selecting the On-Screen Menu Language
English, French, German, Spanish, Italian, Dutch, Swedish, Russian
and Japanese versions of the on-screen menus are available. The
default setting is English.
To select a language of your choice
1 Press the button.
2 Press the
the button again.
3 Press the / buttons to select LANGUAGE and press
the button.
4 Press / the buttons to select the language you want
and press the button once more to confirm your selection.
5 To close the menu use the / buttons to select
EXIT. If no buttons are pressed, the menu closes automatically
after about 30 seconds.
/ buttons to select OPTION and press
To reset to English
Repeat steps 1-5 and select English as the chosen language.
12 EnglishEnglish
 Loading...