


HP g95, g85XI, g85, G Series, g55 User Manual
...
AvMac.book Page 1 Friday, June 23, 2000 10:34 AM
HP OfficeJet G Series
<RXU %DVLF *XLGH IRU 0DFLQWRVK
AvMac.book Page 2 Friday, June 23, 2000 10:34 AM
Copyright © Hewlett-Packard Company 2000
Portions Copyright © 1989-1999 Palomar Software Inc. The OfficeJet G Series includes printer driver technology licensed from Palomar Software, Inc. www.palomar.com
Copyright © 1999-2000 Apple Computer, Inc.
Apple, the Apple logo, Mac, Mac logo, Macintosh, and Mac OS are trademarks of Apple Computer, Inc., registered in the U.S. and other countries.
All rights are reserved. No part of the document may be photocopied, reproduced, or translated to another language without the prior written consent of Hewlett-Packard Company.
Publication number: C6736-90147 First edition: June 2000
Printed in U.S.A., Germany, or Singapore
Notice
The information contained in this document is subject to change without notice and should not be construed as a commitment by the Hewlett-Packard Company.
Hewlett-Packard assumes no responsibility for any errors that may appear in this document, nor does it make expressed or implied warranty of any kind with regard to this material, including, but not limited to, the implied warranties of merchantability and fitness for a particular purpose. The Hewlett-Packard Company shall not be liable for incidental or consequential damages in connection with, or arising out of the furnishing, performance, or use of this document and the program material which it describes.
Note: Regulatory information can be found in the “Technical information” section.
It is not lawful in many places to make copies of the following items. When in doubt, check with a legal representative first.
•Governmental paper or documents:
-Passports
-Immigration papers
-Selective service papers
-Identification badges, cards, or insignias
•Governmental stamps:
-Postage stamps
-Food stamps
•Checks or drafts drawn on Governmental agencies
•Paper currency, traveler’s checks, or money orders
•Certificates of deposit
•Copyrighted works
Safety Information
WARNING
!To prevent fire or shock hazard, do not expose this product to rain or any type of moisture.
Always follow basic safety precautions when using this product to reduce risk of injury from fire or electric shock.
WARNING: Potential Shock Hazard
1Read and understand all instructions in the Setup Poster.
2Use only a grounded electrical outlet when connecting the unit to a power source. If you do not know whether the outlet is grounded, check with a qualified electrician.
3Telephone lines can develop hazardous voltages. To avoid electrical shock, do not touch the contacts on the end of the cord, or any of the sockets on the HP OfficeJet. Replace damaged cords immediately.
4 Never install telephone wiring during a lightning storm.
5Observe all warnings and instructions marked on the product.
6Unplug this product from wall outlets and telephone jacks before cleaning.
7 Unplug this product from wall outlets before cleaning.
8Do not install or use this product near water or when you are wet.
9 Install the product securely on a stable surface.
10Install the product in a protected location where no one can step on or trip over the line cord, and where the line cord will not be damaged.
11If the product does not operate normally, see the online Troubleshooting Help.
12No operator-serviceable parts inside. Refer servicing to qualified service personnel.
13Use in a well-ventilated area.
AvMac.book Page i Friday, June 23, 2000 10:34 AM
HP OfficeJet G Series
Contents
1 Additional setup information . . . . . . . . . . . . . . . . . . . . . . . . . . . . . . 1
Install your HP JetDirect Print Server . . . . . . . . . . . . . . . . . . . . . . . . . . . . . . . . . . . . . 1 Connect and configure the print server . . . . . . . . . . . . . . . . . . . . . . . . . . . . . . . . 1 Install the software . . . . . . . . . . . . . . . . . . . . . . . . . . . . . . . . . . . . . . . . . . . . . . . . 2 Set basic fax settings using the front panel . . . . . . . . . . . . . . . . . . . . . . . . . . . . . . . . . 2 Set the date and time . . . . . . . . . . . . . . . . . . . . . . . . . . . . . . . . . . . . . . . . . . . . . . 2 Set the fax header . . . . . . . . . . . . . . . . . . . . . . . . . . . . . . . . . . . . . . . . . . . . . . . . 2 Enter text . . . . . . . . . . . . . . . . . . . . . . . . . . . . . . . . . . . . . . . . . . . . . . . . . . . 3 Set the answer mode . . . . . . . . . . . . . . . . . . . . . . . . . . . . . . . . . . . . . . . . . . . . . . 3
Set the Rings to Answer setting . . . . . . . . . . . . . . . . . . . . . . . . . . . . . . . . . . . . . . 3 Remove and reinstall your HP OfficeJet software . . . . . . . . . . . . . . . . . . . . . . . . . . . . 4
2 Review your unit’s front panel. . . . . . . . . . . . . . . . . . . . . . . . . . . . . 5
3 Use your HP OfficeJet with a Macintosh . . . . . . . . . . . . . . . . . . . . 7
Review the Director . . . . . . . . . . . . . . . . . . . . . . . . . . . . . . . . . . . . . . . . . . . . . . . . . . . 7 Customize the Director . . . . . . . . . . . . . . . . . . . . . . . . . . . . . . . . . . . . . . . . . . . . . 8 Review the Toolbox . . . . . . . . . . . . . . . . . . . . . . . . . . . . . . . . . . . . . . . . . . . . . . . . . . . 9
4 Get help . . . . . . . . . . . . . . . . . . . . . . . . . . . . . . . . . . . . . . . . . . . . . . 11
Where can I find help? . . . . . . . . . . . . . . . . . . . . . . . . . . . . . . . . . . . . . . . . . . . . . . . 11 Setup Poster . . . . . . . . . . . . . . . . . . . . . . . . . . . . . . . . . . . . . . . . . . . . . . . . . . . 11 OnScreen Guide . . . . . . . . . . . . . . . . . . . . . . . . . . . . . . . . . . . . . . . . . . . . . . . . 11 AppleGuide Help . . . . . . . . . . . . . . . . . . . . . . . . . . . . . . . . . . . . . . . . . . . . . . . . 11 Internet help . . . . . . . . . . . . . . . . . . . . . . . . . . . . . . . . . . . . . . . . . . . . . . . . . . . . 12
5 Load paper or transparency film, or load originals . . . . . . . . . . . |
13 |
Load the input tray with letter-, legal-, or A4-size paper . . . . . . . . . . . . . . . . . . . . . . |
14 |
Review tips for loading specific types of paper . . . . . . . . . . . . . . . . . . . . . . . . . |
15 |
HP papers . . . . . . . . . . . . . . . . . . . . . . . . . . . . . . . . . . . . . . . . . . . . . . . . . . |
15 |
Legal-size paper . . . . . . . . . . . . . . . . . . . . . . . . . . . . . . . . . . . . . . . . . . . . . |
16 |
Labels (only works with printing) . . . . . . . . . . . . . . . . . . . . . . . . . . . . . . . . . |
16 |
Postcards (only works with printing) . . . . . . . . . . . . . . . . . . . . . . . . . . . . . . |
16 |
Continuous (banner) paper (only works with printing) . . . . . . . . . . . . . . . . |
17 |
Load the input tray with envelopes (only works with printing) . . . . . . . . . . . . . . . . . . |
17 |
Set the paper type . . . . . . . . . . . . . . . . . . . . . . . . . . . . . . . . . . . . . . . . . . . . . . . . . . . |
19 |
Change the paper size for fax jobs . . . . . . . . . . . . . . . . . . . . . . . . . . . . . . . . . . |
19 |
Load originals on the glass . . . . . . . . . . . . . . . . . . . . . . . . . . . . . . . . . . . . . . . . . . . . |
20 |
Load originals in the automatic document feeder (ADF) . . . . . . . . . . . . . . . . . . . . . . |
20 |
Process letteror A4-size originals exclusively . . . . . . . . . . . . . . . . . . . . . . . . . |
21 |
Process legalor mixed-size originals . . . . . . . . . . . . . . . . . . . . . . . . . . . . . . . . |
21 |
Avoid paper jams . . . . . . . . . . . . . . . . . . . . . . . . . . . . . . . . . . . . . . . . . . . . . . . . . . . |
22 |
6 Use the Workplace features. . . . . . . . . . . . . . . . . . . . . . . . . . . . . . 23
Access the HP Workplace . . . . . . . . . . . . . . . . . . . . . . . . . . . . . . . . . . . . . . . . . . . . . 23 Create a fax cover page . . . . . . . . . . . . . . . . . . . . . . . . . . . . . . . . . . . . . . . . . . . . . . 24
Contents |
i |

AvMac.book Page ii Friday, June 23, 2000 10:34 AM
HP OfficeJet G Series
|
Annotate documents . . . . . . . . . . . . . . . . . . . . . . . . . . . . . . . . . . . . . . . . . . . . . . . . . |
24 |
|
Create links . . . . . . . . . . . . . . . . . . . . . . . . . . . . . . . . . . . . . . . . . . . . . . . . . . . . . . . . |
25 |
|
Use links . . . . . . . . . . . . . . . . . . . . . . . . . . . . . . . . . . . . . . . . . . . . . . . . . . . . . . . . . . |
26 |
7 |
Use the print features . . . . . . . . . . . . . . . . . . . . . . . . . . . . . . . . . . . |
27 |
|
Start a print job . . . . . . . . . . . . . . . . . . . . . . . . . . . . . . . . . . . . . . . . . . . . . . . . . . . . . |
27 |
8 |
Use the scan features. . . . . . . . . . . . . . . . . . . . . . . . . . . . . . . . . . . |
29 |
|
Begin a scan . . . . . . . . . . . . . . . . . . . . . . . . . . . . . . . . . . . . . . . . . . . . . . . . . . . . . . . |
30 |
|
Use an HP OfficeJet that is connected directly to your Macintosh . . . . . . . . . . . |
30 |
|
Use an HP OfficeJet that is networked . . . . . . . . . . . . . . . . . . . . . . . . . . . . . . . |
32 |
9 |
Use the copy features . . . . . . . . . . . . . . . . . . . . . . . . . . . . . . . . . . |
35 |
|
Make copies . . . . . . . . . . . . . . . . . . . . . . . . . . . . . . . . . . . . . . . . . . . . . . . . . . . . . . . |
35 |
|
Initiate the process from your HP OfficeJet . . . . . . . . . . . . . . . . . . . . . . . . . . . . |
36 |
|
Initiate the process from your Macintosh . . . . . . . . . . . . . . . . . . . . . . . . . . . . . . |
36 |
|
Stop copying . . . . . . . . . . . . . . . . . . . . . . . . . . . . . . . . . . . . . . . . . . . . . . . . . . . . . . . |
36 |
10 Use the fax features . . . . . . . . . . . . . . . . . . . . . . . . . . . . . . . . . . . . 37
Using AppleGuide Help . . . . . . . . . . . . . . . . . . . . . . . . . . . . . . . . . . . . . . . . . . . . . . . 37 Enable fax confirmation . . . . . . . . . . . . . . . . . . . . . . . . . . . . . . . . . . . . . . . . . . . . . . . 38 Send a fax . . . . . . . . . . . . . . . . . . . . . . . . . . . . . . . . . . . . . . . . . . . . . . . . . . . . . . . . . 39 Initiate the process from your HP OfficeJet . . . . . . . . . . . . . . . . . . . . . . . . . . . . 39 Initiate the process from your Macintosh . . . . . . . . . . . . . . . . . . . . . . . . . . . . . . 40 Initiate the process from within a program . . . . . . . . . . . . . . . . . . . . . . . . . . . . . 41 Receive a fax . . . . . . . . . . . . . . . . . . . . . . . . . . . . . . . . . . . . . . . . . . . . . . . . . . . . . . 42 Receive a fax manually . . . . . . . . . . . . . . . . . . . . . . . . . . . . . . . . . . . . . . . . . . . 42 Save frequently used fax numbers . . . . . . . . . . . . . . . . . . . . . . . . . . . . . . . . . . . . . . 43
11 Support services and warranty . . . . . . . . . . . . . . . . . . . . . . . . . . . 45
Use Hewlett-Packard’s support services . . . . . . . . . . . . . . . . . . . . . . . . . . . . . . . . . . 45 Hewlett-Packard limited warranty . . . . . . . . . . . . . . . . . . . . . . . . . . . . . . . . . . . . . . . 47
12 Technical information . . . . . . . . . . . . . . . . . . . . . . . . . . . . . . . . . . |
49 |
Regulatory information . . . . . . . . . . . . . . . . . . . . . . . . . . . . . . . . . . . . . . . . . . . . . . . 49 Regulatory notices . . . . . . . . . . . . . . . . . . . . . . . . . . . . . . . . . . . . . . . . . . . . . . . . . . 50 Declaration of Conformity . . . . . . . . . . . . . . . . . . . . . . . . . . . . . . . . . . . . . . . . . . . . . 53
ii |
Contents |
AvMac.book Page 1 Friday, June 23, 2000 10:34 AM
1
Additional setup information
This section provides assistance in resolving installation and configuration issues, setting fax header information using the front panel, and adding and removing software. The standard installation instructions are provided in your Setup Poster, which you should retain for later use.
Install your HP JetDirect Print Server
Your OfficeJet G Series may be networked using the HP Jet Direct 300X Print Server. For the latest information regarding networking, visit the HP Web site at:
www.hp.com/go/all-in-one
Connect and configure the print server
If you have already connected your HP OfficeJet to your Macintosh via the USB port, you must remove the USB cable and unplug the HP OfficeJet before setting up the Jet Direct Print Server.
To connect and configure the print server
1Using the instructions provided with the HP JetDirect Print Server and the 1284C cable provided with the OfficeJet, set up the hardware.
NOTE Do not use the CD-ROM included in the print-server package.
2Turn on the device and insert the HP OfficeJet G Series CD-ROM into your CD-ROM drive.
3Locate and double-click on the HP Network Utility on the CD-ROM.
4Select HP DeskWriter from the Select a drop-down list box.
5Choose the HP OfficeJet G Series you want to install and click OK.
6Select the Settings entry in the list on the left side.
7Select TCP/IP in the Please select a setting: drop-down list box and click Edit.
8Assign the IP number, subnet mask, and router address provided by your network administrator.
Chapter 1—Additional setup information |
1 |

AvMac.book Page 2 Friday, June 23, 2000 10:34 AM
HP OfficeJet G Series
Install the software
To install the software
1Double-click the HP All-in-One Install icon on the CD. After the Macintosh reboots, the All-in-One Setup Wizard runs.
2When asked to choose a device, select TCP/IP and enter the IP number of the JetDirect box in the dialog.
3Complete the setup wizard.
Set basic fax settings using the front panel
You can access basic fax settings from the front panel. In the U.S., regulations require that your name and number appear on every fax. The minimum settings that we recommend are described in the following topics.
Set the date and time
Follow these steps to set the date and time manually.
1On the front panel, press Menu.
2Press 5, and then press 1.
3After Enter date appears, enter the date and time using the keypad. Use only the last two digits for the year.
4After you finish entering your the date and time, press ENTER. The date and time appear on the display.
Set the fax header
Follow these steps to enter your name and fax number.
1On the front panel, press Menu.
2Press 5, and then press 2.
3Enter your name using the guidelines provided in the next section, “Enter text.”
4Using the keypad, enter your fax number.
5After you finish entering your fax number, press ENTER.
2 |
Chapter 1—Additional setup information |
AvMac.book Page 3 Friday, June 23, 2000 10:34 AM
HP OfficeJet G Series
Enter text
The following list provides tips for entering text using the front-panel keypad.
•Press the keypad numbers that correspond to the letters of a name.
ABC  These letters correspond to 2
  this number, and so on.
•Press a button multiple times to see a letter first in uppercase and then in lowercase.
JKL |
To get this character: |
J |
j |
K |
k |
L |
l |
5 |
5 |
Press 5 this many times: |
1 |
2 |
3 |
4 |
5 |
6 |
7 |
|
|
|
|
|
|
|
|
•After the correct letter appears, press X (>), and then press the number that corresponds to the next letter in the name. Again, press multiple times until the correct letter appears.
•To insert a space, press Space (#).
•To enter a symbol, such as a hyphen or parenthesis, press Symbols (*) to scroll through a list of symbols.
•If you make a mistake, press W (<) to clear it, and then make the correct entry.
•After you are done entering text, press ENTER to store your entries.
Set the answer mode
To set the answer mode, choose one of the following:
•If you want your HP OfficeJet to answer every fax call automatically, verify that Auto Answer is enabled. (The light next to Auto Answer on the front panel is on when the feature is enabled. Press the Auto Answer button to turn it on or off.)
•If you do want to answer fax calls manually, turn Auto Answer off.
Set the Rings to Answer setting
This setting tells your HP OfficeJet how many rings should occur before it answers an incoming call. Follow these steps to change the Rings to Answer setting manually.
To use this feature, Auto Answer must be enabled. The light next to Auto Answer is on when the feature is enabled. Press the Auto Answer button to turn it on or off.
1Press Menu.
2Press 5, and then press 3.
3After Answer on Ring appears, press X (>) to scroll to the desired number of rings.
4After the number you want appears, press ENTER.
Chapter 1—Additional setup information |
3 |

AvMac.book Page 4 Friday, June 23, 2000 10:34 AM
HP OfficeJet G Series
Remove and reinstall your HP OfficeJet software
When you remove a program, you need to remove all files associated with that program, not just the files you see in a particular program folder.
NOTE Before removing your HP OfficeJet Software, make sure to save any cover pages, fax logs, and phone books that you wish to maintain.
1Remove the following applications from your Macintosh: —Applications:HP All-in-One Software
—Applications:Readiris
2Remove the following files from your Macintosh: —System Folder:Extensions:DRS6 Files —System Folder:Extensions:HP OfficeJet Fax —System Folder:Extensions:HP OfficeJet Print —System Folder:Extensions:HP OfficeJet Scan
—System Folder:Extensions:HP OfficeJet G55 USB —System Folder:Extensions:HP OfficeJet G55xi USB —System Folder:Extensions:HP OfficeJet G85 USB —System Folder:Extensions:HP OfficeJet G85xi USB —System Folder:Extensions:HP OfficeJet G95 USB
—System Folder:Extensions:TWAIN Data Sources:HP Scan DS —System Folder:Preferences:HP All-in-One Prefs
—System Folder:Preferences:Readiris Prefs —System Folder:Startup Items:HP Director Alias
3To reinstall the software, see the Setup Poster that came with your HP OfficeJet.
4 |
Chapter 1—Additional setup information |
AvMac.book Page 5 Friday, June 23, 2000 10:34 AM
2
Review your unit’s front panel
You can perform many functions using either the front panel or the HP OfficeJet
G Series software. The method you choose may depend on the function you need to perform, or it may depend on which is the most convenient.
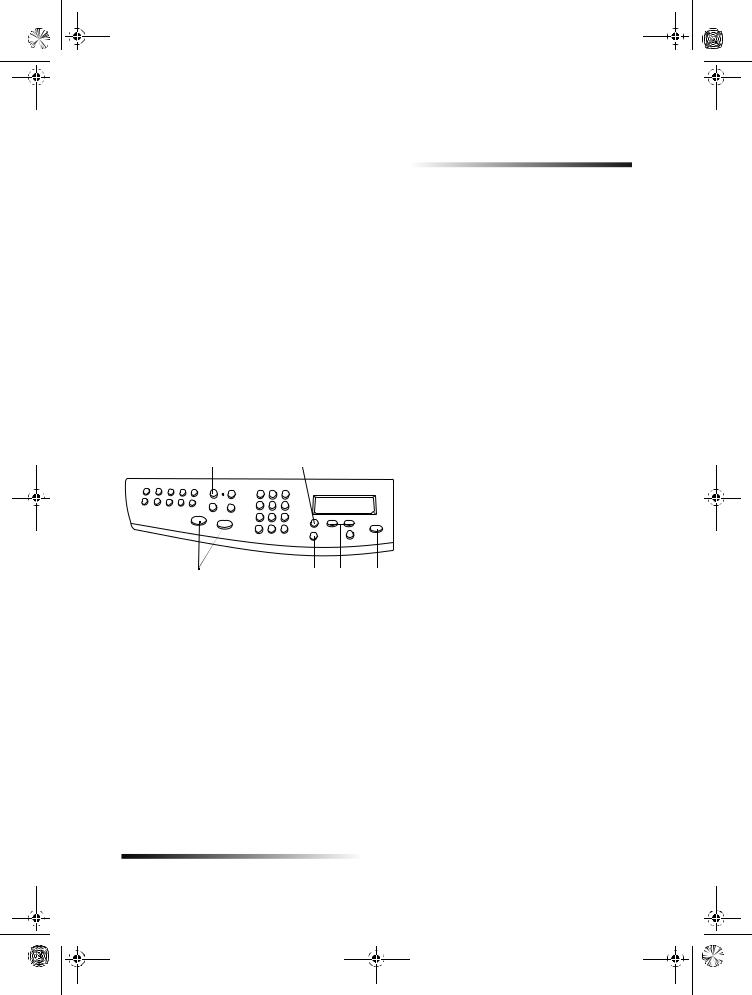
Even if you do not connect your HP OfficeJet to a Macintosh (also called stand-alone use), you can use the front panel to process fax and copy jobs. You can change a wide variety of settings using the front-panel buttons and menu system. Depending on your model, your front panel may look slightly different from the following. Consult the legend for a brief explanation of a specific feature.
Left side of front panel
A B D E
C F G H
Feature |
Purpose |
|
|
|
|
A |
Access one-touch speed-dial buttons (fax model only). |
|
|
B |
Turn Auto Answer on/off (fax model only). |
|
|
C |
Start fax (fax model only). |
|
|
D |
Use keypad to dial fax numbers, enter reduction/enlargement |
|
percentages, enter number of copies, or enter text. |
|
|
E |
Access various scan, copy, and fax settings. |
|
|
F |
Select or save displayed entry. |
|
|
G |
Scroll through scan-copy-fax-setting options. |
|
|
H |
Stop job, or exit menu. |
|
|
Chapter 2—Review your unit’s front panel |
5 |

AvMac.book Page 6 Friday, June 23, 2000 10:34 AM
HP OfficeJet G Series
Right side of front panel
K M
E
F
G H I J L
Feature |
Purpose |
|
|
|
|
E |
Access various scan, copy, and fax settings. |
|
|
F |
Select or save displayed entry. |
|
|
G |
Scroll through scan-copy-fax-setting options. |
|
|
H |
Stop job, or exit menu. |
|
|
I |
Start copy. |
|
|
J |
Access special copy features, such as Fit to Page, Clone, or Poster. |
|
|
K |
Select a specific Macintosh or program to scan to. |
|
|
L |
Start scan. |
|
|
M |
Turn unit on/off. |
|
|
6 |
Chapter 2—Review your unit’s front panel |
AvMac.book Page 7 Friday, June 23, 2000 10:34 AM
3
Use your HP OfficeJet with a Macintosh
If you connect your HP OfficeJet to a Macintosh, you can work from the front panel or from the HP OfficeJet G Series software. The software offers more features and ease of use.
For comprehensive information, see the fully searchable OnScreen Guide. To access the guide, go to the Director, click Tools, and choose View OnScreen Guide.
Review the Director
Once installed, the Director automatically appears when you start-up your Macintosh. It provides centralized access to all of the capabilities of the HP All-In-One software.
The Director dynamically displays only the buttons that pertain to the attached device. You can customize the buttons that are displayed by clicking the Customize button. Refer to the Customize the Director section for additional information.
The following graphic shows some of the features available through the Director. Consult the legend for a brief explanation of a specific feature.
A
B
C
D
E
F
G
H
I
Chapter 3—Use your HP OfficeJet with a Macintosh |
7 |
AvMac.book Page 8 Friday, June 23, 2000 10:34 AM
HP OfficeJet G Series
Feature |
Purpose |
|
|
|
|
A |
Scan a document or photo and send it to a destination. |
|
|
B |
Copy in black and white or color. |
|
|
C |
Fax in black and white (only available on models with fax |
|
capability). |
|
|
D |
Scan a document or photo and attach it to an email message. |
|
|
E |
Scan a document and convert it to text for editing in a text processor. |
|
|
F |
Access the Toolbox. |
|
|
G |
Customize the appearance and functionality of the Director. |
|
|
H |
Access AppleGuide Help for assistance with the HP software. |
|
|
I |
Access copyright information about the HP software. |
|
|
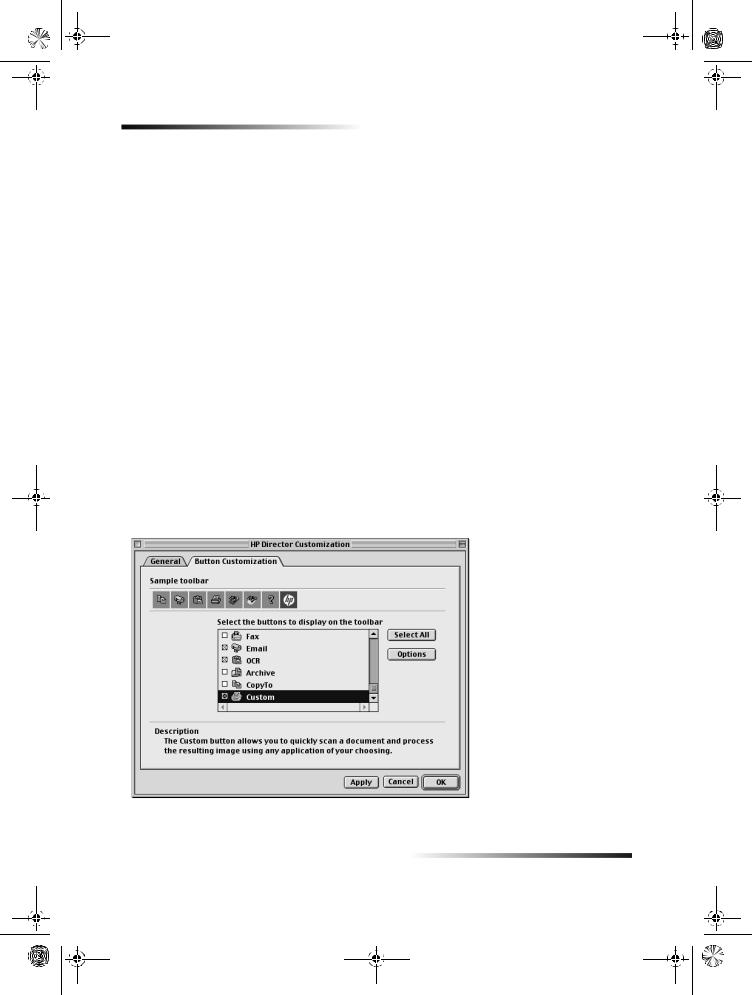
Customize the Director
You can customize the Director to display different functions.
To customize the Director
1From the Director, click Customize.
The HP Director Customization dialog box appears with the General tab selected.
2Click the Button Customization tab.
8 |
Chapter 3—Use your HP OfficeJet with a Macintosh |
AvMac.book Page 9 Friday, June 23, 2000 10:34 AM
HP OfficeJet G Series
3Click the buttons you want to display on the Director toolbar. If you want to display all buttons, click Select All.
4When you have selected the buttons, click Apply.
5Click OK to close the dialog box.
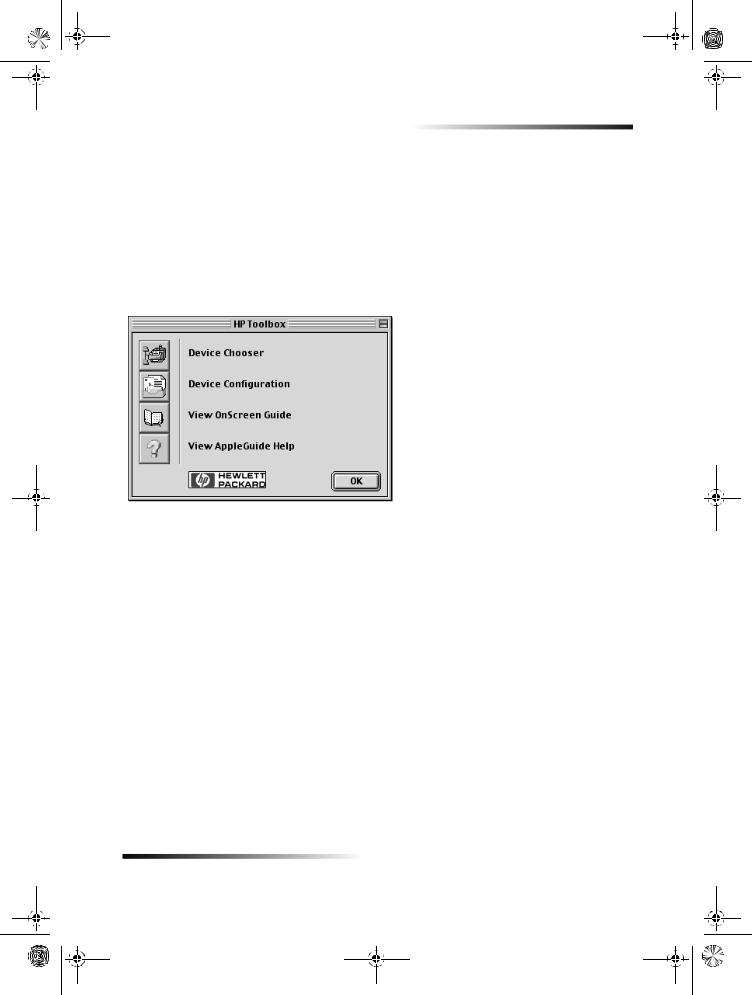
Review the Toolbox
The Toolbox allows you to choose and configure the HP OfficeJet device.
`To access the Toolbox, click the Tools button on the Director.
The Toolbox provides access to the following functions:
Device Chooser: Opens the Macintosh Chooser.
Device Configuration: Opens the HP All-in-One Device Settings dialog box which allows you to specify configuration options for the HP OfficeJet.
View OnScreen Guide: Displays the OnScreen Guide which provides information on how to operate and maintain your OfficeJet.
View AppleGuide Help: Displays the AppleGuide Help which provides a fully searchable help system containing information on using your HP All-in-One software for the Macintosh.
Chapter 3—Use your HP OfficeJet with a Macintosh |
9 |
AvMac.book Page 10 Friday, June 23, 2000 10:34 AM
HP OfficeJet G Series
10 |
Chapter 3—Use your HP OfficeJet with a Macintosh |

AvMac.book Page 11 Friday, June 23, 2000 10:34 AM
4
Get help
This section explains where you can find information about your unit.
Where can I find help?
For hardware and setup information:
•See the HP OfficeJet G Series Setup Poster. The Setup Poster is available in printed format in the box your unit came in.
•See “Additional setup information” in the HP OfficeJet G Series: Your Basic Guide for Macintosh and the HP OfficeJet G Series: OnScreen Guide. The OnScreen Guide is available by clicking View OnScreen Guide from the Toolbox. The Basic Guide is available in printed format in the box your unit came in.
For software information:
•See the HP OfficeJet G Series: OnScreen Guide.
•For more detailed information and instructions on performing everyday operating procedures using your Macintosh, refer to the AppleGuide Help files in the application. To access AppleGuide Help, go to the Director, click Tools, and then click View AppleGuide Help from the Toolbox. AppleGuide Help allows you to search for help using the index, list of topics, or by using Look For which acts like a search tool.
For feature information:
•See the HP OfficeJet G Series: OnScreen Guide.
Setup Poster
The Setup Poster provides installation guidelines for setting up and configuring your unit.
OnScreen Guide
The OnScreen Guide provides detailed information on using your HP OfficeJet and its features. It also provides detailed information on topics ranging from paper types to maintenance.
AppleGuide Help
AppleGuide Help provides detailed information and instructions on using your HP OfficeJet software for the Macintosh.
Chapter 4—Get help |
11 |

AvMac.book Page 12 Friday, June 23, 2000 10:34 AM
HP OfficeJet G Series
Internet help
If you have Internet access, you can get help from the HP Web site at:
www.hp.com/go/all-in-one
This Web site also provides user forums and answers to frequently asked questions.
12 |
Chapter 4—Get help |
AvMac.book Page 13 Friday, June 23, 2000 10:34 AM
5
Load paper or transparency film, or load originals
Your unit is designed to print and copy onto a variety of transparency films and paper types, weights, and sizes. It is important, however, that you choose the right paper and make sure that it is not damaged.
Your unit lets you place originals directly on the glass. With the fax model, you can also load them in the automatic document feeder (ADF).
For comprehensive information, see the fully searchable OnScreen Guide. To access the guide, go to the Director, click Tools, and choose View OnScreen Guide.
Chapter 5—Load paper or transparency film, or load originals |
13 |
AvMac.book Page 14 Friday, June 23, 2000 10:34 AM
HP OfficeJet G Series
Load the input tray with letter-, legal-, or A4-size paper
For best results, adjust the paper settings each time you change paper types. For more information, see “Set the paper type.”
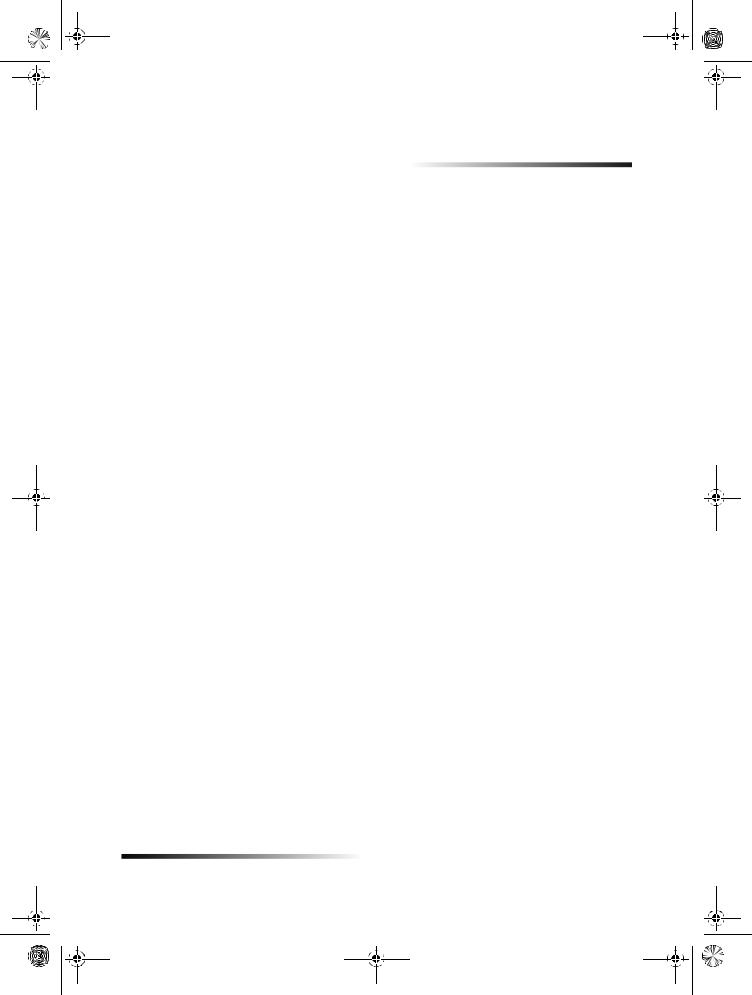
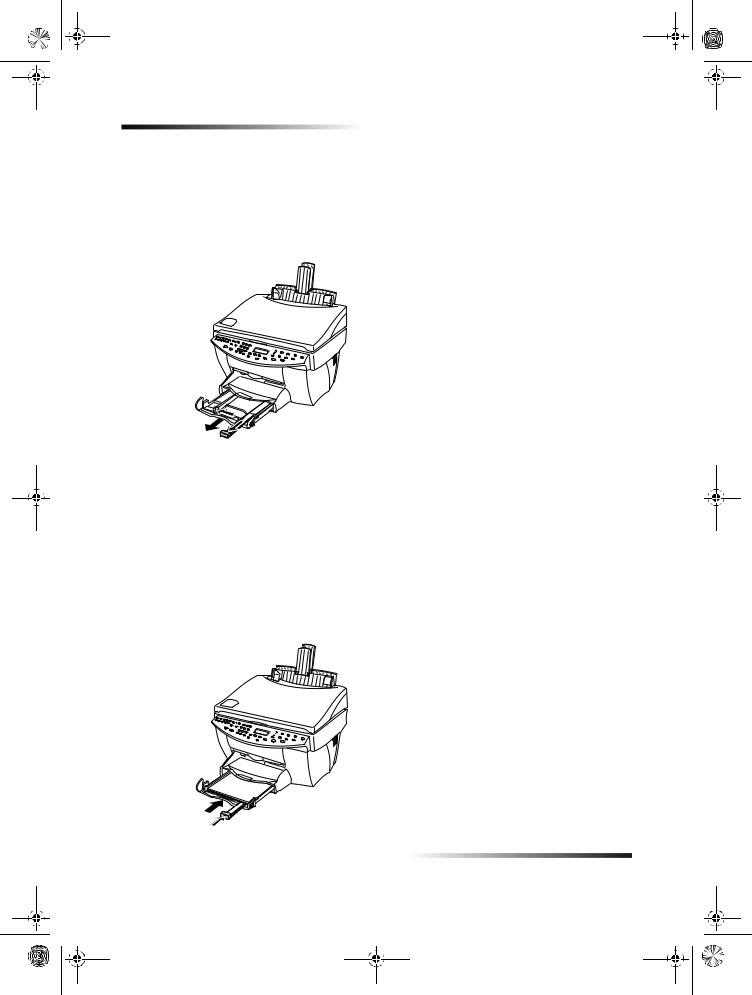
1Pull out the bottom (input) tray, and slide the paper-width and -length adjusters to their outermost positions.
2Tap the stack on a flat surface to even the edges of the paper, and then check the paper for the following:
•Make sure it is free of rips, dust, wrinkles, and curled or bent edges.
•Make sure all the paper in the stack is the same size and type, unless you are working with photo paper.
3Insert paper into the input tray, print-side down and letterhead or top of page first, until it stops.
4Slide the paper-width and -length adjusters in until they stop at the edges of the paper, and be sure that the paper stack lies flat in the input tray and fits under the tab of the paper-length adjuster.
14 |
Chapter 5—Load paper or transparency film, or load originals |
 Loading...