


 CB071AABA, J3500, J3600 User Manual")
HP Officejet J3500/J3600
User Guide

HP Officejet J3500/J3600 All-in-One series
User Guide

Copyright information
© 2007 Copyright Hewlett-Packard Development Company, L.P.
Hewlett-Packard Company notices
The information contained in this document is subject to change without notice.
All rights reserved. Reproduction, adaptation, or translation of this material is prohibited without prior written permission of Hewlett-Packard, except as allowed under copyright laws.
The only warranties for HP products and services are set forth in the express warranty statements accompanying such products and services. Nothing herein should be construed as constituting an additional warranty. HP shall not be liable for technical or editorial errors or omissions contained herein.
Acknowledgements
Windows and Windows XP are U.S. registered trademarks of Microsoft Corporation. Windows Vista is either a registered trademark or trademark of Microsoft Corporation in the United States and/or other countries.
Adobe® and Acrobat® are trademarks of Adobe Systems Incorporated.
Safety information
Always follow basic safety precautions when using this product to reduce risk of injury from fire or electric shock.
1.Read and understand all instructions in the documentation that comes with the device.
2.Use only a grounded electrical outlet when connecting this product to a power source. If you do not know whether the outlet is grounded, check with a qualified electrician.
3.Observe all warnings and instructions marked on the product.
4.Unplug this product from wall outlets before cleaning.
5.Do not install or use this product near water, or when you are wet.
6.Install the product securely on a stable surface.
7.Install the product in a protected location where no one can step on or trip over the line cord, and the line cord cannot be damaged.
8.If the product does not operate normally, see Maintain and troubleshoot.
9.There are no user-serviceable parts inside. Refer servicing to qualified service personnel.
Accessibility
The device provides a number of features that make it accessible for people with disabilities.
Visual
The device software is accessible for users with visual impairments or low vision through the use of your operating system's accessibility options and features. It also supports most assistive technology such as screen readers, Braille readers, and voice-to-text applications. For users who are color blind, colored buttons and tabs used in the software and on the control panel have simple text or icon labels that convey the appropriate action.
Mobility
For users with mobility impairments, the device software functions can be executed through keyboard commands. The software also supports Windows accessibility options such as StickyKeys, ToggleKeys, FilterKeys, and MouseKeys. The device doors, buttons, paper trays, and paper guides can be operated by users with limited strength and reach.
Support
For more details about the accessibility of this product and HP's commitment to product accessibility, visit HP's Web site at www.hp.com/accessibility.
For accessibility information for the Mac OS, visit the Apple Web site at www.apple.com/accessibility.

Contents
1 |
Get started |
|
|
Find other resources for the product ......................................................................................... |
9 |
|
Understand the device parts..................................................................................................... |
10 |
|
Front view........................................................................................................................... |
10 |
|
Printing supplies area......................................................................................................... |
11 |
|
Back view............................................................................................................................ |
11 |
|
Control panel buttons and lights......................................................................................... |
12 |
|
Connection information....................................................................................................... |
13 |
2 |
Use the device |
|
|
Use control panel menus.......................................................................................................... |
15 |
|
Control-panel message types................................................................................................... |
15 |
|
Status messages................................................................................................................ |
16 |
|
Warning messages............................................................................................................. |
16 |
|
Error messages.................................................................................................................. |
16 |
|
Critical error messages....................................................................................................... |
16 |
|
Change device settings............................................................................................................ |
16 |
|
Use the HP Solution Center (Windows)................................................................................... |
17 |
|
Use the HP photo and imaging software.................................................................................. |
17 |
|
Text and symbols...................................................................................................................... |
18 |
|
Type numbers and text on the control-panel keypad......................................................... |
19 |
|
To enter text.................................................................................................................. |
19 |
|
To enter a space, pause, or symbol............................................................................. |
19 |
|
To erase a letter, number, or symbol............................................................................ |
19 |
|
Available symbols for dialing fax numbers......................................................................... |
20 |
|
Load originals........................................................................................................................... |
20 |
|
Load an original in the automatic document feeder (ADF)................................................. |
20 |
|
Select print media..................................................................................................................... |
21 |
|
Tips for selecting and using print media............................................................................. |
21 |
|
Understand specifications for supported media................................................................. |
22 |
|
Understand supported sizes......................................................................................... |
22 |
|
Understand supported media types and weights......................................................... |
23 |
|
Set minimum margins......................................................................................................... |
24 |
|
Load media............................................................................................................................... |
24 |
|
Load full-size paper............................................................................................................ |
24 |
|
Load 10 x 15 cm (4 x 6 inch) photo paper.......................................................................... |
26 |
|
Load index cards................................................................................................................ |
27 |
|
Load envelopes.................................................................................................................. |
28 |
|
Load other types of paper................................................................................................... |
28 |
1
|
Print on special and custom-sized media................................................................................. |
29 |
|
Print on special or custom-sized media (Windows)............................................................ |
30 |
|
Print on special or custom-sized media (Mac OS)............................................................. |
30 |
|
Set up speed-dial entries.......................................................................................................... |
31 |
|
Set up fax numbers as speed-dial entries or groups.......................................................... |
31 |
|
Set up speed-dial entries.............................................................................................. |
31 |
|
Set up a speed-dial group............................................................................................ |
31 |
|
Print and view a list of speed-dial entries........................................................................... |
32 |
|
View a list of speed-dial entries.................................................................................... |
32 |
3 |
|
|
|
Change print settings................................................................................................................ |
33 |
|
Change settings from an application for current jobs (Windows)....................................... |
33 |
|
Change default settings for all future jobs (Windows)........................................................ |
33 |
|
Change settings (Mac OS)................................................................................................. |
34 |
|
Print on both sides (duplexing)................................................................................................. |
34 |
|
Guidelines for printing on both sides of a page.................................................................. |
34 |
|
Perform duplexing.............................................................................................................. |
34 |
|
Cancel a print job...................................................................................................................... |
35 |
4 |
Copy |
|
|
Make copies from the control panel.......................................................................................... |
37 |
|
Change the copy settings......................................................................................................... |
37 |
|
Set the number of copies.......................................................................................................... |
38 |
|
Set the copy paper size............................................................................................................ |
38 |
|
Set the copy paper type............................................................................................................ |
38 |
|
Change copy speed or quality.................................................................................................. |
39 |
|
Resize an original to fit onto letter or A4 paper........................................................................ |
40 |
|
Copy a legal-size document onto letter paper.......................................................................... |
40 |
|
Adjust the lightness and darkness of your copy....................................................................... |
41 |
|
Enhance blurred areas of your copy......................................................................................... |
41 |
|
Enhance light areas of your copy............................................................................................. |
42 |
|
Cancel a copy job..................................................................................................................... |
42 |
5 |
Scan |
|
|
Scan an original........................................................................................................................ |
43 |
|
Scan an original to a program on a computer.................................................................... |
43 |
|
Scan from a TWAIN-compliant or a WIA-compliant program................................................... |
44 |
|
Scan from a TWAIN-compliant program............................................................................. |
44 |
|
Scan from a WIA-compliant program.................................................................................. |
44 |
|
Edit a scanned original............................................................................................................. |
44 |
|
Edit a scanned photo or graphic......................................................................................... |
45 |
|
Edit a scanned document using optical character recognition (OCR) software................. |
45 |
|
Change scan settings............................................................................................................... |
45 |
|
Cancel a scan job..................................................................................................................... |
45 |
2
Contents |
|
|
6 |
Fax |
|
|
Send a fax................................................................................................................................ |
47 |
|
Send a basic fax................................................................................................................. |
47 |
|
Send a fax manually from a phone..................................................................................... |
48 |
|
Send a fax using monitor dialing........................................................................................ |
49 |
|
Send a fax from memory.................................................................................................... |
50 |
|
Schedule a fax to send later............................................................................................... |
50 |
|
Send a fax to multiple recipients......................................................................................... |
51 |
|
Send a fax to multiple recipients from the control panel .............................................. |
51 |
|
Send a fax to multiple recipients from the HP Photosmart Studio Software (Mac |
|
|
OS)............................................................................................................................... |
52 |
|
Send a color original or photo fax....................................................................................... |
53 |
|
Change the fax resolution and Lighter / Darker settings................................................... |
53 |
|
Change the fax resolution............................................................................................. |
53 |
|
Change the Lighter / Darker setting............................................................................ |
54 |
|
Set new default settings............................................................................................... |
55 |
|
Send a fax in Error Correction Mode.................................................................................. |
55 |
|
Receive a fax............................................................................................................................ |
55 |
|
Receive a fax manually...................................................................................................... |
56 |
|
Set up backup fax reception............................................................................................... |
56 |
|
Reprint received faxes from memory.................................................................................. |
57 |
|
Poll to receive a fax............................................................................................................ |
58 |
|
Forward faxes to another number...................................................................................... |
58 |
|
Set the paper size for received faxes................................................................................. |
59 |
|
Set automatic reduction for incoming faxes........................................................................ |
59 |
|
Block junk fax numbers...................................................................................................... |
60 |
|
Set the junk fax mode................................................................................................... |
60 |
|
Add numbers to the junk fax list................................................................................... |
60 |
|
Remove numbers from the junk fax list........................................................................ |
61 |
|
Change fax settings.................................................................................................................. |
61 |
|
Configure the fax header.................................................................................................... |
62 |
|
Set the answer mode (Auto answer).................................................................................. |
62 |
|
Set the number of rings before answering.......................................................................... |
62 |
|
Change the answer ring pattern for distinctive ring............................................................ |
63 |
|
Set the fax error correction mode....................................................................................... |
63 |
|
Set the dial type.................................................................................................................. |
64 |
|
Set the redial options.......................................................................................................... |
64 |
|
Set the fax speed................................................................................................................ |
64 |
|
Fax over the Internet................................................................................................................ |
65 |
|
Test fax setup........................................................................................................................... |
65 |
|
Use reports............................................................................................................................... |
66 |
|
Print fax confirmation reports.............................................................................................. |
66 |
|
Print fax error reports.......................................................................................................... |
67 |
|
Print and view the fax log................................................................................................... |
67 |
|
Cancel a fax.............................................................................................................................. |
68 |
7 |
Configure and manage |
|
|
Manage the device................................................................................................................... |
69 |
|
Monitor the device.............................................................................................................. |
69 |
|
Administer the device......................................................................................................... |
70 |
3
Use device management tools................................................................................................. |
70 |
Toolbox (Windows)............................................................................................................. |
70 |
Open the Toolbox......................................................................................................... |
71 |
Toolbox tabs ................................................................................................................ |
71 |
HP Printer Utility (Mac OS)................................................................................................. |
71 |
Open the HP Printer Utility............................................................................................ |
71 |
HP Printer Utility panels................................................................................................ |
72 |
Set up faxing for the device ..................................................................................................... |
72 |
Set up faxing (parallel phone systems).............................................................................. |
73 |
Choose the correct fax setup for your home or office................................................... |
73 |
Select your fax setup case........................................................................................... |
75 |
Case A: Separate fax line (no voice calls received)..................................................... |
76 |
Case B: Set up the device with DSL............................................................................. |
77 |
Case C: Set up the device with a PBX phone system or an ISDN line........................ |
78 |
Case D: Fax with a distinctive ring service on the same line........................................ |
79 |
Case E: Shared voice/fax line...................................................................................... |
80 |
Case F: Shared voice/fax line with voice mail.............................................................. |
81 |
Case G: Fax line shared with computer modem (no voice calls received)................... |
82 |
Case H: Shared voice/fax line with computer modem.................................................. |
84 |
Case I: Shared voice/fax line with answering machine................................................ |
88 |
Case J: Shared voice/fax line with computer modem and answering machine............ |
89 |
Case K: Shared voice/fax line with computer dial-up modem and voice mail.............. |
93 |
Serial-type fax setup........................................................................................................... |
95 |
Configure the device (Windows)............................................................................................... |
96 |
Direct connection................................................................................................................ |
96 |
Install the software before connecting the device (recommended).............................. |
96 |
Connect the device before installing the software........................................................ |
97 |
Share the device on a locally shared network.............................................................. |
97 |
Configure the device (Mac OS)................................................................................................ |
98 |
Install the software for a direct connection......................................................................... |
98 |
Share the device on a locally shared network.................................................................... |
98 |
Uninstall and reinstall the software........................................................................................... |
99 |
8 Maintain and troubleshoot |
|
Work with print cartridges....................................................................................................... |
103 |
Supported print cartridges................................................................................................ |
103 |
Handle the print cartridges............................................................................................... |
104 |
Replace the print cartridges.............................................................................................. |
104 |
Align the print cartridges................................................................................................... |
108 |
Clean the print cartridges................................................................................................. |
109 |
Clean the print cartridge contacts..................................................................................... |
110 |
Clean the area around the ink nozzles............................................................................. |
112 |
Store print cartridges........................................................................................................ |
113 |
Clean the device..................................................................................................................... |
114 |
Clean the glass strip......................................................................................................... |
114 |
Clean the white strip......................................................................................................... |
115 |
Clean the exterior............................................................................................................. |
116 |
Troubleshooting tips and resources....................................................................................... |
116 |
4
Contents |
|
Solve printing problems.......................................................................................................... |
116 |
The device shuts down unexpectedly............................................................................... |
117 |
Error message appears on control-panel display............................................................. |
117 |
The device is not responding (nothing prints)................................................................... |
117 |
Device takes a long time to print...................................................................................... |
118 |
Blank or partial page printed............................................................................................. |
118 |
Something on the page is missing or incorrect................................................................. |
118 |
Placement of the text or graphics is wrong....................................................................... |
119 |
Poor print quality and unexpected printouts........................................................................... |
119 |
Poor quality printouts........................................................................................................ |
120 |
Meaningless characters print............................................................................................ |
120 |
Ink is smearing.................................................................................................................. |
121 |
Ink is not filling the text or graphics completely................................................................ |
121 |
Output is faded or dull colored.......................................................................................... |
121 |
Colors are printing as black and white.............................................................................. |
122 |
Wrong colors are printing................................................................................................. |
122 |
Printout shows bleeding colors......................................................................................... |
122 |
Colors do not line up properly........................................................................................... |
122 |
Lines or dots are missing from text or graphics................................................................ |
122 |
Solve paper-feed problems.................................................................................................... |
123 |
Media is not supported for the printer or tray.................................................................... |
123 |
Media is not picked up from the tray................................................................................. |
123 |
Media is not coming out correctly..................................................................................... |
123 |
Pages are skewing........................................................................................................... |
123 |
Multiple pages are being picked up.................................................................................. |
123 |
Solve copy problems.............................................................................................................. |
124 |
No copy came out............................................................................................................. |
124 |
Copies are blank............................................................................................................... |
124 |
Documents are missing or faded...................................................................................... |
124 |
Size is reduced................................................................................................................. |
125 |
Copy quality is poor.......................................................................................................... |
125 |
Copy defects are apparent............................................................................................... |
125 |
Error messages appear.................................................................................................... |
126 |
Solve scan problems.............................................................................................................. |
126 |
Scanner did nothing.......................................................................................................... |
126 |
Scan takes too long.......................................................................................................... |
126 |
Part of the document did not scan or text is missing........................................................ |
127 |
Text cannot be edited....................................................................................................... |
127 |
Error messages appear.................................................................................................... |
128 |
Scanned image quality is poor......................................................................................... |
128 |
Scan defects are apparent............................................................................................... |
129 |
Solve fax problems................................................................................................................. |
129 |
The fax test failed............................................................................................................. |
130 |
Troubleshoot installation issues............................................................................................. |
141 |
Hardware installation suggestions.................................................................................... |
141 |
Software installation suggestions..................................................................................... |
142 |
Clear paper jams.................................................................................................................... |
142 |
Avoid paper jams.................................................................................................................... |
144 |
5
A |
HP supplies |
|
|
Order printing supplies online................................................................................................. |
145 |
|
Supplies.................................................................................................................................. |
145 |
|
Print cartridges.................................................................................................................. |
145 |
|
HP media.......................................................................................................................... |
145 |
B |
Support and warranty |
|
|
Hewlett-Packard limited warranty statement.......................................................................... |
148 |
|
Obtain electronic support........................................................................................................ |
149 |
|
Obtain HP telephone support................................................................................................. |
149 |
|
Before you call.................................................................................................................. |
149 |
|
Support process............................................................................................................... |
149 |
|
HP support by phone........................................................................................................ |
150 |
|
Phone support period................................................................................................. |
150 |
|
Telephone support numbers....................................................................................... |
150 |
|
Placing a call............................................................................................................... |
151 |
|
After the phone support period................................................................................... |
152 |
|
Additional warranty options.............................................................................................. |
152 |
|
HP Quick Exchange Service (Japan)............................................................................... |
152 |
|
Call HP Korea customer support...................................................................................... |
153 |
|
Prepare the device for shipment............................................................................................. |
153 |
|
Remove the print cartridges before shipment................................................................... |
153 |
|
Remove the control-panel faceplate................................................................................. |
154 |
|
Pack the device...................................................................................................................... |
155 |
C |
Device specifications |
|
|
Physical specifications............................................................................................................ |
157 |
|
Product features and capacities............................................................................................. |
157 |
|
Memory specifications............................................................................................................ |
158 |
|
System requirements.............................................................................................................. |
158 |
|
Print specifications.................................................................................................................. |
159 |
|
Copy specifications................................................................................................................. |
159 |
|
Fax specifications................................................................................................................... |
159 |
|
Scan specifications................................................................................................................. |
160 |
|
Environmental specifications.................................................................................................. |
160 |
|
Electrical specifications.......................................................................................................... |
160 |
|
Acoustic emission specifications (noise levels per ISO 7779)................................................ |
160 |
D |
Regulatory information |
|
|
FCC statement........................................................................................................................ |
164 |
|
Notice to users in Korea......................................................................................................... |
164 |
|
VCCI (Class B) compliance statement for users in Japan...................................................... |
164 |
|
Notice to users in Japan about the power cord...................................................................... |
165 |
|
RoHS notices (China only)..................................................................................................... |
165 |
|
Noise emission statement for Germany................................................................................. |
165 |
|
Notice to users of the U.S. telephone network: FCC requirements........................................ |
166 |
|
Notice to users of the Canadian telephone network............................................................... |
166 |
|
Notice to users in the European Economic Area.................................................................... |
168 |
|
Australia wired fax statement................................................................................................. |
168 |
|
Warning for Australia and New Zealand with phone handset................................................. |
168 |
|
Regulatory model number...................................................................................................... |
168 |
6
Contents |
|
Declaration of conformity........................................................................................................ |
169 |
Environmental product stewardship program......................................................................... |
170 |
Paper use......................................................................................................................... |
170 |
Plastics............................................................................................................................. |
170 |
Material safety data sheets............................................................................................... |
170 |
Recycling program............................................................................................................ |
170 |
HP inkjet supplies recycling program............................................................................... |
170 |
Disposal of waste equipment by users in private households in the European |
|
Union................................................................................................................................ |
171 |
Energy consumption......................................................................................................... |
171 |
Index............................................................................................................................................ |
173 |
7
8

1 Get started
This guide provides details about how to use the device and to resolve problems.
•Find other resources for the product
•Understand the device parts
Find other resources for the product
You can obtain product information and further troubleshooting resources that are not included in this guide from the following resources:
Resource |
Description |
Location |
|
|
|
Setup poster |
Provides illustrated setup |
A printed version of the |
|
information. |
document is provided with the |
|
|
device. |
|
|
|
Fax Getting Started Guide |
Provides instructions for |
A printed version of the |
|
setting up the device and |
document is provided with the |
|
information about the warranty |
device. |
|
and safety issues. |
|
|
|
|
Readme file and release |
Provide late-breaking |
Included on the Starter CD. |
notes |
information and |
|
|
troubleshooting tips. |
|
|
|
|
Toolbox (Microsoft® |
Provides tools to align the |
The Toolbox is typically |
Windows®) |
device, clean print cartridges, |
installed with the device |
|
print a test page, view ink level |
software as an available |
|
of print cartridges, and order |
installation option. |
|
supplies online. |
|
|
For more information, see |
|
|
Toolbox (Windows). |
|
|
|
|
HP Printer Utility (Mac OS) |
Contains tools to configure |
The HP Printer Utility is |
(Mac OS supported by |
print settings, align the device, |
typically installed with the |
HP Officejet J3600 only) |
clean the print cartridges, view |
device software. |
|
ink level of print cartridges, |
|
|
order supplies online, and find |
|
|
support information from the |
|
|
Web site. |
|
|
For more information, see HP |
|
|
Printer Utility (Mac OS). |
|
|
|
|
Control panel |
Provides status, error, and |
For more information, see |
|
warning information about |
Control panel buttons and |
|
operations. |
lights. |
|
|
|
Logs and reports |
Provides information about |
For more information, see |
|
events that have occurred. |
Monitor the device. |
|
|
|
HP Web sites |
Provide the latest printer |
www.hp.com/support |
|
software, and product and |
www.hp.com |
|
support information. |
|
|
|
Get started |
9 |
Chapter 1
(continued)
Resource |
Description |
Location |
|
|
|
HP telephone support |
Lists information to contact |
For more information, see |
|
HP. During the warranty |
Obtain HP telephone support. |
|
period, this support is often |
|
|
free of charge. |
|
|
|
|
HP photo and imaging |
Provides information about |
For more information, see Use |
software help |
using the software. |
the HP photo and imaging |
|
|
software. |
|
|
|
Understand the device parts
•Front view
•Printing supplies area
•Back view
•Control panel buttons and lights
•Connection information
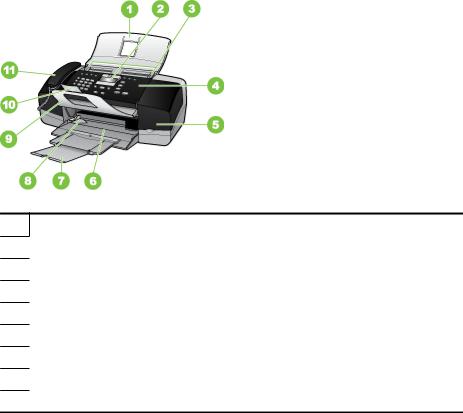
Front view
1Document feeder tray
2Control panel display
3Paper guides
4Control panel
5Print cartridge door
6Input tray
7Tray extender
8Paper-width guide
9Document catcher
10 Get started
(continued)
10Document catcher extender
11Handset
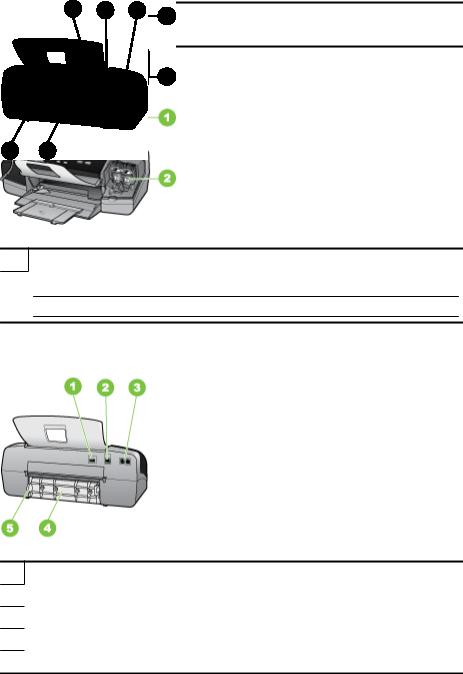
Printing supplies area
1Print cartridge door
2Print cartridges
NOTE: The HP Officejet J3500 supports a black print cartridge only.
Back view
1Power connection
2Rear universal serial bus (USB) port
3Fax ports (1-LINE and 2-EXT)
4Rear door
5Rear door access tab
Understand the device parts |
11 |
Chapter 1
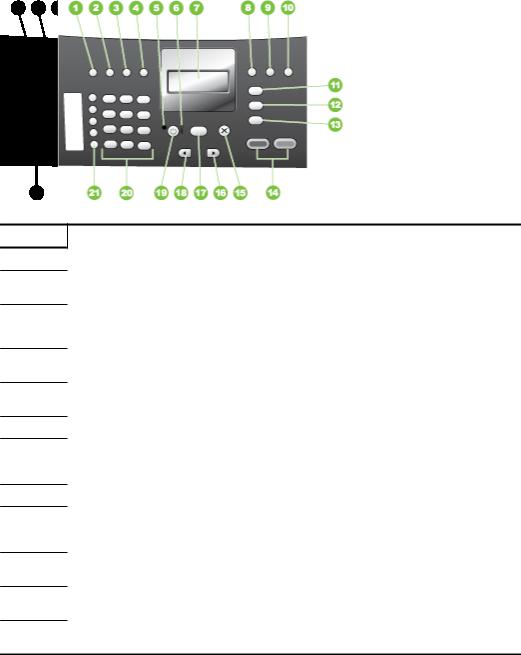
Control panel buttons and lights
The following diagram and related table provide a quick reference to the control panel features.
Label |
Name and Description |
1Speed Dial: Selects a speed dial number.
2Redial/Pause: Redials the most recently dialed number or inserts a 3-second pause in a fax number.
3 |
Lighter / Darker: Lightens or darkens black-and-white faxes being sent. |
4 |
Fax Resolution: Adjusts the resolution for black-and-white faxes being sent. |
5On light: Indicates, when lighted, that the device is on. The light blinks when the device is performing a task.
6Attention light: When blinking, the attention light indicates an error has occurred that requires your attention.
7Display: View menus and messages.
8Auto Answer: Switches among the Answer Mode settings. Depending on the setting, the device automatically answers incoming phone calls, requires you to receive the fax manually, or "listens" for fax tones.
9Flash: Cancels a fax and brings up a dial tone. Also used to answer a call waiting.
10Setup: Presents the Setup Menu for generating reports, changing fax and other maintenance
settings, and accessing the Help menu. Press  to scroll through the Help topics available, and then press OK to select a topic. The Help topic you select opens on your computer screen.
11Fax Menu: Places the device in fax mode and presents the Fax Menu. Press Fax Menu repeatedly to scroll through the options in the Fax Menu.
12Scan To: Places the device in scan mode and presents the Scan To menu for selecting a scan destination.
13Copy Menu: Places the device in copy mode and presents the Copy Menu. Press Copy Menu repeatedly to scroll through the options in the Copy Menu.
12 Get started

(continued)
Label |
Name and Description |
14Start Black: Starts a black-and-white copy, scan, or fax job.
Start Color: Starts a color copy, scan, or fax job (HP Officejet J3600 only.)
15 |
Cancel: Stops a job, exits a menu, or exits settings. |
16 |
Right arrow: Increases values on the display. |
|
|
17 |
OK: Selects a menu or a setting on the display. |
|
|
18 |
Left arrow: Decrease values on the display. |
19Power: Turns the device on or off. The On light next to the Power button is lit when the device is on. The light blinks while performing a job.
When the device is off, a minimal amount of power is still supplied to the device. To completely disconnect the power supply to the HP All-in-One, turn the device off, and then unplug the power cord.
20Keypad: Enter fax numbers, values, or text.
21One-touch speed dial buttons: Accesses the first ten speed dial numbers. Press a speed dial button once to select the speed dial number presented in the left column. Press the same speed dial button a second time to select the speed dial number in the right column.
Connection information
Description |
Recommended number |
Supported software |
Setup instructions |
|
of connected |
features |
|
|
computers for best |
|
|
|
performance |
|
|
USB connection |
One computer connected |
All features are |
Follow the setup poster |
|
with a USB cable to the |
supported. |
guide for detailed |
|
rear USB 2.0 high-speed |
|
instructions. |
|
port on the device. |
|
|
|
|
|
|
Printer sharing |
Up to five computers. |
All features resident on |
For Windows, follow the |
|
The host computer must |
the host computer are |
instructions in Share the |
|
supported. Only print is |
device on a locally shared |
|
|
be turned on at all times, |
||
|
supported from the other |
network. For Mac OS, |
|
|
or the other computers |
||
|
computers. |
follow the instructions in |
|
|
cannot print to the device. |
||
|
|
Share the device on a |
|
|
|
|
|
|
|
|
locally shared network. |
|
|
|
|
Understand the device parts |
13 |
Chapter 1
14 Get started

2 Use the device
This section contains the following topics:
•Use control panel menus
•Control-panel message types
•Change device settings
•Use the HP Solution Center (Windows)
•Use the HP photo and imaging software
•Text and symbols
•Load originals
•Select print media
•Load media
•Print on special and custom-sized media
•Set up speed-dial entries
Use control panel menus
The following sections provide a quick reference to top-level menus that appear on the control-panel display. To display a menu, press the menu button for the function you want to use.
•Scan menu: Presents a list of destinations; for example, HP photo and imaging software.
•Fax menu: Allows you to enter a fax or speed-dial number, or display the Fax menu. Menu options include:
•Modifying resolution
•Lightening/darkening
•Sending delayed faxes
•Setting up new defaults
•Copy menu: Menu options include:
•Selecting copy quantities
•Reducing/enlarging
•Selecting media type and size
Control-panel message types
This section contains the following topics:
•Status messages
•Warning messages
•Error messages
•Critical error messages
Use the device |
15 |

Chapter 2
Status messages
Status messages reflect the current state of the device. They inform you of normal operation and require no action to clear them. They change as the state of the device changes. Whenever the device is ready, not busy, and has no pending warning messages, the status message READY appears if the device is turned on.
Warning messages
Warning messages inform you of events that require your attention, but they do not prevent the device from operating. An example of a warning message is a low ink warning. These messages appear until you resolve the condition.
Error messages
Error messages communicate that some action must be performed, such as adding media or clearing a media jam. These messages are usually accompanied by a blinking red Attention light. Take the appropriate action to continue printing.
If the error message shows an error code, press the Power button to turn off the device, and then turn it on again. In most situations, this action solves the problem. If the message persists, your device might need service. For more information, see Support and warranty.
Critical error messages
Critical error messages inform you of a device failure. Some of these messages can be cleared by pressing the Power button to turn off the device, and then turning it on again. If a critical error persists, service is required. For more information, see Support and warranty.
Change device settings
You can change the device settings from these places:
•From the control panel.
•From the HP Solution Center (Windows) or HP Device Manager (Mac OS). For more information, see Use the HP photo and imaging software.
 NOTE: When you are configuring settings in HP Solution Center or in HP Device Manager, you cannot see the settings that have been configured from the control panel (such as the scan settings).
To change settings from the control panel
1.At the control panel, press the menu button for the function you are using (for example, Copy Menu).
2.To reach the option that you want to change, use one of the following methods:
•Press a control-panel button, and then use the left or right arrow keys to adjust the value.
•Select the option from the menu on the control-panel display.
3.Select the value that you want, and then press OK.
16 Use the device
To change settings from the HP Solution Center (Windows)
▲ See Use the HP photo and imaging software.
To change settings from the HP photo and imaging software (Mac OS)
1.Click the HP Device Manager icon in the Dock.
2.Select the device in the Devices drop-down menu.
3.On the Information and Settings menu, click an item that you want to change.
 NOTE: Mac OS is supported by HP Officejet J3600 only.
Use the HP Solution Center (Windows)
On a Windows computer, the HP Solution Center is the entry point for the HP Photosmart Software. Use the HP Solution Center to change print settings, start the Fax Setup Wizard, order supplies, and access the onscreen Help.
The features available in the HP Solution Center vary depending on the devices you have installed. The HP Solution Center is customized to show icons that are associated with the selected device. If the selected device is not equipped with a particular feature, then the icon for that feature does not appear in the HP Solution Center.
If the HP Solution Center on your computer does not contain any icons, an error might have occurred during the software installation. To correct this, use the Control Panel in Windows to completely uninstall the HP Photosmart Software, and then reinstall the software. For more information, see the onscreen Help that came with the device.
For information about opening the HP Solution Center, see Use the HP photo and imaging software.
Use the HP photo and imaging software
You can use the HP photo and imaging software to access many features that are not available from the control panel.
The software is installed on your computer during setup. For further information, see the setup documentation that came with your device.
Access to the HP photo and imaging software differs by operating system (OS). For example, if you have a Windows computer, the HP photo and imaging software entry point is the HP Photosmart Software window. If you have a Macintosh computer, the HP photo and imaging software entry point is the HP Photosmart Studio window. Regardless,
Use the HP Solution Center (Windows) |
17 |

Chapter 2
the entry point serves as the launching pad for the HP photo and imaging software and services.
To open the HP Photosmart Software on a Windows computer
1.Do one of the following:
•On the Windows desktop, double-click the HP Photosmart Software icon.
•In the system tray at the far right of the Windows taskbar, double-click the HP Digital Imaging Monitor icon.
•On the taskbar, click Start, point to Programs or All Programs, select HP, and then click the HP Photosmart Software.
2.If you have more than one HP device installed, select the tab with your product's name.
 NOTE: On a Windows computer, the features available in the HP Photosmart Software vary depending on the devices you have installed. The software is customized to show icons that are associated with the selected device. If the selected device is not equipped with a particular feature, then the icon for that feature does not appear in the software.
 TIP: If the HP Photosmart Software on your computer does not contain any icons, an error might have occurred during the software installation. To correct this, use the Control Panel in Windows to completely uninstall the HP Photosmart Software; then reinstall the software.
To open the HP Photosmart Studio software on a Macintosh computer
1.Click the HP Photosmart Studio icon in the Dock. The HP Photosmart Studio window appears.
 NOTE: Mac OS is supported by HP Officejet J3600 only.
2.In the HP Photosmart Studio task bar, click Devices. The HP Device Manager window appears.
3.Select your device from the Device drop-down menu.
From here, you can scan, send faxes, import documents, and perform maintenance procedures such as checking the ink levels for the ink cartridges.
 NOTE: On a Macintosh computer, the features available in the HP Photosmart Studio software vary depending on the selected device.
 TIP: When the HP Photosmart Studio software is opened, you can gain access to the Dock menu shortcuts by selecting and holding the mouse button over the HP Photosmart Studio icon in the Dock.
Text and symbols
You can use the keypad on the control panel to enter text and symbols.
You can also enter symbols from the keypad when you dial a fax or phone number. When the device dials the number, it interprets the symbol and responds accordingly. For example, if you enter a dash in the fax number, the device will pause before dialing the
18 Use the device

remainder of the number. A pause is useful if you need to gain access to an outside line before dialing the fax number.
 NOTE: If you want to enter a symbol in your fax number, such as a dash, you need to enter the symbol by using the keypad.
Type numbers and text on the control-panel keypad
You can enter text or symbols by using the keypad on the control panel. After you are done entering text, press OK to store your entry.
To enter text
1.Press the keypad numbers that correspond to the letters of a name. For example, the letters a, b, and c correspond to the number 2, as shown on the button below.
 TIP: Press a button multiple times to see the available characters. Depending on your language and country/region setting, other characters might be available in addition to the ones shown on the keypad.
2.After the correct letter appears, wait for the cursor to advance automatically to the right, or press the right arrow button. Press the number that corresponds to the next letter in the name. Press the button multiple times until the correct letter appears. The first letter of a word is automatically set to uppercase.
To enter a space, pause, or symbol
•To insert a space, press Space.
•To enter a pause, press Redial/Pause. A dash appears in the number sequence.
•To enter a symbol, such as @, press the Symbols button repeatedly to scroll through the list of available symbols: asterisk (*), dash (-), ampersand (&), period (.), slash (/), parentheses ( ), apostrophe ('), equals (=), number sign (#), at (@), underscore (_), plus (+), exclamation (!), semicolon (;), question (?), comma (,), colon (:), percent (%), and approximation (~).
To erase a letter, number, or symbol
▲If you make a mistake, press the left arrow button to clear it, and then make the correct entry.
Text and symbols |
19 |

Chapter 2
Available symbols for dialing fax numbers
To enter a symbol, such as *, press Symbols repeatedly to scroll through the list of symbols. The following table provides the symbols that you can use in a fax or phone number sequence, fax header information, and speed-dial entries.
Available |
Description |
Available when entering |
symbols |
|
|
|
|
|
* |
Displays an asterisk symbol when |
Fax header name, speed-dial |
|
required for dialing. |
names, speed-dial numbers, fax or |
|
|
phone numbers, and monitor dial |
|
|
entries |
|
|
|
- |
When auto-dialing, the device enters a |
Fax header name, fax header |
|
pause in the number sequence. |
number, speed-dial names, speed- |
|
|
dial numbers, and fax or phone |
|
|
numbers |
|
|
|
( ) |
Displays a left or right parenthesis to |
Fax header name, fax header |
|
separate numbers, such as area codes, |
number, speed-dial names, speed- |
|
for easier reading. These symbols do not |
dial numbers, and fax or phone |
|
affect dialing. |
numbers |
|
|
|
W |
When auto-dialing, W causes the device |
Speed-dial numbers and fax or |
|
to wait for a dial tone before continuing to |
phone numbers |
|
dial. |
|
|
|
|
R |
During auto-dialing, the R functions the |
Speed-dial numbers and fax or |
|
same as a Flash button on your telephone. |
phone numbers |
|
|
|
+ |
Displays a plus symbol. This symbol does |
Fax header name, fax header |
|
not affect dialing. |
number, speed-dial names, speed- |
|
|
dial numbers, and fax or phone |
|
|
numbers |
|
|
|
Load originals
You can load an original for a copy, fax, or scan job in the automatic document feeder. Originals that are loaded in the automatic document feeder are automatically fed into the device.
CAUTION: In areas of high humidity and temperature; avoid putting photo originals through the automatic document feeder. They could become jammed and damage your photos.
TIP: To avoid scratches or other damage to your original photos, place your photo in a transparent photo sleeve before loading.
Load an original in the automatic document feeder (ADF)
You can copy, scan, or fax a single or multiple-page A4, letter, or legal-size document by placing it in the document feeder tray.
The document feeder tray holds a maximum of 20 sheets of letter or A4-size paper or 15 sheets of legal-size paper.
20 Use the device

To load an original in the document feeder tray
1.Load your original, with the print side down, into the document feeder tray. Place the pages so that the top edge of the document goes in first. Slide the media into the automatic document feeder until you hear a beep or see a message on the display indicating that the loaded pages were detected.
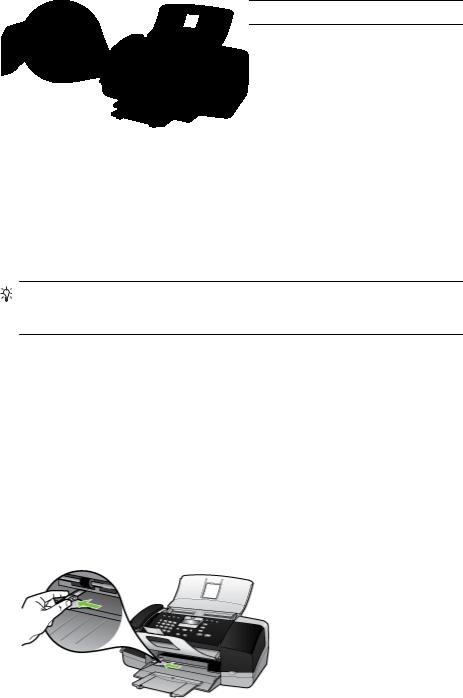
 TIP: For more help on loading originals in the automatic document feeder, refer to the diagram engraved in the document feeder tray.
2. Slide the width guides inward until they stop at the left and right edges of the media.
Select print media
The device is designed to work well with most types of office media. It is best to test a variety of print media types before buying large quantities. Use HP media for optimum print quality. Visit the HP Web site at www.hp.com for more information about HP media.
Tips for selecting and using print media
For the best results, observe the following guidelines.
•Always use media that conforms to the device specifications. For more information, see Understand specifications for supported media.
•Load only one type of media at a time into a tray.
•Load media print-side down and aligned against the right and back edges of the tray. For more information, see Load media.
•Do not overload the tray. For more information, see Understand specifications for supported media.
•To prevent jams, poor print quality, and other printing problems, avoid the following media:
•Multipart forms
•Media that is damaged, curled, or wrinkled
•Media with cutouts or perforations
•Media that is heavily textured, embossed, or does not accept ink well
•Media that is too lightweight or stretches easily
Select print media |
21 |

Chapter 2
Cards and envelopes
•Avoid envelopes that have a very slick finish, self-stick adhesives, clasps, or windows. Also avoid cards and envelopes with thick, irregular, or curled edges, or areas that are wrinkled, torn, or otherwise damaged.
•Use tightly constructed envelopes, and make sure the folds are sharply creased.
•Load envelopes with the flaps facing up.
Photo media
•Use the Best mode to print photographs. Note that in this mode, printing takes longer and more memory is required from your computer.
•Remove each sheet as it prints and set it aside to dry. Allowing wet media to stack up may cause smearing.
Transparencies
•Insert transparencies with the rough side down and the adhesive strip pointing towards the back of the device.
•Use the Normal mode to print transparencies. This mode provides longer drying time and ensures that the ink dries completely before the next page is delivered to the output tray.
•Remove each sheet as it prints and set it aside to dry. Allowing wet media to stack up may cause smearing.
Custom-sized media
•Use only custom-sized media that is supported by the device.
•If your application supports custom-sized media, set the media size in the application before printing the document. If not, set the size in the print driver. You might need to reformat existing documents to print them correctly on custom-sized media.
Understand specifications for supported media
Use the following tables to determine the correct media to use with your device, and determine what features will work with your media.
•Understand supported sizes
•Understand supported media types and weights
Understand supported sizes
 NOTE: The HP Officejet J3600 supports all media listed in the table below. The HP Officejet J3500 supports paper only.
Type |
Size |
|
|
Paper |
A4: 210 x 297 mm (8.3 x 11.7 inches) |
|
Legal: 216 x 356 mm (8.5 x 14 inches) |
|
B5–JIS: 182 x 257 mm (7.2 x 10.1 inches) |
|
|
Envelopes |
U.S. #10: 105 x 241 mm (4.13 x 9.5 inches) |
|
|
22 Use the device

(continued)
Type |
Size |
|
|
|
A2: 111 x 146 mm (4.4 x 5.8 inches) |
|
DL: 110 x 220 mm (4.3 x 8.7 inches) |
|
C6: 114 x 162 mm (4.5 x 6.4 inches) |
|
|
Transparency film |
Letter: 216 x 279 mm (8.5 x 11 inches) |
|
A4: 210 x 297 mm |
|
|
Premium photo paper |
10 x 15 cm (4 x 6 inches) |
|
Letter: 216 x 280 mm (8.5 x 11 inches) |
|
A4: 210 x 297 mm |
|
|
Cards |
Index card: 127 x 203 mm (5 x 8 inches) |
|
A4: 210 x 297 mm |
|
|
Labels |
Letter: 216 x 279 mm (8.5 x 11 inches) |
|
A4: 105 x 149 mm |
|
|
Custom |
102 x 152 mm up to 216 x 356 mm (4 x 6 inches up to 8.5 x 14 |
|
inches) |
|
|
Understand supported media types and weights
 NOTE: The HP Officejet J3600 supports all media listed in the table below. The HP Officejet J3500 supports plain paper and legal paper only.
Type |
Paper weight |
Input tray* |
Output tray** |
Document |
|
|
|
|
feeder tray |
|
|
|
|
|
Plain paper |
16 to 24 lb. (60 to |
up to 100 |
up to 20 |
up to 20 |
|
90 gsm) |
(16 lb. paper) |
(16 lb. paper) |
|
|
|
|
||
|
|
|
|
|
Legal paper |
20 to 24 lb. (75 to |
up to 100 |
up to 20 |
up to 15 |
|
90 gsm) |
(16 lb. paper) |
(16 lb. paper) |
|
|
|
|
||
|
|
|
|
|
Cards |
up to 110 lb. |
20 |
10 |
N/A |
|
index (200 gsm) |
|
|
|
|
|
|
|
|
Envelopes |
20 to 24 lb. (75 to |
10 |
10 |
N/A |
|
90 gsm) |
|
|
|
|
|
|
|
|
Transparency film |
N/A |
25 |
up to 10 |
N/A |
|
|
|
|
|
Labels |
N/A |
up to 20 |
up to 10 |
N/A |
|
|
|
|
|
4 x 6 inch photo |
up to 75 lb. (280 |
30 |
20 |
N/A |
paper |
gsm) |
|
|
|
|
|
|
|
|
8.5 x 11 inch photo |
N/A |
40 |
20 |
N/A |
paper |
|
|
|
|
|
|
|
|
|
*Maximum capacity. The input tray has a maximum input stack height capacity of 10 mm.
**Output tray capacity is affected by the type of paper and the amount of ink you are using. HP recommends emptying the output tray frequently.
Select print media |
23 |
Chapter 2
Set minimum margins
 NOTE: The HP Officejet J3500 does not support envelopes and cards.
|
Top (leading edge) |
Bottom (trailing |
Left and Right |
|
|
edge) |
margins |
|
|
|
|
U.S. (Letter, Legal, |
1.5 mm (0.06 inches) |
12.7 mm (0.50 |
6.4 mm (0.25 inches) |
Executive) |
|
inches) |
|
ISO (A4, A5) and JIS (B5) |
1.8 mm (0.07 inches) |
12.7 mm (0.50 |
3.2 mm (0.13 inches) |
|
|
inches) |
|
Envelopes |
3.2 mm (0.13 inches) |
3.2 mm (0.13 inches) |
1.0 mm (0.04 inches) |
|
|
|
|
Cards |
1.0 mm (0.04 inches) |
12.7 mm (0.50 |
3.2 mm (0.13 inches) |
|
|
inches) |
|
Load media
This section describes the procedure for loading different types and sizes of paper into the device for your copies, printouts, or faxes.
TIP: To help prevent rips, wrinkles, and curled or bent edges, store all paper flat in a resealable bag. If the paper is not stored properly, extreme changes in temperature and humidity might result in curled paper that does not work well in the device.
This section contains the following topics:
•Load full-size paper
•Load 10 x 15 cm (4 x 6 inch) photo paper
•Load index cards
•Load envelopes
•Load other types of paper
Load full-size paper
You can load many types of letter, A4, or legal paper into the input tray of the device.
To load full-size paper
1. Slide the paper-width guide to its outermost position.
24 Use the device
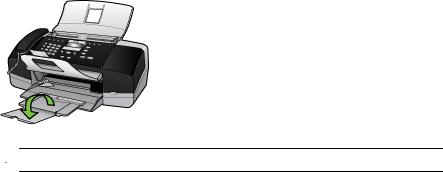
2. Flip the tray extender up toward you.
 NOTE: When you use legal-size paper, leave the tray extender closed.
3.Tap a stack of paper on a flat surface to align the edges, and then check the paper for the following:
•Make sure it is free of rips, dust, wrinkles, and curled or bent edges.
•Make sure all the paper in the stack is the same size and type.
Load media |
25 |

Chapter 2
4.Insert the stack of paper into the input tray with the short edge forward and the print side down. Slide the stack of paper forward until it stops.
CAUTION: Make sure that the device is idle and silent when you load paper into the input tray. If it is servicing the print cartridges or otherwise engaged in a task, the paper stop inside the device might not be in place. You could push the paper too far forward, causing the device to eject blank pages.
TIP: If you are using letterhead, insert the top of the page first with the print side down. For more help on loading full-size paper and letterhead, refer to the diagram engraved in the base of the input tray.
5.Slide the paper-width guide inward until it stops at the edge of the paper.
Do not overload the input tray; make sure the stack of paper fits within the input tray and is no higher than the top of the paper-width guide.
Load 10 x 15 cm (4 x 6 inch) photo paper
(HP Officejet J3600 only)
You can load 10 x 15 cm (4 x 6 inch) photo paper into the input tray of the device. For the best results, use 10 x 15 cm (4 x 6 inch) HP Premium Plus Photo Paper or HP Premium Photo Paper.
TIP: To help prevent rips, wrinkles, and curled or bent edges, store all paper flat in a resealable bag. If the paper is not stored properly, extreme changes in temperature and humidity might result in curled paper that does not work well in the device.
For best results, set the paper type and paper size before copying or printing.
26 Use the device
 Loading...