


 Loading...
DESIGNJET T7100 and
T7100 Monochrome printer series
Using your printer
© 2010 Hewlett-Packard Development |
Legal notices |
Company, L.P. |
The information contained in this document |
|
|
1st edition |
is subject to change without notice. The only |
|
warranties for HP products and services are |
|
set forth in the express warranty statements |
|
accompanying such products and services. |
|
Nothing contained in other sections different |
|
from the express warranty should be |
|
construed as constituting an additional |
|
warranty. HP shall not be liable for technical |
|
and editorial errors or omissions contained |
|
herein. |
Trademarks
Adobe®, Acrobat®, Adobe Photoshop®, and PostScript® are trademarks of Adobe Systems Incorporated.
Microsoft® and Windows® are U.S. registered trademarks of Microsoft Corporation.
PANTONE®* is *Pantone, Inc.'s checkstandard trademark for color.

Table of contents
1 |
Introduction ...................................................................................................................... |
1 |
|
Safety precautions .................................................................................................................... |
2 |
|
Product models ........................................................................................................................ |
2 |
|
Using this guide ....................................................................................................................... |
3 |
|
The printer’s main features ........................................................................................................ |
4 |
|
The printer’s main components ................................................................................................... |
4 |
|
The Embedded Web Server’s main components ........................................................................... |
9 |
|
The HP Utility’s main features ................................................................................................... |
10 |
|
The printer’s internal prints ...................................................................................................... |
10 |
|
Turn the printer on and off ....................................................................................................... |
11 |
2 |
Connectivity and software instructions ............................................................................ |
12 |
|
Choose which connection method to use ................................................................................... |
13 |
|
Connect to a network (Windows) ............................................................................................. |
13 |
|
Connect directly to a computer (Windows) ................................................................................ |
14 |
|
Uninstall the printer driver (Windows) ....................................................................................... |
14 |
|
Connect to a network (Mac OS) ............................................................................................... |
14 |
|
Connect directly to a computer (Mac OS) ................................................................................. |
17 |
|
Uninstall the printer software (Mac OS) ..................................................................................... |
18 |
3 |
Personalize the printer .................................................................................................... |
20 |
|
Change the language of the front-panel display ......................................................................... |
21 |
|
Access the HP Utility ............................................................................................................... |
21 |
|
Access the Embedded Web Server ........................................................................................... |
21 |
|
Change the language of the HP Utility ...................................................................................... |
22 |
|
Change the language of the Embedded Web Server .................................................................. |
22 |
|
Change the sleep mode setting ................................................................................................ |
22 |
|
Turn the buzzer on and off ...................................................................................................... |
22 |
|
Change the front-panel display contrast .................................................................................... |
22 |
|
Change the units of measurement ............................................................................................. |
23 |
|
Configure network settings ...................................................................................................... |
23 |
|
Change the graphic language setting ....................................................................................... |
24 |
|
Paper suitability options .......................................................................................................... |
25 |
4 |
Handle the paper ........................................................................................................... |
26 |
|
Overview .............................................................................................................................. |
27 |
|
Load a roll into the printer ....................................................................................................... |
30 |
ENWW |
iii |
|
Unload a roll from the printer .................................................................................................. |
34 |
|
View information about the paper ............................................................................................ |
35 |
|
Perform paper advance calibration .......................................................................................... |
35 |
|
Download paper presets ......................................................................................................... |
37 |
|
Cancel the drying time ............................................................................................................ |
37 |
|
Change the drying time .......................................................................................................... |
37 |
|
Printing paper info ................................................................................................................. |
38 |
|
Feed and cut the paper ........................................................................................................... |
38 |
|
Store the paper ...................................................................................................................... |
39 |
|
Order paper .......................................................................................................................... |
39 |
5 |
Handle the ink system .................................................................................................... |
44 |
|
Ink system components ............................................................................................................ |
45 |
|
Ink system tips ....................................................................................................................... |
47 |
|
Work with ink system components ............................................................................................ |
48 |
|
Order ink supplies .................................................................................................................. |
67 |
6 |
Use of multiple rolls ........................................................................................................ |
69 |
|
The uses of a multiroll printer ................................................................................................... |
70 |
|
How the printer allocates jobs to paper rolls .............................................................................. |
70 |
7 |
Use of the stacker ........................................................................................................... |
72 |
|
Install the stacker .................................................................................................................... |
73 |
|
Uninstall the stacker ................................................................................................................ |
73 |
|
Using paper with the stacker ................................................................................................... |
73 |
|
Stacker messages ................................................................................................................... |
74 |
|
Change the temperature ......................................................................................................... |
74 |
|
Change paper rolls while using the stacker ............................................................................... |
74 |
|
Clean the exterior of the stacker ............................................................................................... |
74 |
|
Clean the stacker rollers .......................................................................................................... |
75 |
|
Move or store the stacker ........................................................................................................ |
75 |
8 |
Print options ................................................................................................................... |
77 |
|
Create a print job .................................................................................................................. |
78 |
|
Select print quality .................................................................................................................. |
79 |
|
Print a draft ........................................................................................................................... |
80 |
|
High-quality printing ............................................................................................................... |
81 |
|
Select paper size ................................................................................................................... |
82 |
|
Select margins options ............................................................................................................ |
83 |
|
Print on loaded paper ............................................................................................................. |
84 |
|
Rescale a print ....................................................................................................................... |
84 |
|
Preview a print ...................................................................................................................... |
85 |
|
Print 16-bit color images ......................................................................................................... |
85 |
|
Change the treatment of overlapping lines ................................................................................ |
86 |
|
Print crop lines ....................................................................................................................... |
86 |
|
Rotate an image .................................................................................................................... |
86 |
iv |
ENWW |
|
Print in gray shades ................................................................................................................ |
88 |
|
Use paper economically ......................................................................................................... |
88 |
|
Nest jobs to save paper .......................................................................................................... |
89 |
|
Use ink economically .............................................................................................................. |
91 |
|
Roll protection ....................................................................................................................... |
91 |
|
Unattended printing/overnight printing ..................................................................................... |
91 |
9 Color management ......................................................................................................... |
93 |
|
|
Introduction ........................................................................................................................... |
94 |
|
How colors are represented .................................................................................................... |
94 |
|
A summary of the color management process ............................................................................ |
94 |
|
Color calibration .................................................................................................................... |
94 |
|
Color management from printer drivers ..................................................................................... |
96 |
|
Color management from printer drivers (PostScript) .................................................................... |
99 |
|
Color management from the Embedded Web Server ................................................................ |
101 |
|
Color management from the front panel .................................................................................. |
103 |
10 Job queue management ............................................................................................. |
105 |
|
|
Embedded Web Server job queue page ................................................................................. |
106 |
|
Job preview ......................................................................................................................... |
106 |
|
Turn off the job queue ........................................................................................................... |
107 |
|
Select when to print a job in the queue ................................................................................... |
107 |
|
Identify a job in the queue ..................................................................................................... |
107 |
|
Prioritize a job in the queue .................................................................................................. |
108 |
|
Delete a job from the queue .................................................................................................. |
108 |
|
Reprint or copy a job in the queue ......................................................................................... |
108 |
|
Job status messages .............................................................................................................. |
108 |
11 |
Retrieve printer usage information ............................................................................. |
110 |
|
Get printer accounting information ......................................................................................... |
111 |
|
Check printer usage statistics ................................................................................................. |
111 |
|
Check ink and paper usage for a job ..................................................................................... |
111 |
12 |
Practical printing examples ........................................................................................ |
113 |
|
Overview ............................................................................................................................ |
114 |
|
Print a draft for revision with the correct scale .......................................................................... |
114 |
|
Print a project ...................................................................................................................... |
116 |
|
Print a presentation .............................................................................................................. |
127 |
|
Print and scale from Microsoft Office ...................................................................................... |
132 |
13 |
Maintain the printer .................................................................................................... |
139 |
|
Clean the exterior of the printer ............................................................................................. |
140 |
|
Clean the platen .................................................................................................................. |
140 |
|
Clean the paper-advance sensor window ................................................................................ |
142 |
|
Lubricate the printhead carriage ............................................................................................ |
142 |
|
Maintain the ink cartridges .................................................................................................... |
143 |
ENWW |
v |
|
Perform preventive maintenance ............................................................................................ |
143 |
|
Move or store the printer ....................................................................................................... |
144 |
|
Update the printer firmware .................................................................................................. |
144 |
|
Secure disk erase ................................................................................................................. |
145 |
14 |
Accessories ................................................................................................................. |
146 |
|
Order accessories ................................................................................................................ |
146 |
15 |
Troubleshoot print-quality issues ................................................................................ |
147 |
|
General advice .................................................................................................................... |
148 |
|
Troubleshooting tools ............................................................................................................ |
148 |
|
Lines are too thick, too thin or missing .................................................................................... |
149 |
|
Lines appear stepped or jagged ............................................................................................ |
150 |
|
Lines print double or in the wrong colors ................................................................................. |
150 |
|
Lines are discontinuous ......................................................................................................... |
151 |
|
Lines are blurred .................................................................................................................. |
151 |
|
Line lengths are inaccurate .................................................................................................... |
152 |
|
The whole image is blurry or grainy ....................................................................................... |
153 |
|
The paper is not flat ............................................................................................................. |
153 |
|
The print is scuffed or scratched ............................................................................................. |
154 |
|
Ink marks on the paper ......................................................................................................... |
154 |
|
Black ink comes off when you touch the print ........................................................................... |
155 |
|
Vertical lines of different colors .............................................................................................. |
155 |
|
White spots on the print ........................................................................................................ |
156 |
|
Colors are inaccurate ........................................................................................................... |
156 |
|
The output is completely blank ............................................................................................... |
158 |
|
The output contains only a partial print ................................................................................... |
158 |
|
The image is clipped ............................................................................................................ |
159 |
|
The image is in one portion of the printing area ....................................................................... |
159 |
|
The image is unexpectedly rotated ......................................................................................... |
160 |
|
The print is a mirror image of the original ............................................................................... |
160 |
|
The print is distorted or unintelligible ...................................................................................... |
160 |
|
One image overlays another on the same print ........................................................................ |
160 |
|
Pen settings seem to have no effect ......................................................................................... |
160 |
|
The image has a wood-grain appearance (aeroworms) ............................................................ |
161 |
16 |
Troubleshoot paper issues .......................................................................................... |
162 |
|
The paper has jammed ......................................................................................................... |
162 |
|
Prints do not stack correctly in the bin ..................................................................................... |
163 |
17 |
Troubleshoot ink-system issues ................................................................................... |
164 |
|
Cannot insert an ink cartridge ............................................................................................... |
165 |
|
Cannot insert a printhead ...................................................................................................... |
165 |
|
Cannot insert the maintenance cartridge ................................................................................. |
165 |
|
Front panel recommends reseating or replacing a printhead ...................................................... |
165 |
vi |
ENWW |
18 |
Troubleshoot stacker issues ........................................................................................ |
166 |
|
|
Paper scrolling ..................................................................................................................... |
167 |
|
|
The trailing edge of the paper curling up ................................................................................ |
167 |
|
|
The paper is not completely ejected ........................................................................................ |
167 |
|
|
The front panel displays that the stacker is disconnected ........................................................... |
168 |
|
19 |
Troubleshoot other issues ........................................................................................... |
169 |
|
|
The printer is not printing ...................................................................................................... |
170 |
|
|
A job has not been printed .................................................................................................... |
170 |
|
|
The software application slows down or stalls while generating the print job ............................... |
170 |
|
|
The printer seems slow .......................................................................................................... |
171 |
|
|
Communication failures between computer and printer ............................................................. |
171 |
|
|
Cannot access the Embedded Web Server .............................................................................. |
172 |
|
|
“Out-of-memory” error message ............................................................................................. |
172 |
|
|
The platen rollers squeak ....................................................................................................... |
173 |
|
|
Cannot access the HP Utility .................................................................................................. |
175 |
|
|
Print job canceled and purged when held for preview .............................................................. |
175 |
|
|
Printer alerts ........................................................................................................................ |
175 |
|
20 Get help |
..................................................................................................................... |
177 |
|
|
Introduction ......................................................................................................................... |
178 |
|
|
HP Professional Services ....................................................................................................... |
178 |
|
|
HP Instant Support ................................................................................................................ |
179 |
|
|
HP Proactive Support ............................................................................................................ |
179 |
|
|
Customer Self Repair ............................................................................................................ |
179 |
|
|
HP Customer Care ............................................................................................................... |
180 |
|
|
HP Designjet Online ............................................................................................................. |
183 |
|
|
Other sources of information ................................................................................................. |
184 |
|
Appendix A |
Front-panel menus ....................................................................................... |
185 |
|
|
Paper menu ......................................................................................................................... |
186 |
|
|
Job management menu ......................................................................................................... |
187 |
|
|
Ink menu ............................................................................................................................. |
188 |
|
|
Setup menu ......................................................................................................................... |
189 |
|
|
Image quality maintenance menu ........................................................................................... |
192 |
|
|
Connectivity menu ................................................................................................................ |
193 |
|
|
Internal prints menu .............................................................................................................. |
194 |
|
|
Information menu ................................................................................................................. |
195 |
|
Appendix B |
Front-panel error messages .......................................................................... |
196 |
|
Appendix C |
Printer specifications ..................................................................................... |
200 |
|
|
Functional specifications ....................................................................................................... |
201 |
|
|
Physical specifications .......................................................................................................... |
202 |
|
|
Memory specifications .......................................................................................................... |
203 |
|
|
Power specifications ............................................................................................................. |
203 |
|
ENWW |
vii |
Environmental specifications .................................................................................................. |
203 |
Acoustic specifications .......................................................................................................... |
203 |
Glossary ........................................................................................................................... |
204 |
Index ............................................................................................................................... |
206 |
viii |
ENWW |

1 Introduction
●Safety precautions
●Product models
●Using this guide
●The printer’s main features
●The printer’s main components
●The Embedded Web Server’s main components
●The HP Utility’s main features
●The printer’s internal prints
●Turn the printer on and off
Introduction
ENWW |
1 |

Introduction
Safety precautions
The following precautions ensure the correct use of the printer and prevent printer damage. Use these precautions at all times.
●Use the power supply voltage that is specified on the nameplate. To avoid overloading the printer's electrical outlet, do not use the outlet for multiple devices.
●Make sure that the printer is well-grounded. Failure to ground the printer can result in electrical shock, fire, and susceptibility to electromagnetic interference.
●Do not disassemble or repair the printer yourself, unless authorized by HP (see Customer Self Repair on page 179). Contact your local HP Service Representative for service. See HP Customer Care on page 180.
●Use only the electrical cord that HP supplied with the printer. Do not damage, cut, or repair the power cord. A damaged power cord creates a risk of fire and electric shock. Replace a damaged power cord with an HP-approved power cord.
●Do not allow metal or liquids (except those used in HP Cleaning Kits) to touch the internal parts of the printer. Doing so can cause fire, electric shock, or other serious hazards.
●Turn off the printer and unplug the power cable from the power outlet in any of the following cases:
◦When you place your hands inside the printer
◦If smoke or an unusual smell emanates from the printer
◦If the printer is making an unusual noise that does not occur during normal operation
◦If a piece of metal or a liquid (not part of cleaning and maintenance routines) touches internal parts of the printer
◦During an electrical (thunder or lightning) storm
◦During a power failure
Product models
This guide covers the following product models, normally referring to them by their short names for brevity.
Full name |
Short name |
Part numbers |
|
|
|
HP Designjet T7100 |
T7100 |
CQ105A, CQ106A |
|
|
|
HP Designjet T7100 with PostScript upgrade |
T7100ps |
CQ105A, CQ106A + CQ745A |
|
|
|
HP Designjet T7100 Monochrome |
T7100 Mono |
CQ101A, CQ102A |
|
|
|
HP Designjet T7100 Monochrome with PostScript |
T7100ps Mono |
CQ101A, CQ102A + CQ745A |
upgrade |
|
|
|
|
|
2 |
Chapter 1 Introduction |
ENWW |
Using this guide
The HP Start-up Kit DVD includes this guide, which is the most complete source of information about this product, and is organized into the following chapters.
Introduction
This chapter provides a brief introduction to the printer and its documentation for new users.
Use and maintenance
These chapters help you carry out normal printer procedures and include the following topics:
●Connectivity and software instructions on page 12
●Personalize the printer on page 20
●Handle the paper on page 26
●Handle the ink system on page 44
●Print options on page 77
●Color management on page 93
●Practical printing examples on page 113
●Maintain the printer on page 139
Troubleshooting
These chapters help you solve problems that might occur while printing and include the following topics:
●Troubleshoot print-quality issues on page 147
●Troubleshoot ink-system issues on page 164
●Troubleshoot paper issues on page 162
●Troubleshoot other issues on page 169
Support
This chapter describes the various sources of information and help you can consult.
●Get help on page 177
Appendices
The appendices contain reference information on various aspects of your printer.
●Front-panel menus on page 185
●Front-panel error messages on page 196
●Printer specifications on page 200
Introduction
ENWW |
Using this guide |
3 |

Introduction
Glossary
This chapter contains definitions of printing and HP terms that are used in this documentation.
Index
In addition to the table of contents, an alphabetical index is included to help you to find topics quickly.
Warnings and Cautions
Symbols are used in this manual to ensure the proper use of the printer and to prevent printer damage. Follow the instructions that are marked with these symbols.
 WARNING! Failure to follow the guidelines that are marked with this symbol could result in serious personal injury or death.
 CAUTION: Failure to follow the guidelines that are marked with this symbol could result in minor personal injury or damage to the product.
The printer’s main features
Your printer is a color inkjet printer designed for printing high-quality images on paper up to 1067 mm (42 in) wide. Some major features of the printer are shown below:
●Print resolution of up to 2400 × 1200 optimized dots per inch (dpi) from a 1200 × 1200 dpi input, when using photo paper, the Best print-quality option, and the Maximum resolution for the photo paper option
●Two rolls (three rolls in some configurations) loaded at once provide automatic, fast and easy switching between different rolls, or long runs of unattended printing
●A six-ink system in the 7100 and a two-ink system in the 7100 Mono printer
●Accurate and consistent color reproduction with automatic color calibration in the 7100 printer
●Two black printheads enable the printer to print grayscale jobs fast with unusually good quality.
●Paper flexibility and automatic easy load, including information and presets that are available at the front panel or remotely
●High productivity features such as job previewing, nesting and autorotate
●EconoMode for printing economically
●Ink and paper usage accounting for different types of print
●Manage your printer remotely using the Embedded Web Server (see The Embedded Web Server’s main components on page 9) or the HP Utility (see The HP Utility’s main features
on page 10)
The printer’s main components
The following views illustrate the main components of the HP Designjet T7100 printer.
 WARNING! Do not try to disassemble, repair or manipulate the roll door or the rear door. Your fingers or hand may become trapped.
4 |
Chapter 1 Introduction |
ENWW |
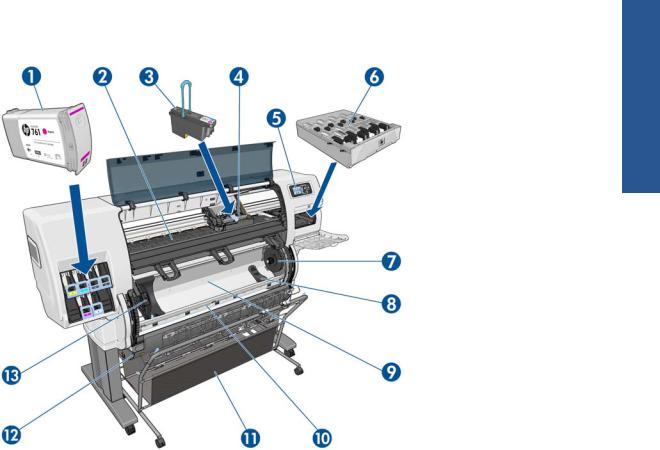
Front view
1.Ink cartridge
2.Platen
3.Printhead
4.Printhead carriage
5.Front panel
6.Maintenance cartridge
7.Right hub
8.Roll support
9.HP Smart Roll-Loading System
10.Paper feed brake
11.Bin/Basket
12.Roll door
13.Left hub
Introduction
ENWW |
The printer’s main components |
5 |

Introduction
Rear view
1.Rear door handle
2.Power switch and socket
3.Sockets for communication cables and optional accessories
The bin/basket
6 |
Chapter 1 Introduction |
ENWW |
The bin/basket is provided to store finished prints. It can be used in several different ways. |
Introduction |
|
● To stack A0 or E paper sizes only, supported by wire loops. For this purpose, the top handles |
||
|
||
should be up and the bottom handles should be down. |
|
|
● To stack A1 or D paper sizes only, supported by wire loops. For this purpose, the top handles |
|
|
should be down; the bottom handles are irrelevant. |
|
|
● To hold mixed paper sizes in the basket at the bottom. For this purpose, the top and bottom |
|
|
handles should be up. |
|
|
Before stacking A0/E or A1/D paper sizes, ensure that the bin/basket is correctly positioned below the |
|
|
paper output: push it up against the printer until it comes to a definite stop. |
|
|
The bin/basket has wheels and can easily be moved around when detached from the printer. |
|
|
The front pockets may be used to store core adaptors and printer documentation. |
|
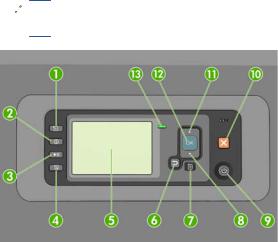
The front panel
Your printer's front panel is located on the front of the printer, on the right-hand side. It has the following important functions:
● It is used to perform certain operations, such as loading and unloading paper
● It displays up-to-date information about the status of the printer, the ink cartridges, the printheads, the maintenance cartridge, the paper, the print jobs, and other parts and processes
● It gives guidance on using the printer
● It displays warning and error messages, when appropriate, with audible alerts to call attention
● It can be used to change the values of printer settings and the operation of the printer
 NOTE: Settings in the Embedded Web Server or in the printer driver override front panel settings.
The front panel has the following components, starting with the four direct-access keys:
1.Paper loading key starts the paper loading process: see Load a roll into the printer on page 30.
2.View information key. By pressing this key repeatedly, you can see information about the loaded papers, the ink levels, the printer's connection to the computer and the printhead status. See Printing paper info on page 38.
3.Pause printing key pauses printing after finishing the current page. Press the key again to restart printing. This can be useful, for instance, when you want to change or load a roll of a different paper type.
ENWW |
The printer’s main components |
7 |

Introduction |
4. |
Form feed and cut key: see Feed and cut the paper on page 38. |
|
5. |
Front-panel display displays errors, warnings and information on using your printer. |
||
|
|||
|
6. |
Back key: To go to the previous step in a procedure or interaction. To go to the upper level, or |
|
|
|
leave the option in the menu, or when given an option. |
|
|
7. |
Menu key: Press to return to the main menu of the front-panel display. If you are already on the |
|
|
|
main menu it will display the status screen. |
|
|
8. |
Down key: To go down in a menu or option, or to decrease a value, for example when |
|
|
|||
|
|
configuring the front-panel display contrast or the IP address. |
|
|
9. |
Power key: To turn the printer off or on, it also has a light to indicate the printer's status. If the |
|
|
|
power key light is off the printer is off. If the power key light is blinking green, the printer is |
|
|
|
starting up. If the power key light is green on, the printer is on. If the power key light is amber on, |
|
|
|
the printer is in standby. If the power key light is blinking amber, the printer needs attention. |
|
|
10. |
Cancel key: To abort a procedure or interaction. |
|
|
11. |
Up key: To go up in a menu or option, or to increase a value, for example when configuring the |
|
|
|
front-panel display contrast or the IP address. |
|
|
12. |
OK key: To confirm an action while in a procedure or interaction. To enter in a submenu in the |
|
|
|
menu. To select a value when given an option. If the status screen is displayed, this key takes you |
|
|
|
to the main menu. |
|
|
13. |
Status light: Indicates the printer's status. If the Status light is solid green, the printer is ready. If it is |
|
|
|
flashing green, the printer is busy. If it is solid amber, there is a system error. If it is flashing |
|
|
|
amber, the printer needs attention. |
|
|
To highlight an item in the front-panel display, press the Up or Down key until the item is highlighted. |
||
|
To select an item in the front-panel display, first highlight it and then press the OK key. |
||
|
When this guide shows a series of front-panel display items like this: Item1 > Item2 > Item3, it |
||
|
means that you should select Item1, then select Item2, then select Item3. |
||
|
For detailed information on the front-panel menus, see Front-panel menus on page 185. |
||
|
For an annotated list of front-panel error messages, see Front-panel error messages on page 196. |
||
|
Information about specific uses of the front panel can be found throughout this guide. |
||
Printer software
The following software is provided with your printer:
●HP-GL/2 printer driver for Windows operating systems
●PostScript printer driver for Windows, Linux and Mac OS operating systems (with the PostScript upgrade)
●HP Utility (see The HP Utility’s main features on page 10)
●The Embedded Web Server, which runs in the printer and enables you to use a Web browser on any computer to check the ink levels and the printer status (see The Embedded Web Server’s main components on page 9)
TIP: See http://hplipopensource.com/hplip-web/index.html if you are using Linux.
8 |
Chapter 1 Introduction |
ENWW |

The Embedded Web Server’s main components
The Embedded Web Server is a Web server running inside the printer. Users can obtain printer information, manage settings and presets, and troubleshoot problems through the Embedded Web Server. It also allows service engineers to retrieve internal information that helps diagnose printer problems.
Access the Embedded Web Server remotely by using an ordinary Web browser running on any computer. Its features and functionality are organized within three tabs. Buttons near the top of each tabs page provide access to online help and supplies reordering.
Main tab
The Main tab provides information about the following items:
●Print jobs and managing the print queue
●Supplies status
●Paper and ink usage and accounting
●PANTONE©* emulation
Setup tab
The Setup tab includes options to complete these tasks:
●Define printer, network and security settings
●Send accounting reports and notifications of warnings and errors through email
●Update firmware
●Upload paper presets
●Set the date and time
Support tab
The Support tab contains options to complete these funtions:
●Use the Embedded Web Server Print Quality Troubleshooting wizard to help resolve some of the most common print quality issues
●Browse helpful information from a variety of sources
●Access HP Designjet links for technical support with your printer, driver and accessories
●Access service support pages that show current and historical data on the usage of your printer
●Troubleshoot image-quality
Introduction
ENWW |
The Embedded Web Server’s main components |
9 |

Introduction
The HP Utility’s main features
The HP Utility provides an easy-to-use interface that allows the user to manage and access various printer features and functionality.
●Manage the printer, including single-point color control with the HP Color Center.
●Gain access to the online HP Knowledge Center.
●View the status of the ink cartridges, the printheads and the paper.
●Manage, install, and create International Color Consortium (ICC) profiles (with the PostScript upgrade only).
●Access and use embedded profiles (with the PostScript upgrade only).
●Update the printer's firmware. See Update the printer firmware on page 144.
●Calibrate the printer and display.
●Change various printer settings (on the Settings tab).
●Configure network settings
The printer’s internal prints
The internal prints provide various kinds of information about your printer. You can request these prints from the front panel without using a computer.
Before requesting any internal print, make sure that paper is loaded and that the Ready message appears on the front-panel display.
To print an internal print, select the  icon, Internal prints, and then select the type of internal print that you want.
The following internal prints are available:
●Demo: shows some of the capabilities of the printer
●Menu map: shows details of all the front-panel menus
●Configuration: shows all the current front-panel settings
●Usage report: shows estimates of the total number of prints, number of prints by paper type, number of prints by print-quality option, and total amount of ink used per color. The accuracy of these estimates is not guaranteed.
●HP-GL/2 palette: shows the color or grayscale definitions in the currently-selected color palette
●PostScript font list: lists the PostScript fonts that are installed in the printer (with the PostScript upgrade only)
●Service information: provides information that service engineers require
10 Chapter 1 Introduction |
ENWW |
Turn the printer on and off
TIP: The printer can be left powered on without wasting energy. Leaving it on improves response time and overall system reliability. When the printer has not been used for a certain period of time (the default time is determined by Energy Star), it saves power by going into sleep mode. However, any interaction with the printer's front-panel display, or sending a new job to print, returns it to active mode, and it can resume printing immediately. To change the sleep mode time, see Change the sleep mode setting on page 22.
 NOTE: In sleep mode, the printer performs maintenance service to the printheads from time-to-time. This avoids long preparation times after long idle periods. Therefore, it is strongly recommended to leave the printer powered on or in sleep mode to avoid wasting ink and time.
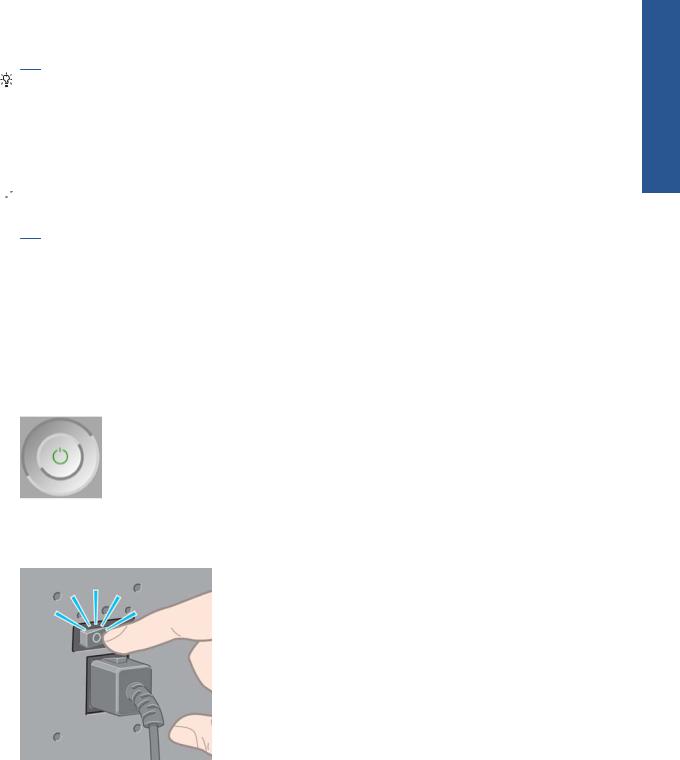
The printer has three levels of power consumption.
●Plugged in: the power cord is plugged into the back of the printer
●Switched on: the switch at the back of the printer is in the on position
●Powered on: the Power key on the front panel shows a green light
If you wish to turn the printer on or off or reset the printer, the normal and recommended method is to use the Power key on the front panel.
However, if you plan to store the printer indefinitely or the Power key does not seem to work, you are recommended to power it off using the Power key, and then also switch off the power switch at the rear.
To turn it back on, use the power switch at the rear.
When the printer is powered back on, it takes about three minutes to initialize and check and prepare the printheads. Preparing the printheads takes about one minute and 15 seconds. However, if the printer has been off for six weeks or more, preparing the printheads could take up to 45 minutes.
Introduction
ENWW |
Turn the printer on and off 11 |

2Connectivity and software instructions
Connectivity
●Choose which connection method to use
●Connect to a network (Windows)
●Connect directly to a computer (Windows)
●Uninstall the printer driver (Windows)
●Connect to a network (Mac OS)
●Connect directly to a computer (Mac OS)
●Uninstall the printer software (Mac OS)
12 |
Chapter 2 Connectivity and software instructions |
ENWW |
Choose which connection method to use
The following methods can be used to connect your printer.
Connection type |
Speed |
Cable length |
Other factors |
|
|
|
|
Gigabit Ethernet |
Very fast; varies according to |
Long: 100 m (328 ft) |
Requires extra equipment |
|
network traffic |
|
(switches). |
|
|
|
|
Jetdirect print server (optional |
Moderate; varies according |
Long: 100 m (328 ft) |
Requires extra equipment |
accessory) |
to network traffic |
|
(switches). |
|
|
|
Useful for wireless or |
|
|
|
AppleTalk connection, and |
|
|
|
for Novell printing. |
|
|
|
|
USB 2.0 (optional accessory) |
Very fast |
Short: 5 m (16 ft) |
|
|
|
|
|
 NOTE: The speed of any network connection depends on all components used in the network, which may include network interface cards, hubs, routers, switches and cables. If any one of these components is not capable of high-speed operation, you will find that you have a low-speed connection. The speed of your network connection can also be affected by the total amount of traffic from other devices on the network.
NOTE: There are various possible ways of connecting the printer to a network, but only one of them can be active at a time; with the exception of the Jetdirect print server, which can be active at the same time as one other network connection.
Connect to a network (Windows)
Once the network cable is connected and the printer is powered up, it automatically obtains an IP address. You need to perform the following steps to configure the printer in the network:
1.Go to your printer's front panel and select the Connectivity menu icon  , then Gigabit Ethernet or Jetdirect EIO, then View configuration.
2.Note the IP address of your printer.
3.Insert the HP Start-Up Kit DVD into your computer. If the DVD does not autorun, run the setup.exe program in the root folder of the DVD.
4.Press the Software Installation button.
5.Press the Express Network Install button.
6.The configuration program will look for printers connected to your network. When the search has finished, a list of printers will be displayed. Identify your printer by its IP address and select it from the list.
If your printer does not appear in the list, select Help me find my network printer and click Next. In the next screen, give the IP address of your printer.
Connectivity
ENWW |
Choose which connection method to use 13 |

Connect directly to a computer (Windows)
You can connect your printer directly to a computer without going through a network, by using the printer's USB 2.0 socket.
|
1. |
Do not connect the computer to the printer yet. You must first install the printer driver |
|
|
|
software on the computer, as follows. |
|
|
2. |
Insert the HP Start-Up Kit DVD into your DVD drive. If the DVD does not autorun, run the |
|
|
|
setup.exe program in the root folder of the DVD. |
|
Connectivity |
3. |
Press the Software Installation button. |
|
4. |
Press the Custom Install button. |
||
|
|||
|
5. |
Follow the instructions on your screen to set up the printer. The following notes will help you to |
|
|
|
understand the screens and make appropriate choices. |
● You may see a message warning that the installer will have to communicate through the Windows Firewall to search for printers on the network. As you intend to set up a direct connection, select Continue installation without searching the network and click Next.
● When asked how the printer is connected, choose USB cable.
● When prompted to do so, connect your computer to the printer, using a USB cable. Ensure that the printer is switched on.
Uninstall the printer driver (Windows)
1.Insert the HP Start-Up Kit DVD into your DVD drive. If the DVD does not autorun, run the setup.exe program in the root folder of the DVD.
2.Press the Software Installation button.
3.Press the Modify Installation button, and follow the instructions on your screen to uninstall the printer driver.
Connect to a network (Mac OS)
You can connect your printer to a network under Mac OS by using the following methods:
●Bonjour
●TCP/IP
 NOTE: The printer does not support AppleTalk.
Before you begin, check your equipment:
●The printer should be set up and on.
●The Ethernet hub or router should be on and functioning correctly.
●All computers on the network should be on and connected to the network.
●The printer should be connected to the network.
14 |
Chapter 2 Connectivity and software instructions |
ENWW |

Now you can proceed to install the printer software and connect your printer.
Bonjour connection
1.Go to your printer's front panel and select the Connectivity menu icon  , then Gigabit Ethernet or Jetdirect EIO, then View configuration. Note the mDNS service name of your printer.
2.Insert the HP Start-up Kit DVD into your DVD drive.
3.Open the DVD icon on your desktop.
Connectivity
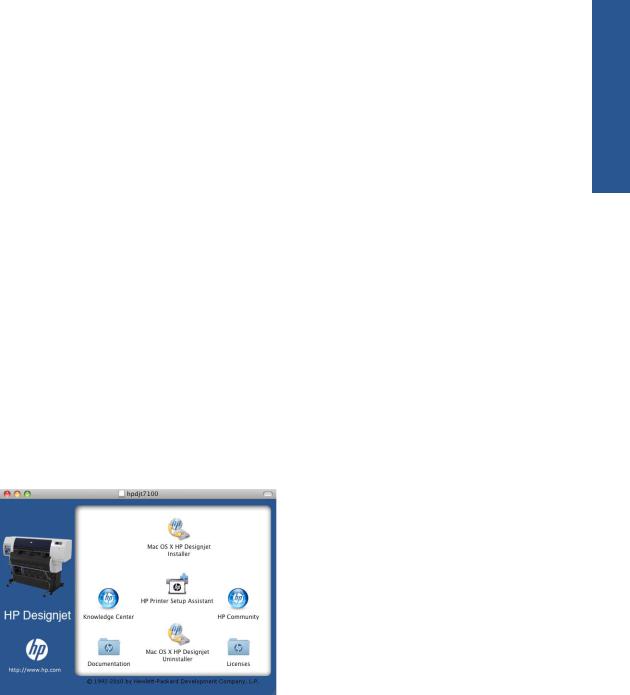
4.Open the Mac OS X HP Designjet Installer icon.
5.Follow the instructions on your screen. You are recommended to use the Easy Install option.
6.The printer software is installed, including the printer driver and the HP Utility.
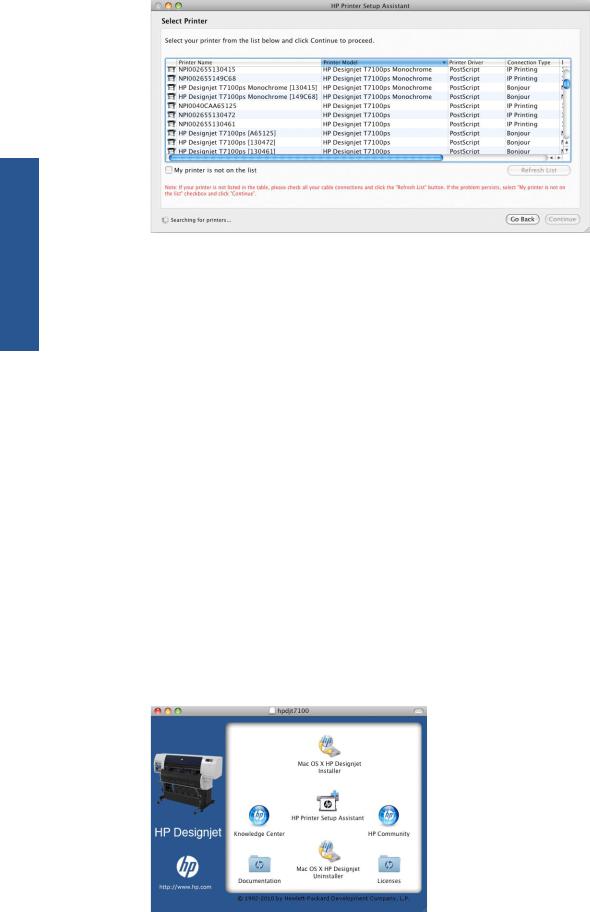
7.When the software has been installed, the HP Printer Setup Assistant starts automatically, to set up a connection to your printer. Follow the instructions on your screen.
8.When you reach the Select Printer screen, look for your printer's mDNS service name (which you noted in step 1) in the Printer Name column.
ENWW |
Connect to a network (Mac OS) 15 |
Connectivity |
● |
If you find the right printer name, scroll sideways to see the Connection Type column, and |
|
||
|
|
check that it shows Bonjour. Then highlight that line. Otherwise, continue searching further |
|
|
down the list. |
● If you cannot find your printer name with a Bonjour connection type, check the box My printer is not in the list.
Click Continue.
9.Continue following the instructions on the screen. When you reach the Printer Queue Created screen, click Quit to exit, or Create New Queue if you want to connect another printer to the network.
10.When the HP Printer Setup Assistant has finished, you can remove the DVD from the DVD drive.
If the printer driver is already installed, the HP Printer Setup Assistant can be run at any time from the DVD.
TCP/IP connection
1. Go to your printer's front panel and select the Connectivity menu icon  , then Gigabit Ethernet or Jetdirect EIO, then View configuration.
2.Note the URL of your printer.
3.Insert the HP Start-up Kit DVD into your DVD drive.
4.Open the DVD icon on your desktop.
16 |
Chapter 2 Connectivity and software instructions |
ENWW |
5.Open the Mac OS X HP Designjet Installer icon.
6.Follow the instructions on your screen. You are recommended to use the Easy Install option.
7.The printer software is installed, including the printer driver and the HP Utility.
8.When the software has been installed, the HP Printer Setup Assistant starts automatically, to set up a connection to your printer. Follow the instructions on your screen.
9.When you reach the Select Printer screen, look for your printer's URL (which you noted in step 1) in the Printer Name column.
●If you find the right printer name, scroll sideways to see the Connection Type column, and check that it shows IP Printing. Then highlight that line. Otherwise, continue searching further down the list.
●If you cannot find your printer name with an IP Printing connection type, check the box My printer is not in the list.
Click Continue.
10.Continue following the instructions on the screen. When you reach the Printer Queue Created screen, click Quit to exit, or Create New Queue if you want to connect another printer to the network.
11.When the HP Printer Setup Assistant has finished, you can remove the DVD from the DVD drive.
If the printer driver is already installed, the HP Printer Setup Assistant can be run at any time from the DVD.
Connect directly to a computer (Mac OS)
You can connect your printer directly to a computer without going through a network, by using the printer's built-in USB 2.0 socket.
1.Make sure the printer is either turned off or disconnected from the computer.
2.Insert the HP Start-up Kit DVD into your DVD drive.
3.Open the DVD icon on your desktop.
4.Open the Mac OS X HP Designjet Installer icon.
5.Follow the instructions on your screen. You are recommended to use the Easy Install option.
Connectivity
ENWW |
Connect directly to a computer (Mac OS) 17 |

6.The printer software is installed, including the printer driver and the HP Utility.
7.When the software has been installed, the HP Printer Setup Assistant starts automatically, to set up a connection to your printer.
8.Make sure that the printer is turned on and connected to the computer with a certified USB cable.
|
|
|
|
|
NOTE: The use of non-certified USB cables can lead to connectivity problems. Only cables |
|
|
|
|
||
|
|
|
|
||
|
|
|
|
certified by the USB Implementor's Forum (http://www.usb.org/) should be used with this printer. |
|
|
9. |
|
|
In the HP Printer Setup Assistant, click Continue. |
|
|
|
|
|||
|
10. |
|
In the list of printers that appears, select the entry that uses the connection type USB, and click |
||
Connectivity |
|
|
|
|
Continue. |
11. |
|
The following screen displays information about your printer's installation, where the name of the |
|||
|
|
||||
|
|
|
|
|
printer can be modified. Make any changes you wish to make, and click Continue. |
|
12. |
|
Your printer is now connected. In the Printer Queue Created screen, click Quit to exit, or Create |
||
|
|
|
|
|
New Queue if you want to connect another printer. |
|
13. |
|
When the HP Printer Setup Assistant has finished, you can remove the DVD from the DVD drive. |
||
|
|
|
|
|
|
If the printer driver is already installed, the HP Printer Setup Assistant can be run at any time from the DVD.
Sharing the printer
If your computer is connected to a network, you can make your directly connected printer available to other computers on the same network.
1.Double-click the System Preferences icon on the Dock menu bar on your desktop.
2.Go to Sharing, select Printer Sharing, and then check the printer(s) that you want to share.
3.Your printer now automatically appears in the list of shared printers displayed by any other computer running Mac OS and connected to your local network.
Any other people wishing to share your printer must install the printer software on their own computers.
Anyone sharing your printer will be able to send print jobs, but will not be able to receive information from the printer—which affects printer alerts, printer status reports, paper management, printer administration and troubleshooting.
You may find that sharing your directly connected printer with other users will slow down your computer unacceptably.
TIP: The best way to share the printer over a network is to connect the printer not to any computer, but to the network. See Connect to a network (Mac OS) on page 14.
Uninstall the printer software (Mac OS)
1.Insert the HP Start-up Kit DVD into your DVD drive.
2.Open the DVD icon on your desktop.
3.Open the Mac OS X HP Designjet Uninstaller, and follow the instructions on your screen to uninstall the printer software.
18 |
Chapter 2 Connectivity and software instructions |
ENWW |

To delete the print queue:
1.From the system preferences, select the Print & Fax dialog.
2.Select the name of the printer and click the – button.
Connectivity
ENWW |
Uninstall the printer software (Mac OS) 19 |

3 Personalize the printer
settings Personal
●Change the language of the front-panel display
●Access the HP Utility
●Access the Embedded Web Server
●Change the language of the HP Utility
●Change the language of the Embedded Web Server
●Change the sleep mode setting
●Turn the buzzer on and off
●Change the front-panel display contrast
●Change the units of measurement
●Configure network settings
●Change the graphic language setting
●Paper suitability options
20 Chapter 3 Personalize the printer |
ENWW |

Change the language of the front-panel display
There are two possible ways to change the language of the front-panel menus and messages.
●If you can understand the current front-panel display language, select the Setup menu icon  , then Front panel options > Select language.
●If you cannot understand the current front-panel display language, start with the printer powered off. At the front panel, press the OK key and hold it down. While holding the OK key down, press the Power key and hold it down. Continue to hold down both keys until the green light on the right side of the front-panel display starts flashing, and then release both keys. You can expect a delay of about one second. If the green light starts flashing without any delay, you may need to start again.
Whichever method you used, the language selection menu should now appear on the front-panel display. Highlight your preferred language with the Up and Down keys, then press the OK key.
When you have selected your preferred language, turn off the printer with the Power key and then turn it on again. The front panel will appear in the selected language.
Access the HP Utility
The HP Utility enables you to manage your printer from a computer with a USB, TCP/IP or Jetdirect connection.
●Under Windows, start the HP Utility from your desktop shortcut or from Start > All Programs > Hewlett-Packard > HP Utility > HP Utility. This launches the HP Utility, showing the printers installed on your computer.
●Under Mac OS, launch the HP Utility from your dock shortcut or by selecting STARTUP_DISK > Library > Printers > hp > Utilities > HP Utility. This launches the HP Utility, showing the printers installed on your computer.
When you select your printer in the left pane, everything that appears in the right pane is specific to that printer.
If you have followed these instructions but failed to get through to the HP Utility, see Cannot access the HP Utility on page 175.
Access the Embedded Web Server
The Embedded Web Server enables you to manage your printer remotely using an ordinary Web browser running on any computer.
To access the Embedded Web Server directly, you must have a TCP/IP connection to your printer. However, you can access the Embedded Web Server indirectly through the HP Utility, if you connect to your printer with a USB connection.
The following browsers are known to be compatible with the Embedded Web Server:
●Internet Explorer 6 and later, for Windows
●Safari 2 and later, for Mac OS X
●Firefox 1.5 and later
Personal settings
ENWW |
Change the language of the front-panel display |
21 |

settings Personal
To access the Embedded Web Server on any computer, open your Web browser and give the IP address of your printer.
You can find your printer's IP address by selecting the Connectivity menu icon  , then Gigabit Ethernet or Jetdirect EIO, then View configuration.
If you have followed these instructions but failed to get through to the Embedded Web Server, see Cannot access the Embedded Web Server on page 172.
Change the language of the HP Utility
The HP Utility can work in the following languages: English, Portuguese, Spanish, Catalan (Windows only), French, Italian, German, Russian, Simplified Chinese, Traditional Chinese, Korean and Japanese.
●Under Windows, select Tools > Set Language and select a language from the list.
●Under Mac OS, the language is changed as for any other application. In System Preferences, select International and re-launch the application.
Change the language of the Embedded Web Server
The Embedded Web Server can work in the following languages: English, Portuguese, Spanish, Catalan, French, Italian, German, Russian, Simplified Chinese, Traditional Chinese, Korean and Japanese. It uses whichever language you have specified in your Web browser's options. If you have specified a language that it cannot support, it works in English.
To change the language, you must change your Web browser's language setting. For example, in Internet Explorer version 6, go to the Tools menu and select Internet Options, Languages. Then ensure that the language you want is at the top of the list in the dialog box.
Change the sleep mode setting
If the printer is left switched on but unused for a certain period of time, it goes automatically into sleep mode to save power. To change the time the printer waits before it goes into sleep mode, go to the
front panel and select the Setup menu icon  , then Front panel options > Sleep mode wait
time. Highlight the wait time you want and then press the OK key. You can set the time from 1 to 240 minutes. The default time is 30 minutes.
Turn the buzzer on and off
To turn the printer's buzzer on or off, go to the front panel and select the Setup menu icon  , then
Front panel options > Enable buzzer, and highlight on or off and press the OK key. By default, the buzzer is set to on.
Change the front-panel display contrast
To change the contrast of the front-panel display, select the Setup menu icon  , then Front panel
options > Select display contrast, and enter a value using the Up or Down key. Press the OK key to set the value. The default contrast is set to 50.
22 Chapter 3 Personalize the printer |
ENWW |
Loading...