


FV 37 GB
FV 34D GB
A 2211
Electric ventilated oven
Instructions for installation and use

Congratulations on choosing an Ariston appliance, which you will find is dependable and easy to use. We recommend that you read this manual for best performance and to extend the life of your appliance. Thank you.
Close-up View
A.Control Panel
B.Knob for selecting the cooking features
C.Variable Grill Knob
D.Electronic Programer (only on a few models) - This feature allows you to set the length and end cooking time for any of the cooking features. It also has a timer feature.
D1.Country Style Clock and Timer (only on a few models).
E.Oven Light (only on certain models) - When the light is on, it indicates that the oven is heating. It will turn off when the temperature setting has been reached.
F.Drip pan
G.Oven Racks
H.Guides for sliding the racks or drip pan in and out
A |
MAX |
50 |
|
|
75 |
||
220 |
100 |
||
180 |
|||
|
140 |
G


MAX
1/2
MIN
 H
H
 F
F
E
E
|
|
MAX |
|
|
MAX |
|
|
1/2 |
|
|
1/2 |
MAX |
50 |
|
MAX |
50 |
|
220 |
75 |
|
|
75 |
|
100 |
MIN |
220 |
100 |
MIN |
|
|
|
||||
180 |
140 |
|
180 |
140 |
|
B |
D |
C |
B |
D1 |
C |
How To Use Your Appliance
The various cooking fetures offered by your oven can be selected using the "B" setting knob and variable grill knob (C) located on the control panel.
Attention: The first time you use the oven we recommend that you set the thermostat on the hightest setting and leave the oven on for about a half of an hour with nothing in it. Then, open the oven door and let the room air. The odour that is often detected during this initial use is due to the evaporation of substances used to protect the oven during storage and until it is installed.
N.B.: Should the appliance be equipped with an electronic programmer, to use the electric oven, just press button


 (the
(the  symbol will appear on the display) before selecting the desired cooking function.
Using the oven
When the oven control knob (B) is turned in a clockwise direction to the symbol 


 the fan and oven light will come on to assist in the defrosting of frozen food. Rotating further to the complete range of temperatures shown on the dial you can choose which is most suitable for the
food you are going to cook. The temperature is reached automatically and controlled by the oven thermostat (from 50°C to 240°C).
Note: Whilst using tag oven for conventional cooking knob (C) must be set with “MAX” in line with the reference mark on the control panel.
Grill 
The top centre heating element will come on and the rotisserie motor (if present) will be activated. On this setting, food is cooked by the thermal radiation given off in the downward direction by the electric heating element. The very high temperature and direct heat of the grill make it possible to brown meats on the surface while locking in the juices to keep them tender.
Double Grill 

Both of the top heating elements turn on and the rotisserie motor (if present) is activated.
This over-sized grill has a completely new design, which is the reason why cooking efficiency has increased by 50%. In addition, the double grill eliminates heat gaps in the corners of the oven.
2
Oven Light
The light comes on when the "B" knob is turned to the 


 setting. The light illuminates the oven and remains on when any of the heating elements is turned on.
Forced Air Ventilation
In order to reduce the external temperature of the oven, some models have been equipped with a cooling fan which comes on when the "B" knob is turned to a cooking setting. The fan remains on during the cooking process and a flow of air can be heard exiting between the oven door and the control panel.
After you have finished cooking, it a good idea to keep the fan on for a few minutes by setting the thermostat knob to "•" in order to allow the oven to cool down rapidly.
3rd Oven Glass
This appliance conforms to all relevant European Standards regarding surface temperatures, however, in order to further decrease the temperature of the oven door and reduce energy consumption, a supplementary kit has been made available as an optional extra. The fitting of this kit should be considered, if energy saving is desirable or if young children may be present. To purchase the supplementary kit code 053413 contact your nearest Merloni Service Centre.
Warning
Only use the bottom shelf of the oven when using the rotisserie to cook (where present). For all other types of cooking, never use the bottom shelf and never place anything on the bottom of the oven when it is in operation because this could damage the enamel. Always place your cookware (dishes, aluminium foil, etc. etc.) on the grate provided with the appliance inserted especially along the oven guides.
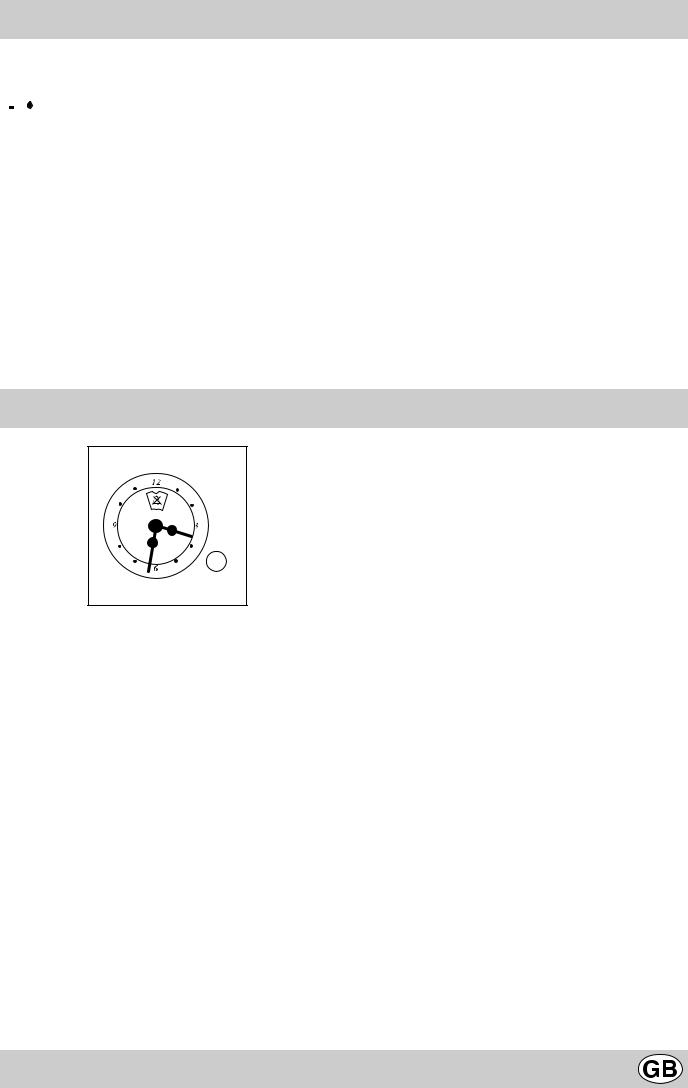
Country Style Clock and Timer
How to Set the Current Time
The oven must be connected to the power supply.
Pull and turn the knob in the clockwise direction to set the time.
N.B.: The clock is electric. Therefore, in the event of a power outage, the clock will stop for the entire time the oven remains without power.When the power comes back on, the clock must be reset to the current time
Timer Feature
The timer operates by counting down a given period of time. This feature does not, however, turn the oven on or off. It merely emits an acoustical alarm when the time has run out.
How to Set the Timer
Turn the knob until the indicator is set on the length of time desired (using the inside numbers).The time is clearly visible through the transparent window on the indicator itself.
The timer will begin to count down immediately.
The sound will stop automatically after approximately 2 minutes and the timer will be set to the  symbol (clock function).
To turn off the buzzer, or to use only the clock, set the indicator on the  symbol.
3
 Loading...