


Operating instructions
DISHWASHER
|
|
|
|
|
|
|
|
|
|
|
|
|
|
|
|
Contents |
|
|
|
|
|
|
|
|
EN |
|
|
EN |
|
DE |
|
NL |
|
||
|
|
|
|
|
||||
|
|
|
|
|
|
|||
|
|
|
|
|
|
|
Product Fiche, 2 |
|
English,1 |
Deutsch, 15 |
Nederland, 29 |
|
|||||
|
|
|
|
|
|
|
Precautions and advice , 3 |
|
|
|
|
|
|
|
|
|
|
|
PL |
|
CS |
|
SK |
|
General safety |
|
|
|
|
|
Disposal |
|
|||
|
|
|
|
|
|
|
|
|
|
Polski, 43 |
Česky, 57 |
Slovensky, 71 |
Saving energy and respecting the environment |
|
|||
|
|
|
||||||
|
|
|
|
|
|
|
Installation and Assistance, 4-5 |
|
|
|
|
|
|
|
|
Positioning and levelling |
|
|
|
|
|
|
|
|
Connecting the water and electricity supplies |
|
|
|
|
|
|
|
|
Advice regarding the first wash cycle |
|
|
|
|
|
|
|
|
Technical data |
|
|
|
|
|
|
|
|
Assistance |
|
LTF 11S111
Description of the appliance, 6
Overall view Control panel
Loading the racks, 7-8
Lower rack
Upper rack
Adjusting upper rack
Third rack
Start-up and use, 9
Starting the dishwasher
Measuring out the detergent
Wash cycles, 10
Table of wash cycles
Special wash cycles and Options, 11
Rinse aid and refined salt, 12
Measuring out the rinse aid Measuring out the refined salt
Care and maintenance, 13
Shutting off the water and electricity supplies Cleaning the dishwasher
Preventing unpleasant odours Cleaning the sprayer arms Cleaning the water inlet filter Cleaning the filters
Leaving the machine unused for extended periods
Troubleshooting, 14
1

Product Fiche
|
|
|
|
|
|
|
|
|
|
|
|
|
|
|
|
|
|
EN |
|
|
|
|
|
|
|
|
|
Product Fiche |
|
|
|
|
|
|
|
|
|
|
|
|
|
|
||
|
|
Brand |
|
|
HOTPOINT ARISTON |
|
||
|
|
|
|
|
|
|
||
|
|
Model |
|
|
LTF 11S111 |
|
||
|
|
|
|
|
|
|
|
|
|
|
Rated capacity in standard place settings (1) |
|
|
15 |
|
|
|
|
|
|
|
|
|
|||
|
|
Energy efficiency class on a scale from A+++ (low consumption) to D |
(high consumption) |
A+ |
|
|||
|
|
|
|
|
|
|
|
|
|
|
Energy consumption per year in kWh (2) |
|
|
302.0 |
|
|
|
|
|
|
|
|
|
|
|
|
|
|
Energy consumption of the standard cleaning cycle in kWh |
|
|
1.07 |
|
|
|
|
|
|
|
|
|
|
|
|
|
|
Power consumption of the off-mode in W |
|
|
0.5 |
|
|
|
|
|
|
|
|
|
|
|
|
|
|
Power consumption of the left-on mode in W |
|
|
5.0 |
|
|
|
|
|
|
|
|
|
|
|
|
|
|
Water consumption per year in litres (3) |
|
|
3080.0 |
|
|
|
|
|
|
|
|
||||
|
|
Drying efficacy class on a scale from G (low efficacy) to A (high efficacy) |
A |
|
||||
|
|
|
|
|
|
|
||
|
|
Programme time for standard cleaning cycle in minutes |
|
|
195’ |
|
||
|
|
|
|
|
|
|
|
|
|
|
The duration of the left-on mode in minutes |
|
|
10 |
|
|
|
|
|
|
|
|
|
|
|
|
|
|
Noise in dB(A) Re 1pW |
|
|
42 |
|
|
|
|
|
|
|
|
|
|
||
|
|
Built-in model |
|
|
Yes |
|
||
|
|
|
|
|
|
|
|
|
|
|
|
|
|
|
|
|
|
|
|
NOTES |
|
|
|
|
|
|
|
|
1) The information on the label and fiche relates to the standard cleaning cycle, this programme is suitable to clean normally soiled |
|
|||||
|
|
tableware and it is the most efficient programme in terms of combined energy and water consumption. The standard cleaning cycle |
|
|||||
|
|
corresponds to the Eco cycle. |
|
|
|
|
|
|
|
|
|
|
|||||
|
|
2) Based on 280 standard cleaning cycles using cold water fill and the consumption of the low power modes. Actual energy |
|
|||||
|
|
consumption depends on how the appliance is used. |
|
|
|
|
|
|
|
|
|
|
|
||||
|
|
3) Based on 280 standard cleaning cycles. Actual water consumption |
depends on how the appliance is used. |
|
||||
|
|
|
|
|
|
|
|
|
2

Precautions and advice
 This appliance was designed and manufactured in compliance with international safety standards The following information has been provided for safety reasons and should therefore be read
carefully.
Keep this instruction manual in a safe place for future reference. If the appliance is sold, given away or moved, please ensure the manual is kept with the
machine.
Please read these instructions carefully: they contain important information on installation, use and safety.
This appliance is designed for domestic use or similar applications, for example:
-staff kitchen areas in shops, offices and other work environments;
-farmhouses;
-use by guests in hotels, motels and other residential settings;
-bed & breakfasts.
General safety
•The appliance should not be operated by people
(including children) with reduced physical, sensory or mental capacities, or by inexperienced people who are not familiar with the product, unless supervision or instructions on how to use it are provided by someone who assumes responsibility for their safety.
•An adult must supervise children at all times to prevent them from playing with the appliance.
•The appliance was designed for domestic use inside the home and is not intended for commercial or industrial use.
•The appliance must be used by adults only to wash domestic crockery in accordance with the instructions in this manual.
•The appliance must not be installed outdoors, even in covered areas. It is extremely dangerous to leave the machine exposed to rain and storms.
•Do not touch the appliance when barefoot.
•When unplugging the appliance always pull the plug from the mains socket. Do not pull on the cable.
•The water supply tap must be shut off and the plug should be removed from the electrical socket before cleaning or maintaining the appliance.
•If the appliance breaks down, do not under any circumstances touch the internal parts in an attempt to perform the repair work yourself.
•Do not lean or sit on the open door of the appliance: this may cause the appliance to overturn.
•The door should not be left open as it may create a dangerous obstacle.
•Keep detergent and rinse aid out of reach of children.
•The packaging material should not be used as a toy for children.
Disposal |
|
|
EN |
||
• Disposal of packaging material: observe local |
||
|
||
legislation so that the packaging may be reused. |
|
|
|
||
• The European Directive 2012/19/EU relating |
|
|
to Waste Electrical and Electronic Equipment |
|
|
(WEEE) states that household appliances should |
|
|
not be disposed of using the normal solid urban |
|
|
waste cycle. Exhausted appliances should be |
|
|
collected separately in order to optimise the re- |
|
|
using and recycling rate of the materials inside the |
|
|
machine, while preventing potential damage to |
|
|
the environment and public health. The crossed- |
|
|
out dustbin symbol is marked on all products to |
|
|
remind the owners of their obligations regarding |
|
|
separated waste collection. |
|
|
For further information relating to the correct |
|
|
disposal of household appliances, owners may |
|
|
contact the relevant public authority or the local |
|
|
appliance dealer. |
|
|
Saving energy and respecting the |
|
|
environment |
|
Saving water and energy
•Only begin a wash cycle when the dishwasher is full. While waiting for the dishwasher to be filled, prevent unpleasant odours using the Soak cycle
(see Wash cycles).
•Select a wash cycle that is suited to the type of crockery and to the soil level of the crockery using the Table of wash cycles:
-for dishes with a normal soil level use the Eco wash cycle, which ensures low energy/water consumption levels.
-If the load is smaller than usual activate the Half
Load option* (see Start-up and use).
•If your electricity supply contract gives details of electricity-saving time bands, run wash cycles when electricity prices are lower. The Delayed
Start button * (see Start-up and use) helps you organise the wash cycles accordingly.
Phosphate-free and chlorine-free detergents containing enzymes
•We strongly recommend that you use detergents that do not contain phosphates or chlorine, as these products are harmful to the environment.
•Enzymes provide a particularly effective action at temperatures around 50°C. As a result detergents containing enzymes can be used in conjunction with low-temperature wash cycles in order to achieve the same results as a normal 65°C wash cycle.
•To avoid wasting detergent, use the product in appropriatequantitiesbasedonthemanufacturer’s recommendations, the hardness of the water, the soil level and the quantity of crockery to be washed. Even if they are biodegradable, detergents contain substances which may alter the balance of nature.
*Only available in selected models.
3
Installation
EN |
|
|
If the appliance must be moved at any time, keep it in an |
|
|
|
|||
upright position; if absolutely necessary, it may be tilted onto its |
||||
|
||||
|
back. |
|||
Positioning and levelling
1.Remove the appliance from all packaging and check that it has not been damaged during transportation. If it has been damaged, contact the retailer and do not proceed any further with the installation process.
2.Arrange the dishwasher so that its sides or back panel are in contact with the adjacent cabinets or the wall. This appliance
can also be recessed under a single worktop* (see the Assembly Instruction sheet.)
3. Position the dishwasher on a level sturdy floor. If the floor is uneven, the front feet of the appliance should be adjusted until it reaches a horizontal position. If the appliance is levelled correctly, it will be more stable and much less likely to move or cause vibrations and noise while it is operating.
4*. To adjust the height of the rear foot, turn the red hexagonal bushing on the lower central part at the front of the dishwasher using a hexagonal spanner with an opening of 8 mm. Turn the spanner in a clockwise direction to increase the height and in an anticlockwise direction to decrease it (see Building-in Instruction sheet attached to the documentation.)
Connecting the water and electricity supplies
 Connection to the water and electricity supplies should only be performed by a qualified technician.
 The dishwasher should not stand on the water hoses or electricity supply cable.
 The appliance must be connected to the water supply network using new hoses.
Do not use old piping.
The water inlet and outlet hoses and the electricity supply cable may be positioned towards the right or the left in order to achieve the best possible installation.
Connecting the water inlet hose
•To a suitable cold water connection point: before attaching the hose, run the water until it is perfectly clear so that any impurities that may be present in the water do not clog the appliance; after performing this operation, screw the inlet hose tightly onto a tap with a ¾ gas threaded connection.
•To a suitable hot water connection point: your dishwasher may be supplied with hot water from the mains supply (if you
have a central heating system with radiators) provided that it does not exceed a temperature of 60°C.
 Screw the hose to the tap as described for connection to a cold water supply.
 If the inlet hose is not long enough, contact a specialist store or an authorised technician (see Assistance.)
 The water pressure must be within the values indicated in the Technical Data table (see adjacent information.)
The hose should not be bent or compressed.
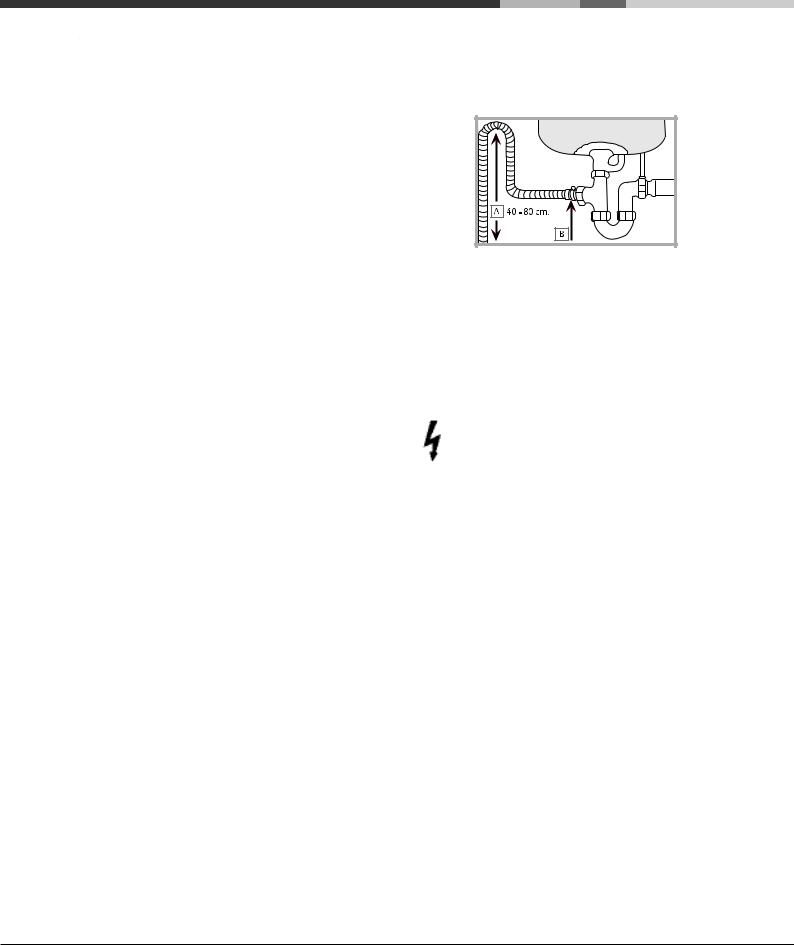
Connecting the water outlet hose
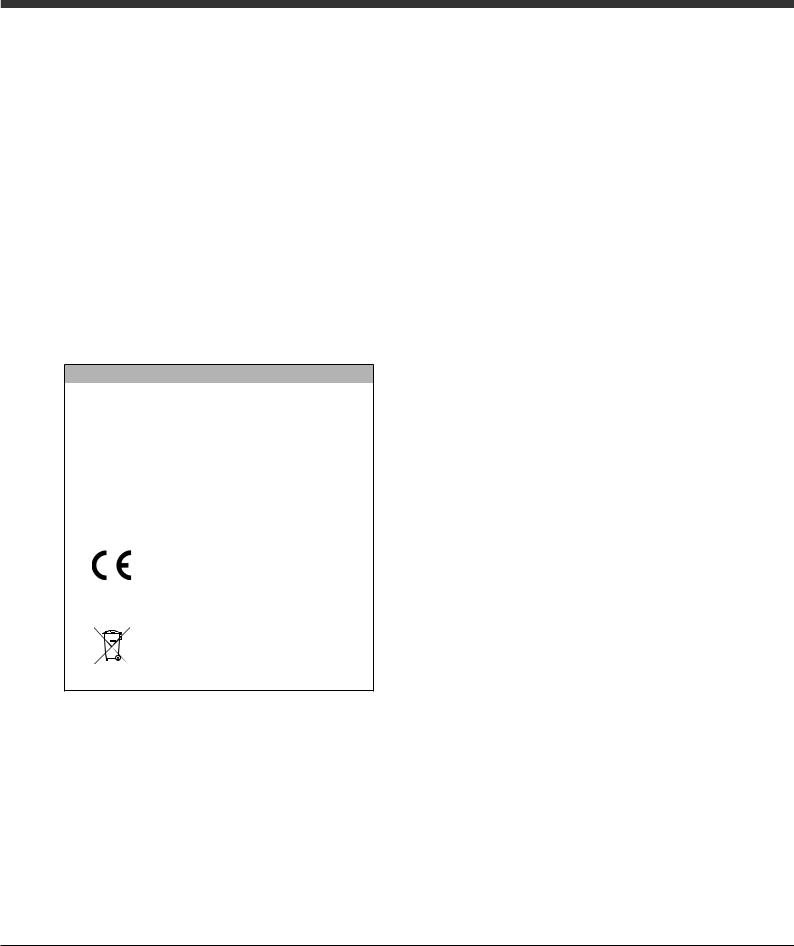
Connect the outlet hose (without bending it) to a drain duct with a minimum diameter of 4 cm.
The outlet hose must be at a height ranging from 40 to 80 cm from the floor / surface where the dishwasher rests (A).
Before connecting the water outlet hose to the sink drain, remove the plastic plug (B).
Anti-flooding protection
To ensure floods do not occur, the dishwasher:
- is provided with a special system which blocks the water supply in the event of anomalies or leaks from inside the appliance.
Some models are also equipped with the supplementary safety device New Acqua Stop*, which guarantees anti-flooding protection even in the event of a supply hose rupture.
WARNING: HAZARDOUS VOLTAGE!
Under no circumstances should the water inlet hose be cut, as it contains live electrical parts.
Electrical connection
Before inserting the plug into the electrical socket, make sure that:
•The socket is earthed and complies with current regulations.
•the socket can withstand the maximum load of the appliance, which is indicated on the data plate located on the inside of the door
(see Description of the appliance);
•The power supply voltage falls within the values indicated on the data plate on the inside of the door.
•The socket is compatible with the plug of the appliance. If this is not the case, ask an authorised technician to replace the plug (see Assistance); do not use extension cables or multiple sockets.
 Once the appliance has been installed, the power supply cable and the electrical socket should be easily accessible.
 The cable should not be bent or compressed.
 If the power supply cable is damaged, it must be replaced by the manufacturer or its Technical Assistance Service in order to prevent all potential hazards (see Assistance.)
* Only available in selected models.
4
Anti-condensation strip*
After installing the dishwasher, open the door and stick the adhesive transparent strip under the wooden shelf in order to protect it from any condensation which may form.
Advice regarding the first wash cycle
After the installation, remove the stoppers from the racks and the retaining elastic elements from the upper rack, if any. Immediately before the first washing, completely fill the salt dispenser with water and add only then approximately 1 kg of salt (see chapter entitled Rinse aid and refined salt). The water may overflow: this is normal and is not a cause for concern. Select the water hardness value (see chapter entitled Rinse aid and refined salt). - After the salt has been poured into the machine, the LOW SALT indicator light* switches off.
 If the salt container is not filled, the water softener and the heating element may be damaged as a result.
Technical data
Dimensions |
width 59.5 cm |
||
height 82 cm |
|||
|
|
|
depth 57 cm |
Capacity |
15 standard place-settings |
||
Water supply |
0,05 ÷ 1MPa (0.5 ÷ 10 bar) |
||
pressure |
7,25 – 145 psi |
||
Power supply voltage |
See appliance data plate |
||
Total absorbed power |
See appliance data plate |
||
|
|
||
Fuse |
See appliance data plate |
||
|
|
|
|
|
|
|
This dishwasher conforms to the |
|
|
|
following European Community |
|
|
|
Directives: |
|
|
|
-2006/95/EC (Low Voltage) |
|
|
|
-2004/108/EC (Electromagnetic |
|
|
|
Compatibility) |
|
|
|
-2009/125/EC (Comm. Reg. |
|
|
|
1016/2010) (Ecodesign) |
|
|
|
-97/17/EC (Labelling) |
|
|
|
-2012/19/EC (WEEE) |
|
|
|
|
The machine has a buzzer/set of tones (depending on the dishwasher model) to inform the user that a command has EN been implemented: power on, cycle end etc.
The symbols/indicator lights/LEDs on the control panel/ display may vary in colour and may have a flashing or fixed light (depending on the dishwasher model).
The display provides useful information concerning the type of wash cycle, drying/wash-cycle phase, remaining time, temperature etc etc.
Assistance
Before contacting Assistance:
•Check whether the problem can be resolved using the
Troubleshooting guide (see Troubleshooting).
•Restart the programme to check whether the problem has ceased to exist.
•If the problem persists, contact the Authorised
Technical Assistance Service.
 Never use the services of unauthorised technicians.
Please have the following information to hand:
•The type of malfunction.
•The appliance model (Mod.).
•The serial number (S/N).
This information can be found on the appliance data plate
(see Description of the appliance).
* Only available in selected models.
5

Description of the appliance
EN |
Overall view |
|
1. Upper rack
2. Upper sprayer arm
3. Tip-up dispensers
4. Rack height adjuster
5. Third rack*
6. Lower rack
7. Lower sprayer arm
8. Washing filter
9. Salt dispenser
10. Detergent and rinse-aid dispensers and device Active Oxigen*
11. Data plate
12. Control panel****
Control panel
Select wash cycle button |
Delayed start button |
|
|
ON-OFF/Reset button |
Multi-functional tablets button and indicator light |
Salt indicator light |
|
and indicator light |
Extra dry button and indicator light |
|
|
|
|
|
|
|
|
|
|
|
|
|
|
|
|
|
|
|
|
|
|
|
|
|
|
|
|
|
|
|
|
|
|
|
|
|
|
|
|
Rinse aid indicator light |
|
|
|
|
|
Zone Wash button |
Active Oxygen button |
||
|
Wash cycle number and |
|
|
Zone Wash indicator lights |
and indicator light |
||||
|
|
|
|
||||||
remaining time indicator light |
|
|
|
||||||
|
Delayed start indicator light |
|
|||||||
|
|
|
|
|
|
||||
***Only in completely built-in models. * Only available in selected models.
The number and type of wash cycles and options may vary depending on the dishwasher model.
6

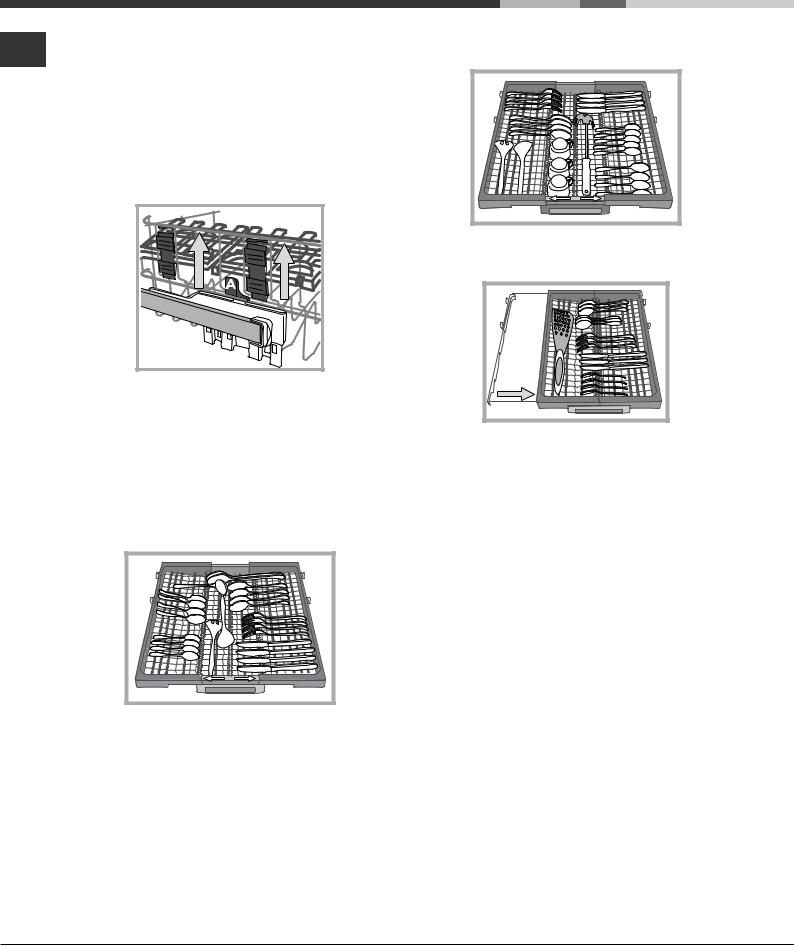
Loading the racks
Tips
Before loading the racks, remove all food residues from the crockery and empty liquids from glasses and containers. No preventive rinsing is needed under running water.
Arrange the crockery so that it is held in place firmly and does not tip over; and arrange the containers with the openings facing downwards and the concave/convex parts placed obliquely, thus allowing the water to reach every surface and flow freely. Make sure that the lids, handles, trays and frying pans do not prevent the sprayer arms from rotating. Place any small items in the cutlery basket.
Since plastic dishes and non-stick frying pans usually retain more water drops, their drying will be not so good as that of ceramic or stainless-steel dishes.
Lightweight items such as plastic containers should be placed in the upper rack and arranged so that they cannot move. After loading the appliance, make sure that the sprayer arms can rotate freely.
Several dishwasher models are fitted with tip-up sectors*. |
|
||||
EN |
|||||
They can be used in a vertical position when arranging dishes |
|||||
|
|||||
or in a horizontal position (lower) to load pans and salad bowls |
|
||||
easily. |
|
||||
|
|
|
|
|
|
|
|
|
|
|
|
|
|
|
|
|
|
|
|
|
|
|
|
Upper rack
Load this rack with delicate and lightweight crockery such as glasses, cups, saucers and shallow salad bowls.
Lower rack
The lower rack can hold pans, lids, dishes, salad bowls, cutlery etc. Large plates and lids should ideally be placed at the sides.
Very soiled dishes and pans should be placed in the lower rack because in this sector the water sprays are stronger and allow a higher washing performance.
*Only available in selected models with different numbers and positions.
Several dishwasher models are fitted with tip-up sectors*.
They can be used in a vertical position when arranging tea/ dessert saucers or in a lower position to load bowls and food containers.
Tip-up compartments with adjustable position
The side tip-up compartments can be positioned at three different heights to optimize the arrangement of crockery inside the rack.
Wine glasses can be placed safely in the tip-up compartments by inserting the stem of each glass into the corresponding slots.
7
Theupperrackcanbeadjustedforheightbasedonrequirements:
EN high position to place bulky crockery in the lower rack and low position to make the most of the tip-up compartments/sectors by creating more space upwards.
Adjusting the height of the upper rack
In order to make it easier to arrange the crockery, the upper rack may be moved to a higher or lower position.
The height of the upper rack should be adjusted WHEN THE RACK IS EMPTY.
NEVER raise or lower the rack on one side only.
If the rack is equipped with a Lift-Up device* (see figure), lift it up by holding its sides. To restore the lower position, press the levers (A) at the sides of the rack and follow the rack down.
 The upper rack cannot be used in the high position and with the tip-up compartments closed in a vertical position.
Third rack
The third rack was designed to house the cutlery. Arrange the cutlery as shown in the figure.
A separate arrangement of the cutlery makes collection easier after washing and improves washing and drying performance.
 “Knives and other utensils with sharp edges must be positioned with the blades facing downwards.”
The geometry of the rack makes it possible to place such small items as coffee cups in the area in the middle.
The third basket is equipped with two sliding side trays to make the most of the height of the space below.
Unsuitable crockery
•Wooden crockery and cutlery.
•Delicate decorated glasses, artistic handicraft and antique crockery. Their decorations are not resistant.
•Parts in synthetic material which do not withstand high temperatures.
•Copper and tin crockery.
•Crockery soiled with ash, wax, lubricating grease or ink. The colours of glass decorations and aluminium/silver pieces can change and fade during the washing process. Some types of glass (e.g. crystal objects) can become opaque after a number
of wash cycles too.
Damage to glass and crockery
Caused by:
•Type of glass and glass production process.
•Chemical composition of detergent.
•Water temperature of rinse cycle.
Tips:
•Only use glasses and porcelain guaranteed by the manufacturer as dishwasher safe.
•Use a delicate detergent suitable for crockery.
•Collect glasses and cutlery from the dishwasher as soon as the wash cycle is over.
8
Start-up and use
Starting the dishwasher
1.Turn the water tap on.
2.Open the door and press ON-OFF button: the ON/OFF indicator lights, options and the display come on.
3.Measure out the detergent. (see adjacent information).
4.Load the racks (see Loading the racks).
5.Select the wash cycle in accordance with the type of crockery and its soil level (see table of wash cycles) by pressing the P
button.
6.Select the wash options*. (see Special wash cycles and options).
7.Start the wash cycle by shutting the door.
8.The end of the wash cycle is indicated by beeps and by the flashing of the wash cycle number on the display. Open the door, switch off the appliance by pressing the ON/OFF button, shut off the water tap and unplug the appliance from the electricity socket.
9.Wait for a few minutes before removing the crockery, in order to avoid burns. Unload the racks, beginning with the lower level.
 - The machine will switch off automatically during certain extended periods of inactivity, in order to minimise electricity consumption.
 AUTO WASH CYCLES*:some models of dishwashers are equipped with a special sensor which can be used to assess the level of soiling and automatically setting the most efficient and economic wash cycle accordingly.
The duration of the Auto wash cycles may vary due to the operation of the sensor.
 If the crockery is only lightly soiled or if it has been rinsed with water before being placed in the dishwasher, reduce the amount of detergent used accordingly.
Modifying a wash cycle in progress
If a mistake was made during the wash cycle selection process, it is possible to change the cycle, provided that it has only just begun: open the door taking care to avoid the escaping steam, by pressing and holding the ON/OFF button, the machine will switch off. Switch the machine back on using the ON/OFF button and select the new wash cycle and any options desired; start the cycle by closing the door.
Adding extra crockery
Without switching off the machine, open the door, taking care to avoid the escaping steam, and place the crockery inside the dishwasher. Shut the door and the cycle will begin from the point at which it was interrupted.
Accidental interruptions
If the door is opened during the wash cycle, or if there is a power cut, the cycle stops. It starts again from the point at which it was interrupted once the door has been shut or the electricity supply is restored.
* Only available in selected models.
Measuring out the detergent |
|
|
EN |
||
A good wash result also depends on the correct |
||
|
||
amount of detergent being used. Exceeding the stated |
|
|
|
||
amount does not result in a more effective wash and |
|
|
increases environmental pollution. |
|
Based on how soiled the items are, the amount can be adjusted to individual cases using powder or liquid detergent.
In the case of normally soiled items, use approximately either 35 gr (powder detergent) or 35 ml (liquid detergent). If tablets are used, one tablet will be enough.
If the crockery is only lightly soiled or if it has been rinsed with water before being placed in the dishwasher, reduce the amount of detergent used accordingly.
For good washing results also follow the instructions shown on the detergent box.
For further questions please ask the detergent producers' Advice Offices.
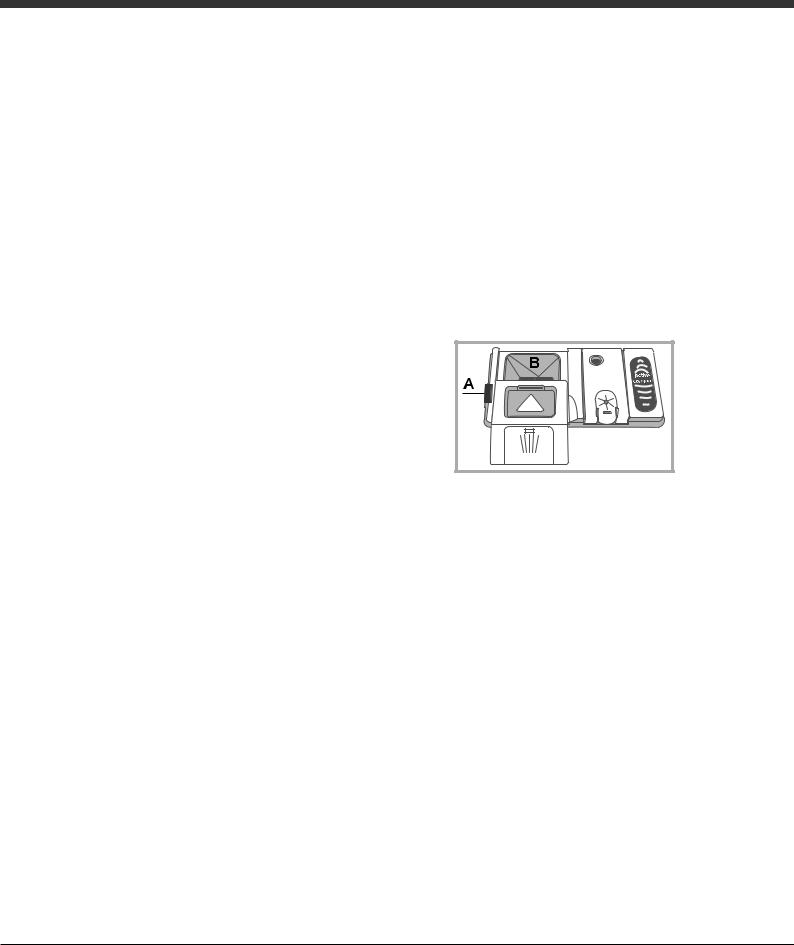
To open the detergent dispenser use the opening device “A”.
Introduce the detergent into the dry dispenser “B” only. Place the amount of detergent for pre-washing directly inside the tub.
1.When measuring out the detergent refer to the Table of wash cycles to add the proper quantity. Compartment B comprises a level showing the maximum quantity of liquid or powder detergent that can be added to each cycle.
2.Remove detergent residues from the edges of the dispenser and close the cover until it clicks.
3.Close the lid of the detergent dispenser by pulling it up until the closing device is secured in place.
The detergent dispenser automatically opens up at the right time according to the wash cycle.
If all-in-one detergents are used, we recommend using the TABS option, because it adjusts the cycle so that the best washing and drying results are always achieved.
 Only use detergent which has been specifically designed for dishwashers.
DO NOT USE washing-up liquid.
Using excessive detergent may result in foam residue remaining in the machine after the cycle has ended.
The use of tablets is only recommended for models which offer the MULTI-FUNCTIONAL TABLETS option.
To achieve the best results from each washing and drying cycle, powder detergent, liquid rinse aid and salt should be used.
9

Wash cycles
Wash-cycle data is measured under laboratory conditions according to European Standard EN 50242.
EN Based on the different conditions of use, the wash-cycle duration and data can change.
 The number and type of wash cycles and options may vary depending on the dishwasher model.
|
Wash cycle |
|
Approximate |
Water |
Energy |
|
|
which |
|
||||
Wash cycle |
Options |
duration of wash |
consumption |
consumption |
||
include |
||||||
|
|
cycles |
(l/cycle) |
(KWh/cycle) |
||
|
drying |
|
||||
|
|
|
|
|
||
1. Eco |
Yes |
Delayed start – Tabs – |
03:15’ |
11,0 |
1,07 |
|
Extra Dry |
||||||
|
|
|
|
|
||
2. Auto Intensive |
Yes |
Delayed start – Tabs – |
02:00’ - 03:10’ |
15,5 - 17,0 |
1,55 - 1,80 |
|
Extra Dry – Zone wash |
||||||
|
|
|
|
|
||
|
|
|
|
|
|
|
3. Auto Normal |
Yes |
Delayed start – Tabs – |
01:30’ - 02:30’ |
15,0 – 16,5 |
1,25 - 1,40 |
|
Extra Dry – Zone wash |
||||||
|
|
|
|
|
||
|
|
|
|
|
|
|
4. Auto Fast |
No |
Delayed start – Tabs |
00:40’ - 01:20’ |
13,0 - 14,5 |
1,20 - 1,30 |
|
|
|
|
|
|
|
|
5. Trio Wash |
Yes |
Delayed start – Tabs – |
02:00’ |
18,0 |
1,35 |
|
Extra Dry |
||||||
|
|
|
|
|
||
|
|
|
|
|
|
|
6. Delicate |
Yes |
Delayed start – Tabs – |
01:40’ |
11,5 |
1,15 |
|
Extra Dry |
||||||
|
|
|
|
|
||
|
|
|
|
|
|
|
7. Express 30’ |
No |
Delayed start – Tabs |
00:30’ |
9,0 |
0,55 |
|
|
|
|
|
|
|
|
8. Goodnight |
Yes |
Delayed start – Tabs – |
03:30’ |
16,0 |
1,05 |
|
Extra Dry |
||||||
|
|
|
|
|
||
|
|
|
|
|
|
|
9. Soak |
No |
Delayed start |
00:12’ |
4,5 |
0,01 |
|
|
|
|
|
|
|
|
10. Sanitazing |
Yes |
Delayed start |
01:20’ |
10,0 |
1,25 |
|
|
|
|
|
|
|
|
11. Self Clean |
No |
Delayed start |
00:50’ |
8,0 |
0,85 |
|
|
|
|
|
|
|
Instructions on wash-cycle selection and detergent dosage:
1. The ECO wash cycle is the standard cycle to which the energy label data refers. It can be used to wash crockery with a normal soil level and is the most efficient cycle in terms of energy and water consumption for this type of crockery. 32 gr/ml + 6 gr/ml** – 1
Tab (**Quantity of pre-washing detergent)
2.Heavily soiled dishes and pans (not to be used for delicate items). 38 gr/ml – 1 Tab
3.Normally soiled pans and dishes. 32 gr/ml + 6 gr/ml** – 1 Tab
4.Limited quantity of daily soiling (ideal for 4 place settings) 25 gr/ml – 1 Tab
5.Wash spread over the three* racks: normal in the upper rack and third* rack for cutlery and glasses, heavy-duty in saucepans in the lower rack. 38 gr/ml – 1 Tab
6.Cycle for delicate items, which are more sensitive to high temperatures 35 gr/ml – 1 Tab
7.Fast cycle to be used for slightly dirty dishes (ideal for 2 place settings) 25 gr/ml – 1 Tab
8.Optimum performance ensured. Ideal for night-time operation. 38 gr/ml – 1 Tab
9.Pre-wash while awaiting completion of the load with the dishes from the next meal. No detergent.
10.High-temperature disinfecting cycle. Ideal to clean crockery and feeding bottles. 30 gr/ml – 1 Tab
11.Dishwasher cleaning cycle to be used when the dishwasher is EMPTY with special detergents.
Standby consumption: Left-on mode consumption: 5 W - Off mode consumption: 0.5 W
10
Special wash cycles and Options
Notes:
Optimum performance levels when using the “Fast" and "Express 30’” cycles can be achieved by respecting the specified number of place settings.
To reduce consumption even further, only run the dishwasher when it is full.
Note for Test Laboratories: for information on comparative EN testing conditions, please send an email to the following address:
ASSISTENZA_EN_LVS@indesitcompany.com
|
|
Multi-functional tablets* (Tabs) |
|
|
EN |
||||
|
|
This option optimises washing and drying results. |
||
When using multi-functional tablets, press the MULTI- |
|
|||
|
||||
FUNCTIONAL TABLETS button; the corresponding indicator |
|
|||
light/symbol will light up. If the button is pressed again, the |
|
|||
option will be deselected. |
|
|||
 The “Multi-functional tablets” option results in a longer wash cycle.
 The use of tablets is only recommended for models having this option and it is not recommended with wash cycles which do not specify the use of multi-functional tablets.
Wash options
If an option is not compatible with the selected wash cycle (see table of wash cycles), the corresponding LED flashes rapidly 3 times and beeps will sound.
Delayed start
The start of the wash cycle may be delayed for a period of time between 1 and 12 hours.
1.Press the DELAYED START button: the corresponding symbol appears on the display; each time you press the button, the time (1h, 2h, etc. up to max. 12h) from the start of the selected wash cycle will be increased.
2.Select the cycle and close the door: the timer will begin counting down;
3.Once this time has elapsed, the indicator light switches off and the wash cycle begins.
To adjust the delay time and select a smaller period of time, press the DELAYED START button. To cancel it, press the button repeatedly until the selected delayed start indicator light switches off. The wash cycle will start automatically as soon as the door is shut.
ACTIVE OXYGEN option
This device releases ozone molecules into the dishwasher, i.e. a natural substance that reduces unpleasant odours.
It should be used between two different wash cycles and
ONLY after soiled crockery has been loaded.
To start the ACTIVE OXYGEN option press and hold the button O3.The option will stay active either for 24 hours or until the wash cycle is started. More items can be introduced at any time until full load.
The typical faint odour that can be smelt inside the dishwasher - the same as you sometimes get with storms - is due to the ozone produced by lightning discharges. This is normal. The device produces just a small quantity, which soon decays.
No replacement needed.
Zone Wash
 This option makes it possible to carry out the wash cycle in the selected rack only. Select the wash cycle and then press the ZONE WASH button: the selected rack lights up and the wash cycle starts in the selected rack only. Press the button again to deselect the option.
The option is available with the following wash cycles:
Intensive and Normal.
Select the option and the Intensive cycle to start the
ULTRAINTENSIVE ZONE washing. This wash cycle is ideal for very soiled mixed loads, e.g. pans and saucepans, dishes with heavy encrustation or difficult-to-clean crockery (grater, vegetable mill, dirty cutlery). The spraying pressure is stronger and the washing temperature higher, thus ensuring optimum handling of stubborn stains.
Select the option and the Normal cycle to start the SAVING
ZONE washing. This function makes it possible to reduce energy consumption. Cycle duration might change
Remember to load the crockery in the selected rack only
Extra drying
To improve the dryness level of the crockery, press the EXTRA DRYING button and the indicator light/symbol will light up. If it is pressed again, the option will be deselected. A higher temperature during the final rinsing and a longer drying phase improve the dryness level.
 The EXTRA DRYING option increases the duration of the wash cycle.
11
Rinse aid and refined salt
EN |
|
|
Only use products which have been specifically designed |
|
|
||
|
for dishwashers. |
||
|
|
||
|
|
Do not use table/industrial salt or washing-up liquid. |
|
|
|
Follow the instructions given on the packaging. |
|
 If using a multi-functional product it is not necessary to add any rinse aid. However, we recommend that you add salt, especially if you live in an area where the water is hard or very hard. (Follow the instructions given on the packaging).
 If you do not add salt or rinse aid, the LOW SALT* and LOW RINSE AID indicator lights will stay lit.
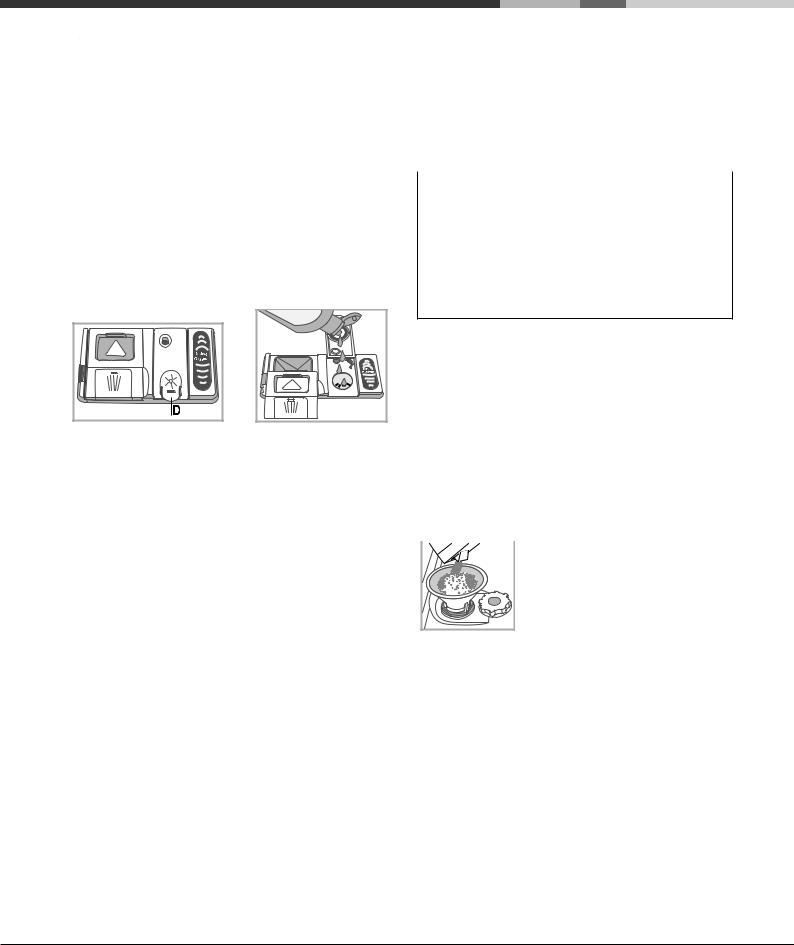
Measuring out the rinse aid
Rinse aid makes it easier for the crockery to dry, as water runs off the surfaces more readily and therefore does not leave streaks or marks. The rinse aid dispenser should be filled:
•When the LOW RINSE AID indicator light* on the control panel is illuminated, a reserve supply of rinse aid is still available for 1-2 cycles;
A |
X |
M |
1.Open the dispenser “D” by pressing and pulling up the tab on the lid;
2.Carefully introduce the rinse aid as far as the maximum reference notch of the filling space - avoid spilling it. If this happens, clean the spill immediately with a dry cloth.
3.Press the lid down until you hear a click to close it.
NEVER pour the rinse aid directly into the appliance tub.
Adjusting the amount of rinse aid
If you are not completely satisfied with the drying results, you may adjust the quantity of rinse aid used. Switch on and off the dishwasher using the ON/OFF button. Press the P button three times. Press the ON/OFF button, the set level appears on the display (set to factory level).
Adjust the rinse aid supply level with the P button.
Press the ON/OFF button to save the adjustment setting.
The rinse aid level can be set to ZERO, in such a case the rinse aid will not be supplied and the low rinse aid indicator light in case of running out.
A maximum of 4 levels can be set according to the dishwasher model.
•If there are streaks on the crockery, set to a low number (1-2).
•In case of drops of water or limescale marks, set to a high number number (3-4).
Setting the water hardness
Every dishwasher is equipped with a water softener which, by using refined salt designed especially for this type of appliance, supplies water without limescale which is then used to wash the crockery.
This dishwasher offers a setting which helps to reduce pollution and optimises washing performance in accordance with the water hardness level in your area. This information can be obtained from your local water supplier.
Switch on and off the dishwasher using the ON/OFF button. Press and hold the P button for a few seconds until you hear a beep.
Switch on the dishwasher with the ON/OFF button, the set level appears on the display (water softener set to medium level).
Adjust the water hardness level with the P button, (1-2-3-4-5* see water hardness table) up to a max. of 5 levels.
Press the ON/OFF button to save the adjustment setting.
Even if using multi-functional tablets, the salt dispenser should still be filled.
Water Hardness Table |
|
Average salt dispenser |
|||
|
capacity duration** |
||||
level |
°dH |
°fH |
mmol/l |
months |
|
1 |
0 |
- 6 |
0 - 10 |
0 - 1 |
7 months |
2 |
6 - 11 |
11 - 20 |
1,1 - 2 |
5 months |
|
3 |
12 |
- 17 |
21 - 30 |
2,1 - 3 |
3 months |
4 |
17 |
- 34 |
31 - 60 |
3,1 - 6 |
2 months |
5* |
34 |
- 50 |
61 - 90 |
6,1 - 9 |
2/3 weeks |
For values between 0°f and 10°f, we do not recommend the use of salt. * a setting of 5 may increase cycle duration.
** 1 wash cycle per day.
(°dH = hardness measured in German degrees - °f = hardness measured in French degrees – mmol/l = millimoles per litre)
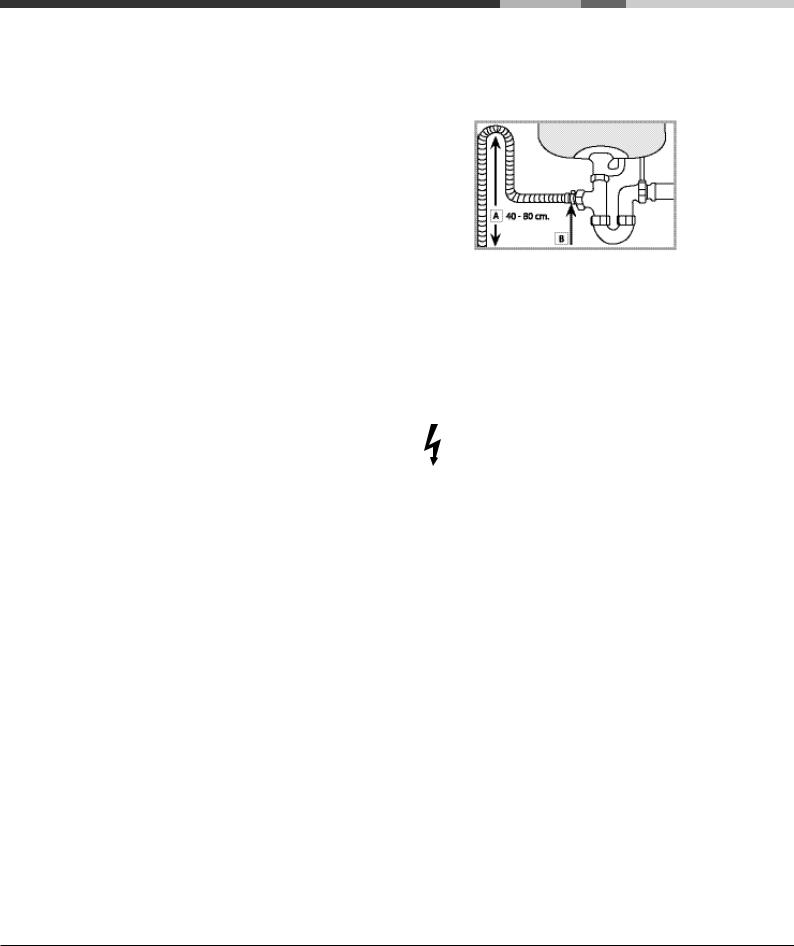
Measuring out the refined salt
In order to obtain the best possible results from a wash cycle, make sure that the salt dispenser is never empty.
Refined salt removes limescale from the water, thus avoiding the formation of deposits on crockery.
The salt dispenser is located in the lower part of the dishwasher (see Description) and should be filled:
•When the green float* cannot be seen by simply looking at the cap of the salt dispenser;
•When the LOW RINSE AID indicator light on the control panel is illuminated *;
1.Remove the lower rack and unscrew the cap (anticlockwise).
 2. The first time you do this: fill the water
tank right up to its edge.
3. Position the funnel* (see figure) and
fill the salt dispenser up to the edge
(approximately 1 kg). It is normal for a little
water to leak out.
4. Remove the funnel* and wipe any salt residues away from the opening; rinse the cap under running water and then screw it on, the head facing downwards so as to let the water flow out of the four slots (star-shaped arrangement)
in the lower part of the cap (cap with green float*).
It is advisable to perform this procedure every time you add salt to the dispenser.
Make sure the cap is screwed on tightly so that no detergent can get into the container during the wash cycle (this could damage the water softener beyond repair).
 When necessary, measure out the salt before a wash cycle so that any saline solution which has leaked out of the salt dispenser is removed.
* Only available in selected models.
12

Care and maintenance
Shutting off the water and electricity |
|
supplies |
|
• |
Turn off the water tap after every wash cycle to avoid leaks. |
• |
Always unplug the appliance when cleaning it and when |
|
performing maintenance work. |
Cleaning the dishwasher |
|
• |
The external surfaces of the machine and the control panel |
|
can be cleaned using a non-abrasive cloth which has been |
|
dampened with water. Do not use solvents or abrasive |
|
products. |
• |
Any marks on the inside of the appliance may be removed |
|
using a cloth dampened with water and a little vinegar. |
Preventing unpleasant odours |
|
• |
Always keep the door of the appliance ajar in order to avoid |
|
moisture from forming and being trapped inside the machine. |
• |
Clean the seals around the door and detergent dispensers |
|
regularly using a damp sponge. This will avoid food becoming |
|
trapped in the seals, which is the main cause behind the |
|
formation of unpleasant odours. |
Cleaning the sprayer arms |
|
Food residue may become encrusted onto the sprayer arms |
|
and block the holes used to spray the water. It is therefore |
|
recommended that you check the arms from time to time and |
|
clean them with a small non-metallic brush. |
|
The two sprayer arms may both be removed. |
|
|
To remove the upper sprayer arm, |
|
turn the plastic locking ring in an |
|
anti-clockwise direction. The upper |
|
sprayer arm should be replaced |
|
so that the side with the greater |
|
number of holes is facing upwards. |
The lower sprayer arm can be |
removed by pressing on the side |
tabs and pulling it upwards. |
Cleaning the water inlet filter* |
If the water hoses are new or have not been used for an extended period of time, let the water run to make sure it is clear and free of impurities before performing the necessary connections. If this precaution is not taken, the water inlet could become blocked and damage the dishwasher.
 Clean the water inlet filter at the tap outlet regularly.
-Turn off the water tap.
-Unscrew the end of the water inlet hose, remove the filter and clean it carefully under running water.
-Re-place the filter and screw the water hose back into position.
Cleaning the filters |
EN |
||
The filter assembly consists of three filters which remove food |
|||
|
|||
residues from the washing water and then recirculate the water. |
|
||
They should be cleaned if you wish to achieve the best results |
|
||
in every wash. |
|
||
|
Clean the filters regularly. |
|
|
|
|
||
|
|
||
|
The dishwasher should not be used without filters or if the |
|
|
|
|
||
|
|
||
filter is loose. |
|
||
• After several washes, check the filter assembly and if necessary clean it thoroughly under running water, using a non-metallic brush and following the instructions below:
1.Turn the cylindrical filter C in an anti-clockwise direction and pull it out (fig. 1).
2.Remove the cup filter B by exerting a slight pressure on the side flaps (fig. 2);
3.Slide out the stainless-steel plate filter A. (fig. 3).
4.Inspect the trap and remove any food residues. NEVER
REMOVE the wash-cycle pump protection (black detail) (fig.4).
After cleaning the filters, re-place the filter assembly and fix it in position correctly; this is essential for maintaining the efficient operation of the dishwasher.
Leaving the machine unused for extended periods
•Disconnect the appliance from the electricity supply and shut off the water tap.
•Leave the door of the appliance ajar.
•When you return, run a wash cycle when the dishwasher is empty.
* Only available in selected models.
13

Troubleshooting
|
|
|
|
|
|
|
|
|
|
Whenever the appliance fails to work, check for a solution from the following list before calling for Assistance. |
|||||
EN |
|
||||||
|
|
|
|
|
|
|
|
|
|
|
|
|
|||
|
|
|
|
|
|||
|
|
Problem: |
Possible causes / Solutions: |
|
|||
|
|
The dishwasher does not start or |
• Switch off the appliance by pressing the ON/OFF button, switch it back on after approximately |
|
|||
|
|
one minute and reset the program. |
|
||||
|
|
cannot be controlled. |
• The appliance has not been plugged in properly. |
|
|||
|
|
|
• The dishwasher door has not been shut properly. |
|
|||
|
|
The door won’t close. |
• The lock was released. Strongly push the door until a “clacking” noise is heard. |
|
|||
|
|
|
|
|
|||
|
|
No water drains out from the |
• The dishwasher cycle has not yet finished. |
|
|||
|
|
• The water inlet hose is bent (see Installation). |
|
||||
|
|
dishwasher. |
|
||||
|
|
• The drain duct is blocked. |
|
||||
|
|
|
|
||||
|
|
|
• The filter is clogged up with food residues. |
|
|||
|
|
|
|
|
|||
|
|
The dishwasher makes excessive |
• The dishes are rattling against each other or against the sprayer arms. |
|
|||
|
|
• Excessive foam presence: the detergent has not been measured out correctly or it is not |
|
||||
|
|
noise. |
|
||||
|
|
suitable for use in dishwashers. (see Start-up and use). |
|
||||
|
|
|
|
||||
|
|
|
|
|
|||
|
|
The dishes and glasses are covered |
• The level of the refined salt is low or the dosage setting is not suited to the hardness of the |
|
|||
|
|
water (see Rinse aid and salt). |
|
||||
|
|
in a white film or limescale deposits. |
• The lid on the salt dispenser is not closed properly. |
|
|||
|
|
|
• The rinse aid has been used up or the dosage is too low. |
|
|||
|
|
|
|
|
|||
|
|
The dishes and glasses are streaked |
• The rinse aid dosage is too high. |
|
|||
|
|
or have a bluish tinge. |
|
|
|
|
|
|
|
The crockery has not been dried |
• A wash cycle without a drying programme has been selected. |
|
|||
|
|
• The rinse aid has been used up or the dosage is too low (see Rinse aid and salt). |
|
||||
|
|
properly. |
• The rinse aid dispenser setting is not high enough. |
|
|||
|
|
|
• The crockery is made from non-stick material or plastic. |
|
|||
|
|
|
|
|
|||
|
|
|
• The racks are overloaded (see Loading the racks). |
|
|||
|
|
|
• The crockery has not been arranged well. |
|
|||
|
|
|
• The sprayer arms cannot move freely. |
|
|||
|
|
The dishes are not clean. |
• The wash cycle is too gentle (see Wash cycles). |
|
|||
|
|
• Excessive foam presence: the detergent has not been measured out correctly or it is not |
|
||||
|
|
|
suitable for use in dishwashers. (see Start-up and use). |
|
|||
|
|
|
• The lid on the rinse aid compartment has not been shut correctly. |
|
|||
|
|
|
• The filter is dirty or blocked (see Care and maintenance). |
|
|||
|
|
|
• The refined salt level is low (see Rinse aid and salt). |
|
|||
|
|
The dishwasher does not take any |
• There is no water in the mains supply. |
|
|||
|
|
• The water inlet hose is bent (see Installation). |
|
||||
|
|
water in - Tap shut-off alarm |
|
||||
|
|
• Turn on the tap and the appliance will start after a few minutes. |
|
||||
|
|
(beeps are heard and H appears for |
|
||||
|
|
• The appliance lock has been activated because no action was taken when the beeps sounded. |
|
||||
|
|
some minutes on the display) |
|
||||
|
|
Switch off the machine using the ON/OFF button, turn on the tap and switch the machine back |
|
||||
|
|
(the ON/OFF indicator light flashes and |
|
||||
|
|
on after a few seconds by pressing the same button. Re-program the appliance and restart the |
|
||||
|
|
number 6 appears on the display). |
|
||||
|
|
wash cycle. |
|
||||
|
|
|
|
||||
|
|
|
|
|
|
|
|
* Only available in selected models.
14

Gebrauchsanleitung
GESCHIRRSPÜLER
DE
Deutsch, 15
Inhaltsverzeichnis
Datenblatt, 16
Vorsichtsmaßregeln und Hinweise, 17
Allgemeine Sicherheit Entsorgung
Energie sparen und Umwelt schonen
Installation und Kundendienst, 18-19
Positionierung und Nivellierung Wasserund Elektroanschlüsse Technische Daten
Hinweise zur ersten Inbetriebnahme Kundendienst
LTF 11S111
Beschreibung Ihres Geschirrspülers, 20
Geräteansicht
Schalterblende
Körbe beladen, 21-22
Geschirrspüler-Unterkorb
Geschirrspüler-Oberkorb
Einstellung Oberkorb
Dritter Korb
Starten und Gebrauch, 23
Starten des Geschirrspülers
Einfüllen des Spülmittels
Spülprogramme, 24
Spülprogrammtabelle
Sonderprogramme und Optionen, 25
Klarspüler und Regeneriersalz, 26
Einfüllen des Klarspülers Einfüllen des Regeneriersalzes
Reinigung und Pflege, 27
Abstellen der Wasserund Stromversorgung Reinigung des Geschirrspülers Vermeidung von Geruchsbildung Reinigung der Sprüharme
Reinigung des Wasserfilters Die Filter reinigen
Was tun, bevor Sie für längere Zeit verreisen
Störungen und Abhilfe, 28

Datenblatt
|
|
|
|
|
|
|
|
|
|
|
|
|
|
|
|
DE |
|
|
|
|
|
|
|
|
Datenblatt |
|
|
|
|
|
|
|
|
|
|
|
|
||
|
|
Marke |
|
HOTPOINT ARISTON |
|
||
|
|
|
|
|
|
||
|
|
Modell |
|
LTF 11S111 |
|
||
|
|
|
|
|
|
|
|
|
|
Nennkapazität in Standardgedecken für den Standardreinigungszyklus (1) |
|
15 |
|
|
|
|
|
|
|
|
|
||
|
|
Energieeffizienzklasse (A+++ niedriger Verbrauch) bis D (hoher Verbrauch) |
|
A+ |
|
||
|
|
|
|
|
|
|
|
|
|
Energieverbrauch pro Jahr in kWh (2) |
|
302.0 |
|
|
|
|
|
|
|
|
|
|
|
|
|
Energieverbrauch Standardreinigungszyklus in kWh |
|
1.07 |
|
|
|
|
|
|
|
|
|
|
|
|
|
Gewichtete Leistungsaufnahme im Aus-Zustand in W |
|
0.5 |
|
|
|
|
|
|
|
|
|
|
|
|
|
Gewichtete Leistungsaufnahme im unausgeschalteten Zustand in W |
|
5.0 |
|
|
|
|
|
|
|
|
|
|
|
|
|
Wasserverbrauch pro Jahr in Liter (3) |
|
3080.0 |
|
|
|
|
|
|
|
|
|
||
|
|
Trocknungseffizienzklasse (A höchste Effizienz) bis G (geringste Effizienz) |
|
A |
|
||
|
|
|
|
|
|
||
|
|
Programmdauer des Standardreinigungszyklus in Minuten |
|
195’ |
|
||
|
|
|
|
|
|
|
|
|
|
Dauer des unausgeschalteten Zustands nach Programmende |
|
10 |
|
|
|
|
|
|
|
|
|
|
|
|
|
Luftschallemissionen dB(A) re 1pW |
|
42 |
|
|
|
|
|
|
|
|
|
||
|
|
Einbaugerät |
|
Ja |
|
||
|
|
|
|
|
|
|
|
|
|
|
|
|
|
|
|
|
|
HINWEIS |
|
|
|
|
|
|
|
1) Angabe auf Grundlage von 280 Standardreingungszyklen bei Kaltwasserbefüllung und dem Verbrauch der Betriebsarten mit geringer |
|
||||
|
|
Leistungsaufnahme. Der tatsächliche Energieverbrauch hängt von der Art der Nutzung des Geräts ab. |
|
||||
|
|
|
|
||||
|
|
2) Die Angaben beziehen sich auf den Standardreinigungszyklus. Dieses Programm eignet sich zur Reingung von normal |
|
||||
|
|
verschmutztem Geschirr und ist am effizientesten in Bezug auf den kombinierten Energieund Wasserverbrauch. Der |
|
||||
|
|
Standardreingungszyklus entspricht dem Eco Zyklus. |
|
|
|
|
|
|
|
|
|
||||
|
|
3) Angabe auf Grundlage von 280 Standardreingungszyklen. Der tatsächliche Energieverbrauch hängt von der Art der Nutzung des |
|
||||
|
|
Geräts ab. |
|
|
|
|
|
|
|
|
|
|
|
|
|
16

Vorsichtsmaßregeln und Hinweise
 Das Gerät wurde nach den strengsten internationalen Sicherheitsvorschriften entworfen und gebaut. Nachstehende Hinweise werden aus Sicherheitsgründen geliefert und sollten aufmerksam gelesen werden
Bewahren Sie diese Bedienungsanleitung bitte sorgfältig auf, damit Sie sie jederzeit zu Rate ziehen können. Im Falle eines Verkaufs, einer Übergabe oder eines Umzugs muss sie das Gerät stets begleiten.
Lesen Sie bitte folgende Hinweise aufmerksam durch, sie liefern wichtige Informationen hinsichtlich der Installation, des Gebrauchs und der Sicherheit.
Dieses Gerät ist für den Hausgebrauch oder ähnliche Anwendungen, zum Beispiel:
-Küchenbereiche für das Personal von Geschäften, Büros und andere Arbeitsumgebungen;
-Bauernhäuser;
-Nutzung durch Kunden in Hotels, Motels und anderen Wohnbereichen;
-Bed and Breakfast.
Allgemeine Sicherheit
•Dieses Gerät ist nicht zur Verwendung durch
Personen (einschließlich Kinder) mit eingeschränkten körperlichen, geistigen oder sensorialen Fähigkeiten oder ohne ausreichende Erfahrung und Kenntnis geeignet, es sei denn, sie werden durch eine für ihre Sicherheit verantwortliche Person beaufsichtigt und eingewiesen.
•Es ist die Aufsicht eines Erwachsenen erforderlich, um zu vermeiden, dass Kinder mit dem Gerät spielen.
•Dieses Gerät ist für den nicht professionellen Einsatz in privaten Haushalten bestimmt.
•DasGerätdarfnurzumSpülenvonHaushaltsgeschirr verwendet werden und nur durch Erwachsene sowie gemäß den Anleitungen dieses Handbuchs bedient werden.
•Das Gerät darf nicht im Freien aufgestellt werden, auch nicht, wenn es sich um einen geschützten Platz handelt. Es ist äußerst gefährlich, das Gerät Regen und Gewittern auszusetzen.
•Berühren Sie den Geschirrspüler nicht, wenn Sie
Barfuß sind.
•Ziehen Sie den Netzstecker nicht am Netzkabel aus der Steckdose, sondern nur am Netzstecker selbst.
•Vor Reinigungsund Wartungsmaßnahmen muss der Wasserhahn zugedreht und der Netzstecker aus der Steckdose gezogen werden.
•Versuchen Sie bei etwaigen Störungen bitte keinesfalls, Innenteile selbst zu reparieren.
•Stützen Sie sich und setzen Sie sich bitte nicht auf die offen stehende Gerätetür, das Gerät könnte umkippen.
•Die Gerätetür sollte nicht offen gelassen bleiben, da man darüber stolpern könnte.
•Bewahren Sie das Spülmittel und den Klarspüler außerhalb der Reichweite von Kindern auf.
•Verpackungsmaterial ist kein Spielzeug für Kinder.
Entsorgung |
|
|
DE |
||
• Befolgen Sie die lokalen Vorschriften; |
||
|
||
Verpackungsmaterial kann wiederverwertet werden. |
|
|
• Die europäische Richtlinie 2012/19/EG über Elektro- |
|
|
und Elektronik-Altgeräte (WEEE) sieht vor, dass |
|
|
Haushaltsgeräte nicht mit dem normalen Hausmüll |
|
|
entsorgt werden dürfen. Die Altgeräte müssen |
|
|
getrennt gesammelt werden, um die Rückführung |
|
|
und das Recycling der Materialien zu optimieren, |
|
|
aus denen die Geräte hergestellt sind, und um |
|
|
mögliche Belastungen der Gesundheit und der |
|
|
Umwelt zu verhindern. Das Mülleimersymbol ist auf |
|
|
allen Produkten dargestellt, um an die Verpflichtung |
|
|
zur getrennten Abfallsammlung zu erinnern. |
|
|
Für weitere Informationen hinsichtlich der |
|
|
ordnungsgemäßenEntsorgungvonHaushaltsgeräten |
|
|
wenden Sie sich bitte an Ihren Händler oder an die |
|
|
zuständige kommunale Stelle. |
|
|
Energie sparen und Umwelt schonen |
|
Wasser und Strom sparen
•Setzen Sie den Geschirrspüler nur bei voller Ladung in Betrieb. Um in der Zwischenzeit, d.h. bis das Gerät ganz gefüllt ist, die Bildung unangenehmer Gerüche zu vermeiden, setzen Sie den Einweichzyklus in Gang (siehe Spülprogramme).
•Wählen Sie ein für das zu spülende Geschirr und den Verschmutzungsgrad geeignetes Programm.
Ziehen Sie hierzu die Programmtabelle zu Rate:
-Verwenden Sie für normal verschmutztes Geschirr das umweltfreundliche Sparprogramm Eco, das einen niedrigen Wasserund Stromverbrauch gewährleistet.
-Bei nur geringfügiger Befüllung aktivieren Sie
die Option Halbe Füllung * (siehe Start und Inbetriebnahme).
•Sieht Ihr Stromliefervertrag Billigstromzeiten vor, empfiehlt sich, das Gerät in diesen Niedrigtarifzeiten
in Betrieb zu setzen. Die Option Startzeitvorwahl*
(siehe Start und Inbetriebnahme) ist Ihnen in diesem Fall eine wertvolle Stütze.
Phosphatund chlorfreie, enzymhaltige Reinigungsmittel
•Wir empfehlen dringend den Einsatz von phosphatund chlorfreien Spülmitteln, da diese die Umwelt nicht zu sehr belasten.
•Die optimale Wirkung der Enzyme ist bei einer Temperatur von ca. 50°C gegeben, demnach können bei enzymhaltigen Spülmitteln Spülgänge bei Niedrigtemperaturen eingestellt und dennoch dieselben Ergebnisse erzielt werden, wie bei
65°C-Programmen.
•Dosieren Sie Spülmittel sparsam je nach Angabe des Herstellers, Wasserhärte, Verschmutzungsgrad und Menge des Geschirrs, um Verschwendungen zu vermeiden. Obwohl sie biologisch abbaubar sind, beinhalten sie dennoch Stoffe, die die Umwelt belasten.
*Nur bei einigen Modellen.
17
Installation - Kundendienst
DE |
|
|
Im Falle eines Umzugs sollte das Gerät möglichst in vertikaler |
|
|
||
|
Position transportiert werden, falls erforderlich, neigen Sie das |
||
|
Gerät zur Rückseite hin. |
||
Positionierung und Nivellierung
1.Nehmen Sie das Verpackungsmaterial ab und prüfen Sie Ihr
Gerät auf eventuelle Transportschäden. Schließen Sie das Gerät im Falle einer Beschädigung bitte nicht an, sondern fordern Sie den Kundendienst an.
2.Stellen Sie das Gerät so auf, dass es mit den Seitenteilen oder mit der Rückwand an den anliegenden Möbeln oder an der
Wand anlehnt. Das Gerät kann auch unter einer durchlaufenden Arbeitsplatte eingebaut werden* (siehe Montageanleitung).
3.Stellen Sie den Geschirrspüler auf einem ebenen und festen Boden auf. Gleichen Sie eventuelle Unregelmäßigkeiten durch Anziehen oder Losschrauben der vorderen Stellfüße aus, bis das Gerät eben ausgerichtet ist. Eine präzise Nivellierung verleiht dem Gerät die erforderliche Stabilität, durch die Vibrationen, Betriebsgeräusche und ein Verrücken des Gerätes vermieden werden.
4*. Regulieren Sie den hinteren Stellfuß durch Einwirken mittels eines 8 mm-Sechskantschlüssels auf die rote Sechskantbuchse (befindlich unter der Frontseitenmitte des Geschirrspülers). Durch Drehen nach rechts wird die Höhe erhöht, durch Drehen nach links wird sie herabgesetzt. (Siehe der Dokumentation beiliegendes Anleitungsblatt)
Wasserund Elektroanschlüsse
 Die Anpassung der Elektround Wasseranlagen zur Installation des Gerätes darf nur von Fachpersonal durchgeführt werden..
 Der Geschirrspüler darf nicht auf Rohrleitungen oder auf dem Netzkabel aufstützen.
 Für den Anschluss des Gerätes an die Wasserversorgung müssen neue Schläuche verwendet werden.
Die alten Schläuche sollten niemals erneut verwendet werden.
Der Wasserzulaufschlauch (A), der Wasserablaufschlauch (B) und das Netzkabel können sowohl nach rechts als auch nach links ausgerichtet werden, wodurch eine optimale Installation gewährleistet wird.
Anschluss des Zulaufschlauchs
•An einen Kaltwasseranschluss: Schrauben Sie den
Wasserzulaufschlauch fest an einen mit ¾-Gewindeanschluss versehenen Hahn; bevor Sie ihn jedoch anschrauben, lassen Sie Wasser auslaufen, bis klares Wasser austritt, um das Gerät vor Verstopfen durch Unreinheiten zu bewahren.
•An einen Warmwasseranschluss: Im Falle einer Zentralheizungsanlage kann der Geschirrspüler auch durch heißes Leitungswasser gespeist werden, vorausgesetzt, die
Temperatur übersteigt 60 °C nicht.
 Schrauben Sie den Schlauch an den Wasserhahn, so wie für den Anschluss an den Kaltwasserhahn beschrieben.
 Sollte der Zulaufschlauch nicht lang genug sein, dann wenden Sie sich bitte an einen Fachhändler oder an einen autorisierten Techniker (siehe Kundendienst).
 Der Wasserleitungsdruck muss innerhalb der in der Tabelle der technischen Daten (siehe seitlich) angegebenen Werte liegen.
Der Schlauch darf nicht eingeklemmt oder abgeknickt werden.
Anschluss des Ablaufschlauchs
Schließen Sie den Ablaufschlauch, ohne ihn zu krümmen, an eine Ablaufleitung mit Mindestdurchmesser von 4 cm an.
Der Ablaufschlauch muss sich in einer Höhe von 40 bis 80 cm vom Boden oder von der Standfläche der Spülmaschine (A) befinden.
Vor dem Anschließen des Ablaufschlauchs an den Siphon des Spülbeckens den Plastikdeckel (B) abnehmen.
Schutz vor Überschwemmungen
Um Überschwemmungen auszuschließen, wurde der Geschirrspüler:
- mit einem System versehen, dank dessen der Wasserzulauf bei Anomalien oder internem Wasserverlust unterbrochen wird. Einige Modelle sind mit einem zusätzlichen New Acqua Stop* Sicherheitssystem ausgestattet, das auch bei Schlauchdefekten vor Überschwemmung schützt.
ACHTUNG: GEFÄHRLICHE SPANNUNG!
Der Versorgungsschlauch darf auf keinen Fall abgeschnitten werden: er enthält nämlich Strom führende Teile.
Elektroanschluss
Vor Einfügen des Netzsteckers in die Steckdose ist sicherzustellen, dass:
•die Netzsteckdose geerdet ist und den gesetzlichen
Bestimmungen entspricht;
•die Netzsteckdose die auf dem Typenschild (befindlich auf der Innentür) angegebene max. Leistungsaufnahme des Gerätes trägt
(siehe Beschreibung Ihres Geschirrspülers);
•die Versorgungsspannung den auf dem Typenschild (auf der
Innentür) vermerkten Werten entspricht;
•die Steckdosemit dem Netzsteckerkompatibelist. Andernfalls muss der Netzstecker von einem autorisierten Techniker ausgetauscht werden (siehe Kundendienst); verwenden Sie bitte keine Verlängerungen oder Vielfachstecker.
 Der Netzstecker, das Netzkabel und die Steckdose sollten bei installiertem Gerät leicht zugänglich sein.
 Das Netzkabel darf nicht gebogen oder eingeklemmt werden.
 Sollte das Speisekabel beschädigt sein, muss es vom Hersteller oder seiner technischen Kundendienststelle ausgetauscht werden, um Unfallrisiken vorzubeugen. (Siehe Kundendienst)
18
Kondensationsschutzstreifen*
Öffnen Sie nach dem Einbau des Geschirrspülers die Gerätetür und bringen Sie den transparenten Klebestreifen unter dem Holzbord an, um es vor eventuellem Kondenswasser zu schützen.
Hinweise zur ersten Inbetriebnahme
Nach Abschluss der Installation die Puffer an den Körben und die Rückhaltegummis vom oberen Korb (wenn vorhanden) entfernen.
Sofort vor dem ersten Spülgang, den Salzbehälter ganz mit
Wasser und fügen Sie ca. 1 kg Salz hinzu (siehe Klarspüler und Regeneriersalz): Es ist völlig normal, dass Wasser austritt. Stellen Sie den Härtegrad des Wassers ein (siehe Abschnitt Klarspüler und Regeneriersalz). - Nach dem
Einfüllen des Salzes erlischt die SALZNACHFÜLLANZEIGE*.
 Das Nichtfüllen des Salzbehälters kann eine Beschädigung des Wasserenthärters und des Heizwiderstandes bewirken
Technische Daten
Abmessungen |
Breite 59.5 cm |
|||
Höhe 82 cm |
||||
|
|
|
Tiefe 57 cm |
|
Fassungsvermögen |
15 Maßgedecke |
|||
Wasserversorgungsdruck |
0,05 ÷ 1MPa (0,5 ÷10 bar) |
|||
7,25 – 145 psi |
||||
Versorgungsspannung |
Siehe Typenschild |
|||
Maximale |
Siehe Typenschild |
|||
Leistungsaufnahme |
||||
|
||||
Schmelzsicherung |
Siehe Typenschild |
|||
|
|
|
Dieses Gerät entspricht |
|
|
|
|
folgenden EG-Richtlinien: |
|
|
|
|
- 2006/95/EC |
|
|
|
|
(Niederspannung) |
|
|
|
|
- 2004/108/EC |
|
|
|
|
(elektromagnetische |
|
|
|
|
Verträglichkeit) |
|
|
|
|
- 2009/125/EC (Comm. Reg. |
|
|
|
|
1016/2010) (Ecodesign) |
|
|
|
|
-97/17/EC (Etikettierung) |
|
|
|
|
- 2012/19/EC (WEEE) |
|
|
|
|
||
Kundendienst |
|
DE |
|
|
|
Bevor Sie den Kundendienst anfordern:
•sollten einige Kontrollen vorab selbst durchgeführt werden
(siehe Störungen und Abhilfe).
•Starten Sie das Programm erneut, um sicherzustellen, dass die Störung behoben wurde.
•Ist dies nicht der Fall, wenden Sie sich bitte an den autorisierten Kundendienst.
 Beauftragen Sie bitte niemals unbefugtes Personal.
Geben Sie bitte Folgendes an:
•die Art der Störung
•das Gerätemodell (Mod.)
Das Gerät ist mit akustischen Signalen/Tönen ausgestattet
(je nach Geschirrspülermodell), die den eingegebenen Befehl anzeigen: Start, Zyklusende, etc..
Die Leuchtsymbole/Kontrollanzeigen/LED-Anzeigen auf dem Bedienfeld/Display, können unterschiedliche Farben aufweisen, blinken oder Dauerlicht anzeigen. (je nach Geschirrspülermodell).
Das Display zeigt nützliche Informationen zum eingestellten Zyklus, Spül-/Trockenphase, Restzeit, Temperatur, etc. an.
* Nur bei einigen Modellen.
19

Beschreibung des Gerätes
DE Geräteansicht
1. |
Geschirrspüler-Oberkorb |
2. |
Oberer Sprüharm |
3. |
Hochklappbare Ablagen |
4. |
Einstellung der Korbhöhe |
5. |
Dritter Korb* |
6. |
Geschirrspüler-Unterkorb |
7. |
Unterer Sprüharm |
8. |
Spülsiebe |
9. |
Salzbehälter |
10. |
Spülmittelkammern, Klarspülerbehälter und |
|
Ozonvorrichtung Active Oxigen* |
11. |
Typenschild |
12. |
Schalterblende*** |
Schalterblende
Taste Programmwahl |
|
Taste Startzeitvorwahl |
|
|
|
||
Taste und |
|
Taste und Anzeigeleuchte Multifunktions-Tabs |
|
|
|
||
Kontrollleuchte |
Salz-Nachfüllanzeige |
Taste und Kontrollleuchte Extra Dry |
|
On-Off/Reset |
|||
|
|
|
|
|
|
|
|
|
|
|
|
|
|
|
|
|
|
|
|
|
|
|
|
|
|
|
|
|
|
|
|
|
|
|
|
|
|
|
|
|
|
Klarspüler-Nachfüllanzeige |
|
|
|
Anzeigeleuchten |
Taste Zone Wash |
Taste und |
|||
|
|
|
|
|
|
|
Anzeigeleuchte Oxygen |
||
|
Leuchtanzeige |
|
|
Zone Wash |
|
|
|||
|
|
|
|
||||||
|
|
|
|
|
|
|
|||
Programmnummer und Restzeit |
|
Kontrollleuchte |
|
|
|||||
|
|
|
|
|
|
|
|||
|
|
|
|
|
Startzeitvorwahl |
|
|
||
*** Nur bei komplett integrierten Modellen * Nur bei einigen Modellen.
Die Anzahl und die Art der Spülprogramme und -optionen sind abhängig vom jeweiligen Geschirrspülermodell.
20

Beladen der Körbe
Hinweise
Bevor Sie das Geschirr in den Geschirrspüler einräumen, befreien Sie es von Speiserückständen und entleeren Sie Gläser und Behälter von Flüssigkeitsresten. Es ist nicht notwendig, das Geschirr unter fließendem Wasser vorzuspülen.
Stellen Sie das Geschirr so ein, dass es fest steht und nicht umfallen kann. Behälter müssen mit der Öffnung nach unten eingestellt werden und hohle oder gewölbte Teile müssen schräg stehen, damit das Wasser alle Oberflächen erreicht und dann abfließen kann.
Achten Sie darauf, dass Deckel, Griffe, Töpfe und Tabletts die Drehung der Sprüharme nicht behindern. Stellen Sie kleine Gegenstände in den Besteckkorb.
Plastikgeschirr und Pfannen und Töpfe aus Antihaftmaterial halten Wassertropfen stärker zurück. Sie sind nach Ablauf des Programms also weniger trocken als Keramikoder Stahlgeschirr-Leichte Gegenstände (wie Plastikbehälter) sollten möglichst im Oberkorb untergebracht und so eingesetzt werden, dass sie sich nicht bewegen können.
Stellen Sie nach Einräumen des Geschirrs sicher, dass sich die Sprüharme frei bewegen können.
Geschirrspüler-Unterkorb
Der Unterkorb kann mit Töpfen, Deckeln, Tellern, Schüsseln, Besteck etc. befüllt werden. Räumen Sie große Teller und Deckel vorzugsweise am Rand des Korbs ein.
Einige Geschirrspülermodelle verfügen über klappbare Bereiche*, die in senkrechter Stellung zum Einsortieren von DE Tellern oder in waagerechter Stellung (umgeklappt) für Töpfe
und Schüsseln verwendet werden können.
Geschirrspüler-Oberkorb |
Hier sortieren Sie empfindliches und leichtes Geschirr ein: Gläser, Tasten, kleine Teller, flache Schüsseln.
Einige Geschirrspülermodelle verfügen über klappbare Bereiche*, die in senkrechter Stellung für Untertassen oder Dessertteller oder in vertikaler Stellung für Schüsseln und sonstige Behältnisse verwendet werden können.
Verstellbare Ablagen
Die seitlichen Ablagen können auf drei verschiedenen Höhen positioniert werden, um beim Einräumen des Geschirrs den Platz im Korb optimal auszunutzen.
Besonders verschmutztes Geschirr sollte vorzugsweise im Unterkorb untergebracht werden, da hier die Wasserstrahlen energischer sind und somit bessere Spülergebnisse erzielt werden.
Stielgläser können an den Ablagen stabilisiert werden, indem sie mit dem Stiel in die vorgesehene Aussparung gestellt werden
*Nur bei einigen Modellen und in unterschiedlicher Zahl und
Position.
21

Der Oberkorb kann in der Höhe verstellt werden: stellen Sie ihn in DE die oberste Position, wenn Sie großes Geschirr in den Unterkorb einräumen wollen. Wenn Sie eher die klapparen Bereiche nutzen
wollen, dann stellen Sie ihn in die untere Position.
Höheneinstellung des Oberkorbes
Um das Einordnen des Geschirrs zu vereinfachen, kann der Oberkorb je nach Bedarf in Hochoder Niedrigstellung eingeschoben werden.
Es empfiehlt sich, die Höhe des Oberkorbes bei LEEREM KORB zu regulieren.
Heben oder senken Sie den Korb NIEMALS nur an einer Seite.
Die Geometrie des Korbes erlaubt das Einräumen von kleinem Geschirr im mittleren Bereich des Korbes.
Ist der Korb mit Lift-Up* (siehe Abbildung) ausgestattet, fassen Sie ihn an den Seiten und ziehen Sie ihn nach oben. Um den Korb zurück in die untere Stellung zu bringen, drücken Sie die Hebel (A) an den Seiten des Korbs und schieben Sie ihn nach unten.
 Der obere Korb kann mit vertikal geschlossenen Ablagen nicht in der Hochstellung eingestellt werden.
Dritter Korb
Der dritte Korb ist ein Besteckkorb. Legen Sie das Besteck wie auf der Abbildung gezeigt in den Korb.
 “Messer mit scharfen Schneiden sind mit nach unten gerichteten Schneiden einzuordnen.”
Das getrennt eingeordnete Besteck wird besser gespült und getrocknet und lässt sich nach dem Spülgang leichter ausräumen.
Der dritte Korb ist mit zwei seitlich angeordneten, verschiebbaren Tabletts ausgestattet, dank derer der darunter liegende Raum auch in der Höhe genutzt werden kann.
Ungeeignetes Geschirr
•Besteck und Geschirr aus Holz.
•Empfindliche Dekorgläser, handgemachte Teller und antikes
Geschirr. Die Dekore sind nicht spülmaschinenfest.
•Nicht temperaturbeständige Kunststoffteile.
•Geschirr aus Kupfer und Zinn.
•Mit Asche, Wachs, Schmieröl oder Tinte verschmutztes
Geschirr.
Glasdekore, Aluminiumund Silberteile können während des Spülgangs die Farbe verändern und ausbleichen. Auch einige Glasarten (z.B. Kristallgegenstände) können nach mehreren Spülgängen matt werden.
Schäden an Glas und Geschirr
Ursachen:
•Glasart und Herstellungsprozess des Glases.
•Chemische Zusammensetzung des Spülmittels.
•Wassertemperatur des Klarspülprogramms.
Empfehlung:
•Spülen Sie nur Gläser und Geschirr in Ihrem Geschirrspüler, die vom Hersteller als spülmaschinenfest ausgezeichnet sind.
•Verwenden Sie ein Feinwaschmittel für Geschirr.
•Nehmen Sie Gläser und Besteck so bald wie möglich nach
Ablauf des Programm aus der Spülmaschine.
22
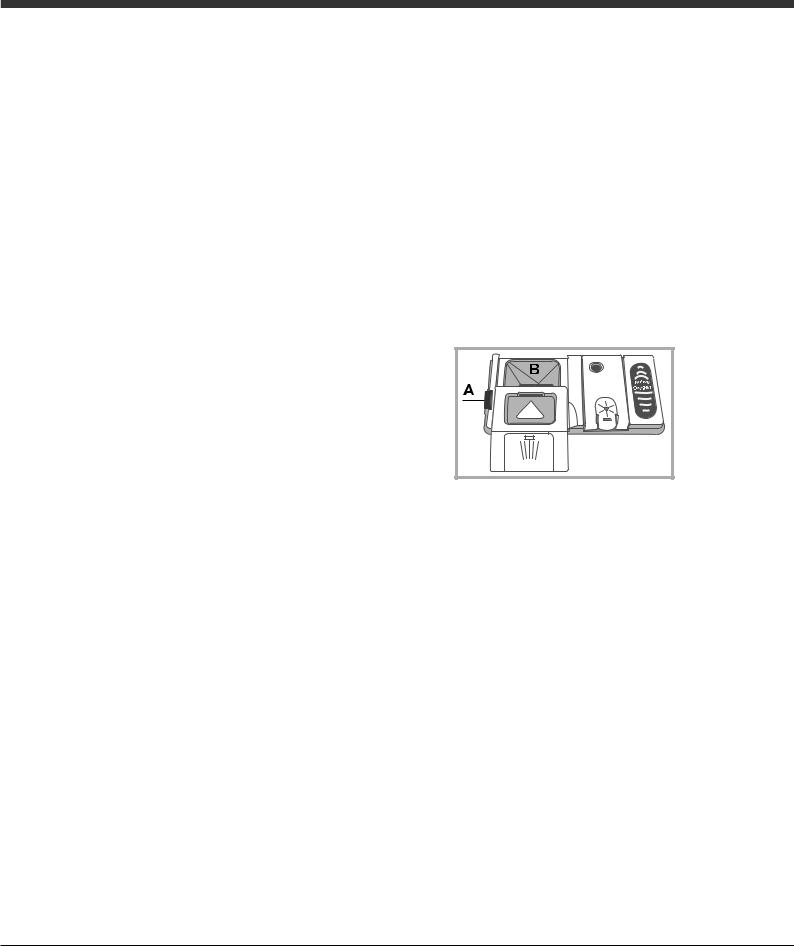
Inbetriebsetzung und Gebrauch
Starten des Geschirrspülers
1.Öffnen Sie den Wasserhahn.
2.Die Gerätetür öffnen und die ON-OFF-Taste drücken: die Kontrollleuchten ON/OFF, Optionen und das Display leuchten auf.
3.Das Waschmittel dosieren. (siehe seitlich).
4.Die Körbe befüllen (siehe Beschickung der Körbe).
5.Wählen Sie das Spülprogramm je nach Geschirrart und Verschmutzungsgrad aus (siehe Spülprogrammtabelle).
Drücken Sie hierzu die Taste P.
6.Auswahl der Spüloptionen*. (siehe Spezialprogramme und Optionen).
7.Starten Sie das Programm, indem Sie die Tür schließen.
8.Das Programmende wird durch akustische Signale und das Blinken der Programmnummer auf dem Display angezeigt.
Öffnen Sie die Gerätetür, schalten Sie das Gerät über EIN/AUS-
Taste aus, schließen Sie den Wasserhahn und ziehen Sie den Netzstecker aus der Steckdose.
9.Warten Sie einige Minuten, bevor Sie das Geschirr herausnehmen. Sie könnten sich daran verbrennen. Räumen Sie die Geschirrspülerkörbe aus, beginnen Sie dabei mit dem Unterkorb.
 - Zur Senkung des Stromverbrauchs bei Stillstand des Geräts schaltet sich das Gerät unter gewissen Bedingungen automatisch aus.
 PROGRAMME AUTO*:einige Geschirrspülgeräte sind mit einem Spezialfühler ausgestattet, der in der Lage ist, den Verschmutzungsgrad zu erfassen und demnach das effektivste und wirtschaftlichste Spülprogramm einzustellen.
Die Dauer der Automatikprogramme kann aufgrund der Einwirkung des Sensors variieren.
 Bei nur leicht verschmutztem Geschirr oder bei Geschirr, das vorher unter laufendem Wasser abgespült wurde, kann die Spülmittelmenge erheblich reduziert werden.
Änderung eines laufenden Programms
Wurde ein falsches Programm ausgewählt, können Sie dieses ändern, wenn es gerade erst begonnen hat: öffnen Sie die Gerätetür, achten Sie dabei auf eventuell austretenden Dampf, und halten Sie die ON/OFF-Taste gedrückt, das Gerät schaltet sich aus. Schalten Sie das Gerät über die EIN/AUS-Taste wieder ein, und wählen Sie das neue Spülprogramm und die eventuellen Spüloptionen. Starten Sie das Spülprogramm durch Schließen der Gerätetür.
Hinzufügen von weiterem Geschirr
Öffnen Sie die Gerätetür vorsichtig, da heißer Dampf austreten könnte, ohne den Geschirrspüler auszuschalten, und räumen Sie das Geschirr ein. Schließen Sie die Tür dann wieder; das Programm läuft automatisch weiter.
Unbeabsichtigtes Unterbrechen des Spülprogramms
Wird während des Spülgangs die Gerätetür geöffnet, oder sollte ein Stromausfall stattfinden, wird der Spülgang unterbrochen. Wird die Gerätetür wieder geschlossen, oder kehrt der Strom zurück, läuft das Programm an der Stelle weiter, an der es unterbrochen wurde.
* Nur bei einigen Modellen.
Einfüllen des Spülmittels |
|
|
DE |
||
Ein gutes Spülergebnis hängt auch von einer |
||
|
||
korrekten Spülmitteldosierung ab. Eine zu hohe |
|
|
Dosierung ist nicht gleichzusetzen mit einem besseren |
|
|
Spülergebnis, man belastet dadurch nur die Umwelt. |
|
Die Dosierung des flüssigen oder Pulverspülmittels kann der jeweiligen Verschmutzung angepasst werden.
Bei normaler Verschmutzung werden gewöhnlich etwa 35 g (Pulverspülmittel) oder 35 ml (flüssiges Spülmittel) verwendet. Werden Spülmitteltabs verwendet, reicht ein Tab aus.
Für nur leicht verschmutztes Geschirr, oder für Geschirr, das vorher unter aufendem Wasser abgespült wurde, kann die Spülmittelmenge erheblich reduziert werden.
Beachten Sie für ein optimales Spülergebnis auch die Hinweise auf dem Spülmittel.
Sollten Sie weitere Fragen haben, dann wenden Sie sich bitte an die Beratungsstellen der Spülmittelhersteller.
Zum Öffnen des Spülmittelbehälters drücken Sie den Öffnungsmechanismus "A".
Füllen Sie das Spülmittel ausschließlich in das trockene Fach "B" ein. Die für den Vorspülgang benötigte Spülmittelmenge wird direkt in den Geschirrspüler gegeben.
1.Hinsichtlich der Dosierung verweisen wir auf die Programmtabelle, in der die richtige Menge angegeben ist. Der Behälter B hat eine Füllstandsanzeige, die die maximale Menge des flüssigen oder pulverförmigen Spülmittels für jeden Spülgang anzeigt.
2.Entfernen Sie eventuelle Spülmittelrückstände von den Kanten der Kammern und schließen Sie den Deckel so, dass er einrastet.
3.Schieben Sie den Deckel der Spülmittelkammer zum Schließen nach oben, bis er einrastet.
Die Spülmittelkammer öffnet sich automatisch zum richtigen
Zeitpunkt des jeweils gewählten Programms.
Werden Kombispülmittel verwendet, dann empfehlen wir, die Option TABS zu verwenden. Damit werden die Programme dem verwendeten Spülmittel angepasst, um das bestmögliche Spülergebnis zu erhalten.
 Verwenden Sie bitte ausschließlich Spülmittel für Geschirrspüler.
VERWENDEN SIE BITTE KEIN HANDSPÜLMITTEL.
Bei übermäßiger Spülmittelverwendung können Schaumreste am Ende des Spülgangs zurückbleiben.
Zum Einsatz von Tabs wird nur dann geraten, wenn das Modell die Zusatzfunktion MULTIFUNKTIONS-TABS vorsieht.
Die besten Spülund Trockenergebnisse erhalten Sie nur durch Einsatz von Spülmitteln in Pulverform, flüssigen Klarspülern und Salz.
23

Programme
|
|
|
|
|
|
|
|
|
|
|
|
|
|
|
Die Programmdaten sind Labormessdaten, die gemäß der europäischen Vorschrift EN 50242 erfasst wurden. |
|
|
||||||||
DE |
|
|
|
|||||||||
|
Je nach den unterschiedlichen Einsatzbedingungen können die Dauer und die Daten der Programme anders ausfallen. |
|||||||||||
|
|
|||||||||||
|
|
Die Anzahl und die Art der Spülprogramme und -optionen sind abhängig vom jeweiligen Geschirrspülermodell. |
||||||||||
|
|
|
|
|
|
|
|
|
|
|
||
|
|
Programm |
Trocknen |
Optionen |
Programmdauer |
Wasserverbrauch |
|
Energieverbrauch |
|
|||
|
|
(l/Zyklus) |
|
(KWh/Zyklus) |
|
|||||||
|
|
|
|
|
|
|
|
|
||||
|
|
|
|
|
|
|
|
|
|
|
|
|
|
|
1. Eco |
Ja |
Startverzögerung – Tabs – |
03:15’ |
11,0 |
|
|
1,07 |
|
||
|
|
Extra Dry |
|
|
|
|||||||
|
|
|
|
|
|
|
|
|
|
|
|
|
|
|
2. Auto Intensiv |
Ja |
Startverzögerung – Tabs – |
02:00’ - 03:10’ |
15,5 - 17,0 |
|
|
1,55 - 1,80 |
|
||
|
|
Extra Dry - Zone Wash |
|
|
|
|||||||
|
|
|
|
|
|
|
|
|
|
|
|
|
|
|
|
|
|
|
|
|
|
|
|
|
|
|
|
3. Auto Täglicher |
Ja |
Startverzögerung – Tabs – |
01:30’ - 02:30’ |
15,0 – 16,5 |
|
1,25 - 1,40 |
|
|||
|
|
Abwasch |
Extra Dry - Zone Wash |
|
|
|||||||
|
|
|
|
|
|
|
|
|
|
|
||
|
|
|
|
|
|
|
|
|
|
|
||
|
|
4. Auto Fast/Schnell |
Nein |
Startverzögerung – Tabs |
00:40’ - 01:20’ |
13,0 - 14,5 |
|
|
1,20 - 1,30 |
|
||
|
|
|
|
|
|
|
|
|
|
|
|
|
|
|
5. Trio Wash |
Ja |
Startverzögerung – |
02:00’ |
18,0 |
|
|
1,35 |
|
||
|
|
Tabs – Extra Dry |
|
|
|
|||||||
|
|
|
|
|
|
|
|
|
|
|
|
|
|
|
|
|
|
|
|
|
|
|
|
|
|
|
|
6. Fein |
Ja |
Startverzögerung – |
01:40’ |
11,5 |
|
|
1,15 |
|
||
|
|
Tabs – Extra Dry |
|
|
|
|||||||
|
|
|
|
|
|
|
|
|
|
|
|
|
|
|
7. Express 30’ |
Nein |
Startverzögerung - Tabs |
00:30’ |
9,0 |
|
|
0,55 |
|
||
|
|
|
|
|
|
|
|
|
|
|
|
|
|
|
8. Extraleise |
Ja |
Startverzögerung – |
03:30’ |
16,0 |
|
|
1,05 |
|
||
|
|
Tabs – Extra Dry |
|
|
|
|||||||
|
|
|
|
|
|
|
|
|
|
|
|
|
|
|
|
|
|
|
|
|
|
|
|
||
|
|
9. Einweichen |
Nein |
Startverzögerung |
00:12’ |
4,5 |
|
|
0,01 |
|
||
|
|
|
|
|
|
|
|
|
|
|
||
|
|
10. Hygiene |
Ja |
Startverzögerung |
01:20’ |
10,0 |
|
|
1,25 |
|
||
|
|
|
|
|
|
|
|
|
|
|
||
|
|
11. Selbstreinigung |
Nein |
Startverzögerung |
00:50’ |
8,0 |
|
|
0,85 |
|
||
|
|
|
|
|
|
|
|
|
|
|
|
|
Angaben zur Programmwahl und Dosierung des Spülmittels:
1. Spülzyklus ECO ist das Standardprogramm, auf das sich die Daten des Energie-Labels beziehen; dieser Zyklus eignet sich zum
Spülen von normal verschmutzem Geschirr und ist das effizienteste Programm im Hinblick auf Energieund Wasserverbrauch für diese Art von Geschirr. 32 g/ml + 6 g/ml** – 1 Tab (**Spülmittelmenge für den Vorspülgang)
2.Stark verschmutztes Geschirr und Töpfe (nicht geeignet für empfindliches Geschirr). 38 g/ml – 1 Tab
3.Normal verschmutztes Geschirr und Töpfe. 32 g/ml + 6 g/ml** – 1 Tab
4.Tägl. Abwasch geringfügiger Mengen (Ideal für 4 Gedecke) 25 g/ml – 1 Tab
5.Differenzierter Spülgang für die zwei/drei* Körbe (* nur bei einigen Modellen vorhanden): normal für Besteck und Gläser im oberen und im dritten* Korb, energisch für Töpfe im unteren Korb. 38 g/ml – 1 Tab
6.Schonspülgang für empfindliches Geschirr, das keinen hohen Temperaturen ausgesetzt werden darf. 35 g/ml – 1 Tab
7.Schneller Spülgang für nur wenig verschmutztes Geschirr. (Ideal für 2 Gedecke) 25 g/ml – 1 Tab
8.Sichert hervorragende Leistungen zu. Geeignet für den nächtlichen Einsatz. 38 g/ml – 1 Tab
9.Abspülen des Geschirrs, das erst später, zusammen mit weiterem Geschirr, gespült werden soll. Kein Spülmittel
10.Desinfektionszyklus mit hohen Temperaturen. Ideal für Geschirr und Babyfläschchen. 30 g/ml – 1 Tab
11.Reinigungszyklus der Spülmaschine, der nur bei LEERER Maschine und mit speziellen Reinigungsmitteln verwendet wird.
Standby-Verbrauch: Verbrauch im Left-On-Modus: 5 W - Verbrauch im Off-Modus: 0,5 W
24

Sonderprogramme und Optionen
Hinweis:
Die optimale Leistung der Programme "Schnell und Express
30´" ist dann gewährleistet, wenn die Anzahl der angegebenen
Maßgedecke eingehalten wird.
Das Für einen geringeren Verbrauch sollte die Maschine voll beladen werden.
Hinweis für die Prüflabors: Informationen hinsichtlich der Bedingungen des EN-Vergleichstests sind unter nachfolgender
Adresse anzufordern: ASSISTENZA_EN_LVS@indesitcompany. com
Spüloptionen
Ist eine Option mit dem eingestellten Programm nicht kompatibel (siehe Spülprogrammtabelle) leuchtet die entsprechende LED 3 Mal rasch auf und Sie vernehmen 2 kurze akustische Signale.
Startzeitvorwahl
Der Start des Spülprogramms kann um 1 bis 12 Std. verschoben werden.
1.Drücken Sie die Taste STARTZEITVORWAHL: das Display zeigt das entsprechende Symbol; mit jedem weiteren Druck wird die Zeit bis zum Start des ausgewählten Programms erhöht (1h, 2h, etc. bis max. 12h).
2.Wählen Sie das Spülprogramm aus und schließen Sie die Tür: der Countdown startet.
3.Ist die Zeit abgelaufen, erlischt die Anzeigeleuchte und das
Spülprogramm startet.
Zur Änderung der Startzeit und zur Wahl eines früheren Startes drücken Sie die Taste STARTZEITVORWAHL. Zum Löschen drücken Sie die Taste so oft, bis sich die der gewünschten Startverzögerung entsprechende Kontrollleuchte ausschaltet. Das Programm startet beim Schließen der Tür.
Programm ACTIVE OXIGEN
Diese Vorrichtung gibt in der Spülmaschine Ozonmoleküle frei, eine in der Natur vorkommende Substanz, die schlechte Gerüche reduzieren kann.
Die Option wird zwischen zwei Spülgängen verwenden und NUR, wenn das Gerät bereits mit verschmutztem Geschirr beladen wurde.
Die Option ACTIVE OXIGEN wird mit einem längeren Druck auf die Taste O3 Aktiviert. Die Option bleibt 24 Stunden oder bis zum nächsten Spülprogrammstart aktiv. Sie können jederzeit weiteres Geschirr einladen, bis das Gerät voll ist. In der Spülmaschine kann ein leichter, typischer Geruch wahrgenommen werden. Der gleiche Geruch ist manchmal bei Gewittern wahrnehmbar und ist ebenfalls auf das von den Blitzen erzeugte Ozon zurückzuführen; das ist völlig normal. Die von der Vorrichtung freigegebene Ozonmenge ist sehr gering und zerfällt sehr schnell.
Ein Nachfüllen ist nicht notwendig.
Extratrocken |
DE |
|
Zur Optimierung des Trockengrades des Geschirrs drücken Sie die Taste EXTRA TROCKEN; die Taste leuchtet auf.
Durch erneuten Druck auf die Taste wird die Option deaktiviert. Eine höhere Temperatur während des letzten Spülgangs und ein längerer Trockengang verbessern die Trocknung des Geschirrs.
 Die Option EXTRATROCKEN verlängert die Programmdauer.
Multifunktions-Tabs (Tabs)
Diese Option optimiert das Spül - und Trocknungsergebniss.
Sollten Sie Multifunktions-Tabs verwenden, drücken Sie die Taste MULTIFUNKTIONS-TABS, die Kontrollleuchte schaltet sich ein; ein erneuter Druck der Taste deaktiviert die Funktion.
 Die Option "Multifunktions-Tabs" bewirkt eine Verlängerung des Spülprogramms.
 Die Verwendung von Tabs wird nur empfohlen, wenn diese Option vorhanden ist. Auch raten wir von der Benutzung von Tabs bei Programmen, die diese nicht vorsehen, ab.
Zone Wash


 Mit dieser Option kann der Spülzyklus auf den ausgewählten Korb beschränkt werden. Wählen Sie erst das
Programm und drücken Sie dann die Taste ZONE WASH: der ausgewählte Korb leuchtet auf und der Spülzyklus wird nur für diesen Korb ausgeführt; mit einem weiteren Druck der Taste wird die Option deaktiviert.
Die Option ist für folgende Programme nicht verfügbar: Intensiv und Normal.
Durch Auswahl der Option und Intensivprogramm wird der Spülzyklus ULTRAINTENSIVE ZONE aktiviert. Dieses Programm ist ideal für stark verschmutztes, gemischtes Geschirr, beispielsweise Töpfe und Pfannen, verkrustete Teller oder schwer zu spülendes Geschirr (Reibe, Gemüsepassiersieb, stark verschmutztes Besteck). Der Drück der Sprüharme wird verstärkt und die Spültemperatur erhöht. Damit kann ein optimales Spülergebnis bei starker Verschmutzung erzielt werden.
Durch Auswahl der Option und Normalprogramm wird der Spülzyklus SAVING ZONE aktiviert. Mit dieser Funktion wird der
Energieverbrauch reduziert. Der Zyklus kann möglicherweise eine andere Dauer aufweisen.
Beachten Sie, dass Sie nur den ausgewählten Korb befüllen.
25
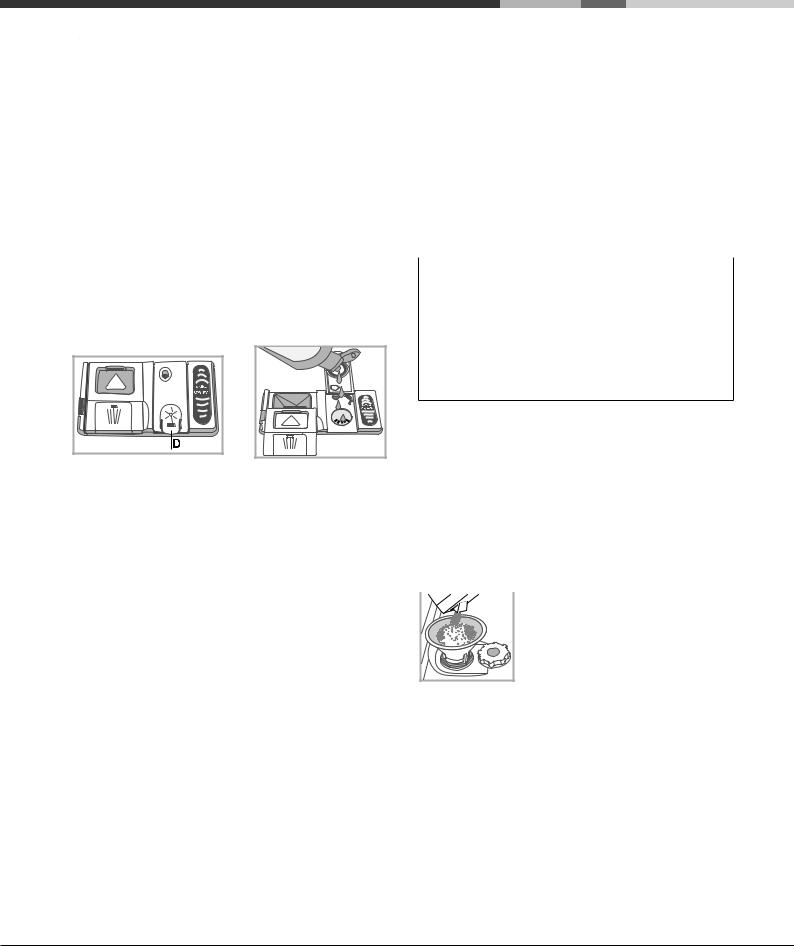
Klarspüler und Regeneriersalz
DE |
|
|
Verwenden Sie bitte nur Spezialspülmittel für |
|
|
||
|
Geschirrspüler. Verwenden Sie bitte kein Kochoder |
||
|
|
||
|
|
Industriesalz und auch keine Handspülmittel. Bitte befolgen |
|
|
|||
|
|
Sie die auf der Verpackung befindlichen Anweisungen. |
|
 Sollten Sie ein Multifunktionsprodukt verwenden, ist ein Hinzufügen von weiterem Klarspüler nicht erforderlich. Der
Zusatz von Regeneriersalz ist jedoch ratsam, besonders bei hartem oder sehr hartem Wasser. (Bitte befolgen Sie die auf der Verpackung befindlichen Anweisungen).
 Da weder Salz noch Klarspüler eingefüllt wird, ist es ganz normal,dassdieKontrollleuchtenderSALZNACHFÜLLANZEIGE* und der KLARSPÜLERNACHFÜLLANZEIGE* weiterhin leuchten.
Einfüllen des Klarspülers
Der Klarspüler fördert das Trocknen des Geschirrs, da das Wasser von der Geschirroberfläche abläuft; es verbleiben weder Streifen noch Flecken. Der Klarspülerbehälter muss aufgefüllt werden:
• w e n n a u f d e r B e d i e n b l e n d e d i e KLARSPÜLERNACHFÜLLANZEIGE* aufleuchtet, ist noch eine Klarspülerreserve für 1-2 Spülgänge vorhanden;
A |
X |
M |
1. Den Behälter “D” durch Drücken und Anheben der Zunge auf dem Deckel öffnen;
2. Den Klarspüler vorsichtig bis zur maximalen
Füllstandsmarkierung an der Füllöffnung einfüllen und ein Überlaufen vermeiden. Andernfalls sofort mit einem trockenen Tuch abwischen.
3. Den Deckel schließen bis er einrastet.
Füllen Sie den Klarspüler NIEMALS direkt ins Innere des Geschirrspülers.
Klarspülerdosierung
Sollte das Trockenergebnis unzufrieden stellend sein, kann die Klarspülerdosierung neu eingestellt werden. Die Spülmaschine mit der ON/OFF-Taste einund ausschalten. Drücken Sie die Taste P drei Mal drücken. Mit der ON/OFF-Taste einschalten, die eingestellte Stufe erscheint auf dem Display (auf werksseitige Werte eingestellt).
Die Klarspülermenge über die Taste P einstellen.
Die ON/OFF-Taste drücken, um die Einstellung zu bestätigen.
Die Klarspülerstufe kann auf NULL eingestellt werden. In diesem Fall wird kein Klarspüler ausgegeben und die Kontrollleuchte zur Anzeige des fehlenden Klarspülers leuchtet nicht mehr auf. Je nach Gerätemodell können bis max. 4 Stufen eingestellt werden.
•wenn das Geschirr Streifen aufweist, drehen Sie den Regler auf eine niedrige Einstellung (1-2).
•befinden sich Wassertropfen oder Kalkflecken darauf, drehen
Sie den Regler auf höhere Einstellungen (3-4).
Einstellen der Wasserhärte
Jeder Geschirrspüler ist mit einem Wasserenthärter ausgestattet, der durch Verwendung von speziell für Geschirrspüler vorgesehenem Regeneriersalz den Geschirrspüler mit kalkfreiem
Wasser versorgt.
Dieser Geschirrspüler kann so eingestellt werden, dass die Umweltbelastung reduziert und die Spülleistungen entsprechend der Wasserhärte optimiert werden. Angaben zur Wasserhärte erhalten Sie bei Ihrem Wasserwerk.
Die Spülmaschine mit der ON/OFF-Taste einund ausschalten.
Die Taste P einige Sekunden gedrückt halten, bis das akustische
Signal ertönt. Mit der ON/OFF-Taste einschalten, die eingestellte
Stufe erscheint auf dem Display (das Regeneriersalz ist auf eine mittlere Stufe eingestellt).
Die Wasserhärte wird mit der Programmtaste P eingestellt; (1-2-
3-4-5* siehe Tabelle Wasserhärte) bis max. 5 Stufen.
Die ON/OFF-Taste drücken, um die Einstellung zu bestätigen.
Wenn Multifunktionstabs verwendet werden, ist trotzdem der Salzbehälter zu füllen.
Tabelle zur Wasserhärte |
|
Salzbehälter reicht |
|||
|
durchschnittlich für** |
||||
|
|
|
|
|
|
Stufe |
°dH |
°fH |
mmol/l |
Monate |
|
1 |
0 |
- 6 |
0 - 10 |
0 - 1 |
7 Monate |
2 |
6 - 11 |
11 - 20 |
1,1 - 2 |
5 Monate |
|
3 |
12 |
- 17 |
21 - 30 |
2,1 - 3 |
3 Monate |
4 |
17 |
- 34 |
31 - 60 |
3,1 - 6 |
2 Monate |
5* |
34 |
- 50 |
61 - 90 |
6,1 - 9 |
2-3 Wochen |
Von 0 °f bis 10 °f wird empfohlen, kein Salz zu verwenden.
* mit der Einstellung 5 kann sich die Haltbarkeit verlängern. ** bei einem Spülzyklus pro Tag
(°dH = Grad deutsche Härte - °fH = Grad französische Härte - mmol/l = Millimol/Liter)
Einfüllen des Regeneriersalzes
Um ein optimales Spülergebnis zu gewährleisten, sollte der Salzbehälter niemals leer sein.
Durch das Regeneriersalz wird das Wasser entkalkt; demnach setzt sich kein Kalk auf Ihrem Geschirr ab.
Der Salzbehälter befindet sich im Geschirrspülerboden (siehe Beschreibung) und muss aufgefüllt werden:
•Wenn der grüne Schwimmer* durch den Salzstöpsel hindurch nicht sichtbar ist;
•wenn auf der Bedienblende/Display die Kontrollleuchte/ Symbol der SALZNACHFÜLLANZEIGE*aufleuchtet;
 1. Ziehen Sie den Unterkorb heraus und
schrauben Sie den Salzbehälterdeckel
gegen den Uhrzeigersinn ab.
2. Nur bei erstmaliger Inbetriebnahme: Füllen
Sie den Behälter bis zum Rand mit Wasser. 3. Setzen Sie den mitgelieferten Trichter* auf (siehe Abbildung ) und füllen Sie den
Behälter bis zum Rand mit Salz (ca. 1 kg), es ist normal, wenn etwas Wasser ausläuft.
4. Nehmen Sie den Trichter* heraus und entfernen Sie die Salzreste vom Öffnungsrand; spülen Sie den Deckel unter fließendem Wasser ab, bevor Sie ihn wieder aufschrauben. Halten Sie ihn hierzu kopfüber unter den Wasserstrahl und lassen Sie das Wasser aus den vier Schlitzen im unteren Bereich des Deckels abfließen. (Salzdeckel mit grünem Schwimmer*)
Es wird empfohlen, diesen Vorgang bei jedem Nachfüllen von Salz zu wiederholen.
Schrauben Sie den Deckel fest auf, damit während des Spülgangs keine Spüllauge eintreten kann. (Diese könnte den Enthärter dauerhaft beschädigen).
 Sollte das Nachfüllen von Salz erforderlich sein, sollte dies sofort vor der Durchführung eines Spülgangs erfolgen, damit die übergelaufene Salzlösung sofort entfernt wird.
* Nur bei einigen Modellen.
26
 Loading...