


Instructions for Installation and Use
Build-in Electric double oven
BD62 Mk2
BD52 Mk2
DQ47 Mk2
DE47X1
To the Installer:
Before installation, fill in the product details on the back cover of this book. The information can be found on the rating plate.
To the User:
You must read the instructions prior to installing and using the appliance and then retain them for future reference.
PLEASE READ THIS BOOKLET CAREFULLY.
Contents |
Page |
Introduction |
3 |
Safety Information - Always |
4 |
Never |
5 |
The main parts of your Double Oven (BD62 & BD52) |
6 |
The main parts of your Double Oven (DQ47 & DE47X1) |
7 |
Temperature Conversion Chart |
8 |
Controls (BD62 & BD52) |
9 |
Controls (DQ47 & DE47X1) |
10 |
Multifunction Selection Switch (BD62 & BD52) |
11 |
Oven Timer Operation |
12-17 |
Grill Pan and Handle |
18 |
Operation when using Top Oven for Grilling |
19-20 |
Guide for Grilling |
20 |
Using the Top Oven as a Convection Oven |
21 |
Operation when using the Top Oven as a Convection Oven |
22 |
Cooking Temperature Charts |
23-24 |
Main Oven Fan Grilling (BD62 & BD52) |
25 |
Main Oven Fan Grilling Roasting Chart (BD62 & BD52) |
26 |
Using the Main Oven for other Functions |
27 |
Main Oven - Convection (BD62 & BD52) and Fan Oven |
28 |
Main Oven - Fan Oven Cookery Notes |
29-30 |
Main Oven - Cooking Temperature Charts |
31-32 |
Main Oven - Circulaire Roasting (BD62 & BD52) |
33 |
Main Oven - Circulaire Roasting Chart (BD62 & BD52) |
34 |
Slow Cook |
35 |
Main Oven Grilling (BD62 & BD52) |
36 |
Care and Cleaning |
37-40 |
Installation Instructions |
41-44 |
If Something Goes Wrong |
45-46 |
Hotpoint Service Cover |
47 |
Key Contacts |
Back Cover |
Retention of this Instruction Book
This Instruction Book must be kept handy for reference as it contains important details on the safe and proper use of the appliance.
If you sell or pass the appliance to someone else, or move house and leave it behind, make sure this Book is also provided so the new owner can become familiar with the appliance and safety warnings.
2

Introduction
Your new appliance is guaranteed* and will give lasting service. This guarantee is only applicable if the appliance has been installed in accordance with the installation instructions detailed in this booklet.
To help make best use of your cooking equipment, please read this booklet carefully.
The appliance is designed specifically for domestic use and responsibility will not be accepted for use in any other installation.
When the cooker is first used an odour may be emitted, this will cease after a period of use
To help remove the ‘new’ smell, heat up the empty ovens to maximum temperature for a minimum of two or three hours, keeping the oven doors closed. Ensure that the room is well ventilated (e.g. open a window or use an extractor fan) and that persons who may be sensitive to the odour avoid any fumes.
It is suggested that any pets be removed from the room until the smell has ceased. This odour is due to temporary finish on oven liners and elements and also any moisture absorbed by the insulation.
*The guarantee is subject to the provisions that the appliance:
(a)Has been used solely in accordance with the Users Instruction Book.
(b)Has been properly connected to a suitable supply voltage as stated on the rating plate attached to this equipment.
(c)Has not been subjected to misuse or accident or been modified or repaired by any person other than the authorised employee or agent.
(d)Has been correctly installed.
This appliance conforms to the following EEC Directives:
Electromagnetic Compatibility |
Low Voltage Equipment |
89/336/EEC |
73/23/EEC |
92/31/EEC |
93/68/EEC |
93/68/EEC |
|
3

Safety Information
When used properly your appliance is completely safe but as with any electrical product there are certain precautions that must be observed.
PLEASE READ THE PRECAUTIONS BELOW BEFORE USING YOUR APPLIANCE.
Always
●Always make sure you remove all packaging and literature from inside the oven and grill compartments before switching on for the first time.
●Always make sure you understand the controls prior to using the appliance.
●Always keep children away from the appliance when in use as the surfaces will get extremely hot during and after cooking.
●Always make sure all controls are turned off when you have finished cooking and when not in use.
●Always stand back when opening an oven door to allow any build up of steam or heat to disperse.
●Always use dry, good quality oven gloves when removing items from the oven/grill.
●Always take care to avoid heat/steam burns when operating the controls.
●Always turn off the electricity supply at the wall switch before cleaning and allow the appliance to cool.
●Always make sure the shelves are in the correct position before switching on the oven.
●Always keep the oven and grill doors closed when the appliance is not in use.
●Always take care when removing utensils from the top oven when the main oven is in use as the contents may be hot.
●Always keep the appliance clean as a build up of grease or fat from cooking can cause a fire.
●Always follow the basic principles of food handling and hygiene to prevent the possibility of bacterial growth.
●Always keep ventilation slots clear of obstructions.
●Always refer servicing to a qualified appliance service engineer.
●During use the oven becomes hot. Care should be taken to avoid touching heating elements inside the oven,
SAFETY ADVICE
IN THE EVENT OF A CHIP PAN OR ANY OTHER PAN FIRE:
1.TURN OFF THE COOKER APPLIANCE AT THE WALL SWITCH.
2.COVER THE PAN WITH A FIRE BLANKET OR DAMP CLOTH, this will smother the flames and extinguish the fire.
3.LEAVE THE PAN TO COOL FOR AT LEAST 60 MINUTES BEFORE MOVING IT. Injuries are often caused by picking up a hot pan and rushing outside with it. NEVER USE A FIRE EXTINGUISHER TO PUT OUT A PAN FIRE as the force of the extinguisher is likely to tip the pan over. Never use water to extinguish oil or fat fires.
4
Safety Information
Never
●Never leave children unsupervised where a cooking appliance is installed as all cooking surfaces will be hot during and after use.
●Never allow anyone to sit or stand on any part of the appliance.
●Never store items above the appliance that children may attempt to reach.
●Never remove the oven shelves whilst the oven is hot.
●Never heat up unopened food containers as pressure can build up causing the container to burst.
●Never store chemicals, food stuffs or pressurised containers in or on the appliance, or in cabinets immediately above or next to the appliance.
●Never operate the grill with the door closed as this will cause the appliance to overheat.
●Never use the appliance as a room heater.
●Never use the grill to warm plates.
●Never dry any items on the oven doors.
●Never install the appliance next to curtains or other soft furnishings.
●Never allow children to play with the appliance controls.
●Never use ‘steam cleaners’.
This appliance is not intended for use by persons (including children) with reduced physical, sensory or mental cpabilities, or lack of experience and knowledge, unless they have been given supervision or instruction concerning use of the appliance by a person responsible for their safety.
Children should be supervised to ensure that they do not play with the appliance.
5
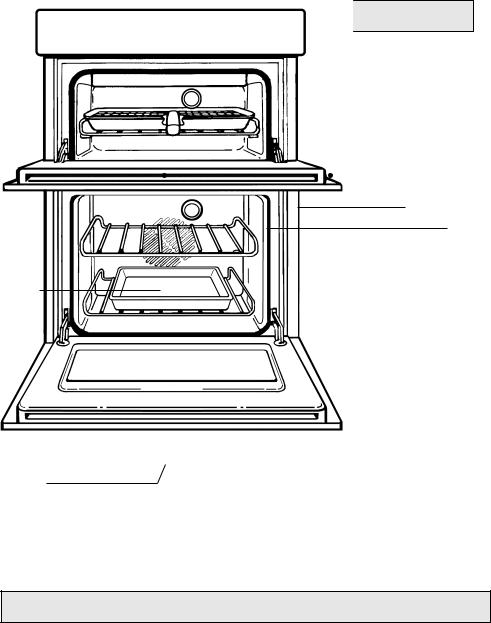
The main parts of your Double Oven (BD62 & BD52)
WARNING: DO NOT TOUCH THE GLASS DOORS WHEN THE OVEN IS IN USE AS THESE
AREAS CAN BECOME HOT.
|
|
|
|
|
|
|
|
|
|
|
|
|
|
|
|
Top Oven |
|
|
|
Main Oven |
|||||||||||||||||||||||
|
|
|
|
|
|
|
|
|
|
|
|
|
|
|
|
|
|
|
Temperature |
||||||||||||||||||||||||
|
|
|
|
|
|
|
|
|
|
|
|
Temperature Control |
|
|
|
Control |
|||||||||||||||||||||||||||
|
|
|
|
|
|
|
|
|
|
|
|
Top |
|
|
|
|
Timer |
|
|
|
|
|
|
|
|
|
|
|
|
|
|||||||||||||
|
|
|
|
|
|
|
|
|
|
|
|
|
|
|
|
|
|
|
|
|
|
|
|
|
|
|
|
|
|||||||||||||||
|
|
|
|
|
|
|
|
|
|
|
|
|
|
|
|
|
|
|
|
|
|
Main Oven |
|||||||||||||||||||||
|
|
|
|
|
|
|
|
|
|
|
|
|
|
|
|
|
|
|
|
|
|||||||||||||||||||||||
|
|
|
|
|
|
|
|
|
|
|
|
Oven |
|
|
|
|
|
|
|
|
|
|
|||||||||||||||||||||
|
|
|
|
|
|
|
|
|
|
|
|
|
|
|
|
|
|
|
|
|
|
|
|
Pilot |
|||||||||||||||||||
|
|
|
|
|
|
|
|
|
|
|
|
Pilot |
|
|
|
|
|
|
|
|
|
|
|
|
|||||||||||||||||||
|
|
|
|
|
|
|
|
|
|
|
|
|
|
|
|
|
|
|
|
|
|
|
|
|
|
|
|
|
|
|
|
|
|
|
|
|
|
||||||
|
|
|
|
|
|
|
|
|
|
|
|
|
|
|
|
|
|
|
|
|
|
|
|
|
|
|
|
|
|
|
|
|
|
|
|
|
|
|
|
|
|
|
|
|
|
|
|
|
|
|
|
|
|
|
|
|
|
|
|
|
|
|
|
|
|
|
|
|
|
|
|
|
|
|
|
|
|
|
|
|
|
|
|
|
|
|
|
|
|
|
|
|
|
|
|
|
|
|
|
|
|
|
|
|
|
|
|
|
|
|
|
|
|
|
|
|
|
|
|
|
|
|
|
|
|
|
|
|
|
|
|
|
|
|
|
|
|
|
|
|
|
|
|
|
|
|
|
|
|
|
|
|
|
|
|
|
|
|
|
|
|
|
|
|
|
|
|
|
|
Multifunction |
|
|
|||
|
|
|
Grill Control |
|
|
|
|
|
|
|
|
|
|
|
|
|
|
|
|
|
|
|
|
|
|
|
|
|
|
|
|
|
|||||||||||
|
|
|
|
|
|
|
|
|
|
|
|
|
|
|
|
|
|
|
|
|
|
|
|
|
|
|
|
|
|
|
|
|
|
|
|
|
|
Selector |
|
|
|||
|
|
|
|
|
|
|
|
|
|
|
|
|
|
|
|
|
|
|
|
|
|
|
|
|
|
|
|
|
|
|
|
|
|
|
High Speed |
||||||||
|
|
|
|
|
|
|
|
|
|
|
|
|
|
|
|
|
|
|
|
|
|
|
|
|
|
|
|
|
|
|
|
|
|
|
Grill Element |
||||||||
|
|
Stay Clean |
|
|
|
|
|
|
|
|
|
|
|
|
|
|
|
|
|
|
|
|
|
|
|
|
|
|
|
|
|
Oven Light |
|||||||||||
|
|
|
|
|
|
|
|
|
|
|
|
|
|
|
|
|
|
|
|
|
|
|
|
|
|||||||||||||||||||
|
|
Liner |
|
|
|
|
|
|
|
|
|
|
|
|
|
|
|
|
|
|
|
|
|
|
|||||||||||||||||||
|
Rod |
|
|
|
|
|
|
|
|
|
|
|
|
|
|
|
|
|
|
|
|
|
|
|
|
|
|
|
|
|
|
|
Grill Pan, Food support |
||||||||||
|
|
|
|
|
|
|
|
|
|
|
|
|
|
|
|
|
|
|
|
|
|
|
|
|
|
|
|
|
|
|
|
||||||||||||
|
|
|
|
|
|
|
|
|
|
|
|
|
|
|
|
|
|
|
|
|
|
|
|
|
and Anti-Splash Tray |
||||||||||||||||||
|
Shelf |
|
|
|
|
|
|
|
|
|
|
|
|
|
|||||||||||||||||||||||||||||
|
|
|
|
|
|
|
|
|
|
|
|
|
|
|
|
|
|
|
|
|
|
|
|||||||||||||||||||||
|
Inner |
|
|
|
|
|
|
|
|
|
|
|
|
|
|
|
|
|
|
|
Top Oven |
||||||||||||||||||||||
|
Door |
|
|
|
|
|
|
|
|
|
|
|
|
|
|
|
|
|
|
|
|||||||||||||||||||||||
|
|
|
|
|
|
|
|
|
|
|
|
|
|
|
|
|
|
|
|
Door |
|||||||||||||||||||||||
|
Glass |
|
|
|
|
|
|
|
|
|
|
|
|
|
|
|
|
|
|
|
|||||||||||||||||||||||
|
|
|
|
|
|
|
|
|
|
|
|
|
|
|
|
|
|
|
|
|
|
|
|||||||||||||||||||||
|
Oven |
|
|
|
|
|
|
|
|
|
|
|
|
|
|
|
|
|
|
|
Fan Grill |
||||||||||||||||||||||
|
|
|
|
|
|
|
|
|
|
|
|
|
|
|
|
|
|
|
|
||||||||||||||||||||||||
|
Light |
|
|
|
|
|
|
|
|
|
|
|
|
|
|
|
|
|
|
|
|
|
|
|
|
|
|
|
|
||||||||||||||
|
|
|
|
|
|
|
|
|
|
|
|
|
|
|
|
|
|
|
|
|
|
|
|
|
|
|
|
|
|||||||||||||||
|
Oven |
|
|
|
|
|
|
|
|
|
|
|
|
|
|
|
|
|
|
|
|
|
|
|
|
|
|
|
|
|
|
|
|
|
|
|
Element |
||||||
|
|
|
|
|
|
|
|
|
|
|
|
|
|
|
|
|
|
|
|
|
|
|
|
|
|
|
|
|
|
|
|
|
|
|
|
||||||||
|
|
|
|
|
|
|
|
|
|
|
|
|
|
|
|
|
|
|
|
|
|
|
|
|
|
|
|
|
|
|
|
|
|
||||||||||
|
|
|
|
|
|
|
|
|
|
|
|
|
|
|
|
|
|
|
|
|
|
|
|
|
|
|
|
|
|
|
|
|
|
||||||||||
|
Fan |
|
|
|
|
|
|
|
|
|
|
|
|
|
|
|
|
|
|
|
|
|
|
||||||||||||||||||||
Stay Clean |
|
|
|
|
|
|
|
|
|
|
|
|
|
|
|
|
|
|
|
|
|
|
|||||||||||||||||||||
Liner |
|
|
|
|
|
|
|
|
|
|
|
|
|
|
|
|
|
|
|
|
|
|
|
|
|
|
|
|
|
|
Oven |
|
|||||||||||
|
|
|
|
|
|
|
|
|
|
|
|
|
|
|
|
|
|
|
|
|
|
|
|
|
|||||||||||||||||||
|
|
|
|
|
|
|
|
|
|
|
|
|
|
|
|
|
|
|
|
|
|
|
|
|
|
|
|
|
|
|
|
|
|
|
|
|
|
||||||
|
|
Meat pan and |
|
|
|
|
|
|
|
|
|
|
|
|
|
|
|
|
|
|
|
|
|
|
|
|
|
|
|
Shelves |
|
||||||||||||
|
|
|
|
|
|
|
|
|
|
|
|
|
|
|
|
|
|
|
|
|
|
|
|
|
|
|
|
|
|
||||||||||||||
|
|
|
|
|
|
|
|
|
|
|
|
|
|
|
|
|
|
|
|
|
|
|
|
|
|
|
|||||||||||||||||
|
|
Roasting rack |
|
|
|
|
|
|
|
|
|
|
|
|
|
|
|
|
|
|
|
|
|
|
|||||||||||||||||||
|
|
|
|
|
|
|
|
|
|
|
|
|
|
|
|
|
|
|
|
|
|
|
|
||||||||||||||||||||
|
|
|
|
|
|
|
|
|
|
|
|
|
|
|
|
|
|
|
|
|
|
|
|
|
|
|
|
|
|
|
|
|
|
|
|
|
|
|
|
|
|
||
|
Model & Serial |
|
|
|
|
|
|
|
|
|
|
|
|
|
|
|
|
|
|
|
|
|
|
|
|
|
|
|
|
|
|
|
|
|
|
|
|||||||
|
number |
|
|
|
|
|
|
|
|
|
|
|
|
|
|
|
|
|
|
|
|
|
|
|
|
|
|
|
|
|
|
|
|
|
|
|
|||||||
|
|
|
|
|
|
|
|
|
|
|
|
|
|
|
|
|
|
|
|
|
|
|
|
|
|
|
|
|
|
|
|
|
|
|
|
|
|
|
|
|
|
|
|
|
Inner Door |
|
|
|
|
|
|
|
|
|
|
|
|
|
|
|
|
|
|
|
|
|
|
|
|
|
|
|
|
|
|
|
|
|
|
|
|||||||
|
|
|
|
|
|
|
|
|
|
|
|
|
|
|
|
|
|
|
|
|
|
|
|
|
|
|
|
||||||||||||||||
|
Glass |
|
|
|
|
|
|
|
|
|
|
|
|
|
|
|
|
|
|
Main Oven |
|||||||||||||||||||||||
|
|
|
|
|
|
|
|
|
|
|
|
|
|
|
|
|
|
|
|
|
|
|
|
|
|
|
|
|
|
|
|
|
|
|
|
|
|
|
|
Door |
|||
NEVER line the shelves, |
or sides of the oven or grill with aluminium foil as |
overheating and damage may result.
6

The main parts of your Double Oven (DQ47 & DE47X1)
WARNING: DO NOT TOUCH THE GLASS DOORS WHEN THE OVEN IS IN USE AS THESE
AREAS CAN BECOME HOT.
Top Oven |
|
Main Oven |
||
Temperature |
|
Temperature |
||
Control |
|
Control |
||
Top |
|
Timer |
|
|
|
|
|||
|
|
|
Main Oven |
|
|
|
|
||
Oven |
|
|
|
|
|
|
|
Pilot |
|
Pilot |
|
|
|
|
|
|
|
|
|
|
|
|
|
|
|
|
|
|
|
Grill Control
Stay Clean
Liner
Rod
Shelf
Inner
Door
Glass
Oven
Light
Oven
Fan
Stay Clean
Liner
Meat pan
High Speed
Grill Element
Oven Light
Grill Pan, Food support and Anti-Splash Tray
Top Oven
Door
Oven
Shelves
Inner Door
Glass Main Oven
Door
MODEL & SERIAL NUMBER LABEL – Record the Model No. and the Serial No. on KEY CONTACTS, back page.
NEVER line the shelves, |
or sides of the oven or grill with aluminium foil as |
overheating and damage may result.
7
Temperature Conversion Chart
The chart below gives details of comparisons of oven settings for gas conventional ovens and fan oven in degrees ˚F and ˚C
GAS |
CONVENTIONAL |
FAN |
|
MARK |
|
OVEN |
OVEN |
|
|
|
|
|
˚F |
˚C |
˚C |
|
|
|
|
1/2 |
250 |
120 |
100 |
1 |
275 |
140 |
120 |
2 |
300 |
150 |
130 |
3 |
325 |
160 |
140 |
4 |
350 |
180 |
160 |
5 |
375 |
190 |
170 |
6 |
400 |
200 |
180 |
7 |
425 |
220 |
200 |
8 |
450 |
230 |
210 |
9 |
475 |
240 |
220 |
|
|
|
|
8
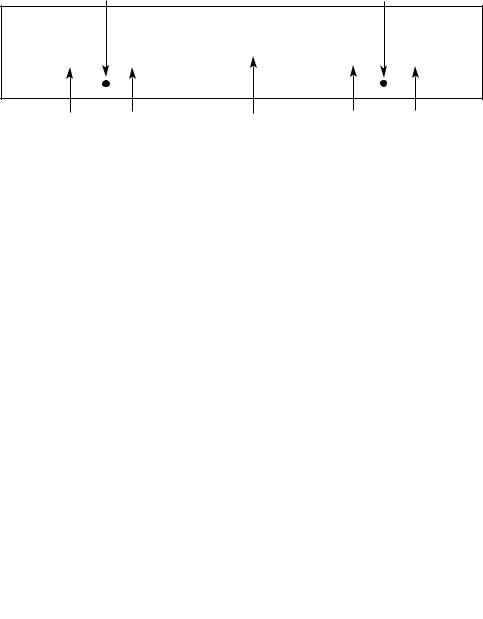
The Controls (BD62 & BD52)
Top Oven Pilot |
Main Oven Pilot |
A B  C D
C D
Grill |
Top Oven |
Timer |
Main Oven |
Multifunction |
Control |
|
Temperature |
Selector |
|
|
|
|||
|
Control |
|
Control |
|
IMPORTANT
Before using your oven in the ordinary way, ALWAYS make sure that the timer has been set to MANUAL operation. Unless this is done, the main oven cannot heat up. Before seeking assistance, sure this is done (refer to oven timer operation).
MULTIFUNCTION ECTOR
Rotate the control knob in either direction to the required function. Many of the functions will require the main oven thermostat to be set before the oven will heat up.
MAIN OVEN TEMP |
E CONTROL |
This is used |
addition to the multifunction selector. This is used for the |
functions: fan oven, fan grill, half grill and full grill and conventional oven. |
|
Turn the control clockwise to set the oven thermostat to the required |
|
temperature |
|
If the timer |
set correctly and the selector switch set to a suitable function an |
indicator light will illuminate. This will remain on until the oven reaches the required temperature. This light will then cycle on and off as the thermostat maintains control of the oven temperature.
TOP OVEN TEMPERATURE CONTROL
Turn the control clockwise to set the top oven thermostat to the required temperature An indicator light will illuminate. This will remain on until the oven reaches the temperature. This light will then cycle on and off as the thermostat maintains control of the oven thermostat.
GRILL CONTROL
The grill control is designed to provide variable heat control of either both grill elements on or the single left-hand grill element only.
To set the grill power turn the grill control to any setting MIN (1) - MAX (4), clockwise for grill and anti-clockwise for HALF grill.
COOLING FAN
A gentle flow air will be blown below the control panel when the grill control is used and after a short period of time when the ovens are used.
Note: Whenever the appliance has been used, the cooling fan may run on or restart itself after all the controls have been turned off. This indicates that the appliance is still warm.
9
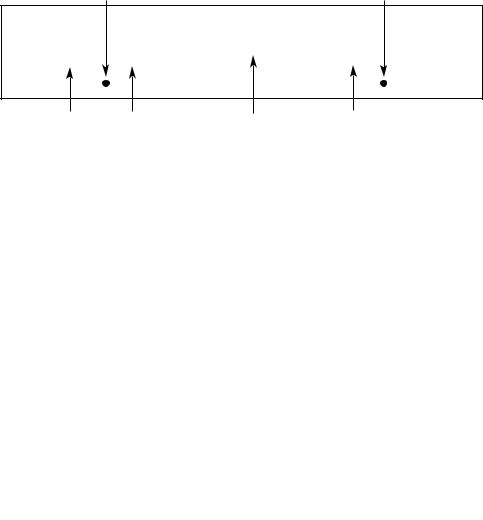
The Controls (DQ47 & DE47X1)
Top Oven Pilot |
Main Oven Pilot |
A B  C
C
Grill |
Top Oven |
Timer |
Main Oven |
Control |
|
Temperature |
|
|
|
||
|
Control |
|
Control |
IMPORTANT
Before using your oven in the ordinary way, ALWAYS make sure that the timer has been set to MANUAL operation. Unless this is done, the main oven cannot heat up. Before
seeking assistance, |
sure this is done (refer to oven timer operation). |
MAIN OVEN TEMP |
E CONTROL |
Turn the control clockwise to set the oven thermostat to the required temperature
If the timer set correctly an indicator light will illuminate. This will remain on until the oven reaches the required temperature. This light will then cycle on and off as the thermostat maintains control of the oven temperature.
TOP OVEN TEMPERATURE CONTROL
Turn the control clockwise to set the top oven thermostat to the required temperature An indicator light will illuminate. This will remain on until the oven reaches the temperature. This light will then cycle on and off as the thermostat maintains control of the oven thermostat.
GRILL CONTROL
The grill control is designed to provide variable heat control of either both grill elements on or the single left-hand grill element only.
To set the grill power turn the grill control to any setting MIN - MAX, clockwise for grill and anti-clockwise for HALF grill.
COOLING FAN
A gentle flow air will be blown below the control panel when the grill control is used and after a short period of time when the ovens are used.
Note: Whenever the appliance has been used, the cooling fan may run on or restart itself after all the controls have been turned off. This indicates that the appliance is still warm.
10
Multifunction Selector Switch (BD62 & BD52)
The Multifunction selector switch is used when operating the main oven. With the exception of the O position the main oven light will remain on when this selector switch is used.
Off 
With the selector in this position the main oven will not heat up. The timer will still operate.
Fan Oven
The oven fan and a rear element are controlled when this function is selected.
Use the main oven thermostat control to set the required temperature.
Conventional Oven
Top and base elements are controlled when this function is selected.
Use the main oven thermostat to set the required temperature.
Half Grill
With this function selected only the left hand side of the grill will be on.
Use the oven thermostat control to set the required temperature.
Oven door must be open for grilling.
Full Grill
Both left and right hand grill elements will be on in this position.
Use the oven thermostat control to set the required temperature.
Oven door must be open for grilling.
Fan Grill
The oven fan and fan grill element are controlled when this function is selected.
Use the oven thermostat control to set the required temperature.
Oven door must be closed for fan grilling.
Fan Only
The oven fan will operate when this function is selected.
The oven thermostat control must be set in the off position.
Light Only
This function switches on the oven light only.
11
Oven Timer Operation
Note: Timer must be set to ‘Time of Day’ and ‘Manual’ before the ovens can be used.
AUTOMATIC COOKING
The Top Oven and Main Oven can be controlled by the automatic timer. When the timer control has been set for one oven, it is possible to use the other oven only during the same automatic cooking programme.
NEVER operate the grill when the ovens are set to cook automatically because the oven cavity can become warm and this may cause bacterial growth in food.
HINTS ON AUTOMATIC COOKING
1.Select foods which will require the same cooking time and temperature.
2.To ensure food does not cool down and require reheating, set the end time so the food is ready when you require it.
3.Always ensure that meat and poultry is defrosted before placing in the oven.
4.Whenever possible, take food out of the refrigerator and keep it as cool as possible.
5.If cooking food that requires frying before placing in the oven for auto cooking, keep the delay start time to a minimum.
6.Never place hot or warm food in the oven for delay start cooking as it could cause the oven to be warm and produce harmful bacteria in the food.
7.We advise that dishes containing left-over cooked poultry or meat, e.g. Shepherd's Pie, should not be cooked automatically if there is to be a delay period.
8.Ensure that delay start times are kept to a minimum to prevent bacterial growth in food.
9.Wine or beer may ferment and cream may curdle during the delay period so it is best to add these ingredients just before serving.
10.Foods which discolour should be protected by coating in fat or tossing in water to which lemon juice has been added, prior to placing food in the oven.
11.Dishes containing liquid should not be filled too full to prevent boiling over.
12.Food should be well sealed (but not airtight) in a container to prevent the loss of liquid during cooking. Aluminium foil gives a good seal.
13.Always ensure that food is piping hot and cooked thoroughly before serving.
14.Only reheat food once.
12
Know Your Timer
CLOCKFACE
 The timer incorporates a 24 hour clock.
Ensure the correct time of day is always set, before using your cooker.
 SYMBOLS
A ‘bell’ symbol will light up when you select a Minute Minder Period and will remain lit for the period set.
At the end of the Minute Minder Period, the timer will emit an audible tone  and the ‘bell’ symbol will disappear.
The ‘cookpot’ symbol will light up either:–
–When the timer is in manual mode, or
–During the actual Cook Period.
‘AUTO’ will light up:–
–When the timer is first turned on it will flash. It will go out when a time of day is set or when the timer is set to manual.
The ‘AUTO’ symbol will flash at the end of an Auto Cooking programme to indicate that the programme has finished.
(When the ‘AUTO’ symbol is flashing, to return the oven to Manual operation, turn the oven controls off, ensure that the correct time of day is set, and press the “Manual” button – The ‘AUTO’ symbol will go out).
TIMER FUNCTION BUTTONS
Minute Minder Here you can set a time period of up to 23 hours 59 minutes, that will count Button down. When it reaches zero, the timer will emit an audible tone.
For Example: If you set 20 minutes, the audible tone will occur 20 minutes later.
AUTO COOKING PROGRAMME
Cook Period |
Cook Period is the actual length of time for which, the timer will switch the |
Button |
oven(s) on as part of an “Auto Cooking” programme. |
|
(e.g. If you set 2 hours, the food will be cooked for 2 hours). |
End Time Button |
The time of day at which you want an “Auto Cooking” programme to end. |
|
For Example: If you set a “Cook Period” for 2 hours, and “End Time” of 11:00. |
|
The timer will switch the oven(s) on at 9:00 and turn the oven(s) off at 11:00. |
|
You will hear an audible tone at 11:00, to indicate that the Auto Cooking |
|
Programme has finished. |
Notes:
-When setting an Auto Cooking programme you will need to set the oven control(s) to the required temperature(s) when you set the timer.
-If an Auto Cooking programme has been set the oven(s) will only operate during the pre-programmed time.
 Manual Button
Needs to be pressed to cancel an Auto Cooking programme and return the oven(s) to Manual operation.
“+/–” Buttons Used to adjust the various timer function settings.
13
Electronic Clock & Automatic Oven Timer
Operation
SETTING THE TIME OF DAY
Step 1 Make sure all oven controls are turned Off.
Step 2 Check the electricity supply to the cooker is turned on.
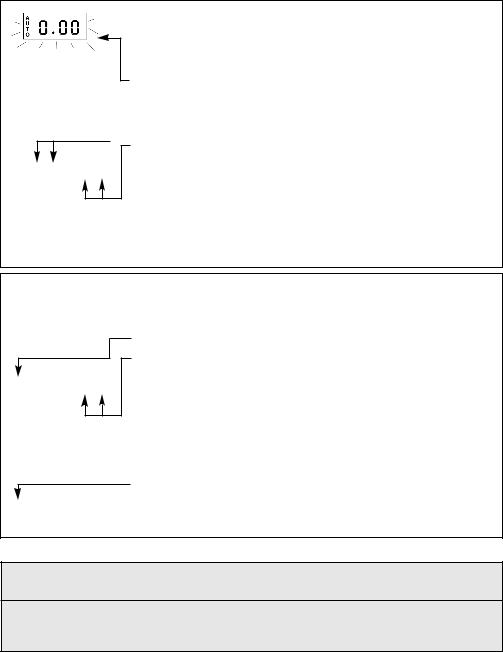
Step 3 When switched on the display will show 0.00 and the Auto symbol, flashing intermittently.
 Step 4 Press & hold in both the Cook Period & End Time buttons together.
Step 5 With the Cook Period & End Time buttons still held in, press the “+” or “-” buttons to set the correct time of day.
Step 6 Release all the buttons simultaneously.
THE TIME OF DAY IS NOW SET.
To change the time of day repeat Steps 4, 5 & 6 above.
Note: You cannot adjust the time of day if the timer has been set for an
Auto Cooking Programme.
SETTING THE MINUTE MINDER
Step 1 Ensure the time of day is set correctly.
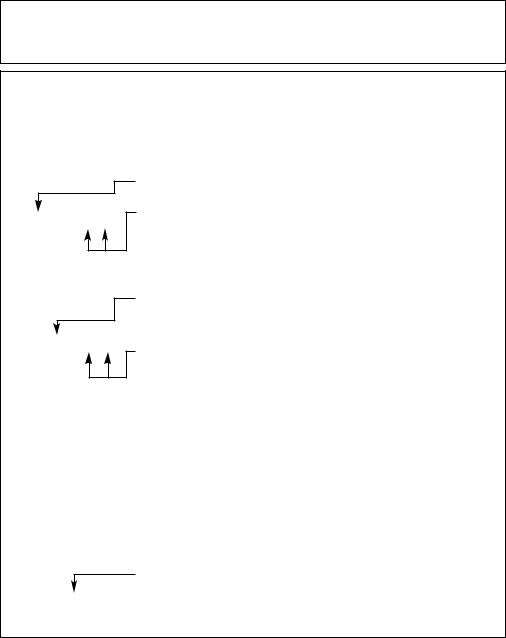
Step 2 Press and hold the Minute Minder button.
Step 3 With the Minute Minder button held in, set the required Minute Minder period using the “+” and “–” buttons. A ‘bell’ symbol will light up.
Release all buttons and the timer display will revert back to the time of day. The ‘bell’ symbol will remain lit to signify that a Minute Minder period has been set.
At the end of the set time an audible tone will be heard, and the ‘bell’ symbol will disappear.
Step 4 To cancel the audible tone press the Minute Minder button.
Note 1 When the Minute Minder has been set, the time remaining can be checked at any time by simply pressing the Minute Minder button.
Note 2 If necessary the Minute Minder can be cancelled before the tone sounds by pressing and holding the Minute Minder button and then at the same time pressing the “–”button until 0.00 appears in the display window.
14
Electronic Clock & Automatic Oven Timer
Operation
AUTO COOKING PROGRAMMES
There are two Auto Cooking programmes that can be selected using your timer:–
(a)To set the timer to switch the oven(s) On and Off Automatically
(b)To set timer to switch on immediately and OFF automatically after a set cook period.
a)TO SET THE TIMER TO SWITCH THE OVEN(S) ON AND OFF AUTOMATICALLY
This allows you to cook at a specified time for a chosen period before the oven switches off Automatically.
Step 1 Check that the correct time of day is set, if not follow instructions for setting the time of day.
Step 2 Place food onto the correct shelf position in the oven and close the oven door(s).
Step 3 Press and hold in the Cook Period button.
The display will read 0.00 with the ‘cookpot’ symbol lit.
Step 4 With the Cook Period button still held in, set the required Cook
Period using the “+” and “–” buttons.
 Release the buttons and the timer display will revert to the time of day with the ‘Auto’ symbol and ‘cookpot’ symbol lit.
Step 5 Press and hold in the End Time button.
The display will read the earliest possible end time for the Cook
Period that you have set above.
The ‘Auto’ symbol and ‘cookpot’ symbol will be lit.
Step 6 With the End Time button still held in, use the “+” and “–” buttons to set the ‘End Time’ (i.e. The time you require the oven to switch off).
Release all the buttons and the timer will revert back to the time of day.
 The ‘Auto’ symbol will remain lit to signify that an Auto Cooking Programme has been set. The ‘cookpot’ symbol will go out.
Step 7 Turn the oven control(s) to the required temperature, and if necessary select the appropriate oven function.
Note: If your appliance has two ovens: When the timer has been set for one oven it is possible to use the other oven only during the same Automatic programme.
At the end of the Automatic Cook Period the Auto Symbol will flash and an intermittent bleeping sound will be heard.
The audible tone will continue unless cancelled.
The ‘Auto’ symbol will continue to flash until the timer is returned to Manual operation (see below).
Step 8 Press the Manual button, the audible tone will be cancelled and the oven(s) will be returned to Manual.
Step 9 Turn the oven control(s) to the OFF position.
15
 Loading...