


T101 T102
GS950T T103
CT7.1
TREADMILL OWNER’S MANUAL MANUEL D’UTILISATION DU TAPIS ROULANT MANUAL DEL PROPIETARIO DE LA CAMINADORA
Read the treadmill guide before using this owner’s manual.
Lire le GUIDE DU TAPIS ROULANT avant de se servir du présent MANUEL D’UTILISATION. Lea la GUÍA DE LA CAMINADORA antes de usar este MANUAL DEL PROPIETARIO.

3 |
ENGLISH |
30 |
Français |
58 |
Español |
2
ASSEMBLY
 WARNING
There are several areas during the assembly process that special attention must be paid. It is very important to follow the assembly instructions correctly and to make sure all parts are firmly tightened. If the assembly instructions are not followed correctly, the treadmill could have parts that are not tightened and will seem loose and may cause irritating noises. To prevent damage to the treadmill, the assembly instructions must be reviewed and corrective actions should be taken.
Before proceeding, find your treadmill’s serial number located near the on/off power switch and power cord and enter it in the space provided below.
ENTER YOUR SERIAL NUMBER AND MODEL NAME IN THE BOXES BELOW:
SERIAL NUMBER:
MODEL NAME: Horizon 
 TREADMILL
»Refer to the SERIAL NUMBER and MODEL NAME when calling for service.
»Be sure to enter both the SERIAL NUMBER and MODEL NAME on your warranty card.
3
T101
GS950T
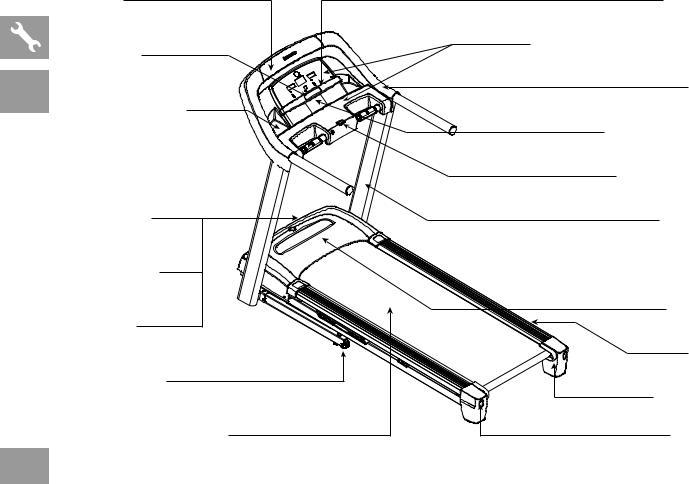
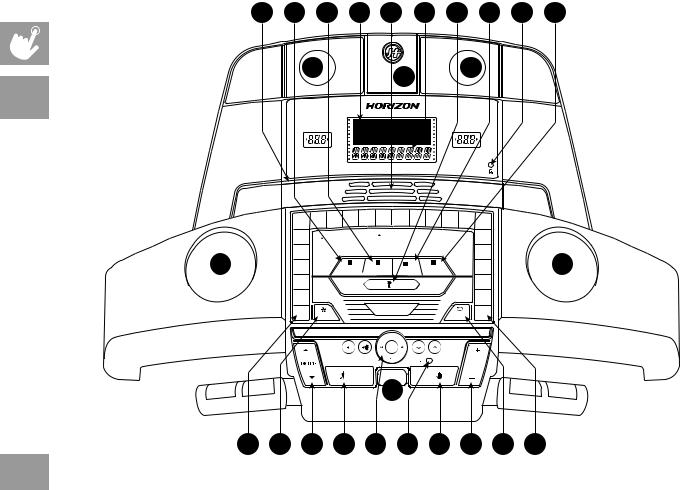
SPEAKERS
CONSOLE FAN (T101 ONLY)
WATER BOTTLE HOLDER
GRIP PULSE HANDRAILS 
ON/OFF SWITCH
CIRCUIT BREAKER
POWER CORD
TRANSPORT WHEEL
RUNNING BELT / RUNNING DECK
READING RACK
TOUCH PAD PANEL AND DISPLAY WINDOWS
CONSOLE
IPOD/MP3 PLAYER POCKET
SAFETY KEY PLACEMENT
CONSOLE MAST
 FOOT LOCK LATCH (UNDERNEATH DECK)
MOTOR COVER
SIDE RAIL
ROLLER END CAP
REAR ROLLER
ADJUSTMENT BOLTS
4
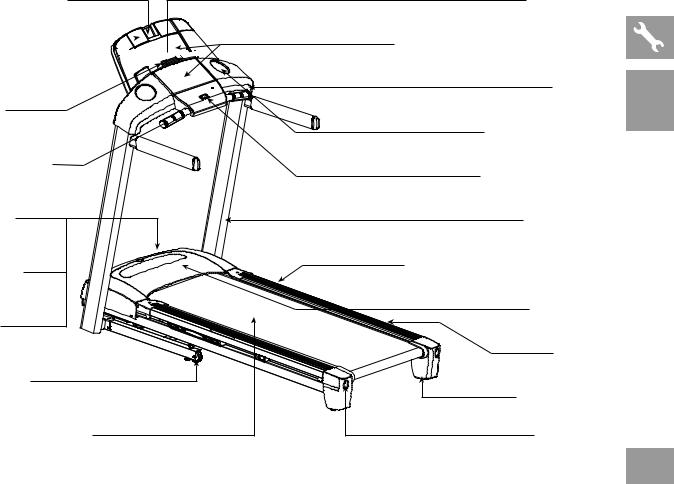
IPOD/MP3 PLAYER POCKET
SPEAKERS 


CONSOLE FAN
GRIP PULSE HANDRAILS
ON/OFF SWITCH
CIRCUIT BREAKER
POWER CORD
TRANSPORT WHEEL
RUNNING BELT / RUNNING DECK
READING RACK
TOUCH PAD PANEL AND DISPLAY WINDOWS
CONSOLE
WATER BOTTLE HOLDER
SAFETY KEY PLACEMENT
CONSOLE MAST
FOOT LOCK LATCH (UNDERNEATH DECK)
MOTOR COVER
SIDE RAIL
ROLLER END CAP
REAR ROLLER
ADJUSTMENT BOLTS
T102 T103 CT7.1
5

|
TOOLS INCLUDED: |
|
|
FF 6 mm T-Wrench |
|
|
||
|
FF 5 mm L-Wrench |
|
|
PARTS INCLUDED: |
|
ALL |
||
MODELS |
|
|
|
FF 1 Console Assembly |
|
|
||
|
FF 2 Console Masts |
|
|
FF 3 Hardware Bags |
|
|
FF 1 |
Safety Key |
|
FF 1 |
Audio Adapter Cable |
|
FF 1 |
Bottle of Silicone Lubricant |
|
(for 2 applications) |
|
FF 3 iPod® Dock Inserts (T103 only)
FF 1 iPod® Dock Rubber Plug (T103 only)
PRE ASSEMBLY
UNPACKING
Place the treadmill carton on a level flat surface. It is recommended that you place a protective covering on your floor. Take CAUTION when handling and transporting this unit. Never open box when it is on its side. Once the banding straps have been removed, do not lift or transport this unit unless it is fully assembled and in the upright folded position, with the lock latch secure. Unpack the unit where it will be used. The enclosed treadmill is equipped with high-pressure shocks and may spring open if mishandled. Never grab hold of any portion of the incline frame and attempt to lift or move the treadmill.
 WARNING
DO NOT ATTEMPT TO LIFT THE TREADMILL! Do not move or lift treadmill from packaging until specified to do so in the assembly instructions. You may remove the plastic wrap from console masts.
 NEED HELP?
If you have questions or if there are any missing parts, contact Customer Tech Support. Contact information is located on the back panel of this manual.
 WARNING
FAILURE TO FOLLOW THESE INSTRUCTIONS COULD RESULT IN INJURY!
NOTE: During each assembly step, ensure that ALL nuts and bolts are in place and partially threaded in before completely tightening any ONE bolt.
NOTE: A light application of grease may aid in the installation of hardware. Any grease, such as lithium bike grease is recommended.
6
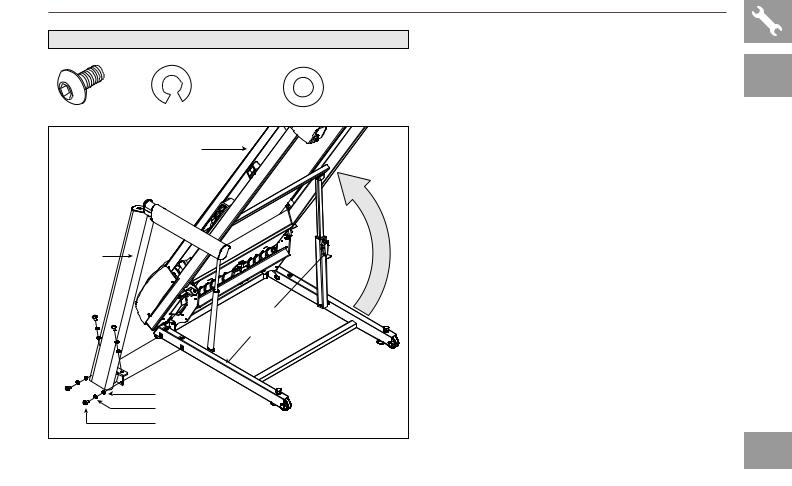
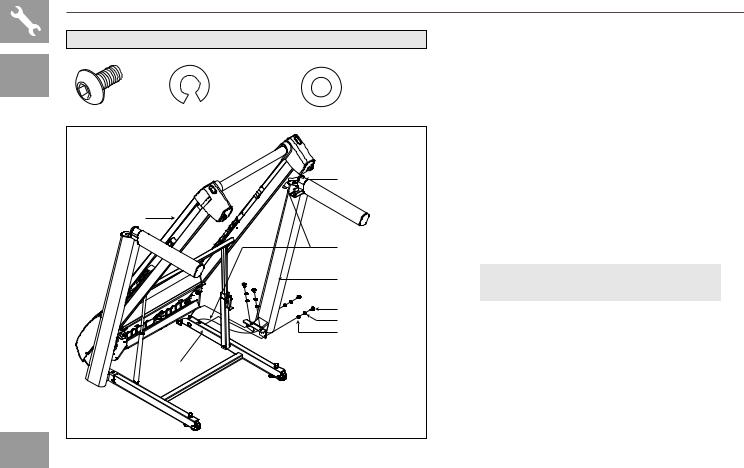
ASSEMBLY STEP 1
HARDWARE BAG 1 CONTENTS :
BOLT (A) |
SPRING WASHER (B) |
FLAT WASHER (C) |
20 mm |
15 mm |
15 mm |
Qty: 4 |
Qty: 4 |
Qty: 4 |
RUNNING DECK |
LEFT |
CONSOLE |
MAST |
FOOT LATCH |
BASE FRAME |
FLAT WASHERS (C) |
SPRING WASHERS (B) |
BOLTS (A) |
ACut the yellow banding straps and lift the running deck upward until the foot latch locks. Remove all contents from underneath the running deck.
BOpen hardware bag 1.
CWith the running deck in the raised position, attach the left console mast to the base frame using 4 bolts (a), 4 spring washers (b) and 4 flat washers (c).
ALL
MODELS
7
ASSEMBLY STEP 2
ALL
MODELS
HARDWARE BAG 2 CONTENTS :
BOLT (A) |
SPRING WASHER (B) |
FLAT WASHER (C) |
20 mm |
15 mm |
15 mm |
Qty: 4 |
Qty: 4 |
Qty: 4 |
LEAD WIRE |
RUNNING DECK |
CONSOLE CABLE |
RIGHT CONSOLE MAST |
BOLTS (A) |
SPRING WASHERS (B) |
FLAT WASHERS (C) |
BASE FRAME |
AOpen hardware bag 2.
BPull lead wire through right console mast. After pulling the lead wire through the mast, the top of the console cable should be located at the top of the mast. Detach and discard the lead wire.
CWith the running deck in the raised position, attach the right console mast to the base frame using 4 bolts
(a), 4 spring washers (b) and 4 flat washers (c).
Note: Be careful not to pinch any wires while assembling the right console mast.
8
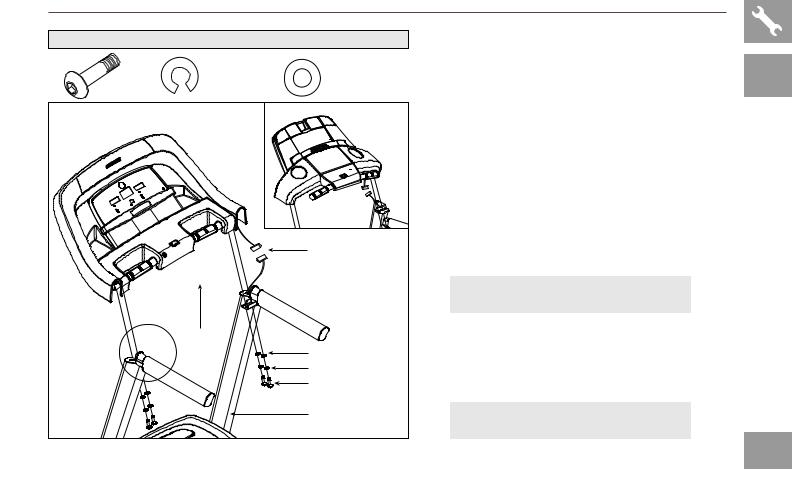
ASSEMBLY STEP 3
HARDWARE BAG 3 CONTENTS : |
|
A |
Disengage the deck lock latch with your |
|
|
|
|
|
foot to lower the running deck. |
BOLT (D) |
SPRING WASHER (B) |
FLAT WASHER (C) |
|
|
45 mm |
15 mm |
15 mm |
B |
Open hardware bag 3. |
Qty: 4 |
Qty: 4 |
Qty: 4 |
||
GS950T, T101 Console |
|
CT7.1, |
C |
Gently place the console on top of the |
|
|
console masts. Attach the left side first |
||
|
|
T102, T103 |
|
|
|
|
Console |
|
using 2 bolts (d), 2 spring washers (b) |
|
|
|
|
and 2 flat washers (c). |
|
|
|
D |
Connect the console cables, carefully |
|
|
|
|
tucking wires in masts to avoid damage. |
|
|
|
E |
Attach the right side of the console |
|
|
|
|
using 2 bolts (d), 2 spring washers |
|
CONSOLE CABLES |
|
(b) and 2 flat washers (c). |
|
|
|
|
|
Note: Be careful not to pinch any wires |
|
|
|
|
while assembling the masts. |
ASSEMBLE |
CONSOLE |
|
|
|
|
|
|
|
|
LEFT SIDE |
FLAT WASHERS (C) |
|
|
|
FIRST |
SPRING WASHERS (B) |
|
|
|
|
|
|
||
|
BOLTS (D) |
|
|
|
|
CONSOLE MAST |
|
YOU ARE FINISHED! |
|
|
|
|
||
ALL
MODELS
9

10
TREADMILL OPERATION
This section explains how to use your treadmill’s console and programming. The BASIC OPERATION section in the treadmill guide has instructions for the following:
•LOCATION OF THE TREADMILL
•Using the SAFETY KEY
•FOLDING the treadmill
•MOVING the treadmill
•LEVELING the treadmill
•TENSIONING THE RUNNING BELT
•CENTERING THE RUNNING BELT
•Using the HEART RATE function
11

|
K |
|
|
U |
|
|
|
|
B |
A |
|
C |
|
|
|
|
Q |
|
|
L |
|
T101 |
|
|
|
|
|
|
P |
|
|
|
|
P |
|
|
|
|
|
|
|
|
|
|
|
|
|
|
|
|
|
|
|
|
|
|
|
|
|
|
|
|
|
|
|
|
|
|
|
|
|
|
|
|
|
T I M E |
|
D I S TA N C E |
|
|
|
|
|
|
|
|
|
|
|
|
|
|
|
|
|
|
|
C A L O R I E S |
|
H E A R T R AT E |
|
|
|
|
|
|
|
|
|
|
|
|
|
|
|
|
|
|
|
|
S P E E D |
|
|
|
|
|
|
|
|
|
|
|
|
|
|
|
|
|
|
|
|
time |
|
manual |
|
|
|
|
|
|
|
|
|
|
|
|
|
|
|
|
|
|
|
distance |
|
intervals |
|
|
|
|
|
|
|
|
|
|
|
|
|
|
|
|
|
|
|
calories |
I N C L I N E |
weight loss |
|
|
|
|
|
|
|
|
|
|
|
|
|
|
|
|
|
|
|
TA R G E T S |
|
W O R KO U T S |
|
|
|
|
|
|
|
|
|
|
|
|
T |
|
|
|
|
|
|
|
|
|
|
|
|
|
|
T |
|
|
|
|
|
|
|
|
|
|
|
|
|
|
S |
|
|
|
|
|
|
|
|
|
|
1 % |
2 % |
3 % |
4 % |
5 % |
6 % |
7 % |
8 % |
9 % |
10 % |
|
ENTER |
1 MPH |
2 MPH |
3 MPH |
4 MPH |
5 MPH |
6 MPH |
7 MPH |
8 MPH |
9 MPH |
10 MPH |
|
D I S P L AY |
||||||||||||||||||||
|
|
|
|
|
|
|
|
|
|
SELECT |
FAN |
SELECT |
|
|
|
|
|
|
|
|
|
|
|
|
|
|
|
|
|
|
|
TARGET |
WORKOUT |
|
|
|
|
|
|
|
|
|
|
|
|
|
|
|
|
|
|
|
|
COOL |
STOP |
|
|
|
|
|
|
|
|
|
|
|
|
|
|
|
|
|
|
|
|
DOWN |
GO |
|
|
|
|
|
|
|
|
|
|
INCLINE |
|
|
|
|
|
|
|
|
|
|
|
|
|
|
|
|
|
|
|
|
SPEED |
|
|
|
|
|
|
|
|
|
|
|
HOLD TO RESET |
|
|
|
|
|
|
|
|
|
|
|
|
|
|
|
|
|
|
|
|
|
|
MP3 READY |
|
|
|
|
|
|
|
|
|
I M D H R G V N F E O J
12

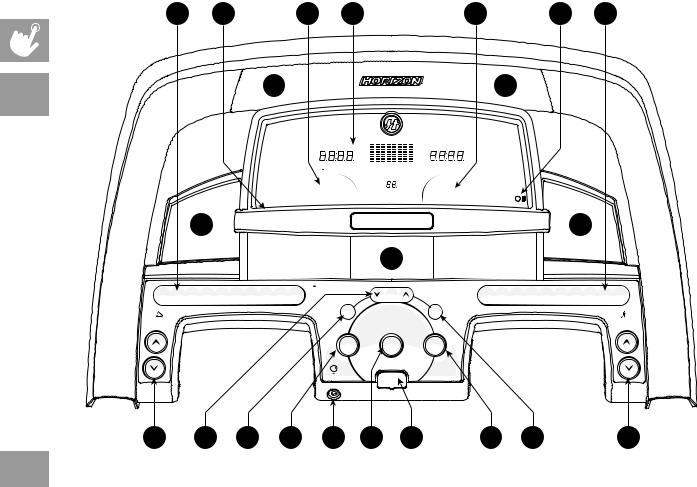
T101 CONSOLE OPERATION
Note: There is a thin protective sheet of clear plastic on the overlay of the console that should be removed before use.
A)LED display windows: time, distance, calories, heart rate, speed, incline and workout profiles.
B)Target LED indicators: indicate what target (if any) is set for the current program.
C)Workout LED indicators: indicate what workout is set for the current program.
D) Select target: press to select your desired target. |
T101 |
E)Select workout: press to select your desired workout.
F)Go: press to begin exercising, start your workout, or resume exercising after pause.
G)Stop: press to pause/end your workout. Hold for 3 seconds to reset the console.
H)Cool down: press to enter cool down mode. Cool down lasts for 4 minutes and reduces speed and incline to allow your heart to readjust to decreased demand.
I)Incline  /
/  keys: used to adjust incline in small increments (0.5% Increments).
J)Speed + / - keys: used to adjust speed in small increments (0.1 Mph increments).
K)Incline quick keys: used to reach desired incline more quickly.
L)Speed quick keys: used to reach desired speed more quickly.
M)Enter and  /
/  keys: used to adjust target and workout settings. Press enter to change display feedback during workout.
N)Fan key: press to turn fan on and off.
O)Fan: personal workout fan.
P)Speakers: music plays through speakers when your cd / mp3 player is connected to the console.
Q)Audio in jack: plug your cd / mp3 player into the console using the included audio adaptor cable.
R)Audio out / headphone jack: plug your headphones into this jack to listen to your music through the headphones. Note: when headphones are plugged into the headphone jack the sound will no longer come out through the speakers.
S)MP3 player pocket: used to store your mp3 player.
T)Water bottle pockets: holds personal workout equipment.
U)Reading rack: holds reading material.
V)Safety key position: enables treadmill when safety key is inserted.
13
K S B A
GS950T |
N |
|
T I M E
C A L O R I E S
 time
time
 distance
  calories
T A R G E T S
R
|
|
|
|
|
|
|
|
|
|
|
|
|
|
|
|
|
|
|
|
WARNING! |
|
|
|
|
|
|
|
|
|
|
|
|
|
|
|
|
|
|
|
|
Attach safety key clip to clothing before starting. To avoid |
1 |
|
2 |
|
3 |
|
4 |
|
5 |
|
6 |
|
7 |
|
8 |
|
9 |
|
10 |
|
injury, stand on the side rails before starting treadmill. |
% |
% |
% |
% |
% |
% |
% |
% |
% |
% |
Read and follow all instructions before operating. Keep |
||||||||||
|
|
|
|
|
|
|
|
|
|
children away from this equipment. Remove safety key |
||||||||||
|
|
|
|
|
|
|
|
|
|
|
|
|
|
|
|
|
|
|
|
when not in use and store out of |
|
|
|
|
|
|
|
|
|
|
|
|
|
|
|
|
|
|
|
|
reach of children. |
select target
incline
cool down
S P E E D
 I N C L I N E
Q
enter
display
stop
HOLD TO RESET
C O L
D I S T A N C E
 H E A R T R A T E
 manual
 intervals
  weight loss
W O R K O U T S
 CAUTION!
Consult a physician before using this equipment. Stop exercising if you feel pain, faint, dizzy or short of breath. For Consumer Use only.
select workout
go
MP3
READY
N
R
1 MPH 2 MPH 3 MPH 4 MPH 5 MPH 6 MPH 7 MPH 8 MPH 9 MPH 10 MPH
speed
I M D H P G T F E J
14

GS950T CONSOLE OPERATION
Note: There is a thin protective sheet of clear plastic on the overlay of the console that should be removed before use.
A)LED display windows: time, distance, calories, heart rate, speed, incline and workout profiles.
B)Target LED indicators: indicate what target (if any) is set for the current program.
C)Workout LED indicators: indicate what workout is set for the current program.
D) Select target: press to select your desired target. |
GS950T |
E)Select workout: press to select your desired workout.
F)Go: press to begin exercising, start your workout, or resume exercising after pause.
G)Stop: press to pause/end your workout. Hold for 3 seconds to reset the console.
H)Cool down: press to enter cool down mode. Cool down lasts for 4 minutes and reduces speed and incline to allow your heart to readjust to decreased demand.
I)Incline  /
/  keys: used to adjust incline in small increments (0.5% Increments).
J)Speed + / - keys: used to adjust speed in small increments (0.1 Mph increments).
K)Incline quick keys: used to reach desired incline more quickly.
L)Speed quick keys: used to reach desired speed more quickly.
M)Enter and  /
/  keys: used to adjust target and workout settings. Press enter to change display feedback during workout.
N)Speakers: music plays through speakers when your cd / mp3 player is connected to the console.
O)Audio in jack: plug your cd / mp3 player into the console using the included audio adaptor cable.
P)Audio out / headphone jack: plug your headphones into this jack to listen to your music through the headphones. Note: when headphones are plugged into the headphone jack the sound will no longer come out through the speakers.
Q)MP3 player pocket: used to store your mp3 player.
R)Water bottle pockets: holds personal workout equipment.
S)Reading rack: holds reading material.
T)Safety key position: enables treadmill when safety key is inserted.
15
U |
C |
|
D |
|
A |
O |
B |
E |
|
M |
Q |
N |
||
|
|
P |
|
|
|
|
S |
|
|
|
P |
|
|
|
T102 |
|
|
|
|
|
|
|
|
|
|
|
|
|
|
|
|
|
|
|
|
|
|
|
|
|
|
|
|
|
CT7.1 |
|
|
TIME |
|
|
|
|
|
|
DISTANCE |
|
|
|
|
|
|
|
|
|
|
|
|
|
|
|
|
|
||
|
|
|
CALORIES |
|
|
|
|
|
|
PULSE |
|
|
|
|
|
|
|
INCLINE |
|
|
|
|
|
|
SPEED |
|
|
|
|
|
7 % |
8 % |
9 % |
10 % |
11 % |
12 % |
12 MPH |
11 MPH |
10 MPH |
9 MPH |
8 MPH |
7 MPH |
|
|
|
6 % |
|
|
|
|
|
|
|
|
|
|
6 MPH |
|
|
|
5 % |
|
|
|
|
|
|
|
|
|
|
5 MPH |
|
|
T |
4 % |
|
|
SELECT |
|
SELECT |
ENTER |
|
FAN |
|
|
4 MPH |
|
T |
|
|
|
TARGET |
|
WORKOUT |
|
|
|
|
|
||||
|
|
|
|
CURRENT WORKOUT |
|
|
|
|
|
|
|
|
||
|
3 % |
|
|
|
|
GOAL |
CENTER |
|
|
|
|
3 MPH |
|
|
|
|
|
|
|
|
|
|
|
|
|
|
|
||
|
|
|
|
|
|
PRESS TO SET OR VIEW GOAL |
|
|
|
|
|
|
|
|
|
2 % |
|
|
|
|
|
|
|
|
|
|
2 MPH |
|
|
|
1 % |
|
|
|
|
|
|
|
|
|
|
1 MPH |
|
|
|
CHANGE |
|
DISPLAYS |
START |
STOP |
|
V |
J H F L |
R G I K |
16

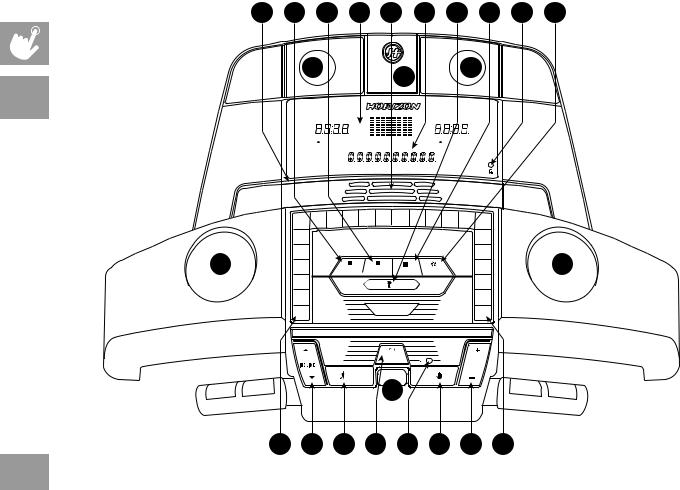
T102, CT7.1 CONSOLE OPERATION
Note: There is a thin protective sheet of clear plastic on the overlay of the console that should be removed before use.
A)Display windows: time, distance, calories, heart rate, speed, incline and workout profiles.
B)Alphanumeric display: displays goal and program information.
C)Select target: press to select your desired target.
D)Select workout: press to select your desired workout.
E)Goal center™: press to set or view your goal.
F)Start: press to begin exercising, start your workout, or resume exercising after pause.
G)Stop: press to pause/end your workout. Hold for 3 seconds to reset the console.
H)Incline  /
/  keys: used to adjust incline in small increments (0.5% increments).
I)Speed + / - keys: used to adjust speed in small increments (0.1 MPH increments).
J)Incline quick keys: used to reach desired incline more quickly.
K)Speed quick keys: used to reach desired speed more quickly.
L)Change display: press to change display feedback during workout.
M)Enter: used to confirm target and workout settings.
N)Fan key: press to turn fan on and off.
O)Fan: personal workout fan.
P)Speakers: music plays through speakers when your cd / mp3 player is connected to the console.
Q)Audio in jack: plug your cd / mp3 player into the console using the included audio adaptor cable.
R)Audio out / headphone jack: plug your headphones into this jack to listen to your music through the headphones. Note: when headphones are plugged into the headphone jack the sound will no longer come out through the speakers.
S)MP3 player pocket: used to store your mp3 player.
T)Water bottle pockets: holds personal workout equipment.
U)Reading rack: holds reading material.
V)Safety key position: enables treadmill when safety key is inserted.
T102 CT7.1
17
U |
C |
|
D |
|
A |
O |
B |
E |
|
M |
Q |
W |
||
|
|
P |
|
|
|
|
S |
|
|
|
P |
|
|
|
|
|
|
|
|
|
|
|
|
|
|
|
|
|
|
T103 |
|
|
|
|
|
|
|
|
|
|
|
|
|
|
|
HEART |
|
INCLINE |
|
|
|
|
|
|
CALORIES |
|
SPEED |
|
|
|
RATE |
|
|
|
|
|
|
|
|
|
|
|||
|
|
|
|
|
|
|
|
|
|
|
|
|
|
|
|
|
|
|
|
TIME |
|
DISTANCE |
|
|
|
|
|
|
|
|
7 % |
8 % |
9 % |
10 % |
11 % |
12 % |
12 MPH |
11 MPH |
10 MPH |
9 MPH |
8 MPH |
7 MPH |
|
|
|
6 % |
|
CAUTION! |
|
|
WARNING! |
|
|
|
|
6 MPH |
|
|
|
|
|
|
|
|
Attach safety key clip to clothing before starting. To avoid injury, stand on the side rails before starting treadmill. Read |
|
|
|
||||||
|
|
|
Consult a physician before using this equipment. Stop exercising if you |
and follow all instructions before operating. Keep children away from this equipment. Remove safety key when not in |
|
|
|
|||||||
|
|
|
feel pain, faint, dizzy or short of breath. For Consumer Use only. |
use and store out of reach of children. |
|
|
|
|
|
|
|
|||
|
5 % |
|
|
|
|
|
|
|
|
|
|
5 MPH |
|
|
T |
4 % |
|
|
SELECT |
|
SELECT |
ENTER |
|
CUSTOM |
|
|
4 MPH |
|
T |
|
|
|
TARGET |
WORKOUT |
|
1 or 2 |
|
|
|
|
||||
CURRENT WORKOUT
|
|
3 % |
|
GOAL CENTER |
|
|
3 MPH |
|
|
|
|
|
|
|
|
|
|
||
|
|
|
|
PRESS TO SET OR VIEW GOAL |
|
|
|
|
|
|
|
2 % |
|
|
|
|
|
2 MPH |
|
|
|
1 % |
FAN |
|
T103 |
|
CHANGE |
1 MPH |
|
|
|
|
|
|
|
DISPLAYS |
|
|
|
|
|
|
|
iPod |
Controls |
|
|
|
|
|
|
|
|
|
Back |
|
|
|
|
|
|
|
|
|
Select |
|
|
|
|
|
|
|
START |
|
|
STOP |
|
|
|
|
|
|
|
|
V |
|
|
|
|
J |
N |
H |
F |
X |
R |
G |
I |
L |
K |
18

T103 CONSOLE OPERATION
Note: There is a thin protective sheet of clear plastic on the overlay of the console that should be removed before use.
A)Display windows: time, distance, calories, heart rate, speed, incline and workout profiles.
B)Alphanumeric display: displays goal and program information.
C)Select target: press to select your desired target.
D) Select workout: press to select your desired workout. |
T103 |
E)Goal center™: press to set or view your goal.
F)Start: press to begin exercising, start your workout, or resume exercising after pause.
G)Stop: press to pause/end your workout. Hold for 3 seconds to reset the console.
H)Incline  /
/  keys: used to adjust incline in small increments (0.5% increments).
I)Speed + / - keys: used to adjust speed in small increments (0.1 MPH increments).
J)Incline quick keys: used to reach desired incline more quickly.
K)Speed quick keys: used to reach desired speed more quickly.
L)Change display: press to change display feedback during workout.
M)Enter: used to confirm target and workout settings.
N)Fan key: press to turn fan on and off.
O)Fan: personal workout fan.
P)Speakers: music plays through speakers when your cd / mp3 player is connected to the console.
Q)Audio in jack: plug your cd / mp3 player into the console using the included audio adaptor cable.
R)Audio out / headphone jack: plug your headphones into this jack to listen to your music through the headphones. Note: when headphones are plugged into the headphone jack the sound will no longer come out through the speakers.
S)iPod® docking station: used to dock and charge your iPod (not included).
T)Water bottle pockets: holds personal workout equipment.
U)Reading rack: holds reading material.
V)Safety key position: enables treadmill when safety key is inserted.
W)Custom 1 OR 2 key: press to select Custom 1 or Custom 2 program.
X)iPod® controls: press to adjust your attached iPod audio settings. See page 23 for more info.
19
Display windows
•TIME: Shown as minutes : seconds. View the time remaining or the time elapsed in your workout.
•DISTANCE: Shown as miles. Indicates distance traveled or distance remaining during your workout.
•SPEED: Shown as MPH. Indicates how fast your walking or running surface is moving.
•INCLINE: Shown as percent. Indicates the incline of your walking or running surface.
•CALORIES: Total calories burned or calories remaining left to burn during your workout.
•HEART RATE: Shown as BPM (beats per minute). Used to monitor your heart rate (displayed when contact is made with both pulse grips).
•PROGRAM PROFILES: Represents the profile of the program being used (speed during speed based programs and incline during incline based programs).
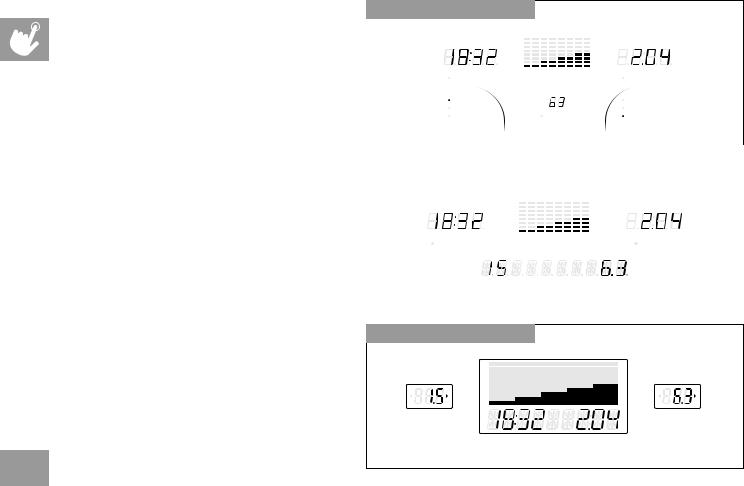
T101, GS950T DISPLAYS
T I M E |
|
D I S TA N C E |
C A L O R I E S |
|
H E A R T R AT E |
|
S P E E D |
|
time |
|
manual |
distance |
|
intervals |
calories |
I N C L I N E |
weight loss |
TA R G E T S |
|
W O R K O U T S |
|
|
|
|
|
|
T102, CT7.1 DISPLAYS |
|
|
TIME |
|
DISTANCE |
CALORIES |
|
PULSE |
INCLINE |
|
SPEED |
|
|
|
• |
Targets: |
T103 DISPLAYS |
|
|
|
|
T101, GS950T: LED lights up next to currently |
|
|
|
|
|
selected target. If no LED is lit, no target is activated. |
|
|
|
|
|
T102, T103, CT7.1: target will be displayed in the |
|
|
|
|
|
alphanumeric window on the bottom of the display. |
HEART |
|
|
|
|
|
INCLINE |
CALORIES |
SPEED |
|
|
|
RATE |
|||
|
|
|
|
|
|
• |
Workouts: |
|
|
|
|
|
T101, GS950T: LED lights up next to currently selected |
|
|
|
|
|
workout. |
|
TIME |
DISTANCE |
|
|
T102, T103, CT7.1: workout will be displayed in the |
|
|
|
|
20 |
alphanumeric window on the bottom of the display. |
|
|
|
|
|
|
|
|
|
|
GETTING STARTED
1)Check to make sure no objects are placed on the belt that will hinder the movement of the treadmill.
2)Plug in the power cord and turn the treadmill ON.
3)Stand on the side rails of the treadmill.
4)Attach the safety key clip to part of your clothing making sure that it is secure and will not become detached during operation.
5)Insert the safety key into the safety keyhole in the console.
6)You have two options to start your workout:
A)Quick start up
Simply press the go/START key to begin working out. Time, distance, and calories will all count up from zero. OR...
B)Select a target and workout
1)Select a target using the select target key.
2)Adjust the target settings using the arrow keys.
3)Press enter to advance.
4)Select a workout using the select workout key.
5)Press go/start to begin workout.
NOTE: If no target or workout is selected, the program will function as a manual program. All changes in speed and incline will need to be from the user in this setting.
CHANGING YOUR TARGET MID-WORKOUT
You can change your Target “on-the-fly” without losing your current workout stats.
Anytime during your workout, press the SELECT TARGET key until you have selected the new TARGET you would like.
Use the  /
/  or + / – keys to enter in the value of your new TARGET and press enter. All previous workout statistics will be rolled into the new TARGET, so you’ll never miss a beat.
NOTE: If you accidentally press the SELECT TARGET key during a workout, if no buttons are pressed after 5 seconds, the current target will resume.
CHANGING YOUR workout MID-WORKOUT
You can change your Workout “on-the-fly”.
Anytime during your workout, press the SELECT WORKOUT key until you have selected the new WORKOUT you would like. Press ENTER.
New workout will begin at the first segment after warm up and all workout statistics will roll over.
NOTE: If you accidentally press the SELECT WORKOUT button during a workout, if no buttons are pressed after 5
seconds the current program will resume.
21

TARGET PROFILES
TARGET 1 – TIME: Allows user to set a target based on how long they would like to workout. Time targets can range from 15:00 – 99:00. TIME will count down. DISTANCE and CALORIES will count up from zero.
TARGET 2 – DISTANCE: Allows user to set a target based on distance they would like to complete. Distance target can range from 0.25 – 26.25 miles. DISTANCE will count down. TIME and CALORIES will count up from zero.
Target 3 – calories: Allows user to set a target based on the number of calories they would like to burn. Calories target can range from 20 – 980 calories. CALORIES will count down. TIME and DISTANCE will count up from zero.
NO TARGET: Allows user to select a workout profile that has no specified time, distance, or calorie target. TIME, DISTANCE, and CALORIES will all count up from zero.
WORKOUT PROFILES
1)manual – ALL MODELS: Allows ‘on the fly’ manual speed and incline changes.
2)intervals – ALL MODELS: Improves your strength, speed and endurance by increasing and decreasing the speed throughout your workout to involve your heart and other muscles.
Segment |
Warm Up |
1 |
2 |
|
||
|
|
|
|
|
Segments 1 & 2 |
|
Time |
4:00 Mins |
90 sec |
30 sec |
|||
repeat until target is |
||||||
|
|
|
|
|
||
Speed |
1 |
1.5 |
2 |
4 |
||
complete |
||||||
|
|
|
|
|
||
Incline |
1 |
1.5 |
0.5 |
1.5 |
|
|
|
|
|
|
|
|
|
22

3) HILLS – T102, T103, CT7.1 MODELS ONLY: Simulates running up and down hills to improve stamina.
Segment |
Warm Up |
1 |
2 |
3 |
4 |
5 |
6 |
7 |
8 |
Segments 1–8 |
||
|
|
|
|
|
|
|
|
|
|
|
||
Time |
4:00 Mins |
30 sec |
30 sec |
30 sec |
30 sec |
30 sec |
30 sec |
30 sec |
30 sec |
repeat until target |
||
|
|
|
|
|
|
|
|
|
|
|
is complete |
|
Level 1 |
1 |
1.5 |
2 |
2.5 |
3 |
3.5 |
4 |
3.5 |
3 |
2.5 |
||
|
||||||||||||
|
|
|
|
|
|
|
|
|
|
|
|
|
4)Workout 4 – weight loss – ALL MODELS: Promotes weight loss by increasing and decreasing the speed, while keeping you in your fat burning zone.
Segment |
Warm Up |
1 |
2 |
3 |
4 |
5 |
6 |
7 |
8 |
|
|||
|
|
|
|
|
|
|
|
|
|
|
|
Segments 1–8 |
|
Time |
4:00 Mins |
30 sec |
30 sec |
30 sec |
30 sec |
30 sec |
30 sec |
30 sec |
30 sec |
||||
repeat until target |
|||||||||||||
|
|
|
|
|
|
|
|
|
|
|
|
||
Level 1 |
Incline |
0 |
0.5 |
1.5 |
1.5 |
1 |
0.5 |
0.5 |
0.5 |
1 |
1.5 |
||
is complete |
|||||||||||||
|
|
|
|
|
|
|
|
|
|
|
|
||
|
Speed |
1 |
1.5 |
2 |
2.5 |
3 |
3.5 |
4 |
3.5 |
3 |
2.5 |
|
|
|
|
|
|
|
|
|
|
|
|
|
|
|
|
Using custom workouts (T103 only)
1)Press the CUSTOM 1 OR 2 key to select a custom workout.
2)Press select target key to select a time, distance, or calories target. Press enter to select desired target.
3)Set each speed profile by using the  /
/  or + / – keys and press enter. Repeat for all 15 speed profiles.
4)Set each incline profile by using the  /
/  or + / – keys and press enter. Repeat for all 15 incline profiles.In
5)Press start to begin.
23

Goal center™
(T102, T103, CT7.1 only)
Research shows that those who create and track their fitness goals, on average, achieve greater success than those who do not. Because your new treadmill is equipped with Horizon’s exclusive goal center™ Performance Tracker, you’ve taken an important step towards achieving your fitness goals. Goal center™ is innovative new software, integrated into your treadmill console, that will allow you to track your fitness goals over time, without the need for paper journals or logs. Read further to learn about how goal center™ can help motivate you to enhance your performance.
Goal center™ setup
1)Select user 1 or user 2 using the  /
/  or + / – keys and press enter.
2)Press and hold goal center™ for approximately five seconds.
3)Press select target key to select time, distance or calorie goal.
4)Use  /
/  or + / – keys to select goal value and press enter.
5)Use the  /
/  or + / – keys to select the number of days to complete the goal.
6)Press enter again to exit the setup mode.
NOTE: These steps can also be used to erase an existing goal and set a new one.
Viewing goal progress
When logged into your user profile, you can view progress toward your goal by pressing the goal center™ key. The console will scroll the remaining time, distance or calories, depending on the goal selected and will also scroll the time remaining to achieve that goal.
NOTE: For workout data to accumulate towards a user’s goal, you must first select that user before beginning a workout.
24

To reset the console
Hold stop key for 3 seconds.
COOL DOWN
(T101, GS950T only)
Puts treadmill into cool down mode. Cool down lasts for four minutes and reduces speed and incline to allow your heart to readjust to decreased demand.
Finishing your workout
When your workout is complete, the monitor display will flash “FINISHED” and beep. Your workout information will stay displayed on the console for 30-45 seconds and then reset.
Clear current selection
To clear the current program selection or screen, hold the stop button for 3-5 seconds.
Using your CD / MP3 player
1)Connect the included audio adaptor cable to the audio in jack on the top right of the console and the headphone jack on your cd / mp3 player.
2)Use your cd / mp3 player buttons to adjust song settings.
3)Remove the audio adaptor cable when not in use.
4) If you don’t want to use the speakers, you can plug your headphones into the audio out jack at the bottom of the console.
25
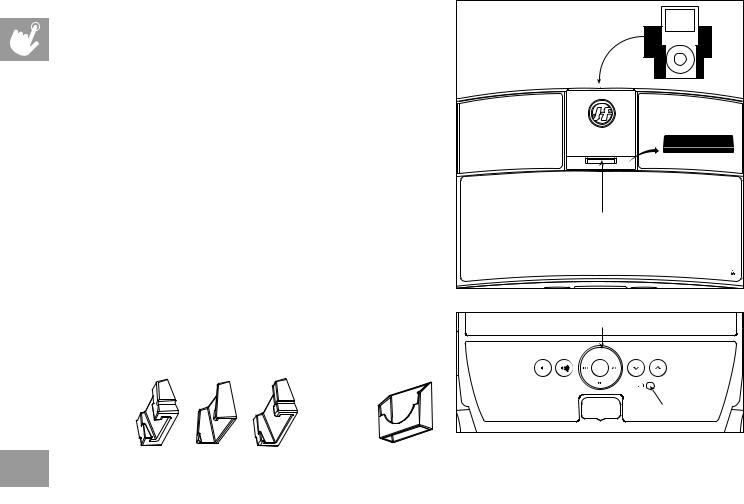
iPod® docking station (T103 only)
The iPod docking station is the entertainment solution for your workouts. Various iPod models with a dock connector can fit this dock. IPhone is not compatible.
Using the iPod docking station (ipod not included)
1)Remove the rubber plug from bottom of the docking station.
2)Plug in your iPod by matching the dock connector pin on the treadmill with the dock connector on your iPod. NOTE: Once you have connected the iPod to the docking station, please allow 2 minutes for the iPod and docking station to sync up before it will be fully functional.
3)You can use your iPod dial to adjust volume and song settings. Or you can adjust your volume and song settings using the iPod control keys on the treadmill console. NOTE: If you don’t want to use the speakers, you can plug your headphones into the audio out jack at the bottom of the console.
Replace the rubber plug into the bottom of the docking station when the station is not in use.
NOTE: iPod audio will not play through speakers if audio adaptor cable is plugged in while iPod is in the docking station.
iPod® Dock Inserts |
Universal MP3 Player |
Note: Dock insert sizes |
|
vary for each iPod. |
Dock Insert |
DOCK
INSERT
IPOD® DOCKING STATION 
RUBBER PLUG
DOCK CONNECTOR PIN
AUDIO IN JACK FOR NON-IPOD PLAYERS 

IPOD® CONTROLS |
|
iPod |
Controls |
|
Back |
|
Select |
|
AUDIO OUT JACK |
26

LIMITED HOME-USE WARRANTY
27
 Loading...