


ELITE SERIES 2.1R 3.1R
Recumbent User’s Guide

Table of Contents
IMPORTANT PRECAUTIONS . . . . . . . . . . . . . . . . . . . . . . . . . . . . . . . . . . . . . . . .3 BEFORE YOU BEGIN . . . . . . . . . . . . . . . . . . . . . . . . . . . . . . . . . . . . . . . . . . . . .6 ASSEMBLY (2.1R & 3.1R) . . . . . . . . . . . . . . . . . . . . . . . . . . . . . . . . . . . . . . . . . .7 RECUMBENT OPERATION & ADJUSTMENT . . . . . . . . . . . . . . . . . . . . . . . . . . . .10 CONSOLE FEATURES & DISPLAY (2.1R & 3.1R) . . . . . . . . . . . . . . . . . . . . . . . . .12 PROGRAM PROFILES . . . . . . . . . . . . . . . . . . . . . . . . . . . . . . . . . . . . . . . . . . . .19 PROGRAM CHARTS . . . . . . . . . . . . . . . . . . . . . . . . . . . . . . . . . . . . . . . . . . . . .20 USING YOUR RACE PROGRAM . . . . . . . . . . . . . . . . . . . . . . . . . . . . . . . . . . . . .23 USING YOUR THR ZONE PROGRAMS 1 & 2 . . . . . . . . . . . . . . . . . . . . . . . . . . . .24 USING YOUR CUSTOM USER PROGRAMS 1 & 2 . . . . . . . . . . . . . . . . . . . . . . . .25 TROUBLESHOOTING & MAINTENANCE PROCEDURES . . . . . . . . . . . . . . . . . . . .26 COMMON PRODUCT QUESTIONS . . . . . . . . . . . . . . . . . . . . . . . . . . . . . . . . . . .29 CONDITIONING GUIDELINES . . . . . . . . . . . . . . . . . . . . . . . . . . . . . . . . . . . . . .30 MONITORING YOUR HEART RATE . . . . . . . . . . . . . . . . . . . . . . . . . . . . . . . . . . .32 HEART RATE CHART . . . . . . . . . . . . . . . . . . . . . . . . . . . . . . . . . . . . . . . . . . . . .33 DEVELOPING A FITNESS PROGRAM . . . . . . . . . . . . . . . . . . . . . . . . . . . . . . . . .34 WARM UP & COOL DOWN . . . . . . . . . . . . . . . . . . . . . . . . . . . . . . . . . . . . . . . . .35 ACHIEVING YOUR FITNESS GOALS . . . . . . . . . . . . . . . . . . . . . . . . . . . . . . . . . .36 WEEKLY LOG SHEETS . . . . . . . . . . . . . . . . . . . . . . . . . . . . . . . . . . . . . . . . . . .37 MONTHLY LOG SHEETS . . . . . . . . . . . . . . . . . . . . . . . . . . . . . . . . . . . . . . . . . .38 LIMITED WARRANTY . . . . . . . . . . . . . . . . . . . . . . . . . . . . . . . . . . . . . . . . . . . .39
!
CAUTION
CAUTION
Read all precautions and instructions in this manual before using this equipment. Save this manual for future reference.
2

Important Precautions
SAVE THESE INSTRUCTIONS
When using an electrical product, basic precautions should always be followed. Read all instructions before using this exercise product.
WARNING
WARNING!
To reduce the risk of burns, fire, electrical shock or injury to persons:
•Use this exercise product for its intended use as described in this user’s guide.
•Do not use attachments not recommended by the manufacture.
•Never drop or insert any object into any opening.
•Do not remove the recumbent bike’s side covers. Service should be performed only by an authorized Horizon Fitness service provider.
•Never operate this recumbent bike if it has a damaged cord or plug, if it is not working properly, if it has been damaged, or immersed in water.
•Keep the cord away from heated surfaces.
•Do not use outdoors.
•Only use the power cord provided with your Horizon Fitness semi-recumbent bike.
•Never place the power cord under carpeting or place any object on top of the power cord, which may pinch or damage it.
•Unplug your Horizon Fitness recumbent bike before moving it.
3

!
CAUTION
CAUTION!
•If you experience chest pains, nausea, dizziness or shortness of breath, stop exercising immediately and consult your physician before continuing.
•Do not turn pedals by hand.
•Do not wear clothing that might catch on any part of the recumbent bike.
•Make sure handlebars are secure before each use.
•Read the owner's guide before operating this recumbent bike.
•Maintain a comfortable pace. Do not ‘sprint’ above 125 rpms on this machine.
•To maintain balance it is recommended to keep a grip on the handlebars while exercising, mounting or dismounting the machine.
OPERATION
It is essential that your recumbent bike is used only indoors, in a climate controlled room. If your recumbent bike has been exposed to colder temperatures or high moisture climates, it is strongly recommended that the recumbent bike is warmed up to room temperature before first time use. Failure to do so may cause premature electronic failure.
CHILDREN
•Keep children off of your recumbent bike at all times.
•When the recumbent bike is in use, young children and pets should be kept at least 10 feet away.
CLEANING
• Clean with soap and slightly damp cloth only. Never use solvents.
USER CAPACITY
• 300lbs (2.1R and 3.1R)
4
CAUTION:
BEFORE BEGINNING ANY EXERCISE PROGRAM, ALWAYS CONSULT YOUR PHYSICIAN. IF YOU EXPERIENCE CHEST PAINS, NAUSEA, DIZZINESS OR SHORTNESS OF BREATH, STOP EXERCISING AND CONSULT YOUR PHYSICIAN BEFORE CONTINUING.
IMPORTANT: PLEASE READ BEFORE USE!
ASSEMBLY
!
CAUTION
CAUTION!
There are several areas during the assembly process of a Horizon Fitness recumbent bike that special attention must be paid. It is very important to follow the assembly instructions correctly and to make sure all parts are firmly tightened. If the assembly instructions are not followed correctly, the recumbent bike could have frame parts that are not tightened and will seem loose and may cause irritating noises. To prevent damage to the recumbent bike, the assembly instructions must be reviewed and corrective actions should be taken.
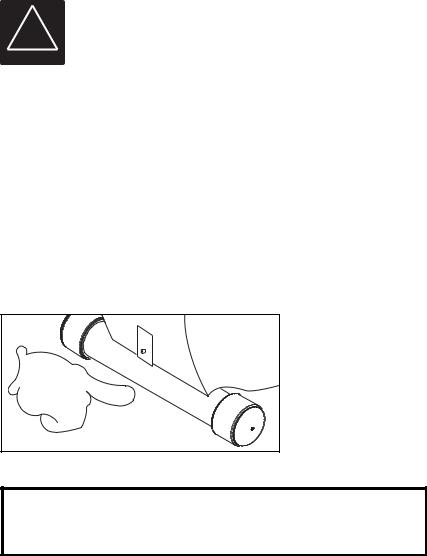
Before proceeding, find your recumbent bike’s serial number and model name located on the front foot tube and enter it in the space provided below:
SERIAL NUMBER AND MODEL NAME LOCATION:
ENTER YOUR SERIAL NUMBER IN BOX BELOW:
Refer to this number when calling for service, and also enter this serial number on your Warranty Card and in your own records. Be sure to read the Safety Instructions and complete Owner’s Guide before using your new Horizon Fitness recumbent bike.
WARRANTY REGISTRATION
Your warranty card must be completed and sent to Horizon Fitness within thirty days of purchase or registered on line at www.horizonfitness.com, before a warranty claim can be processed. Please keep your receipt with the user’s guide as it may be required for a warranty claim. Make sure to send in warranty registration card to valuate your warranty.
5
Before You Begin
CONGRATULATIONS! on choosing a recumbent bike.
You’ve taken an important step in developing and sustaining an exercise program! Your Horizon Fitness recumbent bike is a tremendously effective tool for achieving your personal fitness goals. Regular use of your Horizon Fitness recumbent bike can improve the quality of your life in so many ways.
Here are just a few of the health benefits of aerobic exercise:
•Weight Loss
•A Healthier Heart
•Improved Muscle Tone
•Increased Daily Energy Levels
•Reduced Stress
•Help In Countering Anxiety and Depression
•An Improved Self Image
The key to reaping these benefits is to develop the exercise habit. Your new Horizon Fitness recumbent bike will help you eliminate the obstacles that prevent you from getting in your exercise time. Inclement weather and darkness won't interfere with your workout when you use your Horizon Fitness recumbent bike in the comfort of your home. This manual provides you with basic information for using and enjoying your new machine. A more complete knowledge of your new Horizon Fitness recumbent bike will assist you in realizing your goal of a healthy lifestyle.
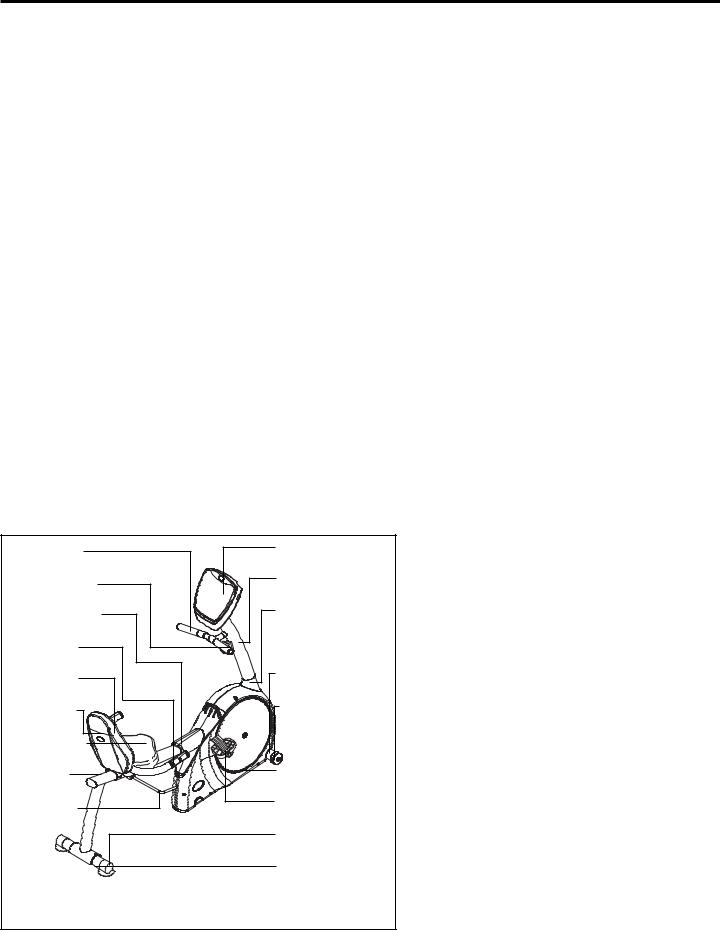
Handle Bar |
Console |
|
|
Tension Knob |
Console Mast |
|
|
Seat Rail Boot |
Console Mast Boot |
|
|
Grip Pulse |
|
Seat Front |
Front Foot Tube |
|
|
Seat Back |
Transport Wheel |
|
|
Seat Bottom |
|
Seat Rail |
Side Cover |
|
|
Seat Lever |
Pedal |
|
|
|
Foot Pad |
|
Rear Foot Tube |
Note: The 3.1R model does not include the tension knob.
6

Assembly
UNPACKING
Unpack the product where you will be using it. Place the product on a level flat surface. It is recommended that you place a protective covering on your floor. Note: It is recommended that you apply grease to the threads of each bolt as you assemble the product, to prevent loosening and noise. Also, during each assembly step, ensure that ALL nuts and bolts are in place and partially threaded in before completely tightening any ONE bolt.
FAILURE TO FOLLOW THESE INSTRUCTIONS COULD RESULT IN INJURY! Place your recumbent on a level flat surface. It is recommended that you place a protective covering on your floor.
PARTS
•1 Rear Foot Tube
•1 Handlebar
•1 Seat Rail
•1 Seat Rail Boot
•1 Seat Back
•1 Seat Front
•1 Seat Bottom
•1 Seat Frame
•1 Console Mast
•1 Console Mast Boot
•2 Mobile Wheel/Sleeves
•1 Console
•2 Pedals
•1 Tension Knob (2.1R only)
•1 Power Supply (2.1R, 3.1R models)
•1 Hardware Pack
TOOLS (included)
•5mm Allen Wrench/Phillips Screw Driver
•Flat Wrench
If you have any questions, or if there are any missing parts, we will guarantee complete satisfaction.
PLEASE CALL OUR TOLL-FREE DIRECT CUSTOMER ASSISTANCE CENTER @ 1-800-244-4192 Mon.-Fri., 8 a.m.-5 p.m. CST (excluding holidays).
7
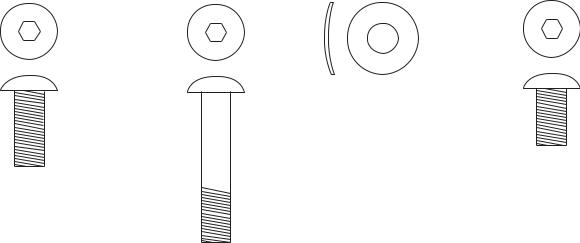
HARDWARE (2.1R & 3.1R)
C) Arc Washer
Quantity: 8
D) 15mm Bolt
A) 20mm Bolt Quantity: 10
Quantity: 2
B) 40mm Bolt
Quantity: 8
8

1 |
A |
STEP 1:
ATTACH REAR FOOT TUBE.
Note: Make sure not to tighten bolts until all assembly steps have been completely assembled and aligned.
2 |
B |
C |
C |
B |
STEP 2:
ATTACH SEAT BACK CUSHION/ COVER AND SEAT BOTTOM.
Note: The seat back cushion is attached with four 40mm bolts and then the seat back cover snaps into place.
3 |
D |
STEP 3:
ATTACH HANDLEBAR.
Note: Connect the grip pulse wires from the seat back to the handlebar. DO NOT PINCH WIRES!
4 |
L |
|
R |
STEP 4:
ATTACH LEFT & RIGHT PEDALS.
Note: Both pedals are labeled L for left and R for right. To tighten turn the left pedal COUNTER CLOCKWISE and the right pedal CLOCKWISE.
5 |
D |
6 |
|
|
D |
STEP 5:
ATTACH SEAT RAIL TO BASE FRAME.
Note: Slide seat post and seat rail boot on seat rail before you tighten bolts.
STEP 6:
ATTACH CONSOLE MAST AND CONSOLE MAST BOOT.
Note: Make sure to loosen the water bottle screws in order to fit the console cable through the mast. DO NOT PINCH WIRES!
7 |
STEP 7:
ATTACH TENSION KNOB. (2.1R only) Note: Bolt is pre-assembled to tension knob.
The resistance indicator is located on the front of the tension knob.
8
STEP 8:
ATTACH CONSOLE.
Note: DO NOT PINCH WIRES!
Note: Bolt is pre-assembled to console.
9
Recumbent Operation & Adjustment
POWER
Your recumbent bike is powered by a power supply. The power supply must be plugged into the power jack, which is located in the front of the machine near the front foot tube.
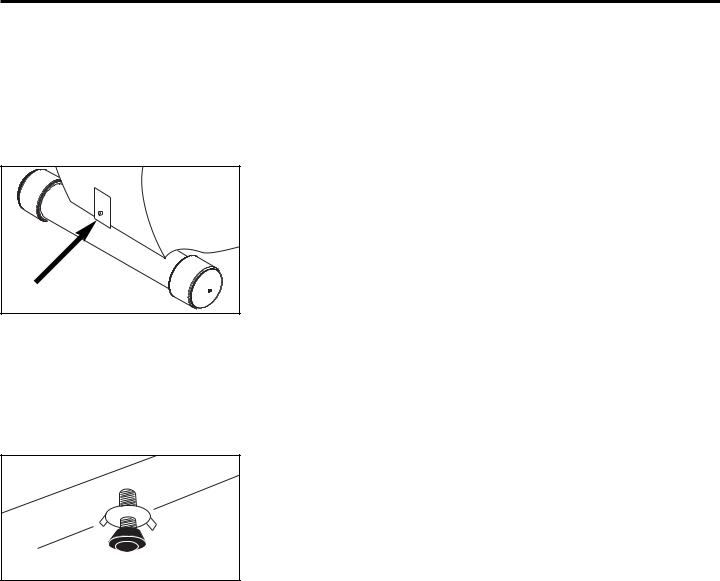
LEVELING
The recumbent bike should be level for optimum use. Once you have placed the recumbent bike where you intend to use it, raise or lower the adjustable leveler located under the rear portion of the side cover. Once you have leveled the recumbent bike, lock the levelers in place by tightening the wing nuts against the frame.
10
MOVING
Your Horizon Fitness recumbent bike has a pair of transport wheels built into the front of the frame. To move, firmly grasp the vertical seat post and one of the side handlebars. Carefully lift and roll.
Note: Your console may very from the above diagram.
!
CAUTION
CAUTION!
Our recumbent bikes are well built and heavy, weighing up to 150lbs.! Use care and additional help if necessary when moving.
11
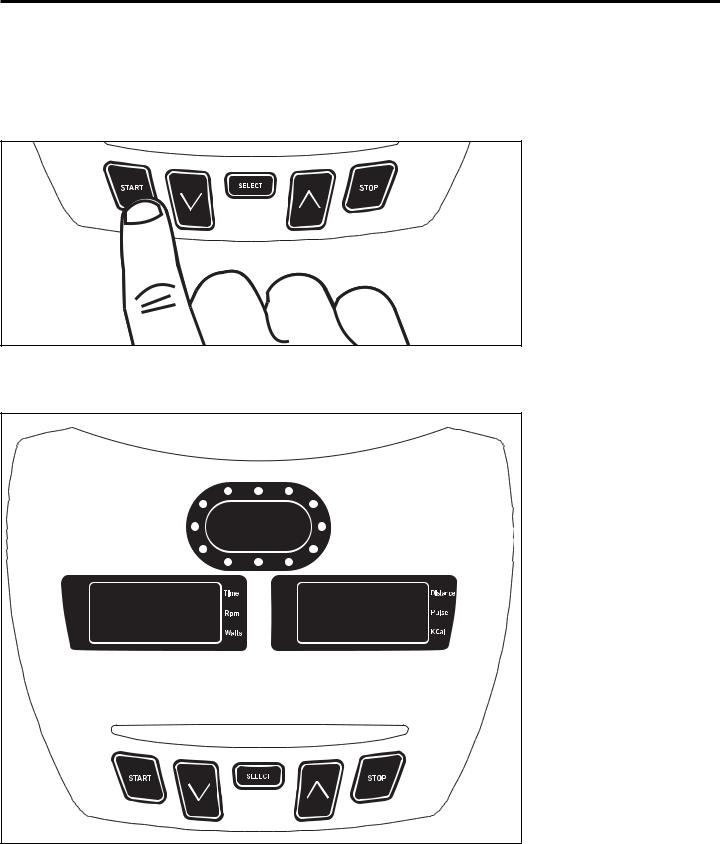
Console Features & Display
2.1R QUICK START UP
Simply press the “Start” button to begin exercising. The console will automatically start counting.
RESET
Press and hold the “Stop” button to reset the recumbent.
2.1R VIEW
12
 Loading...