


Premier Series
FOR MODEL :
E1201
ELLIPTICAL USER’S GUIDE
|
|
|
E1201_Rev.1.5.indd 1 |
9/10/08 11:08:10 AM |
|
|
||
|
|
|

INTRODUCTION
CONGRATULATIONS and THANK YOU for your purchase of this Premier Series elliptical!
Whether your goal is to win races or simply enjoy a fuller, healthier lifestyle, a Premier Series elliptical can help you attain it – adding club-quality performance to your at-home workouts, with the ergonomics and innovative features you need to get stronger and healthier, faster. Because we're committed to designing fitness equipment from the inside out, we use only the highest quality components. It's a commitment we back with one of the strongest frame-to-brake warranty packages in the industry.
You want exercise equipment that offers the most comfort, the best reliability and the highest quality in its class.
Horizon Premier Series ellipticals deliver.
TABLE OF CONTENTS
Important Precautions |
4 |
|
|
Assembly |
6 |
|
|
Before You Begin |
18 |
|
|
Elliptical Operation |
19 |
|
|
Conditioning Guidelines |
26 |
|
|
Troubleshooting & Maintenance |
30 |
|
|
Limited Warranty |
34 |
CONTACT INFORMATION |
Back Panel |
IMPORTANT PRECAUTIONS INTRODUCTION
ASSEMBLY
BEFORE YOU BEGIN
LIMITED TROUBLESHOOTING CONDITIONING ELLIPTICAL WARRANTY & MAINTENANCE GUIDELINES OPERATION
E1201_Rev.1.5.indd 2-3 |
9/10/08 11:08:11 AM |

ASS EMBLY TANT IMPO R ODUCT NTIONI CAUT ONSPREI
IMIL TED SHOOT OUBLNGI TR E COND ITONI NGI ELL PTICALI BFOE RE ANTY WA RR M A&NTNANCI E S E GU DI EL NI E AT ONIOPER G NIB YOU E
IMPORTANT PRECAUTIONS
SAVE THESE INSTRUCTIONS
Read all instructions before using this elliptical. When using an electrical product, basic precautions should always be followed, including the following: Read all instructions before using this elliptical. It is the responsibility of the owner to ensure that all users of this elliptical are adequately informed of all warnings and precautions. If you have any questions after reading this manual, contact Customer Tech Support at the number listed on the back panel of this manual.
|
|
To reduce the risk of burns, fire, |
|
WARNING |
|
|
electrical shock or injury to persons: |
|
|
|
|
|
|
|
|
|
|
•If you experience any kind of pain, including, but not limited to chest pains, nausea, dizziness, or shortness of breath, stop exercising immediately and consult your physician before continuing.
•Maintain a comfortable pace. Do not sprint above 80 rpms.
•To maintain balance, it is recommended to keep a grip on the handlebars while exercising, mounting or dismounting the machine.
•Do not wear clothes that might catch on any part of the elliptical.
•Do not turn pedal arms by hand.
•Make sure handlebars are secure before each use.
•Do not insert or drop any object into any opening.
•Unplug elliptical before moving or cleaning it. To clean, wipe surfaces down with soap and slightly damp cloth only; never use solvents. (See MAINTENANCE)
•This elliptical should not be used by persons weighing more than 300 pounds. Failure to comply will void the warranty.
•This elliptical is intended for in-home use only. Do not use this elliptical in any commercial, rental, school or institutional setting. Failure to comply will void the warranty.
•Do not use elliptical in any location that is not temperature controlled, such as but not limited to garages, porches, pool rooms, bathrooms, car ports or outdoors. Failure to comply may void the warranty.
•Use the elliptical only as described in this manual.
•Keep the topside of the foot support clean and dry.
•Care should be taken when mounting or dismounting the equipment. Before mounting or dismounting, bring the elliptical to 0% incline and move the pedal on the mounting or dismounting side to its lowest position and bring the machine to a complete stop.
•Disconnect all power before servicing the equipment.
At NO time should pets or children under the age of 12 be closer to the elliptical than 10 feet. At NO time should children under the age of 12 use the elliptical. Children over the age of 12 should not use the elliptical without adult supervision.
It is essential that your elliptical is used only indoors, in a climate controlled room. If your elliptical has been exposed to colder temperatures or high moisture climates, it is strongly recommended that the elliptical is warmed up to room temperature before first time use. Failure to do so may cause premature electronic failure.
WARNING |
Connect this exercise product to a properly grounded outlet only. |
See grounding instructions. |
GROUNDING INSTRUCTIONS
This product must be grounded. If a elliptical should malfunction or breakdown, grounding provides a path of least resistance for electrical current to reduce the risk of electrical shock. This product is equipped with a cord having an equipment-grounding conductor and a grounding plug. The plug must be plugged into an appropriate outlet that is properly installed and grounded in accordance with local codes and ordinances.
Improper connection of the equipment-grounding conductor can result in
WARNING a risk of electric shock. Check with a qualified electrician or serviceman if you are in doubt as to whether the product is properly grounded. Do not
modify the plug provided with the product. If it will not fit the outlet, have a proper outlet installed by a qualified electrician.
This product is for use on a nominal 110-volt circuit and has a grounding plug that looks like the illustration to the right. This product must be used on a dedicated circuit. To determine if you are on a dedicated circuit, shut off the power to that circuit and observe if any other devices lose power. If so, move devices to a different circuit. Note: There are usually multiple outlets on one circuit. It is recommended that the elliptical be used with a 15 amp circuit for optimal performance.
3-Pole Grounded Outlet
GROUNDED
ELLIPTICAL
POWER CORD
OPERATION
WARNING To reduce the risk of damaging important components on your elliptical, it is strongly recommended that your elliptical is plugged into a dedicated 15 amp
circuit, without the use of an additional extension cord and/or power strip. Failure to comply may void the warranty.
IMPORTANT PRECAUTIONS INTRODUCTION
ASSEMBLY
BEFORE YOU BEGIN
LIMITED TROUBLESHOOTING CONDITIONING ELLIPTICAL WARRANTY & MAINTENANCE GUIDELINES OPERATION
E1201_Rev.1.5.indd 4-5 |
9/10/08 11:08:12 AM |
ASS EMBLY TANT IMPO R ODUCT NTIONI CAUT ONSPREI
IMIL TED SHOOT OUBLNGI TR E COND ITONI NGI ELL PTICALI BFOE RE ANTY WA RR M A&NTNANCI E S E GU DI EL NI E AT ONIOPER G NIB YOU E
ASSEMBLY
IMPORTANT: READ THESE SAFETY INSTRUCTIONS BEFORE USE!
There are several areas during the assembly process of an elliptical that
WARNING special attention must be paid. It is very important to follow the assembly instructions correctly and to make sure all parts are firmly tightened. If
the assembly instructions are not followed correctly, the elliptical could have frame parts that are not tightened and will seem loose and may cause irritating noises. To prevent damage to the elliptical, the assembly instructions must be reviewed and corrective actions should be taken.
UNPACKING
Unpack the product where you will be using it. Place the product on a level flat surface. It is recommended that you place a protective covering on your floor. During each assembly step, ensure that ALL nuts and bolts are in place and partially threaded in before completely tightening any ONE bolt.
NOTE: A light application of grease may aid in the installation of hardware. Any grease, such as lithium bike grease is recommended.
Before proceeding, find your elliptical’s serial number located on the front stabilizer tube and enter it in the space provided below. Also locate the model name which is located on the mast boot.
Enter your serial number and model name in the boxes below:
SERIAL NUMBER :
MODEL NAME :
*Refer to the serial number and model name when calling for service.
*Also enter this serial number on your Warranty Card.
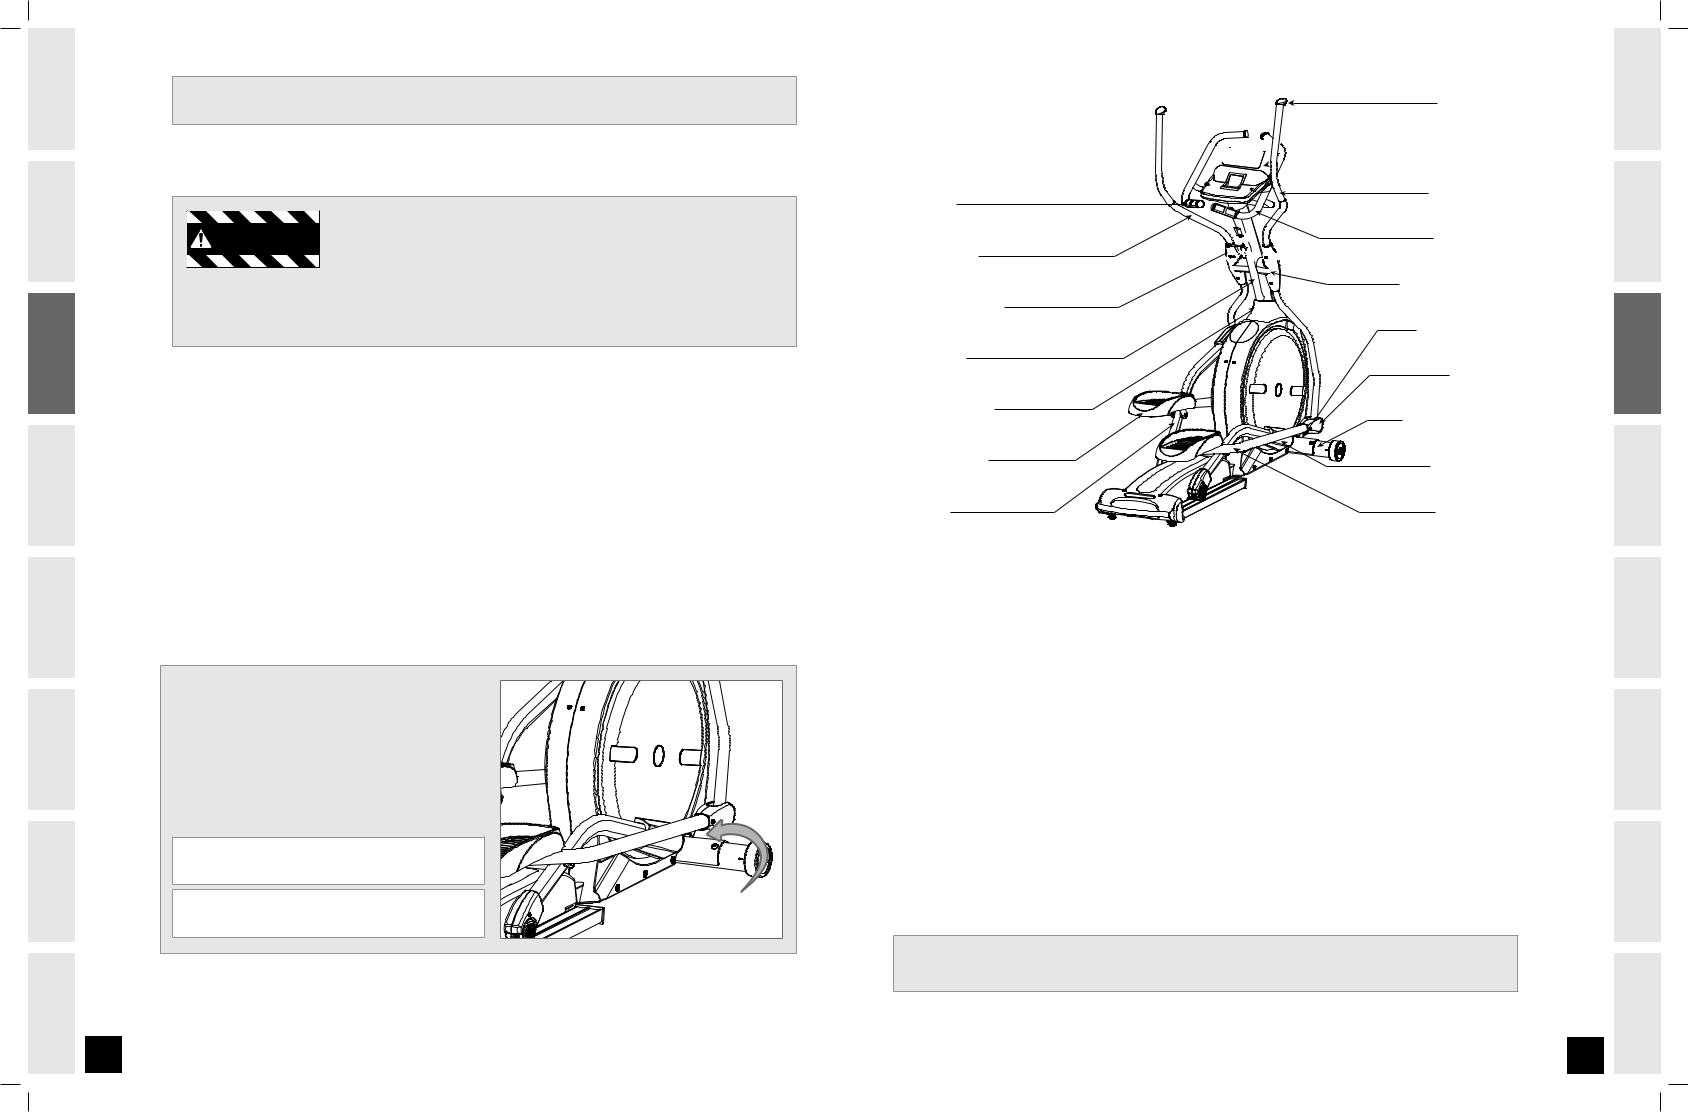
HANDLEBAR CAP
DISPLAY 


 CONSOLE
RIGHT HANDLEBAR
PULSE GRIPS


 MULTI-GRIP BARS LEFT HANDLEBAR


|
HANDLEBAR COVER SETS |
WATER BOTTLE HOLDER |
|
|
POWER CORD SOCKET |
CONSOLE MAST |
|
|
ELBOW COVER |
CONSOLE MAST BOOT |
FRONT STABILIZER TUBE |
|
|
PIVOTING FOOT PAD |
PEDAL ARM COVER |
|
|
PEDAL ARM |
LOWER LINK ARM |
TOOLS INCLUDED |
|
PARTS INCLUDED |
|
|
|
c 5mm Allen Wrench |
c 1 |
Console |
|
c Phillips Screw Driver |
c 1 |
Console Mast |
|
c 13/15mm Flat Wrench |
c 1 |
Console Mast Boot |
|
c 5mm T Wrench |
c 1 |
Front Stabilizer Tube |
|
|
c 2 Handlebars (left & right) |
||
|
c 2 Handlebar Caps |
||
|
c 2 |
Handlebar Cover Sets |
|
|
c 2 |
Lower Link Arms |
|
|
c 2 |
Pedal Arms |
|
|
c 2 |
Pedal Arm Covers |
|
c2 Elbow Covers
c1 Multi-Grip Bars
c2 Pivoting Foot Pads
c1 Water Bottle Holder
c6 Hardware Bags
c3 iPod® Dock Inserts
c1 Universal MP3 Player Dock Insert
c1 iPod® Docking Station Rubber Plug
c1 Audio Adaptor Cable
c1 Power Cord
If you have questions or if there are any missing parts, contact Customer Tech Support. Contact information is located on the back panel of this manual.
For a complete exploded diagram, visit us at www.horizonfitness.com
IMPORTANT PRECAUTIONS INTRODUCTION
ASSEMBLY
BEFORE YOU BEGIN
LIMITED TROUBLESHOOTING CONDITIONING ELLIPTICAL WARRANTY & MAINTENANCE GUIDELINES OPERATION
E1201_Rev.1.5.indd 6-7 |
9/10/08 11:08:16 AM |

ASS EMBLY TANT IMPO R ODUCT NTIONI CAUT ONSPREI
IMIL TED SHOOT OUBLNGI TR E COND ITONI NGI ELL PTICALI BFOE RE ANTY WA RR M A&NTNANCI E S E GU DI EL NI E AT ONIOPER G NIB YOU E
ASS E M B LY STEP 1 |
|
|
BOLTS (A) |
MAIN FRAME |
FRONT STABILIZER TUBE |
AOpen HARDWARE BAG FOR STEP 1.
BAttach the FRONT STABILIZER TUBE to the MAIN FRAME using 2 BOLTS (A).
HARDWARE BAG FOR STEP 1 CONTENTS :
BOLT (A) 20 mm Qty: 2
ASS E M B LY STEP 2
SPRING WASHERS (C) |
CONSOLE MAST |
|
BOLTS (B) |
ARC WASHERS (E) |
BOLTS (B) |
FLAT WASHERS (D) |
|
CONSOLE MAST BOOT |
|
CONSOLE CABLE |
MAIN FRAME |
CONSOLE |
MAST |
WATER |
BOTTLE |
HOLDER |
PRE-ATTACHED |
SCREW |
AOpen HARDWARE BAG FOR STEP 2.
BSlide CONSOLE MAST BOOT onto the bottom of the CONSOLE MAST above bolt holes as shown above.
CCarefully pull the CONSOLE CABLE through the CONSOLE MAST using the twist tie located inside the
CONSOLE MAST.
DAttach the CONSOLE MAST to the MAIN FRAME using 2 BOLTS (B), 2 SPRING WASHERS (C) and 2 FLAT WASHERS (D) in each side and 2 BOLTS (B), 2 SPRING WASHERS (C) and 2 ARC WASHERS (E) in the front of the console mast. Slide CONSOLE MAST BOOT down to cover main frame.
DO NOT PINCH WIRES!
e Attach the WATER BOTTLE HOLDER to the mast using 2 PRE-ATTACHED SCREWS.
HARDWARE BAG FOR STEP 2 CONTENTS : |
ARC |
|
BOLT (B) |
SPRING WASHER (C) |
FLAT WASHER (D) |
WASHER (E) |
|
17 mm |
||||
15 mm |
15 mm |
18 mm |
||
Qty: 2 |
||||
Qty: 6 |
Qty: 6 |
Qty: 4 |
||
|
||||
|
|
|
angle view |
IMPORTANT PRECAUTIONS INTRODUCTION
ASSEMBLY
BEFORE YOU BEGIN
LIMITED TROUBLESHOOTING CONDITIONING ELLIPTICAL WARRANTY & MAINTENANCE GUIDELINES OPERATION
E1201_Rev.1.5.indd 8-9 |
9/10/08 11:08:22 AM |
ASS EMBLY TANT IMPO R ODUCT NTIONI CAUT ONSPREI
IMIL TED SHOOT OUBLNGI TR E COND ITONI NGI ELL PTICALI BFOE RE ANTY WA RR M A&NTNANCI E S E GU DI EL NI E AT ONIOPER G NIB YOU E
ASS E M B LY STEP 3
PULSE GRIP WIRES
MULTI-GRIP BARS
 CONSOLE MAST
ARC
WASHERS (E) 
FLAT
WASHERS (D)
SPRING
WASHERS (C)
BOLTS (B)
AOpen HARDWARE BAG FOR STEP 3.
BRoute pulse grip wires from MULTI-GRIP BARS through CONSOLE MAST and up to console hole.
DO NOT PINCH WIRES!
CAttach the MULTI-GRIP BARS to the CONSOLE MAST using 2 BOLTS (B), 2 SPRING WASHERS (C) and 2 FLAT WASHERS (D) in each side and 2 BOLTS (B), 2 SPRING WASHERS (C) and 2 ARC WASHERS (E) in the rear of the MULTI-GRIP BARS.
HARDWARE BAG FOR STEP 3 CONTENTS : |
ARC |
|
BOLT (B) |
SPRING WASHER (C) |
FLAT WASHER (D) |
WASHER (E) |
|
17 mm |
||||
15 mm |
15 mm |
18 mm |
||
Qty: 2 |
||||
Qty: 6 |
Qty: 6 |
Qty: 4 |
||
|
||||
|
|
|
angle view |
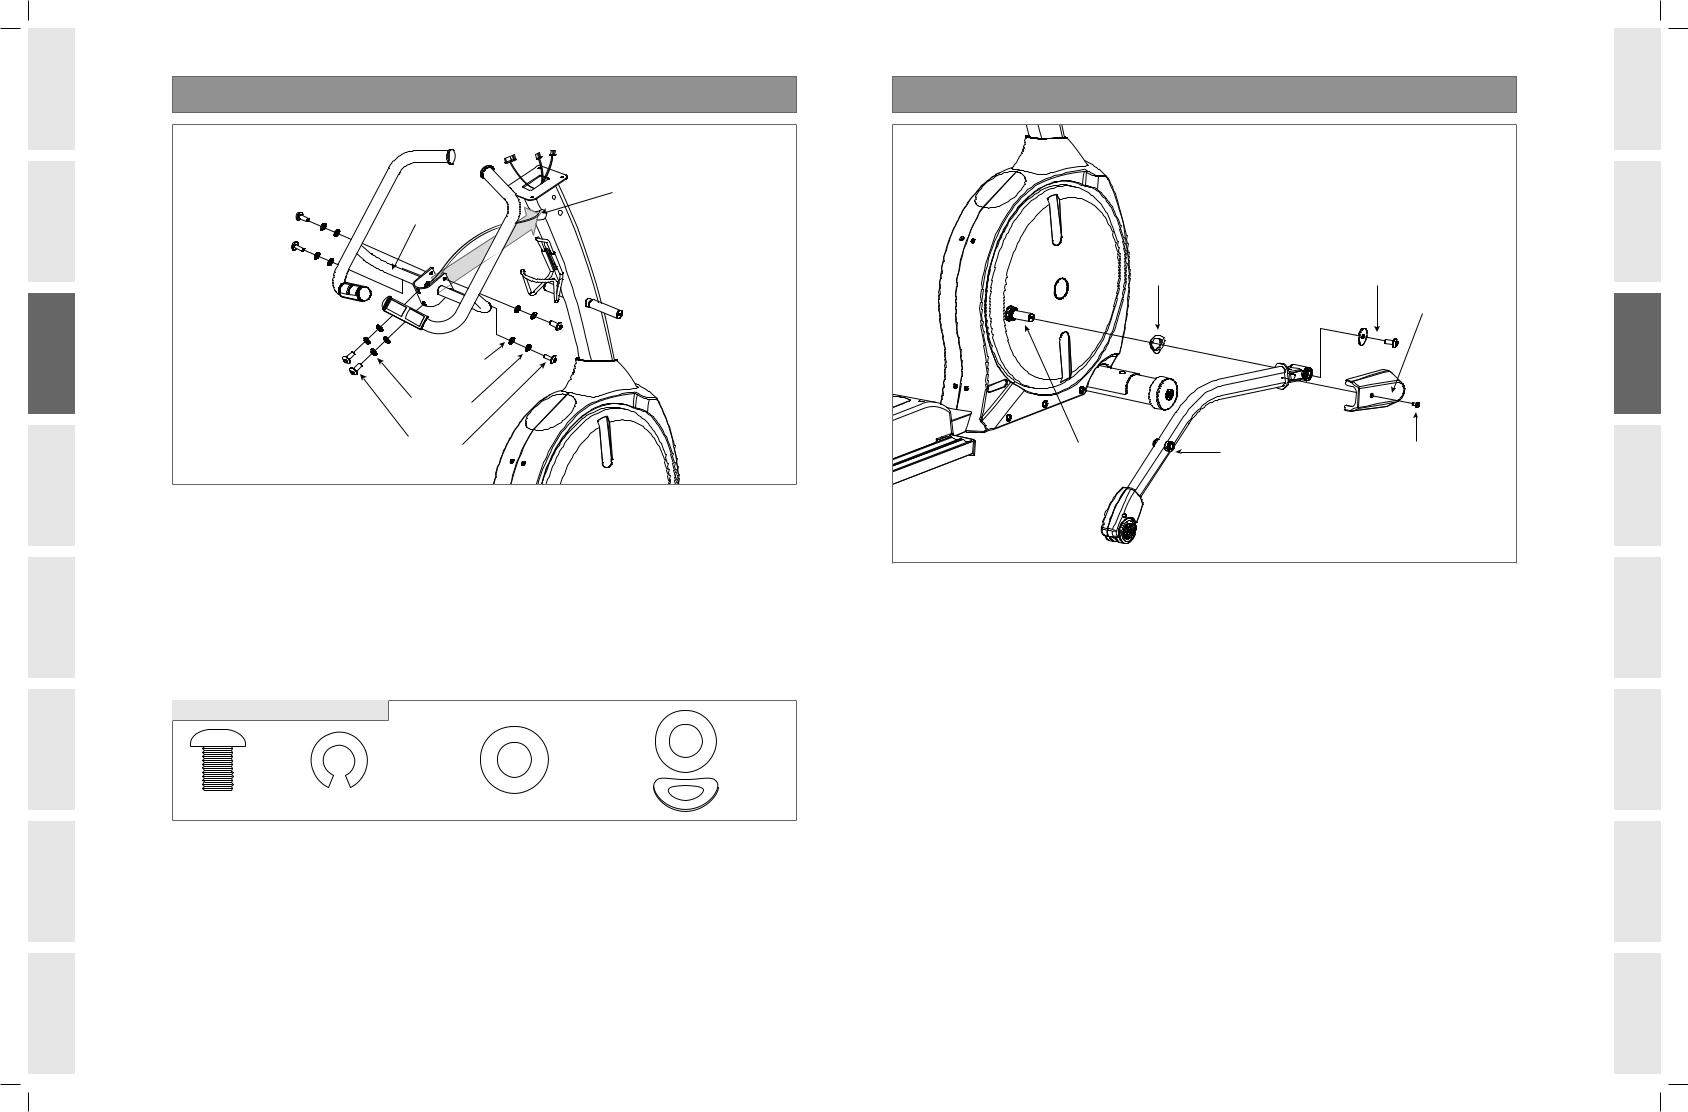
ASS E M B LY STEP 4 |
|
|
|
PRE-ATTACHED WAVY WASHER |
PRE-ATTACHED BOLT & WASHER |
|
|
PEDAL ARM COVER |
CRANK |
PEDAL ARM |
PRE-ATTACHED SCREW |
NOTE: There is NO hardware bag for this step. All hardware is pre-installed.
ARemove PRE-ATTACHED BOLT & WASHER from right PIVOT TUBE.
BSlide right PEDAL ARM onto the CRANK and attach by re-inserting PRE-ATTACHED BOLT & WASHER.
CRepeat on the other side.
DAttach the PEDAL ARM COVER to the right PEDAL ARM using PRE-ATTACHED SCREW.
e Repeat on the other side.
10 |
|
11 |
|
|
|
IMPORTANT PRECAUTIONS INTRODUCTION
ASSEMBLY
BEFORE YOU BEGIN
LIMITED TROUBLESHOOTING CONDITIONING ELLIPTICAL WARRANTY & MAINTENANCE GUIDELINES OPERATION
E1201_Rev.1.5.indd 10-11 |
9/10/08 11:08:27 AM |
 Loading...