


CLUB SERIES
HR
Treadmill User’s Guide

Table of Contents
IMPORTANT PRECAUTIONS . . . . . . . . . . . . . . . . . . . . . . . . . . . . . . . . . . . . . . . .3 ASSEMBLY . . . . . . . . . . . . . . . . . . . . . . . . . . . . . . . . . . . . . . . . . . . . . . . . . . . . .5 BEFORE YOU BEGIN . . . . . . . . . . . . . . . . . . . . . . . . . . . . . . . . . . . . . . . . . . . . .9 TREADMILL OPERATION . . . . . . . . . . . . . . . . . . . . . . . . . . . . . . . . . . . . . . . . . .12 TROUBLESHOOTING . . . . . . . . . . . . . . . . . . . . . . . . . . . . . . . . . . . . . . . . . . . . .19 CONDITIONING GUIDELINES . . . . . . . . . . . . . . . . . . . . . . . . . . . . . . . . . . . . . .22 LIMITED WARRANTY . . . . . . . . . . . . . . . . . . . . . . . . . . . . . . . . . . . . . . . . . . . .29
2

Important Precautions
SAVE THESE INSTRUCTIONS
Read all instructions before using this treadmill. When using an electrical product, basic precautions should always be followed, including the following: Read all instructions before using this treadmill. It is the responsibility of the owner to ensure that all users of this treadmill are adequately informed of all warnings and precautions.
WARNING! Connect this exercise product to a properly grounded outlet only. See grounding instructions.
GROUNDING INSTRUCTIONS
This product must be grounded. If a treadmill should malfunction or breakdown, grounding provides a path of least resistance for electrical current to reduce the risk of electrical shock. This product is equipped with a cord having an equipment-grounding conductor and a grounding plug. The plug must be plugged into an appropriate outlet that is properly installed and grounded in accordance with local codes and ordinances.
DANGER! Improper connection of the equipment-grounding conductor can result in a risk of electric shock. Check with a qualified electrician or serviceman if you are in doubt as to whether the product is properly grounded. Do not modify the plug provided with the product. If it will not fit the outlet, have a proper outlet installed by a qualified electrician.
This product is for use on a nominal 120-volt circuit, and has a grounding plug that looks like the plug illustrated below. A temporary adapter such as the one illustrated below may be used to connect this plug to a 2-pole receptacle as shown, if a properly grounded outlet is not available. The temporary adapter should be used only until a properly grounded outlet can be installed by a qualified electrician. The green colored rigid ear, lug, or the like extending from the adapter must be connected to a permanent ground such as a properly grounded outlet box cover. Whenever the adapter is used, it must be held in place by a metal screw.
2-Pole Outlet In Grounded Box
3-Pole Grounded Outlet
Adapter
Grounded Treadmill Power Cord
Metal Grounding Screw
3

WARNING! To reduce the risk of burns, fire, electrical shock or injury to persons:
•Never use the treadmill before securing the safety tether clip to your clothing.
•If you experience chest pains, nausea, dizziness, or shortness of breath, stop exercising immediately and consult your physician before continuing.
•Do not wear clothes that might catch on any part of the treadmill.
•Keep power cord away from heated surfaces.
•Keep children off of treadmill at all times.
•Do not use treadmill in garages, porches, car ports or outdoors.
•The treadmills are intended for in-home use only. Do not use this treadmill in any commercial, rental, or institutional setting.
•Unplug treadmill before moving it.
•Do not remove the treadmill motor covers or roller covers. Service should be performed only by an authorized service provider.
•At no time should more than one person be on treadmill while in operation.
•Keep children under the age of 12 and pets at least 10 feet away from the treadmill at all times.
•The treadmills should not be used by persons weighing more than 275 pounds (CST3), 300 pounds (CST4) and 325 pounds (CST5HR).
•Clean with soap and slightly damp cloth only; never use solvents.
OTHER SAFETY TIPS FOR YOUR TREADMILL
OPERATION
To reduce the risk of damaging important components on your treadmill, it is strongly recommended that your treadmill is plugged into a dedicated 20amp outlet, without the use of an additional extension cord. IMPORTANT: The treadmill is not compatible with GFCI-equipped outlets.
It is essential that your treadmill is used only indoors, in a climate controlled room. If your treadmill has been exposed to colder temperatures or high moisture climates, it is strongly recommended that the treadmill is warmed up to room temperature before first time use. Failure to do so may cause premature electronic failure.
4

Assembly
IMPORTANT: PLEASE READ BEFORE USE!
CAUTION! There are several areas during the assembly process of a the treadmill that special
attention must be paid. It is very important to follow the assembly instructions correctly and to make sure all parts are firmly tightened. If the assembly instructions are not followed correctly, the treadmill could have frame parts that are not tightened and will seem loose and may cause irritating noises. There should be no side-to-side play in the console masts or any forward and back play in the console assembly or handlebars. If there is any play in these areas, the treadmill has not been properly assembled. To prevent damage to the treadmill, the assembly instructions must be reviewed and corrective actions should be taken.
UNPACKING
Place your treadmill on a level flat surface. It is recommended that you place a protective covering on your floor. Take CAUTION when handling and transporting this unit. Never open box when it is on its side. Once the banding straps have been removed, do not lift or transport this unit unless it is fully assembled and in the upright folded position, with the lock latch secure. NOTE: The console assembly is located under the treadmill deck and should ONLY be removed after STEP 1 of the assembly instructions have been fully completed! FAILURE TO DO SO MAY RESULT IN SERIOUS INJURY!
Unpack the unit where it will be used. The enclosed treadmill is equipped with high-pressure shocks and may spring open if mishandled. Never grab hold of any portion of the incline frame and attempt to lift or move the treadmill. FAILURE TO FOLLOW THESE INSTRUCTIONS COULD RESULT IN INJURY!
Before proceeding, find your treadmill’s serial number and model name located to the left of the on/off power switch and power cord and enter it in the space provided below and be sure to read the Safety Instructions and complete User’s guide section before using your new treadmill:
ENTER YOUR SERIAL NUMBER AND MODEL NAME IN THE BOX BELOW:
Refer to the serial number and model name when calling for service, also enter this serial number on your Warranty Card.
5

Reading Rack |
Console |
Touch Pad
Water Bottle Holder*
Fan
Grip Pulse
Handrail
Safety Key Placement
Upright Support |
Motor Cover |
On/Off Switch |
Running Belt |
Circuit Breaker |
Side Rail |
|
Roller End
Cap
Side Rail Cap
Air Cell
Rear Roller
Adjustment Bolt
*Water bottle is not included
TOOLS (Included)
• 5mm Allen Wrench/Phillips Screw Driver • 8mm Allen Wrench or 6mm Allen Wrench
PARTS
• 1 Safety Key • 1 Console Assembly (located under treadmill deck) • 1 Power Cord • 1 Hardware Pack (contents listed)
Teflon Washer (B) |
Lock Washer (E) |
Qty: 4 |
Qty: 2 |
45mm Bolt (A)
Qty: 2
8mm Bolt (D) |
|
|
|
|
|
|
|
Qty: 4 |
Arc Washer (F) |
||
|
|||
|
Qty: 2 |
||
If you have questions, or if there are any missing parts, we will guarantee complete satisfaction.
PLEASE CALL OUR TOLL-FREE DIRECT CUSTOMER ASSISTANCE CENTER @ 1.888.993.3199 Mon.-Fri., 8 a.m.-5 p.m. CST (excluding holidays).
6
NOTE: It is recommended that you apply grease to the threads of each bolt as you assemble your treadmill, to prevent loosening and noise. Also, during each assembly step, ensure that ALL nuts and bolts are in place and partially threaded in before completely tightening any ONE bolt.
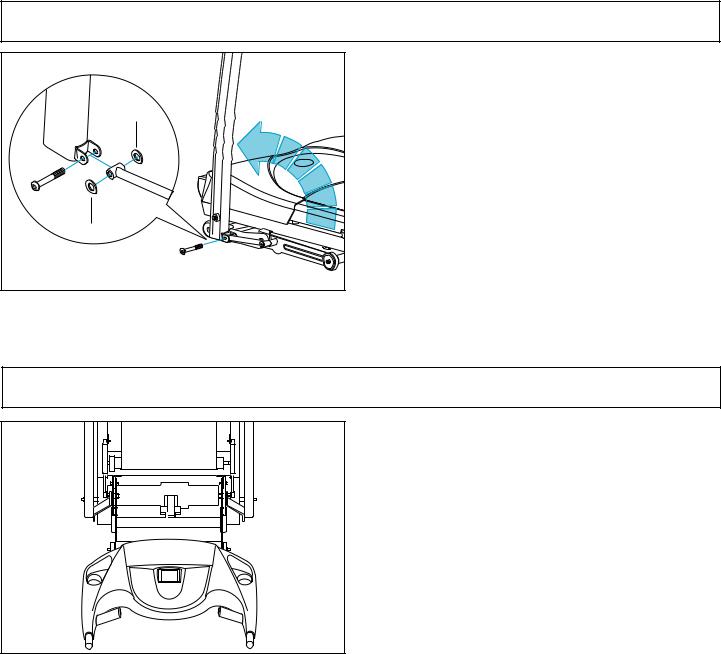
Assembly Step 1
B |
B |
1.Lift left console mast into upright position. Be sure to hold the console mast firmly, as it will not stay in the upright position on it’s own.
2.Move left side linkage arm, Teflon Washer (B) into position and insert bolt (A) and tighten.
3.Repeat on the right side.
4.Cut and remove the banding strap.
Assembly Step 2
1. Lift the running deck until lock latch is fully engaged.
2. Remove console assembly from treadmill carton and place out of the way.
3. Lower the treadmill running deck from the folded position.
7
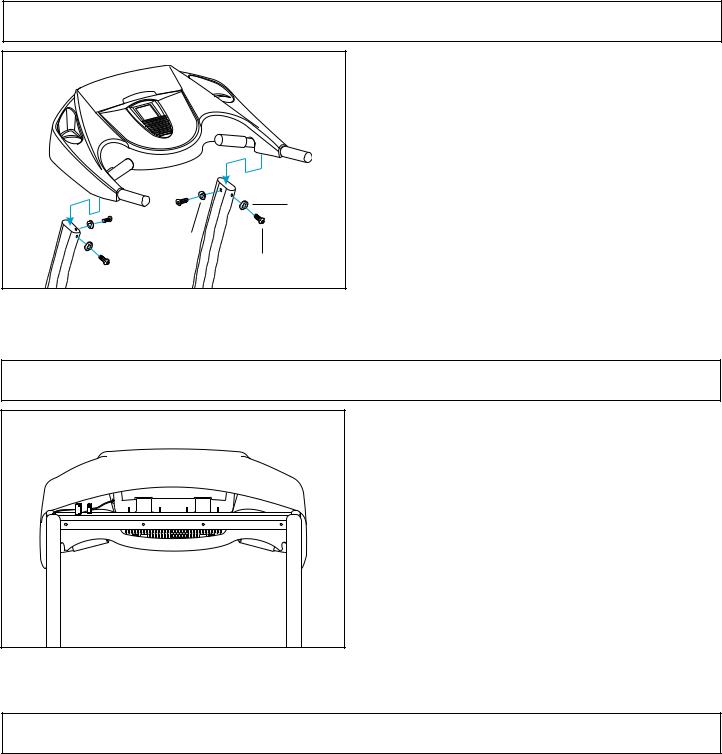
Assembly Step 3
F |
E |
D |
1.Place console assembly into its correct position.
2.Place Lock Washer (E) and bolt (D) into left upright support and tighten.
3.Place Arc Washer (F) and bolt (D) into left upright support and tighten.
4.Repeat STEPS 2 and 3 for the right-side upright support.
NOTE: Do not pinch console cable or grip pulse wires.
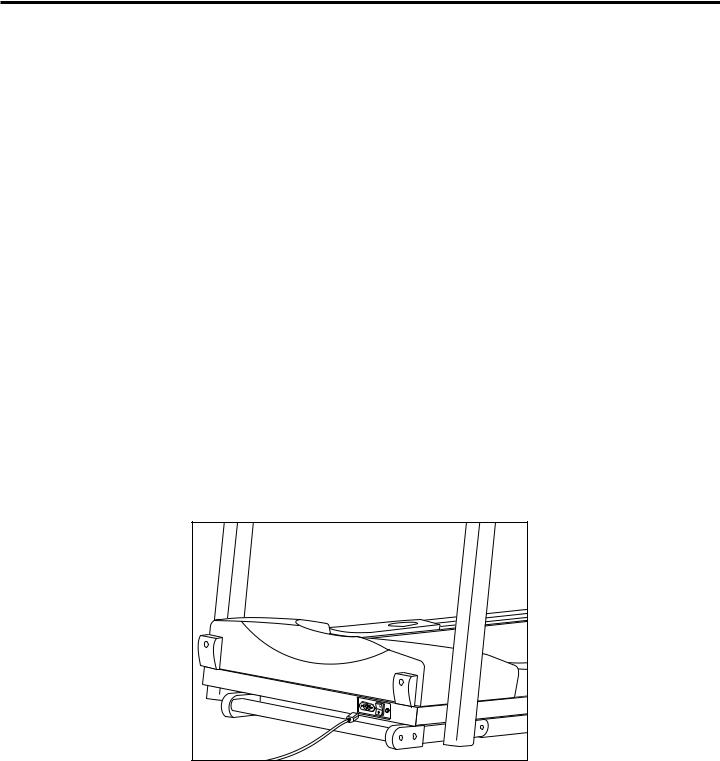
Assembly Step 4
1. Connect the console cable. Carefully tuck wires in mast to avoid damage.
NOTE: Do not pinch the wires
FINISH
8
Before You Begin
CONGRATULATIONS! on choosing your treadmill. You’ve taken an important step in developing and sustaining an exercise program! Your treadmill is a tremendously effective tool for achieving your personal fitness goals. Regular use of your treadmill can improve the quality of your life in so many ways.
Here are just a few of the health benefits of exercise:
• Weight Loss • A Healthier Heart • Improved Muscle Tone • Increased Daily Energy Levels • Reduced Stress • Help In Countering Anxiety and Depression • An Improved Self Image
The key to reaping these benefits is to develop an exercise habit. Your new treadmill will help you eliminate the obstacles that prevent you from getting in your exercise time. Inclement weather and darkness won't interfere with your workout when you use your treadmill in the comfort of your home. This guide provides you with basic information for using and enjoying your new machine. A more complete knowledge of your new treadmill will assist you in realizing your goal of a healthy lifestyle.
TURN POWER ON
Make sure that your treadmill is properly connected to a power outlet. The on/off switch is located next to the power cord. Flip this switch to the 'on' position, so that the switch is lit. You will hear a beep and the console will light up.
DO NOT STAND ON THE BELT
While you are preparing to use the treadmill, do not stand on the belt. Place your feet on the side rails before starting the treadmill. Start walking on the belt only after the belt has begun to move. Never start the treadmill at a fast running speed and attempt to jump on!
9
 Loading...