


User manual.
WH20440
Series
IMPORTANT: Read carefully before assembly and use.
©2014 Techtronic Floor Care Technology Limited. All Rights Reserved. Distributed by Royal Appliance Mfg. Co. Glenwillow, Oh 44139 #961151137 ID110561-R0
Welcome to Hoover ownership.
Now you can make it official.
Visit www.hoover.com/filter-reminders to receive free service reminders sent straight to your inbox.
Get cleaning confidence for up to 1 full year with the Hoover® limited warranty.
Your Guide:
Safety Instructions |
1 |
|
|
Getting started with your steam mop |
3 |
|
|
How to use |
6 |
|
|
Using your machine |
10 |
|
|
Handheld steamer |
16 |
|
|
Maintenance |
21 |
|
|
Need Help? |
26 |
|
|
Troubleshooting |
27 |
|
|
Service & Warranty |
28 |
|
|
IMPORTANT SAFETY INSTRUCTIONS
SAVE THESE INSTRUCTIONS
When using an electrical steam cleaner, basic precautions should always be followed, including the following:
READ ALL INSTRUCTIONS BEFORE USING THIS STEAM CLEANER. THIS PRODUCT IS INTENDED FOR HOUSEHOLD
USE ONLY. IF USED COMMERCIALLY WARRANTY IS VOID. WARNING: TO REDUCE THE RISK OF FIRE,
ELECTRIC SHOCK OR INJURY:
•Fully assemble before operating.
•Operate steam cleaner only at voltage specified on data label on back of steam cleaner.
•Do not leave steam cleaner when plugged in. Unplug from outlet when not in use and before cleaning or servicing.
•Do not use outdoors or store outdoors.
•Do not use for space heating purposes.
•Do not immerse in water.
•Do not allow to be used as a toy. Not intended for use by children age 12 and under. Close supervision is necessary when used near children. To avoid injury, burn, or damage, keep children away from product, and do not allow children to touch steam cleaner while in use or before completely cool, or to place fingers or other objects into any openings.
•Do not use any extension cord with this product.
•Do not handle the plug, or the Steam Mop with wet hands. Do not operate the Steam Mop without footwear.
•Do not place hands or feet under the Steam Mop while it is in operation as the steam cleaner gets very hot and may create a burn hazard.
•Use only on flat, horizontal surfaces. Do not use the Steam Mop on walls, counter tops or windows.
•To protect against a risk of electric shock, do not immerse the Steam Mop into water or any other liquids.
•Use only as described in this manual. Use only manufacturer’s recommended attachments and products.
•Do not use with damaged cord or plug. If appliance is not work ing as it should, has been dropped, damaged, left outdoors, or dropped into water, call Customer Service at 1-800-944-9200 for instructions before continuing use.
•Do not pull or carry by cord, use cord as a handle, close a door on cord, or pull cord around sharp edges or corners. Do not place product on cord. Do not run steam cleaner over cord. Keep cord away from heated surfaces.
•Do not unplug by pulling on cord. To unplug, grasp the plug, not the cord.
•Do not put any object into openings. Do not use with any opening blocked.
•Keep hair, loose clothing, fingers, and all parts of body away from openings.
•Turn off all controls before unplugging.
•Use extra care when cleaning on stairs. When not in use do not place steam cleaner on stairs or furniture, as it may result in injury or damage.
•To avoid burn or injury, do not apply steam directly to any person or animal.
1
•Only use water to refill the water tank. Do not use any type of chemicals or additives in the water tank.
•Do not add descaling, aromatic, alcoholic products, cleaning solutions, scented perfumes, oils or any other chemicals to the water used in this steam cleaner as this may damage the steam cleaner or make it unsafe for use. While this Steam Mop is designed for tap water, to increase effectiveness of the steam and to avoid build up of minerals, you may use distilled water to fill Steam Mop.
•Do not use Steam Mop in an enclosed space filled with vapor given off by oil-based paint, paint thinners, some moth proofing substances, flammable dust, or other explosive or toxic vapors.
•When in use, never turn the steam cleaner over or use while on its side.
•Allow Steam Mop sufficient time to cool prior to removing the microfiber pad.
•Before cleaning the Steam Mop, unplug the power cord from the electrical outlet and clean with a dry or damp cloth. Do not pour water or use alcohol, benzene or paint thinner on the steam cleaner.
•Do not use in areas where flammable or combustible liquids, such as gasoline may be present.
•Do not use without microfiber pad properly attached to mophead.
•Do not clean over floor electrical outlets.
•Do not use the Steam Mop on leather, wax polished furniture or floors, synthetic fabrics, velvet or other delicate, steam sensitive materials.
•Use only Hoover 4X Steam Multi-Floor Cleaning Solution.
•Do not operate Steam Mop without water in water tank.
•Unplug Steam mop from outlet before filling, rinsing or cleaning. Do not fill water reservoir with more than recommended amount of water. Do not fill detergent reservoir with more than recommended amount of detergent and water.
WARNING:This product contains chemicals known to the State of California to cause cancer, birth defects or reproductive harm. WASH HANDS AFTER HANDLING.
CAUTION:
•Check and follow flooring manufacturers warranty and recommendations regarding the use of steam mops PRIOR to using this product on your floors and carpets.
•Store appropriately indoors in a dry place. Do not expose machine to freezing temperatures.
•Never use Steam Mop without microfiber pad attached.
•Never leave Steam Mop in one spot or on any surface for any period of time when pump is turned on and steam is activated.
WARNING:
TO REDUCE THE RISK OF ELECTRIC SHOCK, THIS APPLIANCE HAS A POLARIZED PLUG (ONE BLADE IS WIDER THAN THE OTHER). THIS PLUG WILL FIT IN A POLARIZED OUTLET ONLY
ONE WAY. IF THE PLUG DOES NOT FIT FULLY IN THE OUTLET,
REVERSE THE PLUG. IF IT STILL DOES NOT FIT, CONTACT A QUALIFIED ELECTRICAN TO INSTALL THE PROPER OUTLET. DO NOT CHANGE THE PLUG IN ANY WAY.
2
Getting started with your steam mop:
|
|
C* |
F* |
|
H** |
A |
|
D |
|
G |
I** |
|
|
|
|
||
|
|
|
|
|
|
|
B |
|
|
|
|
|
|
E |
|
|
|
J |
K |
L |
M |
N |
O |
P Q
3
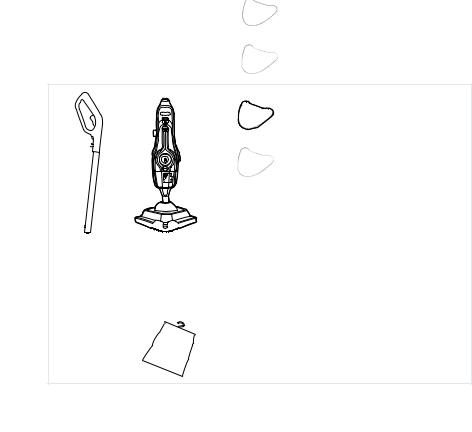
CARTON CONTENTS
A.Handle
B.Steam Mop Body (Water
Tank and Solution Tank attached)
C.Multi-Surface Microfiber Pads (x2) *quantities vary per model
D.Carpet Glider
E.Water Filter (Pre-assembled in steam cleaner, remove water tank to expose filter)
F.8 oz. 4X Steam Multi-floor Cleaning Solution *quantities vary per model
G.Hose
H.Squeegee Tool**
I.Upholstery Cloth Tool**
J.Large Plastic Brush
K.Small Plastic Brush
L.Metal Brush
M.Grout Brush
N.Scraper Nozzle
O.Concentration Nozzle
P.Detail Nozzle
Q.Accessory Bag
Remove all parts from carton and identify each item shown.
Make sure all parts are located before disposing of packing materials.
**Select models only
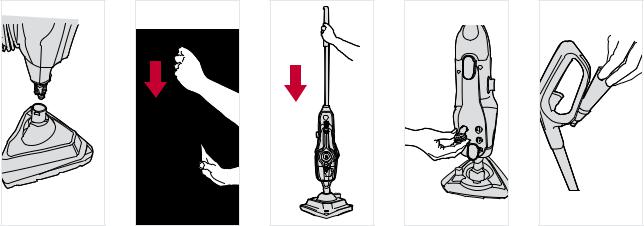
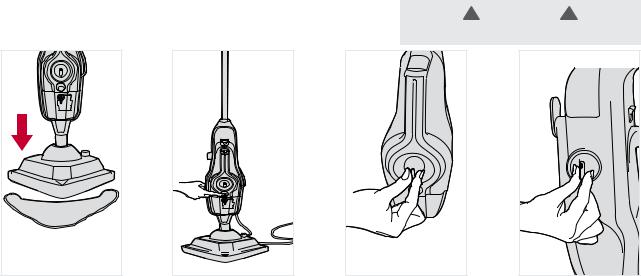
Assembly:
Insert the body into |
Insert the handle |
To stand steam |
Insert tools into the |
Insert |
the floor head until it |
until it clicks into |
mop upright, push |
back of the |
concentration |
1clicks into place. |
2 place. |
3 handle down until |
4 steam mop. |
5 nozzle into the |
|
|
clicks into place. |
|
storage hook on |
|
|
|
|
the back of handle. |
4
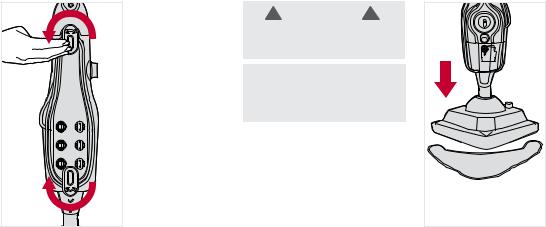
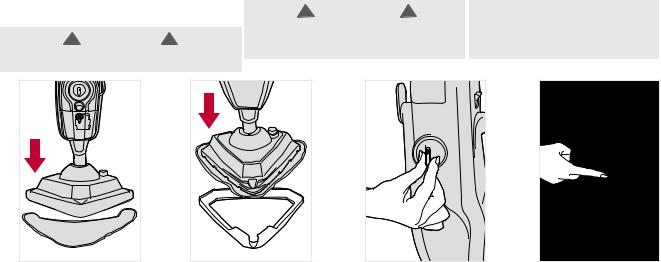
Cord storage: |
Attach microfiber pad: |
|
|
|
! WARNING ! |
|
|
To reduce the risk of personal injury - |
|
|
Unplug the steam cleaner when |
|
|
assembling the accessories. |
|
|
• IMPORTANT • |
|
|
Never use the Steam Mop without |
|
|
the Microfiber Pad correctly |
|
|
attached to the Mop Head. |
|
|
The “Multi-Surface Microfiber |
|
|
Pad” can be used on all sealed |
|
|
hard floor surfaces as well as |
|
|
carpet. When using on carpet the |
|
|
carpet glider attachment should |
|
|
be utilized as directed in the |
|
|
“Refreshing Carpet” section of |
1 |
|
this manual. |
Wrap cord around |
|
|
|
|
|
|
cord release hooks. |
|
5
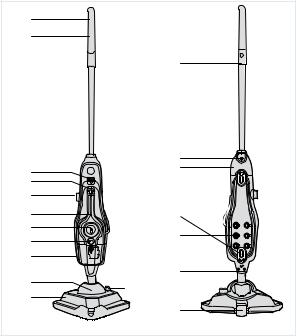
How to use:
1. Handle
2. Solution Trigger (behind)
3. Handheld release button
4. Handheld Steam Trigger
5. Solution Control Dial
6. Steam Ready Indicator
7. Steam Control Dial
8. On/Off Switch
9. Water Tank
10. Hard Water Filter (hidden)
11. Tile & Grout Scrub Brush (hidden)
12. Floorhead
13. SteamStream™ on/off button
14. Concentration Nozzle Storage
15. Handle Release Button
16. Solution Tank
17. Quick Cord Release Hook
18. Tool Storage
19. Floorhead Release Button
20. Carpet Glider
1
2
3
4
5
6
7
8
9
10 
11 |
13 |
12 |
|
Front
14
15
16
17 
18
19
20
Back
6

Accessories:
21.Multi-Surface Microfiber Pad*
22.Carpet Glider
23.Water Filter (Pre-assembled in steam cleaner, remove
tank to expose filter)
24.Cleaning Solution*
25.Hose
26.Squeegee Tool**
27.Upholstery Cloth Tool**
28.Large Plastic Brush
29.Small Plastic Brush
30.Metal Brush
31.Grout Brush
32.Scraper Nozzle
33.Concentration Nozzle
34.Detail Nozzle
35.Accessory Bag
21* |
22 |
23 |
24* |
25 |
26** |
27** |
28 |
29 |
30 |
31 |
32 |
33 |
34 |
35 |
*Quantities vary per model
**Select models only TECHNICAL SPECIFICATION Model Number: WH20440 series Input Power: AC 120V / 60Hz / 10A
7
Before you begin cleaning:
Filling the twin tanks
! WARNING ! |
|
• IMPORTANT • |
To avoid the risk of personal injury - Turn off, |
|
DO NOT MIX HOOVER® 4X |
unplug, and allow steam cleaner to cool before |
|
STEAM MULTI-FLOOR CLEANING |
servicing or filling water or solution tank. Do |
|
SOLUTION WITH ANY OTHER |
not use hot or boiling water to fill water tank. |
|
CLEANING SOLUTION. |
|
|
|
• IMPORTANT •
DO NOT ADD SOLUTION TO
WATER TANK.
NOTE: When the tank is turned upright it may allow a few drops to drip from cap. This is normal.
• IMPORTANT •
If you don’t want to use solution on your flooring, turn solution dial to OFF position.
Always test on an inconspicuous area of flooring first before using solution.
Press the water tank |
2 |
Pull the tab on the water |
Fill the water tank with |
release buttons and pull |
tank cap to open. |
water only to fill line, |
|
1the water tank to remove. |
|
3 replace the cap and push |
firmly to close.
4Slide the water tank back into the machine until it clicks into place.
8

!WARNING !
Only use recommended Hoover® 4x Steam Multi-Floor Cleaning Solution.
5To remove the solution tank press both release buttons and pull to release.
6Twist the solution tank cap counter clockwise and lift to remove.
Pour solution to the |
Replace the |
Insert the solution |
solution fill line. Then |
solution tank cap |
tank back into the |
7fill remainder with |
8and twist clockwise |
9machine until it |
water. See tank fill |
to close. |
clicks into place. |
lines for reference. |
|
|
9

•The steam mop and accessories get very hot during use, always allow them to cool down before handling.
•Always unplug and switch off the steam mop when assembling.
•Always switch off the steam mop before emptying the water tank or changing the cleaning pads/accessories.
•IMPORTANT: Please refer to floor manufacturer’s care recommendations before use and test the steam mop on a discrete area of flooring to begin with.
•When using the steam mop, basic safety precautions should always be observed.
•Don’t aim the steam mop at people, animals, plants or electrical components such as interior of ovens or wires. Never touch the steam spray or floor head from a short distance. (There is a risk of scalding)
•The steam mop is equipped with a thermostat and a thermal cut out. If for any reason the steam mop overheats it will switch off. If this happens turn off and unplug the steam mop, allow to cool for a least 2 to 4 hours and re-start.
Using your machine:
!WARNING !
Never leave the Steam Mop in one spot on any surface for an extended period of time with a damp or wet Microfiber pad attached as this may damage the floor surface.
When cleaning hard floors, your Steam Mop should only be used on tiles, linoleum, sealed hardwood flooring, engineered hardwood, laminate,
vinyl and sealed stone floors.
If used on waxed flooring, you may experience loss of glossiness.
To reduce the risk of personal injury, unplug the steam cleaner when assembling the accessories.
Do not clean over floor electrical outlets.
Do not use steam cleaner or press the Steam Trigger without water in the water tank.
!IMPORTANT !
Never use the Steam Mop without the Microfiber pad properly attached to the Mop Head.
10
!WARNING !
To reduce the risk of personal injury - Unplug the steam cleaner when assembling the accessories.
Place the microfiber pad on |
2 |
Plug into an outlet and Push |
3 |
the floor white side facing |
On/Off switch to turn ON |
||
1up. Place steam mop onto |
(I=ON). The blue light will |
||
pad making sure the entire |
|
illuminate to show power on. |
|
pad covers the floor head. |
|
The green light will illuminate to |
|
|
|
show the steam mop is ready |
|
11 |
to use. |
|
Adjust the steam dial to desired setting.
4To steam your floors with solution turn the dial to ON (I=ON) and without solution turn the dial to OFF (0=OFF).
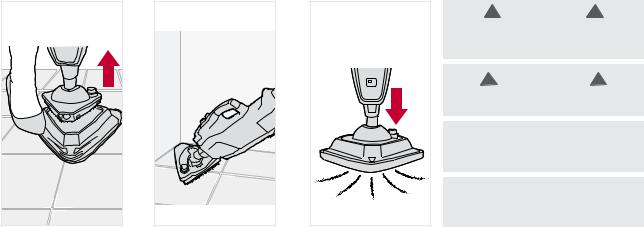
5To recline the steam mop place foot here and pull handle backwards.
TO SANITIZE HARD SURFACES
Turn the solution dial to "OFF" position and steam control dial to "MAX" position.
Connect the microfiber pad and run a minimum
of 6 strokes at a medium pace (5-7 seconds per
32" stroke) across same area. Allow to dry.
To produce steam squeeze |
Move the steam mop slowly |
the trigger in short bursts. |
backwards and forwards |
6 Don’t hold the trigger |
7 across the floor. Squeeze |
continuously to prevent |
and release trigger as |
over saturating floors. |
required. |
12
Refreshing carpets:
!WARNING !
To reduce the risk of personal injury - Unplug the steam cleaner when assembling the accessories.
!WARNING !
Do not clean over floor electrical outlets.
Do not use steam cleaner or press the Steam Trigger without water in the water tank.
• IMPORTANT •
When using on carpets, always ensure the multi-surface Microfiber Pad is properly attached to the Mop Head.
1Place the microfiber pad on the floor white side facing up. Place steam mop onto pad making sure the entire pad covers the floor head.
13
With microfiber pad |
3 |
Turn the solution dial to OFF |
4 |
Push On/Off button |
attached, hook the steam |
when refreshing carpet. |
to power on and off. |
||
2 mop into the front of the |
|
|
carpet glider and push to clip into place. Carpet glider should only be used when refreshing carpets.
5To recline the steam mop place foot on here and pull handle backwards.
6To produce steam, squeeze the trigger. To prevent overly wetting the carpet, avoid holding the trigger continuously.
7Move the steam mop slowly backwards and forwards across the carpet.
8To release the carpet glider, place foot on clip and push down. Lift steam mop to unhook and remove.
14
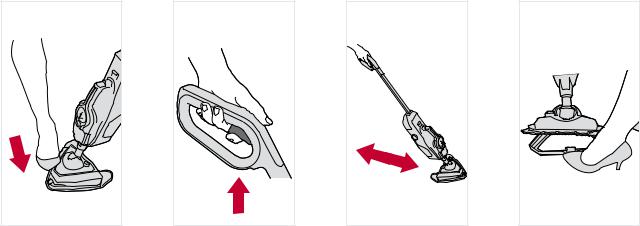
Using tile and grout scrub brush and SteamStream™:
1Place foot on outer floor head and gently pull away steam mop to release the tile and grout scrub brush.
2Move steam mop back and forth across the floor, getting into corners and awkward places.
! WARNING !
Do not clean over floor electrical outlets.
Do not use steam cleaner or press the Steam Trigger without water in the water tank.
! WARNING !
Scrub brush bristles may damage wood floors.
• IMPORTANT •
Always switch off the steam mop before attaching or removing the floor head.
• IMPORTANT •
Scrub brush only recommended for tile and grout cleaning only.
3To engage SteamStream™ from the front nozzle, press the SteamStream™ button to activate, and squeeze the trigger to release steam. Press the SteamStream™ button to turn OFF (0=OFF).
15
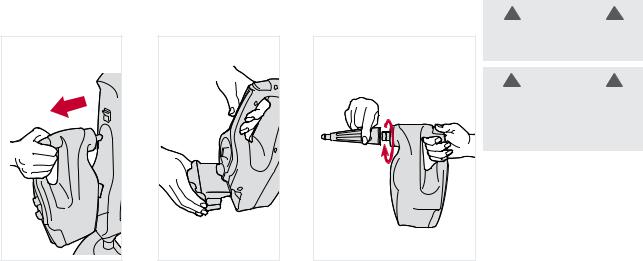
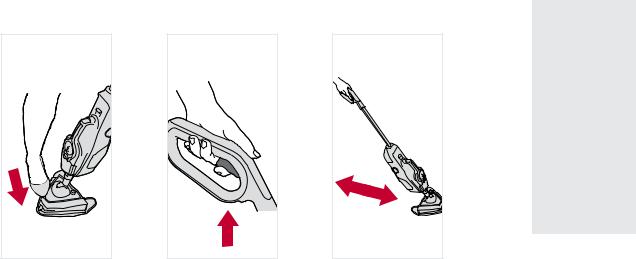
Using the handheld steamer:
Lift the handheld release |
2 |
Remove water tank and |
3 |
button and gently pull |
refill before use. |
||
1the handheld to release |
|
from the steam mop.
! WARNING !
Turn off, unplug and allow steam cleaner to cool before servicing or filling water tank.
! CAUTION !
Turn off, unplug and allow steam cleaner to cool before removing accessories. Always have the nozzle pointed away from you and others during installation.
When using the handheld always attach the concentration nozzle or hose. Push onto the handheld nozzle and twist clockwise to lock into position.
16

!WARNING !
To avoid burn injury, do not touch the steam cleaning nozzle or adjacent surfaces when steam cleaning or when the nozzle is heated.
Adjust the dial on the front |
5 |
To Turn unit ON, push |
To produce steam push the |
of the handheld to desired |
switch to (I=ON). |
trigger with your thumb in |
|
4 steam setting. |
|
6 short bursts. Don’t hold the |
trigger continously to prevent over wetting.
7Insert the handheld back into the machine until it clicks into place.
17
Using small accessories:
! CAUTION !
Turn off, unplug, and allow steam cleaner to cool before removing accessories. Always have the nozzle pointed away from you and others during installation.
1Small tools can be attached via concentration nozzle. Twist clockwise until locked into position and secure. To remove concentration nozzle, turn counter-clockwise.
Using large accessories:
1Larger accessories can be attached using the concentration nozzle or hose. To attach the hose twist clockwise until locked into position and secure. To remove hose, turn counter-clockwise.
18
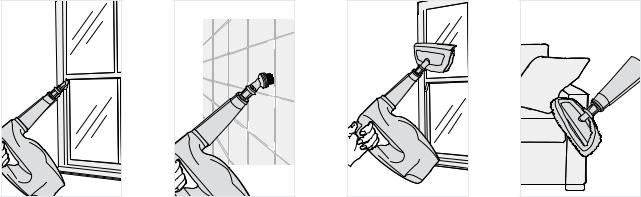
Using the tools: |
|
|
Concentration nozzle |
Brushes |
Squeegee tool* |
Use to remove soap scum |
Ideal for any surface |
Great for leaving your |
in baths and shower |
from tiles, sinks, toilets |
windows, tiles and |
1enclosures and to clean |
2and oven tops. |
3 mirrors gleaming. |
heavily soiled areas |
|
* Select models only |
in kitchens. |
|
|
|
|
|
Upholstery/ |
cloth tool* |
4Attach the cloth to the squeegee tool for use on upholstery and clothes.
*Select models only
19
 Loading...