


User Guide
Y9420H Sundial RF2 Pack 2
How to use:
ST9420C Wireless Enabled Programmer DT92E Wireless Room Thermostat
This document is to be left with the user and forms part of a Home Information Pack

ST9420C Controls Layout
|
1 |
2 |
3 |
|
4 |
5 |
6 |
7 |
8 |
23 |
|
HOT WATER |
|
|
HEATING |
|
|
|
|
|
|
|
|
|
|
|
|||
22 |
EXTRA HOUR |
|
|
|
|
|
|
EXTRA HOUR |
9 |
|
|
|
|
|
|
|
|
|
|
|
OVERRIDE |
|
|
|
|
|
|
OVERRIDE |
|
21 |
|
|
|
|
|
|
|
|
10 |
|
NEXT |
|
|
|
|
|
|
|
|
|
DAY |
|
|
|
|
|
|
|
|
20 |
COPY |
|
|
|
|
|
|
|
|
|
|
|
|
|
|
DAY/TIME |
|
||
|
DAY |
|
|
|
|
|
11 |
||
|
|
|
|
|
|
OK |
HOT WATER |
||
19 |
|
|
|
|
|
|
|||
HOLIDAY |
|
|
|
|
|
HEATING |
|
||
|
|
|
|
|
|
NEXT |
|
RUN |
|
18 |
ST9420C |
|
|
|
|
|
|
|
|
|
|
|
|
|
|
|
|
|
|
|
17 |
16 |
15 |
|
|
14 |
13 |
12 |
|
1 |
Hot Water ‘ON’ period indicator |
|
13 |
Heating Operating Mode Button |
|
||||
2 |
Time Display |
|
|
14 |
OK/Next Button |
|
|
||
3 |
LoT™ Technology Display |
|
15 |
Clock – and + Buttons |
|
||||
4 |
Programme Time Markers |
|
16 |
Hot Water Operating Mode Button |
|
||||
5 |
Day of Week Indicator |
|
17 |
Hot Water Operating Mode Indicator |
|||||
6 |
RF Symbol |
|
|
18 |
Holiday Button |
|
|
||
7 |
Heating ‘ON’ period indicator |
|
19 |
Copy Day Button |
|
||||
8 |
Heating Extra Hour Button |
|
20 |
Next Day Button |
|
|
|||
9 |
Heating Indicator Lamp |
|
21 |
Hot Water Override Button |
|
||||
10 |
Heating Override Button |
|
22 |
Hot Water Indicator Lamp |
|
||||
11 |
Slider |
|
|
23 |
Hot Water Extra Hour Button |
|
|||
12 |
Heating Operating Mode Indicator |
|
|
|
|
|
|
||
Keep this document in a Home Information Pack
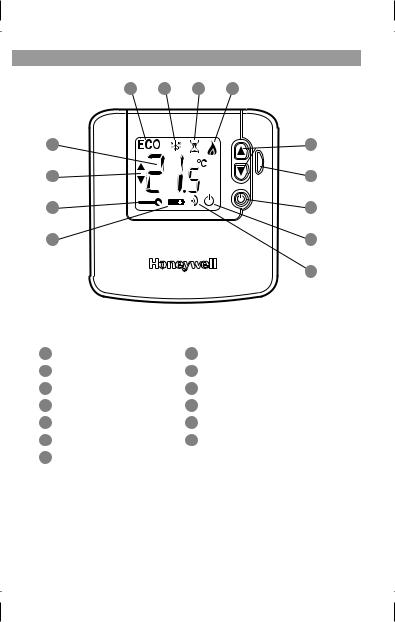
DT92E Controls Layout
1 |
2 |
3 |
4 |
13 |
|
|
5 |
12 |
|
|
6 |
11 |
|
|
7 |
10 |
|
|
8 |
|
|
|
9 |
1 |
ECO Mode Active |
8 |
OFF/Standby Indicator |
2 |
Frost Protect Indicator |
9 |
RF Communications Indicator |
3 |
ECO Countdown Indicator |
10 |
Battery Low Indicator |
4 |
Heating Demand Indicator |
11 |
Fault Indicator |
5 |
Setpoint Change Buttons |
12 |
Setpoint Indicator |
6 |
ECO Button |
13 |
Temperature Display |
7 |
OFF/Standby Button |
|
|

Contents |
|
CONTROL OF YOUR SYSTEM |
|
General Description of Controls in Your System............................................... |
4 |
The way to use a Programmer.......................................................................... |
4 |
The way to use a Room Thermostat / Optimisation........................................... |
5 |
GETTING STARTED WITH YOUR ST9420C |
|
Step 1: Setting the Date & Time........................................................................ |
6 |
Step 2: Running a Built-in Programme.............................................................. |
7 |
PROGRAMMING YOUR ST9420C |
|
The Built-in Programmes / Your Personal Programme...................................... |
8 |
Reviewing the Programme Times...................................................................... |
9 |
Modifying the Hot Water Programme................................................................ |
9 |
Modifying the Heating Programme................................................................. |
11 |
Disabling / Enabling Time Periods (for Heating and/or Hot Water)................. |
11 |
OPERATING YOUR ST9420C |
|
Choosing the Operating Mode (for Heating and/or Hot Water)...................... |
12 |
Overriding the Operation Without Changing the Programmes....................... |
12 |
The Extra Hour Function (for Heating and/or Hot Water)................................ |
13 |
The Holiday Function...................................................................................... |
13 |
Enquiry Mode.................................................................................................. |
14 |
FINE TUNING YOUR ST9420C |
|
Changing from AM/PM Time Display to the 24 Hour Clock............................ |
15 |
Changing the Installer Parameters.................................................................. |
15 |
Optimisation.................................................................................................... |
17 |
BOILER SERVICE REMINDER |
|
Countdown to Service / When Service is Due................................................. |
18 |
Shut-down....................................................................................................... |
19 |
OPERATING YOUR DT92E |
|
Inquiring about the Set Temperature / Adjusting the Set Temperature........... |
19 |
Switching Off / Display Updates / Heating Indicator / Frost Protection.......... |
20 |
DT92E OPERATING INDICATORS |
|
Low Battery Indicator / Battery Replacement................................................. |
21 |
RF Communications Indicator / Lockout......................................................... |
21 |
DT92E ENERGY SAVING ECO FEATURE |
|
Entering ECO Mode and Setting the Energy Saving Time Period.................. |
22 |
What Happens in ECO Mode?........................................................................ |
22 |
How to Exit ECO Mode.................................................................................... |
23 |
FINE TUNING YOUR DT92E |
|
Changing the DT92E Installer Parameters...................................................... |
23 |
FAQ AND TROUBLESHOOTING |
|
Frequently Asked Questions........................................................................... |
25 |
Troubleshooting Guide.................................................................................... |
27 |
CONFIGURATION & SERVICE DATA |
|
Configuration Data (to be completed by Installer).......................................... |
30 |
Boiler & System Service Log........................................................................... |
31 |
3

CONTROL OF YOUR SYSTEM
General Description of Controls in Your System
Your Honeywell ST9420C provides timing control for both your central heating and hot water systems, letting you set ON and OFF periods to suit your own lifestyle.
The ST9420C does not directly control the temperature but works together with other temperature controls, such as room thermostats and cylinder thermostats or sensors, to control your heating and hot water system in your home.
With 7-day programming and up to 3 on/off periods per day, every day can be set differently, and heating and hot water can be set at different times from each other.
ST9420C also has a Boiler Service reminder / Shut-down feature, which helps ensure your gas boiler is regularly serviced in compliance with UK Gas Safety Regulations. For more details see pages 18 & 19.
Your system may include a DT92E wireless room thermostat, and/or a CS92A wireless cylinder sensor. These products use state of the art 2 way RF communications to share information and give you robust and flexible control of your indoor environment.
The following instructions explain how to programme and use the ST9420C, and associated controls, to provide the most home comfort at the least cost.
The way to use a Programmer
Think about the time periods when you are typically in the house and when you are not, and also the times when you use a lot of hot water. These are the times you should use as the basis for the programmes. It will be necessary to allow some heat up time for the heating system after periods when it has been off – this would typically be 1 - 1½ hours, depending on your house and your preferences.
If Optimum Start has been selected (see page 17), you do not have to allow for this heat up time as the Programmer is intelligent and will calculate the correct starting time for your house. This is based on measurements it makes about your system characteristics, and on the current and target room temperatures. All you have to do is programme the time periods when you want to be comfortable.
Other features are commonly available on the Programmer to enhance comfort and convenience, for example, OVERRIDE, EXTRA HOUR, and MODE buttons.
A typical use of the OVERRIDE feature is when you return home unexpectedly for the rest of the day and the heating is off. Just press the heating OVERRIDE button and the heating will come on until the next programme time, at which point it will follow the normal programme. The advantage here is that you do not have to remember to switch off because the normal time programme does this for you.
A typical use of the EXTRA HOUR button would be if you returned to the house for a short period when the heating and hot water were off. Pressing the appropriate
4

CONTROL OF YOUR SYSTEM (cont.)
EXTRA HOUR button gives you 1, 2, or 3 hours of heating, exactly when you need it. Another typical use is when the heating is already on and you want it to stay on a little longer - just press EXTRA HOUR and, for that day only, an hour will be added to the end of the time at which heating normally goes off.
The MODE buttons allow you to select how you want to operate heating and hot water independently. The most obvious use is to switch heating OFF during the summer months, but you may also use this feature if you take a mid-week day off work, you can then set the MODE to ONCE to keep the system ON during the day from the first programmed ON time till the last programmed OFF time.
The way to use a Room Thermostat
The way to set and use your room thermostat is to find the lowest temperature setting that you are comfortable with, and then leave it alone to do its job. The best way to do this is to set the room thermostat to a low temperature – say 18°C – and then turn it up by one degree each day until you are comfortable with the temperature. You won’t have to adjust the thermostat further. Any adjustment above this setting will waste energy and cost you more money.
DT92E has a green ECO button, which enables you to set a period of time at a lower temperature. This energy saving feature is most useful if you are out of the house for a few hours, or if you want a reduced temperature for a while and don’t want to have to remember to turn the temperature back up (see pages 22 & 23 for details).
Optimisation (see page 17 for explanatory diagrams)
Your control system has some features called Optimisation, which aim to save energy while making you as comfortable as possible. These may or may not be enabled – check page 30 where your Installer should have indicated how these were set. Optimisation does not apply to your Hot Water, only to your Heating.
Optimum Start works by measuring how quickly your system normally heats up, and using this to calculate the correct time to switch on to reach your comfort temperature, when you want it. So the times you set are when you want the heating to be at the correct temperature, and the system adjusts the starting time to meet this.
Delayed Start is an alternative to Optimum Start. It works by using your normal programmed start times, compares the actual temperature with the set temperature, and delays the start a little depending on how close these temperatures are to each other.
Optimum Stop saves energy, and money, by switching off a little earlier than the normal programme time. If the house is up to temperature, you will not notice the effect on the temperature, but you will see a difference in your fuel bill.
The radiator symbol on ST9420C will flash to let you know whenever Optimisation is operating.
The other controls in your system should not require adjustment.
5
GETTING STARTED WITH YOUR ST9420C
Your ST9420C should have been set up to work correctly when it was installed. However, the following will show you how you can modify your settings to meet your particular lifestyle.
To assist you with programming and everyday use your ST9420C will display text messages at every stage to help you get the most out of your central heating and hot water system. The ST9420C uses LoT™ Technology to constantly update the display to give you feedback about what is required.
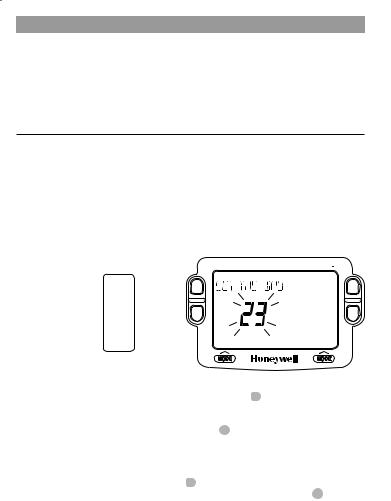
Step 1: Setting the Date & Time
Your ST9420C had the date and time set at the factory, and these are normally maintained by a backup battery in the event of power failures. If you wish to change the date or time, or if the LoT™ Display shows the message ‘SET DATE + TIME’ just follow the instructions below. Otherwise, go to Step 2.
a.Move the slider to the DAY/TIME position. The message ‘SET DATE + TIME’ will show briefly on the screen, followed by ‘SET THE DAY’, and the day of the month will now be flashing to indicate it can be changed.
HOT WATER |
HEATING |
DAY/TIME
HOT WATER
HEATING
RUN
b.To change the day of the month, press the 
 or
or  buttons until the correct day is shown. Each press of the button will change the date by one day. As soon as a change has been made, the message ‘IS DAY OK?’ will be displayed. Once
the correct day is reached, press the green  button to confirm, and move to the next step. If you do not need to make a change, just press the
  button immediately and this will move you to the next step.
c.The month digits will now be flashing and ‘SET THE MONTH’ will be displayed. To
change the month, press the
 or
or  buttons until the correct month is shown. The message ‘IS MONTH OK?’ will be displayed. Press the green
  button to confirm the month is correct and move to the next step.
6

GETTING STARTED WITH YOUR ST9420C
d.The year digits will now be flashing and ‘SET THE YEAR’ will be displayed. To
change the year, press the
 or
or  buttons until the correct year is shown. The message ‘IS YEAR OK?’ will be displayed. Press the green
  button to confirm the year is correct. If you have made a change and the date is a valid date, the message ‘DATE SAVED’ will show and you can move to the next step. If the date you set was not valid, for example 31 September, the message ‘INVALID’ will show and you will be returned to the start of the date setting operation.
e.The time will now be flashing and the message ‘SET THE TIME’ will be displayed.
To change the time, press the 
 or
or  buttons until the correct time is shown. Each press of the button will change the time by one minute. Holding the button down for more than a few seconds will change the time slowly at first, then
quickly. The message ‘IS TIME OK?’ will be displayed. Press the green  button to confirm the time is correct. If you have made a change, the message ‘TIME SAVED’ will show, followed quickly by ‘DATE + TIME COMPLETE’.
f.Move the slider to the RUN position to complete setting the date and time.
Note: if the slider is moved at any time before the date and time have been set correctly, the message ‘DATE UNCHANGED’ will be displayed briefly, and your changes will not be saved.
Step 2: Running a Built-in Programme
With the date and time correct, your ST9420C Programmer will now be operating to the built-in programmes. These have been designed to provide heating and hot water at typical times throughout the day, but if you want to customise the settings, please see the next section ‘PROGRAMMING YOUR ST9420C’ (page 8).
7
PROGRAMMING YOUR ST9420C
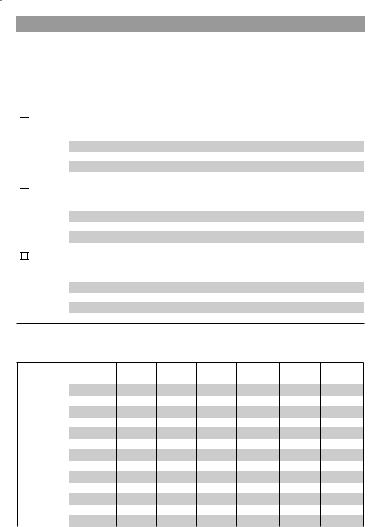
The Built-in Programmes
The built-in programmes give you a starting point that you can personalise to your own requirements. Your Installer should have selected one and ticked the box alongside it. If there is no tick, the product normally leaves the factory with Profile A installed, but it is a simple matter to select one of the other profiles (see Changing the Installer Parameters, page 15).

 Built-in Programme (Profile A)
|
|
ON 1 |
OFF 1 |
ON 2 |
OFF 2 |
ON 3 |
OFF 3 |
Monday to |
Heating |
6:30am |
8:30am |
12:00pm |
1:00pm |
4:30pm |
10:30pm |
Friday |
Hot Water |
6:30am |
8:30am |
12:00pm |
1:00pm |
4:30pm |
10:30pm |
Saturday & |
Heating |
6:30am |
9:30am |
12:00pm |
1:00pm |
4:30pm |
11:00pm |
Sunday |
Hot Water |
6:30am |
9:30am |
12:00pm |
1:00pm |
4:30pm |
11:00pm |

 Built-in Programme (Profile b)
|
|
ON 1 |
OFF 1 |
ON 2 |
OFF 2 |
ON 3 |
OFF 3 |
Monday to |
Heating |
6:30am |
9:30am |
12:00pm |
1:00pm |
4:30pm |
11:00pm |
Friday |
Hot Water |
6:30am |
9:30am |
12:00pm |
1:00pm |
4:30pm |
11:00pm |
Saturday & |
Heating |
6:30am |
9:30am |
12:00pm |
1:00pm |
4:30pm |
11:00pm |
Sunday |
Hot Water |
6:30am |
9:30am |
12:00pm |
1:00pm |
4:30pm |
11:00pm |
Built-in Programme (Profile C) |
|
|
|
|
|
||
|
|
|
|
|
|
|
|
|
|
ON 1 |
OFF 1 |
ON 2 |
OFF 2 |
ON 3 |
OFF 3 |
Monday to |
Heating |
6:30am |
7:30am |
12:00pm |
12:00pm |
5:00pm |
10:00pm |
Friday |
Hot Water |
6:30am |
7:30am |
12:00pm |
12:00pm |
5:00pm |
10:00pm |
Saturday & |
Heating |
8:30am |
9:30am |
12:00pm |
1:00pm |
5:30pm |
10:30pm |
Sunday |
Hot Water |
8:30am |
9:30am |
12:00pm |
1:00pm |
5:30pm |
10:30pm |
Your Personal Programme
The table below has been left blank for you to record your own personal programme.
ON 1 |
OFF 1 |
ON 2 |
OFF 2 |
ON 3 |
OFF 3 |
Monday |
Heating |
|
Hot Water |
Tuesday |
Heating |
|
Hot Water |
Wednesday |
Heating |
|
Hot Water |
Thursday |
Heating |
|
Hot Water |
Friday |
Heating |
|
Hot Water |
Saturday |
Heating |
|
Hot Water |
Sunday |
Heating |
|
Hot Water |
8

PROGRAMMING YOUR ST9420C
Reviewing the Programme Times
To review your hot water programme, move the slider to the HOT WATER position. To review your heating programme, move the slider to the HEATING position.
To review the programme times, press the  button repeatedly. The appropriate ON and OFF markers will be displayed to show you which time is being reviewed. Any of these times can be adjusted by using the
 or
or  buttons, and then confirmed using the
  button. Remember to return the slider to the RUN position after reviewing is complete.
Modifying the Hot Water Programme
The hot water programme has three pairs of ON/OFF switching times per day. Each time can be set between 3.00 am and 2.50 am (on the next day) to allow you to programme the hot water to stay on past midnight, if required.
a.Move the slider to the HOT WATER position. ‘SET HOT WATER’ will show briefly to verify this action.
HOT WATER |
HEATING |
DAY/TIME
HOT WATER
HEATING
RUN
b.‘SET ON-TIME 1’ will then be displayed and the time setting for the first ON 1 time for MONDAY will now be flashing to indicate it can be changed. If you do not wish to change the time, press the green  button and move to the next
step. If you do wish to make a change, use the 
 or
or  buttons to change the first ON 1 time. Each press of the button will change the time by 10 minutes. As soon as the time has been changed, the message ‘ON-TIME 1 OK?’ will be displayed. Press the green
  button to confirm the time is correct and move to the next step. ‘SAVED’ will be displayed for a moment to confirm that any change has been saved to memory.
HOT WATER |
HEATING |
HOT WATER |
HEATING |
9
PROGRAMMING YOUR ST9420C
Note: When pressing the  button the next ON or OFF marker may start to flash. This indicates you have tried to set a time equal to one of the next programme times already in the memory. Similarly, when pressing the
  button the previous ON or OFF marker may start to flash. This indicates you have tried to set a time equal to one of the previous programme times. If this happens the ST9420C simply moves both times together as long as you continue to press the
 or
or  buttons. Follow the procedure in ‘Reviewing the Programme Times’ (page 9) to check and adjust these times as necessary.
c.‘SET OFF-TIME 1’ will be displayed and the first OFF 1 time will now be flashing. If you do not wish to change the time, press the green  button and move to the next
step. Otherwise, use the 
 or
or  buttons to change the time. Press the green
 button to confirm the time is correct and move to the next step. ‘SAVED’ will be displayed for a moment to confirm that any change has been saved to memory.
d.The remaining ON and OFF times (ON 2, OFF 2, ON 3, OFF 3) can be set by
using the 
 or
or  buttons to change the time, then the green
  button to confirm the time is correct and move to the next step. If you do not wish to change the time, just press the green
  button to move directly to the next ON/ OFF time without making any changes.
e.After setting or reviewing the last off time, OFF 3, the message ‘COMPLETE’ will be displayed to indicate the times for Monday have been set.
You now have a choice of how to set the programme for the next day:
Copying One Day’s Programme to Another Day (example Monday to Tuesday):
f.Whilst the day is showing Monday, Press the COPY DAY button. The message ‘COPY MON TO TUESDAY OK?’ will be displayed and the letters TUE will flash to indicate the programme for Monday can be copied to Tuesday.
g.To select a different day to copy to, press the NEXT DAY button to cycle through the days. With each press of the NEXT DAY button the message will change to indicate the new day you are copying to.
h.When the required day is indicated, press the green  button to confirm, and the message ‘MON COPIED’ will be displayed for a moment. The day into which Mondays programme has been copied is now available to have its programme edited.
Note: Once a day’s programme has been confirmed in this way, it now becomes the day whose programme is copied if the COPY DAY button is pressed again.
OR
Programming a Different Day:
i.Press the NEXT DAY button to select the next day, which is displayed along the top of the screen. The programme for that day can then be adjusted by following steps b – e above. Programmes for the remaining days can be set in the same way, using the NEXT DAY button to move to the next day.
10
 Loading...