


 Loading...
L4006A,B,E,H
Aquastat® Controllers
|
INSTALLATION INSTRUCTIONS |
APPLICATION |
technician. |
|
3. Installer must be a trained, experienced service |
These boiler-mounted, immersion type controllers |
4. After installation is complete, check out product |
operation as provided in these instructions. |
|
operate in response to temperature changes in hydronic |
|
heating systems. |
WARNING |
L4006A breaks the circuit on a temperature rise to the |
|
control setting. It is used for high limit or low limit control. |
Electrical Shock Hazard. |
When used as a controller or as a low limit, a separate |
Can cause serious injury, death or equipment |
high limit must be used. |
damage. |
|
Disconnect the power supply before beginning |
L4006B makes the circuit on a temperature rise. It is |
installation to prevent electrical shock or |
used as a circulator controller, delaying circulator |
equipment damage. |
operation when boiler water temperature is below the |
Installing Immersion Well Models |
|
control setting. |
||
|
||
L4006E,H includes a trip-free manual reset switch. |
(L4006A,B,E) |
|
These models are designed to break the control circuit |
|
|
whenever the temperature of the controlled medium |
IMPORTANT |
|
reaches the high limit setting. A reset button on the front |
||
Obtain the best thermal response with a well |
||
of the case must be pressed to re-establish the control |
||
that snugly fits the sensing bulb. The bulb |
||
circuit. L4006H also includes bracket and clamp for |
||
should be inserted until it rests against the |
||
surface mounting on pipe or tank. |
||
bottom of the well. Use a well of correct length |
||
|
||
A plastic bag of heat-conductive compound is included |
and bend the tubing, if necessary, to provide |
|
enough force to hold the bulb against the |
||
with the L4006A,B,E Aquastat® Controllers for use when |
||
bottom of the well. Do not make a sharp bend in |
||
the sensing bulb is inserted into a well designed for a |
||
the tubing. A sharp bend can produce a break in |
||
large bulb than the one used on the L4006A,B,E. A |
||
the tubing and cause a loss of fill. This condition |
||
124904 Well Adapter, for use on old wells that do not fit |
||
will cause the high and low limit controls to be |
||
the L4006A,B,E immersion well clamp, can be ordered; |
||
made continuously. |
||
see form 68-0040, Wells and Fittings for Temperature |
||
|
||
Controllers.. A setting stop is included to prevent setting |
If the well is not a snug fit on the bulb, use the |
|
above a desired temperature on limit. |
||
heat-conductive compound as follows. Fold the |
||
|
||
If a well adapter or other accessories are needed, refer to |
plastic bag of compound lengthwise and twist |
|
gently. Snip the end of the bag and insert into |
||
form 68-0040, Wells and Fittings for Temperature |
||
the well. Slowly pull out the bag while squeezing |
||
Controllers, for part numbers and ordering information. |
||
firmly to distribute the compound evenly in the |
||
|
||
INSTALLATION |
well. Insert the bulb into the well. Bend the |
|
tubing, if necessary, to provide force to hold the |
||
bulb against the bottom of the well and to hold |
||
|
the out end of the bulb in firm contact with the |
|
When Installing This Product… |
side of the well. Wipe off any excess compound. |
|
|
1.Read these instructions carefully. Failure to follow them could damage the product or cause a hazardous condition.
2.Check the ratings given in the instructions and on the product to make sure the product is suitable for your application.
NOTE: Some models have an adjustable capillary tubing length to 3 inches (76 mm). In these models, pull out extra tubing from inside the case, if needed.
Follow the boiler manufacturer instructions, if available; otherwise, proceed as follows.
® U.S. Registered Trademark
Copyright © 2001 Honeywell • All Rights Reserved
600915- 4

L4006A,B,E,H AQUASTAT® CONTROLLERS
1.Remove the old control.
2.Refer to the cover insert of the old control to identify and tag each lead as it is disconnected.
3.Leave the old well in place if it is suitable.
If Well is Otherwise Suitable But Does Not Fit The L4006 Immersion Well Clamp
Use a 124904 Well Adapter (order separately, see form 68-0040) to secure the L4006 to the old well. The adapter has a flange at one end for fastening the L4066 adapter clamp.
1.Loosen, but do not remove, the two adapter clamp screws (see Fig. 1).
2.Slide the adapter onto the capillary and short tube; see Fig. 2 inset.
3.Make sure the flanged end of the adapter fits into the hole in the case. Position the adapter well clamp snugly over the flange on the adapter, then tighten the clamp screws.
4.Insert the bulb into the well, as shown in Fig. 2. If necessary, use the heat-conductive compound as instructed in the IMPORTANT statement on page 1.
5.Tighten the setscrew (if one is present in the old well spud) against the adapter.
SETPOINT
INDICATING DIAL
DIFFERENTIAL
ADJUSTMENT 1
WHEEL
ADAPTER CLAMP
SCREWS
IMMERSION 2 WELL
1MODELS WITH FIXED DIFFERENBTIALS DO NOT INCLUDE ADJUSTING WHEEL.
2VERTICALLY MOUNTED IMMERSION WELL IS ATTACHED
TO THE BOTTOM OF THE CASE. |
M4679 |
Fig. 1. Internal view of L4006A,B with horizontal well. L4006E is the same with reset button added.
|
|
ADAPTER |
|
|
|
CLAMP |
BACK OF |
|
|
|
CASE |
|
|
ADAPTER |
|
CONTROLLER |
BOILER |
|
|
CASE |
|
|
|
ADAPTER |
1 |
IMMERSION |
|
WELL SPUD |
|
||
CLAMP |
|
|
|
ADAPTER |
OLD IMMERSION |
SENSING |
|
|
|
||
|
|
WELL ASSEMBLY |
BULB |
|
|
(A) |
|
(C) |
|
|
(D) |
2 |
|
|
(B) |
|
|
HEAT-CONDUCTIVE COMPOUND |
|
CAPILLARY |
|
|
|
TUBE |
|
|
|
SETSCREW |
SHORT TUBE |
|
|
|
|
|
|
|
|
FITS IN CENTRAL |
|
|
|
RECESS OF |
|
|
|
ADAPTER |
|
1 SLIGHTLY BEND IN TUBES SHOULD HOLD BULB IN GOOD THERMAL CONTACT WITH THE WELL AT TWO OPPOSITE POINTS, AS IN (A) AND (B).
2 ASSURE THAT TUBES FIT FREELY IN ADAPTER SO THAT TENSION OF THE CAPILLARY TUBE AT POINT (C)
HOLDS THE SENSING BULB IN GOOD THERMAL CONTACT WITH THE BOTTOM OF WELL AT POINT (D).
M4678
Fig. 2. Bulb in immersion well and use of adapter.
If the Old Well Is Unsuitable.
1.Drain the system and remove the well.
2.Select a new well from form 68-0040 (order well separately).
3.Install the new well, refill the system and check for leaks.
4.Loosen, but do not remove, the two adapter clamp screws (Fig. 1).
5.Insert the sensing bulb into the well until it bottoms as show in Fig. 2. Add heat-conductive compound, if necessary, as instructed in the IMPORTANT statement on page 1.
60-0915—4 |
2 |
L4006A,B,E,H AQUASTAT® CONTROLLERS
6.Make sure the end of the well fits into the hole in the case. Position the immersion well clamp snugly over the well flange and tighten the clamp screw securely.
Mounting Surface Mount Model (L4006H)
The L4006H is designed for surface mounting on piping or tanks and can be mounted in any position.
When mounting the L4006H on piping, the pipe should be 1 in. (25 mm) diameter or larger for accurate temperature sensing.
1.Remove any insulation from the pipe.
2.Thoroughly scrape off all scale, rust or paint.
3.Mount controller as shown in Fig. 3 using
adjustable pipe strap furnished.
When mounting the L4006H on a tank, use a pipe strap (not provided) of appropriate length for the tank. Fit the pipe strap through the slot in the mounting bracket. See Fig. 3.
Wiring
 WARNING
Electrical Shock Hazard.
Can cause serious injury, death or equipment damage.
Disconnect power supply before connecting wiring to avoid electrical shock or equipment damage.
All wiring must comply with local codes and ordinances regarding wire size, insulation, enclosure, etc. See Fig. 4 and 5 for typical diagrams of Aquastat® Controllers used in heating systems.
Use these Aquastat Controllers with copper wire only.
ENCLOSED
SENSING BULB
PIPE
ADJUSTABLE
PIPE STRAP
AQUASTAT¤
CONTROLLER
CASE
M8771
Fig. 3. Mount L4006H directly on surface.
|
24 VOLT |
|
|
|
|
|
THERMOSTAT |
1 |
|
L4006A OR L4007A |
|
|
|
RA832A |
L1 |
L2 |
HIGH LIMIT |
|
|
SWITCHING RELAY |
(HOT) |
|
AQUASTAT¤ |
|
|
|
|
|
CONTROLLER |
T |
T |
2 |
|
|
1 |
|
|
|
|
|
2 |
|
|
1 |
|
|
IGNITION |
|
|
|
|
|
4 |
X |
X |
4 |
CIRCULATOR |
|
|
|
|
|
|
||
|
|
L4006B OR L4007B |
|
3 |
|
|
|
CIRCULATOR |
|
|
|
|
|
|
|
|
|
|
|
AQUASTAT¤ |
|
|
|
|
|
CONTROLLER |
|
|
BURNER |
|
|
|
|
|
|
|
|
2 |
|
|
T |
|
|
|
|
|
|
|
|
L4006A OR L4007A LOW LIMIT |
|
|
|
|
|
AQUASTAT¤ CONTROLLER |
|
|
|
|
|
|
|
|
T |
|
|
|
|
PROTECTORELAY¤ |
|
|
|
|
|
CONTROL |
|
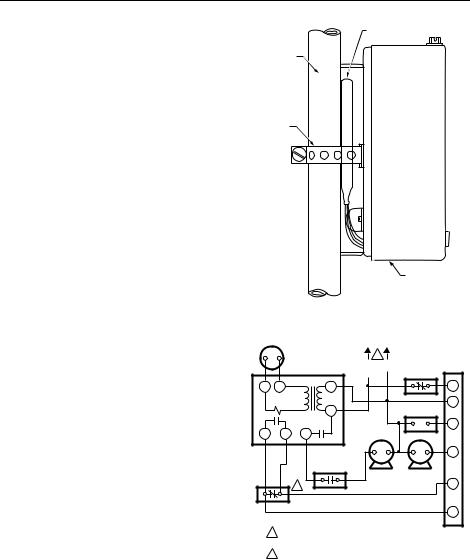
1POWER SUPPLY. PROVIDE DISCONNECT MEANS AND OVERLOAD PROTECTION AS REQUIRED.
2 USE L4006E FOR MANUAL RESET. |
M2855A |
Fig. 4. Hookup for oil-fired, summer-winter, hydronic system with domestic hot water. This is typical where control for domestic hot water is added, or where each Aquastat Controller is mounted in a separate location.
3 |
60-0915—4 |
Loading...