


69-0733-3
INSTRUCTIONS
PROGRAMMINGANDINSTALLATION
|
|
|
|
Honeywell/34 |
|
ModelCT3400/CT3455 |
THERMOSTAT |
||||
LowVoltage(20to30Vac)ThermostatandWallplate |
|||||
ProgrammableHeatand/orCool |
PROGRAMMABLE |
||||
Weekday/Saturday/Sunday |
|||||
|
|
|
|
|
|
|
|
|
|
|
|
TYPICAL ENERGY SAVINGS FOR REPRESENTATIVE CITIES IN THE U.S. AND CANADA
|
|
Savings for Once-A-Day |
Savings for Twice-A-Day |
Savings for 5 F (3 ) |
||||
|
|
10 F (5 C) decrease |
10 F (5 C) decrease* |
|
increase |
° |
||
|
30% |
° |
° |
° |
° |
summer |
° |
|
savings |
28% |
|
|
|
|
|
|
|
26% |
|
|
|
|
|
|
|
|
24% |
|
|
|
|
|
|
|
|
cost |
|
|
|
|
|
|
|
|
22% |
|
|
|
|
|
|
|
|
energy |
|
|
|
|
|
|
|
|
20% |
|
|
|
|
|
|
|
|
18% |
|
|
|
|
|
|
|
|
of |
|
|
|
|
|
|
|
|
|
|
|
|
|
|
|
|
|
percentage |
16% |
|
|
|
|
|
|
|
14% |
|
|
|
|
|
|
|
|
12% |
|
|
|
|
|
|
|
|
|
|
|
|
|
|
|
|
|
Approximate |
10% |
|
|
|
|
|
|
|
8% |
|
|
|
|
|
|
|
|
6% |
|
|
|
|
|
|
|
|
4% |
|
|
|
|
|
|
|
|
|
|
|
|
|
|
|
|
|
|
2% |
|
|
|
|
|
|
|
Minneapolis |
Edmonton |
Calgary |
Halifax |
Vancouver |
Buffalo |
Denver |
Boston |
Cincinnati |
New York |
Louisville |
San |
Dallas |
Los Angeles |
San Diego |
St. Paul |
Regina |
Moncton |
|
|
Cleveland |
Des Moines |
Chicago |
Kansas City |
Philadelphia |
Portland |
Francisco |
Atlanta |
|
|
Montreal |
Winnipeg |
North Bay |
|
|
Milwaukee |
Omaha |
Detroit |
St. Louis |
Seattle |
Wash., D C |
|
|
|
|
Ottawa |
|
Quebec |
|
|
|
Salt Lake |
Pittsburgh |
Columbus |
|
|
|
|
|
|
Toronto |
|
St. John's |
|
|
|
City |
Indianapolis |
|
|
|
|
|
|
|
*Based on 10 F (5 C) decrease—(5 |
F [3 C] decrease |
|
|
gives |
approximately 55 percent of these savings). |
M2416A |
|
° ° |
° ° |
||
J.S. Rev. 4-97 ©Honeywell Inc. 1997 Printed in U.S.A. Form Number 69-0733—3
TOTAL COMFORT TEMPERATURE MANAGEMENT
WITH ADAPTIVE INTELLIGENT RECOVERY™
Congratulations! You made a smart choice when you purchased your new Honeywell Thermostat. It’s the smart thermostat that:
■Keeps you comfortable by automatically calculating exactly when the furnace or air conditioning should go on to have the house at the desired comfort temperature by the time you wake up or return home.
■Saves the maximum amount of energy and money by remembering to automatically adjust the heat or air conditioning when you leave home or go to sleep.
■Provides the ultimate in comfort and convenience. It comes already programmed, so it’s your choice—use the preprogrammed schedule or set your own.
We invite you to spend a few minutes reading this manual. You’ll find it answers many of the questions that will arise as you become familiar and comfortable with your Honeywell thermostat, the state of the art in home comfort controls.
 M3375 Recycling Thermostat
If this thermostat is replacing a control that contains mercury in a sealed tube, do not place your old control in the trash. Contact your local waste management authority for instructions regarding recycling and the proper disposal of this control, or of an old control containing mercury in a sealed tube.
If you have questions, call Honeywell Inc. at 1-800-468-1502.
MERCURY
SWITCH
M3701
Fig. 1. Typical location of a mercury switch in a thermostat.

Table Of Contents
STEP 1 Prepare For Installation .................................................................................................... |
2 |
STEP 2 Remove Old Thermostat .................................................................................................. |
4 |
STEP 3 Before You Program ......................................................................................................... |
6 |
Install the Batteries .................................................................................................................... |
6 |
Adaptive Intelligent Recovery™ Selection ............................................................................. |
7 |
STEP 4 Program The Thermostat ................................................................................................. |
9 |
STEP 5 Mount Thermostat Wallplate .......................................................................................... |
16 |
STEP 6 Adjust System On-Time, Clock Display, as Required ................................................ |
18 |
STEP 7 Adjust Fan Operation Switch, as Required .................................................................. |
20 |
STEP 8 Wire Wallplate Terminals ............................................................................................... |
21 |
STEP 9 Mount The Thermostat ................................................................................................... |
24 |
STEP 10 Check Thermostat Operation After Programming and Installing ........................... |
25 |
STEP 11 Set the Fan and System Switches .............................................................................. |
28 |
Troubleshooting Guide ................................................................................................................ |
30 |
Index ............................................................................................................................................... |
34 |
Limited One-Year Warranty ......................................................................................................... |
36 |
1 |
69-0733—3 |
|
|
|
|
STEP 1 Prepare For Installation
■ Check Table 1 to make sure this thermostat is compatible with your system. If not, return to retailer. For more information, call Honeywell Customer Assistance, toll-free 1-800-468-1502.
Table 1. Compatibility Chart.
System Type |
Compatible with CT3400/3455 |
|
|
|
|
Gas—Standing Pilot |
Yes |
|
Gas—Electronic Ignition |
Yes |
1 |
Gas-Fired Boilers |
Yes |
|
Gas—Millivolt |
No |
|
Oil-Fired Boilers |
Yes |
1 |
Oil-Fired Furnace |
Yes |
|
Electric Furnace |
Yes |
|
Electric Air Conditioning |
Yes |
|
Baseboard Electric (120/240 line volt) |
No |
|
Heat Pumps/Multistage Equipment |
No |
|
Not compatible with any 120/240 volt circuit.
1Compatible with 2-wire Honeywell and Taco zone valves. Not compatible with 3-wire zone valves or 2-wire White Rodgers no. 1361 valves.
2 |
69-0733—3 |
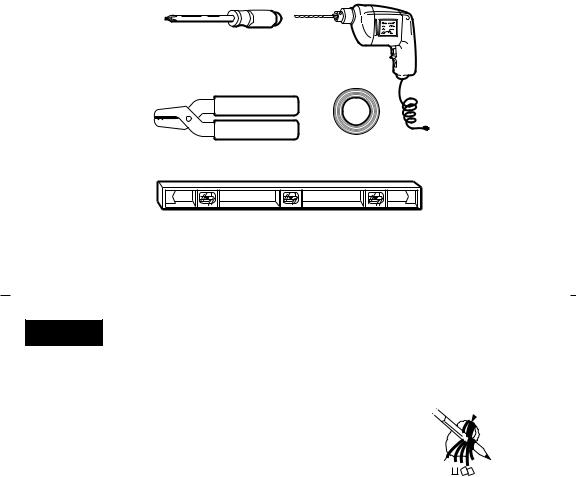
■ Acquire tools and items as needed (below).
CROSS-RECESSED SCREWDRIVER
HAND OR POWER DRILL WITH 3/16 INCH
DRILL BIT, IF NEEDED, TO DRILL HOLES IN WALL
WIRE CUTTER/STRIPPER OR SHARP KNIFE, IF NEEDED, TO STRIP WIRES
MASKING TAPE, IF NEEDED, TO LABEL WIRES AS DISCONNECTED FROM OLD THERMOSTAT
LEVEL, IF NEEDED, TO LEVEL |
|
THERMOSTAT FOR APPEARANCE |
M878B |
3 69-0733—3
STEP 2 Remove Old Thermostat
■Test to make certain that your heating and cooling systems are working properly. If either does not work, contact your local heating/air conditioning dealer. To avoid compressor dam-
age, do not operate the cooling system when outdoor temperature is below 50°F (10°C).
■Turn off power to system at the furnace, or at the fuse/circuit breaker panel.
■Carefully unpack your new thermostat and wallplate; save package of screws, instructions and receipt.
■Remove the cover from the old thermostat. If it does not snap off when pulled firmly from the bottom, check for a screw used to lock on the cover.
■Loosen screws holding thermostat to subbase, wallplate or wall, and lift away.
■ Disconnect wires from old thermostat or subbase. As you disconnect each wire, use masking tape to label it with the old terminal designation. If there are
only two wires, they do 
 not need to be labeled.
  Wrap wires around
  pencil to keep them
 from falling back into


 the wall, as shown.
Replacing a clock thermostat that has C or C1 clock terminals?
If you are replacing a Honeywell Chronotherm® Thermostat, you may find one or two wires that go to the C or C1 clock terminals on the Chronotherm® Thermostat wiring wallplate. Do
4 |
69-0733—3 |

not allow them to touch, or you can damage your transformer. Disconnect the wires and wrap them separately using electrical tape; do not wrap them together. Place the wires where they will not interfere with the operation of the new thermostat. Record the colors and terminal designation labels of the remaining wires.
Six or more wires?
If there are six or more wires (excluding clock wires attached to terminals), you most likely have a variation of a heat pump or multistage system. The thermostat is not compatible with such systems so return the product to the place of purchase. If you would like information about
which programmable thermostats will work with your system, call Honeywell Customer Assistance at 1-800-468-1502.
Three thermostat wires?
If you have three wires for heating only and can operate the fan using the fan ON switch, this thermostat will work with your system. However, some hot water (zoned) heating systems have three thermostat wires. The thermostat will not work without installing an isolating relay on these systems. For details, call Honeywell Customer Assistance at 1-800-468-1502.
5 |
69-0733—3 |
|
|
|
|
STEP 3 Before You Program
Install the Batteries
IMPORTANT: Three AA alkaline batteries are included with the thermostat. Batteries must be installed for programming and operation of the thermostat and heating/cooling system.
■ Install the batteries in back of the thermostat as shown, making sure positive (+) terminals all face toward the right.
As the batteries are running low, a REPL BAT indicator will flash for 1 to 2 months before batteries run out completely. Replace the batteries as soon as possible after the indicator starts flashing.
If you insert new batteries within 20 to 30 seconds of removing the old ones, you will not have to reprogram the thermostat. However, if the display is blank, the batteries are dead or incorrectly installed. In this case, you will have to reprogram. See pages 13 through 15 to reprogram. If you do not reprogram, the factory-prepro-
grammed settings will be
in effect, as shown in
chart on pages 11
and 12.
M2589
6 |
69-0733—3 |

IMPORTANT: Although the thermostat has a low battery indicator, replace the batteries once a year to prevent leakage and to prevent the thermostat and heating/cooling system from shutting down due to lack of battery power.
As a precaution when leaving home for longer than a month, change batteries before you leave to prevent system from shutting down due to lack of battery power.
Use fresh alkaline batteries; nonalkaline batteries do not last as long, and may leak, causing damage to the thermostat or the wall surface. We recommend Energizer® batteries.
Adaptive Intelligent Recovery™ Selection
Before you program your thermostat, you must decide if you want to leave the thermostat at the factory-set Adaptive Intelligent Recovery™ setting, or adjust it to conventional recovery. If you choose conventional recovery, adjust screw 3A (on the back of the thermostat) by turning out one turn.
With Adaptive Intelligent Recovery™, your home gradually reaches the comfort temperature you set at the exact time programmed into the thermostat to achieve maximum energy savings and comfort.
7 |
69-0733—3 |
|
|
|
|
More about Adaptive Intelligent Recovery™…
This thermostat is actually a small but powerful computer. When calculating the exact time to turn on your furnace or air conditioner, it considers: (1) air temperature, (2) the temperature of the wall and (3) when you want the comfort temperature established.
During recovery, the thermostat increases the control temperature gradually and turns the equipment on and off several times before reaching your comfort time to save energy by avoiding overshooting the comfort temperature. You can see the current control temperature anytime during recovery by pressing the CURRENT SETTING key.
This smart control learns from experience. Each day it checks how closely it hit the target and adjusts the recovery start time accordingly. It normally takes four to eight days after installation
for the thermostat to adjust to the weather, your lifestyle, home construction and heating/cooling system.
With conventional recovery, the programmed time marks the start of the time your furnace or air conditioner comes on to start recovery; therefore, you should program the start time to be earlier than the desired comfort time. The best starting time varies as the seasons change, but 30 minutes is a good head start time to use.
NOTE:Ifyouadjustscrew
PM
3Aforconventionalre-
covery, a ■ indicator appears in the lower
right corner of the thermostat display as a re-
minder that you are no longer using the Adaptive Intelligent Recovery™ feature.
8 |
69-0733—3 |
 Loading...