


Honeywell 60, 500, 504, 512, 128 User Manual
...
Galaxy 8/18/60/128/500/504/512
User Guide
Honeywell Security
Table of Contents |
|
Introduction ------------------------------------------------------------------------------------------ |
vii |
KEYPAD INFORMATION ---------------------------------------------------------------------------- |
1 |
General ---------------------------------------------------------------------------------------------- |
1 |
Number Keys (0 – 9) ----------------------------------------------------------------------------- |
1 |
View Keys (A and B) ----------------------------------------------------------------------------- |
1 |
Enter Key (ent) ------------------------------------------------------------------------------------ |
2 |
Escape Key (esc) --------------------------------------------------------------------------------- |
2 |
Hash Key (#) --------------------------------------------------------------------------------------- |
2 |
Star Key (*) ----------------------------------------------------------------------------------------- |
2 |
Power LED ----------------------------------------------------------------------------------------- |
2 |
Banner ----------------------------------------------------------------------------------------------- |
2 |
User Codes ----------------------------------------------------------------------------------------- |
2 |
SETTING THE SYSTEM ---------------------------------------------------------------------------- |
3 |
Before Setting -------------------------------------------------------------------------------------- |
3 |
Entering A Pin - User Level 1-2 ---------------------------------------------------------------- |
3 |
Entering A Pin - User Level 3 - 6 -------------------------------------------------------------- |
3 |
Setting groups ------------------------------------------------------------------------------------- |
3 |
Exit time -------------------------------------------------------------------------------------------- |
3 |
Sounder --------------------------------------------------------------------------------------------- |
4 |
Zones Open ---------------------------------------------------------------------------------------- |
4 |
Final Door/Terminator ---------------------------------------------------------------------------- |
4 |
System Set----------------------------------------------------------------------------------------- |
4 |
Part Setting----------------------------------------------------------------------------------------- |
4 |
Cancelling The Setting --------------------------------------------------------------------------- |
4 |
Group Name ---------------------------------------------------------------------------------------- |
4 |
MICROMAX SETTING OPTIONS----------------------------------------------------------------- |
5 |
Setting with the MicroMAX Cards ------------------------------------------------------------- |
5 |
Dual Focus ----------------------------------------------------------------------------------------- |
5 |
Proximity Keypads ------------------------------------------------------------------------------- |
5 |
UNSETTING THE SYSTEM ------------------------------------------------------------------------ |
6 |
Normal Entry --------------------------------------------------------------------------------------- |
6 |
Straying From the Entry Route ---------------------------------------------------------------- |
6 |
Slow Entry ------------------------------------------------------------------------------------------ |
6 |
Cancelling Alarms -------------------------------------------------------------------------------- |
6 |
Manager Reset ------------------------------------------------------------------------------------ |
6 |
Engineer Reset ------------------------------------------------------------------------------------ |
6 |
Unsetting with the MicroMAX Cards ---------------------------------------------------------- |
6 |
MENU OPTIONS -------------------------------------------------------------------------------------- |
7 |
Full Menu ------------------------------------------------------------------------------------------- |
7 |
iii
Quick Menu ---------------------------------------------------------------------------------------- |
7 |
Accessing The Menu ----------------------------------------------------------------------------- |
8 |
Full Menu ------------------------------------------------------------------------------------------- |
8 |
Quick Menu ---------------------------------------------------------------------------------------- |
8 |
Omit Zones (User Level 3 And Above) ---------------------------------------------------- |
9 |
Purpose --------------------------------------------------------------------------------------------- |
9 |
Selecting Omit Zones ---------------------------------------------------------------------------- |
9 |
Viewing Eligible Zones --------------------------------------------------------------------------- |
9 |
Omitting Zones ------------------------------------------------------------------------------------ |
9 |
Setting With Omitted Zones -------------------------------------------------------------------- |
9 |
Vibration Zones (504 & 512 Only) ------------------------------------------------------------- |
9 |
Atm 1/2/3/4 Zones (512 Only) ----------------------------------------------------------------- |
10 |
Forced Set (User Level 3 and Above) --------------------------------------------------- |
10 |
Purpose -------------------------------------------------------------------------------------------- |
10 |
Selecting Forced Set ---------------------------------------------------------------------------- |
10 |
Non-omittable Zones ---------------------------------------------------------------------------- |
10 |
Chime (User Level 3 and Above) -------------------------------------------------------------- |
11 |
Purpose -------------------------------------------------------------------------------------------- |
11 |
Selecting Chime ---------------------------------------------------------------------------------- |
11 |
Chime In Operation ------------------------------------------------------------------------------ |
11 |
Display Zones (User Level 4 and Above) ----------------------------------------------- |
11 |
Purpose -------------------------------------------------------------------------------------------- |
11 |
Selecting Display Zones ------------------------------------------------------------------------ |
11 |
Address -------------------------------------------------------------------------------------------- |
11 |
Function -------------------------------------------------------------------------------------------- |
11 |
Status ---------------------------------------------------------------------------------------------- |
12 |
Description ---------------------------------------------------------------------------------------- |
12 |
Selecting And Viewing -------------------------------------------------------------------------- |
12 |
Escape --------------------------------------------------------------------------------------------- |
12 |
Display Log (User Level 4 and Above) ------------------------------------------------- |
12 |
Purpose -------------------------------------------------------------------------------------------- |
12 |
Selecting Display Log --------------------------------------------------------------------------- |
12 |
Events ---------------------------------------------------------------------------------------------- |
12 |
Selecting a Date --------------------------------------------------------------------------------- |
12 |
Viewing Each Event ----------------------------------------------------------------------------- |
12 |
Additional Information --------------------------------------------------------------------------- |
13 |
Printing --------------------------------------------------------------------------------------------- |
13 |
Print (User Level 4 and Above) ------------------------------------------------------------ |
13 |
Purpose -------------------------------------------------------------------------------------------- |
13 |
Selecting Print ------------------------------------------------------------------------------------ |
13 |
Codes ----------------------------------------------------------------------------------------------- |
13 |
Zones ----------------------------------------------------------------------------------------------- |
13 |
Log -------------------------------------------------------------------------------------------------- |
13 |
iv
All --------------------------------------------------------------------------------------------------- |
13 |
Help Message ------------------------------------------------------------------------------------ |
13 |
Walk Test (User Level 5 and Above) ----------------------------------------------------- |
14 |
Purpose -------------------------------------------------------------------------------------------- |
14 |
Selecting Walk Test ----------------------------------------------------------------------------- |
14 |
All Zones ------------------------------------------------------------------------------------------- |
14 |
Selected Zones ----------------------------------------------------------------------------------- |
14 |
Ending Walk Test -------------------------------------------------------------------------------- |
14 |
Time/Date (User Level 6) -------------------------------------------------------------------- |
15 |
Purpose -------------------------------------------------------------------------------------------- |
15 |
Selecting Time/Date ----------------------------------------------------------------------------- |
15 |
Changing Time ------------------------------------------------------------------------------------ |
15 |
Changing Date ------------------------------------------------------------------------------------ |
15 |
Advance and Retard ----------------------------------------------------------------------------- |
15 |
Codes (User Level 6) ------------------------------------------------------------------------- |
16 |
Purpose -------------------------------------------------------------------------------------------- |
16 |
Manager Code ------------------------------------------------------------------------------------ |
16 |
Selecting Codes ---------------------------------------------------------------------------------- |
17 |
User Codes ---------------------------------------------------------------------------------------- |
17 |
Modify Pin ----------------------------------------------------------------------------------------- |
17 |
Modify Level --------------------------------------------------------------------------------------- |
18 |
Duress Code -------------------------------------------------------------------------------------- |
18 |
Quick Menu --------------------------------------------------------------------------------------- |
19 |
Modify Name -------------------------------------------------------------------------------------- |
19 |
Time Zone (Galaxy 60, 128, 500, 504 and 512) ------------------------------------------- |
19 |
Temporary Codes (Galaxy 128, 500, 504 and 512) --------------------------------------- |
20 |
Pin Change (Galaxy 128, 500, 504 and 512) ---------------------------------------------- |
20 |
Modify Groups (Galaxy 18, 60, 128, 500, 504 and 512) --------------------------------- |
21 |
Single Groups ------------------------------------------------------------------------------------- |
21 |
Multiple Groups ----------------------------------------------------------------------------------- |
21 |
Group Choice ------------------------------------------------------------------------------------ |
22 |
Max Number -------------------------------------------------------------------------------------- |
22 |
Max Function ------------------------------------------------------------------------------------- |
23 |
Max Keypad --------------------------------------------------------------------------------------- |
23 |
“CardHeld” Max Operation ------------------------------------------------------------------- |
23 |
Forgive Antipassback --------------------------------------------------------------------------- |
23 |
Pin Warning --------------------------------------------------------------------------------------- |
24 |
Max Users ( Pre V4 Only) --------------------------------------------------------------------- |
24 |
Groups (Pre V4 Only) --------------------------------------------------------------------------- |
25 |
Summer (User Level 6) ------------------------------------------------------------------------- |
25 |
v
AVOIDING FALSE ALARMS ---------------------------------------------------------------------- |
26 |
ZONE REFERENCE TABLES---------------------------------------------------------------------- |
27 |
ALARM AND HELP MESSAGES ---------------------------------------------------------------- |
28 |
Other Keypad In Use (Galaxy 8 And 18 Only)--------------------------------------------- |
28 |
Alarm In Progress -------------------------------------------------------------------------------- |
28 |
PA Reset Required ------------------------------------------------------------------------------ |
28 |
Manager Reset Required ----------------------------------------------------------------------- |
28 |
Engineer Reset Required ----------------------------------------------------------------------- |
28 |
No Entries ----------------------------------------------------------------------------------------- |
28 |
Invalid Selection ---------------------------------------------------------------------------------- |
28 |
Invalid Code---------------------------------------------------------------------------------------- |
28 |
Technistore Reset -------------------------------------------------------------------------------- |
28 |
No Modules Added ------------------------------------------------------------------------------ |
28 |
INSTALLER DETAILS ------------------------------------------------------------------------------ |
29 |
vi
INTRODUCTION
The Galaxy alarm system is, in fact, a computer which has been designed using the latest software and hardware technology.
First and foremost, the Galaxy meets all your security needs. The engineer will program and commission the system to your own exacting requirements.
Warning:
There are no user serviceable parts inside. Please refer all servicing to a qualified installer.
vii
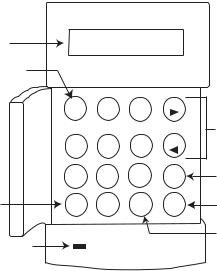
KEYPAD INFORMATION
General
The Galaxy Alarm system is controlled by Galaxy Mk7 Full Alpha Liquid Crystal Display (LCD) keypads. A maximum of 16 keypads may be connected to the Galaxy 8, 18 and 60 and 128 control panels. A maximum of 32 keypads may be attached to the Galaxy 500, 504 and 512 control panels.
LCD Display
GALAXY 504 V4.00 08:58 TUE 22 NOV
Number Keys
Star Key
Power LED
1 |
2 |
3 |
A |
|
|
|
|
|
View keys |
4 |
5 |
6 |
B |
|
7 |
8 |
9 |
ent |
Enter Key |
* |
0 |
# |
esc |
Escape Key |
|
Hash Key
Number Keys (0 – 9)
These keys are used to enter the code and to select and modify options.
Before carrying out operations on the system, users must identify themselves with a Personal Identification Number (PIN). This number is a 4, 5 or 6 digit number selected from keys 0 - 9.
The number keys are also used where groups are programmed on the system permitting groups (areas) to be set or unset.
View Keys (A and B)
These keys have been programmed to activate one of the system options. Pressing the A > key after a valid code has been entered starts the full set routine. Pressing the < B key after a valid code has been entered starts the part set routine.
Once a system option has been selected, the A > or < B keys can be used to operate as view keys, stepping forwards (A >) or backwards (< B) through lists of information. Holding down a view key while viewing an option list, rapidly displays each item in the list, permitting quick access to the information.
1
Enter Key (ent)
The ent key accepts and processes entered data. Valid actions are performed and the next option is accessed.
Escape Key (esc)
The esc key aborts the current option to return to the previous option level. Any option modification made prior to the option being aborted is erased. Successive pressing of the esc key returns the user to the start display (known as the BANNER).
The esc key also aborts the setting routine if pressed during the exit time.
Hash Key (#)
The # key is used to display additional choices for certain options, e.g. ADVANCE/RETARD the time in the Time/Date option.
This key is also used as the user duress key (by pressing twice following a valid code entry).
Star Key (*)
The * key is used to provide additional features for certain options, e.g. printing the event log or deleting entries.
Power LED
The green power LED remains lit whenever the keypad is connected to a mains power supply. A mains power failure is indicated by the LED flashing slowly. The LED flashes rapidly if the battery voltage falls below the minimum threshold or if one of the fuses on the control panel PCB blows.
Banner
The banner is the display shown on the keypad, e.g. Galaxy 504 V4.00 (with the time and date on the bottom line). This is shown at all times when the system is unset, unless the menu is being accessed or an alarm or help message is on the display. The banner can be changed by the engineer. In the set condition the banner is normally blank.
User Codes
The user code is a unique four, five or six digit PIN (Personal Identification Number). The PIN identifies the user to the Galaxy Alarm panel and allows operation of the system.
2
SETTING THE SYSTEM
Before Setting
Before setting the system ensure all doors and windows are secured and areas protected by movement detectors are free from obstruction.
Entering A Pin - User Level 1-2
As each digit is entered the keypad responds with a bleep and displays a *. When all the digits are entered, press the ent or A > key to start the setting routine.
|
|
|
Entering A Pin - User Level 3 - 6 |
|
|
|
|
As each digit is entered the keypad responds with a bleep and displays |
|
|
|
|
a *. When all the digits are entered press the A > key to start the setting |
|
|
routine. |
|||
|
||||
|
|
|
Setting groups |
|
|
|
|||
Where group choice has been assigned to the PIN, select which groups |
||||
|
|
|||
|
|
|
have to set as part of the setting routine. The set status of each group is |
|
|
|
|
||
displayed on the keypad screen. Possible status options are :-
!"
|
|
|
|
|
|
|
|
|
|
|
|
|
|
|
|
|
|
|
|
||||||||||||||
|
|
|
|
|
|
|
|
|
|
|
|
|
|
|
|
|
|
|
|
|
|
|
|
|
|
|
|
|
|
|
|
|
|
|
|
|
|
|
|
|
|
|
|
|
|
|
|
|
|
|
R = Ready (Groups is unset, and all zones are closed)
F = Faulted (Group is unset, and at least one zone is open) S = Set (Group is set)
L = Lockout (Group is locked out, and cannot be unset)
Select which groups have to be to set by entering the number of the group. For example, to set groups 2 and 3 press keys 2 and 3 . The display changes to indicate the groups selected for setting. Pressing the ent key starts the setting routine for the specified groups.
The Galaxy 500, 504 and 512 have more than 8 groups. If the user has group choice, the available groups will be displayed at the keypad following a valid code + A >. The groups will be displayed showing A1 to A8. Use both A > and < B keys to scroll to the various sets of groups. If the user does not have group choice, entering the PIN and A > will cause all groups assigned to the user to set.
Exit time
If all the system zones are closed when the setting routine is started, the display indicates the remaining time, in seconds, to vacate the premises. Exit the building using the agreed route.
3
Sounder
During the setting period the sounder emits a continuous tone if all of the zones are closed. If a zone is opened during the setting period, the sounder begins to pulse. The sounder also pulses during the last 25% of the setting time to indicate time running short.
Zones Open
The exit time will reset should any zones be open or opened during setting. The display will indicate the number of zones open and invite viewing. Closing the zones will restart the exit time. An alarm will be generated on Galaxy 60, 128, 500, 504, 512, if setting is not completed before the Fail to Set period expires. (Fail to Set; programmed by engineer).
Note: Before closing the open zone, press esc to abort the setting routine. The ESC TO ABORT message will flash as a reminder.
|
|
|
|
|
|
|
|
|
|
|
|
|
|
|
|
|
|
|
|
|
|
|
|
|
|
|
|
|
|
|
|
Final Door/Terminator |
|
|
|
|
|
|
|
|
|
|
|
|
|
|
|
|
|
|
|
|
|
|
|
|
|
|
|
|
|
|
|
|
The setting procedure can be manually completed by either closing the |
|
|
|
|
|
|
|
|
|
|
|
|
|
|
|
|
|
|
|
|
|
|
|
|
|
|
|
|
|
|
|
|
FINAL door or by pressing the TERMINATOR button. |
|
|
|
|
|
|
|
|
|
|
|
|
|
|
|
|
|
|
|
|
|
|
|
|
|
|
|
|
|
|
|
|
System Set |
|
|
|
|
|
|
|
|
|
|
|
|
|
|
|
|
|
|
|
|
|
|
|
|
|
|
|
|
|
|
|
|
When time has expired or a manual termination is made, the system |
|
|
|
|
|
|
|
|
|
|
|
|
|
|
|
|
|
|
|
|
|
|
|
|
|
|
|
|
|
|
|
|
waits four seconds before setting. The sounders emit two long tones to |
|
|
|
|
|
|
|
|
|
|
|
|
|
|
|
|
|
|
|
|
|
|
|
|
|
|
|
|
|
|
|
|
confirm that the system is set. The keypad briefly displays the message |
|
|
|
|
|
|
|
|
|
|
|
|
|
|
|
|
|
|
|
|
|
|
|
|
|
|
|
|
|
|
|
|
SYSTEM SET, before becoming blank. |
|
|
|
|
|
|
|
|
|
|
|
|
|
|
|
|
Part Setting |
||||||||||||||||
|
|
|
|
|
|
|
|
|
|
|
|
|
|
|
|
|
|
|
|
|
|
|
|
|
|
|
|
|
|
|
|
To Part Set the system press the < B key after the PIN. Only the zones |
|
|
|
|
|
|
|
|
|
|
|
|
|
|
|
|
|
|
|
|
|
|
|
|
|
|
|
|
|
|
|
|
|
|
|
|
|
|
|
|
|
|
|
|
|
|
|
|
|
|
|
|
|
|
|
|
|
|
|
|
|
|
|
|
|
|
|
|
|
|
which have the PART attribute enabled are set. All other setting features |
||||||||||||||||||||||||||||
|
|
|
|
|
|
|
|
|
|
|
|
|
|
|
|
|
|
|
|
|
|
|
|
|
|
|
|
|
|
|
|
are the same. |
|
|
|
|
|
|
|
|
|
|
|
|
|
|
|
|
|
|
|
|
|
|
|
|
|
|
|
|
|
|
|
|
|
|
|
|
|
|
|
|
|
|
|
|
|
|
|
|
|
|
|
|
|
|
|
|
|
|
|
|
|
|
|
|
|
|
!"
Cancelling The Setting
The setting routine can be aborted by pressing the esc key before the system sets.
Group Name
Press * and # keys simultaneously when groups are displayed on the keypad (when setting for example), will display the name of the group . The group name should be programmed by the installation engineer. Press the * and # keys to return to the group display.
4
MICROMAX SETTING OPTIONS
Setting with the MicroMAX Cards
The MicroMAX user cards can be used to set the system. This is done by assigning a MAX user card (or fob) with one of the setting options. When the MAX card is held against a MAX module for three seconds, the MAX function is activated. For example, if the MAX function assigned is 13 = Part Set, then activating the card held function results in the system being part set.
If a user is assigned group choice, then a keypad will have to be accessed to select the group for setting after swiping the card.
Dual Focus
If a # is assigned to a particular users pin and their max card number, then the user will have dual focus operation. This means that they will have to enter their pin first, before setting with the max card and vice versa.
Proximity Keypads
A proximity keypad is a keypad that has a card reader built in. They are normally installed on systems where dual focus setting and unsetting are used. Proximity keypads are used as a keypad and microMAX as detailed above, but the card is held against the lower right corner of the keypad as shown in the following diagram:
GALAXY 504 V4.00 08:58 TUE 22 NOV
1 |
2 |
3 |
A |
4 |
5 |
6 |
B |
7 |
8 |
9 |
ent |
* |
0 |
# |
esc |
|
5
 Loading...