


OWNER’S MANUAL
GS190
WARNING:
The engine exhaust from this product contains chemicals known to the State of California to cause cancer, birth defects or other reproductive harm.
31Z2CA00 |
|
|
|
POM53639 |
EM3 |
|
IPC |
10,000.2003.11 |
|
00X31-Z2C-A000 |
|
|||
|
|
|
PRINTED IN U.S.A. |
CONTENTS
INTRODUCTION . . . . . . . . . . . . . . 1
SAFETY MESSAGES . . . . . . . . . 1
COMPONENT & CONTROL
LOCATION . . . . . . . . . . . . . . . . . . 2
IS YOUR ENGINE
READY TO GO . . . . . . . . . . . . . . . 2
OPERATION . . . . . . . . . . . . . . . . . 2
Safe Operating
Precautions . . . . . . . . . . . . . . . . 2
Type 1 Operation . . . . . . . . . . . 2
Type 2 Operation . . . . . . . . . . . . 3
Type 3 Operation . . . . . . . . . . . 4
Oil Alert® System . . . . . . . . . . . 4
SERVICING YOUR ENGINE . . . . . 4
The Importance of
Maintenance. . . . . . . . . . . . . . . . 4
Maintenance Safety . . . . . . . . . 4
Safety Precautions . . . . . . . . . . 4
Maintenance Schedule . . . . . . . 5
Refueling . . . . . . . . . . . . . . . . . . 5
Fuel Recommendations . . . . . . 5
ENGINE OIL . . . . . . . . . . . . . . . . 5
Recommended Oil. . . . . . . . . . . 5
Oil Level Check . . . . . . . . . . . . . 5
Oil Change . . . . . . . . . . . . . . . . . 5
AIR CLEANER . . . . . . . . . . . . . . 6
Inspection . . . . . . . . . . . . . . . . . 6
Cleaning . . . . . . . . . . . . . . . . . . . 6
Spark Plug . . . . . . . . . . . . . . . . . 6
Spark Arrester . . . . . . . . . . . . . 7
HELPFUL TIPS &
SUGGESTIONS. . . . . . . . . . . . . . . 7
Storing Your Engine . . . . . . . . . 7
Transporting . . . . . . . . . . . . . . . 8
TAKING CARE OF UNEXPECTED
PROBLEMS. . . . . . . . . . . . . . . . . . 8
TECHNICAL & CONSUMER
INFORMATION . . . . . . . . . . . . . . . 9
Serial Number and Type
Location . . . . . . . . . . . . . . . . . . . 9
High Altitude Operation . . . . . . 9
Oxygenated Fuels . . . . . . . . . . 9
Emission Control System
Information. . . . . . . . . . . . . . . . 10
Air Index. . . . . . . . . . . . . . . . . . 10
Specifications . . . . . . . . . . . . . 10
Tuneup Specifications . . . . . . 10
Quick Reference Information . 11
Wiring Diagram . . . . . . . . . . . . 11
CONSUMER INFORMATION . . . 11
Honda Publications. . . . . . . . . 11
U.S.A. Distributor’s Limited
Warranty. . . . . . . . . . . . . . . . . . 11
International Warranty . . . . . . 11
Emission Control System
Warranty. . . . . . . . . . . . . . . . . . 12
Distributor/Dealer Locator
Information. . . . . . . . . . . . . . . . 12
Customer Service
Information. . . . . . . . . . . . . . . . 12
INTRODUCTION
Thank you for purchasing a Honda engine. We want to help you to get the best results from your new engine and to operate it safely. This manual contains information on how to do that; please read it carefully before operating the engine. If a problem should arise, or if you have any questions about your engine, consult an authorized Honda servicing dealer.
All information in this publication is based on the latest product information available at the time of printing. American Honda Motor Co., Inc. reserves the right to make changes at any time without notice and without incurring any obligation. No part of this publication may be reproduced without written permission.
This manual should be considered a permanent part of the engine and should remain with the engine if resold.
Review the instructions provided with the equipment powered by this engine for any additional information regarding engine startup, shutdown, operation, adjustments or any special maintenance instructions.
SAFETY MESSAGES
Your safety and the safety of others is very important. We have provided important safety messages in this manual and on the engine. Please read these messages carefully.
A safety message alerts you to potential hazards that could hurt you or others. Each safety message is preceded by a safety alert symbol and one of three words, DANGER, WARNING, or CAUTION.
These signal words mean:
DANGER
WARNING
CAUTION
You WILL be KILLED or SERIOUSLY HURT if you don't follow instructions.
You CAN be KILLED or SERIOUSLY HURT if you don't follow instructions.
You CAN be HURT if you don't follow instructions.
Each message tells you what the hazard is, what can happen, and what you can do to avoid or reduce injury.
DAMAGE PREVENTION MESSAGES
You will also see other important messages that are preceded by the word NOTICE.
This word means:
|
Your engine or other property can be |
|
NOTICE |
||
damaged if you don’t follow instructions. |
||
|
The purpose of these messages is to help prevent damage to your engine, other property, or the environment.
SAFETY INFORMATION
•Understand the operation of all controls and learn how to stop the engine quickly in case of emergency. Make sure the operator receives adequate instruction before operating the equipment.
•Your engine’s exhaust contains poisonous carbon monoxide. Do not run the engine without adequate ventilation, and never run the engine indoors.
•The engine and exhaust become very hot during operation. Keep the engine at least 3 feet (1 meter) away from buildings and other equipment during operation. Keep flammable materials away, and do not place anything on the engine while it is running.
© 2003 American Honda Motor Co., Inc.—All Rights Reserved |
1 |

COMPONENT & CONTROL LOCATION
MUFFLER |
AIR |
|
CLEANER |
||
|
MUFFLER DEFLECTOR (optional) 
|
OIL FILLER CAP/ |
OIL DRAIN |
DIPSTICK |
BOLT |
|
|
SPARK PLUG |
FUEL |
|
FILLER |
|
CAP |
|
STARTER
FUEL
TANK 
ENGINE CONTROL TYPES
TYPE 1: MANUAL THROTTLE / MANUAL CHOKE
 CHOKE ROD
THROTTLE

 LEVER (gray)
Used on engines with an adjustable throttle lever.
TYPE 2: FIXED THROTTLE / IGNITION SWITCH LEVER / MANUAL CHOKE
 CHOKE ROD
IGNITION SWITCH

 LEVER (red)
Used on engines with a non-adjustable throttle lever.
TYPE 3: FIXED THROTTLE / ENGINE STOP SWITCH / MANUAL CHOKE
ENGINE
STOP
SWITCH
 CHOKE ROD
BEFORE OPERATION CHECKS
IS YOUR ENGINE READY TO GO?
For your safety, and to maximize the service life of your equipment, it is very important to take a few moments before you operate the engine to check its condition. Be sure to take care of any problem you find, or have your servicing dealer correct it, before you operate the engine.
WARNING
Improperly maintaining this engine, or failure to correct a problem before operation, can cause a malfunction in which you can be seriously hurt or killed.
Always perform a preoperation inspection before each operation, and correct any problem.
Before beginning your preoperation checks, be sure the engine is level and the throttle lever (ignition switch lever or engine stop switch) is in the STOP position.
Always check the following items before you start the engine:
1.Fuel level (see page 5).
2.Oil level (see page 5).
The Oil Alert® system (applicable engine types) will automatically stop the engine before the oil level falls below safe limits. However, to avoid the inconvenience of an unexpected shutdown, always check the engine oil level before startup.
3.Air cleaner (see page 6).
4.General inspection: Check for fluid leaks and loose or damaged parts.
5.Check the equipment powered by this engine.
Review the instructions provided with the equipment powered by this engine for any precautions and procedures that should be followed before engine startup.
OPERATION
SAFE OPERATING PRECAUTIONS
Before operating the engine for the first time, please review the
SAFETY INFORMATION section on page 1 and the BEFORE OPERATION CHECKS above.
WARNING
Carbon monoxide gas is toxic. Breathing it can cause unconsciousness and even kill you.
Avoid any areas or actions that expose you to carbon monoxide.
Review the instructions provided with the equipment powered by this engine for any safety precautions that should be observed with engine startup, shutdown or operation.
TYPE 1: MANUAL THROTTLE / MANUAL CHOKE
Starting A Cold Engine |
CHOKE ROD |
|
1. Pull the choke rod to the CLOSED position.
2
2.Move the throttle lever (gray) away from the SLOW position, about 1/3 of the way toward the FAST position.
Some engine applications use a remotely-mounted throttle control rather than the engine-mounted throttle lever shown here.
3.Pull the starter grip lightly until resistance is felt, then pull briskly.
NOTICE
Do not allow the starter grip to snap back against the engine. Return it gently to prevent damage to the starter.
THROTTLE
LEVER (gray)
FAST
SLOW
STARTER GRIP
4.If the choke rod was pulled to the CLOSED position to start the engine, push it to the OPEN position as soon as the engine warms up enough to run smoothly.
Throttle Setting
Position the throttle control lever (gray) for the desired engine speed. For best engine performance, it is recommended the engine be operated with the throttle in the FAST (or high) position.
Starting a Warm Engine
FAST
SLOW
THROTTLE
LEVER (gray)
If the engine has run out of fuel, pull the choke rod to the CLOSED position after refueling. If the engine has not run out of fuel, leave the choke rod in the OPEN position.
1.Place the throttle lever in the FAST position.
2.Pull the starter grip lightly until you feel resistance, then pull briskly.
Stopping The Engine
1.Move the throttle lever (gray) to the SLOW position.
2.Allow the engine to idle for a few seconds, then move the throttle lever to the STOP position.
THROTTLE
LEVER (gray)
FAST
STOP
TYPE 2: FIXED THROTTLE / IGNITION SWITCH LEVER / MANUAL CHOKE
Starting A Cold Engine |
CHOKE ROD |
|
1. Pull the choke rod to the CLOSED position.
2.Move the ignition switch lever (red) to the ON position.
Some engine applications use a remotely-mounted ignition switch rather than the enginemounted ignition switch lever shown here.
3.Pull the starter grip lightly until resistance is felt, then pull briskly.
NOTICE
Do not allow the starter grip to snap back against the engine. Return it gently to prevent damage to the starter.
IGNITION SWITCH
LEVER (red)
ON
STARTER GRIP
4.If the choke rod was pulled to the CLOSED position to start the engine, push it to the OPEN position as soon as the engine warms up enough to run smoothly.
5.The engine speed is preset on this type.
Starting a Warm Engine
If the engine has run out of fuel, pull the choke rod to the CLOSED position after refueling. If the engine has not run out of fuel, leave the choke rod in the OPEN position.
1.Pull the starter grip lightly until you feel resistance, then pull briskly.
2.If the choke was pulled to the CLOSED position to start, push it to the OPEN position as soon as the engine starts.
Stopping The Engine
Move the ignition switch lever (red) to the OFF position.
OFF
3
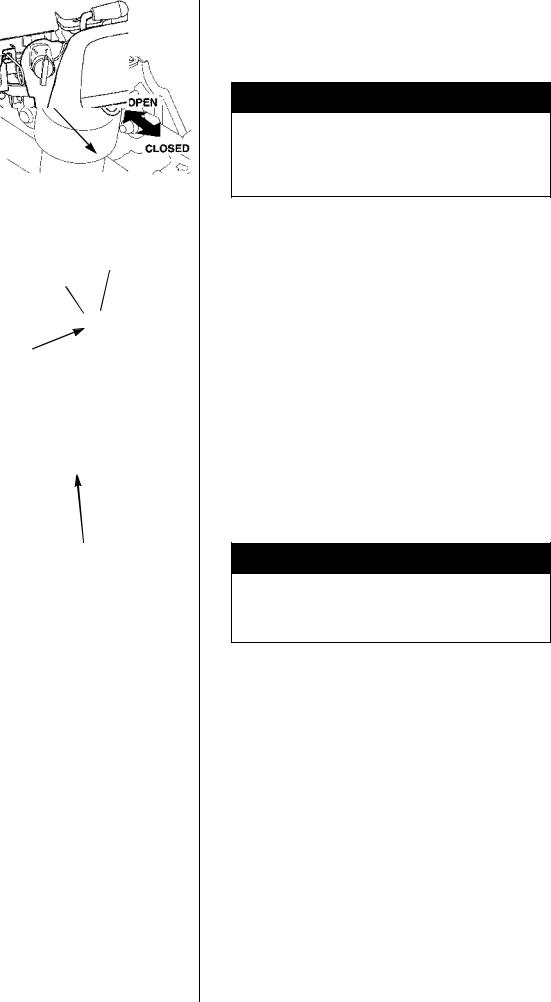
TYPE 3: FIXED THROTTLE / ENGINE STOP SWITCH / MANUAL CHOKE
Starting A Cold Engine |
|
|
1. Pull the choke rod to the |
|
|
CHOKE ROD |
||
CLOSED position. |
||
|
2. Move the engine stop switch
to the ON position. |
|
|
|
|
|
|
|
ON |
|
|
|
|
|
|
Some engine applications |
|
OFF |
|
|
|
||||
|
|
|
|
|
use a remotely-mounted |
|
|
|
|
ignition switch rather than the |
|
|
|
|
engine-mounted engine stop |
ENGINE |
|||
switch shown here. |
||||
|
STOP |
|||
|
SWITCH |
|||
3. Pull the starter grip lightly until resistance is felt, then pull briskly.
|
NOTICE |
|
|
Do not allow the starter grip to |
|
||
snap back against the engine. |
|
||
Return it gently to prevent |
|
||
damage to the starter. |
|
||
4. If the choke rod was pulled to |
STARTER GRIP |
||
the CLOSED position to start |
|
||
the engine, push it to the OPEN |
|
||
position as soon as the engine |
|
||
warms up enough to run |
|
||
smoothly. |
|
||
5. The engine speed is preset on this type.
Starting a Warm Engine
If the engine has run out of fuel, pull the choke rod to the CLOSED position after refueling. If the engine has not run out of fuel, leave the choke rod in the OPEN position.
1.Pull the starter grip lightly until you feel resistance, then pull briskly.
2.If the choke was pulled to the CLOSED position to start, push it to the OPEN position as soon as the engine starts.
Stopping The Engine
Move the engine stop switch to the OFF position.
OIL ALERT® SYSTEM
The Oil Alert system is designed to prevent engine damage caused by an insufficient amount of oil in the crankcase. Before the oil level in the crankcase can fall below a safe limit, the Oil Alert system will automatically stop the engine [the throttle lever (ignition switch lever) will remain in a run position].
If the engine stops and will not restart, check the engine oil level (page 5) before troubleshooting in other areas.
SERVICING YOUR ENGINE
THE IMPORTANCE OF MAINTENANCE
Good maintenance is essential for safe, economical and trouble-free operation. It will also help reduce pollution.
WARNING
Improper maintenance, or failure to correct a problem before operation, can cause a malfunction in which you can be seriously hurt or killed.
Always follow the inspection and maintenance recommendations and schedules in this owner’s manual.
To help you properly care for your engine, the following pages include a maintenance schedule, routine inspection procedures, and simple maintenance procedures using basic hand tools. Other service tasks that are more difficult, or require special tools, are best handled by professionals and are normally performed by a Honda technician or other qualified mechanic.
The maintenance schedule applies to normal operating conditions. If you operate your engine under severe conditions, such as sustained high-load or high-temperature operation, or use in unusually wet or dusty conditions, consult your servicing dealer for recommendations applicable to your individual needs and use.
Maintenance, replacement, or repair of the emission control devices and systems may be performed by any engine repair establishment or individual, using parts that are “certified” to EPA standards.
MAINTENANCE SAFETY
Some of the most important safety precautions follow. However, we cannot warn you of every conceivable hazard that can arise in performing maintenance. Only you can decide whether or not you
should perform a given task.
WARNING
Failure to properly follow maintenance instructions and precautions can cause you to be seriously hurt or killed.
Always follow the procedures and precautions in this owner’s manual.
SAFETY PRECAUTIONS
•Make sure the engine is off before you begin any maintenance or repairs. This will eliminate several potential hazards:
–Carbon monoxide poisoning from engine exhaust.
Be sure there is adequate ventilation whenever you operate the engine.
–Burns from hot parts.
Let the engine and exhaust system cool before touching.
–Injury from moving parts.
Do not run the engine unless instructed to do so.
•Read the instructions before you begin, and make sure you have the tools and skills required.
•To reduce the possibility of fire or explosion, be careful when working around gasoline. Use only a nonflammable solvent, not gasoline, to clean parts. Keep cigarettes, sparks and flames away from all fuel related parts.
Remember that an authorized Honda servicing dealer knows your engine best and is fully equipped to maintain and repair it.
To ensure the best quality and reliability, use only new genuine Honda parts or their equivalents for repair and replacement.
4

MAINTENANCE SCHEDULE
REGULAR SERVICE PERIOD (3) |
|
First |
Every 3 |
Every 6 |
Every |
|
||
Perform at every indicated |
Before |
month |
months |
months |
year |
|
||
each |
or |
or |
or |
or |
Page |
|||
Item month or operating hour |
use |
20 |
50 |
100 |
200 |
|
||
interval, which ever comes first. |
|
hours |
hours |
hours |
hours |
|
||
Engine oil |
Check level |
O |
|
|
|
|
5 |
|
|
|
|
|
|
|
|
||
Change |
|
O |
|
O |
|
5 |
||
|
|
|
|
|||||
|
Check |
O |
|
|
|
|
|
|
Air cleaner |
Clean |
|
|
O (1) |
|
|
6 |
|
|
|
|
|
|
|
|
|
|
|
Replace |
|
|
|
|
O (*) |
|
|
Spark plug |
Check-adjust |
|
|
|
O |
|
6 |
|
Replace |
|
|
|
|
O |
|||
|
|
|
|
|
|
|||
|
|
|
|
|
|
|
|
|
Spark arrester |
Clean |
|
|
|
O |
|
7 |
|
(optional parts) |
|
|
|
|
||||
|
|
|
|
|
|
|
||
Idle speed |
Check-adjust |
|
|
|
|
O(2) |
Shop |
|
|
|
|
|
manual |
||||
|
|
|
|
|
|
|
||
Valve clearance |
Check-Adjust |
|
|
|
|
O(2) |
Shop |
|
|
|
|
|
manual |
||||
|
|
|
|
|
|
|
||
Combustion chamber |
Clean |
|
Every 250 hours (2) |
|
— |
|||
Fuel tank and filter |
Clean |
|
|
|
|
O(2) |
Shop |
|
|
|
|
|
manual |
||||
|
|
|
|
|
|
|
||
Fuel tube |
Check |
Every 2 years (Replace if necessary) (2) |
Shop |
|||||
manual |
||||||||
|
|
|
|
|
|
|
||
(*)Replace paper element type only.
(1)Service more frequently when used in dusty areas.
(2)These items should be serviced by an authorized Honda servicing dealer, unless you have the proper tools and are mechanically proficient. Refer to the Honda shop manual for service procedures.
(3)For commercial use, log hours of operation to determine proper maintenance intervals.
REFUELING
Use unleaded gasoline with a pump octane rating of 86 or higher. This engine is certified to operate on unleaded gasoline. Unleaded gasoline produces fewer engine and spark plug deposits and extends exhaust system life.
WARNING
Gasoline is highly flammable and explosive, and you can be burned or seriously injured when refueling.
•Stop engine and keep heat, sparks, and flame away.
•Refuel only outdoors.
•Wipe up spills immediately.
NOTICE
Fuel can damage paint and some types of plastic. Be careful not to spill fuel when filling your fuel tank. Damage caused by spilled fuel is not covered under the Distributor’s Limited Warranty (see page 11).
Never use stale or contaminated gasoline or oil/gasoline mixture. Avoid getting dirt or water in the fuel tank.
1.Remove the fuel tank cap.
2.Add fuel to the bottom of the fuel level limit in the neck of the fuel tank. Do not overfill. Wipe up spilled fuel before starting the engine.
Fuel tank capacity: 0.53 gal (2.0 l)
MAXIMUM
FUEL LEVEL
FUEL 
LEVEL
MARK
ENGINE OIL
Recommended Oil |
|
Use 4-stroke motor oil that meets |
|
or exceeds the requirements for |
|
API service classification SH, SJ, |
|
or equivalent. Always check the |
|
API service label on the oil |
|
container to be sure it includes the |
AMBIENT TEMPERATURE |
letters SH, SJ, or equivalent. |
SAE 10W-30 is recommended for general use. Other viscosities shown in the chart may be used when the average temperature in your area is within the indicated range.
Oil Level Check
1.Check the oil with the engine stopped and level.
2.Remove the oil filler cap/dipstick and wipe it clean.
3.Insert the oil filler cap/dipstick into the oil filler neck as shown, but do not screw it in, then remove it to check the oil level.
4.If the oil level is near or below the lower limit mark on the dipstick, remove the oil filler cap/dipstick, and fill with the recommended oil to the upper limit mark (bottom edge of the oil fill hole). Do not overfill.
5.Reinstall the oil filler cap/dipstick.
OIL FILLER CAP/
DIPSTICK
OIL FILL HOLE |
UPPER LIMIT |
|
LOWER LIMIT |
||
(bottom edge) |
||
|
Oil Change
Drain the engine oil when the engine is warm. Warm oil drains quickly and completely.
1.Place a suitable container next to the engine to catch the used oil
2.Remove the oil filler cap/ dipstick and the oil drain plug.
3.Allow the used oil to drain completely, then reinstall the drain plug and washer. Tighten the drain plug securely.
OIL FILLER
CAP/
DIPSTICK
DRAIN
PLUG
WASHER
Please dispose of used motor oil in a manner that is compatible with the environment. We suggest you take used oil in a sealed container to your local recycling center or service station for reclamation. Do not throw it in the trash or pour it on the ground or down a drain.
4.With the engine in a level position, fill to the upper limit mark (bottom edge of the oil fill hole) on the dipstick with the recommended oil (see page 5).
Engine Oil Capacity: 0.61 qt (0.58 )
NOTICE
Running the engine with a low oil level can cause engine damage.
5. Reinstall the oil filler cap/dipstick securely.
5
 Loading...