


 Loading...
Ultima System
Operator Manual
COP |
GMO |
Product |
Service |
Device # |
Models |
Description |
Reference # |
Ultimc4-1 |
U2000CP1 |
Control Panel (30) |
ML – 28811 |
Ultimc2-1 |
U2000CP2 |
Control Panel (30) |
ML – 28821 |
Ultimc3-1 |
U2000CP3 |
Control Panel (102) |
ML – 28810 |
Ultimc1-1 |
U2000CP4 |
Control Panel (102) |
ML – 28820 |
Ultimp1-1 |
U2000P1 |
Printer |
ML – 28812 |
Ultimp2-2 |
U2000P2 |
Printer |
ML – 28819 |
Ultimsp-1 |
U2000P3 |
2nd Printer |
ML – 28813 |
Ultimsa-1 |
U2000S1 |
Stand Alone Scale |
ML – 28808 |
Ultimsn-1 |
U2000S2 |
NSW Scale |
ML – 28816 |
Ultimsc-2 |
U2000S3 |
Scale Conveyor |
ML – 28859 |
701 S. RIDGE AVENUE
TROY, OHIO 45374
www.hobartcorp.com
F-34319 (10-99)

|
Ultima System |
Table of Contents |
|
INTRODUCTION........................................................................................................................... |
1-2 |
FCC Note............................................................................................................................................ |
1-3 |
Verify Correctness of Weight & Price........................................................................................... |
1-3 |
Operator Manual Overview ........................................................................................................... |
1-3 |
UNDERSTANDING THE SYSTEM........................................................................................... |
2-2 |
Electrical Connections ..................................................................................................................... |
2-2 |
Communication Connections......................................................................................................... |
2-3 |
Using the Console............................................................................................................................. |
2-3 |
The Keypad .................................................................................................................................. |
2-4 |
User Display................................................................................................................................. |
2-6 |
Loading Labels.................................................................................................................................. |
2-7 |
Removing and Replacing the Label Cassette ............................................................................ |
2-11 |
START-UP PROCEDURES........................................................................................................... |
3-2 |
Powering Up the System................................................................................................................. |
3-2 |
Setting the Date & Time .................................................................................................................. |
3-2 |
Understanding the Start a Run Screen ......................................................................................... |
3-3 |
Verifying Zero Weight................................................................................................................ |
3-4 |
Rezeroing the Scale ..................................................................................................................... |
3-4 |
Weigh Types................................................................................................................................. |
3-4 |
Totals Types.................................................................................................................................. |
3-5 |
Selecting Weigh and Totals Types ........................................................................................... |
3-5 |
Entering Operator IDs ................................................................................................................ |
3-5 |
HELP Key Functions........................................................................................................................ |
3-6 |
Help on "F" Keys.......................................................................................................................... |
3-6 |
About the Keyboard ................................................................................................................... |
3-6 |
Basic Help ..................................................................................................................................... |
3-6 |
Moving Through the System..................................................................................................... |
3-7 |
Accessing the On Screen Library................................................................................................... |
3-7 |
USING THE ULTIMA SYSTEM.................................................................................................. |
4-2 |
Weighing, Printing and Applying (Auto Weigh)....................................................................... |
4-2 |
Auto Repeat....................................................................................................................................... |
4-3 |
Weighing, Printing and Applying (Semi Auto Weigh)............................................................ |
4-4 |
Semi Auto Repeat............................................................................................................................. |
4-5 |
Weighing and Printing (Manual Weigh) ..................................................................................... |
4-5 |
Manual Repeat .................................................................................................................................. |
4-6 |
Copyright Hobart Corporation 1999

Ultima System
Printing Totals and Subtotals......................................................................................................... |
4-6 |
Setting the Countdown ................................................................................................................... |
4-8 |
Entering the Sell By or Best Before Dates .................................................................................. |
4-10 |
Changing Product Information (Temporarily)......................................................................... |
4-12 |
Using Forced Price ......................................................................................................................... |
4-13 |
Using Forced Tare .......................................................................................................................... |
4-14 |
Using Platter Tare........................................................................................................................... |
4-15 |
CLEANING AND MAINTAINING YOUR SYSTEM............................................................ |
5-2 |
Hygiene Requirements for Cleaning and Sanitizing................................................................. |
5-2 |
Cleaning the Printhead.................................................................................................................... |
5-3 |
TROUBLESHOOTING.................................................................................................................. |
6-2 |
Reviewing System Errors................................................................................................................ |
6-2 |
INDEX................................................................................................................................................ |
7-2 |
ii

Ultima System
Chapter One: Introduction
♦Introduction
♦FCC Note
♦Verify Correctness of Weight & Price
♦Operator Manual Overview
1 - 1 |
Introduction |
Ultima System
Introduction
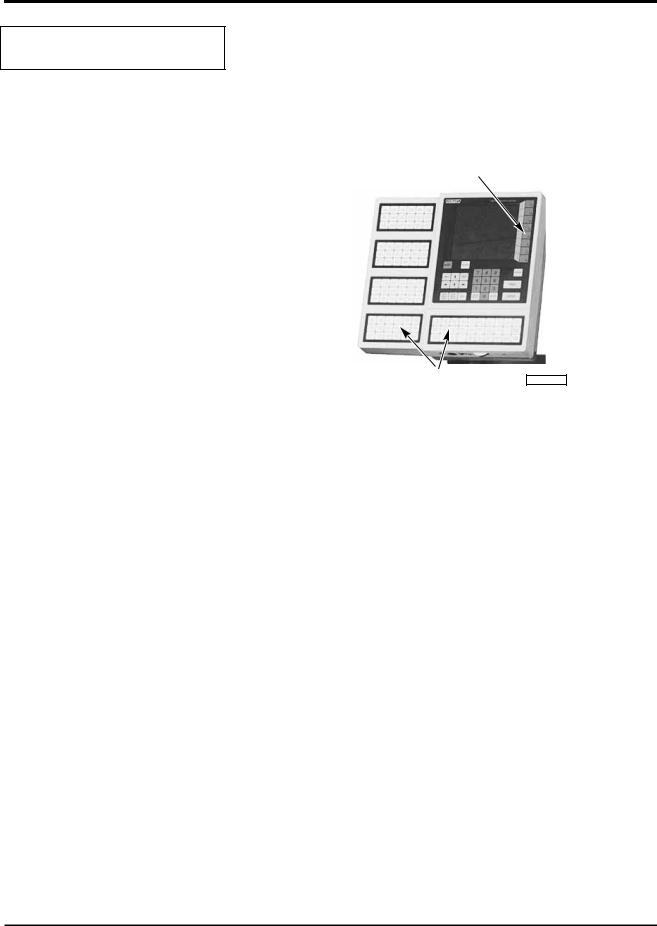
The Ultima Scale Printer System can handle a broad variety of products for meat, produce, fish, cheese, or bakery departments. It functions as a prepack system with Hobart wrapping and labeling equipment. It gives you merchandising capabilities with multiple fonts, graphics, and label types and allows for flexibility in label design.
FUNCTION KEYS
SPEED KEYS |
PL-41341-1 |
Ultima 2000
The easy to use control panel allows for productive operation. All necessary operator data appears on the screen and Function Keys (F1-F8) provide easy access to PLU information. Speed Keys can be used for the most frequently used PLUs. An optional panel is available with 72 additional Speed Keys.
This Operator Manual describes product weighing and label printing. The companion Supervisor Manual covers programming and setup.
Introduction |
1 - 2 |

Ultima System
FCC Note
This equipment has been tested and found to comply with the limits for a Class A digital device, pursuant to Part 15 of the FCC Rules. These limits are designed to provide reasonable protection against harmful interference when the equipment is operated in commercial environment. This equipment generates, uses, and can radiate radio frequency energy and, if not installed and used in accordance with the instruction manual, may cause harmful interference to radio communications. Operation of this equipment in a residential area is likely to cause harmful interference; in which case, the user will be required to correct the interference at his own expense.
Verify Correctness of
Weight & Price
Verification of information on labels should be made routinely. Check the multiplication of price-per-pound times weight, and check the indicated weight against printed weight. Weigh the same package several times to verify consistency. Keep in mind that some packages which weigh near the middle of the .01 lb. increment will normally vary up or down by .01 lb. Greater variation than .01 lb. indicates a need for adjustment of the system. In such cases, or whenever necessary, contact your authorized Hobart service representative.
Operator Manual
Overview
This manual will use the following methods to explain keystrokes and data entry procedures:
♦The word PRESS means to press a key on the Control Panel.
♦The word TYPE means to press a series of keys on the Control Panel followed by the [ENTER] key.
♦The word SELECT means to choose an item from the display.
♦The word ENTER means to press the [ENTER] key on the Control Panel. Be aware that, in normal operation, the [ENTER] key and [DOWN ARROW] key perform the same function.
♦Words in uppercase enclosed in brackets (for example [ENTER]) represent specific keys.
1 - 3 |
Introduction |

Ultima System
The following special instructions are used in the manual:
Note
A note is information that you need to know, but it is not an actual step in the procedures.
Tip
A tip is additional information that may be useful when you are using the system.

 Look At This
Look At This is information to alert you that you may be doing something that will permanently alter your system.
Introduction |
1 - 4 |

Ultima System
Chapter Two: Understanding the System
♦Electrical Connections
♦Communication Connections
♦Using the Console
•The Keypad
•User Display
♦Loading Labels
♦Removing and Replacing the Label Cassette
2 - 1 |
General Information |
Ultima System
Understanding the
System
Electrical Connections
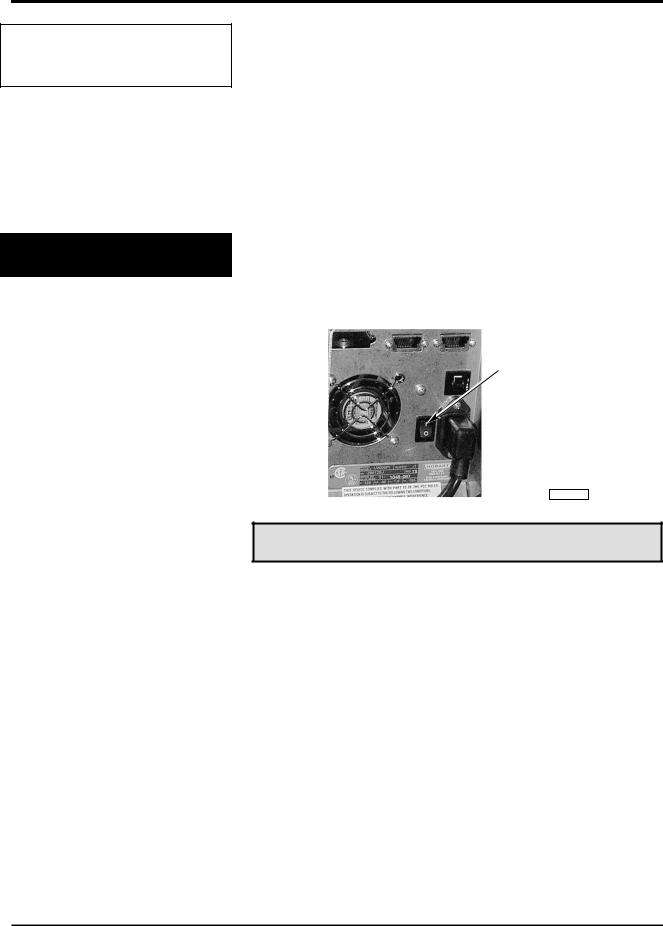
Utilizing memory from 1 MB expandable to 6 MB, the system can store information on thousands of products. This information includes NutriFacts and Safe Handling instructions (which enable you to meet labeling law requirements), Expanded Text (which is used for Ingredients), Health Tips, Meal Planners, Recipes and Cooking Instructions, as well as, Merchandising Graphics.
The Ultima System should be installed or moved only by qualified Hobart Service Technicians. It can operate in a temperature range from 32˚F to 104˚F (0˚C to 40˚C).
A Power Cord and Main Power Switch are located at the back of the printer. An electric power of 120 volts, 60Hz, Phase 1 (3-wire plus ground) is required. The Main Power Switch turns the system ON (I) and OFF (O).
POWER SWITCH
 POWER CORD
PL-41340-1
Note
The POWER key on the console is used to turn the User Display on or off only. This does not impact the system power. The Power key should be used at the end of the day, not the Main Power Switch.
General Information |
2 - 2 |
Ultima System
Communication
Connections
In addition to the electrical connections, there are up to four
(4) additional communication connections. There are several ports which can be configured for peripherals.
At the rear of the printer:
♦Disk Player/Recorder & Cassette Player/Recorder (RS232)
♦Parallel Port for Printer (80 column Dot Matrix) – Optional
♦RJ-11 Jack for RS-485 Communications (ScaleMaster)
♦RJ-45 Jack for Ethernet 10BaseT Connector (TCP/IP) (Wireless TCP/IP – Symbol wireless Ethernet card)
At the front of the printer:
♦External Disk Drive or Secondary Printer (MODNET)
♦IBM-AT/PS keyboard
IBM–AT/PS KEYBOARD |
|
EXTERNAL DISK DRIVE |
|
|
|
 CONTRAST KNOB
PL-41347-1
Note
You can use an IBM-AT/PS keyboard in place of the keypad. To purchase the keyboard kit or the interface cable, contact your local Hobart Representative.
Using the Console
The console consists of:
♦User Display - displays all information to the user.
♦Keypad - enables you to enter information into any field.
♦Speedkey Panel (Optional) - adds 72 additional Speedkeys.
2 - 3 |
General Information |

Ultima System
|
The Keypad |
|
Refer to the following table for specific key descriptions. |
|
|
|
|
|
|
|
|
|
Key/Highlight |
Function |
|
|
|
|
|
|
POWER |
Turns the screen and the keyboard ON/OFF. |
|
|
|
|
|
|
Function Keys (F1-F8) |
Enables you to make selections from the menu screens. |
|
|
|
|
|
|
Numeric Keypad |
Enables you to enter numeric data. |
|
|
|
|
|
|
BACKSPACE |
Enables you to remove the character to the left of the cursor. |
|
|
|
|
|
|
CLEAR |
Enables you to reset a numeric field to zero. This key is not active in a text |
|
|
|
field. |
|
|
|
|
|
|
ESCAPE |
Enables you to return to the previous screen. |
|
|
|
|
|
|
Enables you to print a label or report. |
||
|
|
NOTE: This is only available in specific modes; Manual Weigh, |
|
|
|
Manual Repeat and Supervisor. |
|
|
|
|
|
|
ENTER |
Enables you to accept the selected data and advance to the next field or |
|
|
|
screen. |
|
|
|
|
|
|
PREV (Previous) |
Moves you back one page. |
|
|
|
NOTE: This can also be used to print Subtotals. |
|
|
|
|
|
|
NEXT |
Moves you to the next page. |
|
|
|
NOTE: This can also be used to print Totals. |
|
|
|
|
|
|
ARROW KEYS |
UP and DOWN Arrow Keys enable you to move the cursor from field-to- |
|
|
|
field or LEFT and RIGHT Arrow Keys enable you to move the cursor |
|
|
|
from character-to-character within a field. |
|
|
|
|
|
|
SAVE/RECALL |
Press this key to have the system remember a series of keystrokes which |
|
|
|
can be recalled later by entering a reference number (Macro ID). |
|
|
|
NOTE: This key should be used in Supervisor mode only. |
|
|
|
|
|
|
SUPER MENU |
Enables you to access the Supervisor Menu. |
|
|
ON/OFF |
|
|
|
|
|
|
|
REZERO |
Enables you to set the scale to 0.00 pounds/0.000 grams. |
|
|
|
|
|
|
HELP |
Enables you to access the Help Screens. The system is equipped with |
|
|
|
context sensitive Help Screens to assist you in quick, efficient operation. |
|
|
|
From the Run Screen in the Operate mode, it enables you to access the On |
|
|
|
Screen Library and select a PLU. Refer to the Glossary for a complete |
|
|
|
description of the On Screen Library. |
|
|
|
|
|
General Information |
2 - 4 |

|
|
Ultima System |
|
|
|
|
|
|
Key/Highlight |
Function |
|
|
|
|
|
|
ALPHA |
Enables you to enter upper case or lower case alpha characters while in a |
|
|
CHARACTERS |
text field. |
|
|
|
|
|
|
SPECIAL CHARS. |
Press this key to type a special character (found in the upper left corner of |
|
|
|
each alpha-key). You must press Special Chars. For each special character |
|
|
|
you type. |
|
|
|
|
|
|
CHANGE CASE |
Enables you to switch between Upper or Lower case. You must press |
|
|
|
Change Case each time you want to change the case in the text field. |
|
|
|
|
|
|
RETURN |
Advances the cursor to the next field or inserts the End-of-Line in a text |
|
|
|
field. |
|
|
|
|
|
|
SPACE |
Enables you to type (add) a space between words and characters. |
|
|
|
|
|
Tip
The optional keyboard interface cable is REQUIRED for programming on a remote keyboard.
The optional IBM AT/PS keyboard is helpful when entering large amounts of data at one time.
2 - 5 |
General Information |

Ultima System
User Display |
|
The Ultima System’s User Display has several common |
|
|
|
screen highlights that assist you in interacting with the |
|
|
|||
|
|
system. The highlights act the same regardless of your |
|
|
|
screen location. |
|
|
|
|
|
|
|
Highlight |
Description |
|
|
|
|
|
|
Active Field |
A box surrounding text or numeric fields |
|
|
|
indicates that the field is active. If you |
|
|
|
begin typing from the keyboard or |
|
|
|
control panel, data is entered into this |
|
|
|
field. |
|
|
|
|
|
|
Bar Cursor |
A bar cursor ( ) indicates that the field is |
|
|
|
a text field. |
|
|
|
|
|
|
Block Cursor |
A block cursor ( ) indicates that the field |
|
|
|
is a numeric field. |
|
|
|
|
|
|
Changeable Fields |
If a field has a dotted line (.............) |
|
|
|
under it, the field can be changed or |
|
|
|
edited. |
|
|
|
|
|
|
Grayed Fields |
If a field or selection is grayed, it is not |
|
|
|
available for that particular screen or |
|
|
|
transaction. |
|
|
|
|
|
|
Prompt Line |
The Prompt Line is white text, reversed |
|
|
|
out of a black box. It is typically located |
|
|
|
at the bottom portion of the screen. It |
|
|
|
prompts you on what your next step |
|
|
|
should be. (Depending on your |
|
|
|
configuration, it may be black text |
|
|
|
reversed out of a white box.) |
|
|
|
|
|
|
Screen Title |
The Screen Title identifies the screen |
|
|
|
name and function that you are |
|
|
|
attempting to complete. It is typically |
|
|
|
located at the top left corner of the |
|
|
|
screen. |
|
|
|
|
General Information |
2 - 6 |

Ultima System
Loading Labels
In order to accommodate different label stock widths the system uses different label cassettes.
The Ultima 2000 uses a cassette for standard label stock and another cassette for narrow label stock.
Note
If you want to change label stock, contact your local Hobart Service Office to make the necessary adjustments.
Your Hobart Representative can create custom labels to accommodate your unique merchandising needs.
The Ultima 2000 uses:
•A Standard Label Cassette for standard (2.25”) wide label stock.
PL-41338
•A Narrow Label Cassette for narrow (1.5”) wide label stock.
PL-41339
2 - 7 |
General Information |
Ultima System
Tip
To promote cleanliness and sanitation, Hobart recommends you do not remove the label cassette to load labels.
Note
Labels load the same for a narrow cassette and standard cassette. The following are photos of the standard cassette.
To load labels:
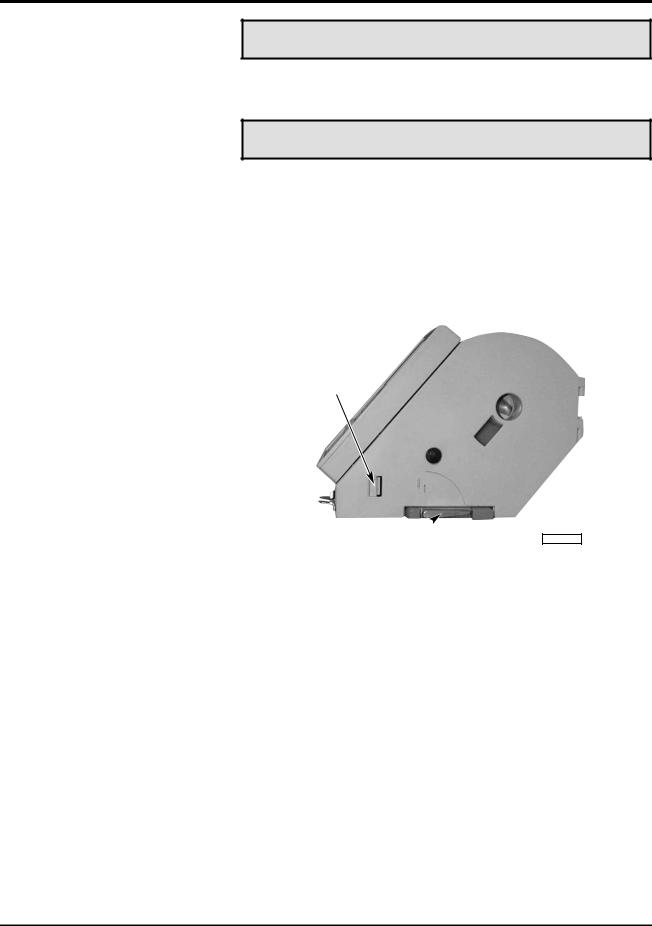
1.Open the label cassette door.
2.Rotate the printhead lever clockwise to the unlocked position.
3.Push the door latch in while opening the cassette door from the bottom.
DOOR LATCH
PRINTHEAD LEVER  (UNLOCKED POSITION)
PL-41342-1
General Information |
2 - 8 |

Ultima System
4.Remove labels from the first eighteen (18) inches of the label roll. This creates a leader which attaches to the take-up reel.
5.Place the label roll on the hub in the cassette. (The leader feeds from the bottom of the roll in a clockwise direction.)
LABEL ROLL 
HUB 
PL-41338-1
6.Thread the leader around the paper guides, as shown on the label instructions on the inside of the cassette.
7.Pull out the take-up reel knob.
TAKE-UP
REEL KNOB
PAPER GUIDES
PL-41338-2
2 - 9 |
General Information |
Loading...