


VIDEO CASSETTE RECORDER
VT-FX6404A
Owner's manual
Using these quality features:
• The VCR Plus+* programming system allows you to program the VCR for timer recording by simply entering a PlusCode* number.
* VCR Plus+ and PlusCode are trademarks of Gemstar Development Corporation.
The VCR Plus+ system is manufactured under license from Gemstar Development Corporation.
•Auto install system automatically tune in broadcast channels
•S-VHS Quasi Playback allows you to playback a tape that is recorded by S-VHS type.
•Super index allows you to quickly search for a program you want to view or the point from which you want to start recording on the tape.
•Super rewind and fast forward
•Multi-channel TV sound (MTS).
•8-program/1 month preset recording.
•Auto tracking system automatically adjusts the tracking so the picture is optimized.
•Frequency synthesized tuner provides easy, preset tuning of up to 68 broadcast TV channels and 125 cable channels.
•VHS Hi-Fidelity sound in playback.
•On-screen programming guide.
•Easy cursor operation
Auto Install System - simply plug in all leads and press the POWER button.
 As an ENERGY STAR" Partner, HITACHI Home Electronics (America), Inc. has determined that this product meets the ENERGY STAR' guidelines for energy efficiency.
HITACHI HOME ELECTRONICS (AMERICA), INC.
1855 Donroch Court
San Diego, CA 92173
Tel. 619-661-3441
HITACHI (HSC) CANADA INC.
6740 Campobello Road
Mississauga, Ontario L5N 2L8
CANADA
Tel. 905-821-4545
1
TABLE OF CONTENTS |
|
FOR YOUR SAFETY.................................................................................................................. |
3 |
IMPORTANT SAFEGUARDS..................................................................................................... |
4 |
INSTALLATION ...................................................................................................................... |
4 |
USE ........................................................................................................................................ |
6 |
CUSTOMER CONTROLS .......................................................................................................... |
7 |
REMOTE OPERATION .............................................................................................................. |
9 |
Install batteries in the remote control .................................................................................... |
10 |
Operating in the remote control............................................................................................. |
10 |
CASSETTE TAPES.................................................................................................................. |
11 |
Types .................................................................................................................................... |
11 |
Safety tabs prevent erasure.................................................................................................. |
11 |
Insertion ................................................................................................................................ |
12 |
Removal................................................................................................................................ |
12 |
BASIC ANTENNA HOOKUP [A]............................................................................................... |
12 |
ADVANCED ANTENNA HOOKUP -AV HOOKUP [B] .............................................................. |
13 |
BASIC CABLE HOOKUP [C].................................................................................................... |
14 |
ADVANCED CABLE HOOKUP -AV HOOKUP [D] ................................................................... |
15 |
BASIC CABLE HOOKUP -WITH CABLE BOX [E].................................................................... |
16 |
ADVANCED CABLE HOOKUP -WITH CABLE BOX [F]........................................................... |
17 |
ADVANCED CABLE HOOKUP -WITH CABLE BOX AND SPLITTER [G] ............................... |
18 |
AUTO INSTALL........................................................................................................................ |
19 |
SETTING THE CLOCK ............................................................................................................ |
20 |
Tips ....................................................................................................................................... |
20 |
To set the clock..................................................................................................................... |
20 |
PRE-TUNING THE VCR TUNER ............................................................................................. |
23 |
Presetting the received channels without using a cable box (Hookups [A], [B], [C], or [D]) .. |
23 |
Auto blue setting ................................................................................................................... |
27 |
CABLE BOX SETUP ................................................................................................................ |
28 |
PLAYBACK............................................................................................................................... |
31 |
Rewinding the tape ............................................................................................................... |
32 |
Rewinding or fast forwarding a tape at high speed ............................................................... |
33 |
To remove noise from the picture ......................................................................................... |
33 |
SPECIAL PLAYBACK EFFECTS ............................................................................................. |
34 |
Variable speed playback....................................................................................................... |
34 |
Slow motion .......................................................................................................................... |
35 |
Visual Search........................................................................................................................ |
36 |
Choosing a mode for audio playback.................................................................................... |
36 |
SHUTTLE CONTROL............................................................................................................... |
37 |
Using the shuttle ring ............................................................................................................ |
37 |
USING THE "SUPER INDEX" FEATURE................................................................................. |
38 |
What is SUPER INDEX?....................................................................................................... |
38 |
Locating the beginning of a recorded program (INDEX SEARCH) ....................................... |
38 |
Locating the beginning of a blank section (BLANK SEARCH) .............................................. |
39 |
Switching rewind or fast forward to visual search (EASY VIEW) .......................................... |
41 |
Skipping unnecessary scenes (SKIP PLAYBACK) ............................................................... |
41 |
VIEWING THE ON-SCREEN DISPLAY ................................................................................... |
42 |
Switching between the clock, time counter and time of remaining tape................................ |
42 |
INDEX WITH THE TIME COUNTER........................................................................................ |
43 |
To find specific sections on a tape........................................................................................ |
43 |
2

RECORDING A PROGRAM..................................................................................................... |
44 |
Basic recording steps............................................................................................................ |
44 |
RECORDING A PROGRAM -RECORDING TIPS............................................................... |
47 |
To watch one program while recording another.................................................................... |
47 |
To change the channel being recorded................................................................................. |
48 |
To record a Second Audio Program (SAP) ........................................................................... |
49 |
DELAYED RECORDING.......................................................................................................... |
50 |
Setting the VCR to record later ............................................................................................. |
50 |
Delayed Recording Steps ..................................................................................................... |
51 |
USING THE VCR PLUS+ SYSTEM FOR RECORDING.......................................................... |
56 |
About the VCR Plus+ system................................................................................................ |
56 |
Channel setup....................................................................................................................... |
56 |
EASY DELAYED RECORDING WITH THE VCR PLUS+ SYSTEM ........................................ |
57 |
VCR Plus+ setup - Channel setup ........................................................................................ |
57 |
Using the VCR Plus+ system to record a program (by using TV screen).............................. |
59 |
PROGRAM REVIEW................................................................................................................ |
62 |
PROGRAMMING THE VCR REMOTE TO CONTROL YOUR TV ........................................... |
64 |
Using the VCR remote to control your TV............................................................................. |
65 |
PROGRAMMING THE VCR REMOTE CONTROL TO CONTROL YOUR CABLE BOX ......... |
66 |
Using the VCR remote to control your cable box .................................................................. |
67 |
INTEGRATING YOUR STEREO SYSTEM WITH YOUR VCR ................................................ |
67 |
Hookup ................................................................................................................................. |
67 |
To record from stereo ........................................................................................................... |
68 |
COPYING TAPES FROM A CAMCORDER............................................................................. |
69 |
Hook-up ................................................................................................................................ |
69 |
To copy from a camcorder .................................................................................................... |
69 |
COPYING FROM ONE VCR TO ANOTHER VCR (DUBBING)................................................ |
70 |
Hookup ................................................................................................................................. |
70 |
To copy from one VCR to another VCR................................................................................ |
70 |
PROBLEM GUIDE / MAINTENANCE....................................................................................... |
71 |
Problem guide....................................................................................................................... |
72 |
Maintenance ......................................................................................................................... |
72 |
Guide indications in VCR display and OSD screen............................................................... |
72 |
TECHNICAL SPECIFICATIONS .............................................................................................. |
73 |
FOR YOUR SAFETY
POWER SUPPLY: AC 120V, 60 Hz ONLY.
The POWER button turns the VCR on and off, leaving the clock/timer unaffected. If the unit is to be left unattended for a long period, it is recommended that the unit be completely switched off and unplugged.
Illustrated below is the label on the back of your unit.
 This symbol warns the user that uninsulated voltage within the unit may have sufficient magnitude to cause electric shock. Therefore, it is dangerous to make any kind of contact with any inside part of this unit.
3
This symbol alerts the user that important literature concerning the operation and maintenance of this unit has been included. Therefore, it should be read carefully in order to avoid any problems.
CAUTION: TO REDUCE THE RISK OF ELECTRIC
SHOCK, DO NOT REMOVE COVER (OR BACK).
NO USER-SERVICEABLE PARTS INSIDE.
REFER SERVICING TO QUALIFIED SERVICE PERSONNEL.
WARNING: Many television programs and films are copyrighted. In certain circumstances, copyright law may apply to private in-home videotaping of copyrighted materials.
WARNING: TO PREVENT FIRE OR ELECTRIC SHOCK, DO NOT EXPOSE
THIS APPLIANCE TO RAIN OR MOISTURE.
CAUTION: TO PREVENT ELECTRIC SHOCK, MATCH WIDE BLADE OF PLUG TO WIDE SLOT, FULLY INSERT.
Caution to the user: Changes or modifications not expressly approved by the party responsible for compliance could void the user's authority to operate the equipment.
"Note to CATV system installer: This reminder is provided to call the CATV system installer's attention to Article 820-40 of the NEC that provides guidelines for proper grounding and, in particular, specifies that the cable ground shall be connected to the grounding system of the building, as close to the point of cable entry as practical".
IMPORTANT SAFEGUARDS
In addition to the careful attention devoted to quality standards in the manufacture of your video product, safety is a major factor in the design of every instrument. But, safety is your responsibility too.
This page lists important information that will help to assure your enjoyment and proper use of a Video Cassette Recorder and accessory equipment. Please read it carefully before operating your video product and keep it in a handy place for future reference.
INSTALLATION
1 Read and Follow Instructions -- All the safety and operating instructions should be read before the video product is operated. Follow all operating and use instructions.
2Retain Instruction -- The safety and operating instructions should be retained for future reference.
3Heed Warnings -- Comply with all warnings on the video product and in the operating instructions.
4Polarized Plug -- This video product is equipped with a polarized alternating current line plug (a plug having
one blade wider than the other). This plug will fit into the power outlet only one way. This is a safety feature. If you are unable to insert the plug fully into the outlet, try reversing the plug. If the plug should still fail to fit, contact your electrician to replace your obsolete outlet. To prevent electric shock do not use this polarized plug with an extension cord, receptacle or other outlet unless the blades can be fully inserted without blade exposure. If you need an extension, use a polarized cord.
4
5Power Sources -- This video product should be operated only from the type of power source indicated on the marking label. If you are not sure of the type of power supply to your home, consult your video dealer or local power company. For video products intended to operate from battery power, or other sources, refer to the operating instructions.
6Overloading -- Do not overload wall outlets and extension cords as this can result in a risk of fire or electric
shock. Overloaded AC outlets and extension cords are dangerous, and so are frayed power cords, damaged or cracked wire insulation and broken plugs. They may result in a shock or fire hazard. Periodically examine the cord and have it replaced by your service technician if appearance indicates damage or deteriorated insulation.
7Power Cord Protection -- Power supply cords should be routed so that they are not likely to be walked on or pinched by items placed upon or against them, paying particular attention to cords at plugs, convenience receptacles, and the point where they exit from the appliance.
8Ventilation -- Slots and openings in the cabinet are provided for ventilation to ensure reliable operation of the
video product and to protect it from overheating. These openings must not be blocked or covered. The openings should never be blocked by placing the video product on a bed, sofa, rug or other similar surface. This video product should never be placed near or over a radiator or heat register. This video product should not be placed in a built-in installation such as a bookcase or rack unless proper ventilation is provided or the video product manufacturer's instructions have been followed.
9 Attachments -- Do not use attachments unless recommended by the video product manufacturer as they may cause hazards.
Caution: Maintain electrical safety. Powerline operated equipment or accessories connected to this unit should bear the UL listing mark or CSA certification mark on the accessory itself and should not have been modified so as to defeat the safety features. This will help avoid any potential hazard from electric shock or fire. If in doubt, contact qualified service personnel.
10Water and Moisture -- Do not use this video product near water - for example, near a bath tub, wash bowl, kitchen sink, or laundry tub, in a wet basement, or near a swimming pool, and the like.
11Accessories -- Do not place this video product on an unstable card, stand, tripod, bracket or table. The video
product may fall, causing serious injury to a child or adult, and serious damage to the appliance. Use only with a cart, stand, tripod, bracket or table recommended by the manufacturer, or sold with the video product. Any mounting of the product should follow the manufacturer's instructions, and should use a mounting accessory recommended by the manufacturer.
11A An appliance and cart combination should be moved with care. Quick stops, excessive force, and uneven surfaces may cause the appliance and cart combination to overturn.
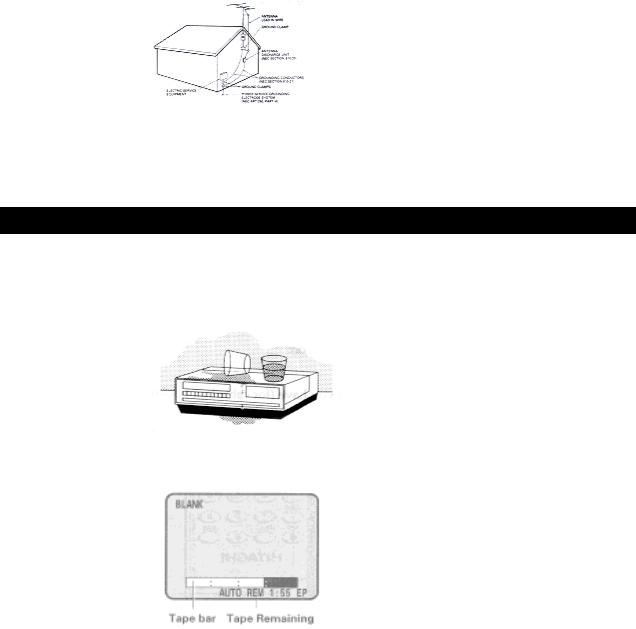
12 Outdoor Antenna Grounding -- If an outside antenna or cable system is connected to the video product, be sure the antenna or cable system is grounded so as to provide some protection against voltage surges and builtup static charges. Section 810 of the National Electrical Code, ANSI/NFPA No. 70, provides information with respect to proper grounding of the mast and supporting structure, grounding of the lead-in wire to an antenna discharge unit, size of grounding conductors, location of antenna-discharge unit, connection to grounding electrodes, and requirements for the grounding electrode. See example below.
EXAMPLE OF ANTENNA GROUNDING
5
13 Power Lines -- An outside antenna system should not be located in the vicinity of overhead power lines or other electric light or power circuits, or where it can fall into such power lines or circuits. When installing an outside antenna system, extreme care should be taken to keep from touching or approaching such power lines or circuits as contact with them might be fatal. Installing an outdoor antenna can be hazardous and should be left to a professional antenna installer.
USE
14Cleaning -- Unplug this video product from the wall outlet before cleaning. Do not use liquid cleaners or aerosol cleaners. Use a damp cloth for cleaning.
15Object and Liquid Entry -- Never push objects of any kind into this video product through openings as they may touch dangerous voltage points or short-out parts that could result in a fire or electric shock. Never spill liquid of any kind on the video product.
16Lightning -- For added protection for this video product during a lightning storm, or when it is left unattended and unused for long periods of time, unplug it from the wall outlet and disconnect the antenna or cable-system. This will prevent damage to the video product due to lightning and power-line surges.
SERVICE
17Servicing -- Do not attempt to service this video product yourself as opening or removing covers may expose you to dangerous voltage or other hazards. Refer all servicing to qualified service personnel.
18Conditions Requiring Service -- Unplug this video product from the wall outlet and refer servicing to
qualified service personnel under the following conditions.
a.When the power-supply cord or plug is damaged.
b.If liquid has been spilled, or objects have fallen into the video product.
c.If the video product has been exposed to rain or water.
d.If the video product does not operate normally by following the operating instructions. Adjust only those controls that are covered by the operating instructions. Improper adjustment of other controls may result in damage and will often require extensive work by a qualified technician to restore the video product to its normal operation.
e.If the video product has been dropped or the cabinet has been damaged.
f.When the video product exhibits a distinct change in performance - this indicates a need for service.
19Replacement Parts -- When replacement parts are required, have the service technician verify that the replacements he uses have the same safety characteristics as the original parts. Use of replacements specified by the video product manufacturer can prevent fire, electric shock or other hazards.
20Safety Check -- Upon completion of any service or repairs to this video product, ask the service technician to
6
perform safety checks recommended by the manufacturer to determine that the video product is in safe operating condition.
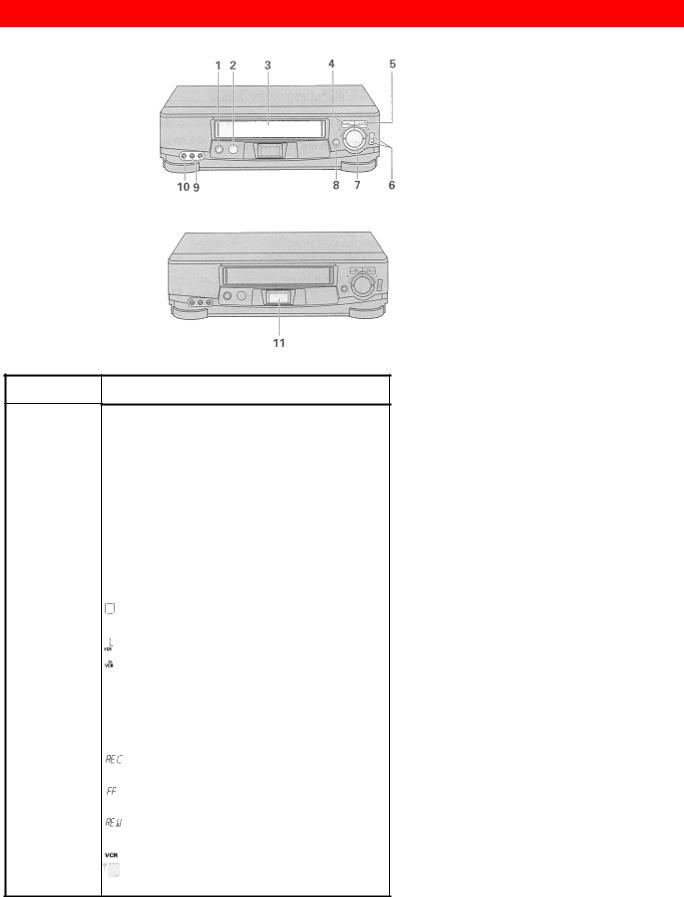
CUSTOMER CONTROLS
VCR Customer Controls
Item No. |
Function |
|
|
1POWER button
2Infrared receiver
3Cassette compartment
4STOP/EJECT button
5PLAY/STILL button
6CHANNEL (channel up/down)/ TRACKING buttons
7Shuttle ring
8REC button
9AUDIO IN L (mono), R jacks
10VIDEO IN JACK
11VCR LCD Window Display
power on in stop mode (flashes during auto install)
RF03H (RF Channel 3)
RF04CH (RF Channel 4)
 playback (flashes during double speed play, visual search, reverse search, slow play, play pause and skip playback)
recording and timer recording (flashes during record pause)
fast forward (flashes during high speed fast forward)
rewind flashes during high speed rewind)
operate MODE
delay recording indicator (flashes if a cassette has not
7
been inserted or a cassette without a safety tab has been inserted)
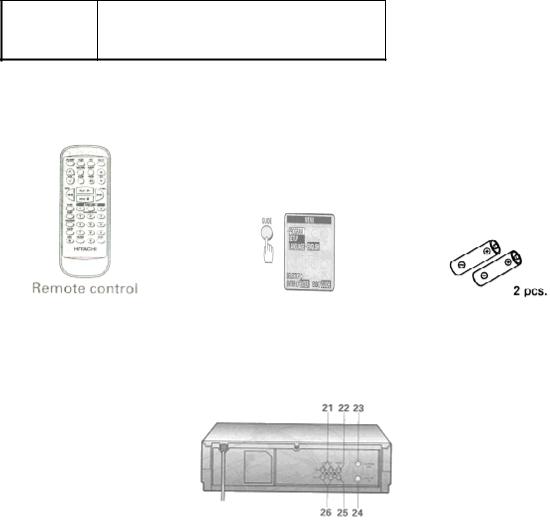
Accessories supplied |
Check and identify the accessories supplied. |
|
|
If any are missing or appear damaged, consult your dealer. |
|
|
|
|
|
Cable for connecting |
Batteries for remote |
|
this VCR to a TV |
control handset (R6) |
|
|
|
VCR Customer Controls
Item No. |
Function |
|
|
12 |
AUDIO IN L, R jacks |
13 |
VIDEO IN jack |
14 |
IN FROM ANT. - signal input |
15 |
OUT TO TV - signal out to TV |
16 |
VIDEO OUT jack |
17 |
AUDIO OUT L, R jacks |
|
|
Remote Control Customer Controls
8
|
Item No. |
Function |
|
|
|
1
2
3
4
5
6
7
8
9
10
11
12
13
14
15
16
17
18
19
20
21
22
23
Transmission window POWER button
TAPE SPEED button - select the recording speed SP or EP.
VOL button - increase or decrease the audio volume
SLOW button - for slow motion picture REW button - fast rewind or search STOP button - stops play/
record function GUIDE - to recall OSD menu
DISPto recall on-screen display PROGRAM (programming) button CLEAR - clears time counter REC - record button
100/ENT button VCR, TV - Device buttons let
you set the remote to control one of the two devices.
VCR/TV mode select button CH (channel up/down) button PAUSE/ENTER buttons Cursor buttons
F.FWD button - fast forward or search PLAY button - playback
SUPER INDEX buttons - to use the SUPER INDEX function
Number buttons AVX button - select LINE
REMOTE OPERATION
9
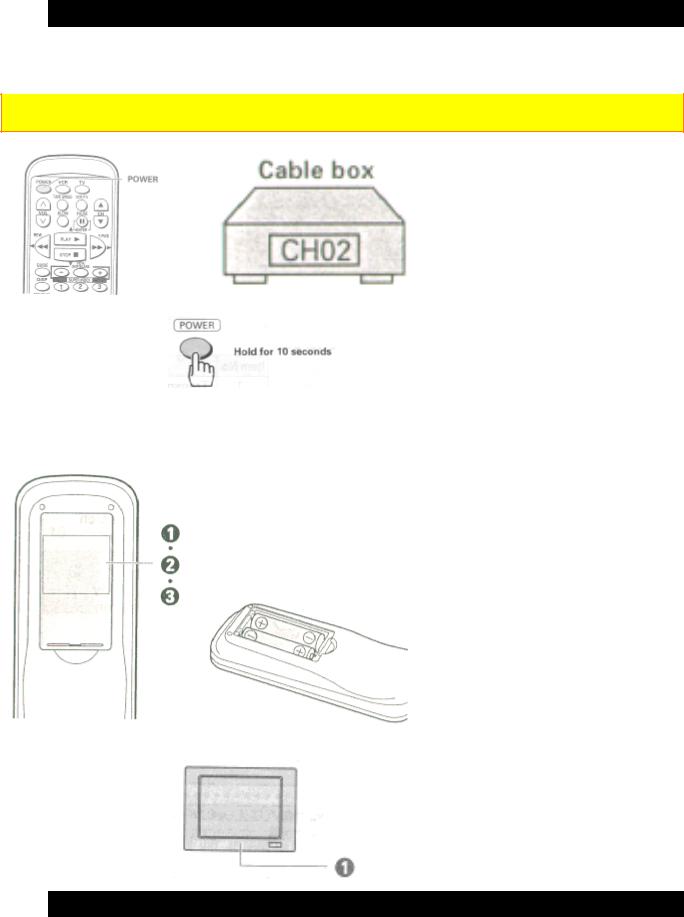
Install batteries in the remote control
The remote control requires two "AA" batteries.
1 Insert your fingertip into the notch and push the battery compartment lid to remove it.
Note: When replacing the batteries, remove the old batteries and keep the POWER button depressed for 10 seconds before inserting fresh batteries.
2Install batteries.
•Align the positive (+) and negative (-) polarity marks on the batteries with those indicated on the remote control.
3 Replace the lid.
Operating in the remote control
10
1 Make sure there is no obstacle between the remote control and VCR's infrared receiver.
Note: You cannot operate the VCR if there is an obstacle (for example, coffee table, sofa, etc) between the VCR and remote control.
2Point the remote control at the VCR's infrared receiver and press the required button on the remote control.
Note: If the remote does not work even at close range, try replacing the batteries with two fresh "AA" batteries.
CASSETTE TAPES
Types
Only use video cassettes with the  mark in this VCR.
The table shows the recording time of different cassettes.
•To get the best quality picture record at standard recording speed (SP)
•This VCR does not record at the LP speed, but it can play cassette that were recorded at the LP speed.
Safety tabs prevent erasure
11
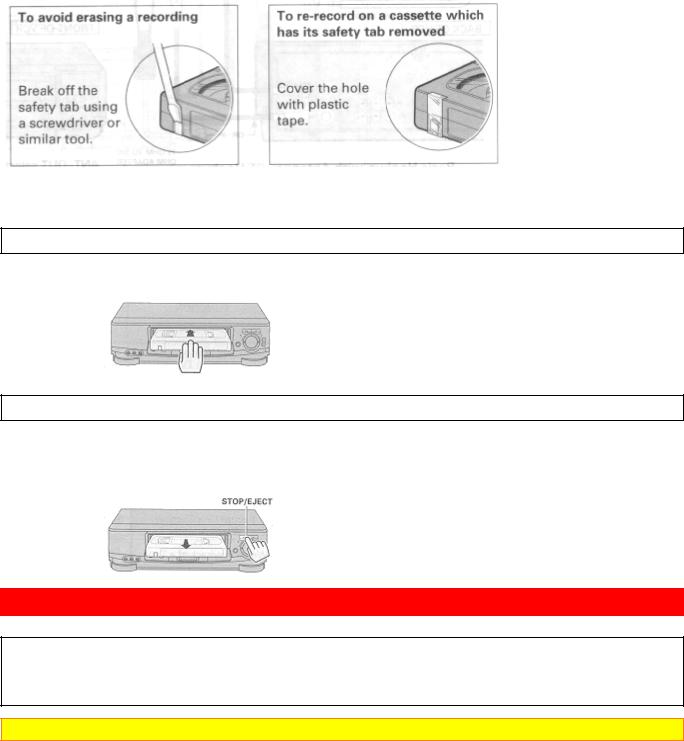
The VCR automatically enters the playback mode when a cassette without its safety tab is inserted. The VCR won't record on a tape without a safety tab and the cassette will be ejected if the REC or REC/IRT button is pressed. Be sure to check the safety tab before inserting a cassette.
Insertion
Push the video cassette gently into the slot on the front of the VCR.
• The VCR automatically turns on.
Removal
Press the STOP/EJECT button on the VCR.
The cassette will come partially out of the compartment so you can pull it out.
• The cassette can be ejected with the power on or off.
BASIC ANTENNA HOOKUP [A]
WITH THIS HOOKUP
YOU CAN...
•WATCH AVAILABLE TV CHANNELS
•RECORD AND WATCH THE SAME CHANNEL
•RECORD ONE CHANNEL AND WATCH ANOTHER
Caution: Do not connect to the mains supply socket before connecting all leads (ss page 17).
12
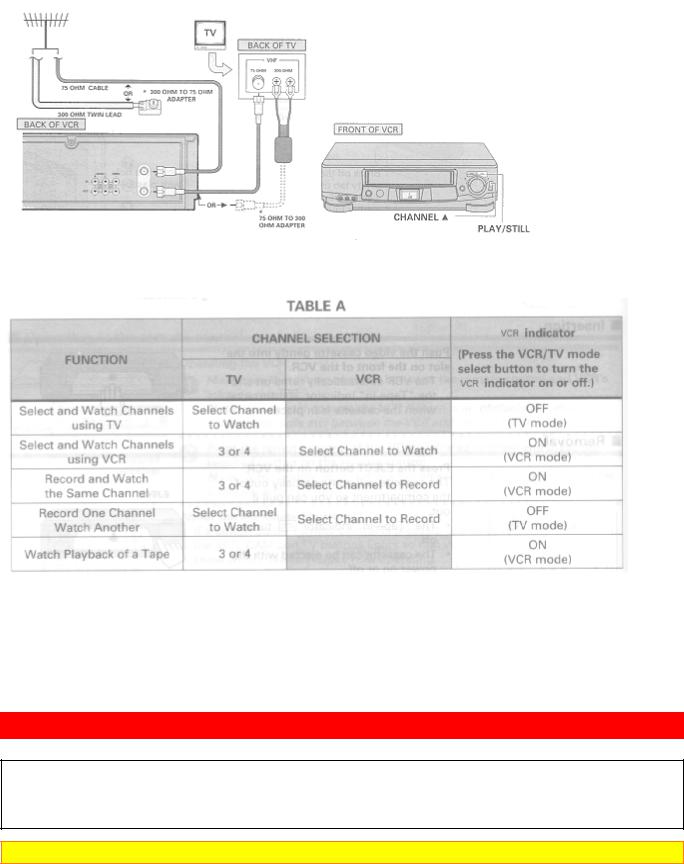
Basic Hookup with Antenna: RF Hookup
* PURCHASED SEPARATELY
Switch the RF Channel
When the VCR is on, its video signal can come into your TV on either channel 3 or channel 4. You need to select the appropriate channel.
• When the power is turned on, press the POWER button to turn it off. Press the PLAY button on front of the
VCR. Pressing the CHANNEL  button alternates between
  (channel 3) and
  (channel 4) in the VCR's display.
Display the channel which is not used by a commercial channel in your area.
ADVANCED ANTENNA HOOKUP -AV HOOKUP [B]
WITH THIS HOOKUP
YOU CAN...
•WATCH AVAILABLE TV CHANNELS
•RECORD AND WATCH THE SAME CHANNEL
•RECORD ONE CHANNEL AND WATCH ANOTHER
Caution: Do not connect to the mains supply socket before connecting all leads (ss page 17).
13
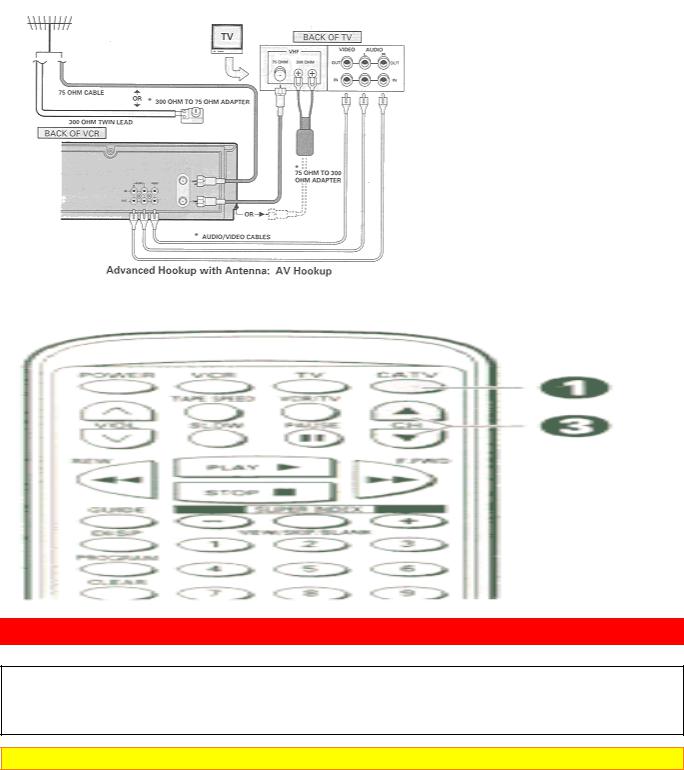
* PURCHASED SEPARATELY
BASIC CABLE HOOKUP [C]
WITH THIS HOOKUP
YOU CAN...
•WATCH AVAILABLE CABLE CHANNELS
•RECORD AND WATCH THE SAME CHANNEL
•RECORD ONE CHANNEL AND WATCH ANOTHER
Caution: Do not connect to the mains supply socket before connecting all leads (ss page 17).
14

Switch the RF Channel
When the VCR is on, its video signal can come into your TV on either channel 3 or channel 4. You need to select the appropriate channel.
• When the power is turned on, press the POWER button to turn it off. Press the PLAY button on front of the
VCR. Pressing the CHANNEL  button alternates between
  (channel 3) and
  (channel 4) in the VCR's display.
Display the channel which is not used by a commercial channel in your area.
ADVANCED CABLE HOOKUP -AV HOOKUP [D]
WITH THIS HOOKUP
YOU CAN...
•WATCH AVAILABLE CABLE CHANNELS
•RECORD AND WATCH THE SAME CHANNEL
•RECORD ONE CHANNEL AND WATCH ANOTHER
Caution: Do not connect to the mains supply socket before connecting all leads (ss page 17).
15
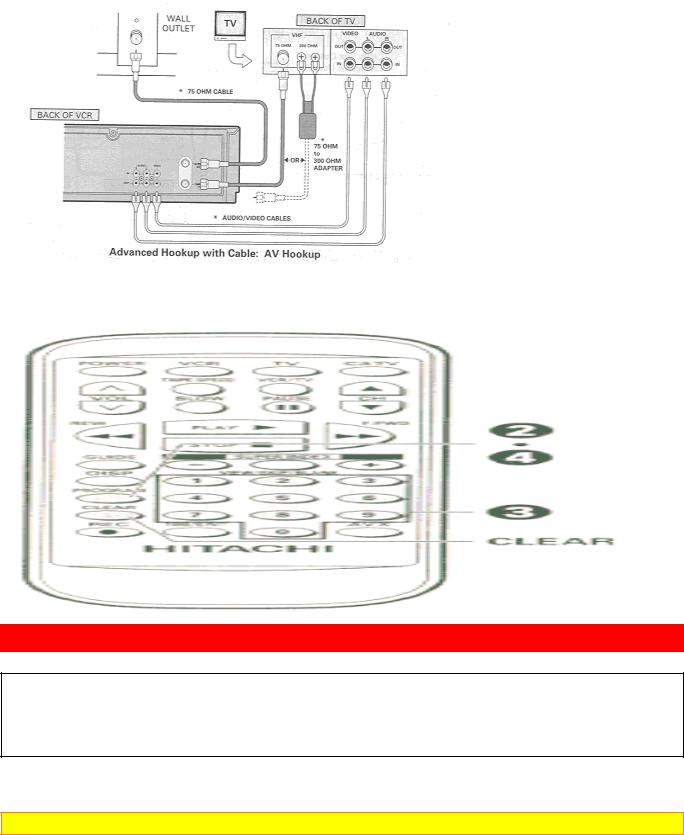
* PURCHASED SEPARATELY
BASIC CABLE HOOKUP -WITH CABLE BOX [E]
WITH THIS HOOKUP
YOU CAN...
•WATCH AVAILABLE CABLE CHANNELS
•RECORD AND WATCH THE SAME CHANNEL
YOU CAN'T...
•RECORD ONE CHANNEL AND WATCH ANOTHER
ALL CHANNEL SELECTIONS MUST BE MADE AT THE CABLE BOX.
BE SURE TO CONSULT YOUR CABLE BOX MANUAL FOR THE CABLE BOX OUTPUT CHANNEL.
Caution: Do not connect to the mains supply socket before connecting all leads (ss page 17).
16
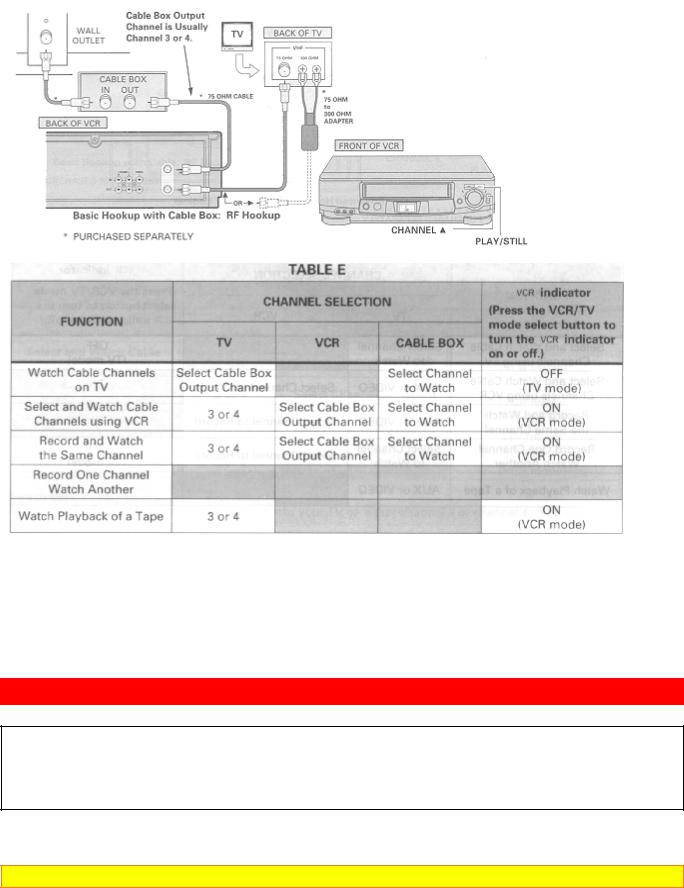
Switch the RF Channel
When the VCR is on, its video signal can come into your TV on either channel 3 or channel 4. You need to select the appropriate channel.
• When the power is turned on, press the POWER button to turn it off. Press the PLAY button on front of the
VCR. Pressing the CHANNEL  button alternates between
  (channel 3) and
  (channel 4) in the VCR's display.
Display the channel which is not used by a commercial channel in your area.
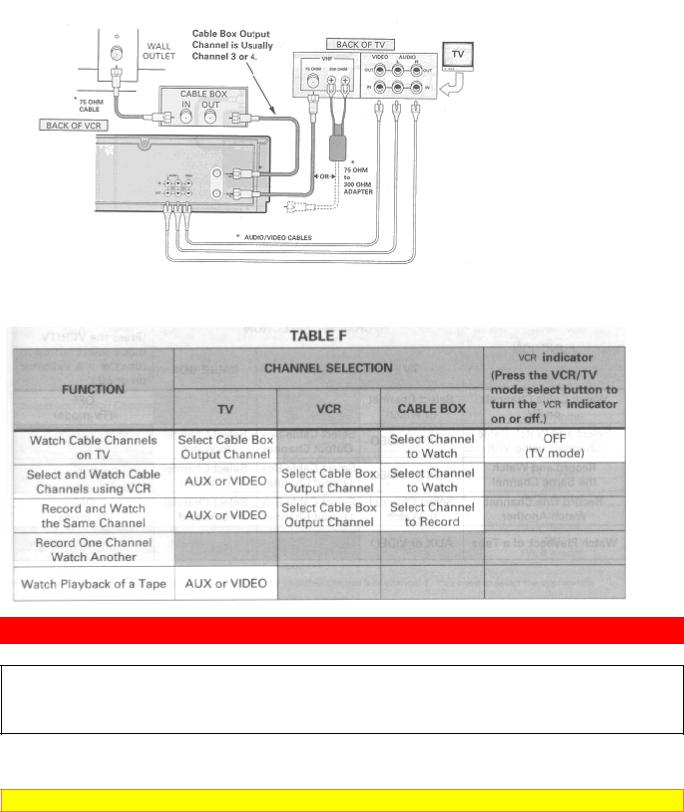
ADVANCED CABLE HOOKUP -WITH CABLE BOX [F]
WITH THIS HOOKUP
YOU CAN...
•WATCH AVAILABLE CABLE CHANNELS
•RECORD AND WATCH THE SAME CHANNEL
YOU CAN'T...
• RECORD ONE CHANNEL AND WATCH ANOTHER
ALL CHANNEL SELECTIONS MUST BE MADE AT THE CABLE BOX.
BE SURE TO CONSULT YOUR CABLE BOX MANUAL FOR THE CABLE BOX OUTPUT CHANNEL.
Caution: Do not connect to the mains supply socket before connecting all leads (ss page 17).
17
Advanced Hookup with Cable Box: AV Hookup
* PURCHASED SEPARATELY
ADVANCED CABLE HOOKUP -WITH CABLE BOX AND SPLITTER [G]
WITH THIS HOOKUP
YOU CAN...
•WATCH AVAILABLE CABLE CHANNELS
•RECORD AND WATCH THE SAME CHANNEL
•RECORD ONE CHANNEL AND WATCH ANOTHER
TO RECORD, ALL CHANNEL SELECTIONS MUST BE MADE AT THE CABLE BOX.
BE SURE TO CONSULT YOUR CABLE BOX MANUAL FOR THE CABLE BOX OUTPUT CHANNEL.
Caution: Do not connect to the mains supply socket before connecting all leads (ss page 17).
18
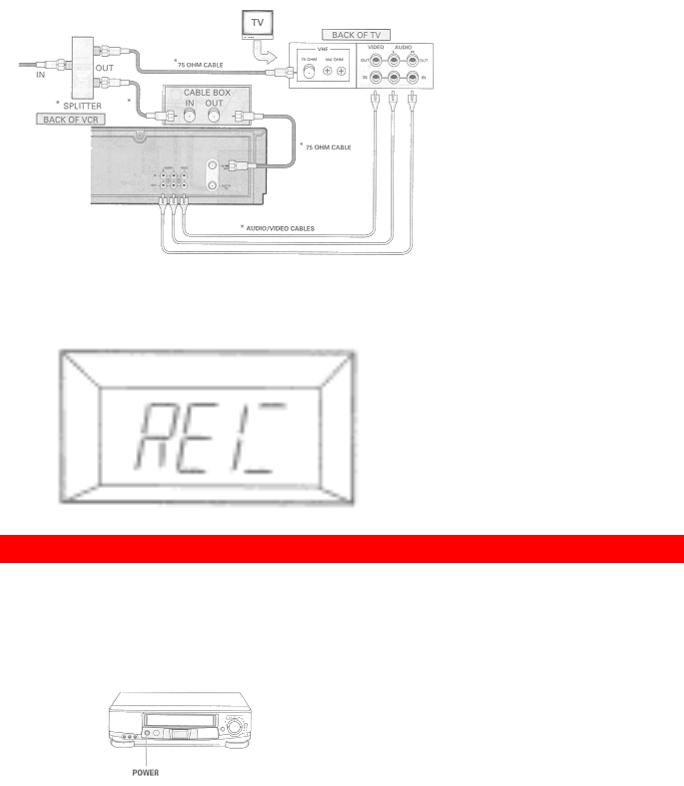
Advanced Hookup with Cable Box and Splitter: AV and RF Hookup
* PURCHASED SEPARATELY
AUTO INSTALL
Setting the channel automatically
1Switch on at the mains supply socket after completely connecting all leads. Please refer to page 10 to
16on "HOOKUP" sections.
The VCR will be in the standby mode at this stage.
2Press the POWER button on the VCR to start the auto install.
This screen appears to show that the channel is being set. The " " will flash in the VCR's display.
•The VCR will automatically store channels received in your area.
•It takes about 2 - 3 minutes.
19
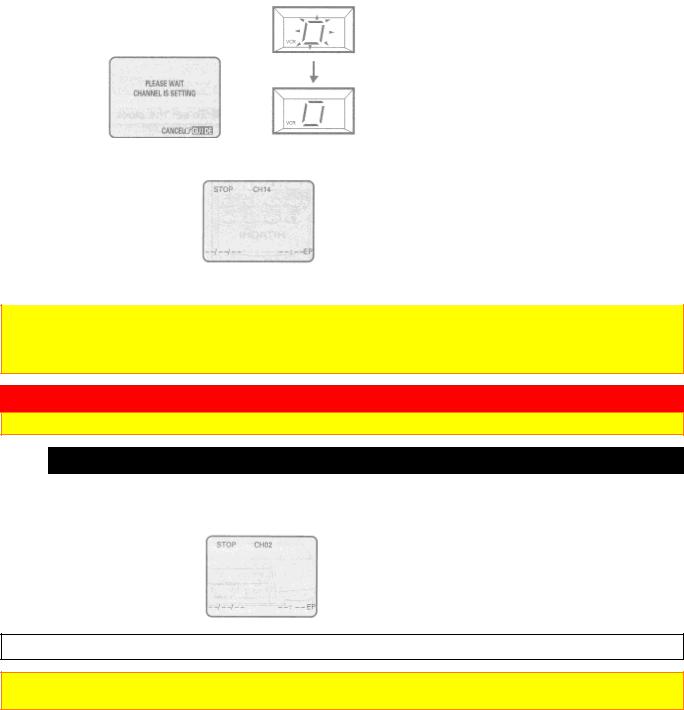
When the auto install is complete, the channel with the lowest number appears in the TV display.
Notes
•If you press the POWER button inadvertently before connecting all leads, follow the steps on page 20 for further tuning function.
•If you press the POWER button during auto install mode, the VCR automatically switches to the STOP mode.
SETTING THE CLOCK
Note: An antenna or cable must be connected to the VCR before you begin this operation.
Tips
1 You'll need to set the clock when first hooking up your VCR, and any time the power goes out for more than 1 hour. When you first plug in the VCR or after a power outage, the clock display will read "--:--" on the TV display.
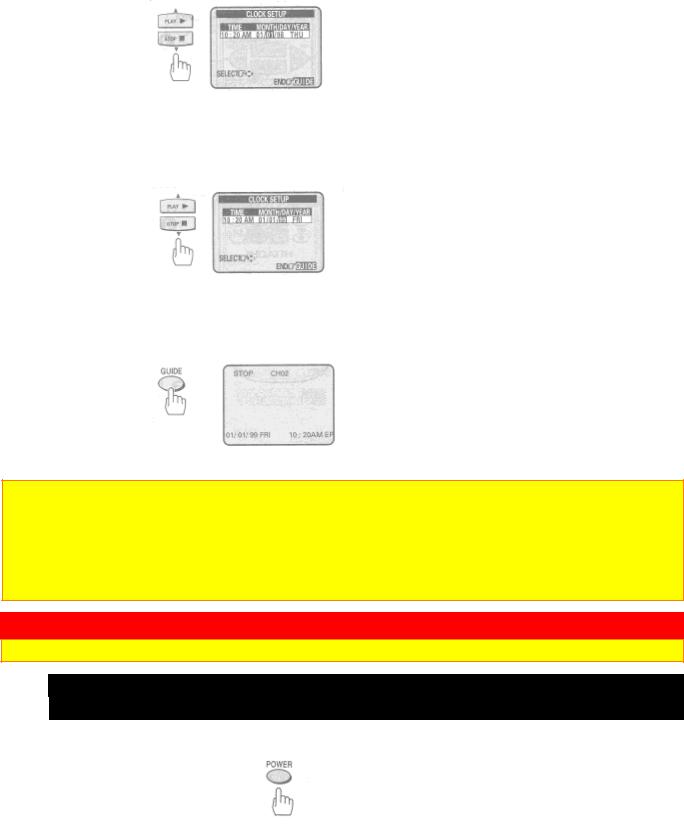
To set the clock
Note: Turn on the TV and select the video channel (3 or 4). Or, if you are hooked up with an audio/video cable, set the TV to AUX or VIDEO.
20
1 Press the GUIDE button.
The main on-screen menu will appear on the TV screen.
You may view all the on-screen instructions in English, French, or Spanish. When you first set up your VCR, it will be set to English. Press the  cursor button to select
LANGUAGE option, and then press the  cursor button for French or for Spanish.
2 Press the  cursor button to select the SETUP option, and then press the ENTER button.
3 Press the  cursor button to select the CLOCK, and then press the ENTER button.
4 Press the  or
or  cursor button to change the hour.
• The "AM" or "PM" can be select when you change the hour.
21

5 Press the  cursor button to select the minutes, and then press
  or
or  cursor button to change the minutes.
6 Press the  cursor button to select MONTH, and then press the
  or
or  cursor button to change the month.
7 Press the  cursor button to select DAY, and then press the
  or
or  cursor button to change the day.
The correct day of the week will appear by itself.
22
8 Press the  cursor button to select YEAR, and then press the
  or
or  cursor button to change the year.
9 Press the GUIDE button.
The VCR clock is now set, and should show the correct time of day on the TV screen.
Notes:
•The clock uses the 12-hour system. You set it for AM or PM.
•You can correct any item entered as you go by pressing  cursor button to select and press
  or
or  cursor to change.
•If you press  or
or  cursor button continuously, the time or date is kept changing.
PRE-TUNING THE VCR TUNER
Note: An antenna or cable must be connected to the VCR before you begin this operation.
Presetting the received channels without using a cable box (Hookups [A], [B], [C], or [D])
Press the POWER button to turn on the VCR.
1 Turn on the TV and select the video channel (3 or 4).
Or, if you are hooked up with an audio/video cable, set the TV to AUX or VIDEO.
23
 Loading...