


USERS GUIDE
C2142N/S
CL2142AN/S
CP2142AN/S
C2842N/S
CL2842AN/S
CP2842AN/S

Contents |
|
Remote Control Buttons ................................. |
2 |
Control Panel Buttons..................................... |
3 |
Connect Peripheral Equipment...................... |
4 |
Via the SCART connector .............................. |
5 |
Via Ant Input .................................................... |
5 |
Decoder .......................................................... |
5 |
Connecting a decoder with an aerial socket |
|
to the TV .................................................... |
5 |
Connecting a decoder without an aerial |
|
socket to the TV ........................................ |
5 |
TV and Video Recorder .................................. |
5 |
Playback NTSC .............................................. |
5 |
Copy Facility ................................................... |
5 |
Camera and Camcorder ................................ |
5 |
Connect the decoder to the video recorder .... |
5 |
Connecting Headphones ................................ |
5 |
Preparation ....................................................... |
6 |
Features ......................................................... |
6 |
Safety Precautions .......................................... |
6 |
Before Switching on your TV ......................... |
9 |
Power connection ........................................... |
9 |
Aerial Connections ......................................... |
9 |
How to connect other devices ........................ |
9 |
Inserting batteries in the remote control |
|
handset ........................................................... |
9 |
Switching the TV ON/OFF ............................... |
9 |
To switch the TV on ........................................ |
9 |
To switch the TV off ........................................ |
9 |
Operating the TV ............................................. |
9 |
APS (Automatic Programming System) ......... |
9 |
Operating with the onset buttons .................. |
10 |
Operating with Remote Control .................... |
10 |
Menu System .................................................. |
11 |
Information Menu .......................................... |
11 |
Sound Menu.................................................. |
11 |
To change sound settings ....................... |
11 |
Setting Volume: ....................................... |
11 |
Setting Bass Level: ................................. |
11 |
Setting Treble Level: ................................ |
12 |
Setting Balance: ...................................... |
12 |
Setting Sound Effect: .............................. |
12 |
To Store the Settings: .............................. |
12 |
To Change Headphone Sound Settings: . 12 |
|
Setting Headphone Volume:................. |
12 |
Setting Headphone Sound Mode: ........ |
12 |
To Store the Settings: ........................... |
12 |
Picture Menu................................................. |
13 |
To change picture settings: ..................... |
13 |
Setting Brightness: .................................. |
13 |
Setting Colour: ........................................ |
13 |
Setting Contrast: .................................... |
13 |
Setting Sharpness: ................................. |
13 |
Setting Hue: ............................................ |
13 |
Picture Mode Menu: ................................ |
14 |
To Store the Settings: .............................. |
14 |
Feature Menu................................................ |
14 |
Sleep Timer: ............................................ |
14 |
Child Lock: .............................................. |
14 |
Installation Menu ........................................... |
14 |
Tuning Menu ............................................ |
14 |
Automatic Search ................................ |
15 |
To name a Programme ........................ |
15 |
To change Standard ............................. |
15 |
Direct Channel Access ........................... |
15 |
Fine Tuning ........................................... |
15 |
Program (Programming) Menu ............... |
15 |
To delete a channel from a programme |
|
number: ................................................ |
16 |
To insert a channel into a programme |
|
number: ................................................ |
16 |
APS (Automatic Programming System):16 |
|
TV Setup Menu........................................ |
16 |
Selecting Menu Language.................... |
16 |
Selecting Country................................. |
17 |
Setting External Source Output ........... |
17 |
Other Features ............................................... |
17 |
Sound Mute................................................... |
17 |
Bilingual Broadcast ....................................... |
17 |
Information on Screen .................................. |
17 |
Teletext ........................................................... |
18 |
To operate Teletext ........................................ |
18 |
To select a page of Teletext .......................... |
18 |
To Select Index Page .................................... |
18 |
To Reveal “concealed” Information ............... |
18 |
To Stop Automatic Page Change .................. |
18 |
To Select a Subpage Page ........................... |
18 |
8 Page Fastext and Toptext .......................... |
18 |
For Fastext and Toptext .......................... |
18 |
For TOPTEXT ......................................... |
18 |
To exit Teletext .............................................. |
19 |
To Display the Time ...................................... |
19 |
Tips.................................................................. |
19 |
Specifications................................................. |
20 |
GB - 1 -
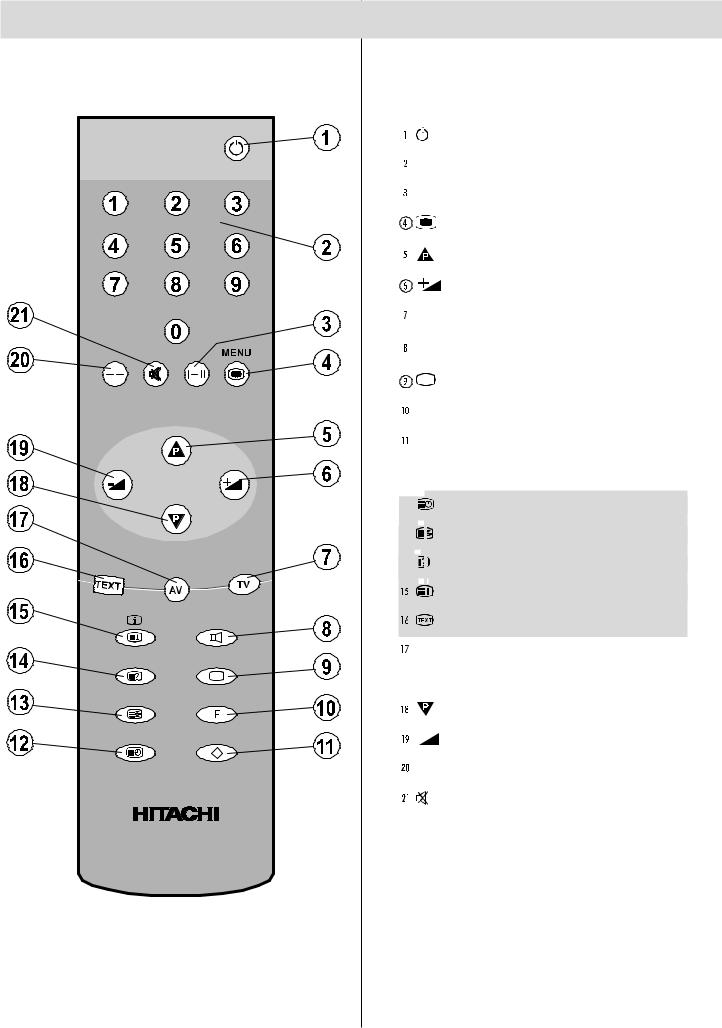
Remote Control Buttons

 = Stand By
 0 - 9 = Direct Program
 I-II = Mono/Stereo - Dual I-II
MENU = MENU

 = Programme Up (Cursor Up)
 = Cursor Right / Volume +
 TV = TV / Quit Menu

 (Red) = Sound Menu
(Green) = Picture Menu
 F (Yellow)= Feature Menu

 (Blue)= Installation Menu
Teletext Buttons

 = Time

 = Hold

 = Reveal

 = Index Page

 = Teletext
 AV = External Source
(AV1, AV2, AV3)

 = Programme Down (Cursor Down)

 = Cursor Left / Volume -
 - - = Two Digit Program Number Entry

 = Mute
GB - 2 -
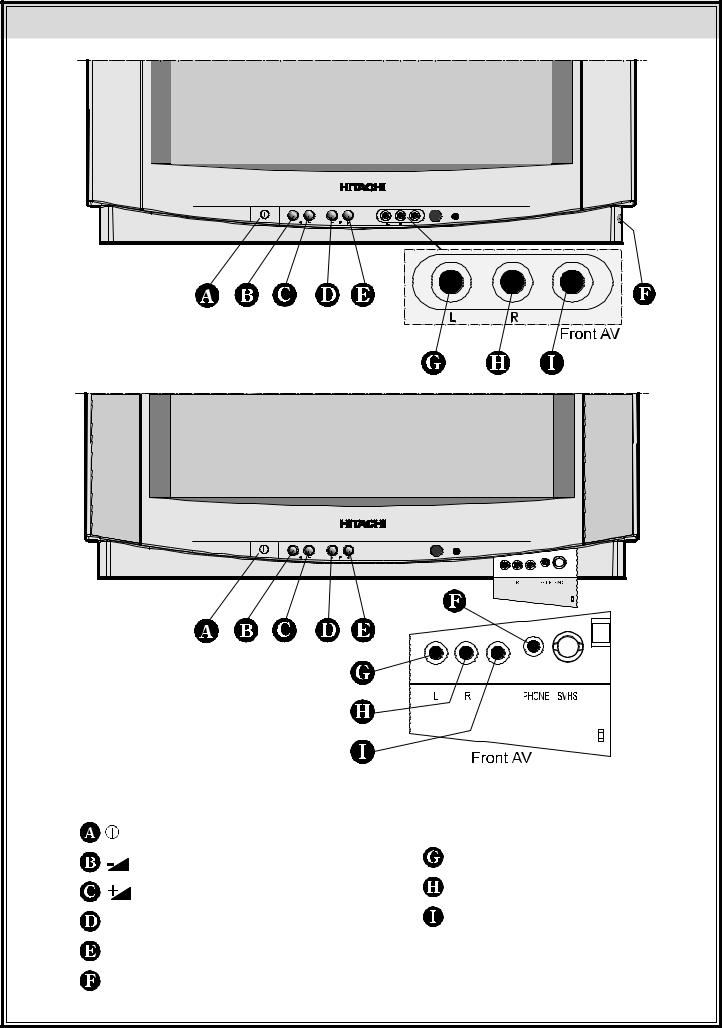
Control Panel Buttons |
|
= Power On / Off |
Front AV input |
= Volume - |
AUDIO L = Audio left (white) |
|
|
= Volume + |
AUDIO R = Audio right (red) |
|
|
- P = Program - |
VIDEO = VCR (yellow) |
|
|
P + = Program + |
|
H-PHONE = Headphone 3,6 mm Ø |
|
GB |
- 3 - |

Connect Peripheral Equipment
There is a wide range of audio and video equipment that can be connected to your TV.
The following connection diagrams show you where the different equipment should be connected at the back or the front side of the TV.
21” REAR PANEL |
|
28” REAR PANEL |
|
|
|
|
|
|
|
|
|
|
|
|
|
|
|
|
|
CAMERA
AUDIO
HEADPHONE
VIDEO
DECODER
FOR SATELLITE RECEIVER
GB - 4 -

ViatheSCARTconnector
Your TV set has two SCART connector sockets. If you want to connect peripherals (e.g. video, decoder, etc.) which have SCART connectors, to your TV, use EXT1 and EXT2 inputs.
ViaAntInput
If you want to connect to your TV, peripherals like videorecorders or decoders, but the device you want to connect does not have SCART connector you should connect it to the ANT input of your TV set.
Decoder
Cable TV offers you a wide choice of programs. Most of them are free, others are to be paid for by the viewer. This means that you will need to subscribe to the broadcasting organisation whose programmes you wish to receive. This organisation will supply you with a corresponding decoder unit to allow the programmes to be unscrambled.
For further information ask your dealer. See also the booklet supplied with your decoder.
Connecting a decoder with an aerial socket to the TV
• Connect the aerial cable.
Connecting a decoder without an aerial socket to the TV
• Connect the decoder to your TV with a SCART lead to EXTERNAL1 or EXTERNAL 2. When your decoder has a SCART connector you can obtain better picture quality if you connect a SCART lead to EXTERNAL.
•Then select the appropriate AV mode by pressing the “AV” button.
TVandVideoRecorder
• Connect the aerial cables.
Better picture quality can be obtained if you also connect a SCART lead to EXTERNAL 2.
PlaybackNTSC
Connect NTSC VCR player to Euroconnector at the back of the TV or RCA JACK at the front of the TV.
Then, press “AV“ button to select AV-1, AV-2 or AV3.
NTSC 4.43 system can be watched at this mode automatically.
CopyFacility
Source selection for VCR recording.
Select TV Setup Menu in the Installation Menu.
• Select AV-2 OUTPUT source pressing “  ” or “
  ” button.
Search for and store the test signal of the videorecorder
•Unplug the aerial cable from the aerial socket “ANT” of your video recorder.
•Switch on your TV and put the video recorder on the test signal. (See the handbook for your video recorder.)
•Enter the Tuning menu via the Installation menu.
•Search for the test signal of your video recorder in the same way as you searched for and stored the TV signals. See Tuning, Search and Store TV channels. Store the test signal either under programme number 0 or between 55 and 99.
•Replace the aerial cable in the aerial socket “ANT” of your video recorder once you have stored the test signal.
CameraandCamcorder
To connect to Front-AV input
Connect your camcorder to the front of your TV.
• Connect your equipment to the TV via VIDEO (yellow), AUDIO R (red) and AUDIO L (white) inputs . You should connect the jacks to the input of the same colour.
Connect the decoder to the video recorder
Some video recorders have a special SCART connector for decoder.
•Connect a SCART lead to the SCART connector of your decoder and to the special SCART connector of your video recorder. See also the handbook of your video recorder.
•To connect your video recorder to the TV, see TV and Video Recorder section.
If you want to connect more equipment to your TV, consult your dealer.
ConnectingHeadphones
Use the stereo headphone socket (HP) to connect headphones. This socket is located on the front / right hand side of the television.
GB - 5 -

Preparation
Place TV on a solid surface.
For ventilation, leave a space of at least 10 cm free all around the set. To prevent any fault and unsafe situations, please do not place any objects on top of the set.
Features
•It is a remote controlled colour television.
•100 programmes from VHF, UHF bands or cable channels can be preset.
•It can tune cable channels.
•Controlling the TV is very easy by its menu driven system.
•It has SCART connector socket for external devices (video, video games, audio set, etc.)
•Second SCART connector socket is available.
•Stereo sound system (Nicam Stereo).
•Full function Teletext.
•It is possible to connect headphone.
•Direct channel access.
•APS (Automatic Programming System).
•All programmes can be named.
•Forward or backward automatic tuning.
•Sleep timer.
•Automatic sound mute when no transmission.
•5 minutes after the broadcasting (closedown), the TV switches itself automatically to stand-by mode.
Safety Precautions
IMPORTANTSAFETYINFORMATIONONOPERATINGYOURTV
Do’s and Don’ts
DO’s
This Television has been designed and manufactured to meet international safety standards, but like any electrical equipment, care must be taken if you are to obtain the best results and safety is to be assured.
DO read the operating instructions before you attempt to use the equipment.
DO consult your dealer if you are in any doubt about installation, operation or safety of your equipment.
DO be careful with glass panels or doors on equipment.
This TV is supplied with a fitted mains plug. This plug must not be cut off as it may contain a special radio interference filter, the removal of which could lead to impaired performance. If you wish to extend the lead, obtain an appropriate safety approved extension lead or consult your dealer.
Observe the manufacturers instructions when connecting extension leads to the TV. Check the fuse rating on the new plug, this should be fitted with a 5 Amp fuse which conforms to either ASTA or BSI (BS1 362) approvals, these
are easily identifiable by either the or
or

 symbols. If you are in any doubt about the installation of an extension lead, please consult a competent electrician.
• • • • • • • • • • • • • • • • • • • • • • • • • • • • • • • • • • • • • • • • • • • • • • • • • • • • • • • •
GB - 6 -
 Loading...