


Applications Manual
and Cooking Guide
Henny Penny Combis
All MCS, MCG
and BCS Models

This manual should be retained in a convenient location for future reference.
Wiring diagram for this appliance is located inside the unit, behind the control panel.
WARNING: Improper installation, adjustment, alteration, service or maintenance can cause property damage, injury or death. Read the installation, operating and maintenance instructions thoroughly before installing or servicing this equipment.
LIMITED WARRANTY FOR HENNY PENNY APPLIANCES
Subject to the following conditions, Henny Penny Corporation makes the following limited warranties to the original purchaser only for Henny Penny appliances and replacement parts:
New Equipment Any part of a new appliance, except lamps and fuses, which proves to be defective in material or workmanship within two (2) years from date of original installation, will be repaired or replaced without charge F.O.B. factory, Eaton, Ohio, or F.O.B. authorized distributor. To validate this warranty, the registration card for the appliance must be mailed to Henny Penny within ten (10) days after installation.
Replacement Parts Any appliance replacement part, except lamps and fuses, which proves to be defective in material or workmanship within ninety (90) days from date of original installation will be repaired or replaced without charge F.O.B. factory, Eaton, Ohio, or F.O.B. authorized distributor.
The warranty for new equipment and replacement parts covers only the repair or replacement of the defective part and does not include any labor charges for the removal and installation of any parts, travel or other expenses incidental to the repair or replacement of a part.
Extended Frypot Warranty Henny Penny will replace any frypot that fails due to manufacturing or workmanship issues for a period of up to seven (7) years from date of manufacture. This warranty shall not cover any frypot that fails due to any misuse or abuse, such as heating of the frypot without shortening.
0 to 3 Years During this time, any frypot that fails due to manufacturing or workmanship issues will be replaced at no charge for parts, labor, or freight. Henny Penny will either install a new frypot at no cost or provide a new or reconditioned replacement fryer at no cost.
4 to 7 Years During this time, any frypot that fails due to manufacturing or workmanship issues will be replaced at no charge for the frypot only.
Any freight charges and labor costs to install a new frypot as well as the cost of any other parts replaced, such as insulation, thermal sensors, high limits, fittings, and hardware, will be the responsibility of the owner.
Any claim must be presented to either Henny Penny or the distributor from whom the appliance was purchased. No allowance will be granted for repairs made by anyone else without Henny Penny’s written consent. If damage occurs during shipping, notify the carrier at once so that a claim may be filed.
THE ABOVE LIMITED WARRANTY SETS FORTH THE SOLE REMEDY AGAINST HENNY PENNY FOR ANY BREACH OF WARRANTY OR OTHER TERM. BUYER AGREES THAT NO OTHER REMEDY (INCLUDING CLAIMS FOR ANY INCIDENTAL OR CONSEQUENTIAL DAMAGES) SHALL BE AVAILABLE.
The above limited warranty does not apply (a) to damage resulting from accident, alteration, misuse, or abuse; (b) if the equipment’s serial number is removed or defaced; or (c) to lamps and fuses. THE ABOVE LIMITED WARRANTY IS EXPRESSLY IN LIEU OF ALL OTHER WARRANTIES, EXPRESS OR IMPLIED, INCLUDING MERCHANT ABILITY AND FITNESS, AND ALL OTHER WARRANTIES ARE EXCLUDED. HENNY PENNY NEITHER ASSUMES NOR AUTHORIZES ANY PERSON TO ASSUME FOR IT ANY OTHER OBLIGATION OR LIABILITY.
Indication of Safety Warnings
Throughout this manual you will see the following words and symbols relating to important issues of personal safety and proper operation. Their usage is described here:
The word DANGER indicates an imminent hazard
which will result in highly serious injury, such as severe burns.
The word WARNING is used to alert you to a procedure, that if not performed properly, may cause personal injury.
The word CAUTION is used to alert you to a procedure, that if not performed properly, may damage the equipment.
The word IMPORTANT is used to highlight especially important information.
The word NOTE is used to separate additional useful subject matter for the sake of clarity.
1

Dear Customer:
Congratulations on your decision to purchase a new Henny Penny MCS, MCG, or BCS Combi. In our opinion, you now possess one in the family of the most advanced combis in the industry. As you become familiar with its operation and more confident in the results, you will see the outstanding potential for quality, variety and productivity these units have to offer.
The Henny Penny Combi is not difficult to operate, but it is a fairly sophisticated piece of equipment. We recommend a thorough study of this Applications Manual. It is filled with information, suggestions, and explanations that will help you achieve the potential of the unit. Keep the manual in a safe place, but accessible for easy reference.
Henny Penny products are known for their outstanding craftsmanship, leading edge technology and user-friendly operation. As a company, we believe in establishing a partnership with our customers that leads both parties to long-term success. In that spirit, we remain interested in any questions, comments, suggestions or ideas you may have concerning your new combi or this manual.
We hope you enjoy good food and good profits with your new Henny Penny Combi. Welcome to the world of imaginative cooking.
Henny Penny Corporation
+1 937 456.8400
Toll free in USA 800 417.8417
www.hennypenny.com
2

Table of Contents |
|
General Information |
|
Models and Features ................................................................................................ |
5 |
Control Panel Functions .......................................................................................... |
8 |
Loading and Unloading.......................................................................................... |
10 |
Cooking Modes .............................................................................................................. |
13 |
Moist Heat Mode .................................................................................................. |
14 |
Dry Heat Mode .................................................................................................... |
16 |
Combination Mode .............................................................................................. |
18 |
Forced Steaming .................................................................................................... |
20 |
Tender Steaming .................................................................................................... |
22 |
Rethermalizing ...................................................................................................... |
24 |
Probe Cooking ................................................................................................................ |
26 |
Additional Functions |
|
Cool Down ............................................................................................................ |
28 |
Steam Injection ...................................................................................................... |
29 |
HACCP Interface .................................................................................................. |
30 |
Programming .................................................................................................................. |
32 |
Cleaning.......................................................................................................................... |
35 |
Installation – Electric and Gas Units .............................................................................. |
37 |
Cooking Guides .............................................................................................................. |
45 |
Distributors .................................................................................................................... |
59 |
3

 General Information
The Combi Advantage
The Henny Penny MCS, MCG and BCS Combis have the potential to make your entire approach to foodservice production simpler, more consistent and more productive.
Simpler because, ultimately, you will use fewer appliances as you become more adept at utilizing the Combi for different applications.
More consistent because the Henny Penny Combi precisely generates specific cooking climates for up to five different modes over a wide range of temperatures to handle just about any type of food.
More productive because it is versatile, easy to use, cooks faster with less food shrinkage then conventional appliances, and practically cleans itself.
The Combi Concept
The Henny Penny Combi uses pressure-less steam and hot-air convection, individually, in sequence, or in combination regulated by the unit’s control system, to help you create the right conditions for cooking perfect foods. There are plenty of other features and functions, all designed to make this effort easier and more precise.
As you become more familiar with the way the machine operates and the cooking concepts it employs, experiment! Try different settings. Change modes and settings at any time in the cooking cycle (you can.) Observe the results, adjust your approach. In short, learn and use the capabilities of the Combi to create the kind of food you want to create.
The Family
Henny Penny Combis are available in two versions, the MCS electric and MCG gas models, and the BCS electric model. All models accept mobile oven racks (optional on some sizes) and feature rugged stainless steel construction and a host of high-performance features (see next page.) The BCS is considered the basic model. The MCS/G models offer additional cooking modes as well as touch pad controls, digital displays and programmable functions. As a result, certain sections, pages, or operating instructions in this manual may apply only to MCS/G units. This distinction is clearly noted in each case.
Please note that Henny Penny also offers the (LCS/LCG) Combi, a high-end unit that employs a completely different and technologically advanced control system. The ClimaPlus Combi allows precise control of a nearly infinite combination of moist and dry heat, offers up to 99 separate custom cooking programs, and features IQT Intelligent Cooking Technology. If you would like to learn more about the ClimaPlus Combis, please contact your Henny Penny distributor.
4

GENERAL
INFORMATION
Models and Features at a glance
Models and sizes available
Model numbers are designated according to pan capacity. Units are available in either electric (MCS, BCS) or gas (MCG, only.)
Model |
|
|
|
|
|
Designation |
Pan Capacity |
Pan size inches (mm) |
|||||
|
|
|
|
|
|
|
|
|
|
|
|
|
|
|
|
|
|
|
|
|
|
|
|
|
MCS-6 |
6 steam table pans (1/1 GN) or |
12 x 20 x 21⁄2 (325 x 530 x 65) |
|
|
|
|
|
|
|
|||||||
|
|
|
|
|
|
|
|
|
|
|
MCG-6 |
6 half sheet pans |
13 x 18 (330 x 457) |
|
|
|
|
|
|
|
|
|
|
|
BCS-6 |
||
|
|
|
|
|
|
|
|
|
|
|
|
|
|
|
|
|
|
|
|
|
|
|
|
|
|
|
|
|
|
|
|
|
|
|
|
|
|
|
MCS-10 |
10 steam table pans (1/1 GN) |
12 x 20 x 21⁄2 (325 x 530 x 65) |
|
|
|
|
|
|
|
|
||||||
Base-top |
|
|
|
|
|
|
|
|
|
|
MCG-10 |
or 10 half sheet pans |
13 x 18 (330 x 457) |
|
|
|
|
|
|
|
|
BCS-10 |
|||||
models |
|
|
|
|
|
|
|
|
|
|
|
|
|
|
|
|
|
|
|
|
|
|
|||||
|
|
|
|
|
|
|
|
|
|||||
|
|
|
|
|
|
|
|
|
|
|
MCS-1020 |
10 full sheet pans with |
18 x 26 (457 x 660) |
|
|
|
|
|
|
|
|
|
|
|
rack adapter or |
|
|
|
|
|
|
|
|
|
|
|
|
||||
|
|
|
|
|
|
|
|
|
|
|
MCG-1020 |
20 steam table pans (1/1 GN) |
1 |
|
|
|
|
|
|
|
|
|
|
|
BCS-1020 |
12 x 20 x 2 ⁄2 (325 x 530 x 65) |
|
|
|
|
|
|
|
|
|
|
|
|
or 10 steam table pans (2/1 GN) |
20 x 24 x 21⁄2 (530 x 650 x 65) |
|
|
|
|
|
|
|
|
|
|
|||||
|
|
|
|
|
|
|
|
|
|
|
|
|
|
|
|
|
|
|
|
|
|
|
|
|
MCS-20 |
20 steam table pans (1/1 GN) |
12 x 20 x 21⁄2 (325 x 530 x 65) |
|
|
|
|
|
|
|
|
|
|
|
|||
|
|
|
|
|
|
|
|
|
|
|
MCG-20 |
||
|
|
|
|
|
|
|
|
|
|
|
or 20 half sheet pans |
13 x 18 (330 x 457) |
|
|
|
|
|
|
|
|
|
|
|
|
BCS-20 |
||
|
|
|
|
|
|
|
|
|
|
|
|
|
|
Floor |
|
|
|
|
|
|
|
|
|
||||
|
|
|
|
|
|
|
|
|
|
|
40 steam table pans (1/1 GN) |
|
|
models |
|
|
|
|
|
|
|
|
MCS-40 |
or 20 steam table pans (2/1 GN) |
12 x 20 x 21⁄2 (325 x 530 x 65) |
||
|
|
|
|
|
|
|
|
|
|||||
|
|
|
|
|
|
|
|
|
|
|
or |
20 x 24 x 21⁄2 (530 x 650 x 65) |
|
|
|
|
|
|
|
|
|
|
|
|
MCG-40 |
||
|
|
|
|
|
|
|
|
|
|
|
40 half sheet pans or |
13 x 18 (330 x 457) |
|
|
|
|
|
|
|
|
|
|
|
|
BCS-40 |
||
|
|
|
|
|
|
|
|
|
|
|
20 full sheet pans with |
18 x 26 (457 x 660) |
|
|
|
|
|
|
|
|
|
|
|
|
|
||
|
|
|
|
|
|
|
|
|
|
|
|
||
|
|
|
|
|
|
|
|
|
|
|
|
rack adapter |
|
|
|
|
|
|
|
|
|
|
|
|
|
|
|
NOTE: Features may vary between gas and electric models. Accessories may vary according to unit size.
A reference such as “MCS models” or “MCS-6/10/1020/20/40” designates the MCS electric model in all sizes. A reference such as “MCG base-top models” or “MCG-6/10/1020” designates only MCG gas models of those sizes.
5
GENERAL
INFORMATION
Models and |
Features |
Features |
|
continued
MCS/G
Cooking Modes
■Moist Heat
■Dry Heat
■Combination Moist and Dry
■Tender Steaming
■Rethermalizing
Control
■Touchpad and electromechanical controls for mode, time, temperature mode, time, temperature
■LED readouts
■Forced Steaming
■Steam Injection
■Cool Down
■Probe cooking
■Programmable operation with (9) three-step custom cooking program capacity
■Custom cleaning program
Design and operation
■Auto-reverse fan
■Filterless grease extraction
■Dual glass door
■Safety latch handle (Standard on all floor models, available as option on all base-top models)
■HACCP interface and serial port
■Auto flush
■Built-in retractable hand shower
BCS
Cooking Modes
■Moist Heat
■Dry Heat
■Combination Moist and Dry
Control
■Electromechanical controls for mode, time, temperature
■Lighted indicators
■Cool Down
■Forced Steaming
Design and operation
■Auto-reverse fan
■Filterless grease extraction
■Dual glass door
■Safety latch handle (Standard on all floor models, available as option on all base-top models)
■Auto flush
■Built-in retractable hand shower
6
GENERAL INFORMATION
Models and
Features
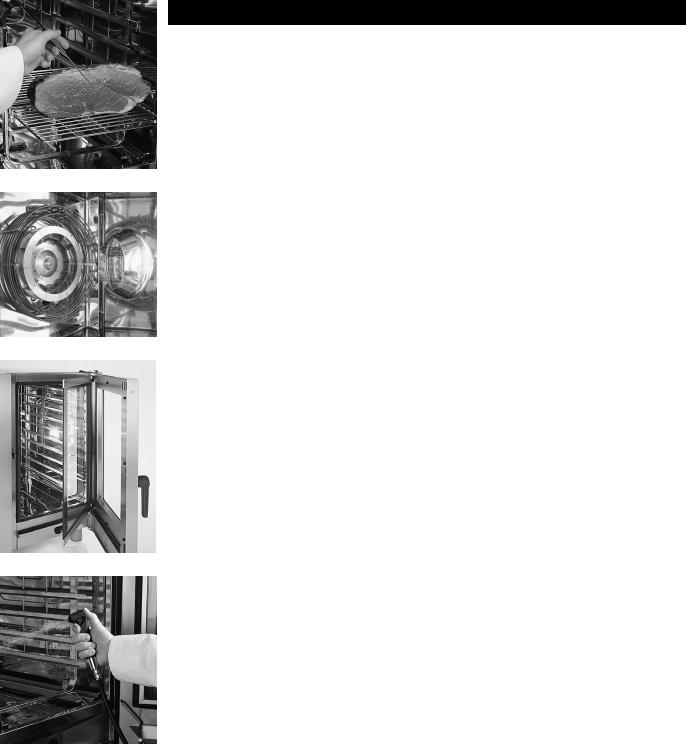
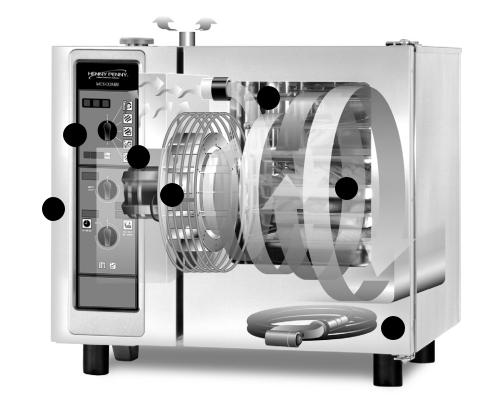
How it works
continued
6
3
1
2 |
5 |
4
7
1.Moist heat is created and dispersed rapidly from the self-cleaning steam generator.
2.Dry heat up to 575°F (300°C) is produced by tubular electrical elements or gas burners.
3.Select cooking mode: Moist Heat, Dry Heat, or Combination modes. With MCS/G models you have the additional selection of Tender
Steaming and Rethermalizing modes.
4.Set and select desired cabinet temperature and cooking time. With MCS/G models you may select probe cooking and set desired “done temperature.
5.Auto-reverse fan and air circulation system keep temperatures precise and heat distribution uniform throughout the cabinet, even when cooking full loads.
6.Hinged racking system or mobile oven rack accepts a wide range of pans and grids.
7.Coved corners, filterless grease extraction system, and built-in handshower minimize cleaning labor.
7

GENERAL
INFORMATION
MCS MODELS
6/10/1020/20/40
Control Panel Functionsat a glance
0 |
°C °F
300°C
575°F
|
D |
0 -120 mi |
20 - 99°C |
|
65 - 210°F |
1Warning light - lights red when steam generator temperature exceeds 302°F (150°C)
2 NO WATER warning light - check water supply
3ON indicator light (green)
4MOIST HEAT mode–212°F (100°C)
•For steaming, stewing, blanching, preserving, etc.
•Mode light blinks when temperature exceeds 40°F (5°C) over set point 5 DRY HEAT mode–85°F to 575°F (30°C to 300°C)
•For roasting, baking grilling, etc
6Mode selection switch
7COMBINATION mode–85°F to 575°F (30°C to 300°C)
•For Combi-Steaming instead of roasting and glazing or baking
•Forced Steaming between 213°F to 266°F (101°C to 130°C)– firm vegetables or potatoes are cooked more quickly
8TENDER STEAMING mode–85°F to 210°F (30°C to 99°C)
•For blanching, poaching, simmering, soaking, vacuum cooking 9 RETHERMALIZING mode–85°F to 575°F (30°C to 300°C)
•For reheating pre-cooked (chilled) food
10PROGRAM function
•Create and store up to 9, three-step cooking programs
11Program START key
12Program NUMBER display (1 to 9 programs)
13Program ADVANCE key display (1 to 9 stages)
14CABINET TEMPERATURE indicator key
•Key lights up when elements heat
•Press key to display cabinet temperature
15Temperature indicator (°F or °C)
16TEMPERATURE selection dial
17TEMPERATURE display
•Displays selected cooking temperature
•Displays cabinet temperature when CABINET TEMPERATURE indicator key (14) is pressed
18PROBE COOKING displays
•Upper display indicates actual internal food temperature
•Lower display shows pre-selected “done” temperature
19COOKING TIME display
•Shows actual cooking time remaining
•Press key to activate probe
20PROBE COOKING key
•Select food internal “done” temperature using TIMER/PROBE COOKING dial (21)
21TIMER/PROBE COOKING dial
•Set TIMER for 0 minutes to 120 minutes, press TIMER activation key (22)
•Set PROBE temperature from 65°F to 210°F (20°C to 99°C), press PROBE COOKING key (20)
•Select “D” for Continuous Run
22TIMER activation key
•Press key to switch from PROBE COOKING
•Select time using the TIMER/PROBE COOKING dial (21)
23STEAM INJECTION
•Four-second burst of steam in DRY HEAT mode between 248°F (120°C) and 480°F (250°C)
24COOL DOWN
•Fan continues to operate when door is open, reducing cabinet temperature rapidly
25Unit serial number (located on the left side of cabinet in the lower right hand corner)
•Please refer to this number when requesting service
26HACCP printer port
MCG gas models will have this
key pad display |
reset |
|
|
|
|
|
|
|
IGNITION |
COOL |
STEAM |
|
RESET |
DOWN |
INJECTION |
|
|
key |
key |
8
GENERAL
INFORMATION
BCS MODELS
6/10/1020/20/40
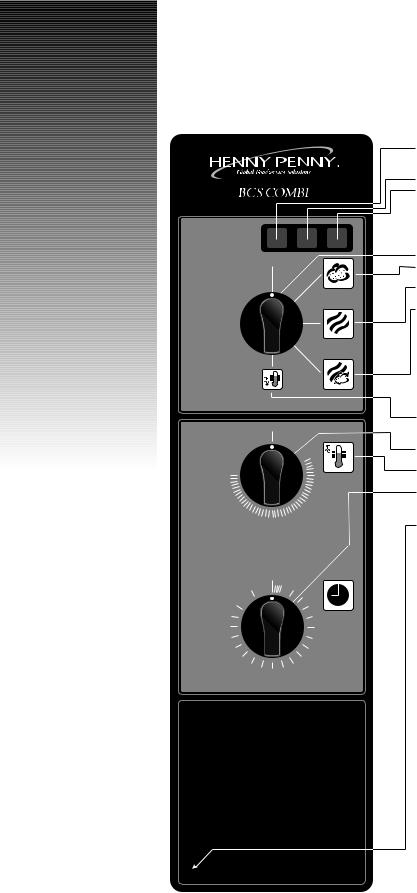
Control Panel Functionsat a glance
1 Warning light– lights red when cabinet temperature exceeds 239°F (115°C)
in steam mode
2 NO WATER warning light–check water supply/steam generator
3 ON indicator light (green)
4 Mode selection switch
0
5 MOIST HEAT mode–212°F (100°C)
• For steaming, stewing, blanching, preserving...
6 DRY HEAT mode–140°F to 575°F (60°C to 300°C) • For roasting, baking grilling, etc.
7 COMBINATION mode–140°F to 575°F (60°C to 300°C)
• For combi-steaming instead of roasting and glazing or baking
• Forced steaming between 213°F to 266°F (101°C to 130°C)– firm vegetables or potatoes are cooked more quickly
|
140 |
|
575 |
|
|
550 |
212 |
|
500 |
250 |
|
|
||
450 |
300 |
|
350 |
||
400 |
5
D 10
10
100 |
20 |
90 |
30 |
80 |
40 |
70 |
50 |
|
60 |
8COOL DOWN function
•Fan continues to operate when door is open, reducing cabinet temperature rapidly
9TEMPERATURE selection dial
•For convection and combination modes 10 HEAT ON indicator
•Lights during DRY HEAT mode
11TIMER (0 to 120 minutes)
(UL -approved units: 0 to 100 minutes, CE-approved units: 0 to 120 minutes)
• Set on “D” for Continuous Run
12Unit serial number (located on the left side of cabinet in the lower right hand corner)
•Please refer to this number when requesting service
9
GENERAL
INFORMATION
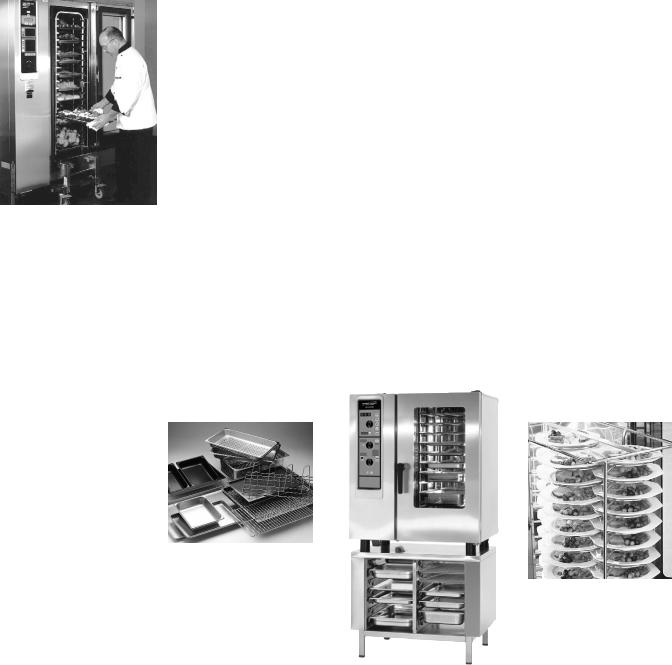
Loading and Unloading
Your Henny Penny Combi includes either a removable hinged racking system (standard with 6 and 10-pan units) or a mobile oven rack that is integral
to the equipment’s operation. All pans and grids are loaded directly onto the hinged racking system, or onto the mobile oven rack which is then rolled into the cooking cabinet.
Base-top Models
Removable Hinged Racking–Standard MCS/G/BCS- 6 & 10
To remove, simply lift rack upward and out of mountings. Reverse the action to replace the rack. To move rack laterally on hinges, lift front of rack slightly to clear mounting and swivel rack.
Mobile Oven Racks (Standard on 1020)
Oven rack on transport cart rolls up to the front of the unit. Oven rack rolls completely into the cabinet. Standard with MCS/G/BCS-1020, available separately (rail system required) for MCS/G/BCS-6 and10.
* Additional racking systems optional.
Floor Models
Mobile Oven Racks (20 and 40)
Mobile oven rack rolls directly into unit. Specially designed oven rack allows cabinet door to close easily and completely around the rack. Standard with MCS/G/BCS-20 and 40. Additional mobile oven racks or specially designed oven plate racks are available separately.
Transport Cart
(optional)
IMPORTANT!
When using the oven rack on transport cart, be sure to lock the front casters of the transport cart when it is in the loading or unloading position at the front of the cabinet. Keep the front wheels of the oven rack locked at all times (using the locking lever near the right front wheel) except when rolling it into or out of the cabinet and onto the transport cart itself. Following this procedure stabilizes the load. To keep pans in place lock both vertical hinged bars.
To Load
■Preheat unit to set temperature or above.
■Place food product on appropriate grids, pans and racks.
■If using mobile oven rack, slide full grids, pans and racks into shelves on mobile oven rack. Be sure containers are secure on both sides.
Opening door during operation
■ Open door slightly until fan stops and heat dissipates. Open door fully with care. 10

GENERAL
INFORMATION
Loading and |
NOTE: MCS/G and BCS models 20 & 40 have a built-in safety latch that lets |
|
Unloading |
steam and heat out before door fully opens. Safety latch is optional on models 6, 10 |
|
continued |
and 1020. If your ClimaPlus Combi is NOT equipped with this feature, open door |
|
slightly until fan stops and steam dissipates. Open door fully with care to unload. |
||
|
Opening Door During Operation
Open door slightly to allow hot steam and/or vapors to escape. KEEP FACE AND HANDS AWAY FROM OPENING or burns could result. When steam and/or heat has dissipated open door fully with care. Escaping hot steam and/or vapors can cause serious burns. Interior surfaces, including pans, grids and oven racks, can be extremely hot. To prevent burns, allow unit to cool or use appropriate heat resistant protective mitt or pad when handling. Do not use built-in retractable hand shower when cabinet temperature is above 150°F (65°C) or burns could result.
■Load hinged racking system with food containers or roll loaded mobile oven rack directly into unit.
■Remove handle
■Shut door and begin cooking.
To unload
■Open door slightly until fan stops and heat and steam dissipates. Open door fully with care.
■Insert cart handle. (MOR only)
■Using oven mitts or pads, remove food containers carefully from shelves in hinged racking system.
■With floor units, roll mobile oven rack straight out of unit to appropriate location.
■With base-top models using transport cart, roll transport cart up to front of unit and lock front casters. Roll oven rack out of unit and onto transport cart. Be sure wheels on oven rack are locked to stabilize load and reduce the chances of spills.
WARNING: Surfaces of food containers, mobile oven racks and inside cabinet surfaces may be extremely hot. Always use insulated oven mitts or pads when removing food containers or handling mobile oven racks or burns could result.
11
GENERAL INFORMATION
Loading and Unloading continued
Partial Loads
Individual pans or racks of product can be easily loaded or unloaded while the unit is in operation.
■Open door slightly until fan stops and heat and steam dissipates. Open door fully with care.
■Using oven mitts or pads, load or unload individual containers.
■Shut door. Cooking process continues automatically.
Tips
■Preheat cooking cabinet prior to loading for full loads.
■Since no flavor transfer occurs during cooking, try to plan full loads based on similar cooking climates (Moist, Dry, Combination) rather than food compatibility.
■When cooking for longer periods, or on continuous run cooking, load items that will be done sooner toward the front of the oven. These can be removed individually when done.
■For the greatest efficiency, try to cook with full loads. In general, cooking times and temperatures are not affected by the quantity of product in the cooking cabinet.
■When loading roasts or large cuts of meat, place product on grids and load grids directly onto shelves near the bottom of the unit. Load an empty pan directly beneath the roast to catch drippings and roast bones.
■For base-top models, consider the purchase of Combi Base Units. Several styles are available that offer storage for convenient access to pans, grids, and racks.
■If rethermalizing plated portions is a frequent part of your production, consider the purchase of special plate racks and thermal covers.
12

Cooking Modes
Henny Penny Combis operate with three basic cooking modes: Moist Heat, Dry Heat and Combination. The MCS/G model also incorporates two additional modes: Tender Steaming and Rethermalizing. Almost all traditional cooking processes can be accomplished in these modes. Cooking modes can be used exclusively or in any sequence or combination to achieve desired results.
Moist Heat Mode for steaming
The steam generator produces hygienic steam and releases it (without pressure)
into the cooking cabinet where it is circulated at high speeds by the fan. The cooking temperature in this mode is fixed at 212°F (110°C). This mode is used for steaming.
Dry Heat Mode for baking or roasting
Powerful heating elements heat the air inside the cabinet. The fan circulates this hot, dry air evenly throughout the interior. Temperature can be regulated precisely between 85-575°F (30-300°C)*.
Combination Mode for maintaining a moist environment at high temperatures
The unit’s control system combines both Moist Heat and Dry Heat modes to create a humid cooking environment at temperatures even above 212°F (100°C). Selected temperatures can range from 85-575°F (30-300°C)*. The cooking environment retains all humidity generated from the unit and from the moisture released by food as it cooks.
*Lowest temperature on BCS - 140°F (60°C)
MCS/G models, only
Tender Steaming mode for low temperature steaming
In this mode an automatic sensor maintains the selected temperature lower than 212°F (100°C) within a moist environment. Temperatures can be selected from 85-210°F (30-99°C).
Rethermalizing mode for ideal results when reheating
This special mode combines moist and dry heat to create the ideal climate for reheating cooked foods. Rethermalizing restores the look, taste and texture of fresh hot food without drying or marking. Rethermalize works best at temperatures between 85-575°F (30-300°C).
13

COOKING MODES
Moist Heat Mode 212°F (100°C)
Pressureless steam generation and auto-reverse fan quickly produce a cooking environment of 100% humidity. Perfect for steaming a wide variety of foods with no flavor transfer. Also used for stewing, blanching, poaching, simmering, soaking, thawing, rethermalizing, preserving.
Advantages
■ Extremely short preheating time. ■ Excellent food consistency.
■ Conserves nutrients, color. ■ No added fats or oils.
■ Cook different products at the same time with no flavor transfer. ■ Can be partially unloaded for serving convenience.
■ No need to boil water in pots.
Menu suggestions
■ Ingredient preparations–tomato concasees, garnishes, mushrooms, blanched vegetables for stuffing, peeling, etc.
■Starters, appetizers–scrambled, poached or boiled eggs; vegetable pate, asparagus, stuffed vegetables, cannelloni.
■Entrees–cooked beef, ham, turkey legs, steamed fish, chicken breasts.
■Sides–rice, dumplings, pasta, fresh and frozen vegetables, boiled potatoes, and grains.
Tips
■Determine which foods can be cooked together for the greatest production efficiency. This is best done by considering the cooking modes and temperatures. Keep in mind that fish, meat, vegetables, fruit, etc. can be cooked at the same time because no flavor transfer occurs.
■Potatoes should always be cooked in perforated pans. This allows steam to circulate for faster, more even cooking.
■In general, two shallower pans are better than one deeper pan. This avoids bruising.
■Dumplings should be placed in shallow pans not too close together.
■Rice, dry pasta, beans, and grains are foods to which water must be added prior to cooking. Longer soaking times mean shorter cooking times.
■Tomatoes can be skinned easily when steamed for 30 to 60 seconds, then chilled in cold water.
■Stock can be collected by inserting a container in the bottom of the oven rack.
14

COOKING MODES
Moist Heat |
Operation and Settings |
continued
■Set on MOIST HEAT mode and set TIMER on “D” Continuous Run.
■Preheat until warm-up control light goes out.* Temperature will remain at 212°F (100°C).
* M model only
■ Load oven rack.
MCS/G units
■ Set desired cooking time and press TIMER key OR set desired “done” temperature and press PROBE cooking key. OR set on Continuous Run.
BCS units
■Set dial to desired cooking time OR set on Continuous Run.
■Unload oven when done. Blower and heat automatically stops when door is opened.
NOTE: MCS/G/BCS models 20 & 40 have a built-in safety latch that lets steam and heat out before door fully opens. Safety latch is optional on
models 6, 10 and 1020. If your Combi is NOT equipped with this feature, open door slightly until fan stops and steam dissipates. Open door fully to unload.
Opening Door During Operation
Open door slightly to allow hot steam and/or vapors to escape. KEEP FACE AND HANDS AWAY FROM OPENING or burns could result. When steam and/or heat has dissipated open door fully with care. Escaping hot steam and/or vapors can cause serious burns. Interior surfaces, including pans, grids and oven racks, can be extremely hot. To prevent burns, allow unit to cool or use appropriate heat resistant protective mitt or pad when handling. Do not use built-in retractable hand shower when cabinet temperature is above 150°F (65°C) or burns could result.
15

COOKING MODES
Dry Heat Mode MCS/G: 85-575°F (30-300°C)
BCS: 140-575°F (60-300°C)
Powerful convection heating and auto-reverse fan create the ideal environment for fast, even broiling, roasting, baking, browning, thawing, grilling and sautéing.
Advantages
■ Powerful heating capability up to 575°F (300°C), even when fully loaded. ■ Fast pre-heating.
■ High-speed air circulation creates even heating for high quality food production. ■ Consistent cooking and even browning at all rack levels.
■ No added fats or oils are needed for cooking. ■ Cook different products at the same time.
■ Can be partially unloaded for serving convenience.
Menu suggestions
■ Ingredient preparations–roasted bones for stock, melting butter, thawing frozen ingredients.
■ Starters, appetizers–meatballs, roast beef, grilled ham, sausage, chicken wings, quiches, tarts, breadsticks, bread rolls, etc.
■Entrees–beef and pork roasts, ribs, chicken whole or piece, turkey, frozen lasagna, pizza, pizza rolls.
■Sides–baked potatoes, soufflés, casseroles.
■Desserts–sponge cake, marble cake, puff pastries, frozen fruit puffs, pies, etc.
Tips
Cooking times
Proper cooking times will vary depending on the quality, weight, or size of the product being cooked. Generally, cooking time is not affected by the size of the load. However, avoid overloading grids or pans so air will circulate evenly around all product.
Roasting, broiling
■Preheat up to 575°F (300°C). Load and set to desired temperature.
■Ideal thickness for steaks, chops, cutlets, or loin cuts: 1⁄2-1 in. (13-25mm).
■Cook on grids with drip pans underneath. This allows even browning on all sides.
■Group similarly sized products on the same grids.
Sautéing
■Preheat enamel pan.
■Shallow pans work best.
Browning, finishing
■ Preheat up to 575°F (300°C). Load and set to desired temperature.
16

COOKING MODES
Dry Heat continued
MCS/G units
BCS units
Baking
■Preheat to desired baking temperature. In general, Combi baking temperatures will be 40-50°F (5-10°C) LOWER than conventional ovens.
■When baking do NOT preheat pans.
■For bread, rolls, and muffins use only every second rack. Trays should not be deeper than 23⁄4 in. (70mm).
■Defrost frozen bread dough and let rise for a short time before baking.
■Lightly mist breaded products with water or vegetable oil or brush with eggwash.
■When baking whole fish, wrap tail in foil and support it from underneath with raw potatoes.
Operation and settings
■Set on DRY HEAT mode and set TIMER on “D” Continuous Run.
■Preheat until set temperature is reached or heat indicator light goes out.
■Load oven rack.
■Set desired cooking TEMPERATURE: 85-575°F (30-300°C). Selected cooking temperature appears in display. Press TEMPERATURE key to display current cabinet temperature.
■Set desired cooking TIME and press TIMER key OR set desired “done” temperature and press PROBE cooking key. OR set on Continuous Run.
■Set dial to desired cooking TEMPERATURE: 140-575°F (60-300°C).
■Set dial to desired cooking time OR set on Continuous Run.
■NOTE: Steam generator does not operate during Dry Heat Mode. However, humidity builds in the cabinet from the moisture escaping food as it cooks.
■Unload oven when done. Blower and heat automatically shuts off when door is opened.
NOTE: MCS/G/BCS models 20 & 40 have a built-in safety latch that lets steam and heat out before door fully opens. Safety latch is optional on models 6, 10 and 1020. If your Combi is NOT equipped with this feature, open door slightly until fan stops and steam dissipates. Open door fully to unload.
17
 Loading...