

HEIDENHAIN iTNC 530 User Manual
Pilot
smarT.NC
iTNC 530
NC Software
340 490-05
340 491-05
340 492-05
340 493-05
340 494-05
English (en)
12/2008

The smart.NC Pilot
... is the concise programming guide for the smarT.NC
operating mode of the iTNC 530. For complete information on
programming and operating the iTNC 530, refer to the User’s
Manual.
Symbols in the Pilot
Certain symbols are used in the Pilot to denote specific types of
information:
Important note!
Control NC Software Number
iTNC 530 340 490-05
iTNC 530, export version 340 491-05
iTNC 530 with Windows XP 340 492-05
iTNC 530 with Windows XP,
export version
iTNC 530 programming station 340 494-05
340 493-05
The TNC and the machine tool must be prepared by
the machine tool builder to perform this function!
Warning: danger for the user or machine!
3
Contents
The smart.NC Pilot ..................................................................................................................................................... 3
Quick .......................................................................................................................................................................... 5
Fundamentals ............................................................................................................................................................. 16
Defining Machining Operations................................................................................................................................... 44
Defining Machining Positions ..................................................................................................................................... 145
Defining Contours ...................................................................................................................................................... 168
Processing DXF Files (Software Option) ..................................................................................................................... 178
Graphically Testing and Running a Unit Program ........................................................................................................ 204
Contents
4
Quick Guide
For the first time, select the new operating mode and create a new program
Select the smarT.NC operating mode: The TNC is found in
the file management (see figure at right). If the TNC is not
located in the file management: Press PGM MGT key
In order to write a new machining program, press the NEW
FILE soft key. smarT.NC opens a pop-up window.
Enter a file name with the extension .HU, and confirm with
ENT.
Confirm with the MM (or INCH) soft key or screen button.
smarT.NC creates an .HU program with the selected units
of measurement and automatically inserts the program
header form. This form contains in addition to the workpiece
blank definition the most important presettings valid for the
rest of the program.
Select the standard values and save the program header
form: Press the END key: You can now define the working
steps
Quick Guide
5
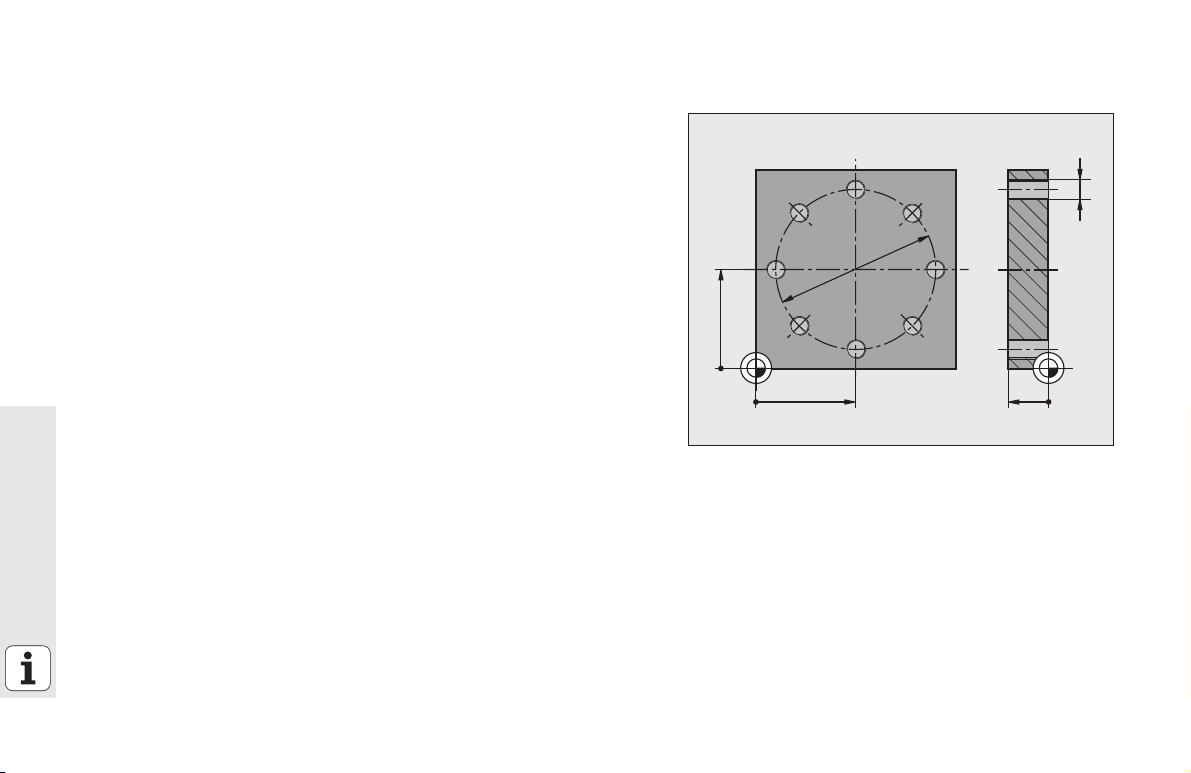
Exercise 1: Simple drilling operations in smarT.NC
Task
Centering bolt hole circle, drilling and tapping.
Prerequisites
The following tools must be defined in the tool table TOOL.T:
NC spotting drill, diameter 10 mm
Drill, diameter 5 mm
Tap M6
M6
¬80
50
Quick Guide
6
0
0
50
20
0
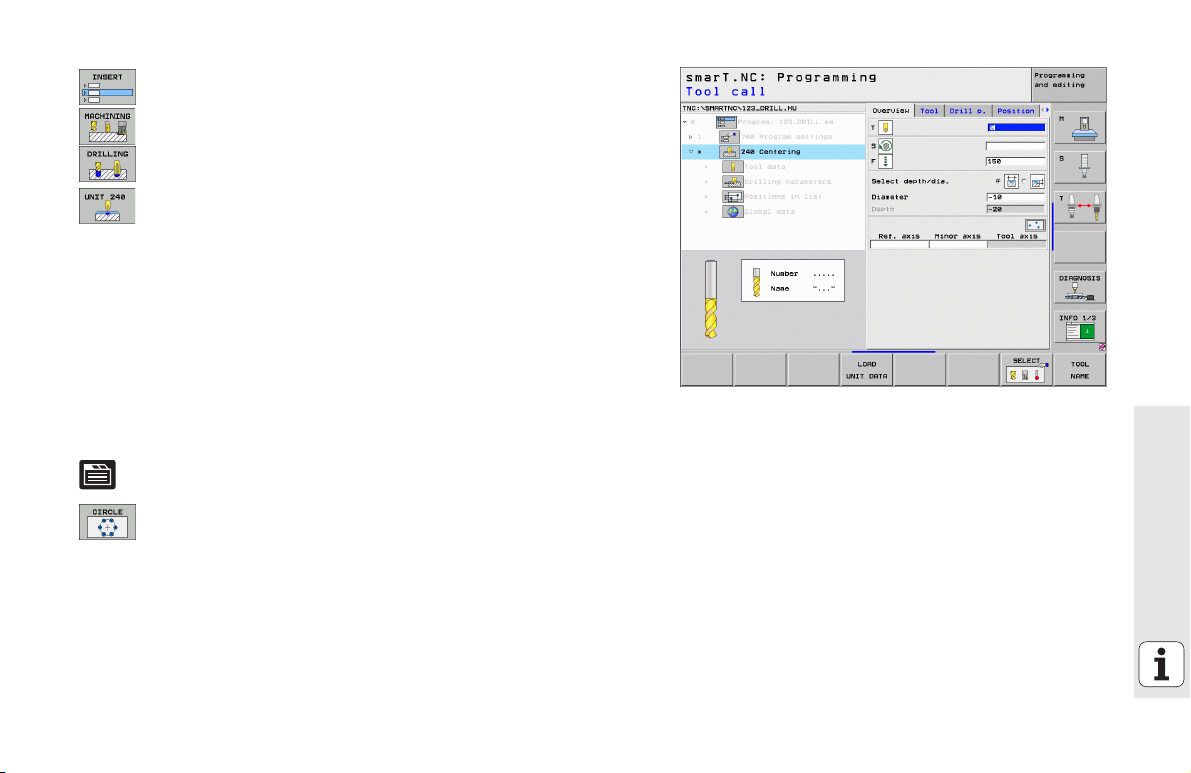
Defining centering
Enter machining step: Press the INSERT soft key
Enter machining
Enter drilling operation: The TNC displays a soft key row
with the available drilling operations
Select centering: The TNC displays the overview form for
defining the entire centering operation
Specify tool: Press the soft key SELECT, the TNC displays
the contents of the tool table TOOL.T in a pop-up window
Move the highlight with the cursor keys onto the NC
spotting drill and enter it into the form with the ENT key. You
may alternatively also enter the tool number directly,
confirm the entry with the ENT key
Enter the spindle speed and confirm entry with the ENT key
Enter the centering feed rate and confirm entry with the
ENT key
Switch to depth entry via soft key and confirm entry with the
ENT key. Enter the desired depth
Select the detail form Position with the tab shift key.
Switch to bolt hole circle definition. Enter required bolt hole
circle data and confirm each entry with the ENT key.
Save the form with the END key. Definition of the centering
operation is complete
Quick Guide
7
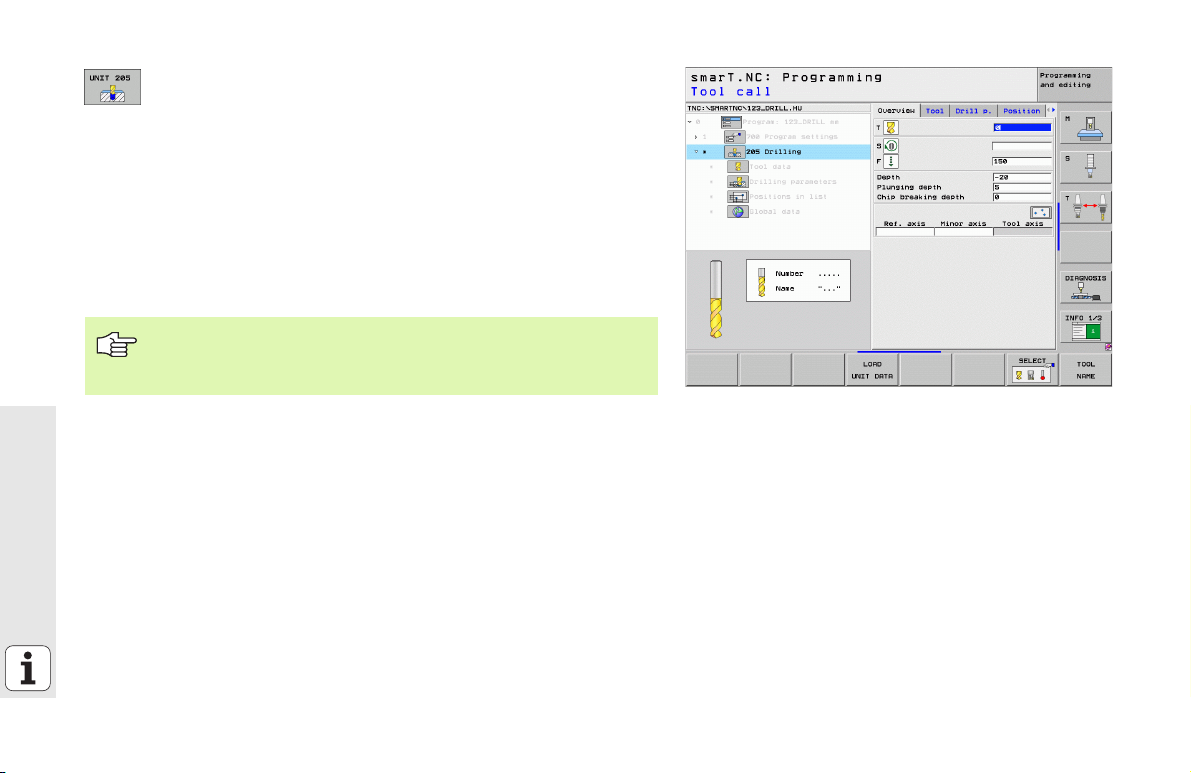
Defining drilling
Select drilling: Press the UNIT 205 soft key. The TNC
Specify tool: Press the soft key SELECT, the TNC displays
Move the highlight with the cursor keys onto the NC drill and
Enter the spindle speed and confirm entry with the ENT key
Enter the drilling feed rate and confirm entry with the ENT
Enter the drilling depth and confirm entry with the ENT key
Enter plunging depth, save the form with the END key
You do not need to define the drilling positions again. The
TNC automatically uses the previously defined positions, i.e.
Quick Guide
those defined for the centering operation.
displays the form for drilling operations
the contents of the tool table TOOL.T in a pop-up window
enter it into the form with the ENT key.
key
8
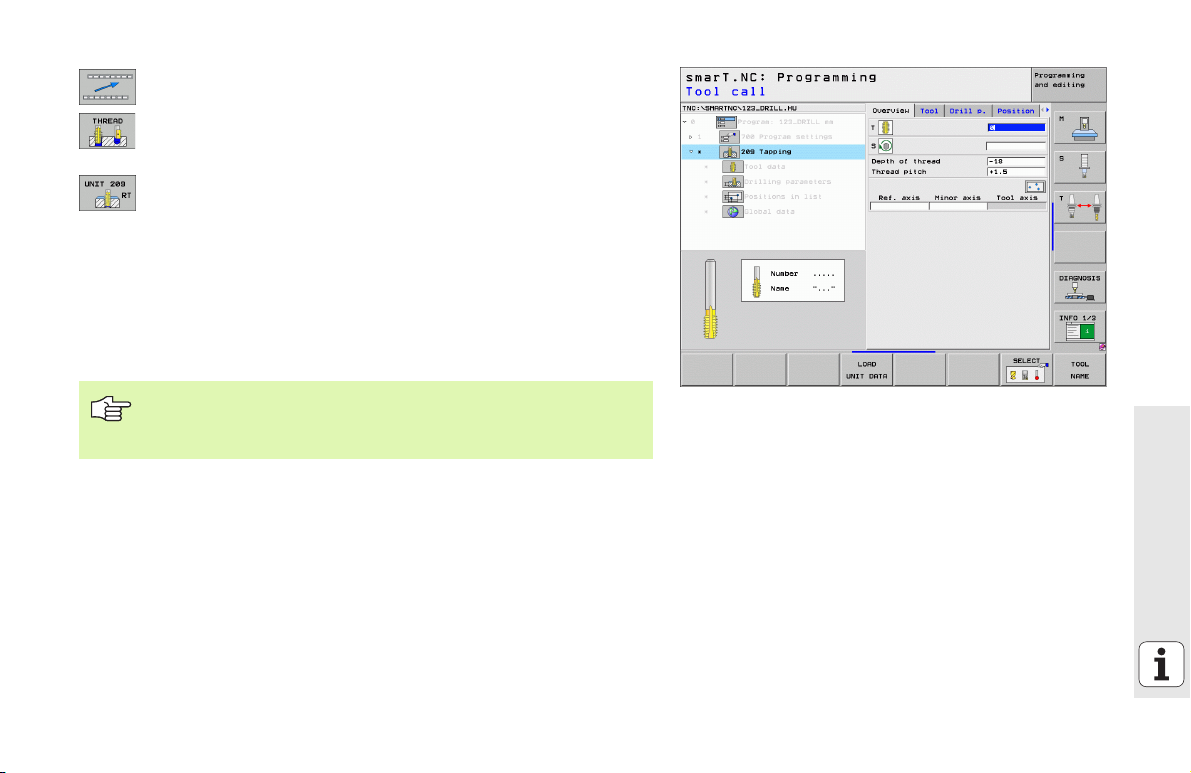
Defining tapping
One level upwards via the soft key BACK
Enter tapping operation: Press the THREAD soft key, the
TNC displays a soft key row with the available tapping
operations
Select rigid drilling: Press the UNIT 209 soft key. The TNC
displays the form for defining tapping operations
Specify tool: Press the soft key SELECT, the TNC displays
the contents of the tool table TOOL.T in a pop-up window
Move the highlight with the cursor keys onto the tap and
enter it into the form with the ENT key
Enter the spindle speed and confirm entry with the ENT key
Enter the depth of thread and confirm with the ENT key
Enter the thread pitch, save the form with the END key
You do not need to define the drilling positions again. The
TNC automatically uses the previously defined positions, i.e.
those defined for the centering operation.
Quick Guide
9

Test run
Select the initial soft key row with the smarT.NC key (home
Select the Test Run submode
Start the test run: The TNC simulates the machining
Select the initial soft key row with the smarT.NC key (home
Running a program
Select the initial soft key row with the smarT.NC key (home
Quick Guide
Select running submode
Start the program run: The TNC runs the machining
Select the initial soft key row with the smarT.NC key (home
function)
operations defined by you
function) after program end
function)
operations defined by you
function) after program end
10
Exercise 2: Simple milling operations in smarT.NC
Task
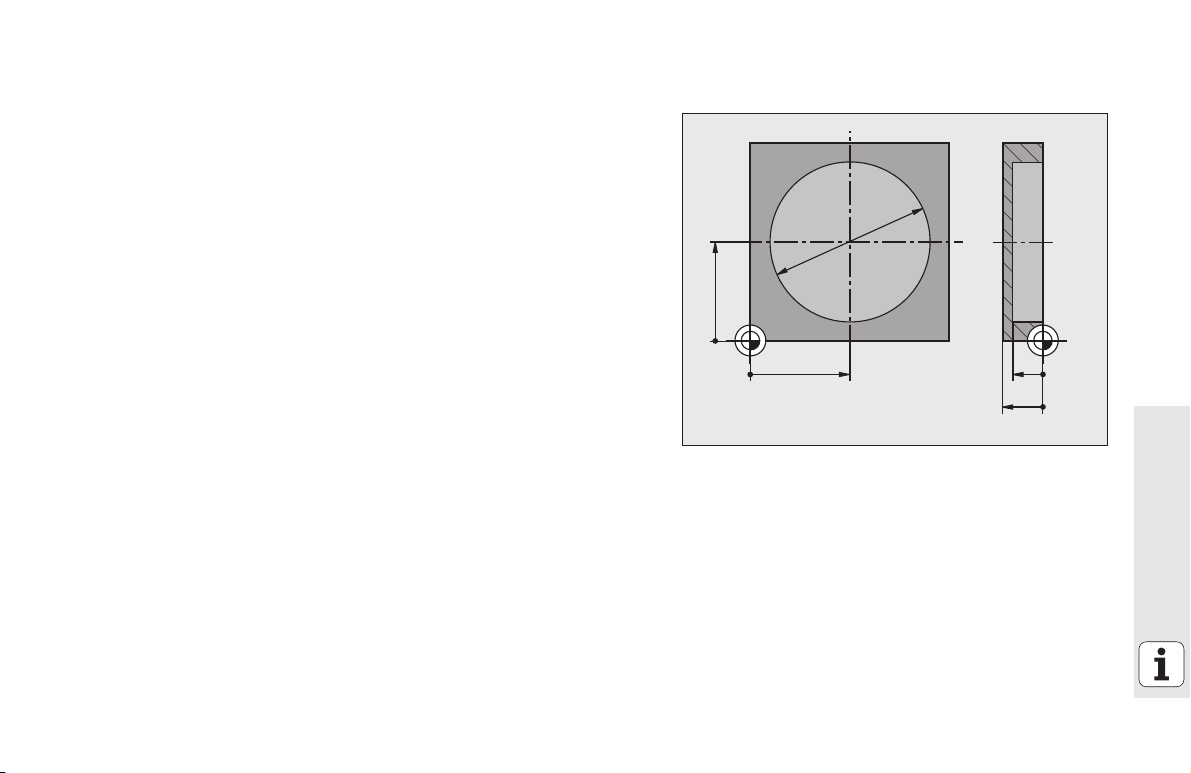
Roughing and finishing a circular pocket with a tool.
Prerequisites
The following tool must be defined in the tool table TOOL.T:
End mill, diameter 10 mm
50
¬80
0
Quick Guide
20
15
0
0
50
11
Defining circular pocket
Enter machining step: Press the INSERT soft key
Enter machining
Enter pocket machining: Press the POCKETS/STUDS soft
key, the TNC displays a soft key row with the available
milling operations
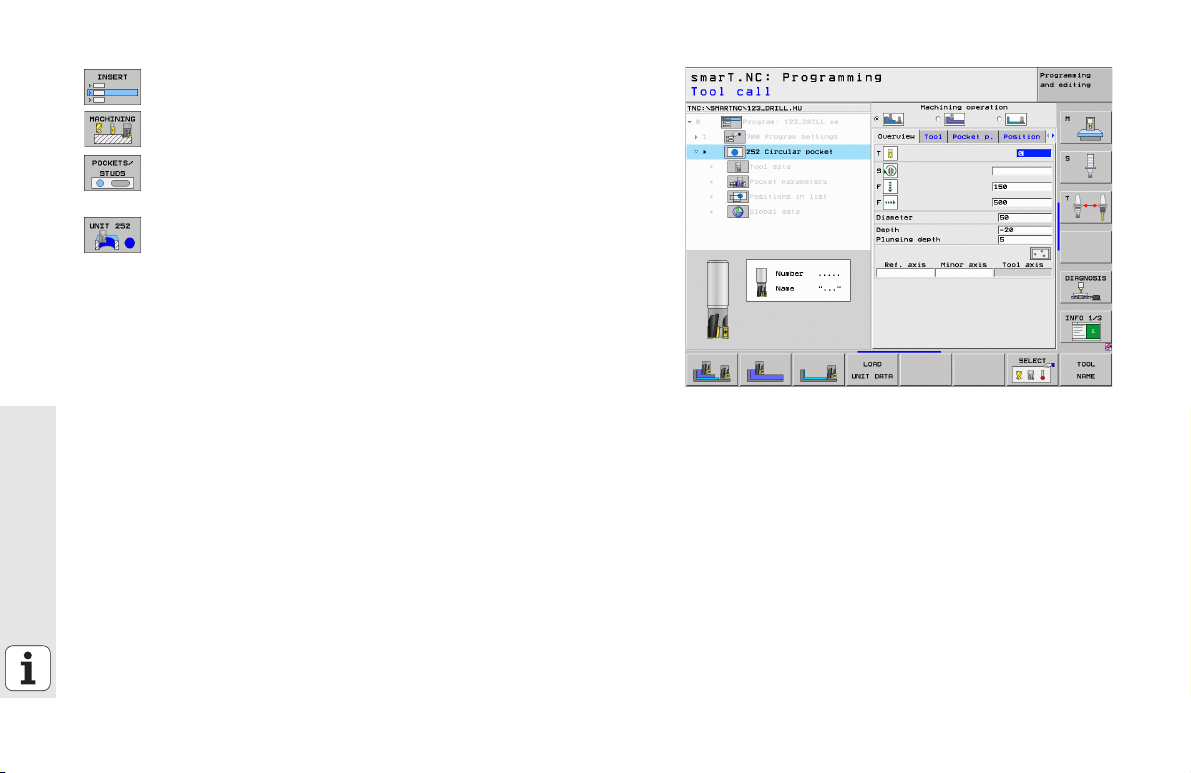
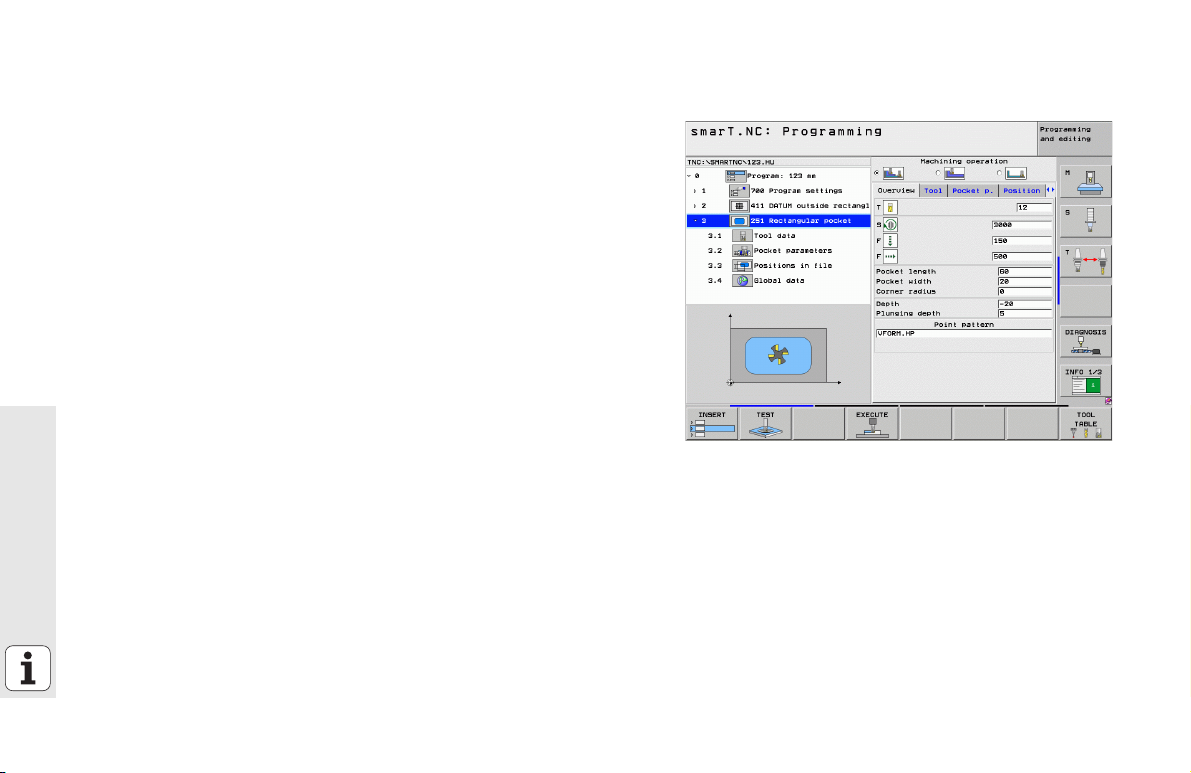
Select circular pocket: Press the UNIT 252 soft key. The
TNC displays the form for a circular pocket operation. The
machining operation is set to roughing and finishing
Specify tool: Press the soft key SELECT, the TNC displays
the contents of the tool table TOOL.T in a pop-up window
Move the highlight onto the end mill with the cursor keys
and enter it into the form with the ENT key
Quick Guide
Enter the spindle speed and confirm entry with the ENT key
Enter the plunge feed rate and confirm with the ENT key
Enter the milling feed rate and confirm with the ENT key
Enter the circular pocket diameter and confirm with the ENT
key
Enter depth, plunging depth and finishing allowance for the
side and confirm each time with the ENT key
Enter X and Y center point coordinates for the circular
pocket, confirm each with the ENT key
Save the form with the END key. Definition of the circular
pocket operation is complete
Test and run the newly created program as previously
described
12
Exercise 3: Contour milling in smarT.NC
Task
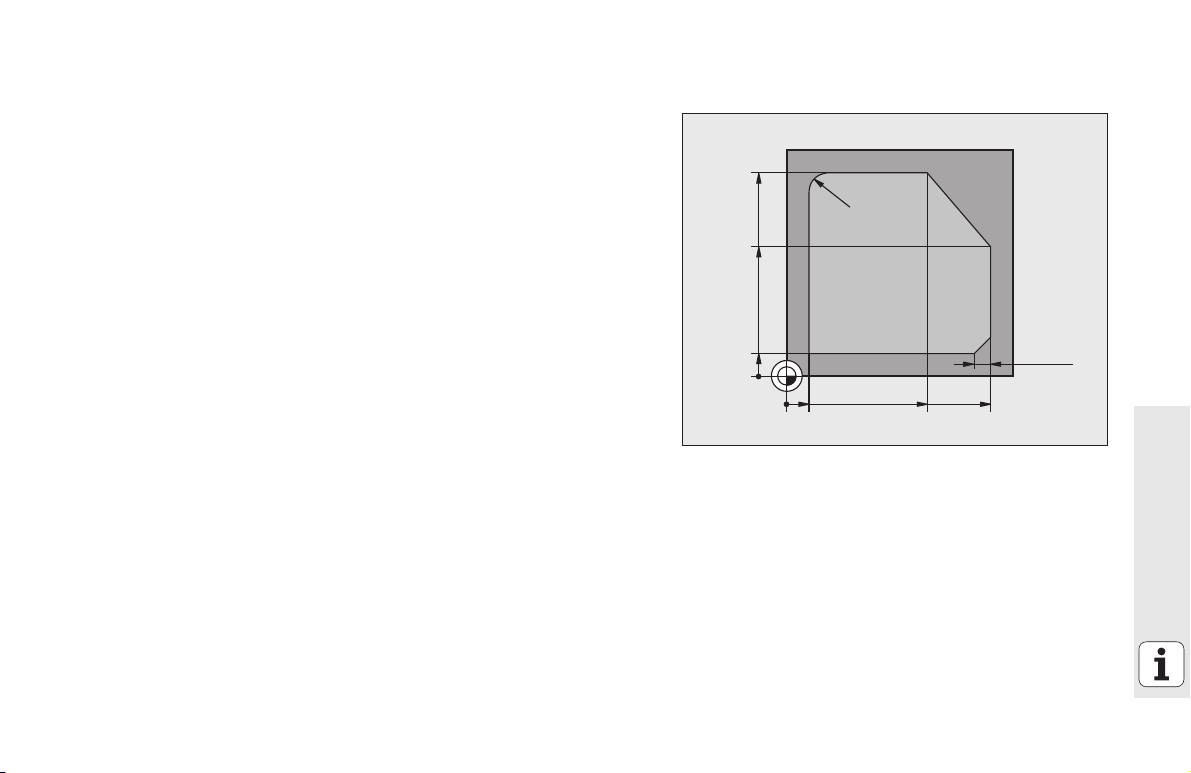
Roughing and finishing a contour with a tool.
Prerequisites
The following tool must be defined in the tool table TOOL.T:
End mill, diameter 22 mm
90
70
10
0
R8
2
1
6
10 80 90
0
3
4
5
6x45°
Quick Guide
13

Defining contour machining
Enter machining step: Press the INSERT soft key
Enter machining
Enter contour machining: Press the CONTR. PGM soft key,
the TNC displays a soft key row with the available contour
operations
Select contour train machining: Press the UNIT 125 soft key.
The TNC displays the form for a contour operation.
Specify tool: Press the soft key SELECT, the TNC displays
the contents of the tool table TOOL.T in a pop-up window
Move the highlight onto the end mill with the cursor keys
and enter it into the form with the ENT key
Enter the spindle speed and confirm entry with the ENT key
Quick Guide
Enter the plunge feed rate and confirm with the ENT key
Enter the milling feed rate and confirm with the ENT key
Enter coordinates of workpiece upper edge, depth, plunging
depth and finishing allowance for the side and confirm each
with the ENT key
Select type of milling, radius compensation and type of
approach via soft keys and confirm each with the ENT key
Enter the approach parameters and confirm each with the
ENT key
14
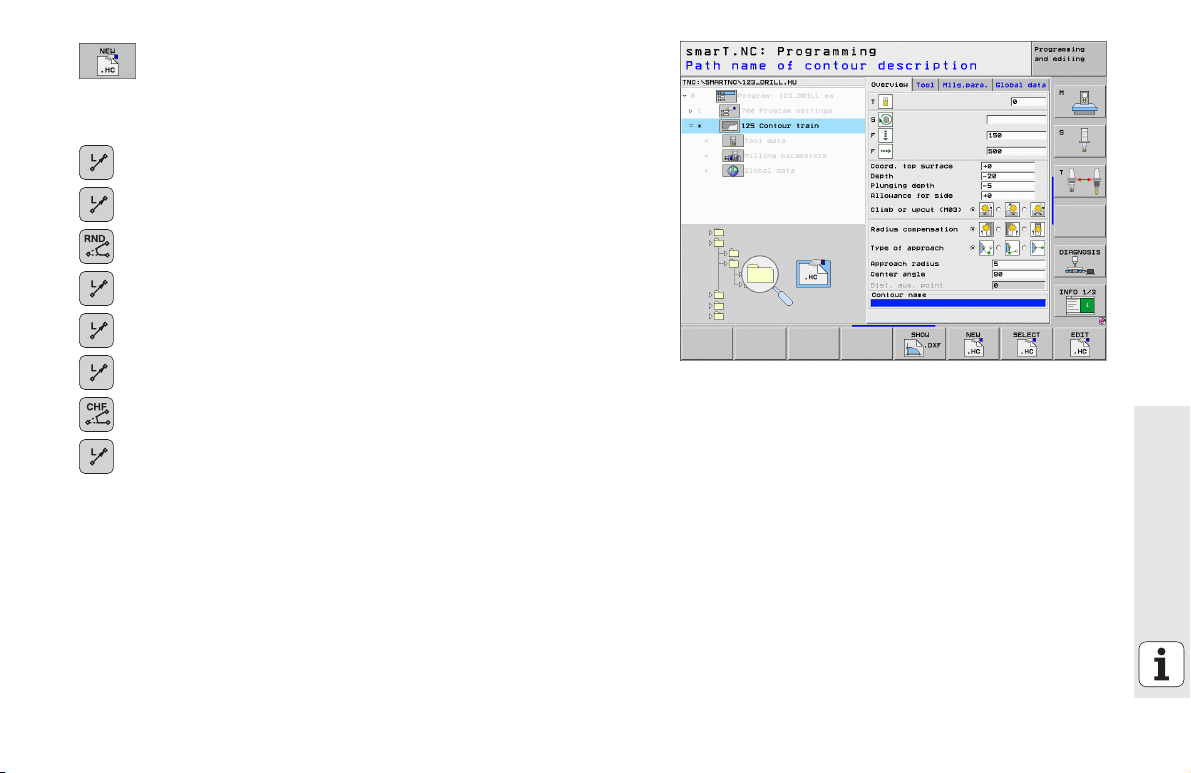
The input field Contour name is active. Create a new contour
program: smarT.NC displays a pop-up window for entering
the contour name. Enter the name of the contour, confirm
with the ENT key. smarT.NC is now in contour programming
mode
Define the starting point of the contour with X and Y with
the L key: X=10, Y=10, save with the END key
Approach point 2 with the L key: X=90, save with the END
key
Define a curvature radius of 8 mm with the RND key, save
with the END key
Approach point 3 with the L key: Y=80, save with the END
key
Approach point 4 with the L key: X=90, Y=70, save with the
END key
Approach point 5 with the L key: Y=10, save with the END
key
Define a chamfer of 6 mm with the CHF key, save with the
END key
Approach end point 6 with the L key: X=10, save with the
END key
Save contour program with the END key: smarT.NC now
displays the form for defining contour machining again
Save entire contour operations with the END key. Definition
of the contour machining is complete
Test and run the newly created program as previously
described
Quick Guide
15
Fundamentals
Introduction to smarT.NC
With smarT.NC you can easily write structured conversational programs
in separate working steps (units) and, if you want, edit them with the
conversational editor. Since the only data basis for smarT.NC is the
conversational program, you can modify data with the conversational
editor, for example, and show them in the form view.
Immediately understandable input forms in the right half of the screen
make it easier to define the required machining parameters, which are
also displayed in a help graphic (lower left quarter of the screen). The
structured program layout in a tree diagram (top left quarter of the screen)
provides you with a quick overview of the working steps in a part
program.
Fundamentals
The separate and universal operating mode smarT.NC provides an
alternative to the well known conversational programming. As soon as
you have defined a machining step you can graphically test it and/or run
it in the new operating mode.
Parallel programming
You can also create and edit smarT.NC programs at the same time that
the TNC is running another program. Simply switch to the Programming
and Editing operating mode and open the desired smarT.NC program
there.
If you want to edit the smarT.NC program with the conversational editor,
select the OPEN WITH function in the file manager, and then press
CONVERSTL.
16
Programs/Files
The TNC keeps its programs, tables and texts in files. A file designation
consists of two components:
PROG20 .HU
File name File type
smarT.NC uses mainly three file types:
Unit programs (file type .HU)
Unit programs are conversational programs that contain two additional
structuring elements: The beginning (UNIT XXX) and the end (END OF
UNIT XXX) of a machining step.
Contour descriptions (file type .HC)
Contour descriptions are conversational programs. They must only
contain path functions that can be used to describe a contour in the
machining plane. The following elements are permitted: L, C with CC,
CT, CR, RND, CHF as well as the FPOL, FL, FLT, FC and FCT elements for FK
free contour programming
Point tables (file type .HP)
smarT.NC saves in point tables the machining positions that you
defined using the powerful pattern generator.
As a default, smarT.NC automatically saves all files in the
TNC:\smarTNC directory. However, you can also select any
other directory.
Files in the TNC Ty p e
Programs
In HEIDENHAIN format
In DIN/ISO format
smarT.NC files
Structured unit program
Contour descriptions
Point tables for machining positions
Tables for
Tools
Tool changers
Pallets
Datums
Presets (reference points)
Cutting data
Cutting materials, workpiece materials
Texts as
ASCII files
Help files
Drawing data as
DXF files .DXF
.H
.I
.HU
.HC
.HP
.T
.TCH
.P
.D
.PR
.CDT
.TAB
.A
.CHM
Fundamentals
17

Selecting the new operating mode the first time
Select the smarT.NC operating mode: The file manager of
the TNC appears.
Select one of the available example programs with the
arrow keys and press ENTER, or
In order to write a new machining program, press the NEW
FILE soft key. smarT.NC opens a pop-up window.
Enter a file name with the extension .HU, and confirm with
ENT.
Confirm with the MM (or INCH) soft key or screen button.
smarT.NC creates an .HU program with the selected units
of measurement and automatically inserts the program
header form.
The data for the program header form are mandatory, since
Fundamentals
they are globally valid for the entire machining program. The
default values are specified internally. Change the data if
necessary, and save them with the END key.
In order to define machining steps, press the EDIT soft key
to select the desired machining step.
18
File management with smarT.NC
As mentioned previously, smarT.NC differentiates between three file
types: unit programs (.HU), contour descriptions (.HC) and point tables
(.HP). These three file types can be selected and edited in the file
manager in the smarT.NC operating mode. Contour descriptions and
point tables can also be edited if you are currently defining a working unit.
You can also open DXF files from within smarT.NC in order to extract
contour descriptions (.HC files) and machining positions (.HP files) from
them (software option).
The file manager in smarT.NC can also be fully operated with the mouse.
You can even use the mouse to change the sizes of the windows within
the file manager. Click the horizontal or vertical separating line, and drag
it to the desired position with the mouse.
Fundamentals
19
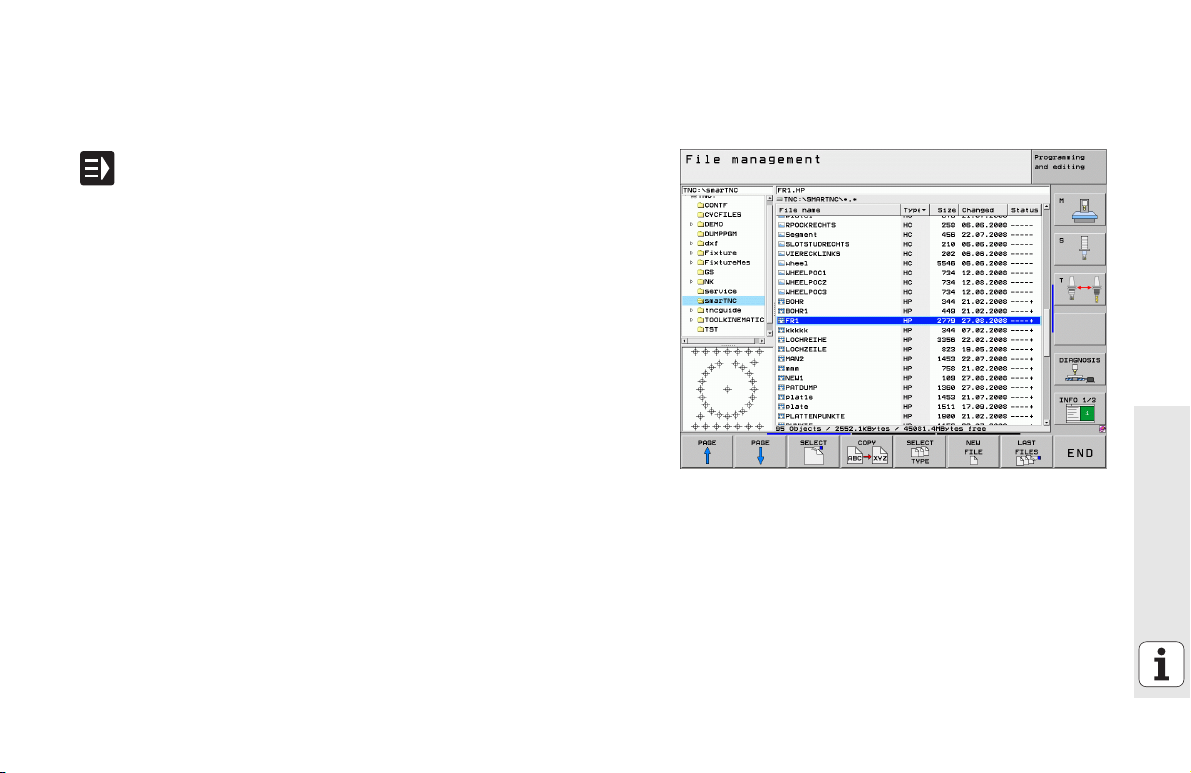
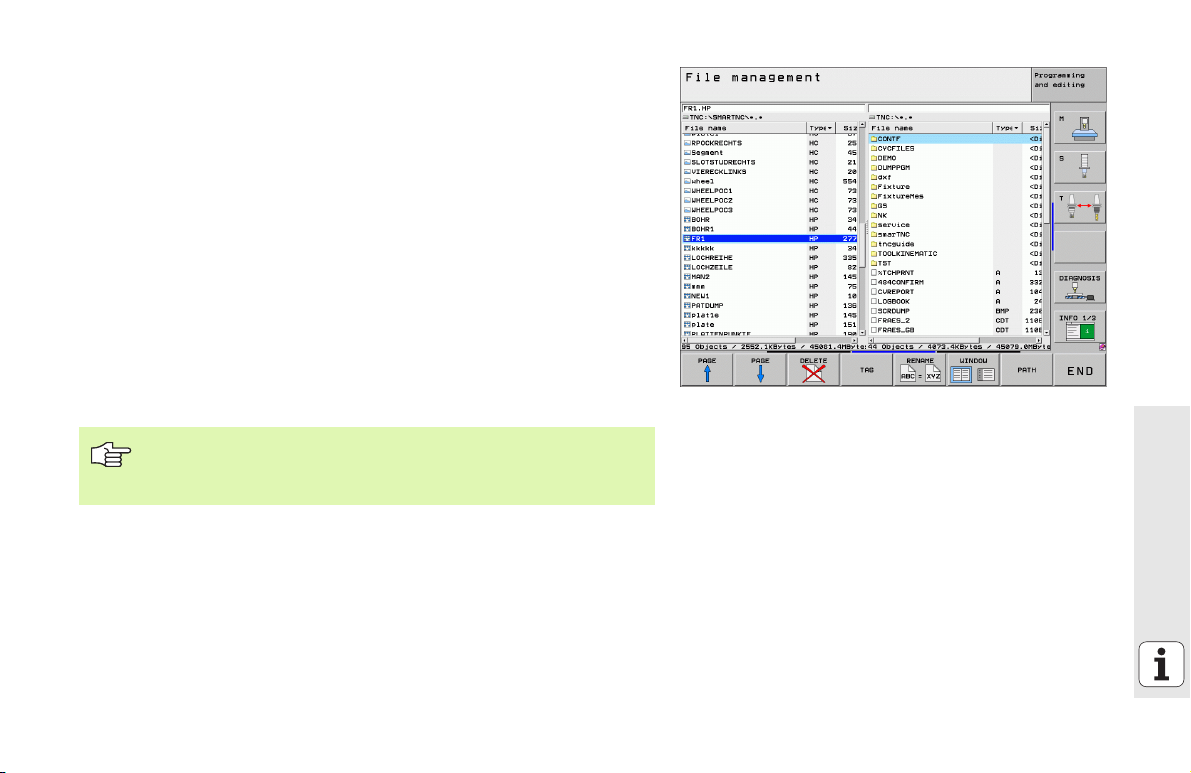
Calling the file manager
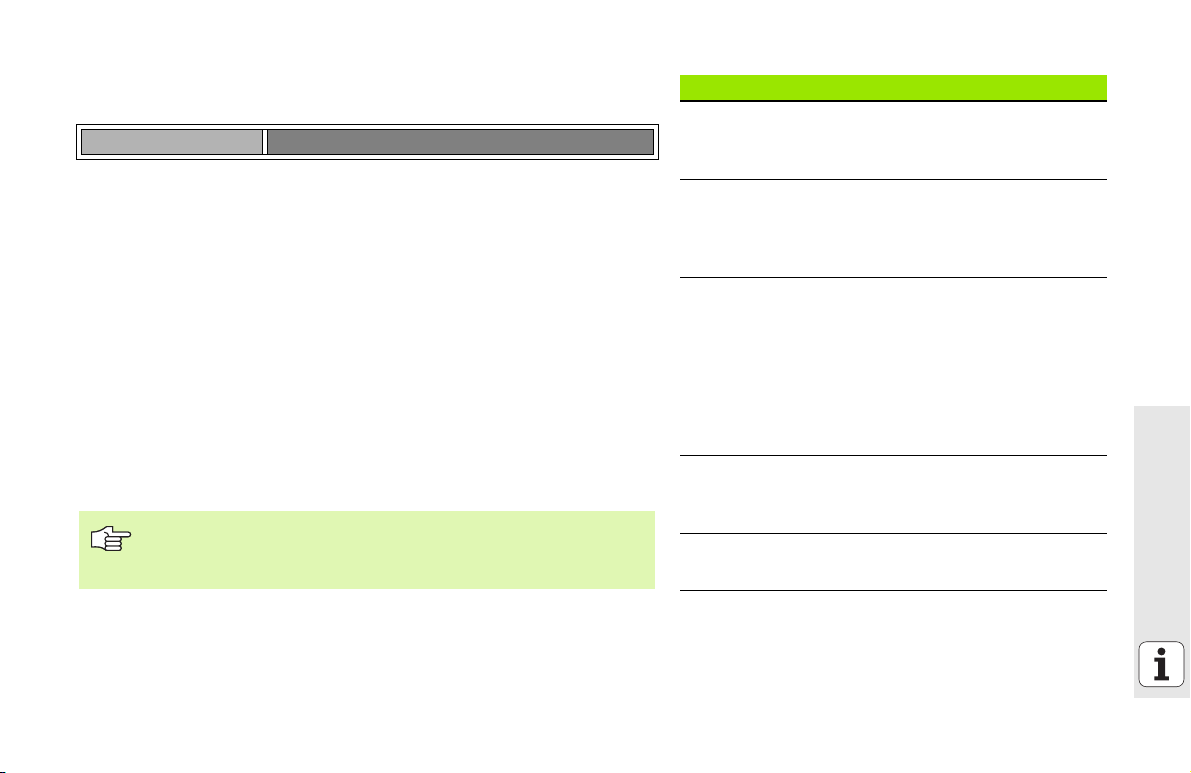
To select the file manager, press the PGM MGT key: The TNC displays
the file manager window (the figure at right shows the default setting).
If the TNC displays a different screen layout, press the WINDOW soft
key on the second soft-key row)
The top window on the left shows the available drives and directories.
Drives designate devices with which data are stored or transferred. A
drive can be the hard disk of the TNC, directories connected via the
network, or USB devices. A directory is always identified by a folder
symbol to the left and the directory name to the right. Subdirectories are
shown to the right of and below their parent directories. A triangle
pointing to the right in front of the folder symbol indicates that there are
further subdirectories, which can be shown with the right arrow key.
The lower window on the left shows a preview of the file contents if an
.HP or .HC file is highlighted.
Fundamentals
20

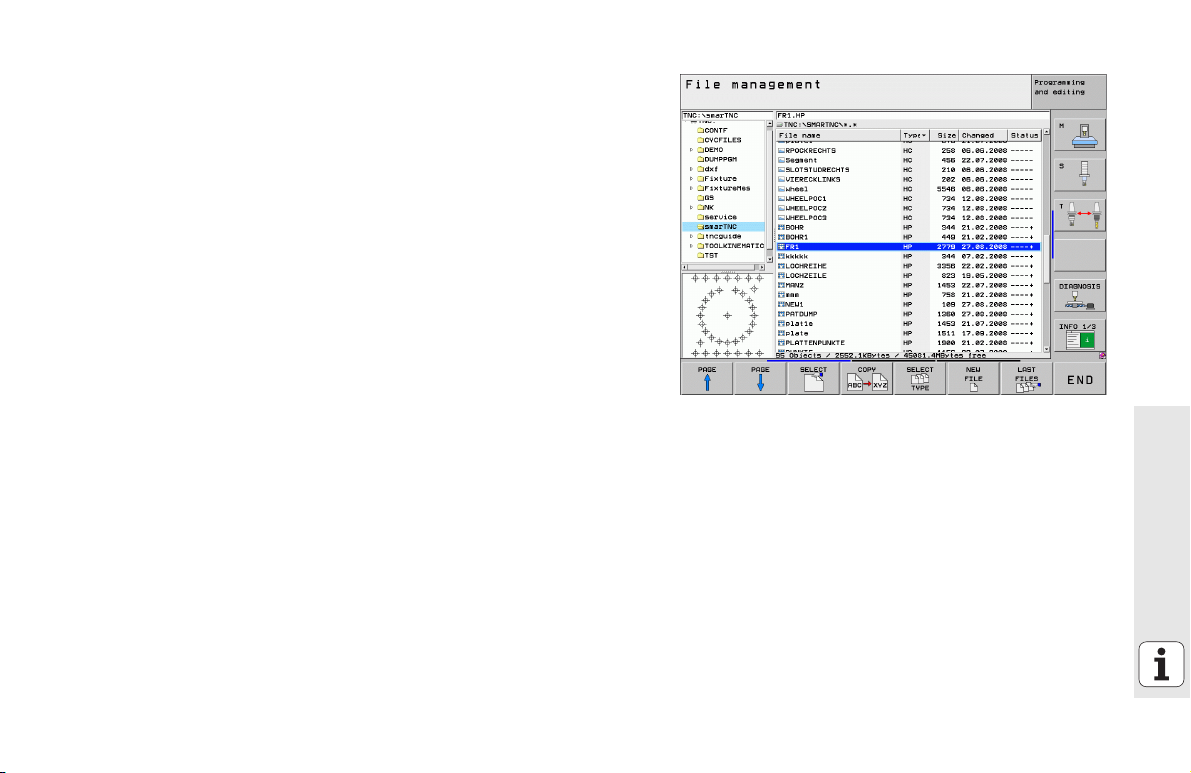
The wide window on the right shows you all files that are stored in the
selected directory. Each file is shown with additional information,
illustrated in the table below.
Display Meaning
File name Name with max. 25 characters
Type File type
Size File size in bytes
Changed Date and time of last change
Status File properties:
E: Program is selected in the Programming and
Editing mode of operation.
S: Program is selected in the Test Run mode of
operation.
M: Program is selected in a Program Run mode
of operation.
P: File is protected against deletion and
editing.
+: Dependent files exist (structure file, toolusage file)
Fundamentals
21
Select drives, directories and files
Call the file manager
Use the arrow keys or the soft keys to move the highlight to the desired
position on the screen:
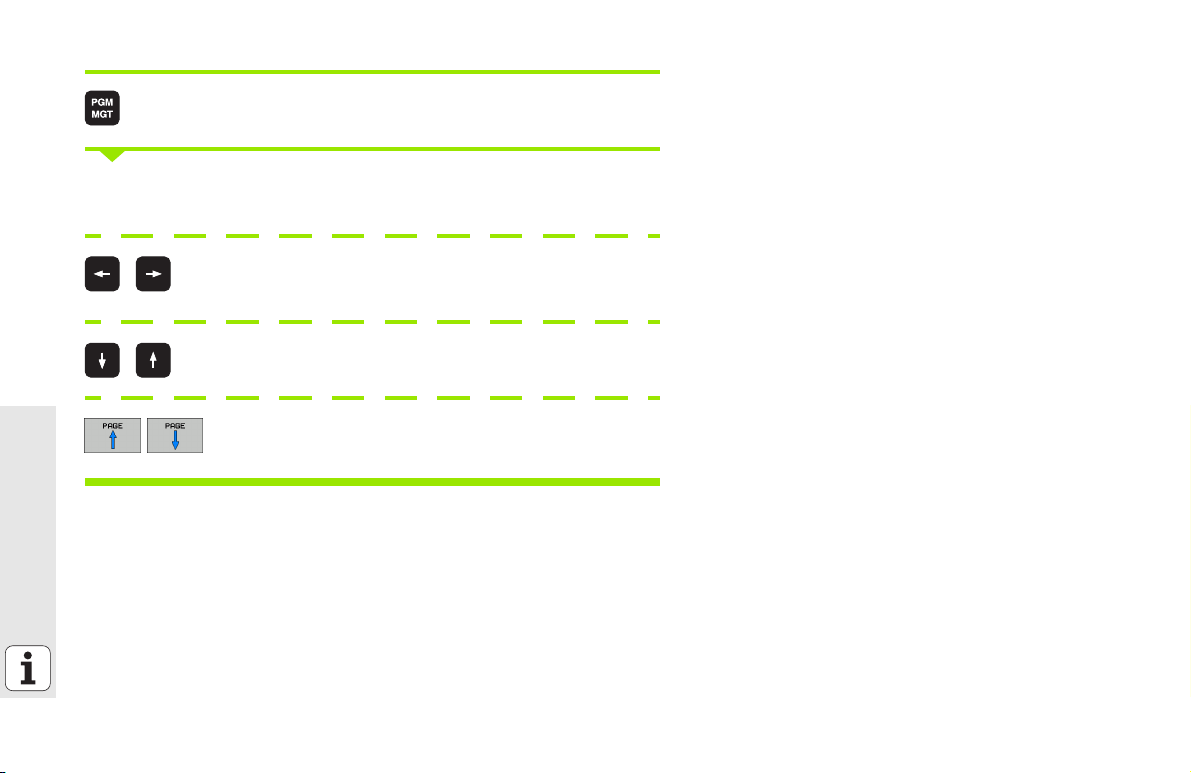
Moves the highlight from the left to the right window,
and vice versa.
Moves the highlight up and down within a window.
Fundamentals
Moves the highlight one page up or down within a
window.
22
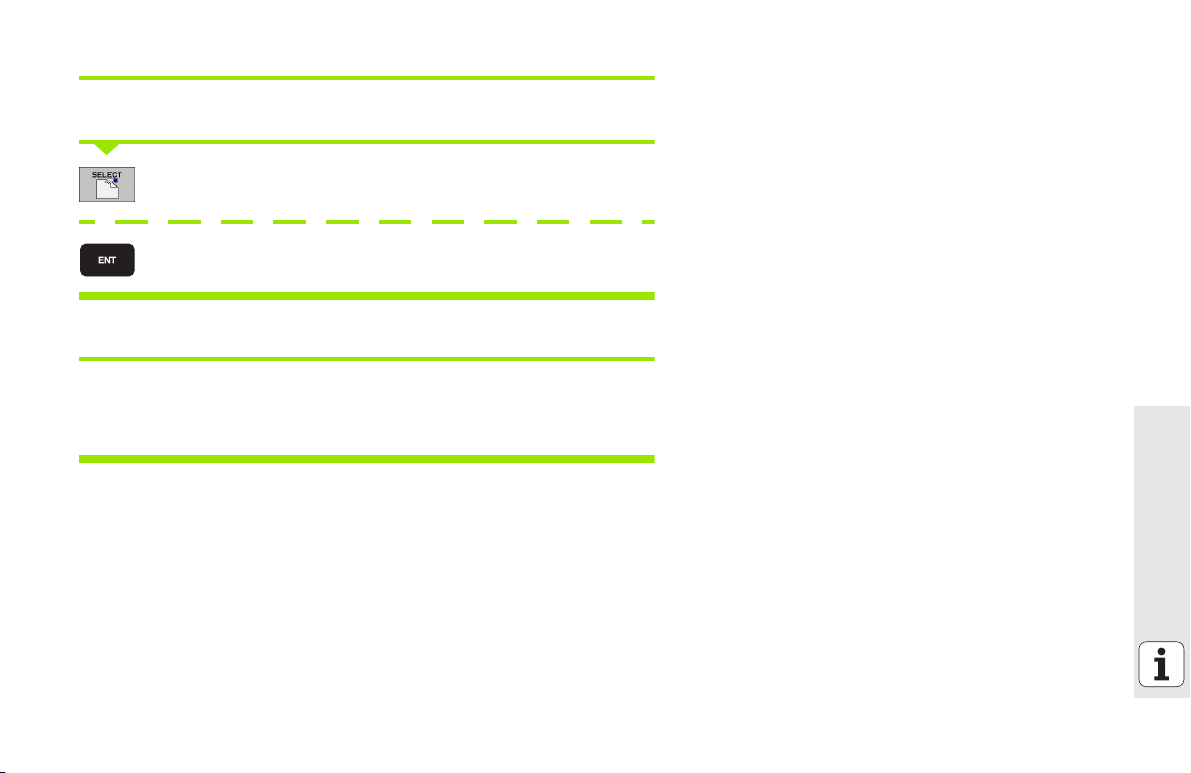
Step 1: Select drive
Move the highlight to the desired drive in the left window:
To select a drive, press the SELECT soft key, or
Press the ENT key.
Step 2: Select a directory
Move the highlight to the desired directory in the left-hand window—the
right-hand window automatically shows all files stored in the highlighted
directory.
Fundamentals
23
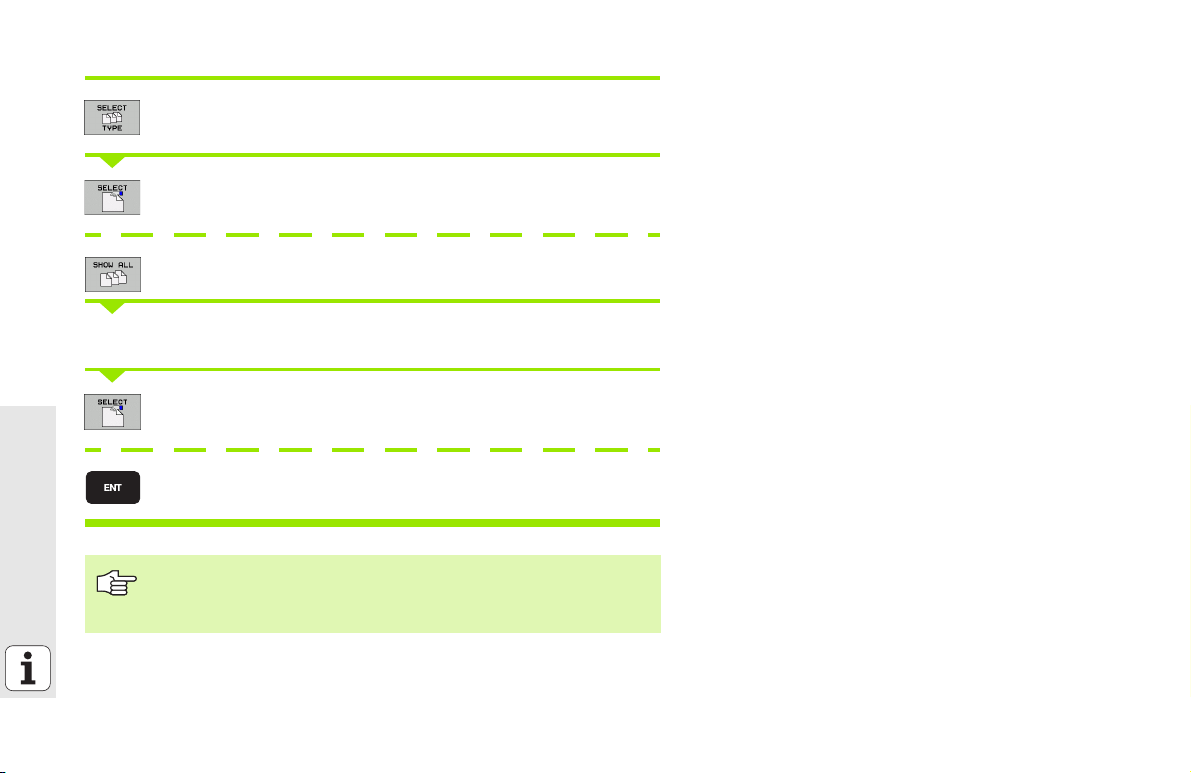
Step 3: Select a file
Press the SELECT TYPE soft key
Press the soft key for the desired file type, or
Press the SHOW ALL soft key to display all files, or
Move the highlight to the desired file in the right window
Fundamentals
Press the SELECT soft key, or
Press the ENT key: The TNC opens the selected file.
If you type in a name from the keyboard, the TNC
synchronizes the highlight with the entered characters so
that you can find the file more easily.
24

Create a new directory
Press the PGM MGT soft key to call the file manager
Use the left arrow key to select the directory tree
Select the TNC:\ drive if you want to create a new main directory, or
select an existing directory to create a new subdirectory in it.
Enter the name of the new directory, and confirm it with the ENT key.
smarT.NC then displays a pop-up window to confirm the new path
name.
Press ENT or the Yes button to confirm. In order to cancel the
procedure, press the ESC key or the No button.
You can also create a new program with the NEW
DIRECTORY soft key. Then enter the directory name in the
pop-up window and confirm with the ENT key.
Creating a new file
Press the PGM MGT soft key to call the file manager
Select the file type of the new file, as described earlier
Enter a file name without an extension, and confirm with ENT.
Confirm with the MM (or INCH) soft key or screen button. smarT.NC
creates a file with the selected units of measurement. In order to
cancel the procedure, press the ESC key or the Cancel screen button.
You can also create a new file with the NEW FILE soft key.
Then enter the file name in the pop-up window and confirm
with the ENT key.
Fundamentals
25

Copying files into the same directory
Press the PGM MGT soft key to call the file manager
Use the arrow keys to place the highlight on the file you want to copy
Press the COPY soft key. smarT.NC opens a pop-up window.
Enter the file name of the target file without the file type, and confirm
with the ENT key or the OK button. smarT.NC copies the contents of
the selected file into a new file of the same file type. In order to cancel
the procedure, press the ESC key or the Cancel screen button
If you want to copy the file to another directory, press the soft key for
path selection, select the desired directory from the pop-up window,
and confirm with ENT or the OK button.
Fundamentals
26
Copying files into another directory
Press the PGM MGT soft key to call the file manager
Use the arrow keys to place the highlight on the file you want to copy
Select the second soft-key row and press the WINDOW soft key to
split the TNC screen.
Shift the highlight to the left window with the left arrow key.
Press the PATH soft key. smarT.NC opens a pop-up window.
In the pop-up window, select the directory to which you want to copy
the file, and confirm with ENT or the OK button.
Shift the highlight to the right window with the right arrow key.
Press the COPY soft key. smarT.NC opens a pop-up window.
If required, enter the new file name of the target file without the file
type, and confirm with the ENT key or the OK button. smarT.NC copies
the contents of the selected file into a new file of the same file type. In
order to cancel the procedure, press the ESC key or the Cancel screen
button
If you want to copy multiple files, select these with the
mouse button. Press the CTRL key and select the desired
file.
Fundamentals
27

Delete file
Press the PGM MGT soft key to call the file manager
Use the arrow keys to place the highlight on the file you want to delete
Select the second soft-key row
Press the DELETE soft key. smarT.NC opens a pop-up window
In order to delete the selected file, press either the ENT key or the Yes
screen button. In order to cancel the delete procedure, press the ESC
key or the No screen button.
Renaming a file
Press the PGM MGT soft key to call the file manager
Use the arrow keys to place the highlight on the file you want to
rename
Select the second soft-key row
Fundamentals
Press the RENAME soft key. smarT.NC opens a pop-up window
Enter the new file name and confirm your entry with the ENT key or OK
screen button. In order to cancel the procedure, press the ESC key or
the Cancel screen button.
28

Protect file / Cancel file protection
Press the PGM MGT soft key to call the file manager
Use the arrow keys to place the highlight on the file you want to protect
or whose file protection you want to cancel
Select the third soft-key row
Press the DELETE soft key. smarT.NC opens a pop-up window
Press the MORE FUNCTIONS soft key.
To protect the selected file: Press the PROTECT soft key. To cancel file
protection: Press the UNPROTECTED soft key
Selecting one of the last 15 files selected
Press the PGM MGT soft key to call the file manager
Press the LAST FILES soft key. smarT.NC displays the last 15 files that
you selected in the smarT.NC operating mode
Use the arrow keys to place the highlight on the file you want to select
Press the ENT key to select the file
Fundamentals
29

Updating directories
If you are navigating on an external data carrier, it might become
necessary to update the directory tree:
Press the PGM MGT soft key to call the file manager
Use the left arrow key to select the directory tree
Press the UPDATE TREE soft key: The TNC updates the directory tree.
File sorting
Use the mouse to perform the file-sorting functions. You can sort the files
by name, type, size, change date and file status, in ascending or
descending order:
Press the PGM MGT soft key to call the file manager
Click with the mouse the column header you want to sort by. A triangle
in the column header indicates the sorting sequence. Click the header
Fundamentals
again to reverse the sequence
30
 Loading...