


Compact Fluorescent Dusk-to-
Dawn 42 Watt Security Light
|
|
|
|
Item |
Model |
|
|
|
|||
135931 |
UT-5681-BZ |
|
|
Questions or problems? Before returning to your retailer, call our technical service department at 1-800-858-8501 (English speaking only), 7:30 am to 4:30 pm, CST, Monday – Friday.
PACKAGE CONTENTS
• |
Security light |
• |
Bulb |
• |
Wire connectors |
• |
1/2" NPT coupler |
• |
1/2" NPT nut |
• |
Lag bolts (x3) |
• |
Mounting template |
|
|
INSTALLATION INSTRUCTIONS
Estimated Installation Time: 1 hour
Items needed for installation (not included):
• Phillips and flathead screwdrivers
• |
Pliers |
• |
Wire strippers/cutters |
• |
Safety glasses |
• |
Silicone caulk |
• |
Ladder |
• |
Black tape |
• |
Conduit fitting |
|
|
Additional item needed for junction box installation (not included):
• Junction box cover with threaded hole (1/2" NPT)
READ ALL INSTRUCTIONS CAREFULLY BEFORE
BEGINNING INSTALLATION.
NOTE: All wiring must be run in accordance with the National Electrical Code (Canadian Electrical Code in Canada) through conduit or another acceptable means. Contact a qualified electrician if there is any question as to the suitability of the system.
Lamp in Fixture Contains Mercury. Dispose According to Local, State, or Federal Laws.
Installation of Diffuser
Note: It is recommended to install the diffuser before mounting fixture to wall or junction box.
1.Place fixture upside down on a solid surface.
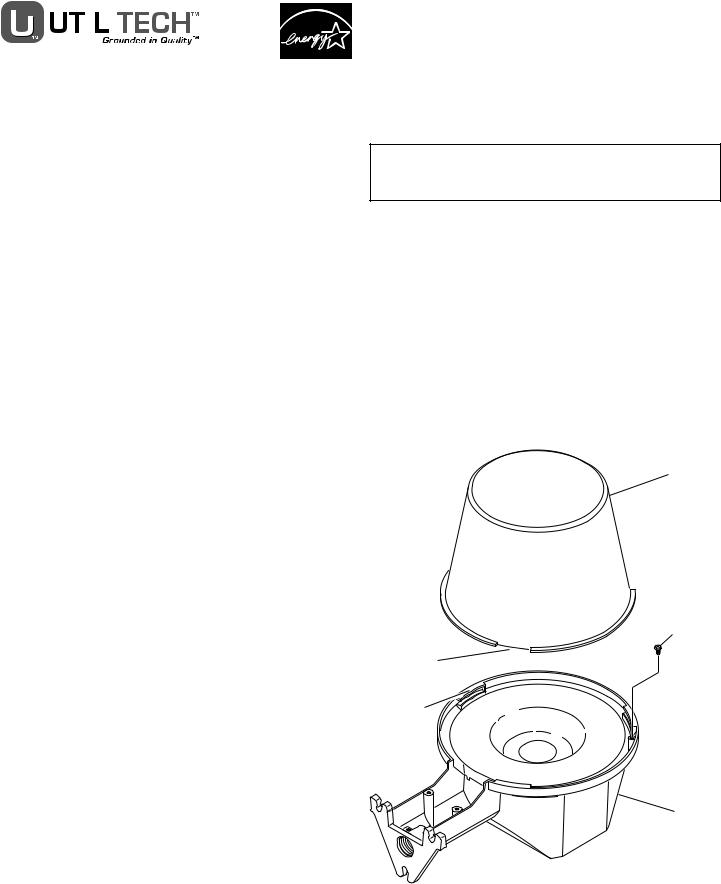
2.Remove diffuser locking screw from fixture (see Figure 1).
3.Align the notches in the diffuser with the tabs on the fixture and place the diffuser on the fixture (see Figure 1).
4.Rotate the diffuser clockwise until the diffuser stops (see Figure 1).
5.Install locking screw removed in step 2 (see Figure 1).
Diffuser
Diffuser
Locking
Screw
Diffuser Notch
Fixture Tab
Fixture
Figure 1
© 2008 HeathCo LLC |
598-1350-01 |

 WARNING: Turn power off at the circuit breaker or fuse.
This fixture can be directly wall mounted or wall mounted using a weatherproof junction box. Use the instructions below that apply to your application.
Installation Without A Junction Box
1.Select a location on a flat wall with structurally sound wood and from 5 to 25 feet (1.5 to 7.6 m) from the ground. The wood should be at least one inch (25 mm) thick to safely secure the fixture.
2.Using the mounting template as a guide, mark the 3 mounting holes. We suggest drilling 3/16" (4.8 mm) pilot holes for the lag screws.
3.Install the two bottom lag screws first. Screw in the lag screws so that there is about 3/8" (9.5 mm) of space under the head.
4.Apply silicone caulk around threaded hole on rear of fixture.
5.Place the fixture on these two screws and install the top lag screw. Tighten the top lag screw first, then tighten the remaining lag screws.
6.Remove the two screws attaching the fixture cover plate to the fixture (see Figure 2).
7.Route the service wires from the conduit through the fixture cover plate (see Figure 2).
8.Secure your outdoor cable or flexible conduit to the cover plate with a fitting (not supplied) in accordance with the National Electrical Code (Canadian Electrical Code in Canada).
Installation Using A Junction Box
1.Thread 1/2" NPT coupler (supplied) into the threaded hole on the rear of the fixture.
2.Attach junction box cover plate with 1/2" NPT threads (not supplied) to coupler.
3.Verify the mounting holes on the cover plate are correctly aligned with the mounting holes on the junction box and install the 1/2" NPT nut behind the cover plate. Securely tighten nut against back of cover plate.
4.Caulk between coupler and cover plate.
5.Remove the two screws attaching the fixture cover plate to the fixture.
6.Route service wires through coupler and into the fixture.
7.Securely attach the cover plate to the junction box.
Complete The Installation
1.Connect the fixture wires to the service wires as shown in Figure 2 (black to black and white to white).
2.This fixture must be connected to ground. Secure the service ground wire under the head of the green ground screw (see Figure 2).
3.Install the cover plate. Secure with the two screws provided (see Figure 2).
4.Plug in the 42 watt compact fluorescent lamp provided (NEMA designation CFTR42W/GX24Q with GX24Q-4 base). ATTENTION: When removing, grasp bulb by the base. Do not grasp glass bulb to remove.
 CAUTION: Do not use any other wattage lamps in this fixture.
To test operation during daylight, cover the photocontrol (round object on front of fixture) with black electrical tape. Turn on the power. The light should come on immediately and will take a few minutes to reach full brightness. Uncover the photocontrol and your unit will operate automatically—on at dusk, off at dawn.
Lag Screw
Caulk
Ground
Screw
Cover Plate
Bulb
Figure 2
2 |
598-1350-01 |
|
|
|
|
|
|
|
|
|
|
|
|
|
|
|
|
|
|
|
|
|
|
|
|
|
|
|
|
|
|
|
|
Articulos |
Modelo |
|
|
||||
|
|||||||
135931 |
UT-5681-BZ |
|
|
||||
Luz de seguridad compacta fluorescente de 42 vatios para usarla desde el anochecer hasta el amanecer
¿Preguntas o problemas? Antes de devolver el producto al minorista, llame a nuestro departamento de servicio técnico al 1-800-858-8501 (sólo se habla inglés), de 7:30 am a 4:30 pm, Hora Estándar del Centro, de Lunes a Viernes.
CONTENIDOS DEL PAQUETE
• |
Luz de seguridad |
• |
Bombilla |
• |
Conectores de alambre |
• |
Acoplador NPT de 1/2 Pulg. |
• |
Tuerca NPT de 1/2 Pulg. |
• |
Tirafondos (x3) |
• |
Plantilla de montaje |
|
|
INDICACIONES PARA SU INSTALACIÓN
Tiempo estimado de instalación: 1 hora
Artículos que se necesitan para la instalación (no incluidos):
•Tornillos Phillips y de cabeza plana
•Alicates
•Desforrador/cortador de alambre
• |
Lentes de seguridad |
• |
Calafateo de silicona |
• |
Escalera |
• |
Cinta aislante negra |
• |
Accesorio del conducto |
|
|
Se necesita un artículo adicional para la instalación de la caja de empalme (no incluidos):
• Tapa de la caja de empalmen con orificio roscado (1/2" NPT)
LEA TODAS LAS INDICACIONES CON CUIDADO ANTES DE COMENZAR LA INSTALACIÓN.
NOTA: Todo el cableado debe estar hecho de acuerdo al Código Eléctrico Nacional (Código Eléctrico Canadiense en Canadá) por medio de conductos o de otro medio aceptable. Comuníquese con un electricista profesional si tiene preguntas relacionadas con la aptitud del sistema.
La lámpara en el dispositivo contiene mercurio. Deseche de acuerdo con las leyes locales, estatales o federales.
Instalación del difusor
Nota: Se recomienda instalar el difusor antes de instalar el aparato a la pared o a la caja de empalme.
1.Ponga el aparato boca arriba sobre una superficie sólida.
2.Quite del aparato el tornillo de fijación del difusor (vea la Figura 1).
3.Alinee las ranuras del difusor con las aletas del aparato y coloque el difusor sobre el aparato (vea la Figura 1).
4.Gire el difusor en sentido horario hasta que el difusor se pare (vea la Figura 1).
5.Ponga el tornillo de fijación que se quitó en el paso 2 (vea la Figura 1).
Difusor
Tornillo de fi jación del difusor
Ranura del aparato
Aleta del aparato
Aparato
Figura 1
598-1350-01 |
3 |
598-1350-01 S |
© 2008 HeathCo LLC |
 Loading...