Hayter Mowers Envoy Code 100C, Envoy Code 101C User Manual

Envoy
CODE 100C . 101C
(English Version)
FROM SERIAL 100133(REV .0.) ISSUE 11.10.04
MAIN FEATURES /SPECIFICATIONS
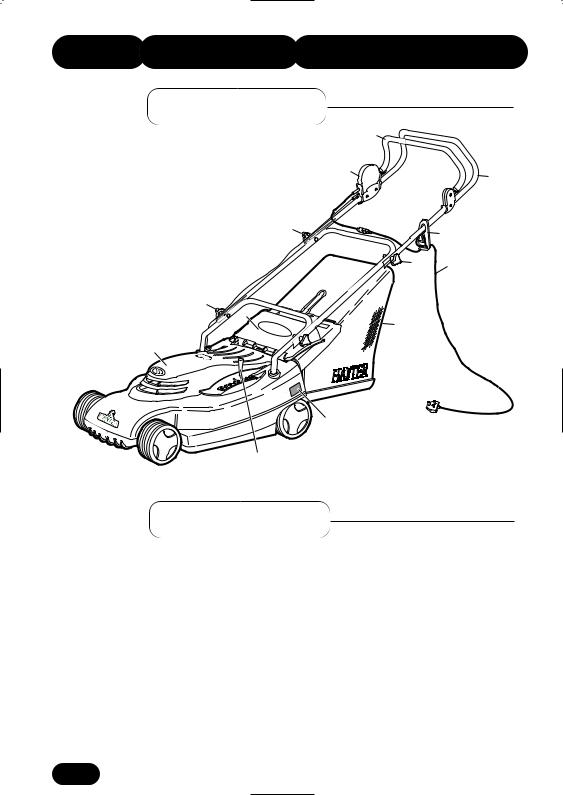
Main Features
1 |
Handlebar |
4 |
|
|
|
||
2 |
Cable. |
|
|
3 |
Switch Control |
3 |
5 |
4 |
Bail Arm. |
|
|
|
|
||
5 |
Handlebar. |
|
|
6 |
Cable Cleat. |
|
|
7 |
Grassbag |
|
|
8 |
Rear Deflector |
|
6 |
9 |
Serial No. |
|
|
10 |
Height of Cut |
1 |
2 |
11 |
Motor Housing |
|
|
|
|
7 |
|
Code |
(100C) (101C) |
Supply |
220-240V~50Hz |
Rated Input |
1.4 kW |
Fuse Rating |
13A |
Weight |
23 Kg |
Cutterblade Speed |
2950 rpm |
Cutting width |
360mm |
Cutting height |
13 - 60mm |
Overall dimensions |
1,360mm x 450mm x 1,040mm |
Supply cable: (For European specification - only)
Cable - HO5 VV-F, 2 x 1 sq. mm. Appliance coupler - VDE / CEE7. Mains plug - Fused in accordance with the above specifications and compliant with the local standards in the country of use. This item is not included with code 101C mowers due to variation in European mains plug specifications and should be supplied separately by your Hayter Dealer.
CONTENTS
1.2 |
Main Features/Specifications |
1.19 - 1.22 |
|
|
1.19 |
1.3 |
Contents |
1.19 |
|
|
1.19 |
1.4 |
Introduction |
1.19 |
|
|
1.19 |
1.5 |
Warranty |
1.20 |
|
|
1.21 |
1.6 - 1.9 |
Safety Precautions |
1.21 |
|
|
1.22 |
1.9 |
Safety Symbols |
|
1.9 |
Control Symbols |
1.23 - 1.24 |
1.10 |
Assembling the Mower |
1.25 |
1.10 |
- Delivery Checklist |
|
1.10 |
- Handlebar |
1.26 - 1.27 |
1.10 |
- Grassbag Attachment |
|
1.10 |
- Supply Cable |
1.28 |
1.11 - 1.15 |
Operating The Mower |
1.30 - 1.31 |
1.11- Electrical Connections
1.11 |
- Starting |
1.32 |
1.11- Forward Travel
1.11- Turning
1.12- Stopping
1.12- Height of Cut
1.12- Before Mowing
1.13- Grassbag
1.13- Without Grass Collection
1.13- Heavy Growth
1.13- Non-Grassed Areas
1.14- Safe Mower Practice
1.15- Overloading Protection
1.16- 1.17 - Lawn Care Calendar - Guide Only
1.17- Lawn Stripes
1.18Maintenance Schedule
1.3

INTRODUCTION
Thank you for purchasing a Hayter mower. The following pages are designed to help you gain safe and efficient service from your mower.
IMPORTANT: This ‘Owners Handbook’ should be regarded as part of the mower as it gives essential information regarding mower safety, operation, maintenance and specifications. Read and understand this handbook prior to operating your mower for the first time. Make sure you are familiar with all the controls and points of regular maintenance. If you have any doubts, consult your local Hayter authorised dealer who will be pleased to give you assistance.
IMPORTANT: This mower is designed solely for use in a domestic grass cutting environment. Use in any other way is considered as contrary to the intended use. Compliance with and strict adherence to the conditions of operation, service and repair as specified in this handbook also constitute essential elements of the intended use.
This mower should be operated, serviced and repaired only by persons who are familiar with its particular characteristics and who are acquainted with the relevant safety procedures.
The safety precautions listed in this handbook and all other generally recognised regulations on safety must be observed at all times.
Any arbitrary modifications carried out to this machine may relieve Hayter Limited of liability for any resulting damage or injury.
Hayter mowers are robustly constructed and designed for efficient economical performance under normal mowing conditions. Correct operation and maintenance will ensure a long and satisfactory service life. Prior to despatch from our factory every effort is made to ensure that your mower is delivered in perfect condition.
Throughout this handbook all references to left and right are as viewed from behind the handlebar, in the direction of forward travel.
This handbook is based on information available at the time of publication.
HAYTER LIMITED reserve the right to amend product specifications without prior notification.

WARRANTY
LIMITED WARRANTY
Hayter Limited warrants to the original user/purchaser that this unit shall be free from defects in material or workmanship under normal use for a period of two years from the date of purchase. To qualify for the full benefit of the warranty, the warranty registration card must be returned to Hayter Limited within 14 days of purchase. If the selling dealer has not returned the Warranty Registration Card which is attached to the rear of the Owners Handbook please complete and return. Subject to the conditions and exclusions noted in this limited warranty, we shall at our option, repair or replace any warranted part during the applicable period. If you are in any doubt or experience any difficulty, please consult a Hayter Authorised Service Dealer for clarification.
A 90 day warranty period applies to those items which are subject to normal wear and tear e.g. wheels, cutterblades, cables, grassbags and other consumable wearing parts.
This warranty does not apply to any unit that has been tampered with, altered, misused, abused or used for hire, and will become invalid if non genuine Hayter parts are fitted. This warranty does not cover minor mechanical adjustments unless they are due to defective material or workmanship. Consult the Owner's Handbook or a Hayter Authorised Service Dealer for assistance when making these adjustments.
The machines are not warranted for commercial use.
To make a warranty claim, return the unit to a Hayter authorised service dealer along with proof of purchase stating the machine serial number and date of purchase. Subject to the conditions and exclusions in this limited warranty, the authorised dealer will, at our option, repair or replace any warranted part within the duration of the warranty period.
This limited warranty gives specific legal rights and is in addition to any statutory rights to which you may be entitled and your statutory rights are not affected by this warranty. If you need additional information concerning this written warranty, or assistance in obtaining services, please write to: Hayter Limited, Service Department, Spellbrook, Bishop's Stortford, Hertfordshire, CM23 4BU
UK ONLY: Details of your local Hayter authorised dealer are contained in The Yellow Pages or contact:- Freephone 0800 616298: or visit the Hayter website at www.hayter.co.uk
SAFETY PRECAUTIONS
Safety Alert Symbol
messages. When Carefully read
observe the
Training
carefully. Ensure that you are familiar with the use of the equipment. Learn how to stop the
emergency.
or people unfamiliar with these instructions to
especially children, or pets are nearby.
the user is responsible for accidents or hazards or their property.
It is recommended that a high sensitivity Residual Current - Operated Circuit - Breaker (RCCB) with a trip current of not more than 30mA is installed at the mains power socket. This will provide the user with additional protection against electric shock. The fuse installed in the plug only provides protection for the electrical equipment and will not safeguard against electrocution. Always check the RCCB before using the mower.
WARNING: Regularly inspect the supply cable for signs of damage or ageing. Replace immediately if defective.
Always wear substantial footwear and long trousers while mowing. Do not operate the equipment when barefoot or wearing sandals.
Thoroughly inspect the area where the mower is to be used and remove all stones, sticks, wires, bones and other foreign objects.
SAFETY
Preparation
Always ensure that the mower is Frequently check all nuts, bolts and uine Hayter parts.
A damaged cutterblade and loose fixing use, visually inspect the cutting mechanism condition. A damaged cutterblade must
a genuine Hayter replacement part.
worn can be resharpened. Ensure that both cutting edges are resharpened equally to maintain balance.
An unbalanced cutterblade may cause serious damage to your machine.
Refer to "Maintenance."
Operation
SWITCH OFF AND REMOVE PLUG FROM MAINS.
- Before clearing blockages or unclogging the discharge chute. - Before cleaning, checking or working on the mower.
-Whenever you leave the mower.
-After striking a foreign object. Inspect the mower for damage and make repairs before re-starting and operating the mower.
-If the mower starts to vibrate abnormally (check immediately).
-If the supply cable is entangled.
THE CUTTERBLADE CAN CONTINUE TO ROTATE AFTER
THE MACHINE IS SWITCHED OFF.
Keep the supply cable clear of the cutterblade at all times.
Do not mow across the supply cable. Immediately disconnect the cable from the mains supply if this occurs and check for damage. Do not use a defective supply cable.
Mow only in the daylight or in good artificial light.
Avoid using the mower on wet grass, where feasible.
Always be sure of your footing on slopes.
Walk, never run.
Mow across the face of slopes, never up and down.
Exercise extreme caution when changing direction on slopes.
Do not mow excessively steep slopes.
SAFETY PRECAUTIONS
Operation
mower towards you.
transportation when crossthe mower to and
securely in position and
from the cutterblade.
absolutely necessary
parts.
or connected to the
mower is in operation,
Maintenance & Storage
to ensure that the mower is in a settings refer to mower mainte-
for signs of damage or ageing.
wear or deterioration and replace if
necessary.
Wear strong work gloves when removing and reassembling the cutterblade.
Replace worn or damaged parts for safety.
1.8
SAFETY PRECAUTIONS
Safety Symbols
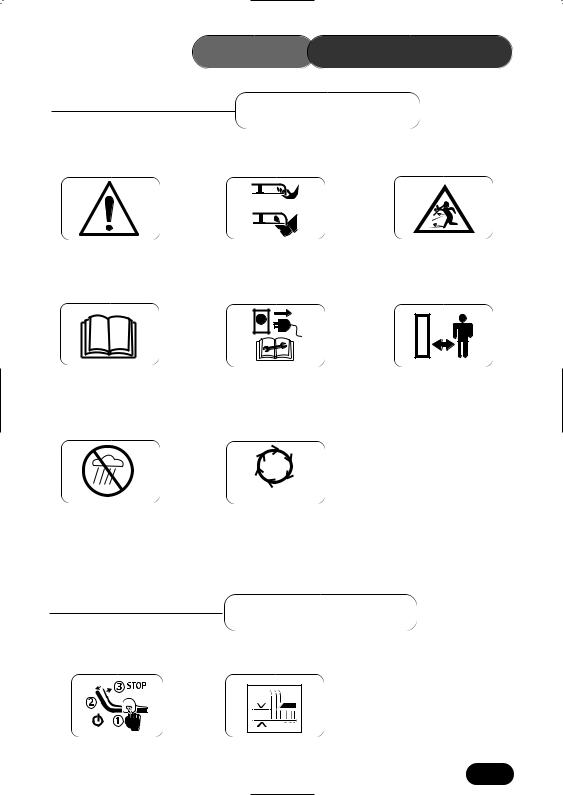
Safety Alert - Be aware to the possibility of injury.
Danger of severing toes or fingers in cutting mechanism.
Danger of being hit by thrown objects.
Switch off and remove plug the from mains before performing
maintenance or repair work.
Keep bystanders at a safe distance from the mower.
Do not use in rain or in wet conditions.
Wait until all machine components have stopped before touching them.
STOP
Switch ON / OFF
(Symbol)
Control Symbols
305113 |
1.9
ASSEMBLING THE MOWER
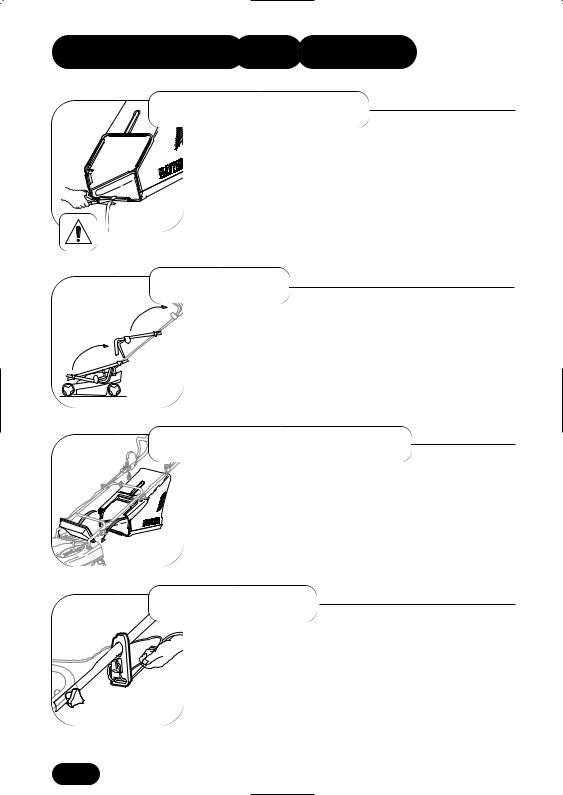
Delivery Checklist
check that the following are missing contact,
Grassbag Top Cover
attached to the grass-
to allow the handleposition. Tighten all
.
not become snagged at
Grassbag Attachment
grassbag is assembled. Raise the rear deflector, pass the under the handlebar and hook in position. Lower the deflecon the grassbag.
Supply Cable
Route the supply cable loosely across to the cable cleat on the left side of the handlebar. Make a loop in the supply cable and secure to the cable cleat.
 Loading...