


hatcocorp.com
Reg ine!
ine!
(see page 2)
S'inscrire en ligne!
 (voir page 15) Intelligent Toast-Qwik®
Conveyor Toaster • Grille-pain à convoyeur ITQ Series • Série ITQ
Installation and Operating Manual Manuel d'installation et d'utilisation
P/N 07.04.636.00
WARNING
Do not operate this equipment unless you have read and understood the contents of this manual! Failure to follow the instructions contained in this manual may result in serious injury or death. This manual contains important safety information concerning the maintenance, use, and operation of this product. If you’re unable to understand the contents of this manual, please bring it to the attention of your supervisor. Keep this manual in a safe location for future reference.
ADVERTENCIA
No opere este equipo al menos que haya leído y comprendido el contenido de este manual! Cualquier falla en el seguimiento de las instrucciones contenidas en este manual puede resultar en un serio lesión o muerte. Este manual contiene importante información sobre seguridad concerniente al mantenimiento, uso y operación de este producto. Si usted no puede entender el contenido de este manual por favor pregunte a su supervisor. Almacenar este manual en una localización segura para la referencia futura.
AVERTISSEMENT
Ne pas utiliser cet équipement sans avoir lu et compris le contenu de ce manuel ! Le non-respect des instructions contenues dans ce manuel peut entraîner de graves blessures ou la mort. Ce manuel contient des informations importantes concernant l'entretien, l'utilisation et le fonctionnement de ce produit. Si vous ne comprenez pas le contenu de ce manuel, veuillez le signaler à votre supérieur. Conservez ce manuel dans un endroit sûr pour pouvoir vous y référer plus tard.
Français = p 15
© 2016 Hatco Corporation
CONTENTS |
|
English |
Important Owner Information .............................................. |
2 |
Introduction........................................................................... |
2 |
Important Safety Information............................................... |
3 |
Model Description................................................................. |
4 |
Model Designation................................................................ |
4 |
Specifications........................................................................ |
5 |
Plug Configurations ............................................................. |
5 |
Electrical Rating Charts ....................................................... |
5 |
Dimensions .......................................................................... |
5 |
Installation ............................................................................. |
6 |
General ................................................................................ |
6 |
Operation............................................................................... |
7 |
General ................................................................................ |
7 |
Touchpad Control................................................................. |
7 |
Operating the Toaster .......................................................... |
8 |
IMPORTANT OWNER INFORMATION
Power Save mode ............................................................... |
8 |
Programming menu Items ................................................... |
9 |
Using the Systems menu................................................... |
10 |
Maintenance ........................................................................ |
11 |
General .............................................................................. |
11 |
Daily Cleaning .................................................................... |
11 |
Cleaning the Fan Filters .................................................... |
12 |
Cleaning the Bottom Element Reflector ............................ |
12 |
Cleaning the Touchpad Control ......................................... |
12 |
Troubleshooting Guide ...................................................... |
12 |
ITQ Error message Guide ................................................. |
13 |
Options and Accessories................................................... |
14 |
Limited Warranty................................................................. |
14 |
Authorized Parts Distributors............................ |
Back Cover |
Record the model number, serial number, voltage, and purchase date of the unit in the spaces below (specification label located on the back of the unit). Please have this information available when calling Hatco for service assistance. model No. ________________________________________
Serial No. ________________________________________
Voltage __________________________________________
Date of Purchase __________________________________
Register your unit!
Completing online warranty registration will prevent delay in obtaining warranty coverage. access the Hatco website at www.hatcocorp.com, select the Parts & Service pull-down menu, and click on “Warranty Registration”.
Business |
7:00 am to 5:00 Pm Central Standard Time (CST) |
|||
Hours: |
||||
|
(Summer Hours: June to September— |
|||
|
7:00 am to 5:00 |
Pm |
CST monday–Thursday |
|
|
7:00 am to 4:00 |
Pm |
CST Friday) |
|
Telephone: 800-558-0607; 414-671-6350 |
||||
E-mail: |
partsandservice@hatcocorp.com |
|||
Fax: |
800-690-2966 |
(Parts and Service) |
||
|
414-671-3976 |
(International) |
||
24 Hour 7 Day Parts and Service
Assistance available in the United States and Canada by calling 800-558-0607.
additional information can be found by visiting our web site at www.hatcocorp.com.
INTRODUCTION
Hatco Intelligent Toast-Qwik® Conveyor Toasters with Spot-On™ technology are specially-designed to automate, accelerate, and enhance the toasting operation. Spot-On™ technology senses when product is placed on the conveyor and activates the unit. Product then passes through a heating chamber for rapid and thorough toasting. Pre-programmed conveyor speed and chamber temperature produce the desired toasting color for the product being toasted.
Hatco toasters are built with quality to meet the demands of foodservice operations and provide years of trouble-free performance. The metal-sheathed, tubular heating elements are guaranteed against breakage and burnout for two years.
Hatco Intelligent Toast-Qwik Conveyor Toasters are products of extensive research and field testing. The materials used were selected for maximum durability, attractive appearance, and optimum performance. Every unit is inspected and tested thoroughly prior to shipment.
This manual provides installation, safety, and operating instructions for Intelligent Toast-Qwik Conveyor Toasters. Hatco recommends all installation, operating, and safety instructions appearing in this manual be read prior to installation or operation of a unit.
Safety information that appears in this manual is identified by the following signal word panels:
WARNING
WARNING indicates a hazardous situation which, if not avoided, could result in death or serious injury.
CAUTION
CAUTION indicates a hazardous situation which, if not avoided, could result in minor or moderate injury.
NOTICE
NOTICE is used to address practices not related to personal injury.
2 |
Form No. ITQm-0116 |
|
|
IMPORTANT SAFETy INFORMATION |
English |
Read the following important safety information before using this equipment to avoid serious injury or death and to avoid damage to equipment or property.
WARNING
ELECTRIC SHOCK HAzARD:
• Plug unit into a properly grounded electrical receptacle of the correct voltage, size, and plug configuration. If plug and receptacle do not match, contact a qualified electrician to determine and install proper voltage and size electrical receptacle.
• Put unit in standby, allow to cool, turn OFF power switch, and unplug power cord before performing cleaning, adjustments, maintenance, or attempting to clear a jam.
• Unit is not weatherproof. Locate unit indoors where ambient air temperature is a minimum of 70°F (21°C) and a maximum of 100°F (38°C).
• DO NOT submerge or saturate with water. Unit is not waterproof. Do not operate if unit has been submerged or saturated with water.
• Do not steam clean or use excessive water on unit.
• This unit is not “jet-proof” construction. Do not use jetclean spray to clean this unit.
• Do not clean unit when it is energized or hot.
• Do not allow liquids to spill into unit.
• Do not pull unit by power cord.
• Discontinue use if power cord is frayed or worn.
• Do not attempt to repair or replace a damaged power cord. Cord must be replaced by Hatco, an Authorized Hatco Service Agent, or a person with similar qualifications.
• Never insert a knife, fork, or similar object into toasting chamber.
• This unit must be serviced by qualified personnel only. Service by unqualified personnel may lead to electric shock or burn.
• Use only Genuine Hatco Replacement Parts when service is required. Failure to use Genuine Hatco Replacement Parts will void all warranties and may subject operators of the equipment to hazardous electrical voltage, resulting in electrical shock or burn. Genuine Hatco Replacement Parts are specified to operate safely in the environments in which they are used. Some aftermarket or generic replacement parts do not have the characteristics that will allow them to operate safely in Hatco equipment.
ExPLOSION HAzARD: Do not store or use gasoline or other flammable vapors or liquids in the vicinity of this or any other appliance.
Make sure all operators have been instructed on the safe and proper use of the unit.
This unit is not intended for use by children or persons with reduced physical, sensory, or mental capabilities. Ensure proper supervision of children and keep them away from the unit.
If toaster overheats or cooling fans inside unit stop working, the safety high-limit switch will shut off toaster. Contact Authorized Service Agent or Hatco for assistance.
Form No. ITQm-0116 |
3 |
|
FIRE HAzARD:
WARNING
• Allow a minimum clearance of 1" (25 mm) along the sides and rear of unit. Allow a minimum clearance of 12" (305 mm) in the front, measured from chamber opening on toaster body. If safe distances are not maintained, discoloration or combustion could occur.
• Do not locate toaster under shelving or closer than 12" (305 mm) from the ceiling.
• Do not place anything on top of toaster. Do not place toaster near or underneath curtains or other combustible materials. Items near or on top of toaster could catch fire causing injury and/or damage to the toaster.
• In case of fire, disconnect toaster from power source immediately. This allows unit to cool, making it easier and safer to put out fire.
This unit has no “user-serviceable” parts. If service is required on this unit, contact an Authorized Hatco Service Agent or contact the Hatco Service Department at 800-558-0607 or 414-671-6350; fax 800-690-2966; or International fax 414-671-3976.
BURN HAzARD:
CAUTION
• Some exterior surfaces on unit will get hot. Use caution when touching these areas.
• Do not remove crumb tray for cleaning until toaster is cool. Locate unit at proper counter height in an area that is convenient for use. Location should be level and strong enough to support weight of unit and contents.
Always operate toaster with crumb tray(s) installed.
If Warning light comes on, unit is malfunctioning due to fan failure. Turn off unit, disconnect from power supply, and have unit serviced by a qualified technician.
NOTICE
Do not locate unit in an area subject to temperatures above 100°F (38°C) or grease from grills, fryers, etc. Excessive temperatures and grease could cause damage to unit.
Do not locate unit in area with excessive air movement around unit. Avoid areas that may be subject to active air movements or currents (i.e., near exhaust fans/hoods, air conditioning ducts, and exterior doors).
Do not locate toaster in an area that restricts air flow around front or rear of unit.
Do not block air flow to cooling fans. Operating issues and/or damage to unit may occur.
Do not turn off unit while cooling fans are running. Damage to unit may occur. Put unit in standby and allow to cool for 20 minutes before turning off.
Use non-abrasive cleaners and cloths only. Abrasive cleaners and cloths could scratch finish of unit, marring its appearance and making it susceptible to soil accumulation.
This unit is intended for commercial use only—NOT for household use.
Clean unit daily to avoid malfunctions and maintain sanitary operation.

MODEL DESCRIPTION
All Models
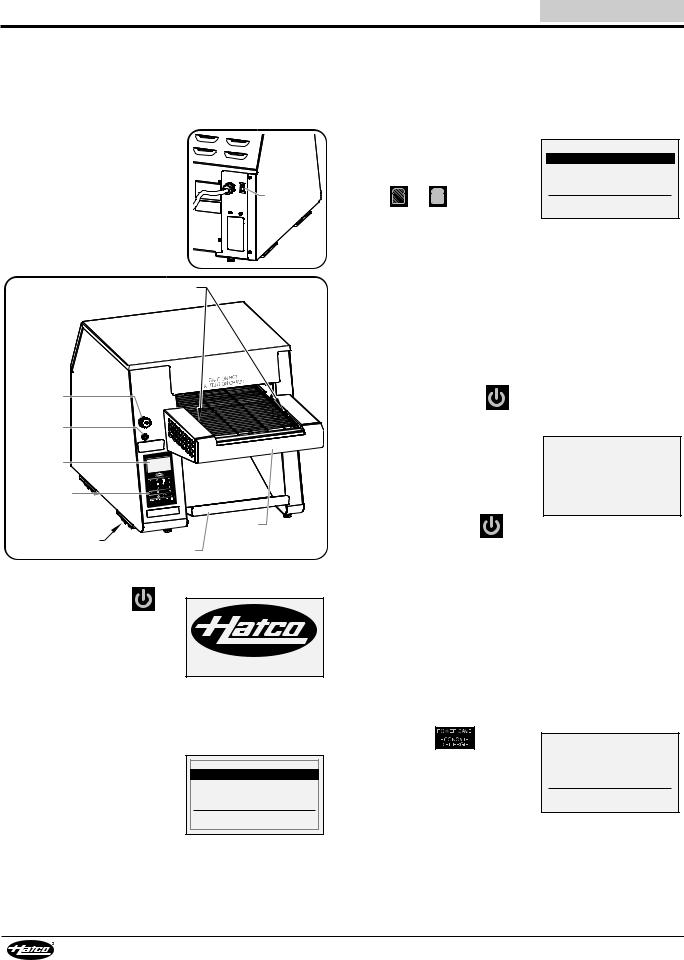
Intelligent Toast-Qwik® Conveyor Toasters are fast, reliable, and extremely versatile. Individually-controlled top and bottom heating elements, multi-speed two-directional conveyor belts, and optical product sensors provide the ability to produce a wide variety of menu items. Intelligent Toast-Qwik Conveyor Toasters include a programmable touchpad control with display, a USB port, a removable toast chute, a removable crumb tray(s), 1″ (25 mm) adjustable legs, and a factory attached 6' (1829 mm) power cord and plug.
Power Save Mode
Intelligent Toast-Qwik Conveyor Toasters feature an energysaving Power Save mode that reduces heat levels to a specified percentage of full power. The toaster enters Power Save mode automatically after a specified period of inactivity or when the POWER SaVE key on the touchpad control is touched. Full power can be restored within 1–2 minutes by placing food product between the product sensors on the conveyor belt or by touching any of the program keys (keys 1–5).
ColorGuard System
Intelligent Toast-Qwik Conveyor Toasters use a patented ColorGuard Sensing System. This system monitors and automatically adjusts conveyor speed and chamber temperature during high usage periods to ensure toast color uniformity.
Model ITQ-1000-1C
model ITQ-1000-1C is a single conveyor toaster capable of toasting bread products up to 1-3/4″ (44 mm) thick.
English
Model ITQ-1750-2C
model ITQ-1750-2C is a dual conveyor toaster capable of toasting bread products up to 2-1/8″ (54 mm) thick. Each conveyor on this model can be operated independently.
Product Sensors
USB |
|
|
|
|
Port |
|
|
|
|
Warning |
|
|
|
|
Light |
|
|
Right Conve |
yor |
Touchpad |
|
t Conveyor |
||
Lef |
|
|||
|
|
|||
Display |
|
|
|
|
Touchpad |
|
|
|
|
Control |
|
|
|
|
Cooling Fan |
|
|
|
|
Toast Chute Slide |
|
|
Crumb |
|
Toast Chute |
Trays |
|
||
|
|
|||
model ITQ-1750-2C
Product Sensors
USB |
|
|
Port |
|
|
Warning |
|
|
Light |
|
|
Touchpad |
|
|
Display |
|
|
Touchpad |
|
|
Control |
|
|
|
Crumb |
|
Cooling Fan |
Tray |
|
Toast Chute |
||
|
model ITQ-1000-1C
MODEL DESIGNATION
I T Q - X X X X - X C
Intelligent Toast-Qwik |
1C |
= Single Conveyor |
Conveyor Toaster |
2C |
= Dual Conveyor |
|
Model Number
4 |
Form No. ITQm-0116 |
|

English |
|
|
|
|
|
SPECIFICATIONS |
|||||
Plug Configurations |
|
|
|
|
|
|
|
|
|
||
Units are supplied from the factory with an electrical cord and |
|
|
|
|
|
|
|||||
plug installed. Plugs are supplied according to the application. |
|
|
|
|
|
|
|||||
|
WARNING |
|
|
|
NEMA 6-30P |
NEMA L6-30P |
|||||
ELECTRIC SHOCK HAzARD: Plug unit into a properly |
|
||||||||||
grounded electrical receptacle of the correct voltage, size, |
|
|
|
|
|
|
|||||
and plug configuration. If plug and receptacle do not |
|
|
Plug Configurations |
|
|
||||||
match, contact a qualified electrician to determine and |
|
|
|
|
|||||||
NOTE: Receptacle not supplied by Hatco. |
|
||||||||||
install the proper voltage and size electrical receptacle. |
|
||||||||||
Electrical Rating Chart |
|
|
|
|
|
|
|
|
|||
Model |
Voltage |
Hertz |
Watts |
Amps |
Plug Configuration |
|
Shipping Weight* |
||||
ITQ-1000-1C |
208–240 † |
60 |
3230–4300 15.5–17.9 |
NEma 6-30P, NEma L6-30P |
89 lbs. (40 kg) |
||||||
ITQ-1750-2C |
208 |
60 |
4960 |
|
23.8 |
NEma 6-30P, NEma L6-30P |
106 lbs. (48 kg) |
||||
|
240 |
60 |
4960 |
|
20.7 |
NEma 6-30P, NEma L6-30P |
106 lbs. (48 kg) |
||||
* Shipping weight includes packaging. |
|
|
|
|
|
|
|
|
|||
† Unit is designed to operate on supply voltages between 208 V and 240 V. |
|
|
|
|
|||||||
Dimensions |
Width |
Depth |
Height |
Footprint |
Footprint |
Platform |
Conveyor |
Opening |
|||
Model |
(A) |
(B) |
(C) |
Width (D) |
Depth (E) |
Width (F) |
Width (G) |
Height (H) |
|||
ITQ-1000-1C |
17-5/8″ |
28-5/8″ |
18″ |
13-3/4″ |
17-3/4″ |
13-3/4″ |
9-7/16″ |
2″ |
|||
(448 mm) |
(727 mm) |
(457 mm) |
(349 mm) |
(450 mm) |
(349 mm) |
(240 mm) |
(51 mm) |
||||
|
|||||||||||
ITQ-1750-2C |
20″ |
28-11/16″ |
16-9/16″ |
16-1/4″ |
17-3/4″ |
16-1/8″ |
5-7/16″ |
2-1/4" |
|||
(508 mm) |
(728 mm) |
(420 mm) |
(412 mm) |
(450 mm) |
(410 mm) |
(139 mm) |
(56 mm) |
||||
|
|||||||||||
|
|
A |
|
|
|
|
B |
|
|
|
|
|
|
|
H |
|
|
|
|
|
|
|
|
C
|
Specification |
|
Label |
D |
E |
Front View |
Side View |
G F
|
Top View |
Model ITQ-1000-1C shown. |
|
|
|
Form No. ITQm-0116 |
5 |
|
|
|
INSTALLATION |
|
|
English |
||
General |
|
4. Level the unit by turning the leveling feet on each leg, if |
|||
The Hatco Intelligent Toast-Qwik® Conveyor Toaster is shipped |
necessary. |
|
|||
with all components pre-assembled. Care should be taken |
5. Install the crumb tray(s), if necessary. |
||||
when unpacking the shipping carton to avoid damage to the |
a. Position the crumb tray directly under the conveyor belt |
||||
unit and the components enclosed. |
|
||||
|
and above the lower conveyor support bar at the front of |
||||
|
WARNING |
|
the toaster. |
|
|
|
|
b. Slide the crumb tray into the toaster until it stops. |
|||
ELECTRIC SHOCK HAzARD: Unit is not weatherproof. |
|||||
|
|
||||
Locate unit indoors where ambient air temperature is |
a |
|
|
||
minimum of 70°F (21°C) and a maximum of 100°F (38°C). |
|
|
|
||
ExPLOSION HAzARD: Do not store or use gasoline or |
|
|
|||
other flammable vapors or liquids in the vicinity of this or |
|
|
|||
any other appliance. |
|
|
|
||
FIRE HAzARD: |
|
|
|
||
• Allow a minimum clearance of 1" (25 mm) along the |
|
|
|||
|
sides and rear of unit. Allow a minimum clearance of |
|
|
||
|
12" (305 mm) in the front, measured from chamber |
|
|
||
|
opening on toaster body. If safe distances are not |
|
|
||
|
maintained, discoloration or combustion could occur. |
|
|
||
• |
Do not locate toaster under shelving or closer than 12" |
|
|
||
|
(305 mm) from the ceiling. |
|
Lower Conveyor |
|
|
• |
Do not place anything on top of toaster. Do not place |
Support Bar Crumb |
|||
|
toaster near or underneath curtains or other combustible |
|
Tray |
||
|
materials. Items near or on top of toaster could catch fire |
|
|
||
|
causing injury and/or damage to the toaster. |
|
Installing a Crumb Tray (ITQ-1750-2C shown) |
||
1. |
Remove the unit from the carton. |
|
6. Install the toast chute, if necessary. There are two styles of |
||
NOTE: To prevent delay in obtaining warranty coverage, |
toast chutes (see illustration for details). |
||||
a. Slide the long/angled section of the toast chute into the |
|||||
|
complete online warranty registration. See the |
||||
|
ImPORTaNT OWNER INFORmaTION section for |
toaster from the front. |
|
||
|
details. |
|
b. as the toast chute nears the rear of the toaster, align |
||
2. Remove tape and protective packaging from all surfaces of |
the cutouts/tabs on each side of the chute with the pins |
||||
inside the toaster. make sure the long/angled section of |
|||||
|
the unit. |
|
|||
|
|
the chute is resting against the back wall of the toaster. |
|||
|
|
|
|||
|
CAUTION |
|
ITQ-1000-1C |
|
|
Locate unit at the proper counter height in an area that is |
Toast Chute |
|
|||
convenient for use. The location should be level to prevent |
|
Cutout |
|||
the unit or its contents from falling accidentally and strong |
ITQ-1750-2C |
||||
|
|||||
enough to support the weight of the unit and contents. |
|
Toast Chute |
|
||
|
NOTICE |
|
|
|
|
Do not locate unit in an area subject to temperatures above |
|
|
|||
100°F (38°C) or grease from grills, fryers, etc. Excessive |
|
|
|||
temperatures and grease could cause damage to unit. |
|
|
|
||
Do not block air flow to cooling fans. Operating issues and |
|
Tab |
|||
damage to unit may occur. |
|
|
(position |
||
|
|
|
|
behind |
|
3. |
Place the unit in the desired location. |
|
|
pin) |
|
|
• make sure the unit is installed where the ambient air |
|
|
||
|
temperature will not rise above 100°F (38°C) and where |
|
|
||
|
it will not be exposed to excessive moisture or grease- |
|
Pin |
||
|
laden air. avoid areas that may be subject to active air |
|
|||
|
movements or currents (i.e., near exhaust fans/hoods, |
Back wall |
|
||
|
air conditioning ducts, and exterior doors). |
|
of toaster. |
|
|
|
• make sure the unit is at the proper counter height in an |
Installing the Toast Chute |
|||
|
area convenient for use. |
|
|||
|
• make sure the countertop is level and strong enough to |
7. For ITQ-1750-2C models, install the toast chute slide onto |
|||
support the weight of the unit and food product. |
|
the toast chute. |
|
8. Plug the unit into a properly grounded electrical receptacle |
|
• make sure all the feet on the bottom of the unit are |
|
|
|
of the correct voltage, size, and plug configuration. See the |
|
positioned securely on the countertop. a minimum shelf |
|
|
|
SPECIFICaTIONS section for details. |
|
depth of 22″ (559 mm) is required for the unit. |
|
|
|
|
|
|
|
|
|
6 |
Form No. ITQm-0116 |
|
|
|
|
|
|
|
|
|
|
|
|
|
|
|
|
|
|
|
|
|
|
|
|
|
|
|
|
|
|
|
|
OPERATION |
|
|
|
English |
|
|
|
|
|
|
|
|
|
|
|
|
|
|
|
|
|
|
|
|
|
|
|
|
|
|
|||
|
|
|
|
|
|
|
|
|
|
|
|
|
|
|
|
|
|
|
|
|
|
|
|
|
|
|
|
|
|
|
|
General |
|
|
|
|
|
|
|
Darker Key |
|
|
|
|
|
|
|
|
|
||||||||||||||
|
|
|
|
|
|
|
|
|
|
|
|
|
|
|
|
||||||||||||||||
The Intelligent Toast-Qwik Conveyor Toaster is designed for |
|
|
|
|
|
|
|
|
|
|
|
|
|||||||||||||||||||
ease of operation and versatility. Use the following information |
The Darker ( |
|
|
|
) key allows a single item to be toasted to a |
||||||||||||||||||||||||||
and procedures to operate the toaster. |
|
|
|||||||||||||||||||||||||||||
darker shade |
|
|
an the current menu item setting. |
||||||||||||||||||||||||||||
|
|
|
|
|
|
|
|
|
|
||||||||||||||||||||||
|
|
|
|
WARNING |
|
|
To use the |
|
|
|
key: |
|
|
|
|
|
|
|
|
|
|||||||||||
|
|
|
|
|
|
|
|
|
|
a. Place the item on the conveyor, and touch the desired |
|||||||||||||||||||||
Read all safety messages in the IMPORTANT SAFETy |
|
|
|||||||||||||||||||||||||||||
INFORMATION section before operating this equipment. |
|
|
|
|
|
program key. |
|
|
|
|
|
|
|
||||||||||||||||||
|
|
|
|
|
|
|
|
|
|
b. Touch the |
|
|
|
key. This key may be touched up to five |
|||||||||||||||||
|
|
|
|
CAUTION |
|
|
|
|
|||||||||||||||||||||||
|
|
|
|
|
|
|
|
|
|
|
times to pr |
duce a shade five times darker than the |
|||||||||||||||||||
|
|
|
|
|
|
|
|
|
|
|
|
|
current menu setting. |
|
|||||||||||||||||
BURN HAzARD: |
|
|
|
|
|
||||||||||||||||||||||||||
|
|
|
|
|
|
|
|
|
|
|
|
|
|
|
|
|
|
|
|
|
|
|
|
|
|
|
|||||
• |
Some exterior surfaces on unit will get hot. Use caution |
|
|
|
|
|
|
|
|
|
|
|
|
|
|
|
|
|
|
|
|
|
|
|
|||||||
|
|
|
|
|
|
|
|
|
|
|
|
|
|
|
|
|
|
|
|
|
|
|
|||||||||
|
when touching these areas. |
|
|
|
Lighter Key |
|
|
|
|
|
|
|
|
|
|||||||||||||||||
• |
Do not remove crumb tray for cleaning until toaster is |
|
|
|
|
|
|
|
|
|
|
|
|
|
|
|
|
|
|
||||||||||||
The Lighter ( |
|
|
|
) key allows a single item to be toasted to a |
|||||||||||||||||||||||||||
|
cool. |
|
|
|
|
|
|
|
|
|
|
|
|
|
|
|
|
|
|
|
|
|
|
|
|
|
|
|
|||
|
|
|
|
|
lighter shade |
|
|
an the current menu item setting. |
|||||||||||||||||||||||
|
|
|
|
|
|
|
|
|
|
|
|
|
|
|
|
|
|
|
|
|
|
|
|
|
|
|
|
||||
Always operate toaster with crumb tray(s) installed. |
To use the |
|
|
|
key: |
|
|
|
|
|
|
|
|
|
|||||||||||||||||
|
|
|
|
|
|
|
|
|
|
|
|
||||||||||||||||||||
|
|
|
|
|
|
|
|
|
|
|
|
|
|
|
|
|
|
|
|
||||||||||||
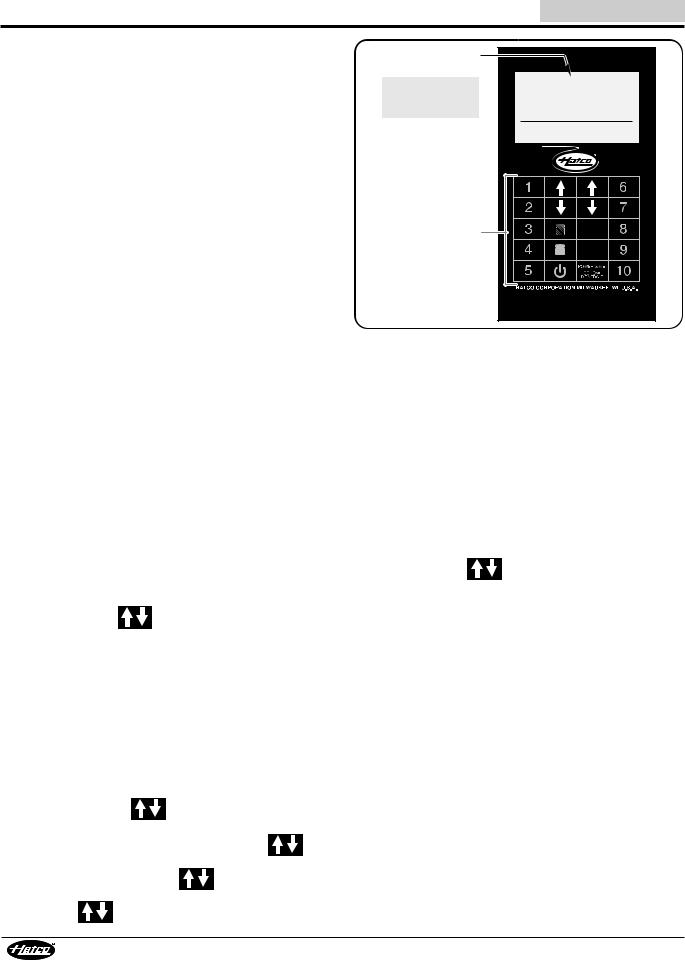
Touchpad Control |
|
|
|
|
|
|
a. Place the item on the conveyor, and touch the desired |
||||||||||||||||||||||||
The following are descriptions of the controls used to operate |
|
|
|
|
|
program key. |
|
|
|
|
|
|
|
||||||||||||||||||
the Intelligent Toast-Qwik Conveyor Toaster. all controls are |
|
|
b. Touch the |
|
|
|
key. This key may be touched up to five |
||||||||||||||||||||||||
located on the touchpad control at the front of the unit. |
|
|
|
|
|
times to pr |
duce a shade five times lighter than the |
||||||||||||||||||||||||
Program Keys (Keys 1–5) |
|
|
|
|
|
current menu setting. |
|
||||||||||||||||||||||||
Each program key stores the toast settings for a custom menu |
|
|
|
|
|
|
|
|
|
|
|
|
|
|
|
|
|
|
|
|
|
|
|
||||||||
item. Touching one of the program keys starts the |
|
|
|
|
|
|
Up/Down Arrow Keys |
||||||||||||||||||||||||
|
|
|
|
|
|
||||||||||||||||||||||||||
corresponding menu item toast sequence. On dual conveyor |
|
|
|
|
|
|
|||||||||||||||||||||||||
|
|
|
|
|
|
||||||||||||||||||||||||||
|
|
|
|
|
|
||||||||||||||||||||||||||
toasters, the program keys on the left side of the touchpad are |
The Up/Down arrow ( |
|
|
|
|
|
) keys scroll through additional |
||||||||||||||||||||||||
for the left conveyor, and the program keys on the right side of |
|
|
|
|
|
||||||||||||||||||||||||||
menu items, if available. Th |
display will show each menu item |
||||||||||||||||||||||||||||||
the touchpad are for the right conveyor. |
|||||||||||||||||||||||||||||||
next to its corresponding program key (1–5). |
|||||||||||||||||||||||||||||||
NOTE: The touchpad control on Model ITQ-1000-1C single |
|||||||||||||||||||||||||||||||
Touchpad Display |
|
|
|
|
|
|
|
||||||||||||||||||||||||
|
|
conveyor toasters have program keys labeled 1–10. |
|
|
|
|
|
|
|
||||||||||||||||||||||
|
|
The touchpad display shows the current status of the toaster |
|||||||||||||||||||||||||||||
|
|
Only keys 1–5 are used for custom menu items. Keys |
|||||||||||||||||||||||||||||
|
|
6–10 are used for programming functions. |
as well as operational information related to the program keys, |
||||||||||||||||||||||||||||
|
|
|
|
|
|
|
|
chamber temperature, error messages, etc... |
|||||||||||||||||||||||
|
Standby Key |
|
|||
|
|
|
|
||
The Standby ( |
|
) key toggles the toaster between operation |
|||
and standby. In |
ndby, the conveyor and elements are off and |
||||
the touchpad display is dark, but the toaster remains energized. |
|||||
• From standby, touch and hold the |
|
key for three |
|||
seconds to activate the toaster. The toas |
will be ready for |
||||
operation in approximately five minutes. |
|
||||
• From operation, touch and hold the |
|
key for three |
|||
seconds to shut down operation and p |
he toaster into |
||||
standby. |
|
|
|
||
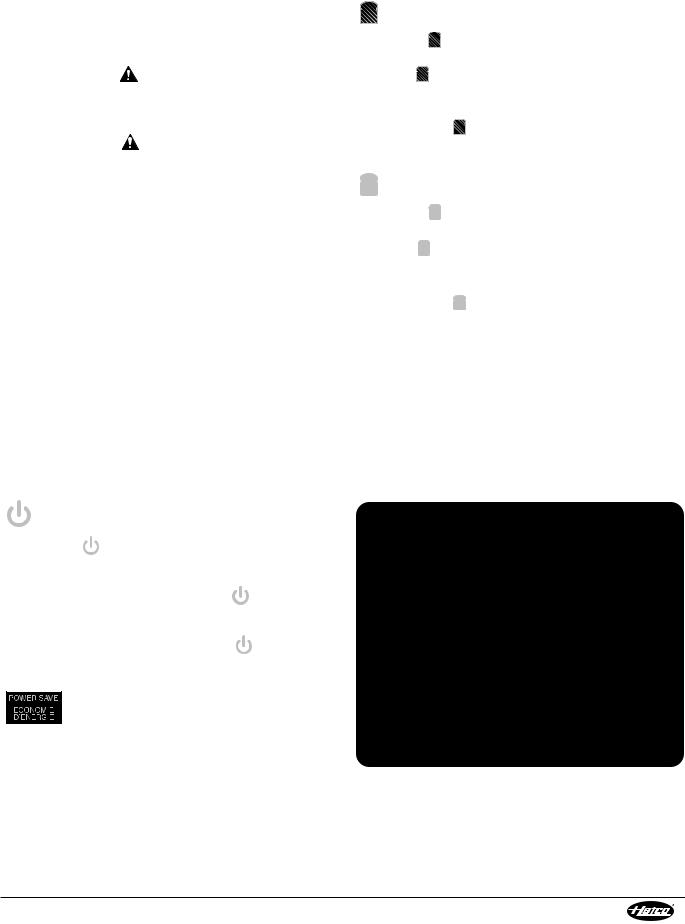
POWER SAVE Key
The POWER SaVE key puts the toaster into Power Save mode. In Power Save mode, the toaster remains activated but the heat level drops to a reduced percentage of the current heat settings. When restarting from Power Save mode, the unit will be ready to toast in approximately two minutes or less.
Touchpad Display
|
|
L1 Bun |
R1 Bun |
||||
|
|
L2 Toast |
R2 Toast |
||||
Touchpad Control |
|
||||||
|
L3 H. Brown |
R3 H. Brown |
|||||
for dual |
|
L4 Product4 |
R4 Product4 |
||||
conveyor unit. |
|
L5 Product5 |
R5 Product5 |
||||
|
|
|
|
||||
|
|
|
|
|
|
|
|
|
|
|
|
|
|
|
|
|
|
|
|
|
|
|
|
|
|
|
|
|
|
|
|
|
|
|
|
|
|
|
|
Left Conveyor
Program Keys
Right Conveyor Program Keys
Touchpad Control and Display (ITQ-1750-2C shown)
Form No. ITQm-0116 |
7 |
|
OPERATION |
|
|
|
|
|
|
|
|
|
|
|
|
|
|
English |
|
||||||
Operating the Toaster |
|
6. Place food product between the product sensors on the |
||||||||||||||||||||
Startup |
|
|
|
|
|
|
conveyor belt. |
|
|
|
|
|
|
|
|
|
|
|||||
|
|
|
|
|
|
• |
The product sensors detect the presence of the food |
|||||||||||||||
1. make sure the toaster is plugged into a properly grounded |
||||||||||||||||||||||
|
product. |
|
|
|
|
|
|
|
|
|
|
|||||||||||
electrical |
outlet of |
the |
correct voltage, size and plug |
• |
For menu items that include two-directional or custom |
|||||||||||||||||
configuration. See |
the |
SPECIFICaTIONS section for |
||||||||||||||||||||
|
conveyor belt movement, the sensors signal the toaster |
|||||||||||||||||||||
details. |
|
|
|
|
|
|
|
|||||||||||||||
|
|
|
|
|
|
|
to begin the toasting sequence. |
|
|
|
||||||||||||
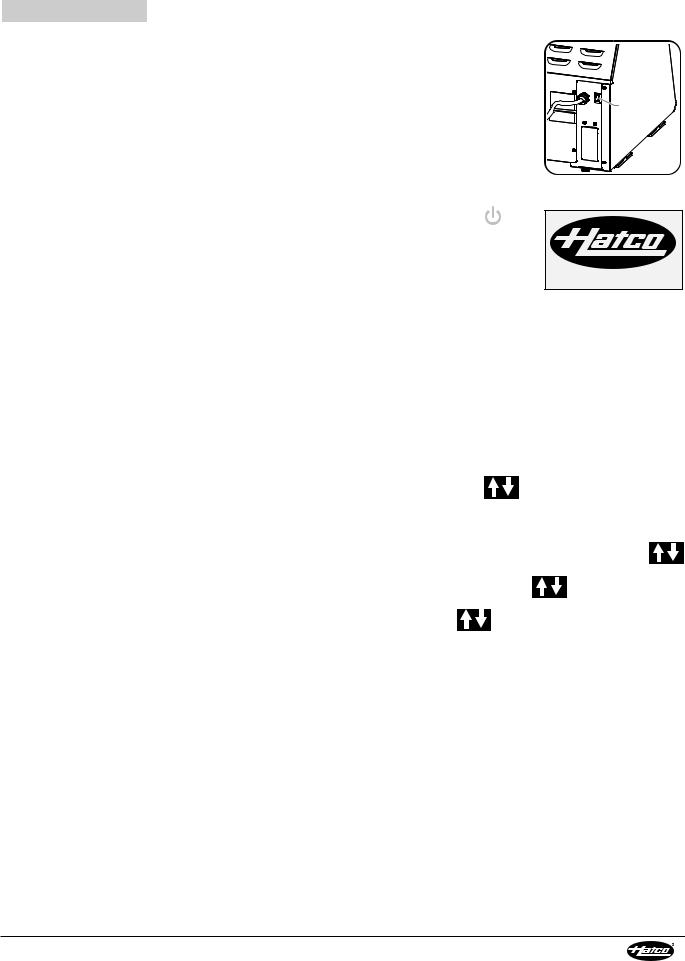
2. move the power I/O switch |
|
|
|
|
|
|||||||||||||||||
|
• |
Change the toasting shade |
1 Bun |
|
|
|||||||||||||||||
located on the back of the |
|
|
|
|||||||||||||||||||
|
2 Toast |
|
|
|||||||||||||||||||
toaster to the “I” (on) position. |
|
|
of the food product any time |
3 Hash Brown |
|
|
||||||||||||||||
• Graphics |
|
and |
software |
|
|
by |
touching |
either |
the |
4 Product 4 |
|
|
||||||||||
|
Power I/O |
|
|
|
or |
keys up to five |
5 Product 5 |
|
|
|||||||||||||
version |
|
information |
will |
|
|
|
2X Lighter |
|
|
|||||||||||||
|
Switch |
|
|
|
es. |
|
|
|
|
|
|
|
|
|||||||||
appear on the display. |
|
|
|
|
|
|
|
|
|
|
|
|
|
|
|
|||||||
3. Wait 10 seconds to allow the |
|
7. Change the selected menu item at any time by touching |
||||||||||||||||||||
toaster |
to |
|
run |
internal |
|
the desired program key on the touchpad control. |
|
|||||||||||||||
diagnostics. |
|
|
|
|
|
NOTE: If the Warning light comes on, the unit may be overheating |
||||||||||||||||
|
|
|
|
Product Sensors |
|
|
due to fan failure/blockage. Turn off and unplug the unit. |
|||||||||||||||
|
|
|
|
|
|
Refer to the “Cleaning the Fan Filters” procedure in the |
||||||||||||||||
|
|
|
|
|
|
|
|
|
|
maINTENaNCE section of this manual. If the unit does not |
||||||||||||
|
|
|
|
|
|
|
|
|
|
function properly after cleaning the fan filters, contact an |
||||||||||||
|
|
|
|
|
|
|
|
|
|
Authorized Service Agent or Hatco for assistance. |
|
|||||||||||
|
|
|
|
|
|
|
|
Standby Shutdown |
|
|
|
|
|
|
|
|
|
|||||
|
|
|
|
|
|
|
|
Use standby shutdown to put the toaster in standby during |
||||||||||||||
|
|
|
|
|
|
|
|
extended periods of non-use. |
|
|
|
|
|
|
||||||||
USB |
|
|
|
|
|
|
1. Touch and hold the |
|
key on the touchpad control for |
|||||||||||||
|
Port |
|
|
|
|
|
|
|
||||||||||||||
|
|
|
|
|
|
|
3 seconds to shut do |
operation and put the toaster into |
||||||||||||||
Warning |
|
|
|
|
|
|
||||||||||||||||
|
|
|
|
|
|
standby. |
|
|
|
|
|
|
|
|
|
|
||||||
Light |
|
|
|
|
|
|
• The heating elements and |
|
|
|
|
|||||||||||
|
|
|
|
|
|
|
|
|
|
|
|
|||||||||||
Touchpad |
|
|
|
|
|
|
|
conveyor(s) will shut down. |
Cooling fans on. |
|
||||||||||||
Display |
|
|
|
|
|
|
• |
The cooling fans will run for |
|
|||||||||||||
Touchpad |
|
|
|
|
|
|
Leave plugged in. |
|
||||||||||||||
|
|
|
|
|
|
|
20 minutes to cool the unit. |
|
|
|
|
|
||||||||||
Control |
|
|
|
|
|
|
Shutdown |
|
|
|
|
|
|
|
|
|
|
|||||
|
|
|
|
|
|
|
Crumb |
|
|
|
|
|
|
|
|
|
|
|||||
|
|
|
|
|
|
|
1. Touch and hold the |
|
key on |
|
|
|
|
|||||||||
Cooling Fan |
|
|
|
Tray |
|
|
|
|
|
|||||||||||||
Toast Chute |
the touchpad contro |
3 seconds to shut down operation |
||||||||||||||||||||
|
||||||||||||||||||||||
|
|
|
|
|
and put the toaster into standby. |
|
|
|
|
|||||||||||||
|
|
|
|
|
|
|
|
|
|
|
|
|||||||||||
|
|
|
|
model ITQ-1000-1C |
2. after the cooling fans stop, move the power I/O switch |
|||||||||||||||||
4. Touch and hold the |
|
key |
|
located on the back of the unit to the “O” (off) position to |
||||||||||||||||||
|
|
turn off the toaster. |
NOTICE: Do not turn off unit while |
|||||||||||||||||||
on |
the |
touchpad |
|
|
|
cooling fans are running. Damage to unit may occur. |
||||||||||||||||
control for three seconds to |
|
Power Save Mode |
|
|
|
|
|
|
|
|||||||||||||
activate the toaster. |
|
|
|
|
|
|
|
|
|
|
||||||||||||
• “Preheating” will show on |
Preheating 10:00 |
all ITQ series toasters have a built-in Power Save mode. This |
||||||||||||||||||||
feature |
significantly |
reduces |
heat |
levels |
and |
energy |
||||||||||||||||
the touchpad display, and |
|
|||||||||||||||||||||
|
consumption when the toaster has not been used for a specified |
|||||||||||||||||||||
the heating elements inside the toaster will energize. |
||||||||||||||||||||||
period of time or when activated by the operator. |
|
|
||||||||||||||||||||
• The preheating cycle lasts approximately 5–10 minutes. |
|
|
||||||||||||||||||||
To start Power Save mode manually during operation: |
|
|||||||||||||||||||||
When the preheating cycle is complete, the available |
|
|||||||||||||||||||||
|
|
|
|
|
|
|
|
|
|
|
|
|
|
|||||||||
menu items will appear on the touchpad display. |
1. Touch the |
|
|
key. |
|
|
|
|
|
|
|
|||||||||||
5. Touch |
the |
appropriate |
1 Bun |
• The conveyor belt will speed |
|
Power Save |
|
|||||||||||||||
program key (keys 1–5) on |
2 Toast |
|
up |
temporarily |
to |
|
clear |
|
Caution Hot |
|
||||||||||||
the touchpad control for the |
3 Hash Brown |
|
product from toaster. |
|
|
|
|
|
|
|
||||||||||||
desired conveyor and menu |
4 Product 4 |
• |
“Power Save” will show on |
|
|
|
|
|||||||||||||||
item. |
|
|
|
|
|
5 Product 5 |
|
|
|
|
||||||||||||
|
|
|
|
|
|
|
the touchpad display. |
|
|
|
|
|
|
|
||||||||
• The |
elements |
|
and |
|
|
|
|
|
|
|
|
|
||||||||||
|
|
To exit Power Save mode: |
|
|
|
|
|
|
|
|||||||||||||
conveyor |
belt will adjust |
|
|
|
|
|
|
|
|
|||||||||||||
|
|
|
|
|
|
|
|
|
|
|
|
|
|
|
||||||||
settings to the selected menu item. |
1. Touch any of the program keys (keys 1–5) or place food |
|||||||||||||||||||||
|
|
|
|
|
|
|
|
product between the product sensors on the conveyor belt. |
||||||||||||||
|
|
|
|
|
|
|
|
The unit will be ready to toast in approximately two minutes |
||||||||||||||
|
|
|
|
|
|
|
|
or less (a countdown will appear on the touchpad display). |
||||||||||||||
8 |
Form No. ITQm-0116 |
|
English
|
|
|
|
|
|
|
|
|
|
|
Programming Menu Items |
|
|
|
|
|
|
|
|
|
|
Intelligent Toast-Qwik® Conveyor Toasters offer several |
||||||||||
programmable parameters to create toasting sequences for |
||||||||||
custom menu items. Use the following information and |
|
|
||||||||
|
||||||||||
procedure to program menu items. |
|
|
|
|
|
|
|
|
|
|
|
|
|
|
|
|
|
|
|
||
|
|
|
|
|
|
|
|
|
||
Programmable Parameters |
|
|
|
|
|
|
|
|
|
|
Top Heat......Heat output level from top elements. Setting range |
|
|
|
|
||||||
is 1–100. 1 = |
lowest |
heat/lightest toast. |
|
|
|
|
||||
100 = highest heat/darkest toast. |
|
|
|
|
||||||
Bot Heat ......Heat output level from bottom elements. Setting |
||||||||||
range is 1–100. 1 = lowest heat/lightest toast. |
||||||||||
100 = highest heat/darkest toast. |
|
|
||||||||
|
||||||||||
Belt Time ....Total time product is in toasting chamber. Increasing |
|
|
||||||||
belt time will slow down conveyor and create darker |
||||||||||
toast. Decreasing belt time will speed up conveyor |
||||||||||
and create lighter toast. |
|
|
|
|
|
|
|
|
|
|
Belt Dir. ......Forward—Conveyor |
|
belt |
moves forward |
|||||||
continuously (standard toaster operation).
In and Out—Conveyor belt moves product into toasting chamber, pauses for programmed Belt Time, then reverses and moves product out of the toasting chamber back onto the feed platform.
In and In—Conveyor belt moves product into toasting chamber, pauses for programmed Belt Time, then continues forward and moves product out of the toasting chamber to the discharge toast chute.
Length ........Length of the product to be toasted (measured parallel to the conveyor).
Name ..........Edit product names.
For single conveyor units: While editing product name, use the “1” program key to move cursor left and the “6” program key to move cursor right. Touch the “8” program key to return name to factory default name.
For dual conveyor units: While editing product name, use the left-side “1” program key to move cursor left and the right side “1” program key to move cursor right. Touch the right-side “3” program key to return name to factory default name.
Form No. ITQm-0116 |
9 |
|
OPERATION |
|
|
|
|
|
|
|
|
|
|
English |
|||
Using the Systems Menu |
|
|
|
|
|
Touchpad Display |
|
|||||||
The Systems menu consists of a list of toaster configuration and |
|
|
||||||||||||
|
|
|
|
|
|
|
|
|
|
|
|
|
||
service functions. most of these functions are for service |
|
Touchpad Control |
1 Bun |
|||||||||||
technician or factory use only. |
|
|
|
|
|
|
|
|
2 Toast |
|||||
Systems Menu Functions |
|
|
|
|
|
|
|
|
conveyor unit. |
4 Product4 |
||||
Toaster options ........Standby |
|
heat—Heat |
output |
level |
|
for single |
3 H. Brown |
|||||||
|
|
|
5 Product5 |
|||||||||||
|
|
|
|
|
|
|
|
|
|
|
|
|
||
|
|
(percentage) of the elements during |
|
|
|
|||||||||
|
|
Power Save mode. |
|
|
|
|
|
|
||||||
|
|
Standby time—Length of time (minutes) |
|
|
|
|||||||||
|
|
the toaster can be idle before Power |
|
|
|
|||||||||
|
|
Save mode starts automatically. |
|
|
|
|
||||||||
|
|
Staging mode—YES = Toaster performs |
|
|
|
|||||||||
|
|
a single toasting sequence, then stops |
|
Program |
|
|||||||||
|
|
until a new toasting sequence is started |
|
|
||||||||||
|
|
manually. |
NO |
= |
Conveyor |
moves |
|
Keys 1–5 |
|
|||||
|
|
|
|
|
|
|
|
|
|
|
|
|
||
|
|
forward |
continuously. Operator use, |
|
|
|
||||||||
|
|
see procedure. |
|
|
|
|
|
|
|
|||||
Service info...............Displays all errors codes that have |
|
|
|
|||||||||||
|
|
occurred. |
Service technician use only. |
|
|
|
||||||||
Operation statistics |
..Displays operational information about |
|
|
|
||||||||||
|
|
toaster such as “on” time, element use, |
|
Touchpad Control and Display (ITQ-1000-1C shown) |
||||||||||
|
|
motor use, etc. Service technician use |
|
|||||||||||
|
|
7. When all desired options have been updated: |
||||||||||||
|
|
only. |
|
|
|
|
|
|
|
|
||||
LCD options..............adjusts |
|
screen |
resolution. |
Service |
• |
For single conveyor units: Touch the “5” program key to |
||||||||
|
|
technician use only. |
|
|
|
|
save the changes; Touch the “10” program key to cancel |
|||||||
Software Update .......Updates toaster software/custom menu |
|
all changes. |
|
|||||||||||
• For dual conveyor units: Touch the left-side “5” program |
||||||||||||||
|
|
items in conjuction with a USB flash |
||||||||||||
|
|
drive. Operator use, see procedure. |
|
key to save the changes; Touch the right-side “5” |
||||||||||
Factory calibration ...Used |
|
for |
factory |
adjustments. |
|
program key to cancel all changes. |
||||||||
|
Updating Software |
|
||||||||||||
|
|
Factory/Service technician use only. |
|
|||||||||||
Test mode .................Used |
for |
troubleshooting. |
Service |
1. Perform steps 1–4 of the “Startup” procedure listed |
||||||||||
|
|
technician use only. |
|
|
|
previously in this section. |
||||||||
Changing Toaster Options |
|
|
|
|
|
|
|
2. Touch and hold the POWER SaVE key for three seconds |
||||||
1. Perform steps |
1–4 of the “Startup” procedure listed |
(this can be done during the preheating cycle). |
||||||||||||
|
previously in this section. |
|
|
|
|
|
|
|
|
• The Systems menu will appear on the display. |
||||
2. Touch and hold the POWER SaVE key for three seconds |
3. Use the left-side |
keys to scroll to Software Update, |
||||||||||||
|
(this can be done during the preheating cycle). |
|
||||||||||||
|
|
and touch the left-si |
5” program key to select. |
|||||||||||
|
• The Systems menu will appear on the display. |
|
||||||||||||
|
|
|
• a password prompt will appear: |
|||||||||||
3. |
Use the left-side |
|
keys to scroll to Toaster options, |
|
||||||||||
|
|
For single conveyor units, touch the “6” program key for |
||||||||||||
|
and touch the left-si |
5” program key to select. |
|
|
||||||||||
|
|
|
the password, and touch the “5” program key to accept. |
|||||||||||
|
• a password prompt will appear: |
|
|
|
|
|
For dual conveyor units, touch the right-side “1” program |
|||||||
|
For single conveyor units, touch the “6” program key for |
|
key for the password, and touch the left-side “5” program |
|||||||||||
|
the password, and touch the “5” program key to accept. |
|
key to accept. |
|
||||||||||
|
For dual conveyor units, touch the right-side “1” program |
4. Insert the designated USB flash drive into the USB port |
||||||||||||
|
key for the password, and touch the left-side “5” |
located above the touchpad control. |
||||||||||||
|
program key to accept. |
|
|
|
|
|
|
|
5. Touch the left-side “5” program key to start the software |
|||||
|
• The toaster options “Standby heat”, “Standby time”, and |
|||||||||||||
|
update. |
|
||||||||||||
|
“Staging mode” will appear on the display. |
|
|
|||||||||||
|
|
• |
The software update will begin and last approximately |
|||||||||||
NOTE: Dual conveyor units will show toaster options for each |
||||||||||||||
|
20 seconds. NOTICE: Do not remove the flash drive |
|||||||||||||
|
conveyor designated by “L” (left) and “R” (right). |
|
||||||||||||
|
|
or turn off the toaster during a software update. |
||||||||||||
|
|
|
|
|
|
|
|
|
|
|
|
|||
4. Use the left-side |
|
|
keys to scroll through and |
• |
When the display returns to the main startup screen |
|||||||||
|
highlight/select the des |
|
toaster option. |
|
|
|
showing the company logo and software version |
|||||||
5. |
With the option highlighted, use the right-side |
keys |
|
information, the update is complete. It is now safe to |
||||||||||
|
remove the flash drive. |
|||||||||||||
|
to change the parameter. |
|
|
|
|
|
|
|
|
|||||
|
|
|
|
|
|
|
|
|
|
|
||||
6. |
Continue to use the left side |
|
keys to scroll through |
|
|
|
||||||||
|
and highlight/select other desire |
ptions, followed by the |
|
|
|
|||||||||
|
right-side |
keys to change the parameter. |
|
|
|
|
||||||||
10 |
Form No. ITQm-0116 |
|
 Loading...