


User Manual Guide de l’utilisateur Manual del usuario
RWT360BW
Top-Load Clothes Washer
Laveuse à chargement par le haut
Lavadora de ropa con carga superior

TABLE OF CONTENTS |
|
IMPORTANT SAFETY INSTRUCTIONS ................................................................. |
2 |
Installation Safety Precautions..................................................................................... |
2 |
General Safety Precautions .......................................................................................... |
3 |
PARTS AND FEATURES ....................................................................................... |
4 |
INSTALLATION INSTRUCTIONS.......................................................................... |
5 |
Tools Needed ................................................................................................................. |
5 |
Parts Supplied................................................................................................................ |
5 |
Location Requirements................................................................................................. |
5 |
Drain System Requirements ......................................................................................... |
6 |
Electrical Requirements ................................................................................................ |
7 |
STEP BY STEP INSTRUCTIONS............................................................................ |
8 |
Step 1 - Unpack the Washer.......................................................................................... |
8 |
Step 2 - Connect and Secure the Drain Hose .............................................................. |
9 |
Step 3 - Connect the Water Hoses............................................................................... |
9 |
Step 4 - Level the Washer ........................................................................................... |
11 |
Step 5 - Complete Installation .................................................................................... |
11 |
CONTROL PANEL AND FEATURES .................................................................... |
12 |
OPERATING INSTRUCTIONS............................................................................. |
15 |
Step 1 - Prepare and Sort Laundry.............................................................................. |
15 |
Step 2 - Add Fabric Care Products.............................................................................. |
15 |
Step 3 - Load the Washer ............................................................................................ |
16 |
Step 4 - Start the Washer ............................................................................................ |
16 |
CARE AND CLEANING GUIDE............................................................................ |
17 |
Cleaning and Maintenance .......................................................................................... |
17 |
Vacationing Precautions ............................................................................................. |
17 |
Moving or Storage Preparation ................................................................................... |
17 |
TROUBLESHOOTING........................................................................................ |
18 |
LIMITED WARRANTY ........................................................................................ |
20 |
RECORD KEEPING
Thank you for purchasing this Haier product. This user manual will help you get the best performance from your new washer.
For future reference, record the model and serial number located on back of the washer, and the date of purchase.
Staple your proof of purchase to this manual to aid in obtaining warranty service if needed.
___________________________________
Model number
___________________________________
Serial number
___________________________________
Date of purchase
1

IMPORTANT SAFETY INSTRUCTIONS
 WARNING
To reduce the risk of Þre, electric shock, or injury to persons when using your appliance, follow the basic precautions, including the following:
•Read all of the instructions before using this appliance.
•Use this appliance only for its intended purpose as described in this user manual.
•Do not use the washer for commercial clothes washing.
•Under certain conditions, hydrogen gas may be produced in a hot-water system that has not been used for 2 weeks or more. HYDROGEN GAS IS EXPLOSIVE. If the hot water system has not been used for such a period, before using a washing machine, turn on all hot-water faucets and let the water ßow from each for several minutes. This will release any accumulated hydrogen gas. As the gas is ßammable, do not smoke or use an open ßame during this time.
INSTALLATION SAFETY PRECAUTIONS
 DANGER
Before you throw away your old appliance, remove the door or lid so that children cannot hide or get trapped inside your old appliance.
•This appliance must be properly installed and located in accordance with the installation instructions before it is used.
•Do not store or install this appliance where it will be exposed to temperatures below freezing or exposed to weather, which can cause damage to the appliance.
•The appliance must be properly grounded to conform with all electrical codes and ordinances. See “Electrical Requirements” section.
2

GENERAL SAFETY PRECAUTIONS
•Keep the area around your appliance free from combustible materials such as lint, paper, rags or chemicals.
•Close supervision is necessary if this appliance is used by or near children. Do not allow children to play on, with, or inside this appliance.
•Do not place articles that have been previously cleaned in, washed in, soaked in, or spotted with gasoline, dry-cleaning solvents or other ßammable or explosive substances in the wash water. These substances give o! vapors that could ignite or explode.
•Do not add gasoline, dry-cleaning solvents, or other ßammable or explosive substances to the wash water. These substances give o! vapors that could ignite or explode.
•Do not reach into the appliance if the wash basket, tub or agitator is moving.
•Do not tamper with the controls.
•Never unplug your washer by pulling on the power cord. Always grasp the plug Þrmly and pull straight out from the outlet.
•To minimize the possibility of electric shock, unplug this appliance from the power supply before attempting any maintenance or cleaning.
NOTE: Turning the cycle selector knob to the “O!” position does NOT disconnect the appliance from the power supply.
•Do not attempt to service, repair or replace any part of the appliance unless speciÞcally recommended in this user manual or in published repair instructions that you understand and have the skills to carry out.
•Before discarding or removing from service, remove the washer door or lid.
SAVE THESE INSTRUCTIONS
HOUSEHOLD USE ONLY
3

PARTS AND FEATURES
A |
|
|
P |
|
E |
|
|
|
|
|
|
B |
|
|
O |
|
|
F |
|
|
|
|
|
|
|
|
N |
C |
|
|
|
|
|
|
M |
|
|
|
G |
L
D  I J
I J
K
H
Top Lid |
Outer Tub Cover |
Control Panel |
Balance Ring |
Cabinet |
Wash Basket |
Leveling Feet (4) |
Drain Port |
Door Safety Switch |
Power Cord (120 Volt/ 60 Hz) |
Liquid Beach Dispenser |
Cold Water Inlet Value |
Access Panel |
Hot Water Inlet Valve |
Agitator |
Back Cover |
4
INSTALLATION INSTRUCTIONS
TOOLS NEEDED
• |
Pliers |
• |
Measuring Tape |
• |
Wrench |
• |
Carpenter’s Level |
• |
Flat-blade Screwdriver |
|
|
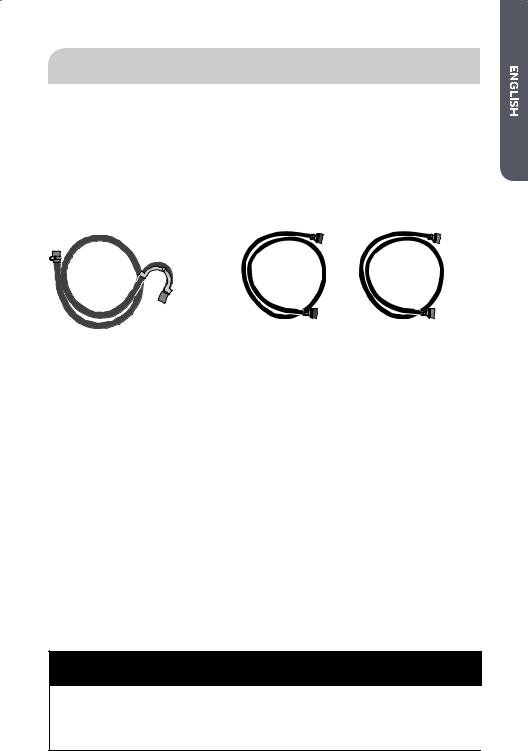
PARTS SUPPLIED
• |
Drain Hose Clamp |
• |
Water Hoses (2) |
|
• |
Drain Hose Hook |
|
(ßat washers pre-installed) |
|
• |
User Manual |
|||
• |
Drain Hose |
|||
|
|
LOCATION REQUIREMENTS
•The washer must be installed on a solid ßoor to minimize vibration during the spin cycle. A concrete ßoor is the best.
•The ßoor should be level with maximum slope of 1” (25 mm) under entire washer.
•A suitable location is protected from direct sunlight and heat sources such as radiators, baseboard heaters, or cooking appliances.
•Do not install on carpeting.
•The location must have a grounded electrical outlet located within 4 ft. (1.2 m) of power cord on the back of the washer.
•Hot and cold water faucets must be present within 3 ft. (0.9 m) of the hot and cold connections on the washer.
•A water heater must supply hot water with a temperature of at least 120°F (49°C).
•The water pressure should be between 20 and 100 psi (138 and 690 kPa).
 WARNING
Do not install or operate the washer where it will be exposed to temperatures below 32°F (0°C). Water remaining in the washer will freeze and cause damage to the washer.
5
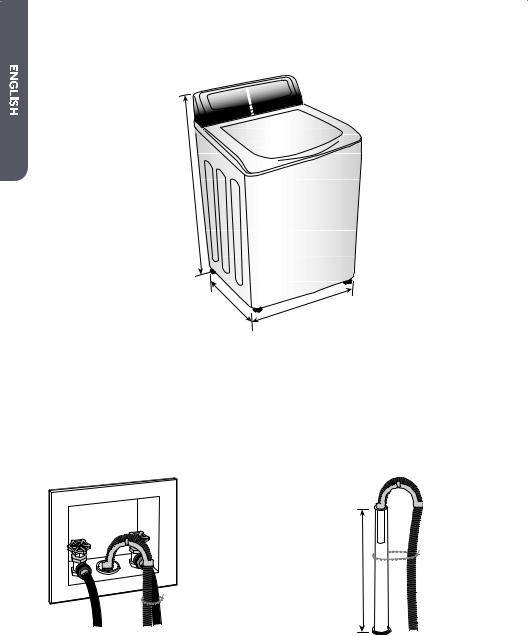
WASHER DIMENSIONS
43.5"
(110.5 cm)
27"
(68.6 cm) 27"
(68.6 cm)
DRAIN SYSTEM REQUIREMENTS
WALL OR FLOOR STANDPIPE
The height of the standpipe must be between 39” (99 cm) and 60” (153 cm) from the bottom of the washer. The minimum diameter of the standpipe must be 2” ( 5 cm).
Wall |
Floor |
||
|
|
|
|
|
|
|
|
39" – 60"
(99 cm – 153<cm)
6
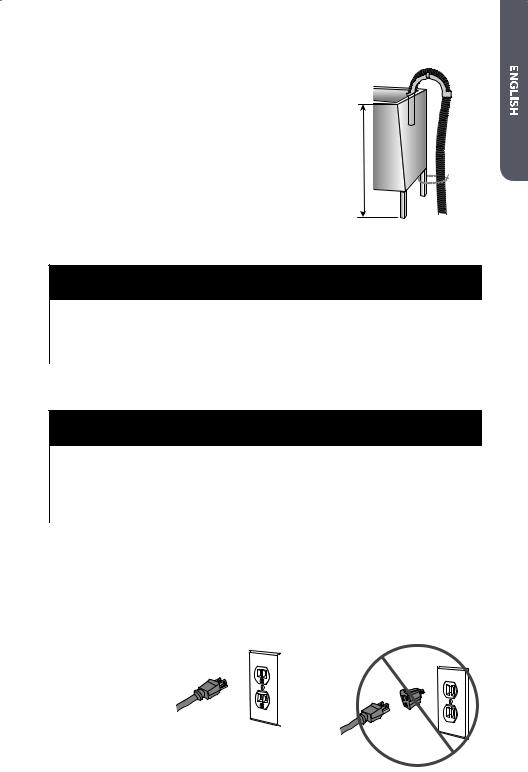
LAUNDRY TUB
The laundry tub must have a minimum capacity of 20 gal. (76 L). The height of the laundry tub must be at least 39” (99 cm) and no more than 48” (122 cm).
39" – 48"
(99 cm – 122<cm)
ELECTRICAL REQUIREMENTS
 WARNING
The washer must be plugged into a properly grounded 120 volt, 60Hz., AC only, 15 or 20-amp, fused electrical outlet. A time-delay fuse or circuit breaker is recommended.@
•If the electric supply provided does not meet the above requirements, contact a licensed electrician.
 WARNING
Improper connection of the equipment-grounding conductor can result in a risk of electric shock. Check with a qualiÞed electrician or serviceman if you are in doubt as to whether the appliance is properly grounded.@
•This appliance must be grounded. In the event of malfunction or breakdown, grounding will reduce the risk of electric shock by providing a path of least resistance for electric current.
•This appliance is equipped with a cord having an equipment-grounding conductor and a grounding plug. The plug must be plugged into an appropriate outlet that is properly installed and grounded in accordance with all local codes and ordinances.
•Do not use a 3 prong plug adapter.
•Do not use an extension cord.
7
STEP BY STEP INSTRUCTIONS
INSTALLING YOUR WASHER
We recommend that your new washer be installed by a qualiÞed appliance technician. If you feel that you have the skills to install the washer, please read the installation instructions carefully before installing.
CAUTION: If, after completing these steps, you are unsure that the washer is properly installed, contact a qualiÞed appliance technician.
 WARNING
If your washer was just delivered and the outside temperature was below freezing, do not operate until the washer warms up to room temperature.
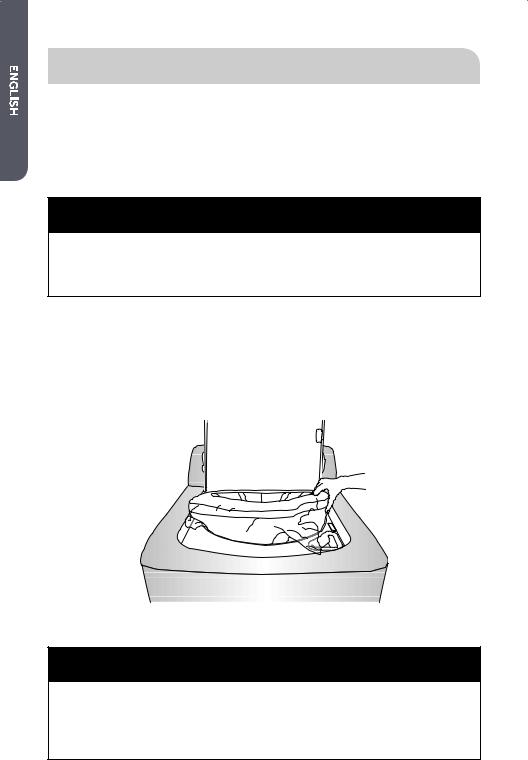
STEP 1 - UNPACK THE WASHER
1.Remove all packing materials. This includes the foam base and all adhesive tape holding the washer accessories inside and outside.
2.Open the top lid to remove the wash basket brace. Pull to remove.
NOTE: Save the wash basket brace to use when moving the washer in the future.
3.Inspect and remove any remains of packing, tape or printed materials before using the washer.
 WARNING
To avoid danger of su ocation, keep plastic bag and other packing material away from babies and children. Do not use this bag in cribs, carriages and playpens. The plastic bag could block nose and mouth and prevent breathing. This bag is not a toy.
8
STEP 2 - CONNECT AND SECURE THE DRAIN HOSE
1. Loosen the drain hose clamp with a ßatblade screwdriver. Slide the clamp up the drain hose, o! the hose rubber end.
2. Fit the drain hose rubber end over the plastic drain port on the washer.
3. Slide the drain hose clamp over the drain hose rubber end and drain port.
4. Tighten the drain hose clamp to secure the connection.
5.Put the the drain hose hook end in a drain pipe or laundry tub.
6.Secure the drain hose in place by fastening it to a water hose, the standpipe, or a leg on the laundry tub. See “Drain System Requirements” for illustrations.
STEP 3 - CONNECT THE WATER HOSES
IMPORTANT: Only use new hoses when installing the washer.
NOTE: Periodically inspect hoses for cracks, cuts, leaks or wear. Replace with new hoses every 5 years.
NOTE: Hot water needs to be set at a temperature of at least 120ºF - 140ºF. (49ºC60ºC) for the soap to dissolve and to avoid soap residue remaining on clothes.
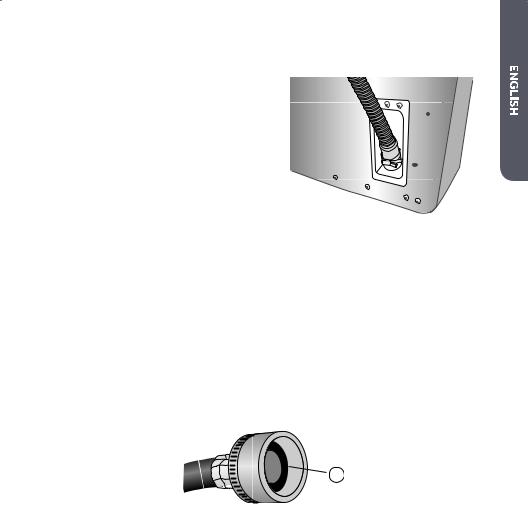
1.Check that a ßat washer is present and Þrmly in place in each end of the water inlet hoses. Flat washers are pre-installed at the factory.
A
 Washer
9
2.The hose couplers are color coded to assist you in making the proper connections. You may want to use gray for cold and red for hot. Thread the inlet hoses onto the water faucets by hand until snug. Then using pliers, tighten an additional two-thirds turn.
IMPORTANT: To avoid damage to the hose couplings, do not overtighten.
NOTE: To avoid damage to the faucets do not use plumber’s tape or sealants on the valve threads.
3.Thread the other end of the inlet hoses by hand onto the inlet valves marked “H” (hot) and “C” (cold) on the back of the washer until snug. Then using pliers, tighten an additional two-thirds turn.
IMPORTANT: To avoid damage to the hose couplings, do not overtighten.
NOTE: To avoid damage to the washer inlet valves, do not use plumber’s tape or sealants on the valve threads.
4.Turn on the hot and cold water faucets and check for leaks. If there is any leaking, check steps 1 through 3 again.
10
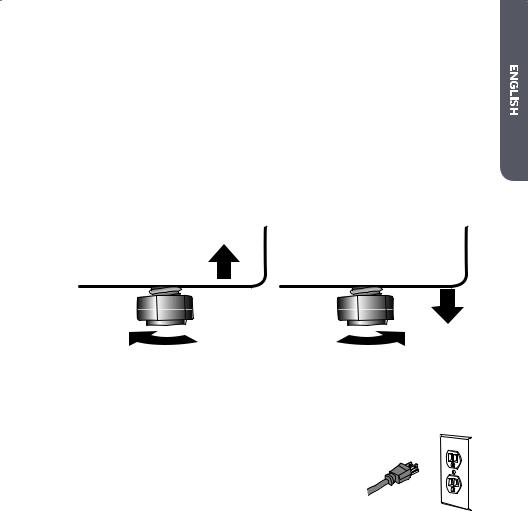
STEP 4 - LEVEL THE WASHER
IMPORTANT: Proper leveling of the washer will help reduce noise and vibration.
1.Place washer in its Þnal location. Check that the water and drain lines are not strained or pinched. Make sure that all four feet are Þrmly in contact with the ßoor and that the washer rests solidly in position.
2.Using a carpenter’s level, check to make sure the the washer is level from side to side and from front to back.
3.If the washer is not level, adjust the leveling feet. Turn clockwise to extend (raise the washer) or counterclockwise to retract (lower the washer).
Raise |
Lower |
STEP 5 - COMPLETE INSTALLATION
1. Plug the washer into a grounded 3 prong outlet.
2. Check that water faucets are turned on.
3. Dispose of/recycle all packaging materials.
4. Run a normal wash cycle using detergent to test and clean the washer. See the ”Operating Instructions” section.
11
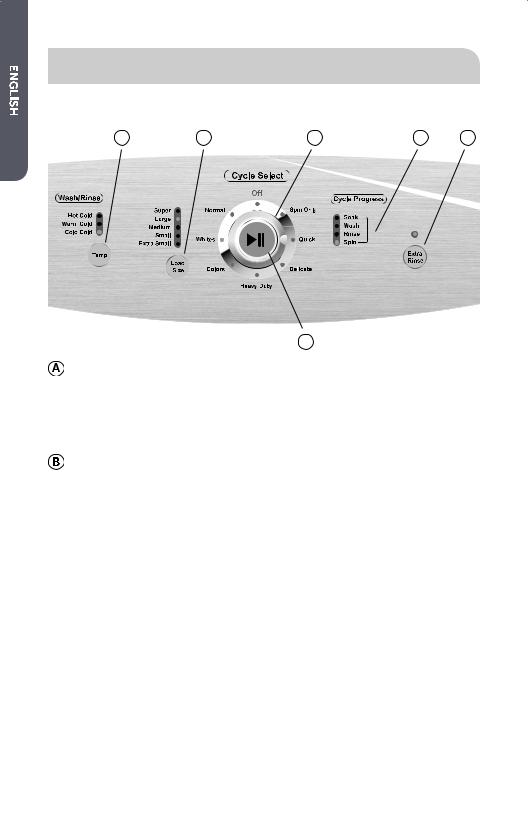
CONTROL PANEL AND FEATURES
CONTROL PANEL
A B C E F
D
TEMP BUTTON
•Use this button to select a wash/rinse temperature combination. For best results follow your garment label instructions and use the warmest water temperature that is safe for your fabric.
•Not all selections are available for all cycles.
LOAD SIZE BUTTON
•Use this button to select an appropriate water level for your load. Extra Small is the lowest water level and Super is the highest.
12

CYCLE SELECTION KNOB
•Turn the washer on by rotating the Cycle Selection Knob.
NOTE: If the washer is not started, it will automatically turn o! after about 5 minutes.
•There are 7 cycles to choose from:
Whites - Use this cycle for white and light colored clothing such as cotton that are susceptible to transfer of dye.
Heavy Duty - Use this cycle for heavily soiled durable garments. This cycle can also be used for towels, sports gear, children’s clothes, etc.
Normal - Use this cycle for normally soiled cottons and mixed fabric loads.
Colors - Use this cycle for lightly soiled, dark, or highly dyed natural fabrics.
Delicate - Use this cycle to wash lightly soiled garments and delicate clothes that need gentle washing.
Quick - Use this cycle to wash small, lightly soiled loads that are needed in a hurry.
Spin Only - Use this cycle to remove excess water from clothes. For certain delicate and cotton clothes that you do not wish to put into the dryer, this is an ideal cycle.
START/PAUSE BUTTON
•Press this button to start a selected cycle or to pause an operating cycle.
NOTE: After starting the wash cycle, you must pause the operating cycle to change the Wash/Rinse Temp and Load Size settings.
CYCLE PROGRESS INDICATORS
•When the washer is Þrst powered on, the Cycle Progress lights indicate the stages of the selected cycle.
•As a stage is completed, the light will turn o! indicating that the next stage is operating.
•The entire wash cycle is complete when all of the lights turn o!.
EXTRA RINSE BUTTON
•Use this button to select or deselect the Extra Rinse option.
NOTE: The Whites cycle automatically selects the Extra Rinse option.
13

CYCLE GUIDE
NOTE: To protect your wash load, all options and settings are not available for all cycles. The shaded boxes indicate the default settings for each cycle.
CYCLE |
FABRIC |
WASH |
ESTIMATED |
TEMPERATURE |
EXTRA |
|
TYPE |
PROCESS |
TIME |
RINSE |
|||
|
|
|||||
|
|
|
|
|
|
|
|
|
20 min Soak |
|
Hot/Cold |
|
|
Whites |
White |
18 min Wash |
1:08* |
|
• |
|
Warm/Cold |
||||||
garments |
Rinse |
|||||
|
|
Cold/Cold |
|
|||
|
|
Spin |
|
|
||
|
|
|
|
|
||
|
|
|
|
|
|
|
|
Heavily |
20 min Soak |
|
Warm/Cold |
|
|
|
soiled, |
|
|
|
||
Heavy |
18 min Wash |
1:08 |
|
• |
||
durable |
Hot/Cold |
|||||
Duty |
Rinse |
|||||
colorfast |
|
Cold/Cold |
|
|||
|
Spin |
|
|
|||
|
fabrics |
|
|
|||
|
|
|
|
|||
|
|
|
|
|
||
|
|
|
|
|
|
|
|
Cottons, |
15 min Wash |
|
Warm/Cold |
|
|
Normal |
linens and |
|
|
• |
||
Spray Rinses |
1:00 |
Hot/Cold |
||||
mixed |
||||||
|
Spin |
|
Cold/Cold |
|
||
|
garments |
|
|
|||
|
|
|
|
|
|
|
|
Dark and |
15 min Wash |
|
Cold/Cold |
|
|
Colors |
color dyed |
Rinse |
:38 |
Hot/Cold |
• |
|
|
fabric |
Spin |
|
Warm/Cold |
|
|
|
|
|
|
|
|
|
|
Lingerie, |
10 min Wash |
|
Warm/Cold |
|
|
Delicate |
sheer |
|
|
• |
||
Long Rinse |
:35 |
Hot/Cold |
||||
fabrics with |
||||||
|
Short Spin |
|
Cold/Cold |
|
||
|
lace trim |
|
|
|||
|
|
|
|
|
|
|
|
Cottons, |
6 min Wash |
|
Warm/Cold |
|
|
Quick |
linens and |
|
|
|
||
Rinse |
:25 |
|
|
|||
mixed |
|
|
||||
|
Short Spin |
|
|
|
||
|
garments |
|
|
|
||
|
|
|
|
|
||
|
|
|
|
|
|
|
|
Clean, |
|
|
|
|
|
Spin |
soaking |
Spin |
:13 |
|
|
|
Only |
wet |
|
|
|||
|
|
|
|
|||
|
garments |
|
|
|
|
|
|
|
|
|
|
|
*Estimated time does not include the automatically selected Extra Rinse option. An extra rinse will add approximately 10 minutes.
14

OPERATING INSTRUCTIONS
STEP 1 - PREPARE AND SORT LAUNDRY
PREPARE LAUNDRY
•Check garment labels for manufacturer’s washing instructions.
•Empty pockets and turn them inside out.
•Turn down cu!s and remove any lint or dirt.
•Tie strings and sashes so they don’t tangle.
•Close zippers, snaps and hooks to avoid snagging.
•Remove pins or other sharp objects from clothes to prevent scratching of the wash basket.
•Pretreat all stains and heavily soiled areas.
•Turn synthetic and wool knits inside out to avoid pilling.
SORT LAUNDRY
•Sort laundry by the type of wash cycle required (water temperature and wash action).
•Separate light colors from dark colors and colorfast items from non-colorfast items.
•Separate heavy duty fabrics from light weight fabrics.
•Separate fabrics that attract lint from fabrics that give o! lint.
STEP 2 - ADD FABRIC CARE PRODUCTS
ADD DETERGENT
•Pour liquid or powder detergent and color safe bleach directly into the wash basket.
NOTE: You can use less or more detergent depending on the size of the load, and whether clothes are heavily or lightly soiled.
ADD BLEACH (IF DESIRED)
•Pour measured liquid chlorine bleach into the liquid chlorine bleach dispenser.
NOTE: Use only liquid bleach in this dispenser.
IMPORTANT: Be careful not to spill undiluted bleach onto the washer cabinet or your clothes. Since it is a strong chemical, it may damage clothes or the Þnish of the washer.
•Follow manufacturer’s directions on garment label for recommended use of liquid or powder bleach.
15

ADD FABRIC SOFTENER (IF DESIRED).
1.Mix fabric softener with an equal amount of warm water but mix only enough to Þll to the line marked inside the fabric softener dispenser.
2.Pour the diluted fabric softener mixture into the hole on the top of the agitator.
NOTES:
•Fabric softener will automatically be dispensed before the deep rinse cycle.
•To avoid staining, do not overÞll the dispenser or spill fabric softener onto the laundry.
•When using fabric softener, do not stop the washing machine during the spray rinse cycle.
STEP 3 - LOAD THE WASHER
1.Load garments loosely and evenly around the agitator.
2.Close the washer lid.
NOTES:
•Do not overload or stu! items into the wash basket.
•The washer will not agitate or spin with the lid open.
STEP 4 - START THE WASHER
1.Turn the washer on by rotating the CYCLE SELECTION KNOB.
2.Select a wash cycle.
3.Modify the default settings and options if desired.
4.Press the START/PAUSE BUTTON on the face of the knob to start the wash cycle.
16

CARE AND CLEANING GUIDE
 WARNING
Always unplug your washer to avoid electric shock before cleaning.
Ignoring this warning may result in death or injury.
Before using cleaning products, always read and follow manufacturer’s instructions and warnings to avoid personal injury or product damage.
CLEANING AND MAINTENANCE
•Only use a damp or sudsy cloth for cleaning the control panel.
•If you spill liquid/powdered softener, bleach or detergent on the cabinet, wipe the cabinet immediately to avoid damage to the Þnish.
•Do not use abrasive cleansers, harsh chemicals, ammonia, chlorine bleach, concentrated detergent, or solvents to clean the washer. These chemicals may dissolve, damage, or discolor the washer.
•After washing clothes, leave the lid open so that moisture inside the machine can evaporate and to prevent the growth of mold or mildew.
VACATIONING PRECAUTIONS
•Turn o! water supply faucets. This will eliminate the potential for damage to your home if a water hose ruptures or leaks.
•Unplug the washer from the electrical outlet.
•Dry the wash basket.
•Leave the lid open so that moisture inside the machine can evaporate and to prevent the growth of mold or mildew.
MOVING OR STORAGE PREPARATION
In addition to performing the “Vacationing Precautions,” complete the following additional steps.
•Disconnect the water hoses and the drain hose and place them into the wash basket.
•Turn the leveling feet so that they are fully retracted into the washer cabinet.
•If moving the washer, place the wash basket brace from the original packing materials back into the top of the washer opening. Use masking tape to secure the washer lid.
•Move and store your washer in an upright position only.
•Do not store your washer in a cold environment where temperatures fall below freezing; store at room temperature.
17

TROUBLESHOOTING
WASHER DOES NOT OPERATE
•Check that the power cord is plugged into a grounded 3 prong outlet.
•Check that the electrical wall receptacle is of proper voltage.
•Check if the circuit breaker needs to be reset or if the fuse needs to be replaced.
•Check that the washer is not overloaded. Laundry may need to be redistributed to re-balance the load.
•Check that the washer lid is properly closed.
•The washer pauses in some cycles. This is normal in the Delicate cycle, which has short periods for laundry to soak. You will not hear the washer operating during that period of time. When the soak time ends, the washer will restart automatically.
PROBLEMS WITH WATER
Water ßow is slow or Þlling takes a long time:
•Check to make sure that the water faucets are fully turned on.
•Check the water hoses to make sure that they are not tangled, kinked, or pinched.
Water temperature is incorrect:
•Check your water heater temperature. Hot water needs to be at a temperature of at least 120ºF -140ºF (49ºC - 60ºC).
•Check that the inlet hoses are properly connected (hot to hot and cold to cold).
Water leaks:
•Check that the inlet hoses connections at the faucets and washer are tight.
•Check that the drain hose connection at the washer is secure and that the drain hose is properly positioned at the drain location.
•Check the plumbing or call a plumber.
Water will not drain:
•Check that the drain hose is properly connected to the washer.
•Check the position of the drain hose. In order to drain properly, the top of drain outlet must be at least 39” (99 cm) above the ßoor.
•Check that the sink or drainpipe is not clogged.
18
 Loading...