


Cabinet Depth Refrigerator
Réfrigérateur avec portes à vantaux
Refrigerador con la profundidad de los gabinetes
User Manual Guide de l’Utilisateur Manual del Usuario Modelo
HB21FC75 / HB21FC45

English |
|
table of contents |
|
|
PAGE |
Safety Precautions.................................................................... |
2-3 |
Energy Saver Instructions........................................................... |
3 |
Installing Your Refrigerator........................................................ |
4 |
Parts & Features.......................................................................... |
5 |
Removing and Installing the Doors........................................ |
6-8 |
Connecting the Water Supply Line....................................... |
9-10 |
Preparing Before Use................................................................ |
11 |
Initial Usage............................................................................... |
11 |
Setting the Control Functions.............................................. |
12-18 |
About the Fresh Food Compartment................................. |
19-21 |
About the Freezer...................................................................... |
21 |
Usage of Ice Maker............................................................. |
22-24 |
Defrosting, Cleaning.................................................................. |
25 |
Changing Water Filter............................................................... |
26 |
Shutting off the Refrigerator.................................................... |
27 |
Troubleshooting................................................................... |
28-35 |
Limited Warranty...................................................................... |
36 |
1
English
important safety instructions
Read all of the instructions before using this appliance.
!When using this appliance, always exercise basic safety precautions, including the following:
1.Use this appliance only for its intended purpose as described in this use and care guide.
2.This refrigerator must be properly installed in accordance with the installation instructions before it is used. See grounding instructions in the installation section.
3.Never unplug your refrigerator by pulling on the power cord. Always grasp the plug firmly and pull straight out from the outlet.
4.Repair or replace all electric service cords that have become frayed or otherwise damaged immediately. Do not use a cord that shows cracks or abrasion damage along its length, the plug, or the connector end.
5.Unplug your refrigerator before cleaning or before making any repairs. Note: If for any reason this product requires service, we strongly recommend that a certified technician perform the service.
6.Do not use any electrical device or sharp instrument in defrosting your refrigerator.
7.If your old refrigerator is not being used, we recommend that you remove the doors. This will reduce the possibility of danger to children.
8.After your refrigerator is in operation, do not touch the cold surfaces in the freezer compartment, particularly when hands are damp or wet. Skin may adhere to these extremely cold surfaces.
9.Do not refreeze foods that have been thawed completely. The United States Department of Agriculture in Home and Garden Bulletin No. 69 reads: “…You may safely refreeze frozen foods that have been thawed if they still
contain ice crystals or if they are cold—below 40° F.”
“… Thawed ground meats, poultry, or fish that have any off-odor or off-color should not be refrozen and should not be eaten. Thawed ice cream should be discarded. If the odor or color of any food is poor or questionable, discard it. The food may be dangerous to eat.”
“…Even partial thawing and re-freezing reduce the quality of foods, particularly fruits, vegetables, and prepared foods. The eating quality of red meats is affected less than that of many other foods. Use refrozen food as soon as possible, to save as much of its eating quality as you can.”
10. Do not operate your refrigerator in the presence of explosive fumes.
2

English
SAVE THESE INSTRUCTIONS
HOUSEHOLD USE ONLY
DANGER
Risk of child entrapment. Before you throw away your old refrigerator or freezer, take the doors off. Leave the shelves in place so that children cannot easily climb inside.
IMPORTANT
ENERGY SAVER INSTRUCTIONS
This refrigerator is shipped with an energy saver feature enabled. Over time, moisture can form on the front surface of the refrigerator cabinet and cause rust. If moisture appears on the front surface of the refrigerator cabinet, horizontal mullion or top of freezer drawer, turn off the energy saver feature by following the instructions on page 18.
Thank you for purchasing our Haier product. This easy-to-use manual will guide you in getting the best use of your refrigerator.
Remember to record the model and serial number. They are on a label inside of the refrigerator.
Model number
Serial number
Date of purchase
Staple your receipt to your manual.
You will need it to obtain warranty service.
3

English
installing your refrigerator
Note: This refrigerator is designed for freestanding installation only. Make sure all air circulation guidelines are followed.
Unpacking Your Refrigerator
1.Remove all packaging material. This includes the foam base and all adhesive tape holding the refrigerator accessories inside and outside.
2.Inspect and remove any remains of packing, tape or printed materials before powering on the refrigerator.
Proper Air Circulation
•To ensure that your refrigerator works at the maximum efficiency, you should install it in a location with proper air circulation, plumbing and electrical connections.
•The following are recommended clearances around the refrigerator:
Sides…………….1" (25mm) Top....................1" (25mm) Back..................1" (25mm)
Electrical Requirements
•Make sure there is a suitable power outlet (115 volts, 15 amps outlet) with proper grounding to power the refrigerator.
•Avoid the use of three-plug adapters or cutting off the third grounding in order to accommodate a two-plug outlet. This is a dangerous practice since it provides no effective grounding for the refrigerator and may result in
shock hazard.
Use of Extension Cord
•Avoid the use of an extension cord because of potential safety hazards under certain conditions. If it is necessary to use an extension cord, use only a 3-wire extension cord that has a 3-blade grounding plug and a 3-slot outlet that will accept the plug. The marked rating of the extension cord must be equal to, or greater than, the electrical rating of the appliance.
Install Limitations
•Do not install your refrigerator in any location not properly insulated or heated, e.g. garage etc. Your refrigerator was not designed to operate in temperature settings below 55˚ Fahrenheit.
•Select a suitable location for the refrigerator on a hard, even surface away from direct sunlight or heat source, e.g. radiators, baseboard heaters, cooking appliances etc. Any floor unevenness should be corrected with the leveling legs located on the front bottom corners of the refrigerator.
4

English
PARTS & FEATURES
Fresh Food Section
Fresh food storage floodlight
Water filter
Dairy product stored here
Glide Shelf
Gallon Door Bin
Meats, fruit and vegetable crispers
Full-width pantry
Freezer lower drawer
Freezer Section |
Upper storage bin |
Ice cube bin
Lower storage basket
Note: When reviewing this manual for your features some models may differ in appearance from what is shown in the manual.
5
English
REMOVING AND INSTALLING THE DOORS
If you have trouble getting the unit into its final location, please follow the below door removal and installation instructions. For your safety have two or more people to assist you in completing the below task to avoid bodily injury, product damage, or property loss.
It is extremely important for the water line connector and tubing on the back panel to be reattached properly. Failure to do so can result in a leak at the connection or dripping at the dispenser.
How to Disconnect the Water Line (Only applicable to HB21FC75*)
1)Unplug unit from power source and remove the top hinge cover (5 screws) and water line cover (1 screw).
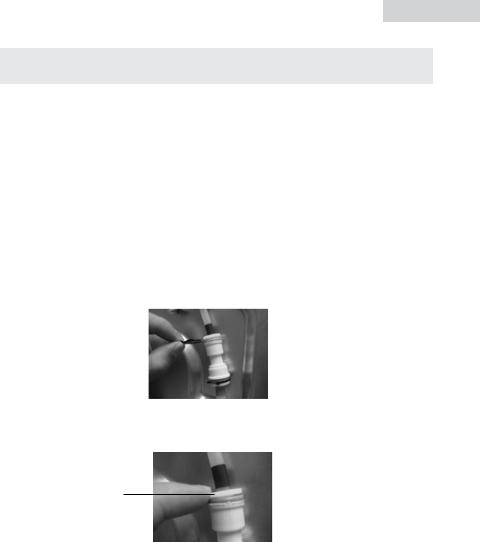
2)Disconnect the plastic water line from the connector on the back panel by first removing the black locking clip on one end of the connector. (Illustration 1)
[Illustration 1]
Black Locking |
|
|
|
|
|
Color Mark |
|
|
|||||
Clip |
|
|||||
|
||||||
|
|
|||||
|
|
|
|
|
|
|
3)Depress the white end of the union inward while pulling the tubing outward. Repeat for the other end. (Illustration 2)
[Illustration 2]
White End of
the Union
4)Pull the water line A out of cabinet from the front of unit as seen in Illustration 4.
5)To disconnect the electrical wires, push down on the locking tab of the plastic connectors and gently pull the two ends apart.
6
English
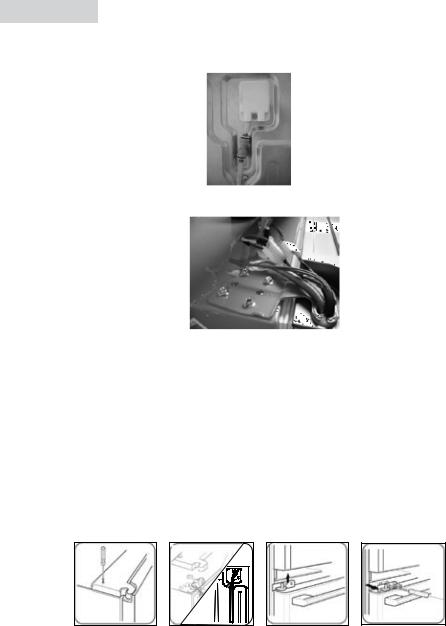
6)Remove the top hinges (4 screws on each side) and lift off the doors. Remove the middle hinges (3 screws) if necessary.
[Illustration 3] |
|
|
|
|
Water Line |
||||||||||||||
Water |
|
|
|
|
Cover |
||||||||||||||
|
|
|
|
Screw A |
|||||||||||||||
|
|
|
|
||||||||||||||||
Line A |
|
|
|
|
|
|
|
|
|
|
Black Locking |
||||||||
|
|
|
|
|
|
|
|
|
|||||||||||
Connector |
|
|
|
|
|
|
|
|
|
|
|
|
|||||||
|
|
|
|
|
|
||||||||||||||
Water Line B |
|
|
|
|
|
|
|
|
|
|
Clips |
||||||||
|
|
|
|
|
|||||||||||||||
Screw B |
|
|
|
|
|
|
|
|
|
||||||||||
|
|
|
|
|
|
|
|
||||||||||||
[Illustration 4] |
|
|
|
|
|
|
|
||||||||||||
Electrical |
|
|
|
|
|
|
|
|
|
|
|
|
|
|
|
|
|||
Connectors |
|
|
|
|
|
|
|
|
|
|
|
|
|
|
|
|
|
|
|
|
|
|
|
|
|
|
|
|
|
|
|
|
|
|
|
|
|
||
Hinge |
|
|
|
|
|
|
|
|
|
|
|
|
|
|
|
|
|
|
Water |
|
|
|
|
|
|
|
|
|
|
|
|
||||||||
Screws |
|
|
|
|
|
|
|
|
|
|
|
|
|
|
|
||||
|
|
|
|
|
|
|
|
|
|
|
|
|
|
|
|||||
|
|
|
|
|
|
|
|
|
|
|
|
|
|
Line A |
|||||
|
|
|
|
|
|
|
|
|
|
|
|
|
|
|
|
|
|
|
|
|
|
|
|
|
|
|
|
|
|
|
|
|
|
|
|
|
|
|
|
How to Reconnect the Water Line (Only applicable to HB21FC75*)
1)Reinstall the cabinet side tubing (Water Line A, Illustration3) to the connector by firmly pushing the tubing into the union as far as it will go. Follow the color mark on the tube as seen in Illustration 1. Do not depress the end of the union when inserting the tube. Replace the black locking clip.
2)Repeat at the back panel of the union (Water Line B), again making sure that the tubing is inserted as far as it will go. Follow the color mark on the tube. Replace the black locking clip.
WARNING: Be careful not to bend or distort the tubing. Also check to ensure there are no foreign objects in the connector, union, or tubes.
Left French Door Removal and Installation
1.First remove the top hinge cover as below.
2.Disconnect the wire cable connector and ground wire from the unit.
3.Remove the middle hinge, if needed.
4.Re-install the door in the reverse order.
When lifting the hinge as it separates from the door, be careful it doesn’t lean forward and fall, causing bodily harm or damaging the door.
7
English
Right French Door Removal and Installation
1.Remove the screws on the top hinge cover, then set aside the top hinge cover and lay it down for installing later.
2.Using a proper tool, remove the top hinge screws. Remove the hinge, then take the refrigerator door off and place it aside for the time being.
3.Remove the middle hinge, if needed.
4.Re-install the refrigerator door in reverse sequence.
When lifting up the refrigerator hinge and separating it from the door body, please be careful not to drop the door. It could cause bodily harm or damage.
Removing and Installing Freezer Drawer (IF REQUIRED)
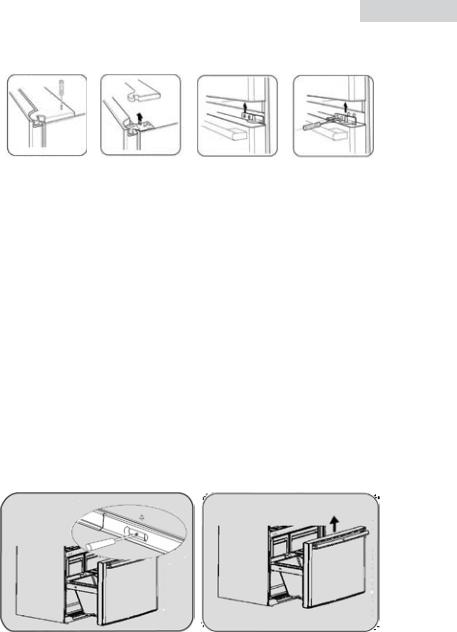
1.First open the drawer as far as possible, and then remove the screw on each side of the drawer as seen in illustration 5.
2.Then pull the drawer body up and towards you, and put it aside in a safe place as seen in illustration 6.
3.Re-install the drawer in the reverse order.
Caution: Keep children from playing inside the freezer drawer as a hiding place. Use caution after drawers are removed, due to the possibility of the plastic track protruding from unit.
Illustration 5 |
Illustration 6 |
8
English
Connecting the Water Supply Line
Note: It is consumer's responsibility, if not using a licensed plumber, to follow your local plumbing codes.
Install the “shut off” valve on the water pipe.
1.Turn off the main water supply pipe. Turn on the nearest tap until the water pipe is cleaned completely.
2.Choose the position of the valve. Choose a position for the valve that is easy to install and reach. It is recommended to install the valve on the side of a vertical water pipe. It is better to connect the valve to a level water pipe on the upside of the water pipe, not the downside, so the sediment may flow out from the water pipe.
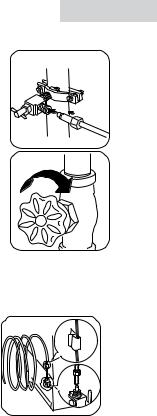
3.Drilling the “shut off” valve hole: Drill a 1/8” diameter hole on the water pipe using a sharp drill. Clean off burrs left on the water pipe by the drill. Use caution to prevent any water flowing into
the drill.
4.Tightening the “shut off” valve: Tighten the valve on the cold water pipe using a pipe nip. Follow the rules specified in the 248CMR of Massachusetts Federal Piping Standard.
Saddle-backed valves are unlawful in Massachusetts and forbidden. Please consult a plumber if you are unsure of the correct method to install the valve.
5. Tightening the pipe tip: Tighten the bolts of the pipe tip until the closing circle begins to expand. Don’t let the bolts of the pipe tip be too tight,
otherwise the water pipe is pressed flat and will cause a leak.
6.Positioning the water line to the refrigerator: Position the water line between the cold water pipe and the refrigerator. Drill a hole in the wall or on
the floor that is near the wall and the location for the fridge. Add extra length for the water supply line, about 8 feet (2.4 meters) and make three circles with the diameter of each circle about 1 foot, so there is extra line to move the fridge in and out for cleaning (unit away from the wall).
9
English
7.Connecting the water line to the “shut off” valve:
Put the tightened nut over the copper or plastic water line,
then the compression fitting, and insert the copper (or plastic) end inside the “shut off” valve. Make sure the pipe end sits all the way inside the valve. Tighten (but don’t over-tighten) the nut. Follow the descriptions
specified in 248CMR of Massachusetts Federal Piping Standard. Saddle-backed valve is unlawful in
Massachusetts and is forbidden. Please consult a licensed plumber if you are unsure of the assembly.
8. Clear the water line supply:
Turn on the main water supply until the water in the pipe becomes clear and clean. Turn off the water valve after
having used water for about 30 seconds – 1 minute. 9. Connect the water supply line to the refrigerator.
Note: Before connecting the water line to the refrigerator, make sure the water line is not draped over the power cord to the refrigerator or power outlet.
(1) Tighten the water supply line at the fridge water valve by sliding the nut over the water line end.
(2) Then, as shown in the figure, connect the end side of the water supply line to the water valve; tighten the water supply line nut with a crescent wrench.
Note: Please make sure that the 1/4" water tube is fully inserted into the water valve prior to tightening. Open the water supply valve and check for leaks, before positioning the unit in place.
10

English
Preparing before Use
1.Remove all packaging material.
2.Check to make sure all parts and materials are available in the fridge. Consult the seller for help if you find parts are missing.
3.Place the refrigerator in a good location (See Install Limitations on page 4).
4.Toe grille installation: Open the freezer drawer and remove the basket inside. Install toe grille with screws from bag.
5.For the convenience of record keeping, the model and serial number, purchase date, and receipt should be copied and taped to this manual for safekeeping.
6.It is recommended to clean the refrigerator before use. Before putting food in the refrigerator, please clean the inside and outside with water and diluted baking soda. Dip clean cloth in a gallon of water with a spoonful of baking soda.
7.Position the fridge then plug it in. After the refrigerator is placed on a flat surface and cleaned, turn on the power then let it run a few hours, then begin loading it with food.
Initial Usage
1.Plug in the power cord.
2.Change the settings to the temperature desired.
3.Putting the food into the refrigerator: The refrigerator will be cooled completely after a period of a few hours. After that, frozen and fresh foods can be put into the refrigerator for normal use.
When changing internal temperatures, a new balance temperature will occur after a period of time. The length of this period of time depends on the degree of the temperature change, the ambient temperature, the frequency of door openings, and the amount of stored food in the fridge.
11
English
Setting the Control Functions
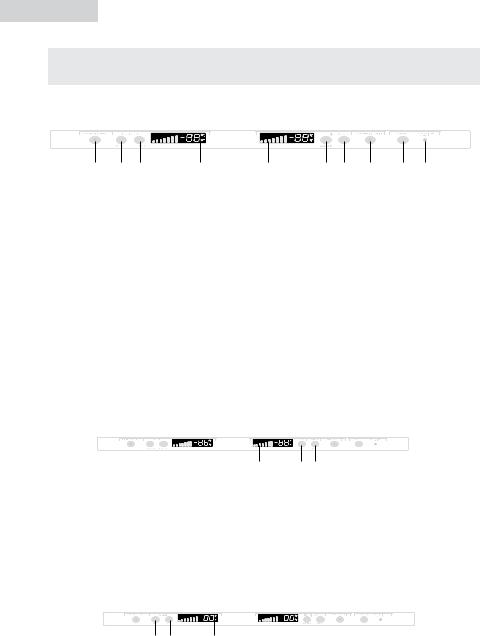
Exterior Refrigerator Control Center (Only for HB21FC75*)
|
|
|
|
O |
|
P |
|
Q |
|
R |
||||||||
A |
|
|
|
|
|
|
|
|
|
|
|
|
|
|
|
|
C |
|
|
|
|
|
|
|
|
|
|
|
|
|
|
|
|
|
|||
|
|
|
|
|
|
|
|
|
|
|
|
|
|
|
|
|||
B |
|
|
|
|
|
|
|
|
|
|
|
|
|
|
D |
|||
|
|
|
|
|
|
|
|
|
|
|
|
|
|
|
|
|
||
|
|
|
|
|
|
|
|
|
|
|
|
|
||||||
|
|
|
|
|
|
|
|
|
|
|
|
|||||||
|
|
|
|
|
|
|
|
|
|
|
|
|
|
|
|
|||
|
|
|
|
S |
T |
U V |
W |
|||||||||||
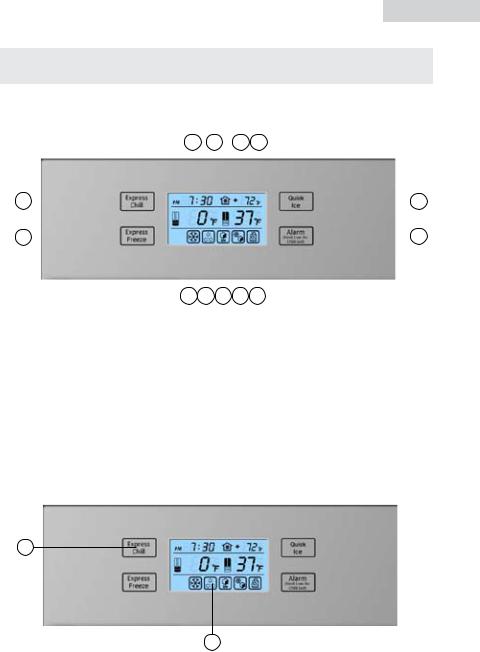
A: Express Chill Button |
|
|
|
|
T: Express Chill Icon |
|||||||||||||
B: Express Freeze Button |
|
|
|
|
Q: Room Temperature |
|||||||||||||
C: Quick Ice Button |
|
|
|
|
U: Ice Maker On-Off Icon |
|||||||||||||
D: Alarm/ Child Lock Button |
|
|
|
|
R: Refrigerator Temperature Display |
|||||||||||||
O: Clock Display |
|
|
|
|
V: Quick Ice Icon |
|||||||||||||
S: Express Freeze Icon |
|
|
|
|
W: Child Lock Icon |
|||||||||||||
P:Bottom Freezer Temperature Display
(1)Express Chill Setting*
A
T
Press the button “A”, the Express Chill icon “T” will light and the refrigerator will be in Express Chill mode. The refrigerator will stop the Express Chill mode if the actual storage temperature is 2 degrees Fahrenheit or 1 degree Celsius lower than the set temperature or after 3 hours. Press the button “A” again if you wish to exit Express Chill mode, icon “T” will go out then.
12
English
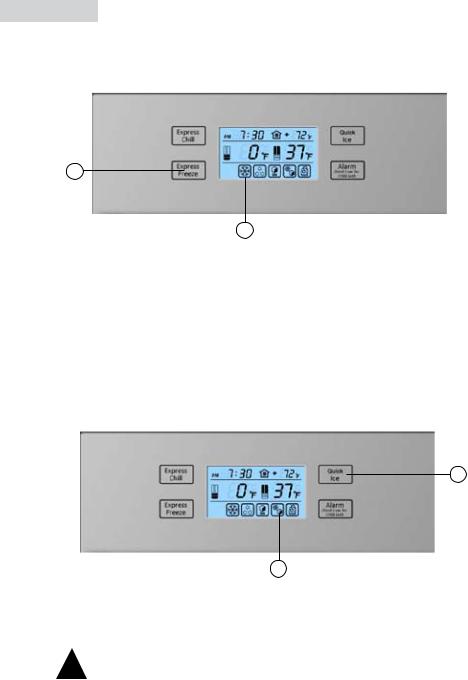
(2) Express Freeze setting *
B
S
The function of Express Freeze is to refreeze the food in the shortest time.
Press the button ”B”, the Express Freeze icon “S” will light and the freezer will be in the Express Freeze mode. It will remain in this mode for 21h to 42h, depends on the actual situation. You can press button “B” if you wish to end the express freeze mode early.
(3) Quick Ice setting*
You can select Quick Ice if you need to increase ice cube production.
C
V
Press the button “C”, the Quick Ice icon “V” will light and the freezer will be in Quick Ice mode. 24 hours later it will exit Quick ice mode automatically. Press the button “C” again if you wish to end the Quick ice mode, icon “V” will go out then.
!Please ensure that the ice maker is ON when you select “Quick Ice”.
*Express Chill, Express Freeze and Quick Ice can be activated or deactivated from either the interior controls or exterior controls.The ice maker must be set to ON for the "Quick Ice" function to work.
13
English
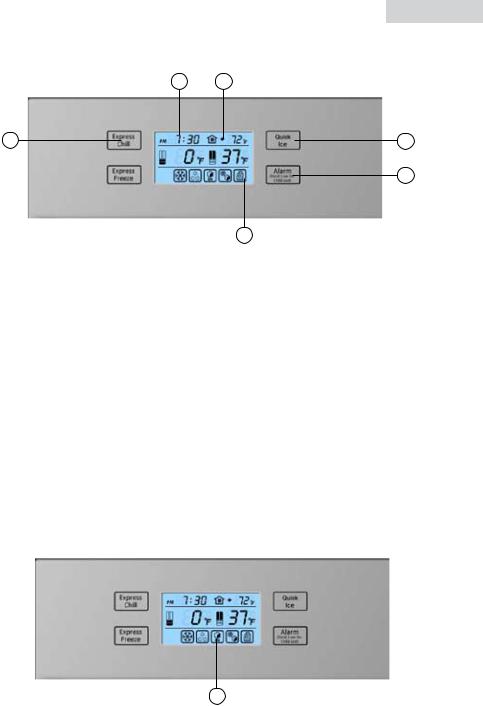
(4) Alarm/ Lock and Unlock
O Q
A C
D
W
The door open alarm will activate after 60 seconds. Press the “D” button for a second to silence the alarm. The door open alarm will re-activate after 5 minutes if the door remains open.
Press and hold the button “D” for 3 seconds in an unlocked status, after the first beep, icon “W” will light, it shows the controls on the dispenser panel is locked. Press and hold the button “D” for 3 seconds again, the unit will beep and the icon “W” goes out, then the unit has exited the locked status.
(5) Time Setting
In the unlocked status, press and hold the buttons “A” & “C” at the same time for 3 seconds, the unit will beep and the clock indicator “O” will flash. Press button “A” to set the hour (1-12) and press the button “C” to set the minute (00-59). AM and PM will shift at every 12 hours.
(6) Room Temperature Display
“Q” shows the room temperature of the refrigerator at present.
(7) Ice maker on-off
The ice maker is initially set to ON, the icon “U” on the dispenser will light if ice maker under normal operation.
U
To activate or deactivate function please see page 17, "Ice Maker On / Off".
14
English
Setting the Control Functions (cont'd)
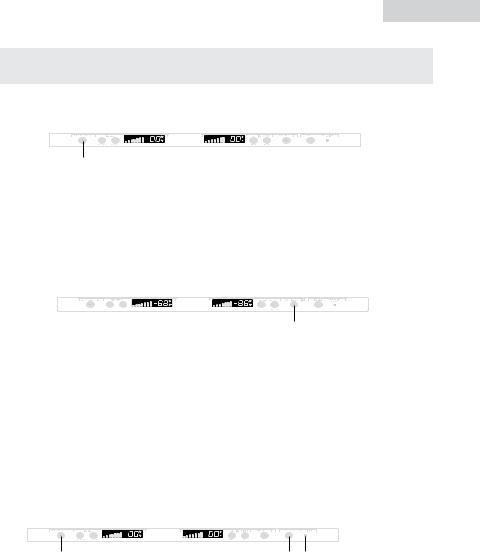
Interior Refrigerator Control Center
|
E |
F G |
H |
I |
J K |
L |
M N |
E. Quick-Freeze Button |
|
J. |
Refrigerator Temperature Decrease |
||||
F. |
Freezer Temperature Decrease |
|
Adjusting Button |
|
|||
|
|
|
|
||||
|
Adjusting Button |
|
K. Refrigerator Temperature Increase |
||||
G. Freezer Temperature Increase |
|
Adjusting Button |
|
||||
|
|
|
|
||||
|
Adjusting Button |
|
L. |
Refrigerator Quick-Chill Button |
|||
H. Freezer Temperature |
|
M. Water Filter Reset and Energy |
|||||
|
Indicating Area |
|
|
Saver Button |
|
|
|
I. |
Refrigerator Temperature |
|
N. Water Filter Indicator Light |
||||
|
Indicating Area |
|
|
|
|
|
|
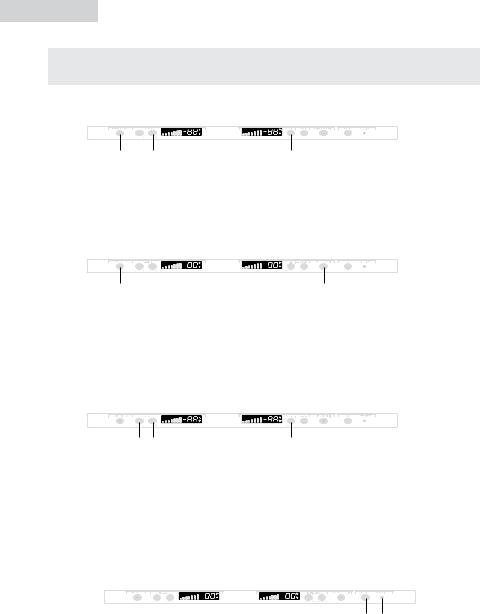
(1) Fresh Food Temperature Adjustment
ENERGY SAVER
I J K
Press Button J or Button K: The fresh food temperature control center will flash. When the temperature is set, the temperature range is 34 to 46 degrees F. Each time you press Button K, temperature will increase a level, until the highest temperature level is reached. Each time you press J, the temperature will decrease a level, until the lowest temperature level is reached.
(2) Freezer Temperature Adjustment
ENERGY SAVER
F G H
Press Button F or Button G on the freezer temperature control center: Area H will flash. When the temperature is set, the range of the freezer is -6 to 6 degrees F. Each time you press Button G, the freezer temperature will increase a level, until the highest temperature level is reached; each time you press Button F, the freezer temperature will decrease a level, until the lowest temperature level is reached.
15
English
Setting the Control Functions (cont'd)
(3) Freezer Express Freeze Setting
ENERGY SAVER
E
Press Button E: The Express Freeze button indicator lamp will light and the freezer will be in the Express Freeze mode. It will remain in this mode for 21-42 hours. You can press Button E if you wish to end the Express Freeze mode early and the Express-Freeze button indicator lamp will go out and the freezer will exit ExpressFreeze.
(4) Fresh Food Express Chill setting
ENERGY SAVER
L
Press Button L: The Fresh Food Express-chill refrigerator button indicator lamp will light and the refrigerator will be in the Express Chill refrigerator mode. The refrigerator will stop Express Chill mode if the storage temperature is 2 degrees Fahrenheit or 1 degree Celsius lower than its desired temperature or after 3 hours. If you want the refrigerator to exit Express Chill mode, press Button L
again. The Express Chill button indicator will go out, and the refrigerator will exit Express-chill.
Caution! When the refrigerator is in the Express-freeze or Express-chill modes, the refrigerator may run continuously to achieve the requested cooling function. This is a normal operating condition.
(5) Quick Ice Function
ENERGY SAVER
E M N
Press Button "E" and "M" at the same time for three seconds: The indicator light N of the water filter will flash, and the freezer will be in the Quick Ice mode; 24 hours later it will exit the Quick Ice mode automatically. Press Button E and M at the same time for three seconds again to exit the Quick Ice mode.
16
English
Setting the Control Functions (cont'd)
(6) Ice Maker On/Off
ENERGY SAVER
E G J
Press Button G and J at the same time for three seconds: The indicator lamp E will flash, and icemaker will turn off. When you press Button G and J at the same time for three seconds again, the icemaker will turn on again.
(7) Sabbath Function
ENERGY SAVER
E L
Press Button E and L at the same time for 3 seconds: The interior lights, LED displays and chimes will turn off. Press Button E and L at the same time for 3 seconds again and the chime will sound and the lights and displays will turn on ending the Sabbath mode.
(8) Celsius/Fahrenheit Conversion Function
ENERGY SAVER
F G J
Press Buttons F, G, and J on the control center at the same time for 3 seconds: Celsius temperature readings will be in effect after the first sound of the chime. Press Button F, G, and J on the control center at the same time for 3 seconds again to switch to Fahrenheit mode. Fahrenheit mode will be in effect after the first sound of the chime.
(9) Water Filter Indicator (Only for 75 & 45 Models)
When the indicator light of the water filter is lit up, the water filter should be
ENERGY SAVER
M N
changed. After the water filter is changed, press and hold the water filter reset button M for one second. The indicator light of the water filter N will go out. Caution! When the water filter needs to be changed, please refer to the “water
filter” section.
YOU MUST FLUSH 3.75 GALLONS THROUGH FILTER BEFORE USE (approximately 5 minutes.)
Note: Our water filters comply with California regulations.
17
English
Setting the Control Functions (cont'd)
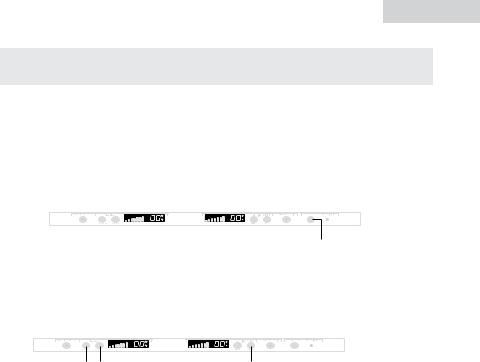
(10) Energy Saver
1.The energy saver button is initially set to ON. You can see "ES" on the right display for 3 seconds when you open the refrigeration doors, then it will turn back to show the refrigeration temperature.
2.By pressing and holding the "energy saver" button M on the control panel for 5 seconds, you can turn on or off the Energy Saver feature.
ENERGY SAVER
M
3. "ES" will appear only when the Energy Saver in the ON position. Note: See additional information on page 3.
(11) Demo mode
ENERGY SAVER
F G K
1.Compressor and fan motors do not operate in the demo mode.
2.Press Button F, G, and K at the same time for 3 seconds: After the first sound of the chime, the demo mode will be in effect. The temperature displays will show "- -". Press Button F, G, and K at the same time for 3 seconds again, and the demo mode will be cancelled.
(12) Power Surge protection
The refrigerator is equipped for power surge protection. When a power surge is detected, the refrigerator will turn off automatically. The refrigerator will automatically restart after 5 minutes.
(13) Loss of Power Return Setting
When a power loss occurs, the settings of the refrigerator before the power break are memorized. This allows the refrigerator to return to the previous settings when it is turned back on.
(14) Display
If the display does not operate properly but you still hear accompanying tones when you press buttons, this means the buttons are still working. However, you should call an after-sales service engineer to fix the problem to ensure optimum performance.
18
English
About the fresh food compartment
•Short term fresh or frozen food can be placed in the upper fresh food section or in the ice cream drawer. Keep raw foods near the lower area, away from ready to eat food in the top area.
•The height of the cantilever shelves can be adjusted to fit your storage needs.
When adjusting the height of the shelf, first remove any foods placed on the shelf. Then lift up by tilting the front up and pull it up. This will unlatch the rear hooks. Then place the hooks in a new ladder slot location and tilt back down into position on an even, horizontal plane.
Caution! Make sure that the two sides of the shelf are in balance, otherwise, the shelf may fall down or the food may slide.
Crisper Use
The refrigerator is designed to include a fruits, vegetables, and/or deli crisper. The inside temperature can be adjusted according to the type of food being stored.
•Turn up the humidity control button on the right side of the crisper, for a high humidity, to store cucumbers, grapes, oranges, apples, peaches, lettuce, and other produce that’s high in moisture.
•Turn down the humidity control button on the right side of the crisper to lower the humidity. This is suitable for storing meats, cheeses, onions, tomatoes and other drier foods.
•Full-width pantry and its usage
The refrigerator is specially designed to include a full-width pantry. The inside temperature can be adjusted, depending on the type of food to be stored there.
Note: To avoid damage do not press the air-adjusting button too hard.
Door bin height adjustment and cleaning
To change location, lift up the door bin while holding it by its two sides, and pull it straight out. After being cleaned, the door bin can be installed in the reverse manner, and the position can be adjusted according to the height of the food to be stored.
Crisper cover removal
Lift up the shelf, then pull it straight out.
Caution! When adjusting the height of the door bin, it is better to keep the dairy bin above the door bin.
19

English
Food Storage Tips (cont'd)
•It is recommended to keep some space between foods for good cold air circulation. The temperatures in the refrigerator are slightly warmer near the top and colder near the base.
Change the Fresh Food Light Bulbs
The voltage and wattage of the fresh food bulbs are: 115volt, 60 Hz – 40W. (Never use bulbs with power over 40W.) The lamp holder is type E17 intermediate size.
When changing the light bulbs:
•Pull out the power cord plug from the wall outlet, cutting off the power.
1.Remove the screw securing the light shield.
2.Use your hands to press down at the back of the light-shield, releasing two tabs.
3.Hold the light-shield and pull it out.
•Turn the bulb in a counterclockwise direction, and put in a new bulb by turning it clockwise.
•Re-install the light-shield back in the tabs in the reverse order, and snap back in place.
Removing and Installing Air Curtain (Only for servicing if needed)
1.Remove the water filter.
2.Take off the fresh food light-shield, and unscrew the bulb.
3.Remove the screws of the air curtain frame, using a screwdriver.
4.Take down the fresh food air curtain, using your hands to press down on the air curtain with a little bit of pressure.
•Re-install the air curtain by following these steps in the reverse order.
20

English
FRESH Food Storage Tips
Before putting hot foods into the refrigerator, first let cool until they reach room temperature. Foods stored in the refrigerator should be cleaned and the water drops patted off after cleaning. Before foods are put into it the refrigerator to be stored, it is recommended that the foods should be pressurized, so that the water cannot vaporize, fruits and the vegetables can keep fresh, and the smells
of the foods will not mix together. Stored foods can be marked in bags. Store the foods independently according to the different kinds of foods. Daily eaten foods should be stored in the front of the shelf. Try avoiding frequent door openings
as it reduces food shelf life. When storing food in the fresh food section make adequate space for air flow circulation. This helps maintain the shelf life of the food. When you store the foods, you should make sure that the foods stored in the refrigerator are not too close to the liner to avoid foods freezing on the back or side walls of the refrigerator.
It is suggested for radishes and other root vegetables to trim the leaves before storage. This keeps nutrients in the root so the leaves do not absorb them. Put the refrigerated foods into the fresh food area to let them defrost. The low temperature of the refrigerated foods reduces the formation of bacteria and extends food life. Some foods like onions, garlic, bananas, and root vegetables are better stored at room temperature than in the fridge. Melon, pineapples, and bananas can go directly into the freezer after preparing if storing over longer period.
ABOUT THE FREEZER
•The freezer is suitable for storing food for a long time. The temperature inside the freezer is low (between -6 and 6 degrees F). It keeps foods fresh for a long period of time. Frozen foods should be wrapped and marked when stored to track storage time period.
The electrical rating of the bulb is: 115V, 60 Hz-40W.
The lamp holder is type E17. (Never use bulbs with power over 40W.)
How to Change the Freezer Light Bulb:
•Pull out the power cord plug to cut off the power.
•Lift the light-shield slightly in the direction upward, and then pull it out in the direction shown.
•Turn the bulb counterclockwise and drop it down, then install a bulb of the same rating.
•Re-install the light-shield in the reverse order.
21

English
Precaution when Freezing Food
Before hot foods are put into the refrigerator, first let them cool until their temperature reaches the room temperature. Divide the food into small portions, so it is easier for it to be stored in the fresh food area. Each portion should be marked so the contents and date can be checked before cooking. Each portion of the food should be not more than 5.5 pounds (2.5 kg). The food should be in packages before it is frozen. Keep the surface of the package dry. This keeps the packs from freezing together. The package material of the foods should be odorless and airproof so different stored foods may be mixed without affecting their quality. Food should be stored based on use. Food should be classified according to its use. Write the date, expiration date, and food name on the
outside of packing materials so you can be assured of the food and when it is safe to eat. Take food from the freezer to defrost when needed. Defrosted food cannot be frozen again unless it is cooked. Otherwise, it will affect food quality and safety. Do not put too much fresh food into the freezer at once. This could go beyond the freezer’s cooling capacity. (Refer to “Technical Data.”)
Usage of Icemaker
1.Preparation before using the icemaker:
a)Cut the water pipe according to need, and avoid bending the water pipe too much. Usually the length should be less than 18ft. (5 m). If the water pipe is too long, the ice maker capacity will be affected because there is not enough water pressure.
b)The water pipe cannot stand heat. Keep it away from heat sources.
c)You may want to have a service engineer install the water pipe.
d)Water supply pipe instructions: The cold water pressure should be between 21-123 psi for automatic ice making.
e)The water filter is for removing chlorine and odors from the water. It cannot sterilize or destroy bacteria–therefore, make sure to connect the water pipe to a drinkable water source.
22

English
Usage of Icemaker (cont'd)
2.Precautions
a)To prevent the pipe from freezing, do not install the water pipe in a place below 32° F.
b)Open water valve to flush pipe, and check leakage in water pipe joints until water is clean.
c)When temperature of icemaker is equal to or below 5˚F, the icemaker will begin to make ice. (Throw out the first several batches of ice cubes if you make ice after not having made it for a long time.)
d)After the fridge is installed, put the water supply pipe in a proper place to prevent pressing and damage.
e)The filter in the water pipe is there to filter impurities in the water and to make ice clean and hygienic. Therefore, the filter will absorb impurities during normal use. After a long time of usage, if the cubed ice becomes smaller, it may mean that the filter is blocked from the impurities. After 6 months of use, the “Change Filter” indicator light will turn on. At this time, we suggest going to your local authorized Haier after-sale service center or call 1-877-337-3639. After you change the filter, press and hold the water filter reset button for one second, the indicator light will turn off. The refrigerator comes with a filter installed; after this you have to buy and change the filter yourself.
f)The ice maker should only be connected to a source of drinkable water.
3.Icemaker Operation:
The icemaker tray periodically receives an automatic flow of water to the icemaker ice cube tray. Once the water freezes a sensor on the tray recognizes cubes have been made and automatically twists the tray to drop the ice cubes into the ice bucket. Capacity of the icemaker depends on
the ambient temperature, frequency of freezer door openings, and freezer compartment cooling temperature setting. Typically ice harvest per day is 4 pounds of ice.
4. If this is your first icemaker:
Occasionally you may hear some sounds, like flowing of water or ice cubes dropping. These sounds are normal. Occasionally, in periods of infrequent ice use, cubes may stick together. This is normal.
5. If you do not use ice often:
Older ice cubes can get stale. Clean the ice container periodically with warm water. Before putting it back, dry it well so cubes do not stick to surfaces.
23

English
Usage of Icemaker (cont'd)
6. When you do not use the ice bucket for long periods of time:
If you will not be using the ice container for a long time, throw out the remaining ice cubes, wash the container with warm water, dry it with a towel, and place it back in the fridge. Then close the water supply valve to the fridge.
Note:
1.Your upper left freezer compartment is arranged to load ice cubes, the right compartment is for ice cream or small size frozen food.
2.When opening the ice tray avoid rapid pullout, which can cause ice cubes to fall into the lower deep freeze drawer.
3.When icemaker is dropping ice into the center drawer ice bucket, a signal of circling dashes will appear on the dispenser clock screen. It is recommended for the user to wait for the ice cubes to drop before opening the ice tray.
4.If the cubes coming from the ice maker are small/ deformed, an adjustment of the water inflow time may need to be made.
Press and hold the buttons F, G, J, and K at the same time for 3s, the unit will beep. Then water inflow time of the ice maker can be regulated. The freezer temperature display area “H” will show the water inflow time. Press button F to decrease the water inflow time and press button G to increase the water inflow time. The factory inflow time is set to 6.5 seconds.
24

English
Defrosting and Cleaning
• Defrosting
Defrosting is done automatically, so there’s no need to manually defrost this fridge.
• Cleaning
To keep internal odors to a minimum, it is best to periodically clean the inside shelves, crispers, bins, and walls. For your safety, before cleaning, pull out the power cord plug. Clean the fridge using a soft cloth or sponge with warm water. When done, dry off the areas with a dry clean cloth.
1.The fridge is heavy. When you move the fridge for cleaning or maintenance, be careful to protect the floor. When you move the fridge, keep it vertical. Do not tilt the fridge. This helps prevents damage to the floor.
2.During cleaning, do not spray or rinse the fridge with water or liquids. This could harm the electrical parts.
3.When you clean near the electrical parts, like the light switch or bulb, use a dry cloth.
4.Do not clean the fridge with a stiff or wire brush. Do not use solvent such as detergent, petrol, lacquer, thinner, acetone, or acid. Warm water is best.
5.Make sure your hands are not wet when you touch cold steel parts, to prevent your skin from sticking to the steel parts.
6.During cleaning, do not use hot water to clean the glass shelves, or they may break or crack. This could cause personal injury and/or damage the fridge.
7.Door gaskets often collect dirt so please clean them off with a damp cloth.
25

English
Changing Water filter
• When the “water filter indicator light” is on:
If the “water filter indicator light” is on, it is indicating that you should change the water filter. You should change the water filter at least every six months or when the water capacity or the ice-making capacity has shown an obvious decrease. Please pay attention to the water condition you are receiving, as you may need to change the water filter frequently due to the difference between water properties in different areas.
Please note: Depending on the water source quality, you may need to change your water filter more frequently than every 6 months.
• Changing the water filter:
1.Remove the old filter by turning the filter cartridge handle counterclockwise.
2.The cartridge will eject slightly from the filter housing.
3.Pull out the cartridge from the filter housing.
Caution! Water may be retained in the old filter cartridge. This could cause some water spillage through the filter housing drain.
4.Remove the protective heat seal from the new filter cartridge. Insert it into the filter housing with the filter cartridge handle in the vertical position. Then push the filter cartridge into the housing until it stops.
5.Gently turn the cartridge handle clockwise until it stops. The cartridge handle should now be horizontal.
6.Run the refrigerator water dispenser for 3-5 minutes after replacing the filter to flush out the water tank. Discard this water.
7.After replacing the Haier filter cartridge, reset the water filter indicator lamp.
Caution!
1.The ice maker can not be used without the water filter.
2.For filter replacement questions or information on your Haier appliances, contact your dealer or call 1-877-337-3639.
Note
1.Do not use water filter or icemaker with water that is micro biologically unsafe. If you are not sure that it is safe, do not use without disinfecting the water before or after it goes through the system.
2.After installing a new water filter, discard all ice produced during the first 24 hours.
3.If the icemaker has not been used actively for an extensive period of time, or if ice cubes have an unpleasant taste or odor, change the water filter.
4.Air trapped in the system may cause water and filter cartridge to eject. Use caution when removing.
26

English
Shutting off the Refrigerator
• Handling Power Failure
Foods can be stored well after several hours of a power failure, even during the summer. After a power failure, do not put new food into the fridge, and open the door as infrequently as possible. If you are aware there will be a power failure ahead of time, make ice cubes and put it in the upper part of the fresh food compartment.
Note: If the temperature becomes warmer in the freezer due to a power failure or other malfunction, the expiration date on frozen food may change, and food quality may decrease.
• Discontinuing Use
If you do not want to use the fridge for a long period of time, pull out the power cord plug. Cut off all power supply and water sources. Clean the fridge as directed in this manual. Leave the fridge door open to prevent any odors from accumulating.
Note: Normally, the fridge performs best when it is left on to run continuously rather than unplugging it and energizing frequently.
• Vacation
If you will be on vacation for a long time, cut off the power source and water supply, and take out all food. Clean the interior of the fridge after any frost melts. Wipe it clean to remove any food residue that could cause odors. If the ambient temperature is below freezing, call qualified service personnel to drain the water system. This prevents leakage and keeps the pipes from bursting due to frozen water.
• During Transport
Pull out the power cord plug and cut off the power. Remove all food. Fix all moveable parts with good adhesive tape, such as fresh food and freezer shelves, and crispers. Close the fridge doors and drawers and fix with tape to prevent opening during transport. During transport, the maximum slant angle must not be over 45 degrees (from vertical standing) to prevent damage to the cooling system. During transport, do not hold the handle of the fridge. This could cause property damage and is a threat to personal safety.
Note: It is suggested that you do not lay the refrigerator flat while transporting. This could cause oil to drain from the compressor. If you must transport this way allow the fridge to stand vertically for 4-6 hours so oil can return into the compressor before turning on the fridge power.
27

English
Troubleshooting
Before calling for service, please first read the following table. This could save you time and money. In this table, common problems are discussed which can be corrected with minor adjustments by you.
Problem |
Cause |
Solution |
|
|
|
|
The temperature is too low. |
|
The |
• The refrigerator is in deep |
• This case is normal for a fridge |
compressor |
freeze cooling. |
automatically. The period of |
doesn’t work |
|
deep freeze cooling lasts about |
|
|
30 minutes. |
|
• The refrigerator isn’t |
• Make sure the power cord |
|
plug is inserted all the way into |
|
|
powered on. |
the power outlet. |
|
|
• Check and change to a new |
|
• The fuse or the circuit |
15A fuse and/or reset the |
|
breaker for room has |
circuit breaker. |
|
tripped off. |
• Check the power line in the |
|
• There is no line electricity. |
room. Call the local electric |
|
|
company. |
The fridge |
• The room temperature or |
• In this case it is normal for the |
runs |
outside temperature is too |
fridge to operate continuously. |
frequently |
high. |
|
or runs for a |
• The automatic icemaker is |
• This is normal since the |
long time. |
||
|
in operation. |
icemaker adds an extra |
|
|
|
|
|
workload on the fridge. |
|
• The doors or drawers are |
• Try to reduce frequency of |
|
frequently being opened |
door or drawer openings. |
|
and closed. |
|
|
• The control settings are |
• Raise up the compartment |
|
settings in freezer and |
|
|
temperatures slightly and |
|
|
fresh food are set to a cold |
|
|
allow 24 hours to reach |
|
|
level. |
|
|
new balance. |
|
|
• Door and/or drawer |
|
|
• Clean off the gaskets and/or |
|
|
gasket seals may be dirty, |
|
|
frayed, or cracked. |
heat slightly with hair dryer so |
|
gasket takes contour of metal |
|
|
|
|
|
|
frame. |
|
• The condenser is dirty. |
• Clean the condenser. |
|
|
|
28
 Loading...