


Service Manual
Grundig Service
|
Hotline Deutschland... |
|
Technik: |
...Mo.-Fr. 8.00-18.00 Uhr |
|
|
|
|
TV |
0180/52318-41 |
|
TV |
0180/52318-49 |
|
SAT |
0180/52318-48 |
|
VCR/LiveCam |
0180/52318-42 |
|
HiFi/Audio |
0180/52318-43 |
|
Car Audio |
0180/52318-44 |
|
Telekommunikation |
0180/52318-45 |
|
Fax: |
0180/52318-51 |
|
Planatron (8.00-22.00 Uhr) 0180/52318-99 |
||
Ersatzteil-Verkauf: |
...Mo.-Fr. 8.00-19.00 Uhr |
|
Telefon: 0180/52318-40 |
||
Fax: |
0180/52318-50 |
|
|
|
|
|
Zusätzlich erforderliche |
||
|
Unterlagen für den Komplettservice |
||
|
Additionally required |
||
|
Service Manuals for the Complete Service |
||
|
|
|
|
Service |
|
Service |
|
Manual |
|
Manual |
|
M 19-C |
|
Sicherheit |
|
M 29-C |
|
Safety |
|
Materialnr./Part No. |
|
Materialnr./Part No. |
|
72010 759 1500 |
|
72010 800 0000 |
|
|
|
|
|
HiFi
M 19-C
(G.LI 0451)
M 29-C
(G.LI 0551)
Btx * 32700 #
Materialnummer
Part Number 72010 759 1500
Änderungen vorbehalten Subject to alteration
Printed in Germany VK232 0199

Allgemeiner Teil / General Section |
M 19-C / M 29-C |
Es gelten die Vorschriften und Sicherheitshinweise gemäß dem Service Manual "Sicherheit", Materialnummer 72010 800 0000, sowie zusätzlich die eventuell abweichenden, landesspezifischen Vorschriften!
The regulations and safety instructions shall be valid as provided by the "Safety" Service Manual, part number 72010 800 0000, as well as the respective national deviations!
Inhaltsverzeichnis |
|
Table of Contents |
|
|
Seite |
|
Page |
Allgemeine Hinweise .................................. |
1 - 2 |
General Notes .............................................. |
1 - 2 |
Allgemeiner Teil ........................... |
1 - 3 … 1 - 21 |
General Section ............................ |
1 - 3 … 1 - 21 |
Technische Daten ...................................................................... |
1 - 3 |
Technical Data ........................................................................... |
1 - 3 |
Bedienhinweise .......................................................................... |
1 - 4 |
Operating Instructions ................................................................ |
1 - 9 |
Ausbauhinweise ....................................................................... |
1 - 15 |
Disassembly Instructions ......................................................... |
1 - 15 |
Abgleichvorschriften ...................... |
2 - 1 ... 2 - 2 |
Adjustment Procedures .................. |
2 - 3 ... 2 - 4 |
Platinenabbildungen |
|
Layout of the PCBs |
|
und Schaltpläne ........................... |
3 - 1 … 3 - 41 |
and Circuit Diagrams ................... |
3 - 1 … 3 - 41 |
Blockschaltplan .......................................................................... |
3 - 1 |
Block Diagram ............................................................................ |
3 - 1 |
Verdrahtungsplan ....................................................................... |
3 - 2 |
Wiring Diagram .......................................................................... |
3 - 2 |
Schaltpläne: |
|
Circuit Diagrams: |
|
Netzteilplatte .......................................................................... |
3 - 4 |
Mains Unit Board .................................................................... |
3 - 4 |
CD-Tastenplatte, Steuerplatte .............................................. |
3 - 10 |
CD Key Board, Control Board .............................................. |
3 - 10 |
Kopfhörerplatte, Hauptplatte ................................................ |
3 - 14 |
Headphone Board, Main Board ............................................ |
3 - 14 |
Tuner-Teil ............................................................................. |
3 - 20 |
Tuner Part ............................................................................ |
3 - 20 |
Verstärkerplatte .................................................................... |
3 - 24 |
Amplifier Board ..................................................................... |
3 - 24 |
Cassetten-Platte ................................................................... |
3 - 30 |
Cassette Board .................................................................... |
3 - 30 |
CD-Platte .............................................................................. |
3 - 34 |
CD Board ............................................................................. |
3 - 34 |
Display ....................................................................................... |
3 - 6 |
Display ....................................................................................... |
3 - 6 |
Platinenabbildungen: |
|
Layout of the PCBs: |
|
Netzteilplatte .......................................................................... |
3 - 6 |
Mains Unit Board .................................................................... |
3 - 6 |
CD-Tastenplatte, Steuerplatte ................................................ |
3 - 8 |
CD Key Board, Control Board ................................................ |
3 - 8 |
Kopfhörerplatte, Hauptplatte ................................................ |
3 - 18 |
Headphone Board, Main Board ............................................ |
3 - 18 |
Verstärkerplatte, Cassetten-Platte ....................................... |
3 - 28 |
Amplifier Board, Cassette Board .......................................... |
3 - 28 |
CD-Platte .............................................................................. |
3 - 32 |
CD Board ............................................................................. |
3 - 32 |
IC-Blockdiagramme ................................................................. |
3 - 36 |
IC Block Diagrams ................................................................... |
3 - 36 |
Ersatzteillisten und |
|
Spare Parts Lists and |
|
Explosionszeichnungen .............. |
4 - 1 … 4 - 10 |
Exploded Views ............................ |
4 - 1 … 4 - 10 |
Allgemeine Hinweise
Materialnummern
Durch die EDV-Umstellung wurden die bisherigen 10-stelligen
Materialnummern auf 12-stellige geändert.
Beispiel: |
bisher: |
29504-111.22 |
|
neu: |
29504 111 2200 |
Während der Umstellphase können im Service Manual beide Schreibweisen vorkommen.
General Notes
Part Numbers
Due to the conversion of the EDP system, the previous 10-digit part numbers were change to 12-digit numbers.
Example: previous: |
29504-111.22 |
new: |
29504 111 2200 |
During the conversion of the system, either form may be found in the Service Manual.
Meßgeräte
Beachten Sie bitte das GRUNDIG Meßtechnik-Programm, das Sie unter folgender Adresse erhalten:
Test Equipment
Please note the GRUNDIG Catalog "Test and Measuring Equipment" obtainable from:
Grundig AG Geschäftsbereich Instruments Testund Meßsysteme Würzburger Str. 150, D-90766 Fürth
Tel.: 0911 / 703-4118, Fax: 0911 / 703-4130
eMail: instruments@grundig.de, Internet: http://www.grundig-instruments.de
1 - 2 |
GRUNDIG Service |

M 19-C / M 29-C |
Allgemeiner Teil / General Section |
Allgemeiner Teil
Technische Daten
VERSTÄRKER |
|
Musikleistung M19-C ......................................................... |
2 x 60W |
M29-C ....................................................... |
2 x 100W |
Sinusleistung M19-C ......................................................... |
2 x 30W |
M29-C ......................................................... |
2 x 50W |
Bandbreite der Ausgangsleistung ............................ |
40…20000Hz |
Frequenzgang .......................................................... |
40…20000Hz |
Signal-Störabstand (bewertet) ............................................. |
³ 75dB |
Eingangsempfindlichkeit Aux .............................................. |
400mV |
Lautsprecher .............................................................................. |
8W |
Kopfhörer (ø 3,5mm) .................................................... |
32…1000W |
TUNER |
|
FM-Wellenbereich (UKW) ....................................... |
87,5…108MHz |
MW-Wellenbereich (9-kHz-Raster) .......................... |
531…1620kHz |
LW-Wellenbereich ..................................................... |
146…290kHz |
Empfindlichkeit bei 75W |
|
UKW-Mono, 26dB Störabstand ............................................ |
2mV |
UKW-Stereo, 46dB Störabstand ......................................... |
40mV |
CD-SPIELER |
|
Frequenzbereich ...................................................... |
20…20000Hz |
Signal-Störabstand (bewertet) ............................................. |
³ 86dB |
Klirrfaktor ........................................................................... |
< 0,05% |
CASSETTENDECK |
|
Frequenzbereich |
|
CrO2-Cassette (Typ II) ............................. |
80…12500Hz (± 8dB) |
Signal-Störabstand (bewertet) ............................................. |
³ 50dB |
Gleichlaufschwankungen ............................................... |
£ ± 0,25% |
GEHÄUSE |
|
Material / Oberfläche ..................................... |
Polystyrol und Metall |
Abmessungen (B x H x T) ............................... |
280 x 310 x 360mm |
Gewicht / mit Lautsprechern ....................................... |
ca. 11 / 17kg |
General Section
Technical Data
AMPLIFIER |
|
Music power M19-C ...................................................... |
2 x 60W |
M29-C .................................................... |
2 x 100W |
Nominal power M19-C ...................................................... |
2 x 30W |
M29-C ...................................................... |
2 x 50W |
Power band width ..................................................... |
40…20000Hz |
Frequency response ................................................. |
40…20000Hz |
Signal-to-noise ratio (weighted) ........................................... |
³ 75dB |
Input sensitivity Aux ............................................................. |
400mV |
Speakers .................................................................................... |
8W |
Headphones (ø 3.5mm) ............................................... |
32…1000W |
TUNER |
|
FM wave range ....................................................... |
87.5…108MHz |
MW wave range (9kHz Grid) ................................... |
531…1620kHz |
LW wave range ......................................................... |
146…290kHz |
Sensitivity at 75W |
|
FM mono, 26dB S/N ............................................................. |
2mV |
FM Stereo, 46dB S/N ......................................................... |
40mV |
CD PLAYER |
|
Frequency range ...................................................... |
20…20000Hz |
Signal-to-noise ratio (weighted) ........................................... |
³ 86dB |
Total harmonic distortion ................................................... |
< 0.05% |
CASSETTE DECK |
|
Frequency range |
|
CrO2 tape (type II) .................................... |
80…12500Hz (± 8dB) |
Signal-to-noise ratio (weighted) ........................................... |
³ 50dB |
Wow and flutter ............................................................... |
£ ± 0.25% |
CABINET |
|
Material / finish ............................................ |
Metal and polystyrene |
Dimensions (w x h x d) .................................... |
280 x 310 x 360mm |
Net weight / with speakers .................................. |
approx. 11 / 17kg |
GRUNDIG Service |
1 - 3 |
Allgemeiner Teil / General Section |
M 19-C / M 29-C |
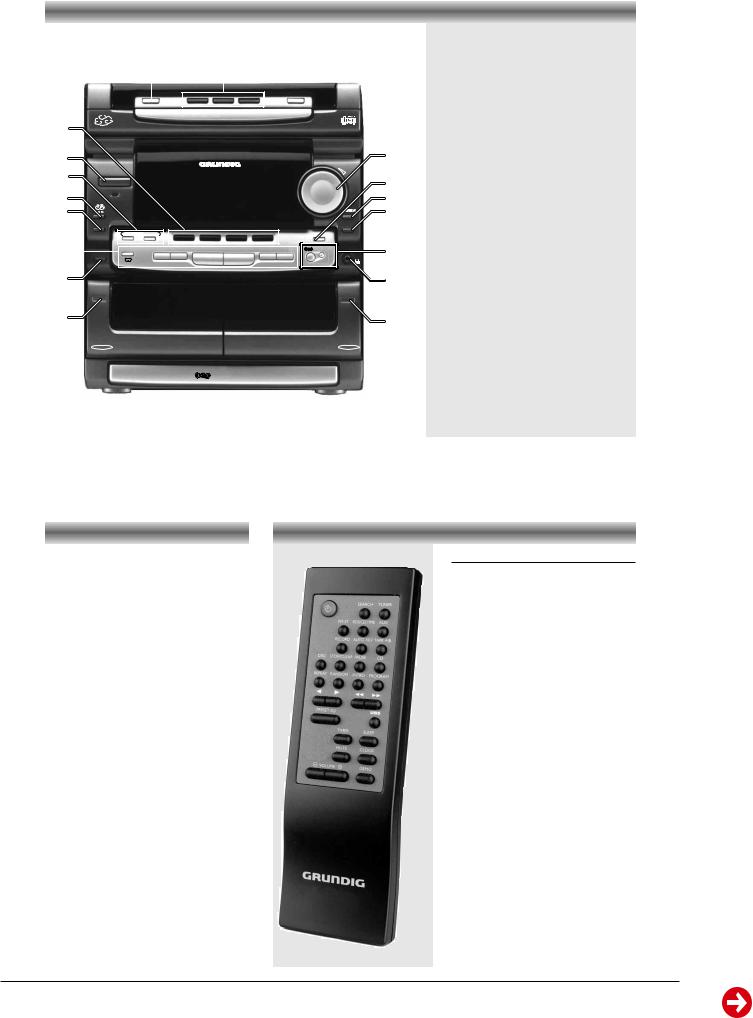
Bedienhinweise
Dieses Kapitel enthält Auszüge aus der Bedienungsanleitung. Weitergehende Informationen entnehmen Sie bitte der gerätespezifischen Bedienungsanleitung, deren Sachnummer Sie in der entsprechenden Ersatzteilliste finden.
BEDIENELEMENTE
|
|
|
|
|
|
|
|
die Abbildung zeigt M29-C |
|
||||||||
|
|
|
|
3 |
|
|
|
|
4 |
|
5 |
|
|||||
|
|
|
|
|
|
|
|
|
|
|
|
|
|
|
|
|
|
|
|
|
|
|
|
|
|
|
|
|
|
|
|
|
|
|
|
|
|
|
|
DISC |
|
DISC 1 |
DISC 2 |
DISC 3 |
|
|
OPEN/CLOSE |
|
|||||
|
|
|
|
|
|
|
|
|
|
|
|
|
|
|
|
|
|
|
2 |
|
|
|
|
|
|
|
|
3 CD CHANGER |
|
|
|
|
|
||
|
3 |
|
|
|
|
|
|
DIRECT DISC SELECT SYSTEM |
|
|
|
|
|
||||
2 |
1 |
|
|
|
|
|
|
|
|
|
|
|
|
|
|
|
|
CD CHANGER |
|
|
|
|
|
|
|
|
|
|
|
|
|
|
|||
|
|
|
|
|
|
|
|
|
|
|
|
|
|
|
|||
1 |
|
|
|
|
|
|
|
|
|
|
|
|
|
|
|
|
|
18 |
|
ON / OFF y |
|
|
|
|
|
|
|
|
|
|
|
|
|
VOLUME |
|
17 |
|
|
|
|
|
|
|
|
|
|
|
|
|
|
|
|
|
16 |
R D S |
|
|
|
|
|
|
|
|
|
|
|
|
|
|
|
|
|
|
|
|
M29-C COMPACT HIFI SYSTEM |
DIGITAL SOUND CONTROL |
|
|||||||||||
|
SEARCH |
|
|
|
|
|
|
|
|
|
|
|
|
|
PRESET EQ |
||
|
|
|
DUBBING SPEED |
|
|
|
|
|
|
BAND |
|
|
|
|
|
||
|
|
|
HIGH |
NORMAL |
|
|
|
|
|
|
|
|
|
|
RECORD |
||
|
|
|
|
|
|
CD |
TAPE |
TUNER |
AUX |
|
|
||||||
|
|
|
|
|
|
|
|
|
|
|
|
||||||
15 |
|
|
|
|
|
|
|
|
|
|
|
|
|
|
|
|
SOUND |
|
|
AUTO REV. |
9 |
|
; |
|
|
|
|
|
S T |
|
SURROUND |
||||
|
|
|
|
STOP / CLEAR |
PAUSE |
PLAY / PRESET |
|
SEARCH / TUNING |
|
||||||||
|
PROGRAM |
|
|
|
|
|
|
|
A |
B |
|
|
|
|
|
||
|
|
|
|
|
|
|
|
|
|
|
|
|
|
|
|||
14 |
|
|
|
|
|
|
|
|
|
|
|
|
|
|
|
|
|
|
|
|
|
|
|
|
|
|
|
|
|
|
|
|
|
|
|
|
? |
|
|
|
|
|
|
|
|
|
|
|
|
|
|
|
? |
13 |
|
|
|
|
|
|
|
|
|
|
|
|
|
|
|
|
|
|
|
|
|
|
|
|
|
|
SYNCHRO RECORD |
AUTOREVERSE |
|
|
|
|
|
||
|
TAPE A PLAYBACK |
|
|
|
NORMAL / HIGH SPEED DUBBING |
FULL LOGIC DRIVE |
|
|
|
|
REC / PLAYBACK TAPE B |
||||||
SOUND SURROUND
1ON/OFF y – Zum Einschalten des Gerätes und zum Umschalten auf Bereitschaftsbetrieb. In Bereitschaftsbetrieb leuchtet die STANDBY LED 6 auf (unter der ON/OFF y-Taste)
2SOURCE SELECTION – Zum Wählen von:
CD : Zum Umschalten auf CD-Betrieb.
TAPE : Zum Umschalten auf Kassettenbetrieb A oder B.
TUNER : Zum Umschalten auf Radiobetrieb. Im Tuner-Betrieb zur Auswahl der Wellenbereiche - FM (UKW), MW oder LW.
AUX : Zum Umschalten auf AUX-Betrieb (für 6 externe Signalquellen, z.B. Ton vom
Fernsehgerät oder Videorecorder).
73 DISC – Bewegt den drehbaren CD-Teller, um eine CD auswählen zu können.
84 DISC 1, 2, 3 – Zum Wählen der Wiedergabe
9einer CD in einem bestimmten CD-Fach.
|
5 |
OPEN/CLOSE ? – Zum Öffnen und Schließen der |
|
|
|
CD-Karusselschublade. |
|
10 |
6 |
VOLUME – Zum Einstellen der Lautstärke. |
|
7 |
RECORD – Zum Starten der Aufnahme. |
||
|
|||
11 |
8 |
UBS (Ultra Bass System) – Zum Einund Ausschal- |
|
|
ten der Baßverstärkung. |
9PRESET EQ – Zum Wählen der gewünschten Klangeffekte: NORMAL, DISCO, ROCK, JAZZ oder CLASSIC.
10(Nur M29-C) Q Sound Surround – Zum Einund
12Ausschalten des Surround-sound-Effektes. Wenn Surround-sound eingeschaltet ist, leuchtet die Surround LED auf.
11 p – Zum Anschließen des Kopfhörers (ø 3,5-mm- Klinkenstecker).
12? – Zum Öffnen des Kassettenfachs von Deck B.
13? – Zum Öffnen des Kassettenfachs von Deck A.
14PROGRAM
bei CD – Zum Programmieren von CD-Stücken. bei TUNER – Zum Programmieren von Vorwahlsendern.
BEDIENELEMENTE
15CD/TAPE/TUNER Benutzeroberfläche
AUTO REV.
bei TAPE – Zum Wählen der verschiedenen Wiedergabe-Betriebsarten.
STOP/CLEAR 9
bei CD – Zum Stoppen der Wiedergabe oder zum Löschen eines Programms
bei TAPE – Zum Stoppen der Wiedergabe oder Aufnahme
PAUSE ;
bei CD – Zum Unterbrechen/Fortsetzen der Wiedergabe
bei TAPE – Zum Unterbrechen/Fortsetzen der Wiedergabe/Aufnahme.
PLAY/PRESET A B
bei CD PLAY B – Zum Starten der Wiedergabe bei TUNER PRESET A B – Zum Wählen eines Vorwahlsenders
bei TAPE PLAY A B – Zum Wählen und Abspielen von Kassettenseite A oder B.
SEARCH/TUNING S T
bei CD – Zum Wählen des vorhergehenden/nächsten Stücks oder zum vorwärts/rückwärts Suchen bei TUNER – Zum Abstimmen auf einen Radiosender mit höherer oder niedrigerer Frequenz. bei TAPE – Zum Voroder Zurückspulen der Kassette.
16SEARCH – Zum Auswählen der festgelegten RDSSender nach Programmart.
17RDS
bei CD – Zum Anzeigen der aktuellen Spieldauer, der verbleibenden Spieldauer des aktuellen Stücks und der insgesamt verbleibende Spieldauer.
bei TUNER – Zum Auswählen von RDS-Daten: Sendername, Programmtyp, Radiotext und Frequenz.
18DUBBING SPEED – Zum Wählen des Kopierens von Kassetten in normaler oder hoher Geschwindigkeitt.
M19-C/M29-C
FERNBEDIENUNG
Funktionen der Fernbedienung
•Zuerst eine der Quellenwahltasten auf der Fernbedienung (z.B. CD, AUX, TUNER oder TAPE) drücken, um die gewünschte Signalquelle zu wählen.
•Anschließend die gewünschte Funktion wählen (PLAY, NEXT, usw.).
Die Tasten an der Fernbedienung haben die gleiche Funktion wie die entsprechenden am Gerät.
Zusätzliche Tasten:
FM ST. – Einstellen auf UKW Stereooder UKW Mono-Empfang.
REPEAT – Wiederholtes Abspielen eines Titels, einer ganzen CD oder von allen drei CDs.
RANDOM – Zum Abspielen der CD-Stücke in zufälliger Reihenfolge.
INTRO – Spielt jeweils 10 Sekunden der Titel der eingelegten CDs an.
TIMER – Zum Einstellen des Timers und zum Einund Ausschalten des Timers
SLEEP – Zum Einstellen des SLEEP-Timers
MUTE – Zum vorübergehenden Stummschalten des Tons
CLOCK – Zum Anzeigen und Einstellen der Uhr
DEMO – Zum Darstellen der verschiedenen Leistungsmerkmale des Systems.
Hinweis:
Wenn eine Taste auf der Fernbedienung gedrückt wird, blinkt die STANDBY Anzeige 6. Hierdurch wird angezeigt, daß das Gerät das Signal von der Fernbedienung empfangen hat.
1 - 4 |
GRUNDIG Service |
M 19-C / M 29-C |
Allgemeiner Teil / General Section |
BEDIENUNG DES SYSTEMS
Wichtig: Vor der Inbetriebnahme ist sicherzustellen, |
|
|
|
|
|
|
|
|
|
|
|
|
|
daß alle vorbereitenden Maßnahmen durchgeführt |
|
|
|
|
|
|
|
|
|
|
|
|
|
wurden. |
|
|
|
|
|
|
|
|
|
|
|
|
|
Das Gerät befindet sich im Bereitschaftsbetrieb, |
|
|
|
|
|
|
|
|
|
|
|
|
|
wenn der Netzstecker mit der Wandsteckdose |
|
|
|
|
|
|
|
|
|
|
|
|
|
|
|
|
|
|
|
|
|
|
|
|
|
|
|
verbunden ist. Die STANDBY Anzeige 6 leuchtet |
|
|
|
|
|
|
|
|
|
|
|
|
|
auf und ‘0:00’ blinkt auf dem Display. |
|
|
|
|
|
|
|
|
|
|
|
|
VOL 12 |
|
|
|
|
|
|
|
|
|
|
|
|
||
Einschalten des Systems |
|
|
|
|
|
|
|
|
|
|
|
Hz |
|
|
|
105 |
|
340 |
|
1K |
|
3K |
|
10K |
|||
|
|
|
|
|
|
|
|
|
|
|
|
|
|
• Die Taste ON/OFF y, CD, TUNER, TAPE oder |
|
|
|
|
|
|
|
|
|
|
|
|
|
AUX am Gerät oder auf der Fernbedienung |
|
|
|
|
|
|
|
|
|
|
|
|
|
drücken. |
|
|
|
|
|
|
|
|
|
|
|
|
|
Umschalten des Systems auf Bereitschaft |
|
|
|
|
|
|
|
|
|
|
|
|
|
• Die Taste ON/OFF y erneut drücken (oder die |
|
|
|
|
|
|
|
|
|
|
|
|
|
Taste y auf der Fernbedienung). |
|
|
|
|
|
|
|
|
|
|
|
|
|
Wählen der Tonsignalquellen |
|
|
|
|
|
|
|
|
|
|
|
|
|
•Die Taste für die gewünschte Signalquelle drücken: CD, TUNER, TAPE oder AUX am
Gerät oder auf der Fernbedienung. |
|
|
|
|
|
|
|
|
|
|
|
|
|
|
|
– Die gewählte Signalquelle läuft einmal über das |
|
|
|
|
|
|
|
|
|
|
|
|
|
|
|
Display. |
|
CD |
|
|
|
|
|
|
|
|
|
|
|
|
|
Hinweis: Bei der Wahl der AUX-Signalquelle ist sicher- |
|
|
|
|
|
|
|
|
|
|
|
|
|
|
|
|
|
|
|
1 |
2 |
3 |
4 |
5 |
6 |
7 |
8 |
|
|||
zustellen, daß der linke und der rechte Ausgang des |
|
|
2 |
|
|
|
|
|
|
|
|
|
|
|
|
|
|
9 |
10 |
11 |
|
|
|
|
|
|
|
||||
externen Gerätes (z.B. TV oder VCR) mit den |
|
1 |
|
3 |
|
|
|
|
|
|
|
|
|
|
|
entsprechenden AUX-IN-Buchsen verbunden sind. |
|
11 |
|
5005 |
|
|
|
|
|||||||
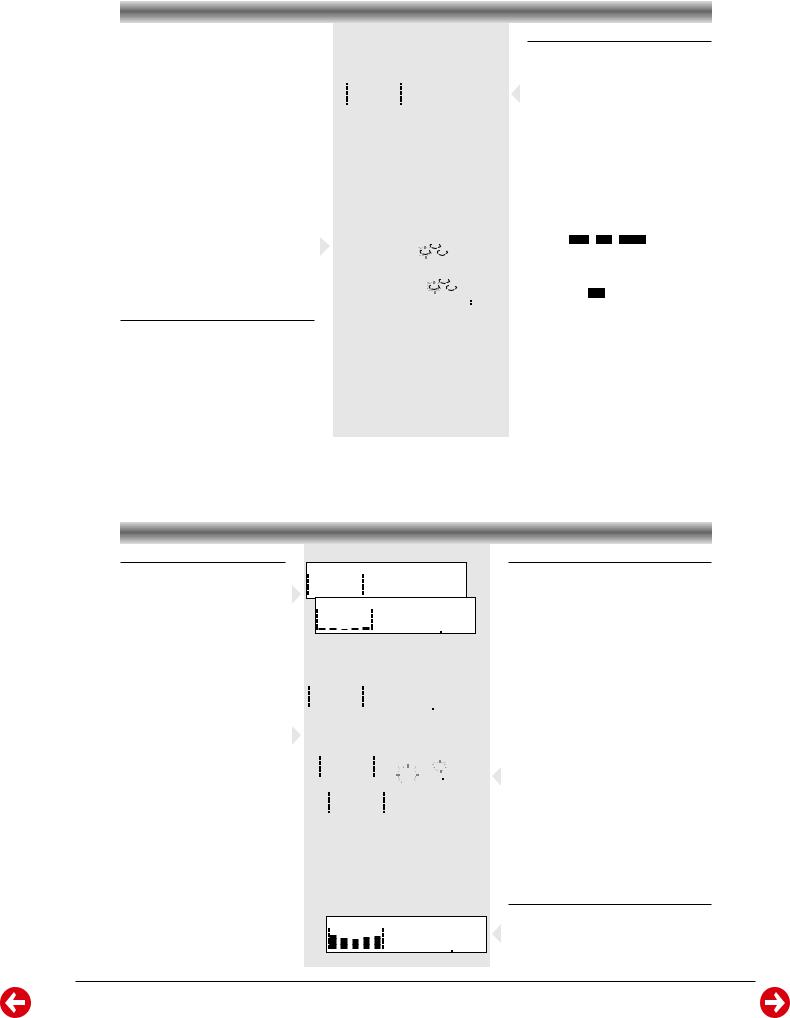
Demo-Betrieb
Die Anlage verfügt über einen Vorführbetrieb, mit dem die verschiedenen Leistungsmerkmale der Anlage demonstriert werden können.
•Die Taste DEMO auf der Fernbedienung drücken, um die Demonstration einzuschalten.
–Auf dem Display erscheint ‘DEMO ON’ und ‘WELCOME TO THE AUDIO WORLD’, gefolgt von den verschiedenen Leistungsmerkmalen.
•Die Taste DEMO erneut drücken oder die Taste ON/OFF y (oder y auf der Fernbedienung) drücken, um den Demo-Betrieb zu stoppen.
– Das System schaltet auf Bereitschaft.
Sound control
Einstellen der Lautstärke
•Den Lautstärkeregler VOLUME nach links oder rechts drehen (oder die Taste VOLUME + oder
– auf der Fernbedienung drücken), um den Lautstärkepegel zu erhöhen oder zu verringern.
– Im Display erscheint den gewählten Pegel.
Für individuelles Hören
•Den Stecker des Kopfhörerkabels mit der p Buchse (3,5 mm) auf der Vorderseite des Gerätes verbinden. Die Lautsprecher werden stummgeschaltet.
Preset Equalizer
Die Preset Equalizer-Funktion schafft mit Hilfe der neuesten digitalen Klangtechnik eine realistische Atmosphäre für die gewählte Musikart.
• Um den gewünschten speziellen Klangeffekt zu genießen, drücken Sie mehrmals die Taste PRESET EQ am Gerät oder auf der Fernbedienung.
–Das Display zeigt den ausgewählten Effekt:
 , ROCK , JAZZ , CLASSIC oder NORMAL
(keine Anzeige).
Ultra Bass System (UBS)
•Die Taste UBS drücken, um den BaßFrequenzgang zu verstärken.
– Das Symbol UBS leuchtet auf.
Q SOUND SURROUND (nur M29-C)
Bei gewöhnlicher Stereophonie ist der Stereoeffekt zwischen linkem und rechtem Lautsprecher hörbar. Er wird durch die Position der Lautsprecher begrenzt (d.h. die ‘Klangbühne’ befindet sich zwischen den zwei Lautsprechern). Der Q Sound Surround erzeugt jedoch noch einen Stereoeffekt jenseits der Lautsprecher, dadurch wird die ‘Klangbühne’ vergrößert.
•Drücken Sie die Taste Q SOUND SURROUND um den Effekt einzuschalten. Die LED Anzeige neben der Taste leuchtet.
•Drücken Sie die Taste Q SOUND SURROUND erneut um die Funktion auszuschalten.
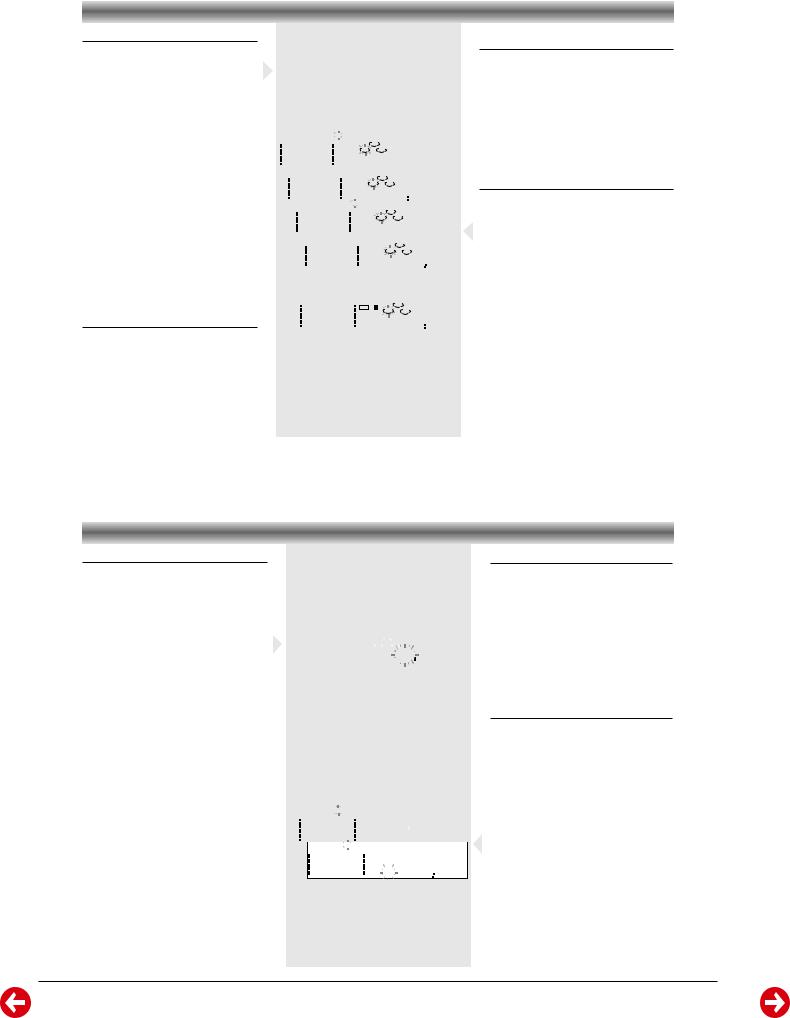
Abstimmen auf Radiosender
1Drücken Sie die Taste TUNER (BAND) am Gerät oder auf der Fernbedienung.
–Zuerst erscheint die Angabe TUNER im Display und kurz darauf wird die aktuelle Frequenz und - falls verfügbar - die Speicherplatznummer angezeigt.
2Drücken Sie die Taste TUNER (BAND) erneut, um den gewünschten Wellenbereich zu wählen: FM (UKW), MW oder LW.
3Halten Sie die Taste TUNING S oder T länger als eine Sekunde gedrückt.
–Auf dem Display wird nach einer Frequenz gesucht, bis ein Sender mit ausreichender Signalstärke gefunden ist.
–Das Symbol STEREO TUNED oder TUNED leuchtet auf.
•Diese Schritte wiederholen, bis der gewünschte Sender erreicht ist.
•Um auf einen schwachen Sender abzustimmen, die Taste TUNING S oder T kurz drücken, bis die richtige Frequenz angezeigt wird und/oder die beste Empfangsqualität erreicht ist.
•Beim Empfangen eines UKW-Senders, stellt die Anlage automatisch auf FM STEREO. Ist der Stereo-Empfang gestört, können Sie auf FM MONO-Empfang schalten, indem Sie die Taste FM ST auf der Fernbedienung drücken.
TUNER
105 340 1K 3K 10K Hz FM 8700MHz
|
|
|
|
|
|
|
|
|
|
|
|
|
|
|
|
|
|
|
|
TUNED |
|
|
|
|
|
|
|
|
|
|
|
|
|
|
|
|
|
|
|
|
|
|
STEREO |
|
|
|
|
|
|
|
|
|
|
|
|
|
|
|
|
|
Hz |
|
|
FM10300MHz |
|
|
||
|
105 |
|
340 |
|
1K |
|
|
|
|
3K |
|
|
|
10K |
|
|
|
|
|
|
||
|
|
|
|
|
|
|
|
|
|
|
|
|
|
|
|
|
|
|
|
|
|
|
|
|
|
|
|
|
|
|
|
|
|
|
|
|
|
|
|
|
|
|
TUNED |
|
|
|
|
|
|
|
|
|
|
|
|
|
|
|
|
|
|
|
|
|
|
PRESET STEREO |
|
|
|
|
|
|
|
|
|
|
|
|
|
|
|
|
|
|
|
|
|
Hz |
9850MHz |
|
|
|
|
|
105 |
|
340 |
|
|
|
|
1K |
|
|
|
3K |
|
|
10K |
|
|
|||
|
|
|
|
|
|
|
|
|
|
|
|
|
|
|
|
|
|
|
|
|
|
|
|
|
|
|
|
|
|
|
|
|
|
|
|
|
|
|
|
|
|
|
TUNED |
|
|
|
|
|
|
|
|
|
|
|
|
|
|
|
|
|
|
|
|
|
|
PRESET STEREO |
|
|
|
|
|
|
|
|
|
|
|
|
|
|
|
|
|
|
|
|
|
Hz STORED |
|
||
|
|
|
|
|
|
|
|
|
|
|
|
|
|
|
|
|
|
|
|
|||
|
|
|
|
|
105 |
|
|
340 |
|
|
|
1K |
|
|
3K |
|
10K |
|
||||
TUNED
PRESET STEREO
105 340 1K 3K 10K Hz 10 9850MHz
Speichern von Vorwahlsendern
Es können bis zu zwanzig Sender im FM-Band (UKW), 10 Sender in MW-Band und 10 Sender im
ein VorSpeicher-
platznummer neben der Frequenz angezeigt.
1Drücken Sie die Taste TUNER (BAND) am Gerät oder auf der Fernbedienung, um den TUNERBetrieb zu wählen.
2Drücken Sie die Taste TUNER (BAND) erneut, um den gewünschten Wellenbereich zu wählen: FM (UKW), MW oder LW.
3Drücken Sie die Taste TUNING S oder T, um auf die gewünschte Frequenz abzustimmen.
4Drücken Sie kurz die Taste PROGRAM.
– Das Symbol PRESET blinkt auf dem Display.
5Drücken Sie die Taste PRESET A oder B (oder A / B auf der Fernbedienung) um die gewünschte Speicherplatznummer zu wählen.
– Die Speicherplatznummer blinkt auf dem Display. 6 Drücken Sie erneut die Taste PROGRAM.
–Der Sender und die Speicherplatznummer werden gespeichert und die Angabe STORED wird angezeigt.
•Die obigen Schritte wiederholen, um weitere Vorwahlsender zu speichern.
Hinweis: Bei einer Unterbrechung der Stromversorgung bleiben die Vorwahlsender noch mindestens 1 Stunde lang gespeichert, bevor sie gelöscht werden.
Abstimmen auf Vorwahlsender
•Drücken Sie die Taste PRESET A oder B (oder A oder B auf der Fernbedienung), um die
gewünschte Speicherplatznummer zu wählen.
–Die Speicherplatznummer und die Frequenz des Vorwahlsenders werden angezeigt.
GRUNDIG Service |
1 - 5 |
Allgemeiner Teil / General Section |
M 19-C / M 29-C |
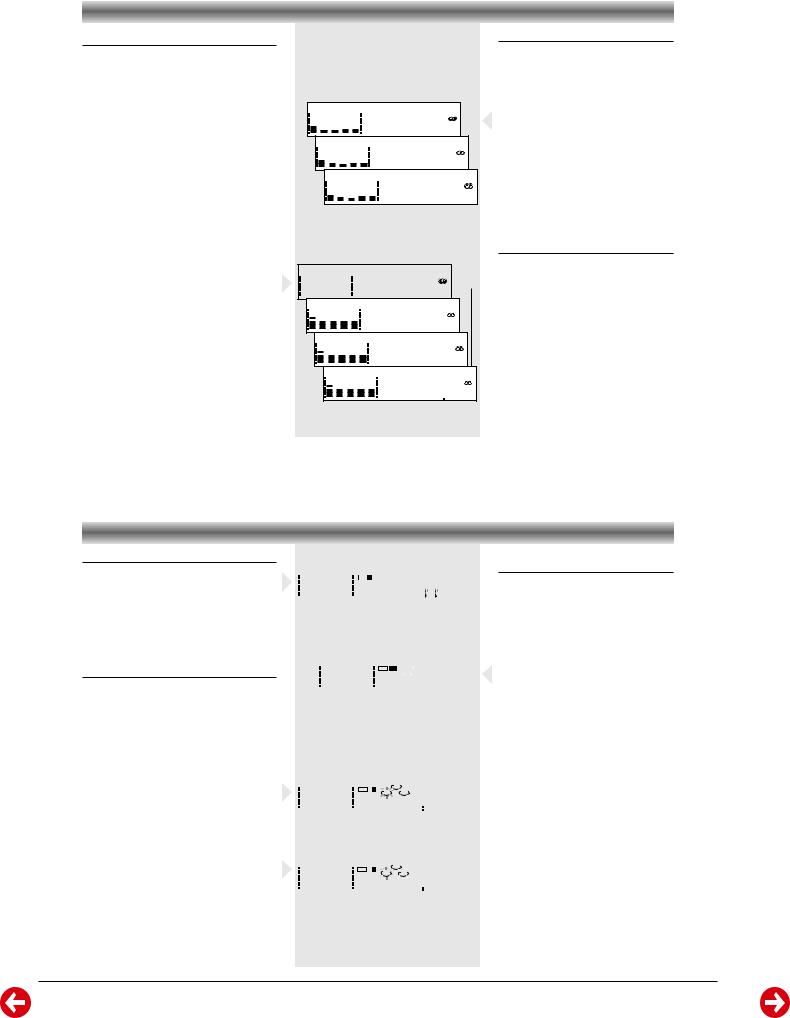
Empfangen eines RDS-Radiosenders Ç
RDS (Radio Data System) ist ein Rundfunkdienst, mit dem FM-Sender (UKW) neben dem normalen UKW-Rundfunksignal zusätzliche Informationen übertragen können.
Die zusätzlichen Informationen können folgendes enthalten:
•SENDERNAME: Der Sendername wird angezeigt.
•FREQUENZ: Die Frequenz des Senders wird angezeigt.
•PROGRAMMTYP: Es gibt folgende Programmtypen, die vom Tuner empfangen werden können: Nachrichten, Wirtschaft, Info, Sport, Bildung, Theater, Kultur, Wissenschaft, Verschiedenes, Pop M, Rock M, M.O.R. (Middle of the Road Musik), Leichte M, Klassik, Andere M.
•RADIO TEXT (RT): Auf dem Display werden Textmeldungen angezeigt.
Wenn das Gerät auf einen RDS-Sender abgestimmt ist, werden das RDS-Logo (Ç) und der Sendername angezeigt.
•Normalerweise zeigt das Display den Sendernamen, wenn dieser zur Verfügung steht.
Durch wiederholtes Drücken der Taste RDS (oder RDS/CD TIME auf der Fernbedienung) kann auf einen anderen anzuzeigenden Informationstyp umgeschaltet werden:
–Auf dem Display werden nacheinander angezeigt: SENDERNAME -> PROGRAMMTYP -> RADIOTEXT -> FREQUENZ -> SENDERNAME.
Hinweis:
1Wenn die Taste RDS (oder RDS/CD TIME auf der Fernbedienung) gedrückt wird und die Angabe “NO PS” auf dem Display erscheint, strahlt der abgestimmte Sender entweder kein RDS-Signal aus oder es handelt sich nicht um einen RDS-Sender.
2Falls der Radiosender keine Programmart überträgt, erscheint im Display “NO PTY”.
TUNER
NEWS
R.D.S
105 340 1K 3K 10K Hz
105 340 1K 3K 10K Hz AFFAIRSR.D.S
R.D.S
105 340 1K 3K 10K Hz INFO
|
|
|
|
|
|
|
|
|
|
|
|
|
|
|
|
|
|
|
|
|
|
|
|
|
|
|
|
|
|
|
|
|
105 |
340 |
|
1K |
|
3K |
|
10K Hz |
|||
TUNED


 PRESET STEREO R.D.S 105 340 1K 3K 10K Hz ROCK M
TUNED


 PRESET STEREO R.D.S 105 340 1K 3K 10K Hz USIC FOR
TUNED


 PRESET STEREO R.D.S 105 340 1K 3K 10K Hz 10 9850MHz
RDS Search
RDS bietet Ihnen die Möglichkeit, FM-Sender nach Programmarten auszuwählen. Mehr und mehr Sender codieren ihre Programmart und erlauben damit eine erfolgreiche Suche mit der Funktion SEARCH.
Der übertragene Code steht jedoch unter Verantwortung des Radiosenders.
•Durch Drücken der Taste SEARCH am Gerät oder auf der Fernbedienung, starten Sie den Aufruf der Programmarten nacheinander.
•Drücken Sie die Taste S oder T um die gespeicherten Sender in Vorwärtsoder Rückwärtsrichtung zu scannen, damit Sie die gewünschte Programmartübertragung finden. Sobald dies der Fall ist, wird der Sender eingestellt.
RDS-Uhr
Einige RDS-Sender übertragen in einminütigen Intervallen eine Zeitangabe in Echtzeit.
Uhrzeit noch nicht eingestellt h. auf dem Display blinkt
‘0:00’):
–Wenn der RDS-Sender eine Uhrzeit in Echtzeit ausstrahlt, wird die aktuelle RDSUhrzeit automatisch gespeichert.
• Wenn die Uhrzeit bereits eingestellt wurde:
–Wenn die RDS-Uhrzeit übertragen wird, wird das Gerät die aktuelle Uhrzeit nicht durch die übertragene RDS-Uhrzeit ersetzen.
Bandschnellauf
1Das Band kann durch Drücken der Taste T bzw. S am Gerät oder auf der Fernbedienung schnell voroder zurückgespult werden.
2Unabhängig von der Laufrichtung der Kassette bei Wiedergabe, behalten S und T ihre Funktion bei.
3Drücken Sie die Taste 9 (oder STOP/CLEAR auf der Fernbedienung), um den Bandschnellauf zu stoppen.
Aufnahme von anderen Signalquellen (Kassettendeck B)
1Setzen Sie eine unbespielte Kassette in Kassettendeck B ein.
2Drücken Sie die Taste TAPE, um TAPE B zu wählen.
3Drücken Sie die Taste AUTO REV., um den Wiedergabebetrieb ( å oder ) zu wählen.
4Drücken Sie die Taste CD, TUNER oder AUX.
6Halten Sie die Taste RECORD am Gerät oder auf der Fernbedienung länger als eine Sekunde
gedrückt, um die Aufnahme zu starten.
–‘RECORD’ läuft über das Display und das Symbol RECORD wird angezeigt.
•Drücken Sie die Taste PAUSE ; am Gerät oder auf der Fernbedienung, um die Aufnahme zu unterbrechen.
•Drücken Sie erneut die Taste PAUSE ;, um die Aufnahme fortzusetzen.
6 Drücken Sie 9, um die Aufnahme zu stoppen.
– ‘REC STOP’ läuft über das Display
Hinweis:
1Während der Aufnahme stehen nur die Betriebsarten å und zur Verfügung.
2Für CD-Aufnahme siehe ‘Überspielen einer CD mit Synchro-Funktion’ im Abschnitt ‘Compact Disc’.
3Während der Aufnahme ist die Wiedergabe einer anderen Tonquelle nicht möglich.
KASSETTENDECK
|
|
|
|
|
|
|
|
|
|
|
|
|
|
|
|
|
|
|
|
|
|
|
|
|
|
|
|
|
|
|
|
|
|
|
|
|
|
|
|
|
|
|
|
|
|
|
|
|
|
|
|
105 |
340 |
|
1K |
|
3K |
|
10K Hz |
|||||
|
|
|
|
|
|
|
|
|
|
|
|
|
|
|
|
|
|
|
|
|
|
|
|
|
DECK |
A B |
|
|
|
|
|
|
|
|
|
|
|
RECORD |
|
||
|
105 340 1K 3K 10K Hz |
|
|
HS DUB |
|||||||||
|
|
|
|
|
|
|
|
|
|
|
|
||
|
|
|
|
|
|
|
|
|
|
|
|
|
|
|
|
|
|
|
|
|
|
|
|
|
|
|
|
|
|
|
|
|
|
3 |
4 |
|
5 |
|
6 |
|
7 |
|
8 |
|
|
|
|
|
|
|
|
|
|
|
|
|
|
|
|
|
|
|
|
|
|
|
|
|
|
|
|
|
|
|
|
|
|
|
|
|
|
|
|
|
|
|
|
|
|
|
|
|
2 |
9 |
10 |
11 |
|
|
|
|
|
|
|
|
|
|
|
|
|
|
|
|
|
|
|
|
|
|
|
|
|
|
|
|
|
|
|
|
|
|
|
|
|
|
|
|
|
|
|
|
|
|
|
|
|
|
|
|
|
DECK |
|
B |
1 |
3 |
|
|
|
|
|
|
|
|
|
|
|
|
|
|
|
|
|
|
|
|
|
|
|
|
|
|
RECORD |
|
|
|
|
|
|
|
|
|
|
|
|
|
|
|
|||
|
105 |
340 |
|
1K |
|
3K |
|
10K |
Hz |
|
|
3 |
|
|
400 |
|
|
|
|
|||||||||||
|
|
|
|
|
|
|
|
|
|
|
|
|
|
|
|
|
|
|
|
|
|
|
|
|
|
|
|
|
|
|
|
|
|
|
|
|
|
|
|
|
|
|
|
|
|
|
|
|
|
|
|
|
|
|
|
|
|
|
|
|
|
|
|
|
|
|
|
|
|
|
|
|
|
|
|
|
|
|
|
|
|
|
|
|
|
|
|
|
|
|
|
|
|
|
|
|
|
|
|
|
|
|
|
|
|
|
|
|
|
|
1 |
2 |
3 |
4 |
5 |
6 |
|
7 |
8 |
|
|||
|
|
|
|
|
|
|
|
|
|
|
|
|
|
|
|
|
|
|
|
|
|
|
|
|
|
|
|
|
|
|
|
|
|
|
|
|
|
|
|
|
|
|
|
|
|
|
|
2 |
9 |
10 |
11 |
|
|
|
|
|
|
|
|
|
|
|
|
|
|
|
|
|
|
|
|
|
|
|
|
|
|
|
|
|
|
|
|
|
|
|
|
|
|
|
|
|
|
|
|
|
|
|
|
|
|
|
|
|
DECK |
|
B |
|
1 |
3 |
|
|
|
|
|
|
|
|
|
|
|
|
|
|
|
|
|
|
|
|
|
|
|
|
RECORD |
|
|
|
STOP |
|||||||||||||||
|
105 |
340 |
|
1K |
|
3K |
|
10K |
Hz |
|
REC |
|
||||||||||||||||||
|
|
|
|
|
|
|
|
|
|
|
|
|
|
|
|
|
|
|
|
|
|
|
|
|
|
|
|
|
||
|
|
|
|
|
|
|
|
|
|
|
|
|
|
|
|
|
|
|
|
|
|
|
|
|
|
|
|
|
|
|
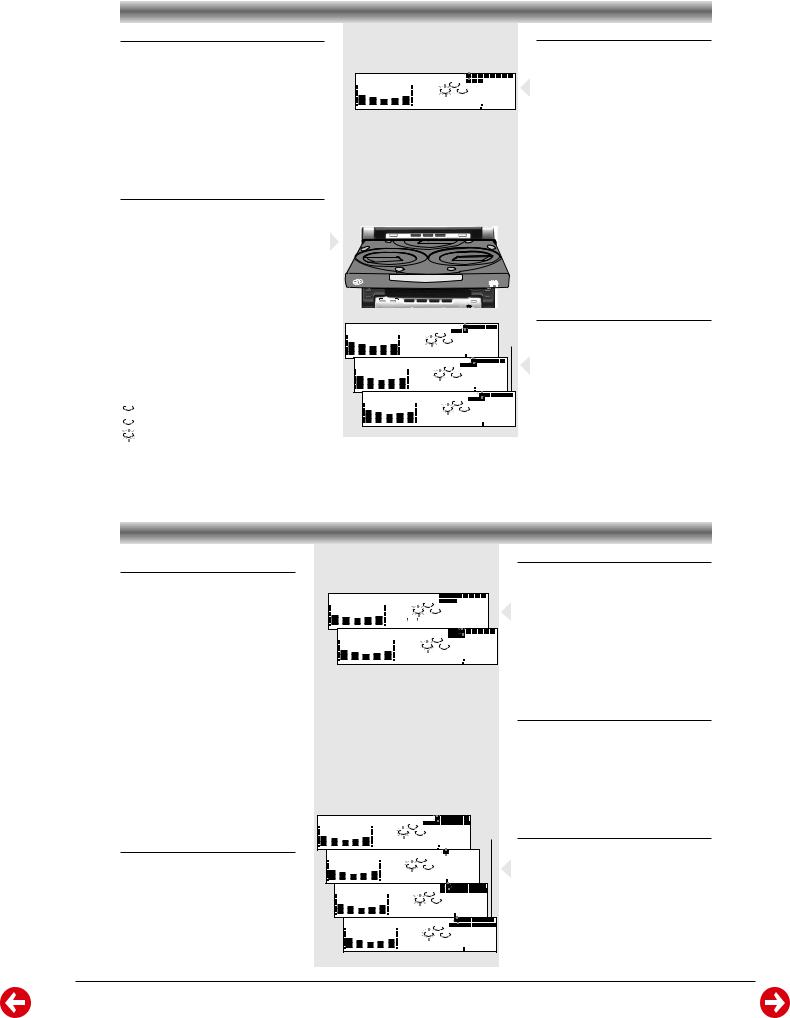
Überspielen von Kassetten (von Deck A auf Deck B)
bespielte Kassette in A und eine unbespielte
Kassette in Kassettendeck B ein.
–Stellen Sie sicher, daß sich bei beiden Kassetten die volle Spule links befindet.
2Drücken Sie die Taste NORMAL oder
HIGH SPEED DUBBING für die gewünschte Überspielart.
–Die Angabe DUBBING (normale Geschwindigkeit) oder HS DUB (erhöhte Geschwindigkeit) erscheint auf dem Display und das Symbol RECORD wird angezeigt.
4Drücken Sie die Taste 9, um den Überspielvorgang zu stoppen.
Hinweise:
–Das Überspielen von Kassetten ist nur in der Betriebsart TAPE möglich. Um eine gute Überspielqualität zu erhalten, sollten Kassetten mit gleicher Bandlänge verwendet werden.
–Während des Überspielens mit hoher Geschwindigkeit in der Betriebsart TAPE werden die Lautsprecher/Kopfhörer abgeschaltet.
1 - 6 |
GRUNDIG Service |
M 19-C / M 29-C |
Allgemeiner Teil / General Section |
Warnung!
1Dieses Gerät ist für herkömmliche CDs konzipiert. Verwenden Sie keine Zubehörteile wie Plattenstabilisierungsringe oder CD-Behandlungsblätter usw., wie sie auf dem Markt angeboten werden, da diese zu einer Fehlfunktion des CD-Mechanismus führen können.
2Pro Fach immer nur eine CD in die Schublade legen.
3Wenn der CD-Wechsler mit CD(s) bestückt ist, sollten Sie das Gerät nicht umdrehen oder schütteln, da sich hierdruch der Wechsler-Mechanismus verklemmen kann.
Für eine kontinuierliche Wiedergabe ohne Unterbrechung können Sie bis zu drei CDs in den CDWechsler einlegen. Zusätzlich zu den herkömmlichen 12- cm-CDs können auch 8-cm-CDs abgespielt werden, ohne daß ein Adapter erforderlich ist.
Einlegen von CDs in den Wechsler
1Drücken Sie die Taste CD, um den CD-Betrieb zu wählen.
2Drücken Sie die Taste OPEN/CLOSE.
– Die Plattenschublade öffnet sich.
3 Legen Sie eine CD mit der bedruckten Seite nach oben in das rechte Fach ein.
•Sie können eine weitere CD in das linke Fach einlegen.
•Zum Einlegen der dritten CD drücken Sie die Taste DISC.
–Das CD-Wechsler-Karussel dreht sich, bis sich das leere Fach rechts befindet und eine CD eingelegt werden kann.
–Die Wiedergabe beginnt immer mit der CD im Fach rechts außen.
4Drücken Sie die Taste OPEN/CLOSE, um die CDSchublade zu schließen.
–Die Gesamtzahl der Stücke und die Spieldauer der zuletzt gewählte CD werden angezeigt
Anhand der folgenden Angaben auf dem Display können Sie erkennen, ob die Plattenfächer leer oder bestückt sind.
– gibt an, daß das Fach leer ist.
1 – gibt an, daß das Fach mit einer CD bestückt ist. 1 – gibt das aktuelle oder gewählte Fach an.
CD-WECHSLER |
|
|
|
|
|
|
||||||
|
|
|
|
|
|
|
|
|
|
|
Wiedergabe einer CD |
|
|
|
|
|
|
|
|
|
|
|
|
1 |
Drücken Sie die Taste B am Gerät oder auf |
|
|
|
|
|
|
|
|
|
|
|
|
der Fernbedienung, um die Wiedergabe zu |
|
|
|
|
|
|
|
|
|
|
|
– |
starten. ‘CD PLAY’ läuft über das Display. |
|
|
|
9 |
10 11 |
4 |
5 |
6 |
7 |
8 |
Die Nummer der CD blinkt und das |
||
|
|
|
1 |
2 |
3 |
|
|
|||||
|
1 |
2 |
3 |
|
|
|
|
|
|
|
|
aktuelle Stück blinkt in der Trackzeile. |
|
|
|
|
|
|
|
|
|
– |
|||
|
1 |
|
|
015 |
|
|
Die Nummer und die abgelaufene |
|||||
105 340 1K 3K 10K Hz |
|
|
|
|
|
Spieldauer des aktuellen Stücks werden |
||||||
|
|
|
|
|
|
|
|
|
|
|
|
|
|
|
|
|
|
|
|
|
|
|
|
|
angezeigt. |
2 |
3 |
3 CD CHANGER
DIRECT DISC SELECT SYSTEM
2
1 3
CD CHANGER |
|
M29-C COMPACT HIFI SYSTEM |
DIGITAL SOUND CONTROL |
SEARCH |
PRESET EQ |
•Zum Unterbrechen der Wiedergabe drücken Sie die Taste PAUSE ; (oder PAUSE auf der Fernbedienung).
–‘CD PAUSE’ läuft über das Display.
–Die Spieldauer blinkt.
•Zum Fortsetzen der Wiedergabe drücken Sie die Taste B oder PAUSE ; erneut.
2Zum Stoppen der Wiedergabe drücken Sie die Taste 9 (oder die Taste STOP/CLEAR auf der Fernbedienung).
Wenn die CD-Schublade geschlossen ist, kann eine CD direkt abgespielt werden, indem die Taste DISC (1 ~ 3) gedrückt wird.
|
|
|
DUBBING SPEED |
|
|
|
BAND |
|
|
|
|
|
|
|
|
|
|
Ändern des Anzeigebetriebs |
|
|
|
|
HIGH |
NORMAL |
|
|
|
|
|
|
RECORD |
|
|
|
|
|
|
||
|
|
|
AUTO REV |
|
|
CD |
TAPE |
TUNER |
AUX |
|
|
SURROUND |
|
|
|
|
|
||
|
|
|
|
|
|
|
|
|
|
|
|
SOUND |
|
|
|
|
|
|
|
|
|
|
|
|
|
|
|
|
|
|
|
|
|
|
|
|
|
|
während der Wiedergabe |
|
|
|
|
|
|
|
|
|
9 |
10 11 |
4 |
5 |
6 |
7 |
8 |
|
|
|
Während der Wiedergabe der CD kann |
|
|
|
|
|
|
|
|
|
|
3 |
|
|
|
|
|||||
|
|
|
|
|
|
|
|
2 |
3 |
|
|
|
|
|
|
|
|
|
zwischen verschiedenen Zeitangaben |
|
|
|
|
|
|
|
|
1 |
|
|
|
|
|
|
|
|
|||
|
|
|
|
|
|
|
|
3 |
|
210 |
|
|
umgeschaltet werden. |
||||||
105 |
340 |
1K |
3K |
10K |
Hz |
|
|
|
|
|
|
|
|||||||
|
|
|
|
|
|
|
• Drücken Sie die Taste RDS (oder RDS/CD |
||||||||||||
|
|
|
|
|
|
|
|
|
|
9 10 11 |
4 |
5 |
6 |
7 |
8 |
|
|||
|
|
|
|
|
|
|
|
|
|
|
|
3 |
|
|
|||||
|
|
|
|
|
|
|
|
2 |
|
|
|
|
|
|
|
|
|
TIME auf der Fernbedienung), um eine der |
|
|
|
|
|
|
|
|
|
1 |
3 |
|
|
|
|
|
|
|
|
||
|
|
|
|
|
|
|
|
3 |
-200 |
|
|
|
verschiedenen Möglichkeiten für die |
||||||
|
105 |
340 |
1K |
3K |
10K |
Hz |
|
|
|
|
Zeitanzeige zu wählen. |
||||||||
|
|
|
|
|
|
|
|
|
2 |
|
|
3 |
4 |
5 |
6 |
7 |
8 |
||
|
|
|
|
|
|
|
|
9 |
10 11 |
|
|
|
|
|
– Auf dem Display werden nacheinander |
||||
|
|
|
|
|
|
|
|
|
1 |
3 |
|
|
|
|
|
|
|
|
angezeigt: die abgelaufene Spieldauer |
|
|
|
|
|
|
|
|
|
|
|
|
|
|
|
|
|
|
|
|
|
|
105 |
340 |
1K |
3K |
10K |
Hz |
|
8-4207 |
|
des aktuellen Stücks –> die verbleibende |
||||||||
|
|
|
|
|
|
|
|
|
|
|
|
|
|
|
|
|
|
|
Spieldauer des aktuellen Stücks –> die |
|
|
|
|
|
|
|
|
|
|
|
|
|
|
|
|
|
|
|
verbleibende Spieldauer der CD –> .... |
Auswählen eines bestimmten Stücks
Auswählen eines bestimmten Stücks im Stopp-Betrieb
1Drücken Sie die Taste S oder T am Gerät oder auf der Fernbedienung, bis die Nummer des gewünschten Stücks angezeigt wird.
2Drücken Sie die Taste B am Gerät oder auf der Fernbedienung, um die Wiedergabe zu starten.
–Die Nummer und die abgelaufene Spieldauer des gewählten Stücks werden angezeigt.
Auswählen eines bestimmten Stücks während der Wiedergabe
1Drücken Sie die Taste S oder T am Gerät oder auf der Fernbedienung, bis die Nummer des gewünschten Stücks angezeigt wird.
–Die Nummer und die abgelaufene Spieldauer des gewählten Stücks werden angezeigt.
•Wenn Sie die Taste S einmal drücken, springt der Laser-Abtaster zum Anfang des aktuellen Stücks zurück und spielt dieses Stück erneut ab.
Suchen nach einer bestimmten Passage während der Wiedergabe
•Halten Sie die Taste S oder T am Gerät oder auf der Fernbedienung gedrückt, bis die gewünschte Passage gefunden ist.
–Während der Suche wird der Ton schneller als normal und mit reduzierter Lautstärke wiedergegeben.
–Sobald Sie die Taste S oder T loslassen, wird die Wiedergabe normal fortgesetzt.
|
|
|
|
|
|
RANDOM |
1 |
2 |
3 |
4 |
5 |
6 |
7 |
8 |
|
|
|
|
|
|
|
|
|
|
2 |
9 |
10 11 |
|
|
|
|
|
|
||
|
|
|
|
|
|
|
|
|
|
|
|
|
|
|
|
|
|
|
|
|
|
|
|
1 |
3 |
|
|
|
|
|
|
|
|
|
|
105 |
340 |
1K |
3K |
10K |
Hz |
|
|
|
|
|
|
|
|
|
|
|
|
|
|
|
|
|
|
|
RANDOM |
|
1 |
|
2 |
3 |
4 |
5 |
6 |
7 |
8 |
|
|
|
|
|
|
2 |
|
9 |
|
10 11 |
|
|
|
|
|
||
|
|
|
|
|
|
3 |
|
|
|
|
|
|
|
|
|||
|
|
|
|
|
|
|
1 |
|
|
|
|
|
|
|
|
||
|
105 |
340 |
1K |
3K |
10K |
Hz |
3 |
|
|
|
002 |
|
|
||||
|
|
|
|
|
|
|
|
|
|
|
3 |
4 |
5 |
6 |
7 |
8 |
|
|
|
|
|
|
|
|
|
|
|
|
2 |
9 |
10 11 12 13 14 15 >15 |
|
|
|
|||||
|
|
|
|
|
|
|
|
|
3 |
|
|
|
|
|
|
|
|
|
|
|
|
|
|
|
|
|
|
|
1 |
|
|
|
|
|
|
|
|
||
|
|
|
|
|
|
|
|
|
3 |
|
410 |
|
|
|
|||||
105 |
340 |
1K |
3K |
10K |
Hz |
|
|
|
|
|
|
|
|
||||||
|
|
|
|
|
|
|
|
RPT. 1 |
|
|
|
3 |
|
|
|
|
|
|
|
|
|
|
|
|
|
|
|
|
2 |
|
|
|
|
|
|
|
|
|
|
|
|
|
|
|
|
|
|
|
1 |
3 |
|
|
|
|
|
|
|
|
|
|
105 |
340 |
1K |
3K |
|
10K |
Hz |
|
3 |
|
410 |
|
|
|
|||||
|
|
|
|
|
|
|
|
RPT. 1 ALL |
|
2 |
1 |
2 |
3 |
4 |
5 6 |
7 |
8 |
|
|
|
|
|
|
|
|
|
|
|
9 |
10 11 12 13 14 15 >15 |
|
||||||||
|
|
|
|
|
|
|
|
|
|
1 |
3 |
|
|
|
|
|
|
|
|
|
|
105 |
340 |
1K |
|
3K |
10K |
Hz |
|
2 |
|
|
302 |
|
|
|
|||
|
|
|
|
|
|
|
|
RPT. |
ALL |
2 |
|
2 |
3 |
4 5 |
|
6 7 |
8 |
||
|
|
|
|
|
|
|
|
|
9 |
10 11 12 13 14 15 >15 |
|||||||||
|
|
|
|
|
|
|
|
|
|
1 |
3 |
|
|
|
|
|
|
||
|
|
|
105 |
340 |
1K |
3K |
10K |
Hz |
|
2 |
|
|
302 |
|
|||||
Zufallswiedergabe mit RANDOM
RANDOM-dient zum Abspielen aller Stücke in zufälliger Reihenfolge CD nach CD.
1Drücken Sie die Taste RANDOM auf der Fernbedienung.
Symbolfolge erscheint im Display. , das aktuelle Fach und die
Nummer des zufällig gewählten Stücks werden angezeigt.
•Die Stücke werden jetzt in zufälliger Reihenfolge wiedergegeben (CD nach CD), bis Sie die Taste 9 drücken.
2Drücken Sie erneut die Taste RANDOM, um die Wiedergabe normal fortzusetzen.
– Das Symbol RANDOM erlischt.
INTRO-Funktion
INTRO – Spielt jeweils 10 Sekunden der Titel der eingelegten CDs an.
•Drücken Sie die Taste INTRO auf der Fernbedienung, um die ersten 10 Sekunden jedes Titels (von allen eingelegten CDs) abzuspielen.
– ‘INTRO SCAN ON’ läuft über das Display
•Drücken Sie die Taste INTRO noch einmal, um die Wiedergabe eines bestimmten Titels normal fortzusetzen.
– ‘INTRO SCAN OFF’ läuft über das Display
REPEAT-Funktion
REPEAT – Wiederholtes Abspielen eines Titels, einer ganzen CD oder von allen drei CDs.
• Drücken Sie REPEAT auf der Fernbedienung.
–Der Wiederholstatus ändert sich von RPT 1 in RPT 1 ALL in RPT ALL und repeat aus.
–RPT 1: Ein bestimmter Titel wird ständig wiederholt.
–RPT 1 ALL: Die aktuelle CD wird von Anfang bis Ende wiederholt.
–RPT ALL: Alle eingelegten CDs werden von Anfang bis Ende wiederholt.
–Wird REPEAT im Programmodus gedrückt, werden die programmierten Titel einer oder aller CDs wiederholt.
GRUNDIG Service |
1 - 7 |
Allgemeiner Teil / General Section |
M 19-C / M 29-C |
Programmieren von Stücken
Die auf einer eingelegten CD enthaltenen Stücke können im Stopp-Betrieb des CDSpielers programmiert werden. Im Display wird die Gesamtzahl der gespeicherten Stücke angezeigt. Bis zu 30 Stücke können in beliebiger Reihenfolge gespeichert werden. Wenn 30 Stücke gespeichert sind und versucht wird, ein weiteres Stück zu speichern, erscheint die Angabe “PROGRAM FULL”.
1Die gewünschte CD in die CD-Schublade legen.
2Drücken Sie die Taste PROGRAM am Gerät oder auf der Fernbedienung, um die Programmierung zu starten.
– Das Symbol PROGRAM wird angezeigt.
3Drücken Sie die Taste für die gewünschte CD, um diese auszuwählen.
4Drücken Sie die Taste S oder T, um das gewünschte Stück zu wählen.
5Drücken Sie die Taste PROGRAM, um das Stück zu speichern.
•Die Schritte 2 bis 5 wiederholen, um weitere CDs und Stücke zu speichern.
Hinweis: Die Titelanzeige zeigt Ihnen immer an, welche Stücke bei der Programmierung ausgewählt und abgespeichert wurden.
Wiedergabe des Programms
1 Drücken Sie die Taste B am Gerät oder auf der Fernbedienung, um die ProgrammWiedergabe zu starten.
–“PROGRAM PLAY” läuft über das Display.
–Die Stücknummer und die abgelaufene
Spieldauer des aktuellen Stücks werden angezeigt.
2Drücken Sie die Taste 9 (oder STOP/CLEAR auf der Fernbedienung), um die ProgrammWiedergabe zu beenden.
CD-WECHSLER
|
|
|
|
|
|
|
|
|
|
|
|
|
|
|
PROG. |
|
|
|
|
|
|
|
2 |
|
|
|
|
|
|
|
|
|
|
|
|
|
|
|
|
|
|
||
|
|
|
|
|
|
|
|
|
|
|
|
|
|
|
|
|
|
|
|
1 |
|
2 |
3 |
|
|
|
|
|
|
|
|
|
|
|
|
|
|
|
|
|
|
|
|
|
|
|
|
|
|
|
|
|
|
|
|
|
|
|
|
|
|
|
|
|
|
|
|
|
|
|
|
|
|
|
|
|
|
|
|
|
|
|
|
|
|||
|
|
|
|
|
|
|
|
|
|
|
|
|
|
Hz |
|
|
|
2 |
|
P-01 |
|
|
|
|
|
|
|
||||||||||||||||
|
|
|
|
|
|
|
|
|
|
|
|
|
|
|
|
|
|
|
|
|
|
|
|
||||||||||||||||||||
|
105 |
|
|
340 |
|
|
1K |
|
|
3K |
|
10K |
|
|
|
|
|
|
|
|
|
|
|
||||||||||||||||||||
|
|
|
|
|
|
|
|
|
|
|
|
|
|
|
|
PROG. |
|
|
|
|
|
|
|
2 |
|
|
|
|
|
|
|
|
|
|
|
|
|
|
|
|
|||
|
|
|
|
|
|
|
|
|
|
|
|
|
|
|
|
|
|
|
|
|
|
2 |
|
|
|
|
|
|
|
|
|
|
|
|
|
|
|
|
|
|
|
||
|
|
|
|
|
|
|
|
|
|
|
|
|
|
|
|
|
|
|
|
1 |
3 |
|
|
|
|
|
|
|
|
|
|
|
|
|
|
|
|
|
|
||||
|
|
|
|
|
|
|
|
|
|
|
|
|
Hz |
|
|
|
|
|
2 |
|
410 |
|
|
|
|
|
|
|
|||||||||||||||
|
|
|
|
|
|
|
|
|
|
|
|
|
|
|
|
|
|
|
|
|
|
|
|
|
|
|
|||||||||||||||||
|
|
|
|
|
|
|
|
|
|
|
|
|
|
|
|
|
|
|
|
|
|
|
|
|
|
|
|||||||||||||||||
|
|
|
105 |
|
|
340 |
|
|
1K |
|
3K |
10K |
|
|
|
|
|
|
|
|
|
|
|
|
|
|
|||||||||||||||||
|
|
|
|
|
|
|
|
|
|
|
|
|
|
PROG. |
|
|
|
|
|
|
2 |
|
|
|
|
5 |
|
|
|
|
|
|
|
||||||||||
|
|
|
|
|
|
|
|
|
|
|
|
|
|
|
|
|
|
|
2 |
3 |
|
|
|
|
|
|
|
|
|
|
|
|
|
|
|
|
|||||||
|
|
|
|
|
|
|
|
|
|
|
|
|
|
|
|
|
|
|
|
|
|
|
|
1 |
|
|
|
|
|
|
|
|
|
|
|
|
|
|
|
|
|
||
|
|
|
|
|
|
|
|
|
|
|
|
|
|
|
|
Hz |
|
|
|
|
5 |
|
P-02 |
|
|
|
|
|
|||||||||||||||
|
|
|
|
|
|
|
105 |
|
340 |
|
1K |
|
3K |
|
10K |
|
|
|
|
|
|
|
|
|
|
||||||||||||||||||
|
|
|
|
|
|
|
|
|
|
|
|
|
|
|
|
|
PROG. |
|
|
|
|
|
|
|
|
|
|
2 |
|
|
|
|
5 |
|
|
|
|
|
|||||
|
|
|
|
|
|
|
|
|
|
|
|
|
|
|
|
|
|
|
|
1 |
2 |
3 |
|
|
|
|
|
|
|
|
|
|
|
|
|
|
|||||||
|
|
|
|
|
|
|
|
|
|
|
|
|
|
|
|
|
|
|
|
|
|
|
|
|
|
|
|
|
|
|
|
|
|
|
|
|
|
|
|
||||
|
|
|
|
|
|
|
|
|
|
|
|
|
|
|
|
|
|
|
Hz |
|
5 |
|
|
|
|
|
808 |
|
|
|
|||||||||||||
|
|
|
|
|
|
|
|
|
|
|
|
|
|
|
|
|
|
|
|
|
|
|
|
|
|
|
|
||||||||||||||||
|
|
|
|
|
|
|
|
|
|
105 |
|
340 |
|
1K |
|
3K |
10K |
|
|
|
|
|
|
|
|
|
|
||||||||||||||||
|
|
|
|
|
|
|
|
|
|
|
|
|
|
|
|
|
|
|
|
|
|
|
|
|
|
|
|
|
|
|
|
|
|
|
|
|
|
|
|
|
|
|
|
|
|
|
|
|
|
|
|
|
|
|
|
|
|
|
|
|
|
|
|
|
|
|
|
|
|
|
|
|
|
|
|
|
|
3 |
|
|
4 |
5 |
6 |
7 |
8 |
|
|
|
|
|
|
|
|
|
|
|
|
|
|
|
|
|
|
|
|
|
|
|
|
|
|
|
|
|
|
|
|
|
|
|
|
|
|
|
|
|
|
|
|
|
|
|
|
|
|
|
|
|
|
|
|
|
|
|
|
|
|
|
|
|
|
|
|
|
|
|
|
2 |
9 |
10 |
11 |
|
|
|
|
|
|
|
|||||||
|
|
|
|
|
|
|
|
|
|
|
|
|
|
|
|
|
|
|
|
|
|
|
|
|
|
|
|
|
|
|
|
|
|
|
|
|
|
|
|
|
|
||
|
|
|
|
|
|
|
|
|
|
|
|
|
|
|
|
|
|
|
|
|
DECK |
|
B |
1 |
|
3 |
|
|
|
|
|
|
|
|
|
|
|
|
|
|
|||
|
|
|
|
|
|
|
|
|
|
|
|
|
|
|
|
|
|
|
|
|
|
|
|
|
|
|
|
|
|
|
|
|
|
|
|
|
|
|
|||||
|
|
|
|
|
|
|
|
|
|
|
|
|
|
|
|
|
|
|
|
RECORD |
|
|
|
|
|
|
|
|
|
|
|
|
|
|
|
|
|
|
|||||
|
|
|
|
|
|
|
|
|
|
|
|
|
|
1K |
|
3K |
|
|
|
Hz |
|
3 |
|
|
|
|
|
|
400 |
|
|
|
|||||||||||
|
|
|
|
|
|
|
105 |
340 |
|
|
|
10K |
|
|
|
|
|
|
|
|
|
|
|||||||||||||||||||||
|
|
|
|
|
|
|
|
|
|
|
|
|
|
|
|
|
|
|
|
|
|
|
|
|
|
|
|
|
|
|
|
|
|
|
|
|
|
|
|
|
|
||
|
|
|
|
|
|
|
|
|
|
|
|
|
|
|
|
|
|
|
|
|
|
|
|
|
|
|
|
|
|
|
|
|
|
|
|
|
|
|
|
|
|
|
|
Löschen des Programms (im Stopp-Betrieb)
1 Drücken Sie die Taste 9 am Gerät oder
– Die Angabe ‘CLEARED’ wird angezeigt.
2Halten Sie die 9 am Gerät oder STOP/CLEAR auf der Fernbedienung zwei Sekunden gedrückt.
–Alle programmierten Stücke werden gelöscht.
–‘PROGRAM CLEAR’ wird angezeigt.
Hinweis: Das Programm wird auch gelöscht, wenn das Gerät von der Stromversorgung getrennt wird oder die CD-Schublade geöffnet wird.
Überspielen einer CD mit Synchrofunktion
1Setzen Sie eine unbespielte Kassette (volle Spule links) in das Kassettenfach von Deck B ein.
2Drücken Sie die Taste CD, um CD-Betrieb zu wählen.
3Eine CD in die CD-Schublade legen.
4Die Taste AUTO REV. drücken, um den Wiedergabemodus ( å oder ) für Deck B zu wählen.
5Halten Sie die Taste RECORD am Gerät oder auf der Fernbedienung länger als eine Sekunde gedrückt, um die Aufnahme zu starten.
–Die Angabe “CD SYNCHRO“ läuft über das Display.
–Das Symbol RECORD wird angezeigt.
–Die CD-Wiedergabe beginnt nach einer Verzögerung von 7 Sekunden, um eine Aufnahme auf dem Vorspannband der Kassette zu verhindern.
6Falls gewünscht, können die Stücke auf der Platte in einem Programm zusammengestellt werden, um sie dann als Programm in der gewünschten Reihenfolge auf die Kassette aufzunehmen (siehe ‘Programmieren von Stücken’).
–Die Angabe “PROGRAM REC’ erscheint dann im Display.
7 Die Taste 9 drücken, um die Aufnahme zu stoppen.
EINSTELLEN DER UHRZEIT |
EINSTELLEN DES TIMERS |
Einstellen der Uhrzeit |
Einstellen des Timers |
Die Uhrzeit wird im 24-Stunden-Format angezeigt; zum Beispiel 00:00 oder 23:59.
1Drücken Sie die Taste ON/OFF, um das Gerät einzuschalten.
2Halten Sie die Taste CLOCK auf der Fernbedienung während 3 Sekunden
gedrückt.
–Auf dem Display wird ‘24 HOUR’ angezeigt und ‘24’ blinkt.
3 Drücken Sie kurz die Taste CLOCK.
3 Stellen Sie die Stunden mit A oder B ein.
6Drücken Sie die Taste PROGRAM oder CLOCK , um die Stundeneinstellung zu speichern.
5Stellen Sie die Minuten mit A oder B ein.
6Drücken Sie die Taste PROGRAM oder CLOCK, um die Einstellung zu speichern.
– Die Uhr beginnt zu laufen.
Hinweis:
1Die Uhrzeit wird angezeigt, wenn sich das Gerät in Bereitschaftsbetrieb befindet.
2Um die Uhrzeit anzuzeigen während das Gerät eingeschaltet ist, drücken Sie kurz die Taste CLOCK auf der Fernbedienung.
3Bei einem Stromausfall wird die Uhrzeit-Einstel- lung gelöscht.
|
|
|
|
|
|
|
|
|
|
|
|
|
|
|
|
|
|
|
|
|
|
|
|
|
|
|
|
|
|
|
|
|
|
|
|
|
|
TIMER |
|
|
|
|||
|
|
|
|
|
|
|
|
|
|
|
Hz TUNER |
|
||
|
|
105 |
|
|
340 |
|
1K |
|
3K |
|
10K |
|
||
|
|
|
|
|
|
|
|
|
|
|
|
|
|
|
|
|
|
|
|
|
|
|
|
|
TIMER |
|
|
|
|
|
|
|
|
|
|
|
|
|
|
TUNED |
|
|
|
|
|
|
|
|
|
|
PRESET STEREO |
|
|
|
|
|
|
|
|
Hz |
8750MHz |
|
105 |
|
340 |
|
1K |
|
3K |
|
10K |
||
•Das System kann automatisch zu einer bestimmten Uhrzeit auf TUNER-, CD-, TAPEoder REC TU-Betrieb geschaltet werden und auf diese Weise z. B. als Wecker dienen.
–Eine Stunde nach der eingestellten Uhrzeit schaltet das System auf Bereitschaft zurück, wenn keine Taste gedrückt wird.
zurückgesetzt wird.
•Die Lautstärke des Timers entspricht der zuletzt gewählten Einstellung vor dem Umschalten des Gerätes auf Bereitschaft.
Einstellen des Timers
1Drücken Sie die Taste ON/OFF, um das Gerät einzuschalten.
2Halten Sie die Taste TIMER auf der Fernbedienung drei Sekunden gedrückt.
– Das Symbol TIMER blinkt.
3Drücken Sie die Taste A oder B, um die gewünschte Signalquelle zu wählen:
– TUNER, CD, TAPE oder REC TU.
3a Wenn TUNER gewählt wird, drücken Sie
TIMER um die Auswahl zu bestätigen. Wählen Sie den gewünschten Wellenbereich (FM, MW oder LW) und drücken Sie anschließend die Taste PRESET A oder B, um den Vorwahlsender zu wählen.
•Fahren Sie nun mit den Schritten 4 bis 8 fort.
3a Wenn CD gewählt wird, wird Stück 1 gewählt und automatisch zur vorgegebenen Zeit wiedergegeben.
•Fahren Sie nun mit den Schritten 4 bis 8 fort
3a Wenn TAPE gewählt wird, wird die Kassette im zuletzt gewählten Kassettendeck automatisch zur vorgegebenen Zeit wiedergegeben.
•Fahren Sie nun mit den Schritten 4 bis 8 fort.
1 - 8 |
GRUNDIG Service |
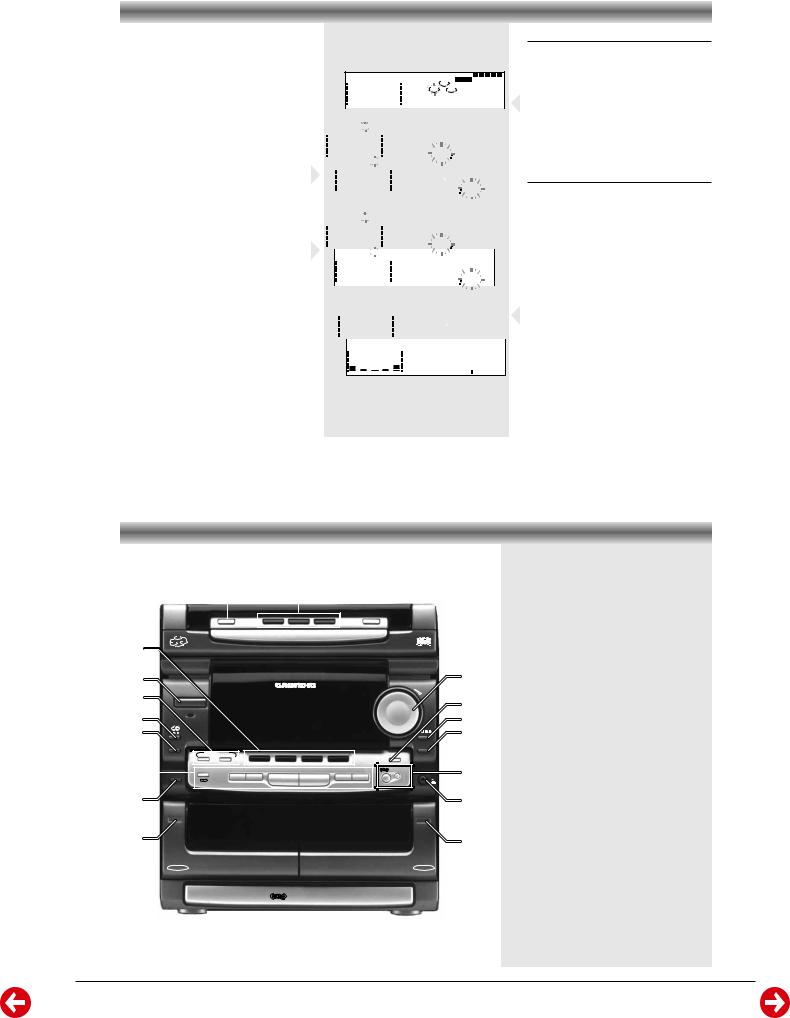
M 19-C / M 29-C |
Allgemeiner Teil / General Section |
EINSTELLEN DES TIMERS |
WEITERE LEISTUNGSMERKMALE |
3a Wenn REC TU gewählt wird, setzen Sie eine unbespielte Kassette in das Kassettenfach ein.
•Drücken Sie TIMER um die Auswahl REC TU zu bestätigen.
•Drücken Sie die Taste PRESETA oder B, um den aufzunehmenden Vorwahlsender zu wählen.
•Fahren Sie nun mit den Schritten 4 bis 9 fort.
4Drücken Sie die Taste TIMER, um die Wahl der Signalquelle zu bestätigen.
–Die Angabe ‘START’ wird angezeigt.
–Auf dem Display erscheint ‘0:00’ und ‘00’ blinkt.
5Drücken Sie die Taste A oder B, um die Stunde für die Timer-Startzeit einzustellen.
6Drücken Sie die Taste TIMER, um die Stundeneinstellung zu speichern.
7Drücken Sie die Taste A oder B, um die Minuten für die Timer-Startzeit einzustellen.
8Drücken Sie die Taste TIMER, um die Startzeit zu speichern.
9Für den REC TU-Betrieb mit der Einstellung der Stoppzeit fortfahren. ‘OFF’ wird angezeigt.
•Stellen Sie die Timer-Stoppzeit ein wie die Einstellung von der Timer-Startzeit und drücken Sie die Taste TIMER, um die Stoppzeit zu speichern.
–Der TIMER ist jetzt eingestellt und das Symbol TIMER leuchtet weiterhin.
Stoppen des TIMERS
•Drücken Sie die Taste TIME.auf der Fernbedienung.
– Das TIMER-Symbol verschwindet vom Display.
Erneutes Starten des TIMERS
•Drücken Sie die Taste TIMER .auf der Fernbedienung.
– Das TIMER-Symbol leuchtet auf.
Hinweise: Das Timer-Einstellprogramm wird automatisch nach 10 Sekunden beendet, wenn keine weitere Taste am Gerät betätigt wird.
4 5 6 7 8
|
2 |
9 |
10 11 |
1 |
3 |
|
|
|
|
|
|
|
|
|
|
|
|
|
|
|
|
|
|
|
|
|
|
|
|
|
|
|
|
|
|
MUTE |
|
|
|
|
|
|
|
|
105 |
|
340 |
|
|
|
1K |
|
|
3K |
|
10K Hz |
|
|
|||||||||
|
|
|
|
|
|
|
|
|
|
|
|
|
|
|
|
|
|
|
|
|
|
|
|
|
|
|
|
|
|
|
|
|
|
|
|
|
|
|
|
|
|
TIMER |
|
|
|
|
|
|
|
|
|
|
|
|
|||
|
|
|
|
|
|
|
|
|
|
|
|
|
|
|
|
|
|
|
|
|
|
|
|
|
ON 0000 |
|
|
|
105 |
340 |
|
|
|
1K |
|
|
|
3K |
|
10K |
|
|
Hz |
|
|
||||||||||||
|
|
|
|
|
|
|
|
|
|
|
|
|
|
|
||||||||||||||
|
|
|
|
|
|
|
|
|
|
|
|
|
|
|
|
|
TIMER |
|
|
|
|
Hz |
|
|
|
|||
|
|
|
|
|
|
|
|
|
|
|
|
|
|
|
|
|
|
|
|
|
|
|||||||
|
|
|
105 |
|
|
|
340 |
|
|
|
1K |
|
|
3K |
|
|
|
10K |
|
|
|
|
||||||
|
|
|
|
|
|
|
|
|
|
|
|
|
|
|
|
|
|
|
|
|
|
|
|
|
|
|
|
|
|
|
|
|
|
|
|
|
|
|
|
|
|
TIMER |
|
|
|
|
|
|
|
|
|
|
|
|
|||
|
|
|
|
|
|
|
|
|
|
|
|
|
|
|
|
|
|
|
|
|
|
|
|
|
OFF0000 |
|
|
|
105 |
340 |
|
|
|
1K |
|
|
|
3K |
|
10K |
|
|
Hz |
|
|
||||||||||||
|
|
|
|
|
|
|
|
|
|
|
|
|
|
|
||||||||||||||
|
|
|
|
|
|
|
|
|
|
|
|
|
|
|
|
|
|
|
|
|
|
|
|
|
|
|
|
|
TIMER
|
|
|
|
|
|
|
|
|
|
|
|
|
|
|
Hz OFF0000 |
|
||||||||
|
|
105 |
|
|
340 |
|
|
1K |
|
|
3K |
|
|
10K |
|
|
||||||||
|
|
|
|
|
|
|
|
|
|
|
|
|
|
|
|
|
|
|
|
|
|
|
|
|
|
|
|
|
|
|
|
|
|
|
|
|
|
|
|
|
|
SLEEP |
|
|
|
|
|||
|
|
|
|
|
|
|
|
|
|
|
|
|
|
|
|
|
|
|
|
|
|
SLEEP |
|
|
|
105 |
340 |
|
|
1K |
|
|
3K |
|
|
10K |
Hz |
|
|||||||||||
|
|
|
|
|
|
|
|
|
|
|||||||||||||||
|
|
|
|
|
|
|
|
|
|
|
|
|
|
|
|
|
|
|
|
|
|
|
|
|
|
|
|
|
|
|
|
|
|
|
|
|
|
|
|
|
|
|
|
|
|
SLEEP |
|
|
|
105 340 1K 3K 10K Hz 120 MIN
Stummschaltung
Mit dieser Funktion kann der Ton der Anlage zeitweilig abgeschaltet werden, wenn Sie einen Moment Stille benötigen, ohne die Anlage auszuschalten.
•Drücken Sie die Taste MUTE auf der Fernbedienung, um den Ton stummzuschalten.
– Die Angabe “MUTE” wird angezeigt.
•Drücken Sie erneut die Taste MUTE auf der Fernbedienung oder stellen Sie die Lautstärke ein auf dem Gerät oder auf der Fernbedienung, um den Ton wieder einzuschalten.
Mit dieser Funktion können Sie eine Zeitdauer einstellen, nach deren Ablauf sich die Anlage automatisch auf Bereitschaft schaltet.
•Drücken Sie die Taste ON/OFF, um das Gerät einzuschalten.
•Drücken Sie wiederholt die Taste SLEEP auf der Fernbedienung, um durch den Schlummer- Timer-Betrieb zu schalten.
–Die Angabe “SLEEP” und das SLEEP-Symbol werden angezeigt.
–Es können folgende Zeitdauern gewählt werden:120 MIN –> 90 MIN –> 60 MIN –> 45 MIN –> 30 MIN –> 15 MIN –> 5 MIN –> OFF –> 120 MIN …
• Wählen Sie die gewünschte Zeitdauer.
Wenn der Schlummer-Timer eingeschaltet ist, kann die verbleibende Zeit vor dem Umschalten auf Bereitschaft geprüft werden.:
• Drücken Sie die Taste SLEEP einmal.
– Die verbleibende Zeit läuft über das Display.
Ausschalten des Schlummer-Timer-Betriebs:
•Drücken Sie die Taste SLEEP, bis ‘OFF’ angezeigt wird.
Operating Hints
This chapter contains excerpts from the operating instructions. For further particulars please refer to the appropriate user instructions the part number of which is indicated in the relevant spare parts list.
CONTROLS
|
|
|
|
|
|
|
the illustration shows: M29-C |
|
||||||||||
|
|
|
|
3 |
|
|
|
|
|
4 |
|
5 |
|
|||||
|
|
|
|
|
|
|
|
|
|
|
|
|
|
|
|
|
|
|
|
|
|
|
|
|
|
|
|
|
|
|
|
|
|
|
|
|
|
|
|
|
|
DISC |
|
|
DISC 1 |
DISC 2 |
DISC 3 |
|
|
OPEN/CLOSE |
|
|||||
|
|
|
|
|
|
|
|
|
|
|
|
|
|
|
|
|
|
|
|
2 |
|
|
|
|
|
|
|
|
|
3 CD CHANGER |
|
|
|
|
|
||
|
3 |
|
|
|
|
|
|
|
DIRECT DISC SELECT SYSTEM |
|
|
|
|
|
||||
2 |
1 |
|
|
|
|
|
|
|
|
|
|
|
|
|
|
|
|
|
|
CD CHANGER |
|
|
|
|
|
|
|
|
|
|
|
|
|
|
|
||
1 |
|
|
|
|
|
|
|
|
|
|
|
|
|
|
|
|
|
|
18 |
|
ON / OFF y |
|
|
|
|
|
|
|
|
|
|
|
|
|
|
VOLUME |
|
17 |
|
|
|
|
|
|
|
|
|
|
|
|
|
|
|
|
|
|
16 |
R D S |
|
|
|
|
|
|
|
|
|
|
|
|
|
|
|
|
|
|
|
|
|
M29-C COMPACT HIFI SYSTEM |
DIGITAL SOUND CONTROL |
|
||||||||||||
|
SEARCH |
|
|
|
|
|
|
|
|
|
|
|
|
|
|
PRESET EQ |
||
|
|
|
DUBBING SPEED |
|
|
|
|
|
|
|
BAND |
|
|
|
|
|
||
|
|
|
HIGH |
NORMAL |
|
|
|
|
|
|
|
|
|
|
|
RECORD |
||
|
|
|
|
|
|
|
|
|
CD |
|
TAPE |
TUNER |
AUX |
|
|
|
||
15 |
|
|
|
|
|
|
|
|
|
|
|
|
|
|
|
|
|
SOUND |
|
|
AUTO REV. |
9 |
|
; |
|
|
|
|
|
|
S T |
|
SURROUND |
||||
|
|
|
|
STOP / CLEAR |
PAUSE |
|
PLAY / PRESET |
|
SEARCH / TUNING |
|
||||||||
|
PROGRAM |
|
|
|
|
|
|
|
|
A |
B |
|
|
|
|
|
||
|
|
|
|
|
|
|
|
|
|
|
|
|
|
|
|
|||
14 |
|
|
|
|
|
|
|
|
|
|
|
|
|
|
|
|
|
|
|
|
|
|
|
|
|
|
|
|
|
|
|
|
|
|
|
|
|
|
? |
|
|
|
|
|
|
|
|
|
|
|
|
|
|
|
|
? |
13 |
|
|
|
|
|
|
|
|
|
|
|
|
|
|
|
|
|
|
|
|
|
|
|
|
|
|
|
|
SYNCHRO RECORD |
AUTOREVERSE |
|
|
|
|
|
||
|
TAPE A PLAYBACK |
|
|
|
NORMAL / HIGH SPEED DUBBING |
FULL LOGIC DRIVE |
|
|
|
|
REC / PLAYBACK TAPE B |
|||||||
SOUND SURROUND
1ON/OFF y – to switch the set on or to standby mode. In standby mode the standby LED 6 lights up (below the ON/OFF y key)
2SOURCE SELECTION –to select the following : CD : to switch to CD mode.
TAPE : to switch to Tape A or B mode. TUNER : to switch to Tuner mode, when in Tuner
mode to select the waveband FM, MW or LW.
AUX : to switch to AUX mode (for external sources, e.g. TV or VCR sound).
63 DISC – to turn the rotary CD tray in order to select a CD.
74 DISC 1, 2, 3 – to select play for CD 1, 2 or 3.
85 OPEN/CLOSE – to open or close the CD carousel tray.
96 VOLUME – to adjust the volume level.
7 RECORD – to start recording.
8 UBS (Ultra Bass System) – to enhance the bass response.
109 PRESET EQ – to select the desired sound effect : NORMAL, DISCO, ROCK, JAZZ or CLASSIC.
1110 (Only M29-C) Q Sound Surround – to switch the Surround Sound effect on or off. When Surround Sound is switched on, the surround LED 6 lights up.
11 p – to connect headphones (ø 3.5mm) jack.
1212 ? – to open TAPE B cassette compartment.
13 ? – to open TAPE A cassette compartment.
14 PROGRAM
for CD – to program track numbers in the memory. for TUNER – to program preset stations.
GRUNDIG Service |
1 - 9 |

Allgemeiner Teil / General Section |
M 19-C / M 29-C |
CONTROLS
15CD/TAPE/TUNER control
AUTO REV.
for TAPE – to select the desired play mode.
STOP/CLEAR 9
for CD – to stop play or to clear a program for TAPE – to stop playback or recording.
PAUSE ;
for CD – to interrupt/continue playback
for TAPE – to interrupt/continue playback or recording.
PLAY/PRESET A B
for CD PLAY B – to start playback
for TUNER PRESET A B – to select a radio preset station
for TAPE PLAY A B – to select and play tape side A or B.
SEARCH/TUNING S T
for CD – to skip to the beginning of the current or previous/next track or to search backward/forward
for TUNER – to tune to a lower or higher radio frequency.
for TAPE – to rewind or fast forward the cassette.
16SEARCH – to search for RDS stations according to their programme type.
17RDS
for CD – to display the current play time, current track, remain play time and total remain time for TUNER – to display RDS station name, Programme type, Radio text and frequency.
18DUBBING SPEED – to select normal or high speed dubbing.
M19-C/M29-C
REMOTE CONTROL
Remote Control Functions
•First select the source you wish to control by pressing one of the source select keys on the remote control (e.g. CD, AUX, TUNER, or TAPE).
•Then select the desired function (PLAY, NEXT, etc.).
The buttons on the remote control have the same functions as the corresponding ones on the unit.
Extra buttons:
FM ST. – to select FM mono or stereo mode.
REPEAT – to playback one track, one disc or all three discs repeatedly.
RANDOM – to play CD tracks at random.
INTRO – to play the first ten seconds of each track on the CDs in the tray.
TIMER – to set the timer and to switch the timer on or off.
SLEEP – to set the sleep timer
MUTE – to turn off the sound. Press again to restore the sound.
CLOCK – to display and set the clock DEMO – to call up the demo mode.
Note:
Whenever a remote control button is pressed, the STANDBY indicator 6 on the set will flicker.
This indicates the remote control signal is received by the set.
OPERATING THE SYSTEM
Important : |
|
Before you begin operating the system, complete |
|
the preparation procedures. |
|
When the mains plug is connected to the wall |
|
socket, the set will enter the STANDBY mode. |
|
The standby indicator 6 lights up and 0:00 |
|
blinks on the display. |
VOL 12 |
105 340 1K 3K 10K Hz |
Switching the system ON
•Press ON/OFF y, CD, TUNER, TAPE or AUX on the set or on the remote control.
Switching the system to standby mode
•Press ON/OFF y again (or y on the remote control).
Selecting the Sound Source
• |
Press the respective source selection: CD, |
|
|
|
|
|
|
|
|
|
|
|
|
|
|
|
|
|
|
|
|
|
|
|
|
|
|
|
TUNER, TAPE or AUX on the set or the |
|
|
|
|
|
|
|
|
|
|
|
|
|
|
|
|
|
|
|
|
|
|
|
|
|
|
|
remote control. |
|
|
|
1 |
2 |
3 |
|
4 |
|
5 |
|
6 |
|
7 |
|
8 |
|
|
|
|||||||
– |
The name of the selected sound source scrolls |
|
|
|
|
|
|
|
|
|
|
|
|
|
|
|
|
|
|
|
|
|
|
|
|
|
|
|
|
|
|
|
|
|
|
|
|
|
|
|
|
|
|
|
|
|
|
|
|
|
|
|
|
||
|
once on the display. |
|
|
|
|
|
|
|
|
|
|
|
|
|
|
|
|
|
|
|
|
|
|
|
|
|
|
Note : For AUX source, ensure that you had |
|
|
|
|
|
|
|
|
|
|
|
|
|
|
|
|
|
|
|
|
|
|
|
|
|||
|
|
|
|
|
9 |
|
10 |
11 |
|
4 |
|
5 |
|
6 |
|
7 |
8 |
|
|||||||||
|
|
|
|
|
|
|
1 |
|
2 |
|
|
3 |
|
|
|
|
|
||||||||||
connected the audio left and right output |
|
2 |
|
|
|
|
|
|
|
|
|
|
|
|
|
|
|
|
|
|
|
|
|
|
|||
|
1 |
3 |
|
|
|
|
|
|
|
|
|
|
|
|
|
|
|
|
|
|
|
|
|
||||
terminals of the external equipment (e.g. TV or |
|
|
|
|
|
|
|
|
|
|
|
|
|
|
|
|
|
|
|
|
|
|
|||||
|
11 |
|
|
5005 |
|
|
|
|
|||||||||||||||||||
VCR) to the AUX IN sockets. |
|
|
|
|
|
|
|
||||||||||||||||||||
Demo mode
The system has a demonstration mode that shows the various features offered by the system.
•Press DEMO on the remote control to switch on the demonstration.
– The display will show “DEMO ON” and “WELCOME TO THE AUDIO WORLD” followed by a demonstration of the various features.
• Press DEMO again or ON/OFF y (or y on remote control) to stop the demonstration mode.
– The set enters the standby mode.
Sound control
Volume Adjustment
• Rotate VOLUME right or left (or press VOLUME + or – on the remote control) to increase or decrease the sound level.
– The display indicates the selected level.
For Personal Listening
•Connect the headphones to the p socket (3.5 mm) at the front of the set. The speakers will be muted.
Preset equalizer
The preset equalizer feature creates a realistic atmosphere for the style of music you select using the latest digital sound technology.
•To enjoy a special sound effect, press PRESET EQ on the set or on the remote control.
– The display shows the selected effect:
• Press UBS to enhance the bass response.
– The UBS flag lights up.
Q SOUND SURROUND (only M29-C)
In ordinary stereo systems, the stereo image is formed between the left and right speakers, and is confined by the speaker positions (i.e. the ‘sound stage’ so located between two speakers). The Q Sound Surround forms the stereo image beyond the speakers, thus enlarging the ‘sound stage’.
•Press Q SOUND SURROUND to enjoy the effect. The LED next to the button lights up.
•Press Q SOUND SURROUND again to switch the function off.
1 - 10 |
GRUNDIG Service |
M 19-C / M 29-C |
Allgemeiner Teil / General Section |
Tuning to radio stations
1Press TUNER (BAND) on the unit or on the remote control.
–First TUNER scrolls once on the display and after a few seconds it will show the current frequency or the station name if available.
2Press TUNER again to select the desired waveband: FM, MW or LW.
3Press TUNING S or T for more than one second.
–The display will search the frequency until a station with sufficient signal strength is found.
–The STEREO TUNED or TUNED flag will light up.
• Repeat this procedure until the desired station is reached.
• To tune to a weak station, briefly press TUNING S or T until the display shows the right frequency and/or when the best reception has been obtained.
•When tuning to a station in FM, the unit always selects FM STEREO. If stereo reception is disturbed you can press FM ST on the remote control to select FM MONO.
TUNER
105 340 1K 3K 10K Hz TUNER
105 340 1K 3K 10K Hz FM 8700MHz
|
|
|
|
|
|
|
|
|
|
|
|
|
|
Hz |
|
|
|
|
|
|
|
|
|
|
|
|
|
|
|
|
|
|
|
|
|
|
|
|
|
|
|
|
|
|
|
|
|
|
|
|
105 340 |
|
1K |
|
3K |
|
10K |
|
Hz |
|
|
|
|
||||
|
|
|
|
|
|
|
|
|
|
|
|
|
|
|
|
|
|
|
|
|
|
|
|
|
|
|
|
|
|
|
TUNED |
|
|
|
|
|
|
|
|
|
|
|
|
|
|
|
|
PRESET STEREO |
|
|
|
|
|
|
|
|
|
|
|
|
|
|
|
Hz |
9850MHz |
|
|
|
|
|
105 |
|
340 |
|
1K |
|
3K |
|
10K |
|
|
|||
|
|
|
|
|
|
|
|
|
|
|
|
|
|
|
|
|
|
|
|
|
|
|
|
|
|
|
|
|
|
|
TUNED |
|
|
|
|
|
|
|
|
|
|
|
|
|
|
|
|
PRESET STEREO |
|
|
|
|
|
|
|
|
|
|
|
|
|
|
|
|
Hz STORED |
|
|
|
|
|
|
|
105 |
|
340 |
|
1K |
|
3K |
|
10K |
|
||
TUNED
PRESET STEREO
105 340 1K 3K 10K Hz 10 9850MHz
Storing Preset Stations
You can store up to 20 stations in the FM waveband, 10 stations in the MW and 10 stations in the LW waveband in the memory. When a preset station is selected, the preset number appears next to the frequency on the display.
Manual programming
1Press TUNER (BAND) on the set or remote control to select TUNER mode.
2Press TUNER again to select the desired
FM, MW or LW.
S or T to tune to the desired frequency.
4 Press briefly PROGRAM
– The PRESET flag flashes on the display.
5Press PRESET A or B (or A or B on the remote control) to select a preset number.
– The preset number flashes on the display. 6 Press PROGRAM again.
–The station and the preset number are stored and STORED scrolls on the display.
•Repeat the above procedure to store other preset stations.
Note: In case of a power interruption the preset stations will be kept in the memory for at least one hour.
Tuning to Preset Stations
•Press PRESET A or B (or A or B on the remote control) to select the desired preset
number.
–The preset number and frequency appear on the display.
Receiving RDS radio stations Ç
RDS (Radio Data System) is a broadcasting service that allows FM stations to send additional information along with the regular FM radio signal.
This additional information can contain:
•STATION NAME : The station name is displayed.
•PROGRAM TYPE (PTY): The following program types exist and can be received by your tuner: News, Affairs, Info, Sport, Educate, Drama, Culture, Science, Varied, Pop M, Rock M, M.O.R. (middle of the road music), Light M, Classics, Other M.
•RADIO TEXT (RT) : Text messages appear in the display.
•FREQUENCY : The frequency of the station is displayed.
When you have tuned to an RDS station, the RDS logo (Ç) and the station name will appear on the display:
•The display normally shows the radio station name if available.
By repeatedly pressing RDS (or RDS/CD TIME on the remote control) you can change the type of display information:
– The display shows in turn: STATION NAME
-> PROGRAM TYPE -> RADIO TEXT -> FREQUENCY -> STATION NAME ...
Notes :
1When you press RDS (or RDS/CD TIME on the remote control) and the display shows “NO PS”, it indicates that either the tuned station is not transmitting RDS signal or it is a non RDS station.
2When no program type is transmitted by the radio station, the display shows “NO PTY”.
TUNER
NEWS
R.D.S
105 340 1K 3K 10K Hz
105 340 1K 3K 10K Hz AFFAIRSR.D.S
R.D.S
105 340 1K 3K 10K Hz INFO
|
|
|
|
|
|
|
|
|
|
|
|
|
|
|
|
|
|
|
|
|
|
|
|
|
|
|
|
|
|
|
|
|
105 |
340 |
|
1K |
|
3K |
|
10K Hz |
|||
TUNED


 PRESET STEREO R.D.S 105 340 1K 3K 10K Hz ROCK M
TUNED


 PRESET STEREO R.D.S 105 340 1K 3K 10K Hz USIC FOR
TUNED


 PRESET STEREO R.D.S 105 340 1K 3K 10K Hz 10 9850MHz
RDS Search
RDS allows you to select memorized FM stations according to programme type. More and more stations are codifying their programme type allowing efficient search with the SEARCH function. The transmitted code is, however, the responsibility of the radio station.
•By using the SEARCH button on the system or on the remote control, you can call up the programme types one after another.
•Press S or T to start scanning the memorized stations in forward or backward direction to find a station broadcasting the required programme type. As soon as such a station is found it is tuned to.
RDS Clock
Some RDS station may be transmitting a real time every minute.
been set manually by flashing); the current RDS
clock time will be stored automatically when the RDS station transmits the real time clock.
•If you have already set the clock time, the set time will not be replaced when the RDS clock time is being received
GRUNDIG Service |
1 - 11 |
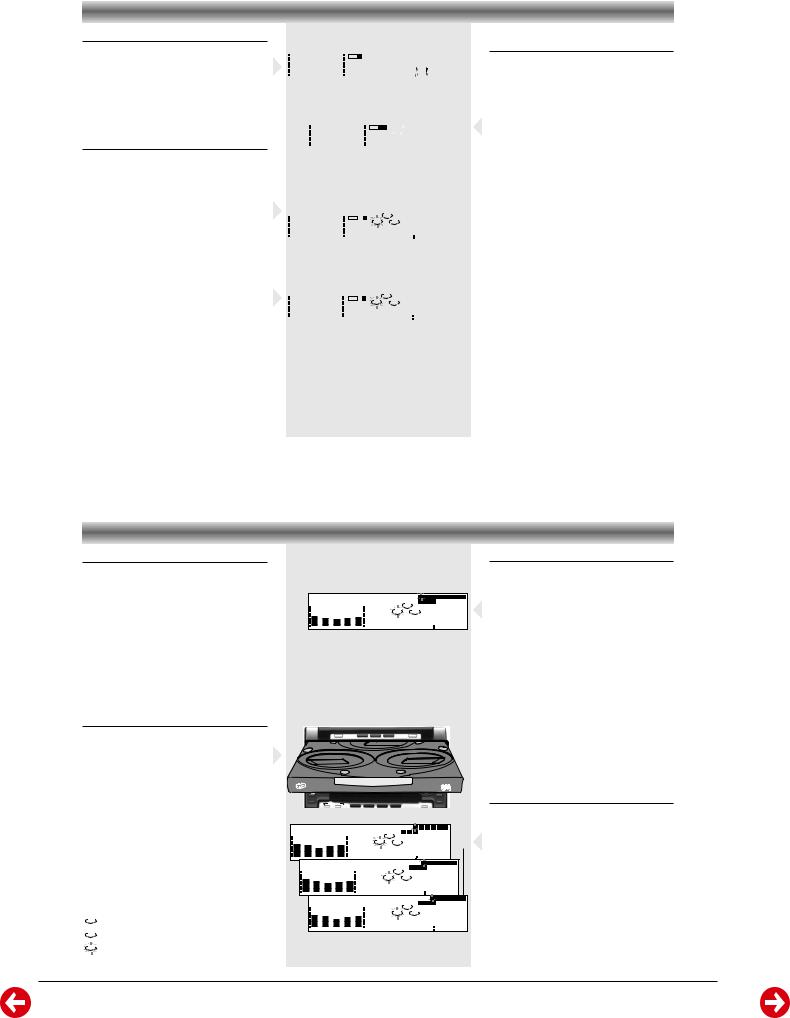
Allgemeiner Teil / General Section |
M 19-C / M 29-C |
Fast Forward/Rewinding
1You can rewind or fast forward the tape by pressing S or T on the set or on the remote control respectively.
2These controls function independent of the playback direction that was chosen.
3Press 9 (or STOP/CLEAR on the remote control) to stop fast forwarding or rewinding.
Recording from other sources (TAPE DECK B)
1Load a blank cassette into TAPE B.
2Press TAPE to select TAPE B.
3Press AUTO REV. to select the play mode ( å or ).
4Press CD, TUNER or AUX.
5Press RECORD on the set or on the remote control for at least one second to start recording.
–“RECORD” scrolls on the display and the RECORD flag appears.
•Press PAUSE ; on the set or on the remote control to interrupt the recording.
•Press PAUSE ; again to resume the recording.
6 Press 9 to stop recording.
– “REC STOP” scrolls on the display
Note :
1Only å or mode is available during recording.
2For CD recording see CD Synchro-start recording under Compact Disc section.
3During recording, it is not possible to listen to another sound source.
CASSETTE DECK
|
|
|
|
|
|
|
|
|
|
|
|
|
|
|
|
|
|
|
|
|
|
|
|
|
|
|
|
|
|
|
|
|
|
|
|
|
|
|
|
|
|
|
|
|
|
|
|
|
|
|
|
|
|
|
|
|
|
|
|
|
|
|
|
|
|
|
|
|
|
|
|
|
|
|
|
|
|
|
|
|
|
|
|
|
|
|
|
|
|
|
|
|
|
|
|
|
|
|
|
|
|
|
|
|
|
|
|
|
|
|
|
|
|
|
|
|
|
|
|
|
|
|
|
|
|
|
|
|
|
|
|
|
|
|
|
|
|
|
|
|
|
|
|
|
|
|
|
DECK |
A B |
|
|
|
|
|
|
|
|
|
|
|
|
|
|
|
|
RECORD |
|
|
||
|
|
|
|
|
105 340 1K 3K 10K |
Hz |
HS DUB |
|||||||||||
|
|
|
|
|
|
|
|
|
|
|
|
|
|
|
|
|
||
|
|
|
|
|
|
|
|
|
|
|
|
|
|
|
|
|
|
|
|
|
|
|
|
|
|
|
|
|
|
|
|
|
|
|
|
|
|
|
3 |
4 |
|
5 |
|
6 |
|
7 |
|
8 |
|
|
|
|
|
|
|
|
|
|
|
|
|
|
|
|
|
|
|
|
|
|
|
|
|
|
|
|
|
|
|
|
|
|
|
|
|
|
|
|
|
|
|
|
|
|
|
|
|
2 |
9 |
10 |
11 |
|
|
|
|
|
|
|
|
|
|
|
|
|
|
|
|
|
|
|
|
|
|
|
|
|
|
|
|
|
|
|
|
|
|
|
|
|
|
|
|
|
|
|
|
|
|
|
|
|
|
|
|
|
DECK |
|
B |
|
|
|
|
|
|
|
|
|
|
|
|
|
|
||
|
|
|
|
|
|
|
|
|
|
|
|
|
1 |
3 |
|
|
|
|
|
|
|
|
|
|
|
|
|
|||
|
|
|
|
|
|
|
|
|
|
|
|
RECORD |
|
|
|
|
|
|
|
|
|
|
|
|
|
|
|
|||
|
105 |
340 |
|
1K |
|
3K |
|
10K |
Hz |
|
|
3 |
|
|
400 |
|
|
|
|
|||||||||||
|
|
|
|
|
|
|
|
|
|
|
|
|
|
|
|
|
|
|
|
|
|
|
|
|
|
|
|
|
|
|
|
|
|
|
|
|
|
|
|
|
|
|
|
|
|
|
|
|
|
|
|
|
|
|
|
|
|
|
|
|
|
|
|
|
|
|
|
|
|
|
|
|
|
|
|
|
|
|
|
|
|
|
|
|
|
|
|
|
|
|
|
|
|
|
|
|
|
|
|
|
|
|
|
|
|
|
|
|
|
|
1 |
2 |
3 |
4 |
5 |
6 |
|
7 |
8 |
|
|||
|
|
|
|
|
|
|
|
|
|
|
|
|
|
|
|
|
|
|
|
|
|
|
|
|
|
|
|
|
|
|
|
|
|
|
|
|
|
|
|
|
|
|
|
|
|
|
|
2 |
9 |
10 |
11 |
|
|
|
|
|
|
|
|
|
|
|
|
|
|
|
|
|
|
|
|
|
|
|
|
|
|
|
|
|
|
|
|
|
|
|
|
|
|
|
|
|
|
|
|
|
|
|
|
|
|
|
|
|
DECK |
|
B |
|
1 |
3 |
|
|
|
|
|
|
|
|
|
|
|
|
|
|
|
|
|
|
|
|
|
|
|
|
RECORD |
|
|
|
STOP |
|||||||||||||||
|
105 |
340 |
|
1K |
|
3K |
|
10K |
Hz |
|
REC |
|
||||||||||||||||||
|
|
|
|
|
|
|
|
|
|
|
|
|
|
|
|
|
|
|
|
|
|
|
|
|
|
|
|
|
||
|
|
|
|
|
|
|
|
|
|
|
|
|
|
|
|
|
|
|
|
|
|
|
|
|
|
|
|
|
|
|
Dubbing cassettes
(from TAPE DECK A to TAPE DECK B)
into TAPE A B.
have their full
spools to the left.
3Press NORMAL or HIGH SPEED DUBBING to select the respective dubbing speed mode.
–DUBBING (normal speed) or HS DUB (high speed) appears on the display and the RECORD flag appears.
5 Press 9 to stop dubbing.
Notes :
–Dubbing of cassettes is only possible in the TAPE mode. To ensure good dubbing, use tapes of the same length.
–During high speed dubbing in Tape mode, the sound is completely muted.
Warning!
1This set is designed for conventional CDs. Do not use any accessories like disc stabilizer rings or CD treatment sheets, etc, which may damage the CD mechanism.
2Do not load more than one disc into each tray.
3When the CD changer is loaded with CD(s), do not turn over or shake the unit as this may jam the changer mechanism.
You can load up to three discs in the CD changer for continuous play without interruption. In addition to the conventional 12-cm disc, 8-cm discs can also be used without an adaptor .
Loading the CD Changer
1Press CD to select CD
2Press OPEN/CLOSE.
– The CD compartment slides out.
3Load a disc with the printed side up in the right tray.
•You can load another disc in the left tray.
•To load the third disc, press the DISC button.
– The CD changer carousel will rotate until the empty tray is at the right hand side and is ready for loading.
– Playback will always start with the outer right disc tray.
4 Press OPEN/CLOSE to close the CD tray.
–The total number of tracks and playing time of the last selected disc appear on the display.
The following display indications will help you to know whether the disc trays are empty or loaded.
– indicates the disc tray is empty.
1 – indicates the disc tray is loaded with a disc. 1 – indicates the current or selected disc tray.
CD CHANGER |
|
|
|
|
|
|
||||||
|
|
|
|
|
|
|
|
|
|
|
Playing a Disc |
|
|
|
|
|
|
|
|
|
|
|
|
1 |
Press B on the unit or on the remote control |
|
|
|
|
|
|
|
|
|
|
|
|
to start playback. |
|
|
|
|
|
|
|
|
|
|
|
– |
‘CD PLAY’ scrolls across the display. |
|
|
|
9 |
10 11 |
4 |
5 |
6 |
7 |
8 |
– |
The selected disc tray blinks and the playing |
|
|
|
|
1 |
2 |
3 |
|
|
|||||
|
1 |
2 |
3 |
|
|
|
|
|
|
|
|
track flashes in the calendar. |
|
|
|
|
|
|
|
|
|
|
|||
|
1 |
|
|
015 |
|
|
– |
The track number and elapsed playing time |
||||
105 340 1K 3K 10K Hz |
|
|
|
|
|
of the current track appear on the display. |
||||||
|
|
|
|
|
|
|
|
|
|
|
|
|
|
|
DISC |
DISC 1 |
DISC 2 |
DISC 3 |
OPEN/CLOSE |
|
|
|
|
|
|
1 |
|
|
2 |
|
|
|
3 |
|
|
|
3 CD CHANGER |
|
|
|
|
2 |
|
DIRECT DISC SELECT SYSTEM |
|
||
1 |
3 |
|
|
|
|
|
|
CD CHANGER |
|
|
|
|
|
|
|
M29-C COMPACT HIFI SYSTEM |
|
DIGITAL SOUND CONTROL |
||
|
SEARCH |
|
|
|
|
PRESET EQ |
|
DUBBING SPEED |
|
BAND |
|
|
|
|
HIGH |
NORMAL |
|
|
RECORD |
|
|
|
CD |
TAPE |
TUNER |
|
AUX |
|
|
|
|
|
|
|
|
|
|
|
3 |
4 |
5 |
6 |
7 |
8 |
|
|
|
|
|
|
|
|
|
|
|
2 |
9 |
10 11 |
|
|
|
|
|
|
|
|
|
|
|
|
|
|
|
|
|
|
|
|
|
|
|
|
|
|
|
|
|
|
|
|
|
|
|
|
1 |
3 |
|
|
|
|
|
|
|
|
|
|
|
|
|
|
|
|
|
|
3 |
|
|
210 |
|
|
|||||||
105 |
340 |
1K |
3K |
10K |
Hz |
|
|
|
|
|
|
|
|||||||
|
|
|
|
|
|
|
|
|
|
|
|
|
3 |
4 |
5 |
6 |
7 |
8 |
|
|
|
|
|
|
|
|
2 |
|
9 |
10 11 |
|
|
|
|
|
|
|||
|
|
|
|
|
|
|
3 |
|
|
|
|
|
|
|
|
|
|||
|
|
|
|
|
|
|
1 |
|
|
|
|
|
|
|
|
|
|||
|
105 |
340 |
1K |
3K |
10K |
Hz |
|
3 |
|
-200 |
|
|
|
||||||
|
|
|
|
|
|
|
|
|
|
|
|
|
3 |
4 |
5 |
6 |
7 |
8 |
|
|
|
|
|
|
|
|
|
2 |
|
9 |
10 11 |
|
|
|
|
|
|||
|
|
|
|
|
|
|
|
|
|
|
|
|
|
|
|
|
|||
|
|
|
|
|
|
|
|
1 |
|
3 |
|
|
|
|
|
|
|
|
|
|
|
105 |
340 |
1K |
3K |
10K |
Hz |
8-4207 |
|
||||||||||
• To interrupt play, press PAUSE ; (or PAUSE on the remote control).
–‘CD PAUSE’ scrolls across the display.
–The playing time flashes.
• To resume play, press B or PAUSE ; again.
2To stop play, press 9 (or STOP/CLEAR on the remote control).
Note : All the available discs will play once, then stop.
When the CD tray is closed, you can play a CD
Changing the display mode during playback
You can change to a different type of time display when the CD is playing.
•Press RDS (or RDS/CD TIME on the remote control) to cycle through the various time display modes.
–The display will show :
Elapsed playing time of the current track –> Remaining playing time of the current track –> Remaining playing time of CD –> …
1 - 12 |
GRUNDIG Service |
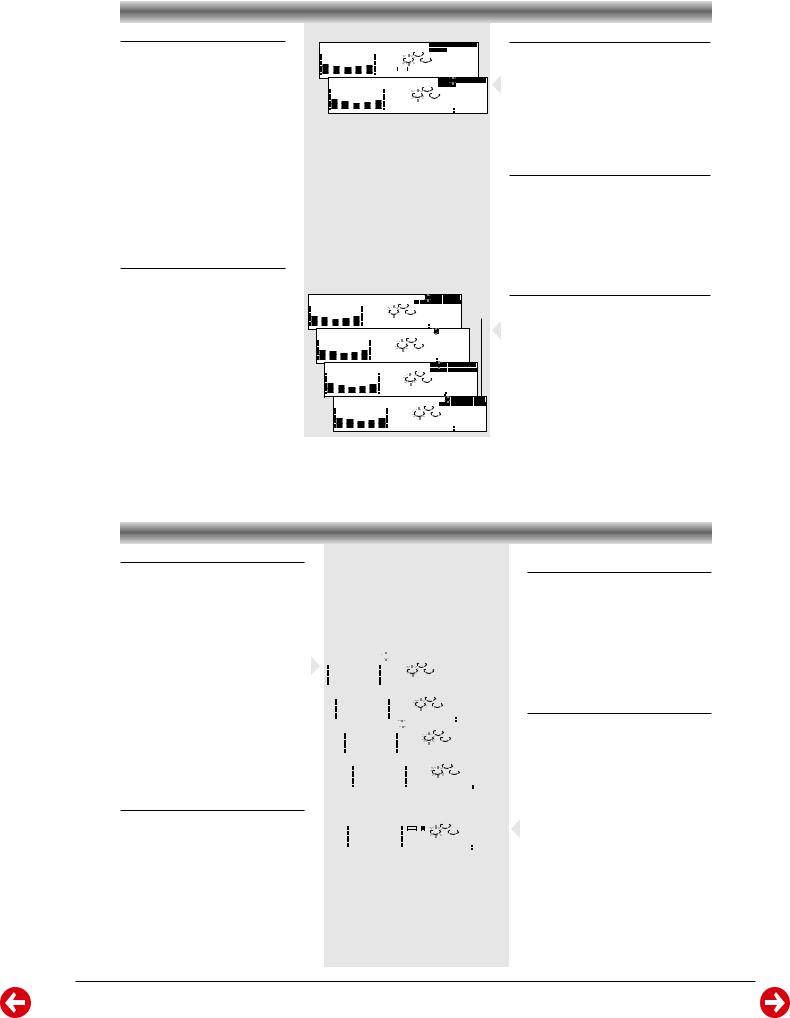
M 19-C / M 29-C |
Allgemeiner Teil / General Section |
CD CHANGER
Selecting a desired track
Selecting a desired track at the stop mode
1Press S or T on the unit or on the remote control until the desired track appears on the display.
2Press B on the unit or on the remote control to start playback.
–The selected track number and elapsed playing time appear on the display.
Selecting a desired track during play mode
1Press S or T on the unit or on the remote control until the desired track appears on the display.
–The selected track number and elapsed playing time appear on the display.
•If you press S once it will skip to the beginning of the current track and play the track again.
Searching for a particular passage during playback
•Press and hold S or T on the unit or on the remote control until the desired passage is located. During the search, the sound is played at a faster than normal rate and at a reduced volume. Playback returns to normal when S or T is released.
|
|
|
|
|
|
RANDOM |
1 |
2 |
3 |
4 |
5 |
6 |
7 |
8 |
|
|
|
|
|
|
|
|
|
|
2 |
9 |
10 11 |
|
|
|
|
|
|
||
|
|
|
|
|
|
|
|
|
|
|
|
|
|
|
|
|
|
|
|
|
|
|
|
1 |
3 |
|
|
|
|
|
|
|
|
|
|
105 |
340 |
1K |
3K |
10K |
Hz |
|
|
|
|
|
|
|
|
|
|
|
|
|
|
|
|
|
|
|
RANDOM |
|
1 |
|
2 |
3 |
4 |
5 |
6 |
7 |
8 |
|
|
|
|
|
|
2 |
|
9 |
|
10 11 |
|
|
|
|
|
||
|
|
|
|
|
|
3 |
|
|
|
|
|
|
|
|
|||
|
|
|
|
|
|
|
1 |
|
|
|
|
|
|
|
|
||
|
105 |
340 |
1K |
3K |
10K |
Hz |
3 |
|
|
|
002 |
|
|
||||
|
|
|
|
|
|
|
|
|
|
|
3 |
4 |
5 |
6 |
7 |
8 |
|
|
|
|
|
|
|
|
|
|
|
|
2 |
9 |
10 11 12 13 14 15 >15 |
|
|
|
|||||
|
|
|
|
|
|
|
|
|
3 |
|
|
|
|
|
|
|
|
|
|
|
|
|
|
|
|
|
|
|
1 |
|
|
|
|
|
|
|
|
||
|
|
|
|
|
|
|
|
|
3 |
|
410 |
|
|
|
|||||
105 |
340 |
1K |
3K |
10K |
Hz |
|
|
|
|
|
|
|
|
||||||
|
|
|
|
|
|
|
|
RPT. 1 |
|
|
|
3 |
|
|
|
|
|
|
|
|
|
|
|
|
|
|
|
|
2 |
|
|
|
|
|
|
|
|
|
|
|
|
|
|
|
|
|
|
|
1 |
3 |
|
|
|
|
|
|
|
|
|
|
105 |
340 |
1K |
3K |
|
10K |
Hz |
|
3 |
|
410 |
|
|
|
|||||
|
|
|
|
|
|
|
|
RPT. 1 ALL |
|
2 |
1 |
2 |
3 |
4 |
5 6 |
7 |
8 |
|
|
|
|
|
|
|
|
|
|
|
9 |
10 11 12 13 14 15 >15 |
|
||||||||
|
|
|
|
|
|
|
|
|
|
1 |
3 |
|
|
|
|
|
|
|
|
|
|
105 |
340 |
1K |
|
3K |
10K |
Hz |
|
2 |
|
|
302 |
|
|
|
|||
|
|
|
|
|
|
|
|
RPT. |
ALL |
2 |
|
2 |
3 |
4 5 |
|
6 7 |
8 |
||
|
|
|
|
|
|
|
|
|
9 |
10 11 12 13 14 15 >15 |
|||||||||
|
|
|
|
|
|
|
|
|
|
1 |
3 |
|
|
|
|
|
|
||
|
|
|
105 |
340 |
1K |
3K |
10K |
Hz |
|
2 |
|
|
302 |
|
|||||
Random function
RANDOM – playing all the tracks in random order disc by disc.
1 Press RANDOM on the remote control). symbol appears on the display.
flag, the disc and the track selected at random appear on the display.
•The tracks will now be played in random order disc by disc until you press 9.
2 Press RANDOM again to resume normal play.
– The RANDOM flag disappears from the display.
Intro function
INTRO – playing the first ten seconds of each track on all discs in the CD tray.
1Press INTRO on the remote control to play the first ten seconds of each track on all discs in the CD tray.
–’INTRO SCAN ON’ scrolls across the display.
• Press INTRO again while a desired track is playing to resume normal playback.
–’INTRO SCAN OFF’ scrolls across the display.
Repeat function
REPEAT – to playback one track, one disc, all three discs or a programme repeatedly.
• Press REPEAT on the remote control.
–You can change the repeat status from RPT 1 to RPT 1 ALL to RPT ALL to repeat off.
–RPT 1: A specific title is played over and over again.
–RPT 1 ALL: The current CD is repeated from the beginning till the end of the CD´s last title.
–RPT ALL: All CD’s are repeated from the beginning till the end.
When REPEAT is pressed in the programme mode, the programmed track(s) on one disc will be repeated.
Programming Tracks
Programming tracks of a loaded CD is possible when CD playback is stopped. The display will indicate the total tracks stored in the program. Up to 30 tracks can be stored in the memory in any order. When 30 tracks are stored and you attempt to store another track, the display will show “PROGRAM FULL”.
1Load the desired discs in the disc trays.
2Press PROGRAM on the unit or on the remote
control to start programming.
– The PROG. flag lights up on the display.
3Press the desired disc button to select the disc.
4Press S or T to select the desired track.
5Press PROGRAM to store the track.
•Repeat steps 2 to 5 to store other discs and tracks.
Note:
The track number indicator always shows which numbers have been stored in the programme.
Playing the program
1Press B on the unit or on the remote control to start program playback.
–“PROGRAM PLAY” scrolls across the display.
–The track number and elapsed playing time of the current track will appear on the display.
2Press 9 (or STOP/CLEAR on the remote control) to stop program playback.
CD CHANGER
|
|
|
|
|
|
|
|
|
|
|
|
|
|
|
|
|
|
|
|
|
|
|
|
|
|
|
|
|
|
|
|
|
|
|
|
|
|
|
|
|
|
|
|
|
|
|
|
|
|
|
|
|
|
|
|
|
|
|
|
|
|
|
|
|
|
|
|
|
|
|
|
|
|
|
|
|
|
|
|
|
|
|
|
|
|
|
|
|
|
|
|
|
|
|
|
|
|
|
|
|
|
|
|
|
|
|
|
|
|
|
|
|
|
|
|
|
|
|
|
|
|
|
105 340 |
|
|
1K |
|
3K |
|
|
10K Hz |
|
|
|
|
|
|
|
|
|
|
|
|
|
|
|
|
|
|
|
|
|
|
|
|
|
|
|
|
||||
|
|
|
|
|
|
|
|
|
|
|
|
PROG. |
|
|
|
|
|
|
|
|
2 |
|
|
|
|
|
|
|
|
|
|
|
|
|
|
|
|
|||
|
|
|
|
|
|
|
|
|
|
|
|
|
|
|
|
|
|
|
2 |
|
|
|
|
|
|
|
|
|
|
|
|
|
|
|
|
|
|
|
||
|
|
|
|
|
|
|
|
|
|
|
|
|
|
|
|
1 |
|
3 |
|
|
|
|
|
|
|
|
|
|
|
|
|
|
|
|
|
|
||||
|
|
105 |
|
340 |
|
1K |
|
3K |
|
10K |
|
Hz |
|
|
|
|
|
2 |
|
410 |
|
|
|
|
|
|
|
|||||||||||||
|
|
|
|
|
|
|
|
|
|
|
|
|
PROG. |
|
|
|
|
|
|
|
2 |
|
|
|
|
5 |
|
|
|
|
|
|
|
|||||||
|
|
|
|
|
|
|
|
|
|
|
|
|
|
|
|
|
|
|
2 |
3 |
|
|
|
|
|
|
|
|
|
|
|
|
|
|
|
|
||||
|
|
|
|
|
|
|
|
|
|
|
|
|
|
|
|
|
|
|
|
|
1 |
|
|
|
|
|
|
|
|
|
|
|
|
|
|
|
|
|
||
|
|
|
|
|
|
|
|
|
|
|
|
Hz |
|
|
|
|
|
5 |
|
P-02 |
|
|
|
|
|
|||||||||||||||
|
|
|
|
|
|
|
|
|
|
|
|
|
|
|
|
|
|
|
|
|
|
|
||||||||||||||||||
|
|
|
105 |
|
340 |
|
1K |
|
3K |
|
10K |
|
|
|
|
|
|
|
|
|
|
|
||||||||||||||||||
|
|
|
|
|
|
|
|
|
|
|
|
|
|
|
PROG. |
|
|
|
|
|
|
|
|
|
|
|
2 |
|
|
|
|
5 |
|
|
|
|
|
|||
|
|
|
|
|
|
|
|
|
|
|
|
|
|
|
|
|
|
|
1 |
2 |
3 |
|
|
|
|
|
|
|
|
|
|
|
|
|
|
|||||
|
|
|
|
|
|
|
|
|
|
|
|
|
|
|
|
|
|
|
|
|
|
|
|
|
|
|
|
|
|
|
|
|
|
|
|
|
||||
|
|
|
|
|
|
|
|
|
|
|
|
|
|
|
Hz |
|
|
5 |
|
|
|
|
|
808 |
|
|
|
|||||||||||||
|
|
|
|
|
|
|
|
|
|
|
|
|
|
|
|
|
|
|
|
|
|
|
|
|
||||||||||||||||
|
|
|
|
|
|
105 |
|
340 |
|
1K |
|
3K |
10K |
|
|
|
|
|
|
|
|
|
|
|
||||||||||||||||
|
|
|
|
|
|
|
|
|
|
|
|
|
|
|
|
|
|
|
|
|
|
|
|
|
|
|
|
|
|
|
|
|
|
|
|
|
|
|
|
|
|
|
|
|
|
|
|
|
|
|
|
|
|
|
|
|
|
|
|
|
|
|
|
|
|
|
|
|
|
|
|
3 |
|
|
4 |
5 |
6 |
7 |
8 |
|
|
|
|
|
|
|
|
|
|
|
|
|
|
|
|
|
|
|
|
|
|
|
|
|
|
|
|
|
|
|
|
|
|
|
|
|
|
|
|
|
|
|
|
|
|
|
|
|
|
|
|
|
|
|
|
|
|
|
|
|
|
|
|
|
|
2 |
9 |
10 |
11 |
|
|
|
|
|
|
|
|||||||
|
|
|
|
|
|
|
|
|
|
|
|
|
|
|
|
|
|
|
|
|
|
|
|
|
|
|
|
|
|
|
|
|
|
|
|
|
|
|
||
|
|
|
|
|
|
|
|
|
|
|
|
|
|
|
|
|
DECK |
|
|
B |
1 |
|
|
|
3 |
|
|
|
|
|
|
|
|
|
|
|
|
|
|
|
|
|
|
|
|
|
|
|
|
|
|
|
|
|
|
|
RECORD |
|
|
|
|
|
|
|
|
|
|
|
|
|
|
|
|
|
|
|
|||||
|
|
|
|
|
|
|
|
|
|
1K |
|
3K |
|
|
|
Hz |
|
|
3 |
|
|
|
|
|
|
400 |
|
|
|
|||||||||||
|
|
|
105 |
340 |
|
|
|
|
10K |
|
|
|
|
|
|
|
|
|
|
|
||||||||||||||||||||
|
|
|
|
|
|
|
|
|
|
|
|
|
|
|
|
|
|
|
|
|
|
|
|
|
|
|
|
|
|
|
|
|
|
|
|
|
|
|
||
|
|
|
|
|
|
|
|
|
|
|
|
|
|
|
|
|
|
|
|
|
|
|
|
|
|
|
|
|
|
|
|
|
|
|
|
|
|
|
|
|
Erasing the program (in the stop position)
1Press 9 on the unit or STOP/CLEAR on the remote control.
–The last stored track is erased.
–‘CLEARED’ appears on the display.
2Press and hold 9 on the unit or STOP/CLEAR on the remote control for 2 seconds.
–All the programmed tracks are erased.
–‘PROGRAM CLEAR’ appears on the display.
erased when the set supply or the CD
tray is opened.
CD Synchro Start Recording
1Load a blank cassette (full spool to the left) into TAPE DECK B.
2Press CD to select CD.
3Load a disc into the disc tray.
4Press AUTO REV. to select the play mode ( å or ) for TAPE DECK B.
5Press and hold RECORD on the unit or on the
remote control for 1 second.
–‘CD SYNCHRO’ scrolls across the display.
–The RECORD flag appears on the display.
–The CD starts playing after a seven-second delay to prevent recording on the leader tape at the beginning of the tape.
6You can program the tracks in the order you want them to be recorded (see Programming
Tracks).
– ‘PROGRAM REC’ appears then on the display. 7 Press 9 to stop recording.
GRUNDIG Service |
1 - 13 |
Allgemeiner Teil / General Section |
M 19-C / M 29-C |
CLOCK SETTING
Setting the clock
The clock will display in 24-hour mode, e.g.
00:00 or 23:59.
1Press ON/OFF to switch on the set.
2Press and hold CLOCK on the remote control for 3 seconds.
–‘24 HOUR’ appears and the ‘24’ starts flashing.
3Press CLOCK briefly.
4Set the hour with A or B.
5Press PROGRAM or CLOCK to store the hour setting.
6Set the minutes with A or B.
7Press PROGRAM or CLOCK again to store the setting.
– The clock starts running.
Notes:
1The clock time is displayed during standby mode.
2If you wish to call up the clock time when the unit is operating, press briefly the CLOCK button on the remote control.
3When a power interruption occurs, the clock setting is erased.
TIMER
105 340 1K 3K 10K Hz TUNER
TIMER
|
|
|
|
|
|
|
|
|
|
TUNED |
|
|
|
|
|
|
|
|
|
|
PRESET STEREO |
|
|
|
|
|
|
|
|
Hz |
8750MHz |
|
105 |
|
340 |
|
1K |
|
3K |
|
10K |
||
TIMER SETTING
Setting the Timer
•The system can switch on to TUNER, CD, TAPE or REC TU mode automatically at a preset time.
It can serve as an alarm to wake you up. One hour after the preset time, the system will return to the standby mode if no button is
sure the clock
is set correctly.
•The timer setting will remain active until you reset it.
•The volume of the timer will be at the last setting before the set is switched to standby mode.
Timer Setting
1Press ON/OFF to switch on the set.
2Press and hold TIMER on the remote control
for 3 seconds.
– The TIMER flag flashes.
3 Press A or B to select the desired source.
– TUNER, CD, TAPE or REC TU.
3a If you select TUNER...
Press TIMER to confirm the tuner selection. First, select the desired waveband (FM, MW or LW) and then press PRESET A or
B to select the preset station.
•Then, continue with steps 4 to 8.
3a If you select CD...
Track 1 will be selected and playback starts automatically at the preset time.
•Continue with steps 4 to 8.
3a If you select TAPE...
Tape playback of the last selected deck will start automatically at the preset time.
•Continue with steps 4 to 8.
TIMER SETTING
3a If you select REC TU...
A blank tape has to be inserted into the cassette compartment.
•Press TIMER to confirm the REC TU selection.
•Press PRESETA or B to select the preset station to be recorded.
•Then, continue with steps 4 to 9.
4Press TIMER to confirm your source selection.
– ‘START‘ is displayed.
– The display shows ‘0:00’ and ‘00’ flashes.
5Press A or B to set the hour for the timer to start.
6Press TIMER to store the hour setting.
7Press A or B to set the minutes for the timer to start.
8Press TIMER to store the start time.
9If you have selected REC TU, you should also adjust the stop time. ‘OFF’ is displayed.
•Adjust the stop time in the same way as the start time and press TIMER to store the stop time.
–The TIMER is now set and the TIMER flag remains lit.
To stop the timer
• Press TIMER on the remote control.
– The TIMER flag disappears from the display.
To start the timer again
• Press TIMER on the remote control.
– The TIMER flag appears again on the display.
Notes: When no button is pressed for 10 seconds, the set will automatically leave the timer setting mode.
4 5 6 7 8
|
2 |
9 |
10 11 |
1 |
3 |
|
|
|
|
|
|
|
|
|
|
|
|
|
|
|
|
|
|
|
|
|
|
|
|
|
|
|
MUTE |
|
|
105 |
|
340 |
|
|
1K |
|
3K 10K Hz |
|
|
||||||||||||||||
|
|
|
|
|
|
|
|||||||||||||||||||
|
|
|
|
|
|
|
|
|
|
|
|
|
|
|
|
|
|
|
|
|
|
|
|
|
|
|
|
|
|
|
|
|
|
|
|
|
TIMER |
|
|
|
|
|
|
|
|
|
|
|
|||
|
|
|
|
|
|
|
|
|
|
|
|
|
|
|
|
|
|
Hz |
|
|
|
||||
|
105 |
|
|
340 |
|
|
1K |
|
|
3K |
|
|
10K |
|
|
|
|
||||||||
|
|
|
|
|
|
|
|
|
|
|
|
|
|
|
|
|
|
|
|
|
|
|
|
|
|
TIMER
|
|
|
|
|
|
|
|
|
|
|
|
Hz ON 0000 |
|
|||||||||
|
105 |
|
|
340 |
|
|
1K |
|
3K |
|
10K |
|
||||||||||
|
|
|
|
|
|
|
|
|
|
|
|
|
|
|
|
|
|
|
|
|
|
|
|
|
|
|
|
|
|
|
|
|
|
|
TIMER |
|
|
|
|
|
|
|
|||
|
|
|
|
|
|
|
|
|
|
|
|
|
|
|
|
|
|
|
|
|
OFF0000 |
|
105 |
340 |
|
|
1K |
|
|
3K |
|
10K |
|
Hz |
|
||||||||||
|
|
|
|
|
|
|
|
|||||||||||||||
|
|
|
|
|
|
|
|
|
|
|
|
|
|
|
|
|
|
|
|
|
|
|
|
|
|
|
|
|
|
|
|
|
|
|
|
|
|
|
TIMER |
|
|
|
|
||
|
|
|
|
|
|
|
|
|
|
|
|
|
|
|
Hz OFF0000 |
|
||||||||
|
|
105 |
|
|
340 |
|
|
1K |
|
|
3K |
|
|
10K |
|
|
||||||||
|
|
|
|
|
|
|
|
|
|
|
|
|
|
|
|
|
|
|
|
|
|
|
|
|
|
|
|
|
|
|
|
|
|
|
|
|
|
|
|
|
|
SLEEP |
|
|
|
|
|||
|
|
|
|
|
|
|
|
|
|
|
|
|
|
|
|
|
|
|
|
|
|
SLEEP |
|
|
|
105 |
340 |
|
|
1K |
|
|
3K |
|
|
10K |
Hz |
|
|||||||||||
|
|
|
|
|
|
|
|
|
|
|||||||||||||||
|
|
|
|
|
|
|
|
|
|
|
|
|
|
|
|
|
|
|
|
|
|
|
|
|
SLEEP
105 340 1K 3K 10K Hz 120 MIN
OTHER FEATURES
Mute
This feature allows you to temporarily switch off the sound of the system without switching off the set when you require a moment of silence.
•Press MUTE on the remote control to switch off the sound.
– ‘MUTE’ is displayed.
•Press MUTE on the remote control again or adjust the volume on the set or on the remote
switch on the sound.
Sleep
This feature allows you to select a time after which the system will switch to the standby mode automatically.
•Press ON/OFF to switch on the set.
•Press SLEEP on the remote control repeatedly to cycle through the sleep timer mode.
–‘SLEEP’ and the SLEEP flag are displayed.
–The selection is as follows:
120 MIN –> 90 MIN –> 60 MIN –> 45 MIN –> 30 MIN –> 15 MIN –> 5 MIN –> OFF –> 120 MIN …
 • Select the sleep time you desire.
When the sleep timer is switched on, you can check the remaining time before the set switches to standby mode.
• Press SLEEP once.
–The remaining time will scroll through the display.
To switch off the sleep timer mode.
•Press SLEEP repeatedly until “OFF” is displayed.
1 - 14 |
GRUNDIG Service |
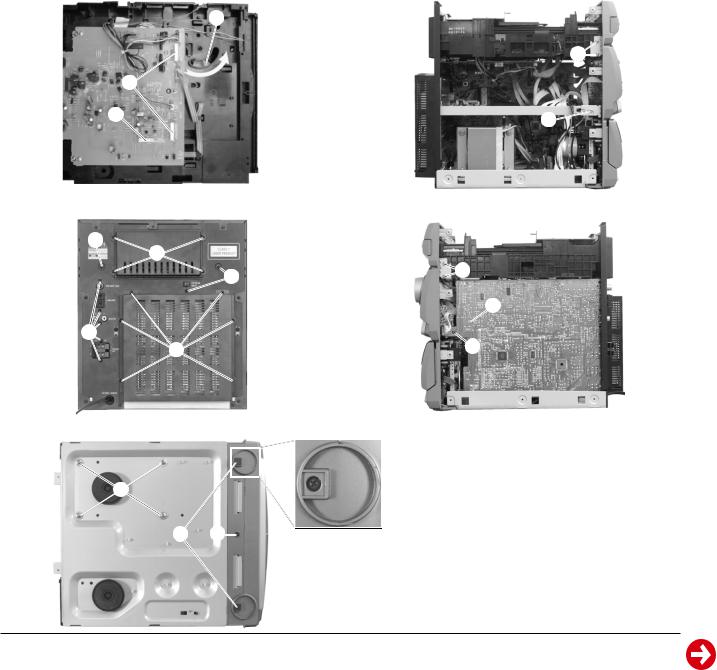
M 19-C / M 29-C |
Allgemeiner Teil / General Section |
Ausbauhinweise
1.Öffnen des Gehäuses
-Die jeweils 12 Schrauben in den Gehäuseseitenwänden sowie die 6 Schrauben in der Gehäuserückwand herausschrauben und das Gehäuse abnehmen.
2.CD-Laufwerk ausbauen
-4 Schrauben F(Fig. 3) herausschrauben und Abdeckung abnehmen.
-Weißen Hebel A(Fig. 1) in Pfeilrichtung zur Gerätefront drücken, die CD-Schublade öffnen und CD-Fach-Blende nach oben abnehmen.
-1 Stecker B(Fig. 1) und 2 Stecker C(Fig. 1) abziehen. Hinweis: Beim Zusammenbau die beiden Stecker Cnicht vertauschen, Leitungen müssen über Kreuz zur Front gehen.
-4 Schrauben D(Fig. 2, Fig. 4) und 3 Schrauben G(Fig. 3) herausschrauben.
3.Frontblende ausbauen
-CD-Laufwerk ausbauen (Pkt. 2).
-Die 2 Schrauben unter den Gummifüßen L und die Schraube M
(Fig. 5) herausschrauben.
-Die 2 Schrauben E (Fig. 2, Fig. 4) herausschrauben und Metallschienen beidseitig aushängen.
-Frontblende abnehmen, dabei Steckverbinder nach Bedarf öffnen.
4.Hauptplatte ausbauen
-CD-Laufwerk ausbauen (Pkt. 2).
-5 Schrauben I(Fig. 3) und Schraube J(Fig. 4) herausschrauben.
-Hauptplatte herausnehmen, dabei Steckverbinder nach Bedarf öffnen.
Fig. 1
A |
C |
B |
Disassembly Instructions
1.Opening the Cabinet
-Undo 12 screws on each side of the cover and 6 screws on the rear of the cabinet and take the cabinet off.
2.Dismantling the CD Drive Mechanism
-Undo 4 screws F(Fig. 3) and remove the cover.
-Press the white lever A(Fig. 1) in the direction of the arrow towards the front of the system. Open the CD tray and pull out the CD tray cover carefully upwards to remove it.
-Unplug 1 connector B(Fig. 1) and 2 connectors C(Fig. 1). Note: When re-assembling, do not reverse the two connectors C.
The leads must be routed crosswise to the front.
-Undo 4 screws D (Fig. 2, Fig. 4) and 3 screws G(Fig. 3).
3.Removing the Front
-Remove the CD drive mechanism (para 2).
-Undo the 2 screws below the rubber feet Land undo screw M(Fig. 5).
-Undo 2 screws E(Fig. 2, Fig. 4) and unhook the metal bars on both sides.
-Remove the front; unplug the connector if necessary.
4.Removing the Main Circuit Board
-Remove the CD drive mechanism (para 2).
-Undo 5 screws I(Fig. 3) and screw J(Fig. 4).
-Remove the main circuit board; if necessary unplug the connectors.
Fig. 2
D |
E |
Fig. 3
G |
I |
Fig. 5
F
G |
H |
Fig. 4
D |
J |
E |
K
L M |
GRUNDIG Service |
1 - 15 |

Allgemeiner Teil / General Section |
M 19-C / M 29-C |
5.Cassettenfachklappe ausbauen (Fig. 6)
-Cassettenfach öffnen, beidseitige Sperrklinke N eindrücken und
Klappe vorsichtig in Pfeilrichtung abziehen.
6.Bedienplatten ausbauen (Fig. 7)
-5 Schrauben O herausschrauben und die CD-Tastenplatte Q abnehmen (2 Schrauben P sind für die Befestigung der Tastenstößel).
-Lautstärkeknopf abziehen.
-2 Schrauben Rherausschrauben und den Träger Sabnehmen.
-14 Schrauben Therausschrauben und die Steuerplatte Vabnehmen (3 Schrauben Usind für die Befestigung der Tastenstößel).
Fig. 6
5.Removing the Cassette Compartment Lid (Fig. 6)
-Open the cassette compartment, press in the click Non both sides and pull off the lid carefully in the direction of the arrow.
6.Removing the Operation PCBs (Fig. 7)
-Undo 5 screws O and remove the CD key board control Q (the 2 screws Pare used for fastening the key tappets).
-Pull off the volume control knob.
-Undo 2 screws Rand take out the support S.
-Undo 14 screws Tand remove the control board V(the 3 screws Uare used for fastening the key tappets).
Fig. 7
T |
N |
P Q
O
 V
V
U |
T |
S
R
1 - 16 |
GRUNDIG Service |
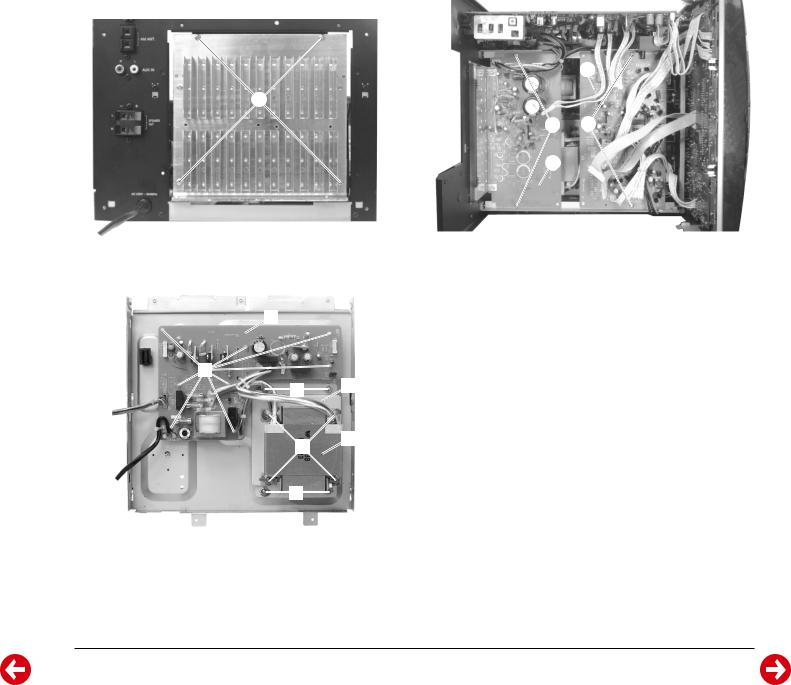
M 19-C / M 29-C |
Allgemeiner Teil / General Section |
7.Endstufe ausbauen
-CD-Laufwerk ausbauen (Pkt. 2).
-4 Schrauben W(Fig. 8) und 2 Schrauben W(Fig. 9) herausschrauben.
-Verstärkerplatte Xanheben, verkanten und nach hinten herausziehen, dabei Steckverbinder nach Bedarf öffnen.
8.Cassetten-Platte der Cassettendecks ausbauen
-CD-Laufwerk ausbauen (Pkt. 2).
-2 Schrauben Y(Fig. 9) herausschrauben.
-Cassetten-Platte Zder Cassettendecks herausnehmen.
9.Netzteilplatte ausbauen
-CD-Laufwerk ausbauen (Pkt. 2).
-Endstufe ausbauen (Pkt.7).
-Cassetten-Platte der Cassettendecks ausbauen (Pkt 8).
-Spreizanker A (Fig. 10) zusammen drücken und Leiterplatte leicht anheben.
-Leiterplatte B herausnehmen, dabei Steckverbinder nach Bedarf öffen.
10.Netztrafo ausbauen
-Netzteilplatte ausbauen (Pkt. 9)
-4 Schrauben C herausschrauben.
-Trafo F mit Trägerplatte E herausnehmen.
-4 Schrauben D herausschrauben und Trägerplatte E abnehmen.
Fig. 8
7.Removing the AF Board
-Remove the CD drive mechanism (para 2).
-Undo 4 screws W(Fig. 8) and 2 screws W(Fig. 9).
-Lift the AF board X, tilt it and pull it out towards the rear side. Open the connector if necessary.
8.Removing the Cassette Board of the Cassette Decks
-Remove the CD drive mechanism (para 2).
-Undo 2 screws Y(Fig. 9).
-Remove the cassette board Zof the cassette decks.
9.Removing the Power Supply Board
-Remove the CD drive mechanism (para 2).
-Remove the AF board (para 7).
-Remove the cassette deck board (para 8).
-Press the expansion bolt A (Fig. 10) together and lift the circuit board by a small amount.
-Take the circuit board B out. Open the connectors if necessary.
10.Removing the Mains Transformer
-Remove the power supply board (para 9).
-Undo 4 screws C.
-Take out the transformer F together with the supporting plate E.
-Undo 4 screws D and remove the supporting plate E.
Fig. 9
Z
W
W Y |
X
Fig. 10
B
A
CE
F
D
C
GRUNDIG Service |
1 - 17 |
 Loading...