


 Loading...
K2 Dyno S
Replay Controller
User Manual
Software Version 3.2
071-8909- 01
20140207


K2 Dyno S
Replay Controller
User Manual
Software Version 3.2
071-8909- 01
20140207
Contents |
|
Introduction................................................................................................................................................... |
9 |
What is the K2 Dyno S Replay System?................................................................................................... |
9 |
System description................................................................................................................................... |
9 |
Dyno Startup.............................................................................................................................................. |
15 |
Starting up the K2 Dyno S Replay Controller......................................................................................... |
15 |
Open or New session............................................................................................................................. |
16 |
About session channels.......................................................................................................................... |
16 |
Configure Session Channels.................................................................................................................. |
17 |
About loop modes in K2, Dyno, and GV STRATUS............................................................................ |
18 |
Deleting a Session during startup........................................................................................................... |
18 |
Deleting a session while in an active session......................................................................................... |
18 |
Home Screen............................................................................................................................................. |
19 |
About the Record Status section............................................................................................................ |
19 |
Adjusting audio output............................................................................................................................ |
21 |
Adjusting the audio record levels............................................................................................................ |
22 |
Assigning Aux Channels......................................................................................................................... |
22 |
Setting Flying M/E................................................................................................................................... |
23 |
Setting ABCD(EFGH)............................................................................................................................. |
24 |
Setting Auto Play.................................................................................................................................... |
24 |
Setting Auto Cue..................................................................................................................................... |
25 |
Setting Pre-Roll....................................................................................................................................... |
25 |
Setting Post-Roll..................................................................................................................................... |
26 |
Setting Mark Pauses............................................................................................................................... |
26 |
About the T-bar....................................................................................................................................... |
26 |
Configuring T-bar settings: default and alternate................................................................................. |
27 |
Stopping all recording processes............................................................................................................ |
29 |
Locking player channels......................................................................................................................... |
29 |
Monitoring and managing transfers........................................................................................................ |
30 |
Configuration Screen.................................................................................................................................. |
33 |
User Panel settings................................................................................................................................. |
33 |
Panel settings......................................................................................................................................... |
34 |
Clip settings............................................................................................................................................ |
35 |
Effects settings....................................................................................................................................... |
37 |
Configuration Network Tab from Transfer Setup..................................................................................... |
38 |
Revising record and play channel status................................................................................................ |
39 |
Resetting configuration........................................................................................................................... |
39 |
Exporting the Config information............................................................................................................ |
40 |
Importing the Config information............................................................................................................ |
40 |
Playback..................................................................................................................................................... |
41 |
Queueing both outputs........................................................................................................................... |
41 |
Playback options..................................................................................................................................... |
41 |
Configuring the alternative playback speed............................................................................................ |
42 |
PGM/PGM Playback in green and red.................................................................................................... |
42 |
PGM/PGM Playback in red and red........................................................................................................ |
42 |
Using PGM or PVW................................................................................................................................ |
43 |
Going back to Live/Rec........................................................................................................................... |
43 |
Marks.......................................................................................................................................................... |
45 |
Marking function..................................................................................................................................... |
45 |
20140207 |
K2 Dyno S User Manual 5 |

Contents
Create clips................................................................................................................................................ |
47 |
Creating a clip......................................................................................................................................... |
47 |
Trimming IN or OUT................................................................................................................................ |
48 |
Creating a clip with one entry point........................................................................................................ |
48 |
Setting the default duration for clips........................................................................................................ |
49 |
Cue replay.................................................................................................................................................. |
51 |
Cueing a clip........................................................................................................................................... |
51 |
Changing angle....................................................................................................................................... |
51 |
Highlights.................................................................................................................................................... |
53 |
Navigating the Highlight screen.............................................................................................................. |
53 |
Changing clip views in a bin................................................................................................................... |
54 |
Changing the thumbnail.......................................................................................................................... |
55 |
Recalling clips......................................................................................................................................... |
55 |
Naming a clip.......................................................................................................................................... |
56 |
Adding Stars........................................................................................................................................... |
57 |
Adding keywords..................................................................................................................................... |
57 |
Editing keywords..................................................................................................................................... |
58 |
Setting keyword Fkeys............................................................................................................................ |
59 |
Copying and moving clips....................................................................................................................... |
60 |
Renaming a Highlight bin........................................................................................................................ |
60 |
Creating a new Highlight bin................................................................................................................... |
61 |
Changing Primary Angle......................................................................................................................... |
61 |
Recalling a clip and Match Frame operation from the record train......................................................... |
62 |
Favorites..................................................................................................................................................... |
63 |
Using the Favorites screen..................................................................................................................... |
63 |
Opening the Favorite bar........................................................................................................................ |
64 |
Playlists...................................................................................................................................................... |
65 |
Accessing Playlist mode......................................................................................................................... |
65 |
Creating a new playlist............................................................................................................................ |
65 |
Adding a clip to the end of a playlist....................................................................................................... |
66 |
Inserting a clip into the middle of a playlist............................................................................................. |
66 |
Adding a group of clips to a Playlist........................................................................................................ |
66 |
Adding multiple clips to a playlist............................................................................................................ |
66 |
Moving events in a playlist...................................................................................................................... |
67 |
Moving multiple events in a playlist......................................................................................................... |
68 |
Shortening a clip in a playlist.................................................................................................................. |
68 |
Lengthening a clip in a playlist................................................................................................................ |
69 |
Adding M/E transitions to single playlist events...................................................................................... |
70 |
Adding M/E transitions to all playlist events............................................................................................ |
70 |
Deleting a clip from a playlist.................................................................................................................. |
70 |
Removing a section of an event in a playlist........................................................................................... |
70 |
Changing the speed of an event in a playlist.......................................................................................... |
71 |
Changing the angle of a clip in a playlist................................................................................................. |
72 |
Clearing the In or Out of an event in a playlist........................................................................................ |
72 |
Cueing up a playlist................................................................................................................................ |
73 |
Playing back a playlist............................................................................................................................. |
73 |
Jumping to a playlist event while playing back........................................................................................ |
73 |
Looping playlist....................................................................................................................................... |
74 |
Renaming a playlist................................................................................................................................ |
74 |
Finding the cursor................................................................................................................................... |
74 |
Navigating multiple playlists.................................................................................................................... |
74 |
Viewing multiple playlists in a bin............................................................................................................ |
75 |
Pausing a playlist.................................................................................................................................... |
76 |
PGM/PVW Playlist.................................................................................................................................. |
76 |
6 K2 Dyno S User Manual |
20140207 |

|
Contents |
Aux Playlist............................................................................................................................................. |
76 |
ShareFlex................................................................................................................................................... |
79 |
About ShareFlex..................................................................................................................................... |
79 |
ShareFlex connections........................................................................................................................... |
79 |
Setting up ShareFlex.............................................................................................................................. |
80 |
Using ShareFlex with record trains......................................................................................................... |
81 |
Accessing and using a remote session.................................................................................................. |
81 |
Creating local clips from remote record trains........................................................................................ |
82 |
Timecode matching a local clip with remote clips................................................................................... |
83 |
Using ShareFlex with playlists................................................................................................................ |
84 |
Library........................................................................................................................................................ |
85 |
Saving to the Library............................................................................................................................... |
85 |
Navigating the Library............................................................................................................................. |
86 |
Copying clips.......................................................................................................................................... |
86 |
Creating a new Library bin...................................................................................................................... |
87 |
Importing files from a storage device to the Library................................................................................ |
87 |
Renaming files in the Library.................................................................................................................. |
87 |
Showing session folders in the Library................................................................................................... |
88 |
Search Function......................................................................................................................................... |
89 |
Using the default 3-Star search folder.................................................................................................... |
89 |
Creating a new search folder.................................................................................................................. |
90 |
Adding Criteria........................................................................................................................................ |
91 |
Deleting conditions................................................................................................................................. |
92 |
Using Keyboard, (CTRL)(F) search function........................................................................................... |
92 |
Adding clips from search to a PL............................................................................................................ |
92 |
VGA Expansion Screen.............................................................................................................................. |
93 |
About the VGA screen............................................................................................................................ |
93 |
Navigating the VGA screen..................................................................................................................... |
93 |
Dragging and dropping clips into Playlist................................................................................................ |
94 |
Right-clicking clips in the Bins and Playlists........................................................................................... |
95 |
Showing more than one bin.................................................................................................................... |
95 |
Showing more than one playlist ............................................................................................................. |
96 |
Shutting the system down.......................................................................................................................... |
97 |
Shutting the system down....................................................................................................................... |
97 |
Rebooting the Dyno and continue recording.......................................................................................... |
99 |
Rejoining a session............................................................................................................................... |
100 |
Appendix.................................................................................................................................................. |
101 |
Button and keyboard names and functions........................................................................................... |
101 |
Trademarks and Agreements................................................................................................................... |
105 |
Trademarks........................................................................................................................................... |
105 |
JPEG acknowledgment......................................................................................................................... |
105 |
20140207 |
K2 Dyno S User Manual 7 |

Contents
8 K2 Dyno S User Manual |
20140207 |

Introduction
What is the K2 Dyno S Replay System?
The K2 Dyno S Replay System is a control system for live event scenarios, with the following features:
•Quickly plays back recorded elements in both real time and slow motion
•Stores recorded segments for playback at a later time
•Assembles recorded segments in a playlist for playback with effect transitions
•Names segments and clips
•Attaches metadata to segments and clips
•Sends clips to other devices for external storage or further editing
System description
The K2 Dyno S Replay System has two main components: A K2 system and a K2 Dyno S Replay Controller.
K2 system
The K2 system can be a K2 Summit Production Client or a K2 Solo Media Server. The K2 Summit system has four video channel connections. Each channel can be configured as either a recorder or aplayer. TheK2Solosystemhastwovideochannelconnections,makingitonehalfofaK2Summit system. With ChannelFlex (a feature of K2 AppCenter Elite), a record channel can be split to record two streams of video.
The K2 Dyno S Replay System supports both 3G and non-3G K2 Summit/Solo systems. The K2 Summit 3G system is pictured here.
20140207 |
K2 Dyno S User Manual 9 |
Introduction
A K2 Summit/Solo system can be configured to complete a variety of specialized tasks, as follows:
•3X Super Slow motion, which records at three times the frame rate for clearer slow motion playback
•3D activities marrying two record steams to playback as one 3D stream
The Dyno S Replay Controller controls the K2 system video streams no matter how the K2 system is configured.
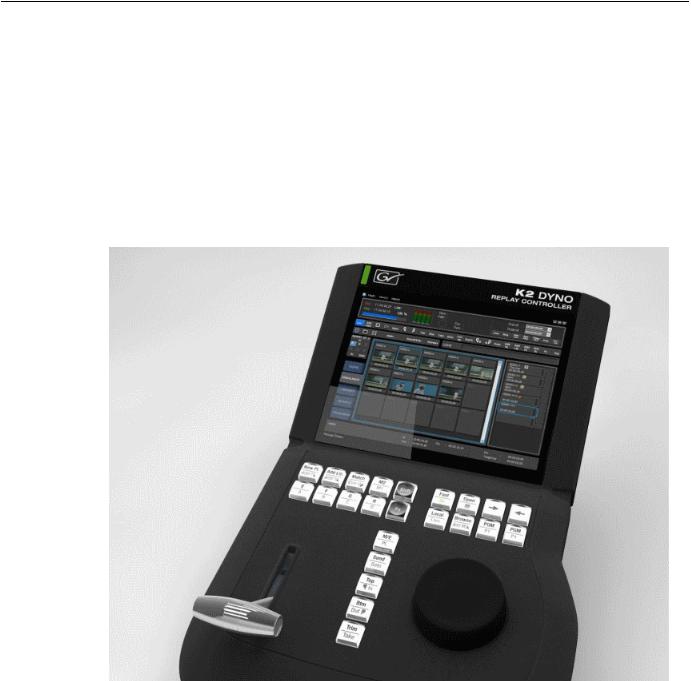
K2 Dyno S Replay Controller
ManyofthefunctionsoftheK2DynoSReplayControllerareoperatedfromthelargetouchscreen. Three key elements of the touch screen are Tabs, Slots, and Bins.
Tabs: The column of SoftKeys on the left side of the screen providing access to primary functions.
10 K2 Dyno S User Manual |
20140207 |
Introduction
Figure 1: All tabs
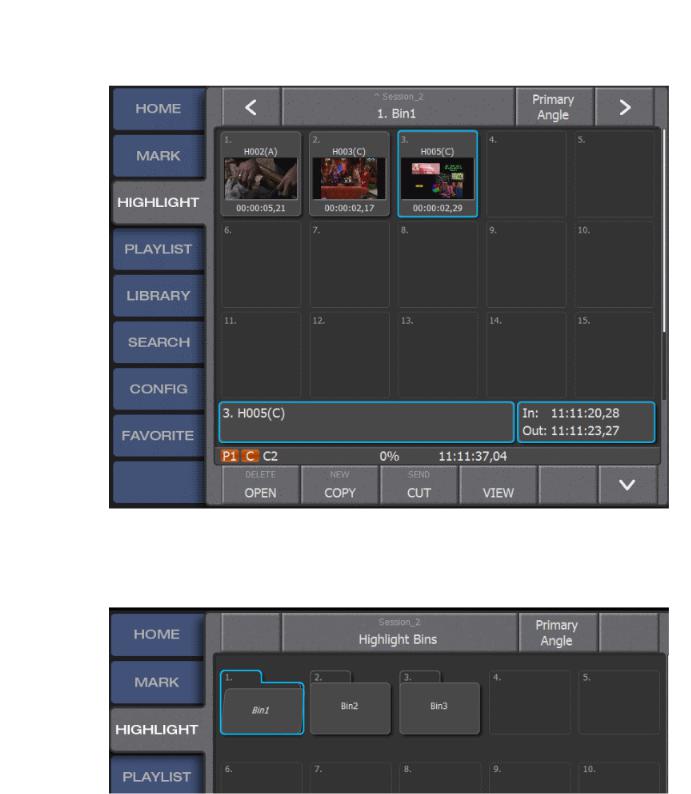
Slots: The numbered storage locations for elements viewable under tabs such as highlights and playlists.
20140207 |
K2 Dyno S User Manual 11 |
Introduction
Figure 2: Slots displayed on Highlight screen
Bins: A collection of like items. A bin is similar to a PC Folder. You can have multiple bins with highlights, playlists, or search results. Additional bins are accessed on the touch screen by tapping the bar at the top of the screen that contains a bin name.
Figure 3: A collection of bins
12 K2 Dyno S User Manual |
20140207 |

Introduction
Key terms
Terms |
Description |
Session |
The bin that holds all the items from a recording period. A session |
|
includesrecordstreams,clips,playlistsandanythingcreatedduring |
|
the period of recording. A session is transient; it is not permanent. |
|
You can delete a session, but doing so deletes all elements of that |
|
period of recording. |
|
SessionmanagementisakeyitemforsuccessinusingtheK2Dyno |
|
Replay Controller. You can save a session and open another but in |
|
so doing you must consider recordable space. The contents of the |
|
session might take up a large amount of recordable space, since the |
|
session does include the complete record train. |
Clip |
A segment of video selected and saved for future use. It can be used |
|
for individual playback or for addition to a playlist. It can be |
|
configured to save just one record stream or all streams being |
|
recorded at the points that defined it. |
20140207 |
K2 Dyno S User Manual 13 |

Introduction
14 K2 Dyno S User Manual |
20140207 |
Dyno Startup
Starting up the K2 Dyno S Replay Controller
1.Power on the K2 Summit system.
The power button is the round black button on the front plate.
2.Power on the K2 Dyno S Replay Controller.
The power switch is located at the back to the right under the protection flap.
3.Log on to K2 AppCenter:
•Default Username: Administrator
•Password: adminGV!
NOTE: The password is case sensitive.
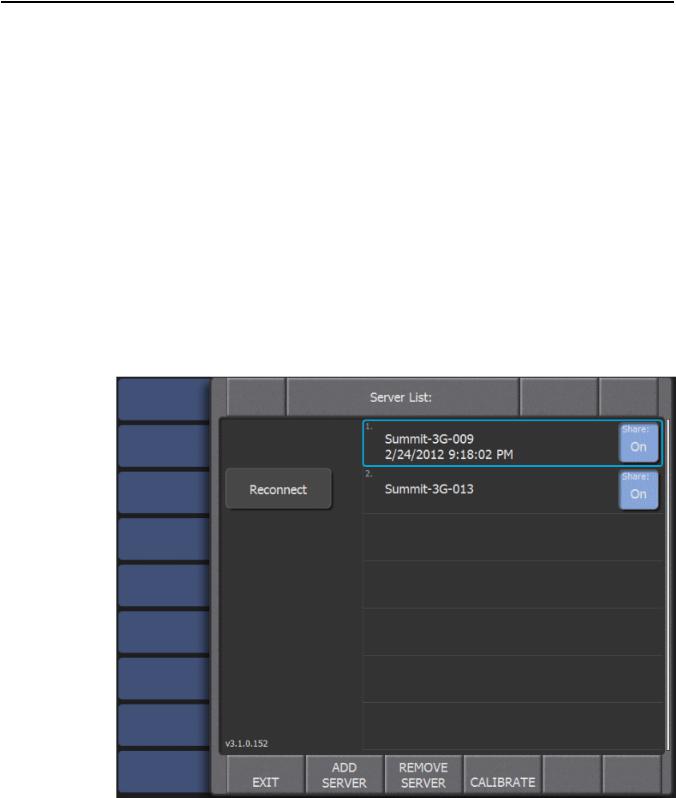
Upon successful login, a list of all K2 Summit systems available on the network appears.
The most recently connected K2 Summit system appears at the top of the list.
20140207 |
K2 Dyno S User Manual 15 |

Dyno Startup
4.Select Share SoftKey to share the local server.
•If this is not the first time the K2 Summit system and the K2 Dyno S Replay Controller has been paired, K2 Dyno S Replay Controller gives you the option to reconnect to a local server.
•IfK2SummitsystemandK2DynoSReplayControllerhavebeenpreviouslypaired,proceed with your Session.
5.Select Add Server SoftKey and type the name of the missing K2 Summit system, if the local K2 Summit system or any K2 Summit system fails to show up in the server registry.
6.For ShareFlex user, type in the K2 Summit system name used in the Host Table.
Open or New session
After configuring and choosing Servers, the next screen addresses Session options.
1.If you are entering a previous Session, select the Session to be reactivated and select the Open session SoftKey.
The record, trains, highlights, and playlists of the Sessions are restored.
2.Select New Session SoftKey if you are configuring a new Session.
By default, a new Session is created with the same channel configuration as the last Session.
About session channels
Thecentreofthescreenistodefinethechannelsoftheserver. Theoptionsavailableforconfiguration are limited to the settings on the server.
This setting is found on the server under the K2 AppCenter system flag, then see Channel and Type for the configuration information.
The first column of boxes is the ON or OFF selections for each channel. When a channel is OFF, the K2 Dyno S Replay Controller no longer controls that channel.
The next column defines the Channel function and, depending on the server setting, the choices can be Player, Recorder, or multichannel recorder.
Pressing Start launches the session but it will not place the server in a state of record.
16 K2 Dyno S User Manual |
20140207 |
Dyno Startup
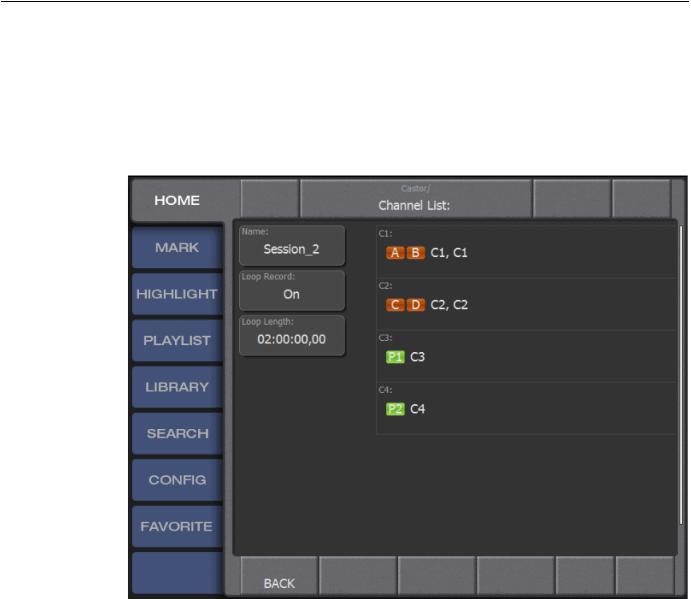
Configure Session Channels
1.Select Session name SoftKey.
A touch-screen keyboard displays.
2.Select the Name box, type a name for the session, and then press Enter.
3.Set Loop Record as follows:
a)Set the Loop Record box to On to recycle record space after a given record duration. The Loop Length box is enabled.
b)Select the Loop Length box and type the record duration before the record train is recycled. You cannot access the record train beyond this point.
When Loop Record is on, unreferenced media is discarded after the specified loop record length.
4. Press Start to begin the session.
To turn Loop Record on or off while the session is active, on the CONFIG screen select CHAN LIST.
20140207 |
K2 Dyno S User Manual 17 |

Dyno Startup
About loop modes in K2, Dyno, and GV STRATUS
Support for loop modes varies on Grass Valley products.
Grass Valley products provide features for putting an asset into a loop mode. Products and their loop modes are as follows:
•K2 AppCenter:
•Loop play: Allows the clip to play in a continuous loop until stopped.
•Continuous record: Allows you to specify a fixed-length recording that records continuously. When the fixed length you specify is reached, AppCenter begins to erase the oldest media in 3 minute segments to make room for new media.
•GV STRATUS:
•Loop play (Loop Playback): Loops the current asset between mark in to mark out.
•K2 Dyno:
•Loop record (LoopRec): Same as K2 AppCenter Continuous record.
While the GV STRATUS application can access the same K2 Storage as K2 AppCenter and K2 Dyno, the GV STRATUS application does not support a recording loop mode. Therefore, in the GV STRATUS application, do not attempt to access an asset while it is in a loop record mode. The asset can be put into this type of loop mode by K2 Dyno or K2 AppCenter.
Deleting a Session during startup
You can delete all non-essential Sessions from the Sessions list as follows:
1.Select the session from the list and tap the DELETE softkey.
2.To delete all Sessions currently on the server, press Shift function of the DELETE SoftKey.
Deleting a session while in an active session
To recover space, delete the non-active sessions.
1.To delete the non-active sessions while in an active session, open the CONFIG screen.
2.Tap SESSIONS.
The Sessions list page appears, listing all Sessions currently on the server.
3.Select the session you are deleting and tap DELETE.
You cannot delete an active session, indicated by the word in use in yellow.
18 K2 Dyno S User Manual |
20140207 |
Home Screen
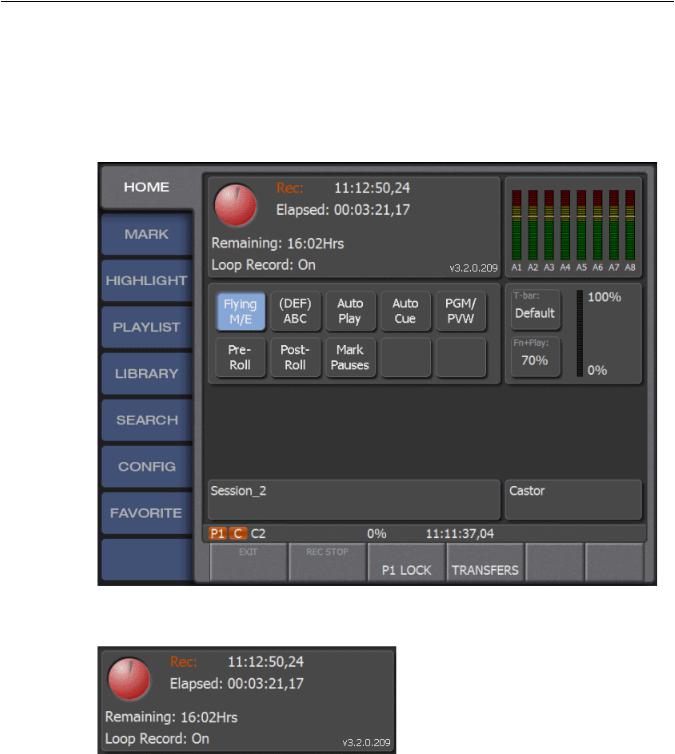
About the Record Status section
On the Home screen, the Record Status section displays key information about the recording status of the Dyno.
Status indicators are as follows:
20140207 |
K2 Dyno S User Manual 19 |

Home Screen
Time Dome Represents the record space available. In continuous record mode, the wedge shape grows as the record space is utilized. The larger the wedge, the smaller the amount of the record space is available.
Rec: Red text indicates recording is underway.
Elapsed: The time that has passed since the start of the recording.
Remaining: The actual amount of record time available, where this record time is divided across the number of record streams in the configuration.
20 K2 Dyno S User Manual |
20140207 |
Home Screen
Adjusting audio output
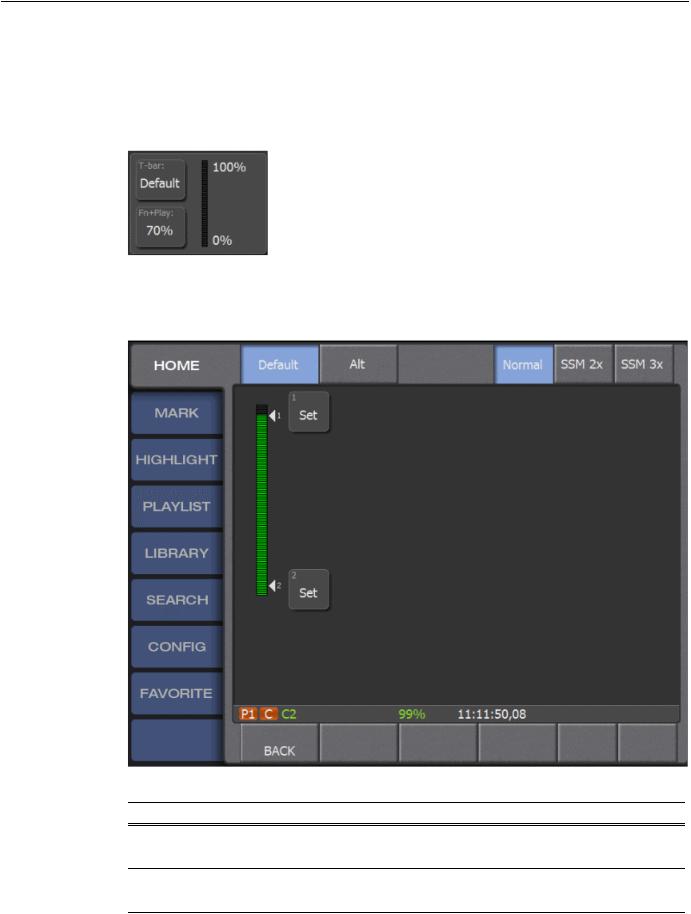
1. On the HOME screen, tap the audio meters section.
The Audio panel opens.
The audio output adjustment is selected by default.
2.Tap audio meters to select the channels you are adjusting.
3.Adjust audio output on the selected channels as follows:
•Select + or - to change the audio output level.
•Select Mute to silence the audio output.
•Select Reset to restore both input and output audio to their default levels.
20140207 |
K2 Dyno S User Manual 21 |
Home Screen
Adjusting the audio record levels
1. On the HOME screen, tap the audio meters section.
The Audio panel opens.
The audio output adjustment is selected by default.
2.Tap audio meters to select the record channels (A,B,C,D) with the record train you are adjusting.
3.Adjust audio audio record levels on the selected channels as follows:
•Select + or - to change the audio record level.
•Select Reset to restore both input and output audio to their default levels.
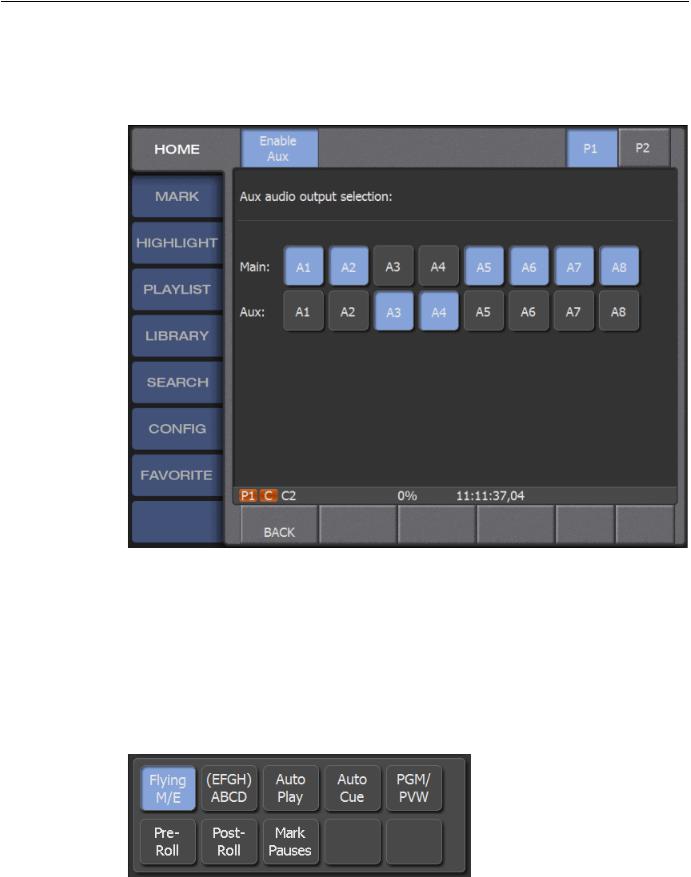
Assigning Aux Channels
1. On the HOME screen, tap the audio meters section.
The Audio panel opens.
22 K2 Dyno S User Manual |
20140207 |
Home Screen
2.Select SHOW AUX.
The Aux audio panel opens.
3.Select the pair of channels from the visible audio channels to be the source for Playlists Aux audio.
4.Select BACK to return to the Audio panel.
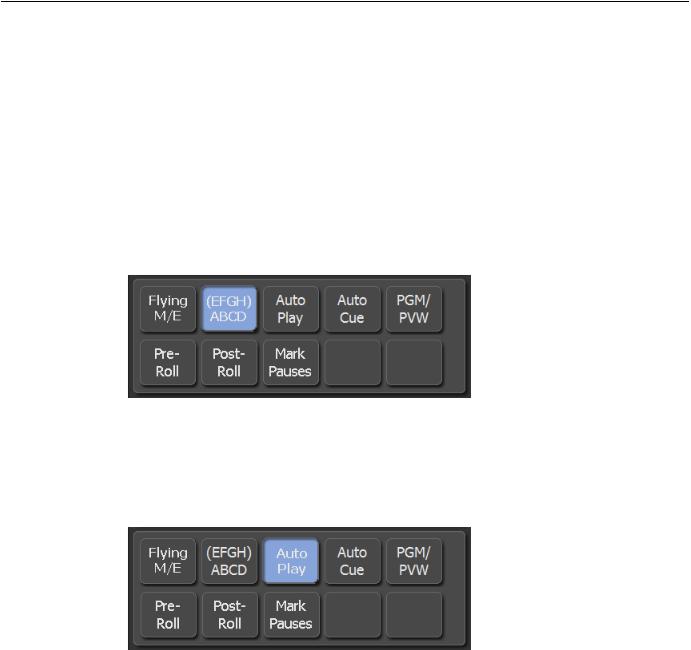
Setting Flying M/E
When Flying M/E is selected, you can preset effect transitions between playback channels. Effects are added when switching record streams during the replay of an item.
1. On the HOME screen, select Flying M/E.
2.To configure the effect for Flying M/E, select CONFIG | EFFECTS. The Effects panel opens.
20140207 |
K2 Dyno S User Manual 23 |
Home Screen
3. For the Flying ME option, make changes to the effect duration and effect type as desired.
Related Topics
Effects settings on page 37
Setting ABCD(EFGH)
This setting grants default status to record channels to EFGH to the ABCD buttons. It also allows access to the upper channels without using the Shift key.
On the HOME screen, select ABCD.
Setting Auto Play
When this setting is selected, any cued element is immediately played.
On the HOME screen, select Auto Play.
Related Topics
Recalling clips on page 55
24 K2 Dyno S User Manual |
20140207 |

Home Screen
Setting Auto Cue
When this setting is selected, an item is automatically cued with a tap.
On the HOME screen, select Auto Cue.
Related Topics
Recalling clips on page 55
Setting Pre-Roll
When this setting is selected, a pre-roll adds to the clip. 1. On the HOME screen, select Pre-Roll.
NOTE: The Pre-Roll and clip duration cannot exceed the guard band duration.
2. To configure the pre-roll duration, select CONFIG | CLIP.
Related Topics
Clip settings on page 35
20140207 |
K2 Dyno S User Manual 25 |
Home Screen
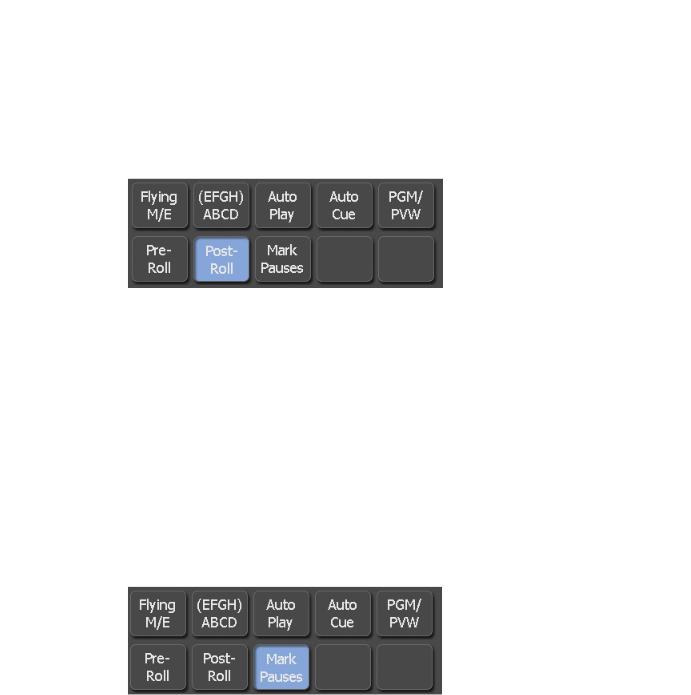
Setting Post-Roll
When this setting is selected, a post-roll adds to the clip. 1. On the HOME screen, select Post-Roll.
NOTE: Whenthe Post-Roll isturnedon,themarkoutpointoftheclipisignored. Theplayback stops at the end of the guard band marker.
2. To configure the post-roll duration, select CONFIG | CLIP.
Related Topics
Clip settings on page 35
Setting Mark Pauses
When this setting is selected, you can mark clip pauses. Pauses registered in the Marks tab will now act as pause points.
Pauses can also become part of the property of a clip angle, and each angle can have its own pause points.
1. Play a clip, and select Mark Pauses on the HOME screen.
2.Use the Play button or T-bar to continue playback after the video has stopped.
3.To add a pause point to a clip angle, cue a clip and press Fn+Mark.
About the T-bar
The T-bar is a lever bar to control playback speed. When you touch the T-bar, it immediately takes control of the speed of the active player channel. Make sure you do not inadvertently touch the T-bar, as doing so changes the playback speed to the programmed speed of the T-bar. The T-bar can be preset with two playback speed configurations: default and alternate. The positions of bar operations can be fine-tuned.
26 K2 Dyno S User Manual |
20140207 |
Home Screen
Configuring T-bar settings: default and alternate
1. On the HOME screen, tap the T-bar section.
The T-bar panel opens.
2.To configure default T-bar settings, select Default. The T-bar default configuration screen opens.
3. Change default settings as follows:
Options |
Description |
Maximum speed |
Advance the T-bar to set the maximum speed and tap the top Set |
|
box. |
Minimum speed |
Pull the T-bar back to the position of the desired minimum speed |
|
and tap the lower Set box. |
20140207 |
K2 Dyno S User Manual 27 |
Home Screen
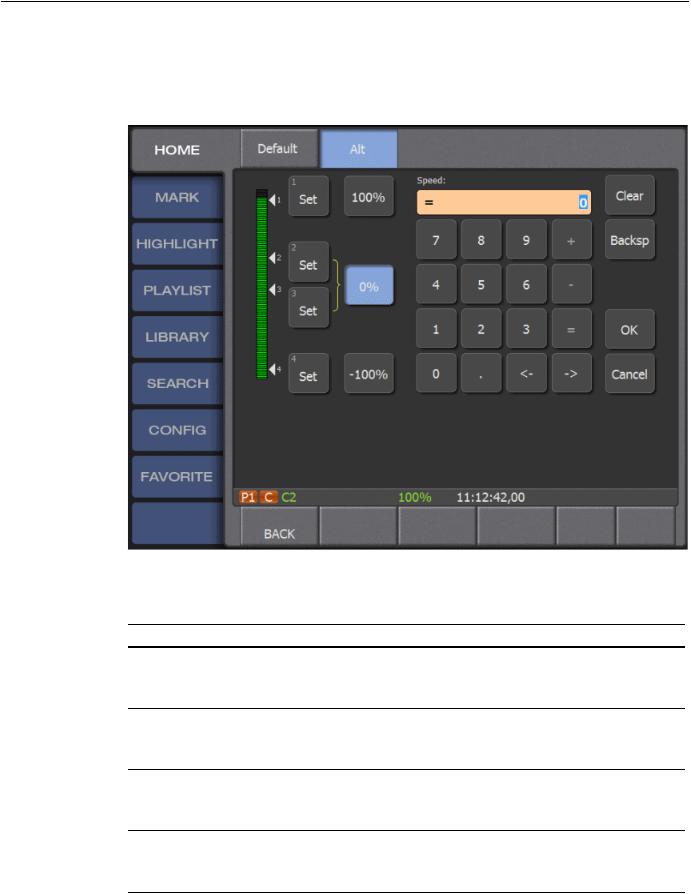
4.To configure alternative T-bar settings, select Alt. The T-bar alternative configuration screen opens.
The four Set boxes set the custom speeds on the path of the T-bar, as indicated by their position on the graphic range bar.
5. Move the T-bar to a position and tap a Set box to change settings as follows:
Options |
Description |
Highest speed |
Tap the top Set box to set the T-bar to top speed position. Select the |
|
adjacent speed button and enter a speed in percentage for this T-bar |
|
location, then press OK. |
Upper middle speed |
Move the T-bar down to the top of the middle range and tap the upper |
|
middle Set box. Select the adjacent speed button and enter a play back |
|
speed in percentage for the middle range of the T-bar, then press OK. |
Lower middle speed
Lowest speed
Move the T-bar lower down the bottom of the middle of the range and tap the lower middle Set box. The adjacent speed button displays the play back speed in percentage for the middle range of the T-bar.
Move the T-bar to the lower limit and tap the lowest Set box. Select the adjacent speed button and enter a speed in percentage for this T-bar location, then press OK.
28 K2 Dyno S User Manual |
20140207 |
Home Screen
Stopping all recording processes
Open the HOME screen or the CONFIG screen, press the Shift button, then tap REC STOP.
Related Topics
Shutting the system down on page 97
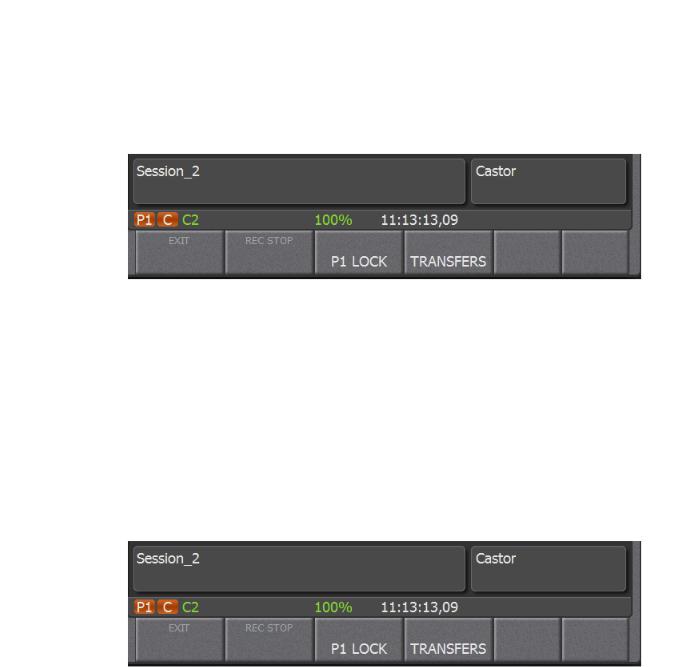
Locking player channels
When you lock the active player channel, either P1 or P2, you lock out all playback functions from the Dyno on that channel. It is possible to lock one playback channel and leave the other active or lock both playback channels.
NOTE: You cannot lock player channels while channels are ganged. Only P1 or P2 can be selected for locking.
Press the desired P1 or P2 button, then on the HOME screen, select the SoftKey labeled P1 LOCK or accordingly.
Related Topics
Shutting the system down on page 97
20140207 |
K2 Dyno S User Manual 29 |
Home Screen
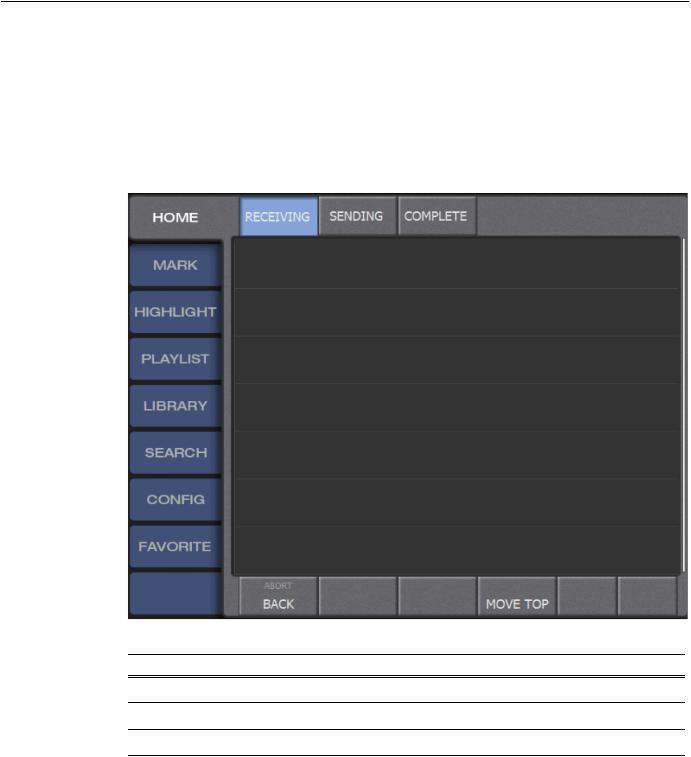
Monitoring and managing transfers
1.To monitor the transfers of elements both to and from the Dyno, on the HOME screen, tap the
TRANSFERS softkey.
The Transfers panel opens.
2. To monitor the transfers functions, select any of the following softkeys:
Options |
Description |
Receiving |
Displays the progress of incoming transfers and their location. |
Sending |
Monitors transfers that are sent to another location. |
Completed |
Shows all completed transfers. |
30 K2 Dyno S User Manual |
20140207 |
Loading...