


6 75
Cleaning
Before cleaning disconnect the device from AC mains. The
Outside of the charging station can be cleaned with a damp,
Soft and lint free cloth to disinfect the unit. Dipping the unit
into solutions or cleaning agents is not allowed! Periodically
check the charging station, making sure that no sign of corrosion or oxidation and dust is present, in case they are present,
it is highly recommended to clean the charger.
Do not use abrasive Ultrasonic cleaners, alcohol or other
chemicals to clean the unit as this may degrade the outside
surface of the charger, as they will scratch the surface.
Autoclaving and Flash sterilization the charger result in severe
electrical damages.
Storage
Since the product is made of corrosion-proof materials suitable for the environmental conditions foreseen for its normal
use, does not require special care, however it is necessary to
store it in such a way to make sure that it is protected from
dust, and water to assure its hygienic conditions and protection against short circuit. Moreover, it is recommended to
place the charger without batteries.
Use and Maintenance
• Use hospital grade plugs only.
• Handle the charger carefully as it contains circuit for charging battery.
• Any unauthorized modication/service is not allowed because it may cause short circuit that may damage the equipment, so always contact the authorized person or send the
unit back to the manufacturer for repair.
• Disconnect the charger from main supply prior to any maintenance.
• Charger is not suitable for use in the presence of a ammable anesthetic mixture with air or oxygen or nitrous oxide. An
explosion may result.
• Examine the charging station for wear or damage monthly.
Clean the charger once in a week according to the Cleaning
Section of this manual.
• Do not charge dry cells.
Product code
Lot number
Serial number
Caution: read instructions (warnings) carefully
Manufacturer
Keep in a cool, dry place
Keep away from sunlight
Medical Device compliant with Regulation (EU)
2017/745
Follow instructions for use
WEEE disposal
Date of manufacture
Medical Device
Class II applied
Alternating current
Fuses
Direct Current
General Batteries Guidelines
It is not recommended to overcharge or overdischarge batteries. Overheating can cause several damages.
It is recommended to use Gima Batteries.
Batteries that are not used for a long time should be charged
at least once a year to prevent overdischarge.
Technical Specications
Type Lithium Ion
Voltage 2,5V 3,5V 2,5V 3,5V 3,5V
Capacity 1000
Charging
Time
Batteries (small)
mAh
2.5 hours 2 hours 5 hours 3.5 hours 5 hours
700
mAh
Disposal: The product must not be disposed of along
with other domestic waste. The users must dispose
of this equipment by bringing it to a specic recycling
point for electric and electronic equipment.
GIMA WARRANTY TERMS
The Gima 12-month standard B2B warranty applies.
Lithium Ion
Batteries (Medium)
2200
mAh
1500
mAh
Plug-In
1400
mAh
PROFESSIONAL MEDICAL PRODUCTS
ZOOM CHARGER
For Rechargeable Battery Handles 2.5V & 3.5V
All serious accidents concerning the medical device supplied by us
must be reported to the manufacturer and competent authority of
the member state where your registered ofce is located.
31542
Gima S.p.A.
Via Marconi, 1 - 20060 Gessate (MI) Italy
gima@gimaitaly.com - export@gimaitaly.com
www.gimaitaly.com
Made in Pakistan
M31542-GB-Rev.3-05.21
Thank you for purchasing the ZOOM Charger. Please review
this manual prior to use. It does not require any special training
for its use.
Introduction
The Zoom charging station is attractive, modular and easy to
use. It is an intelligent charging station based on smart regulator ICs with accurate charging time and indication of battery
charge status.
Intended Use
The Zoom Charger is intended to Charge standard rechargeable li-ion batteries both 2.5V and 3.5V. It is connected directly
to supply mains 100-240VAC, eliminating the need for adaptors, and charges the batteries in CC and CV mode.
Unpacking
Always remember that packing elements (paper, cellophane,
stitches, adhesive tape, etc.) can cut and/or hurt if they are
not carefully handled. They shall be removed with adequate
means and shall not be left at the mercy of irresponsible persons; the same is valid for tools used to remove packages
(scissors, knives, etc.).
After opening the packages, rst of all it is necessary to check
all piece and parts composing the product. Check that they
are all present and in perfect conditions.
Assembling
Attach the power cord with the charger and insert it in mains
supply. Green LED glows which shows main supply is ON.
Now charger is ready for use.
Operating Instructions
The Zoom Charger is intended for installation in medical areas
outside the patient Environment at least 1.5m from the patient
or patient pursuant to IEC 60601-1, See Figure below.
Do not touch the handle (under charging) and patient at the
same time.
After connecting the power cord with the charging station
and main power source, the charging station is ready to use
(the Green LED indicates, “Stand By” position). After insertion of the battery handle, the LED responsible for the respective charging slot displays the charge state (Red=charging, Green=Charged). When charging is completed, the LED
changes from red to green signifying that the charging handle
is completely charged. Upon inserting the battery handle into
the charging slot, the charging starts automatically. The LED
displays the charging process in RED.
When the charging process is completed, the charging function changes to a trickle charge, which can be seen when
the LED becomes Green. When the batteries to be charged
are completely empty, a higher charging current will be used.
Thus, the charging time (LED Red) will be shortened. In the
trickled charge mode, a lower charging current is used, ensuring a permanently stable state of the cells and protection
against the build up of excessive heat.)
Max. Charging current up to 1A.
Max. Charging voltage up to 4.2V.
2 3 41
Device should be turned off when not in use and to safely
terminate the device, user should unplug the power cord from
AC mains inlet socket in the wall or board.
Specications
Input voltage 100-240V ~ 50/60Hz
Input power 28VA max
Fuse 2 x 250V/1A
Output voltage 4.2V
Charging current 1A max
Protection class II
Dimensions: 170mm (6.7") x 86mm (3.4")
Weight 352g
Power supply cord 250 cm (98.4")
Environment
Operating
Temperature limitation 0°C~40°C
Humidity limitation 5%~70%
Atmospheric pressure limitation 700hPa~1000hPa
Transport / storage
Temperature limitation -20°C~80°C
Humidity limitation 5%~90%
Atmospheric pressure limitation 700hPa~1000hPa
Zoom Charges the Small Batteries in max 2 hours
Zoom Charges the Medium Batteries in max 5 hours
Precautions
The unit should be handled carefully.
The product shall be used by qualied personnel only. Do not
use the equipment in case it is damaged. Apply to your retailer. Avoid precarious repairs. Repairs shall be carried out with
original spare parts only, which shall be installed according to
the intended use.
When placing or replacing the handles in the charging compartments, ensure that the internal contacts in the compartments are clean and that the instrument is switched off.
Do not short the charging pins, it can burn the charging circuit
or cause re. Carefully handle the charger and immediately
replace in case of any damage. Avoid precarious repairs. Re-
pairs shall be carried out with original spare parts only, which
shall be installed according to the intended use. Protect charging pins against short circuiting.
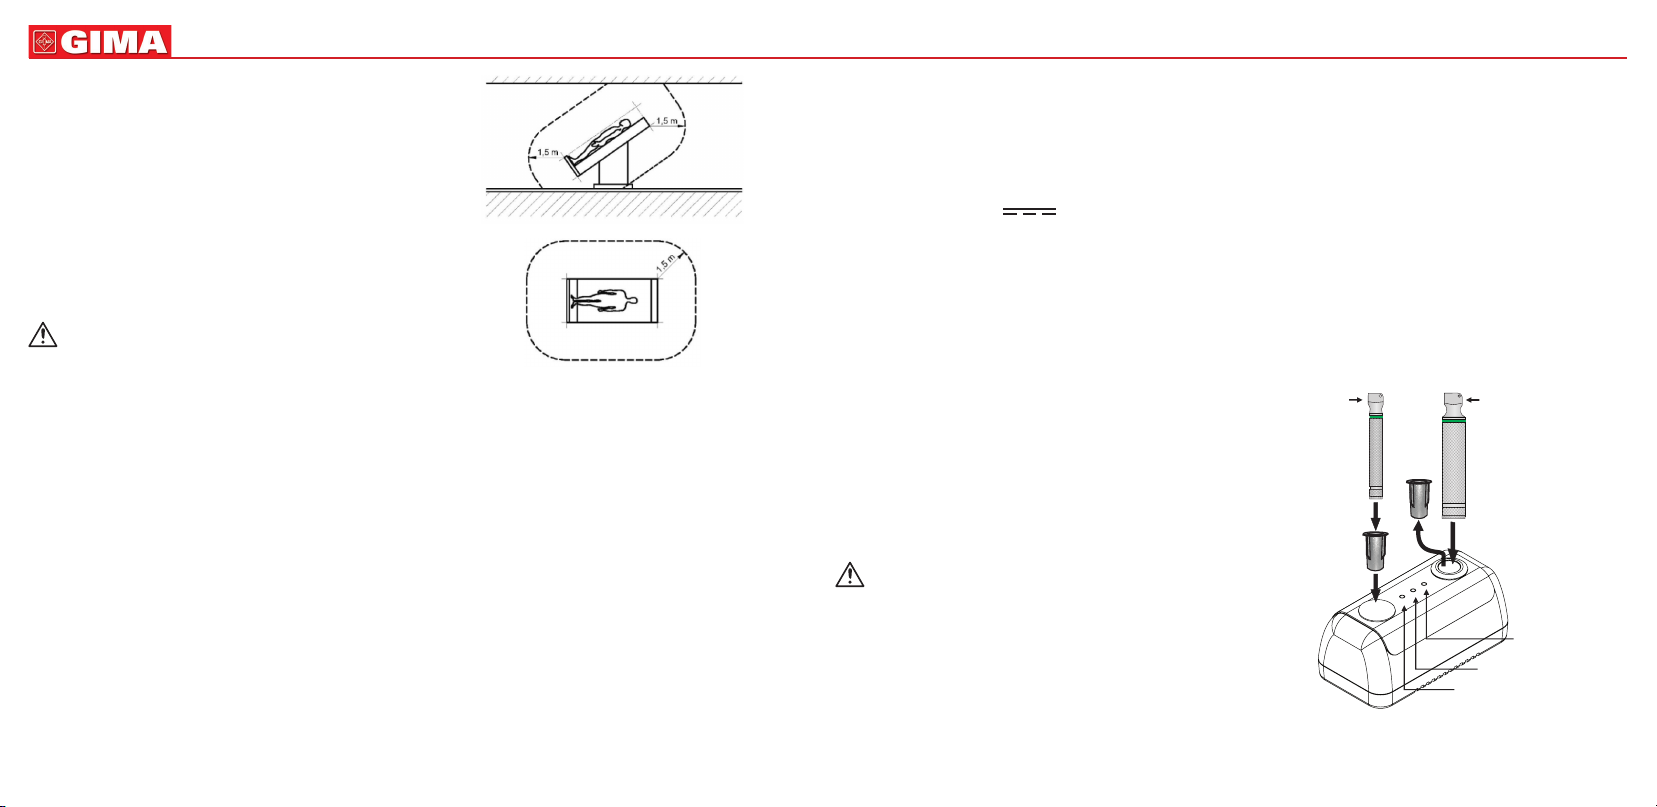
Use of Small and Medium Handle
Small Handle
Insert small handle in the Slot of reducer, which is already inserted in the Slot of “Charging Station’’.
Medium Handle
For medium handle, pull out the reducer from the “Charging
Station’’ and insert medium handle.
The charger is intended to supply power to handle for charging the battery. So the user should not hold the handle in the
charger for more than 30 Seconds.
Before putting the battery handle into charging station please
check the battery, do not put the battery for charging if leaked.
Medium handleSmall handle
Charging light bay-1
Stand by light
Charging light bay-2
Remove the batteries from the handle if not in use for long
time.
 Loading...