


GR120VRQ

1
®
THE LEAN MEAN FAT REDUCING GRILLING MACHINE
®
Please Read and Save this Use and Care Book
Por favor lea este instructivo antes de usar el producto
Models
Modelos
❑GR120V
❑GR120VBQ
❑GR120VPQ
❑GR120VRQ
❑GR120VQVC
For online customer service
and to register your product, go to
www.prodprotect.com/applica
Also view the details for our
latest sweepstakes!
Customer Care Line:
USA/Canada
1-800-231-9786
Mexico
01-714-2500
Accessories/Parts (USA / Canada)
Accesorios/Partes (EE.UU / Canadá)
1-800-738-0245

2
3
IMPORTANT SAFEGUARDS
When using electrical appliances, basic safety precautions should always be
followed, including the following:
❑Read all instructions.
❑Do not touch hot surfaces. Use handles or knobs.
❑To protect against electrical shock do not immerse cord, plugs or appliance in
water or other liquid.
❑Close supervision is necessary when any appliance is used by or near
children.
❑Unplug from outlet when not in use and before cleaning. Allow to cool before
putting on or taking off parts.
❑Do not operate any appliance with a damaged cord or plug, or after the
appliance malfunctions or has been damaged in any manner. Return
appliance to the nearest authorized service facility for examination, repair
or adjustment. Or, call the appropriate toll-free number on the cover of this
manual.
❑The use of accessory attachments not recommended by the appliance
manufacturer may cause injuries.
❑Do not use outdoors.
❑Do not let cord hang over edge of table or counter, or touch hot surfaces.
❑Do not place on or near a hot gas or electric burner, or in a heated oven.
❑Extreme caution must be used when moving an appliance containing hot oil or
other hot liquids.
❑To disconnect, remove plug from wall outlet.
❑Do not use this appliance for other than intended use.
❑The appliance is only to be operated in the closed position.
SAVE THESE INSTRUCTIONS.
This product is for household use only.
POLARIZED PLUG
This appliance has a polarized plug (one blade is wider than the other).
To reduce the risk of electric shock, this plug is intended to fit into a polarized outlet only
one way. If the plug does not fit fully into the outlet, reverse the plug. If it still does not fit,
contact a qualified electrician. Do not attempt to modify the plug in any way.
TAMPER-RESISTANT SCREW
Warning: This appliance is equipped with a tamper-resistant screw to prevent removal
of the outer cover. To reduce the risk of fire or electric shock, do not attempt to remove
the outer cover. There are no user-serviceable parts inside. Repair should be done only
by authorized service personnel.
ELECTRICAL CORD
a) A short power-supply cord (or detachable power-supply cord) is to be provided to
reduce the risk resulting from becoming entangled in or tripping over a longer cord.
b) Longer detachable power-supply cords or extension cords are available and may be
used if care is exercised in their use.
c) If a long detachable power-supply cord or extension cord is used,
1) The marked electrical rating of the detachable power-supply cord or extension
cord should be at least as great as the electrical rating of the appliance,
2) If the appliance is of the grounded type, the extension cord should be a
grounding-type 3-wire cord, and
3) The longer cord should be arranged so that it will not drape over the countertop
or tabletop where it can be pulled on by children or tripped over.
Note: If the power supply cord is damaged, it should be replaced by qualified personnel,
in Latin America, by an authorized service center.
4
5
Product may vary slightly from what is illustrated.
How to Use
This product is for household use only.
GETTING STARTED
• Remove all packing material and any stickers.
• Remove and save literature.
• Please go to www.prodprotect.com/applica to register your warranty.
• Wash all removable parts and/or accessories as instructed in CARE AND CLEANING
section of this manual.
• Wipe grill plates with a damp cloth or sponge to remove any dust. Wipe dry with a soft
cloth or paper towels.
• Select location where unit is to be used, leaving enough space between back of unit
and wall to allow heat to flow without damage to cabinets and walls.
DRIP TRAY
Place the drip tray under the front sloped section of the bottom plate on the grill.
PREHEATING THE GRILL
1. Close cover on grill.
2. Unwind cord and plug into standard electrical outlet. The preheat indicator light
comes on to indicate that the elements are heating.
3. Set temperature control on top of grill to desired grill setting to begin preheating.
(See SUGGESTED GRILL SETTINGS.)
4. Allow the grill to preheat (approximately 4 minutes) before grilling. When the desired
temperature is reached, the preheat indicator light will go out.
Note: The preheat indicator light will cycle on and off during cooking to indicate your
desired temperature is being maintained.
GRILLING
1. Using a pot holder, carefully open the preheated grill.
2. Before first use, lightly oil grill plates, if desired.
Note: Aerosol cooking spray should not be used on nonstick surface. Chemicals that
allow spray to come out of can build up on surface of grill plates and reduce their
efficiency.
3. Carefully place foods to be cooked on lower grilling plate. This grill accommodates
up to 7 servings.
Note: Do not overload grill.
4. Close cover and allow food to cook for desired time. If desired, use a kitchen timer.
Note: Use suggested cooking times found in the GRILLING CHART on pages 6, 7 and 8.
Important: Do not leave the appliance unattended during use.
5. Light pressure can be used on the handle to press and heat food to your liking.
Important: Do not use heavy pressure on the lid of the grill at any time.
6. After selected time, the food should be done. If you would prefer longer cooking,
simply following the steps, beginning at step 4.
7. Using a pot holder, carefully open the grill cover.
8. Remove cooked food using plastic spatula provided.
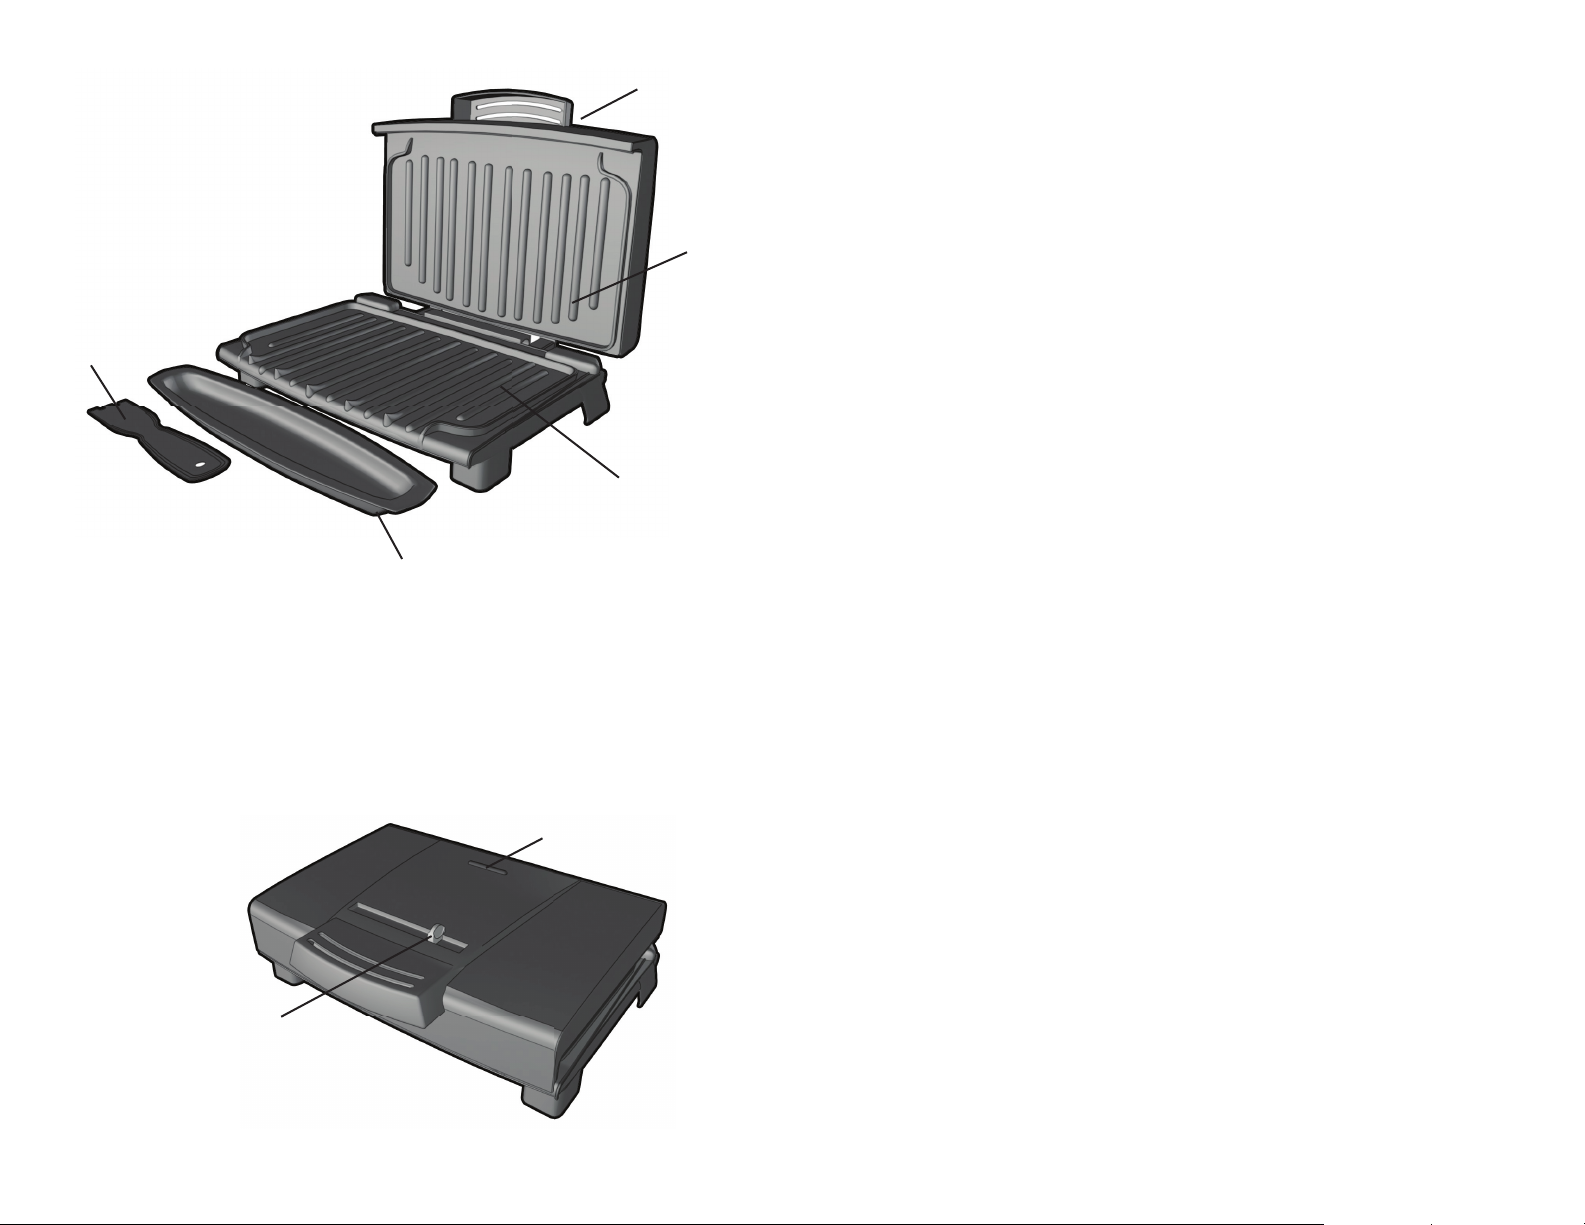
1. Grill cover (lid)
2. Grill plate (upper)
3. Grill plate (lower)
4. ON/OFF switch (not shown)
† 5. Drip tray (Part # GR180V-01)
† 6. Spatula (Part # GR180V-02)
Note: † indicates consumer replaceable/removable parts
5
3
2
6
1
A
2
1
1. Preheat indicator light
2. Variable temperature control
B

6
7
Note: Always use nylon, heatproof plastic or wood utensils to avoid scratching nonstick
surface of grill plates. Never use metal skewers, tongs, forks or knives.
9. When finished cooking, slide the temperature control to the MIN setting and unplug
the appliance.
Important: Heat continues to be ON until grill is unplugged.
10. Allow drip tray to cool before removing it from under grill. Wash and dry drip tray
after each use.
SUGGESTED GRILL SETTINGS
MIN: Use to reheat fully cooked foods.
MIN – Mid: Sandwiches and wraps.
Mid: Fish
Mid – MAX: Fruits, vegetables, meat and poultry
SUGGESTED GRILLING CHART
The following are meant to be used as a guideline only. The times reflect a full grill
of food. Cooking time will depend upon thickness and cut being used. Use a cooking
thermometer as a test for doneness. If the food needs longer cooking, check periodically
to avoid overcooking the food.
FOOD COOKING TIME SETTING COMMENTS
MEAT
Hamburger (5 oz.) 4 – 6 minutes MAX ¾-inch thick
Cooked to medium
(160ºF / 71ºC)
Frozen Hamburgers (5 oz.) 5 – 6 minutes MAX ¾-inch thick
Cooked to medium
(160ºF / 71ºC)
Flank steak (¾ lb.) 6 – 8 minutes MAX ¾-inch thick
Cooked to medium
rare (145ºF / 63°C)
Skirt steak (½ lb.) 4 – 6 minutes MAX ¾-inch thick
Cooked to medium
(160ºF / 71ºC)
NY Strip Steak (Shell
Steak) 6 oz.
6 – 8 minutes MAX ¾-inch thick
Cooked to medium
rare (145ºF / 63ºC)
Beef Tenderloin (5 oz.) 4 - 6 minutes MAX ¾-inch thick
Cooked to medium
rare (145ºF / 63ºC)
Beef Kabobs 5 – 7 minutes MAX Cooked to medium
(160ºF / 71ºC)
FOOD COOKING TIME SETTING COMMENTS
Pork loin chops, boneless 4 – 6 minutes Mid-MAX ¾-inch thick
Cooked to 160ºF
(71ºC)
Pork loin chops, bone in 4 – 6 minutes Mid-MAX ½ -inch thick
Cooked to 160ºF
(71ºC)
Sausage, link or patty 4 - 6 minutes Mid-MAX Cooked to 160ºF
(71ºC)
Hot dogs 4 – 5 minutes Mid-MAX Cooked to 168ºF
(76ºC)
Bacon 6 – 8 minutes Mid-MAX Cooked until just
crisp
Smoked pork loin chops,
boneless
4 – 6 minutes Mid-MAX Cooked to 160ºF
(71ºC)
Lamb chops, loin 5 – 7 minutes MAX ¾-inch thick
Cooked to medium
(160ºF / 71ºC)
POULTRY
Chicken breast, boneless
and skinless (8 oz.)
11 – 13 minutes Mid-MAX Cooked to 170º F
(77ºC)
Chicken tenderloins (4 to 6
pieces)
4 – 6 minutes Mid-MAX Cooked to 170ºF
(77ºC)
Turkey tenderloin (¾ lb.) 9 – 11 minutes Mid-MAX Cooked to 170ºF
(77ºC)
Turkey burgers (5 oz.) 4 – 6 minutes Mid-MAX Cooked to 170ºF
(77ºC)
FISH
Tilapia fillets (6 oz., ea.) 5 – 7 minutes Mid Cooked to 145ºF
(63ºC)
Trout fillet (6 oz.) 4 – 6 minutes Mid Cooked to 145ºF
(63ºC)
Salmon fillet (8 oz. piece) 5 – 7 minutes Mid Cooked to 145ºF
(63ºC)
Salmon steak (6 – 8 oz.) 7 – 9 minutes Mid-MAX Cooked to 145ºF
(63ºC)
Tuna steak (6 oz.) 4 – 6 minutes Mid-MAX Cooked to 145ºF
(63ºC)
Shrimp 3 – 4 minutes Mid-MAX Cooked to 145ºF
(63ºC)
 Loading...