


General Rs35, Ds20a, Ds15, Rs15, Rs20a Owner's Manual
...Elite Steam Residential Steam Humidifiers
User manual

We wish to save you time and money!
We can assure you that the thorough reading of this manual will guarantee correct installation and safe use of the product described
WARNINGS
BEFORE INSTALLING OR HANDLING THE HUMIDIFIER PLEASE CAREFULLY READ AND FOLLOW THE INSTRUCTIONS AND SAFETY STANDARDS DESCRIBED IN THIS MANUAL AND ON THE LABELS ATTACHED TO THE Elite Steam.
CAUTION: ALWAYS DISCONNECT THE MAIN POWER BEFORE OPENING OR SERVICING THE HUMIDIFIER!
Elite Steam produces non-pressurized steam by means of electrodes immersed in the water contained in the plastic steam generator cylinder. Electric current passes through the water between the electrodes, heating the water into steam, which is then used to humidify the air.
The quality of the water used affects the operation of this unit, so the Elite Steam may be supplied with untreated water, as long as this is drinkable and not softened or demineralized. The water converted into steam is automatically replaced through an electric fill valve. Periodically, based on the water quality, the unit will also drain some water to dilute the build-up of minerals in the steam generator and thus extend its life. This humidifier has been designed exclusively to directly humidify rooms or ducts, using a distribution system. The installation, use and maintenance operations must be carried out according to the instructions contained in this manual and on the labels applied internally and externally.
IMPORTANT: BEFORE beginning installation:
•Check for shipping damage to cartons. Mark the shipping waybill accordingly.
•Open cartons and check for any hidden damage. Mark the shipping waybill accordingly.
•Check packing slip to ensure all items have been received. Notify General Filters of any shortages or damaged parts. You must notify General
Filters within 5 working days of any shortages.
The conditions of the environment and the power supply voltage must comply with the specified values listed on the data label in the humidifier. All other uses and modifications made to the humidifier that are not authorized by the manufacturer are considered incorrect, and the manufacturer assumes no liability for the consequences of any such unauthorized use.
Please note that the humidifier contains powered electrical devices and hot surfaces.
All service and/or maintenance operations must be performed by qualified personnel who are aware of the necessary precautions and are capable of performing the operations correctly.
Disconnect the humidifier from the main power supply before accessing any internal parts. The humidifier must be installed in accordance with all local and national standards.
The humidifier is made of metallic and plastic parts. All parts must be disposed of according to the local and national standards for waste disposal.
WARNING: Your humidifier requires water to operate. Do NOT mount it above materials or machinery that could be damaged if a leak occurs. Carel assumes no responsibility for consequential or inconsequential damage as a result of any leaks.
Disposal of the parts of the humidifier: the humidifier is made up of metallic and plastic parts. All parts must be disposed of according to the local standards on waste disposal. Warranty on materials: 2 years (from the date of production, excluding the consumable parts).
3
CONTENTS
1. |
How The Elite Steam Works .................................................................................................................. |
7 |
|
2. |
Models............................................................................................................................................ |
8 |
|
3. |
Installation ...................................................................................................................................... |
9 |
|
|
3.1 |
Positioning ................................................................................................................................... |
9 |
|
3.2 |
Mounting .................................................................................................................................... |
10 |
|
3.3 |
Plumbing .................................................................................................................................... |
11 |
|
3.4 |
Steam distribution ......................................................................................................................... |
12 |
|
3.5 |
Power wiring................................................................................................................................ |
14 |
|
3.6 |
Control wiring .............................................................................................................................. |
15 |
|
3.7 |
Wiring Connections: ....................................................................................................................... |
16 |
4. |
Start-Up ......................................................................................................................................... |
17 |
|
|
4.1 |
Startup Checklist........................................................................................................................... |
17 |
|
4.2 |
The Elite Steam Controller ............................................................................................................... |
17 |
|
4.3 |
Starting Elite Steam ....................................................................................................................... |
18 |
|
4.4 |
Starting with a new cylinder ............................................................................................................. |
18 |
5. |
Operating Elite Steam ........................................................................................................................ |
18 |
|
|
5.1 |
Displaying Information .................................................................................................................... |
18 |
|
5.2 |
Changing The Maximum Production..................................................................................................... |
18 |
|
5.3 |
Activating Manual Drain................................................................................................................... |
18 |
|
5.4 |
Resetting the hour counter............................................................................................................... |
18 |
|
5.5 |
E2 Humidistat .............................................................................................................................. |
19 |
|
5.6 |
Alarms ....................................................................................................................................... |
20 |
6. |
Trouble-Shooting .............................................................................................................................. |
21 |
|
7. |
Maintenance.................................................................................................................................... |
22 |
|
|
7.1 |
Periodic checks............................................................................................................................. |
22 |
|
7.2 |
Cylinder maintenance..................................................................................................................... |
22 |
|
7.3 |
Replacement Parts ........................................................................................................................ |
23 |
8. |
Technical Specifications...................................................................................................................... |
24 |
|
5

1. How The Elite Steam Works
Elite Steam is an electrode humidifier. It produces steam for humidification by passing electric current through the water in the steam plastic generator cylinder between metal electrodes. There are no heating elements. Steam output is directly proportional to the conductivity of the water, and the amount of electrode immersed in the water.
On a call for humidity, the Elite Steam controller will open the water fill valve (1) and allow water to enter the cylinder. A flow restrictor (2) prevents the unit from filling too quickly or with too much pressure. The water flows up the fill tube (3) and into the fill cup (7). Water then flows over the dam in the fill cup (7), which creates a 1” air gap to prevent backflow of contaminated water into the feed lines, and through the fill tube (4) and into the bottom of the steam cylinder (11). Any backflow or overflow of water travels through the overflow hose (5) to the drain.
As the water fills the cylinder, it will reach the electrodes (10) and current will begin to flow. As the water continues to fill the cylinder, the current will increase, and this is monitored by an amperage transformer connected to one of the power wires (9) and located on the electronic controller. When the desired current is reached, the fill valve will close (1) and the water will then begin to warm and produce steam. If the water reaches the cylinder full probes (8) prior to reaching the desired current level, the fill valve (1) will be closed to prevent overflow and the drain valve (13) will be opened to drain away some water so as to move the water apart from the cylinder’s top. If the current rises too much as the water fills the cylinder, the drain valve (13) will be activated to drain away some water and reduce the current flow to acceptable levels. Note that, any time the drain valve is activated, the tempering valve (14) will be opened for tempering the hot drained water down to 140 °F / 60 °C in accordance to local and national standards.
10
12
11
9 |
8 |
7 |
|
|
6 |
|
|
5 |
|
|
4 |
|
|
3 |
|
|
15 |
|
|
2 |
|
|
14 |
13 |
|
1 |
Fig. 1.a
Periodically, based on the incoming water conductivity, the unit will open the drain valve (13) and drain some water to reduce the mineral concentration. A strainer (12) in the cylinder helps to prevent mineral debris from jamming the drain valve (13).
In case Elite Steam remains powered but idle, i.e. without producing steam, for more than 72 hours (3 days), the cylinder will be emptied to not have stagnant water inside.
If there is no water in the cylinder, there will be no current flow and no steam production. The electrodes do not burn out, but they will eventually become completely coated with mineral and the cylinder will then need to be replaced or cleaned.
2
3
1
4
7 |
5 |
|
6 |
Fig. 1.b
No. Description
1Steam generator cylinder
2Room blower/manifold (optional)
3User interface/display
4On/Off, SET buttons
5Fill & tempering valves
6Fill & drain connections
7Drain valve
Tab. 1.a
7

2. Models
There are two basic models for steam distribution:
Duct Injection
|
Fig. 2.a |
Elite Steam comes in two capacities and voltages: |
|
DS35 |
Duct Steam Injection, 35 gallons per day, (12 Lbs per hour), 220-240V. |
RS35 |
Room Steam Discharge, 35 gallons per day, (12 Lbs per hour), 220-240V. |
DS20A |
Duct Steam Injection, 20 gallons per day, (7 Lbs per hour), 220-240V. |
RS20A |
Room Steam Discharge, 20 gallons per day, (7 Lbs per hour), 220-240V. |
DS15 |
Duct Steam Injection, 15 gallons per day, (5.5 Lbs per hour), 115-120V. |
RS15 |
Room Steam Discharge, 15 gallons per day, (5.5 Lbs per hour), 115-120V. |
8
Direct Room Discharge
Fig. 2.b
3. Installation
3.1Positioning
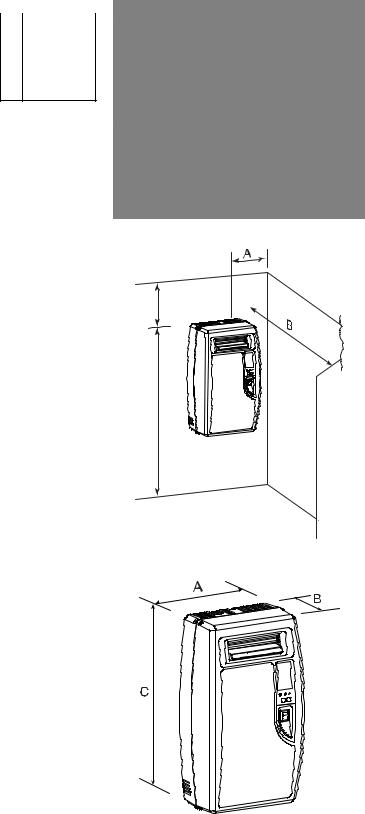
The Elite Steam has been designed for wall mounting and, since it is an atmospheric steam humidifier, should be placed close to the point where the steam will be used, to minimize the steam hose length (and the amount of condensate). Certain clearances must be maintained around the unit for safety and maintenance.
Duct Injection
A |
6” (150 mm) |
B |
6” (150 mm) |
C |
6” (150 mm) |
D |
6” (150 mm) |
E |
24” (600 mm) |
F |
max. 0.2° |
Tab. 3.a
Fig. 3.a
Direct Room Discharge
A |
6” (150 mm) |
|
|
|
B |
36” (900 mm) |
|
D |
|
C |
72” |
(1800 mm) |
|
|
D |
24” |
(600 mm) |
|
|
|
|
Tab. 3.b |
|
|
C
Fig. 3.b
Unit Dimensions: Duct and Room Units:
A |
13.5“ (341 mm) |
|
B |
8.1“ (204 mm) |
|
C |
23.7“ (600 mm) |
|
Weight empty |
18 lbs (8 kg) |
|
Weight packaged |
22 lbs (10 kg) |
|
Weight installed with water |
26 lbs (12 kg) |
|
|
Tab. 3.c |
|
Fig. 3.c
9

3.2 Mounting
3.2.1 Removing the front cover
The front cover is secured by four screws located at the four corners of the unit. Use a phillips head screwdriver to remove the four cover screws. Then simply pull the front cover away from the back part of the unit. Return it in reverse order.
Be careful not to over-tighten the screws.
Fig. 3.d |
Fig. 3.e |
3.2.2 Fastening to the wall
Drill the wall according to the drilling template supplied; then secure Elite Steam firmly to the wall by the screws and anchors supplied.
Fig. 3.f
10
 Loading...