


Parts of the design of this product may be protected by worldwide patents
Information in this manual is subject to change without notice and does not represent a commitment on the part of the vendor. GCI-Technologies shall not be liable for any loss or damage whatsoever arising from the use of information or any error contained in this manual.
No part of this manual may be reproduced, stored in a retrieval system or transmitted, in any form or by any means, electronic, electrical, mechanical, optical, chemical, including photocopying and recording, for any purpose
without the express written permission of GCI-Technologies.
It is recommended that all maintenance and service on the product should be carried out by GCI-Technologies or it’s authorized agents. GCI-Technologies cannot accept any liability whatsoever for any loss or damage caused by service, maintenance or repair by unauthorized personnel.
In the U.S.A., if you have any problems with this unit, call 1-732-346-0061 for customer service. Do not return equipment to your dealer.
WWW.GEMINIDJ.COM
Worldwide Headquarters • 1 Mayfield Ave, NJ 08837 • USA
Tel: (732) 346-0061 • Fax (732) 346-0065
France • GCI-Technologies
2 BIS RUE LEON BLUM, 91120 PALAISEAU, France
Tel: +33 (0) 1-69-79-97-70 • Fax +33 (0) 1-69- 79-97-80
Germany • GCI Technologies GmbH
Lerchenstraße 14 • 80995 München, Munich, Germany
Tel: +49 (0) 89 319 019 80 • Fax: +49 (0) 89 319 019 819
Spain • GCI-Technologies S.A. • Caspe 172, 1A 08013 Barcelona, Spain
Tel: +34-93-436-37-00 • Fax +34-93-347-69-61
UK • GCI-Technologies • Unit 44 The Brambles Enterprise Center, Waterberry Drive, Waterlooville P07 7TH, UK. Tel: 011-44-87-087-00880 Fax: 011-44-87-087-00990
© GCI-Technologies 2009 |
All Rights Reserved |
UHF-116/216 SERIES
UHF-116M
UHF-116HL
UHF-216M
UHF-216HL
OPERATIONS MANUAL MANUAL DE INSTRUCCIONES MANUEL D’INSTRUCTIONS BEDIENUNGSHANDBUCH

2 AdvertenciaWarning |
• Avertissement • Warnungen |
Advertencia • Avertissement • WarnungenWarning 3 |
4 AdvertenciaWarning |
• Avertissement • Warnungen |
Advertencia • Avertissement • WarnungenWarning 5 |
UHF SERIES
English........................ |
4-8 |
Español....................... |
9-14 |
Francais...................... |
15-20 |
Deutsch...................... |
21-26 |
Warranty Card............ |
27-28 |
UHF-116
1
2 3 4
UHF-216 |
5 7 6 |
1 |
|
 3 4 3 4
2
7 |
5 |
7 |
6 |
6 |
Diagrams |
Diagramas • Diagrammes • Darstellungen |
UHF-16-HHM (Handheld Mic)
10 8
9
7
UHF-16BP (Belt Pack) |
|
HSL-08 |
|
|
(Headset/Lavalier) |
|
|
|
|
|
|
10 |
12 |
11 |
|
||
|
|
|
|
|
14 |
15
9
13
7
Diagrams 7
Diagramas • Diagrammes • Darstellungen

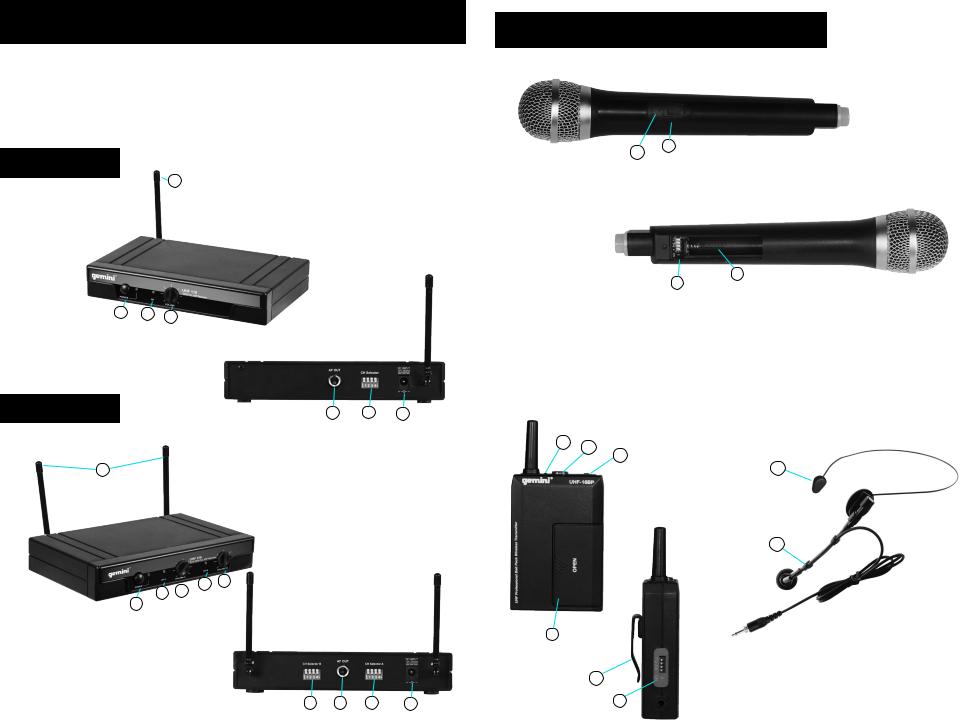
Functions
1Base receiver antennas
2Power ON & LED indicator
3Channel ON LED indicator
4Volume Rotary Dial Control
5AF OUT
6DC INPUT
7Channel Selector
8Microphone MUTE & ON/OFF switch
9Battery cavity
10Power on / Battery Low dual mode LED
11Belt Pack MUTE & ON/OFF switch
12Screw in 1/8” (3.5mm) TRS (Jack)
13Belt clip
14Padded head rest
15Snap-off Lavalier Microphone
Introduction
Congratulations on your purchasing a Gemini wireless system. This system includes the latest features and is backed by a one year limited warranty. Prior to use we suggest that you carefully read all the instructions.
This book includes instructions for both the UHF-116 and the UHF-216 systems.
Caution
1.All operating instructions should be read before using this equipment.
2.To reduce risk of electrical shock, do not open the unit. There are NO USER OR
SERVICEABLE PARTS INSIDE. Please refer servicing to a qualified service technician.
3.Do not expose this unit to direct sunlight or a heat source such as a radiator or stove.
4.Dust, dirt and debris can interfere with the performance of this unit. Make an effort to keep the unit away from dusty, dirty environments, and cover the unit when it is not in use. Dust it regularly with a soft clean brush.
5.When moving this equipment, it should be placed in its original carton and packaging. This will reduce the risk of damage during transit.
6.DO NOT EXPOSE THIS UNIT TO RAIN OR MOISTURE.
7.DO NOT USE ANY SPRAY CLEANER OR LUBRICANT ON ANY CONTROLS OR SWITCHES.
8 Introduction
Presentación • Introduction • Einleitung
Microhone
1.Do not drop the microphone onto a hard surface.
2.Do not strike the microphone head front with fist or fingers, and do not blow strongly into the microphone head front.
3.Do not use the microphone in areas of high humidity and /or high temperature as this could lead to damage of the microphone.
FCC Rules and Regulations
Gemini wireless systems are the type accepted under FCC rules parts 74 and 15. Licensing of Gemini equipment is the user’s responsibility and licensability depends on the user’s classification and application.
This equipment has been tested and found to comply with the limits set forth under part
15 and 74 of FCC rules.
Note
This equipment operates at a frequency that has been authorized by the FCC. However, there is no guarantee that interference will not occur in a particular installation. If this equipment does cause interference to radio or television reception, try one or more of the following suggestions:
1.Repoint or relocate the receiving antenna.
2.Plug the equipment into a socket or a different circuit.
3.Call your dealer to arrange to exchange the unit for one with a different frequency.
Remember, any changes made to the unit without authorization from Gemini will void your warranty.
European Compliance

 0678 !
R & TTed countries
BE, DE, ES, FR, NL, UK
Hereby, GCI Technologies Corp., declares that this PROFESSIONAL UHF WIRELESS SYSTEM is in compliance with the essential requirements and other relevant provisions of Directive 1999/5/EC.The Declaration of Conformity may be consulted at: http://www.geminidj.com/uhf_DoC.pdf
IMPORTANT NOTE: (For European countries only)
A license may be required when using this UHF wireless microphone system in your country. It is your responsibility to ensure that you have the correct license for the frequencies used. Please check the frequency table on Page 10 of this manual.
A license is not required for wireless microphones on UHF frequencies from 863 MHz to 865 MHz, but please visit the following website for more information regarding licensing in you country:
http://www.ero.dk/rtte then follow the “National Frequency Tables” link.
Introduction 9
Presentación • Introduction • Einleitung
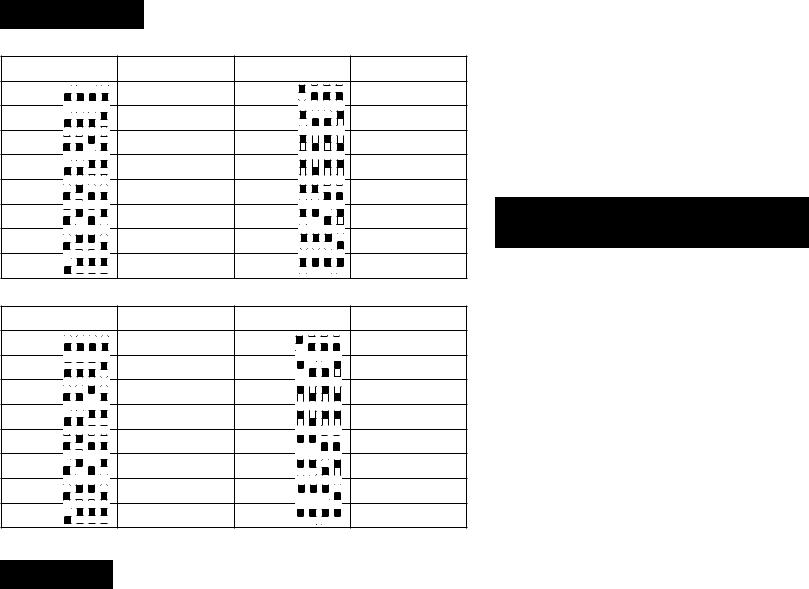
Frequencies |
|
|
|
|
|
US: |
|
|
|
|
|
CHANNEL |
FREQUENCY |
CH (cont.) |
FREQ (cont.) |
||
CH1 |
682.35 |
MHz |
CH9 |
690.1 |
MHz |
CH2 |
683.25 |
MHz |
CH10 |
690.75 MHz |
|
CH3 |
683.85 |
MHz |
CH11 |
691.5 |
MHz |
CH4 |
684.85 |
MHz |
CH12 |
692.5 |
MHz |
CH5 |
685.75 |
MHz |
CH13 |
693.6 |
MHz |
CH6 |
686.6 |
MHz |
CH14 |
694.85 MHz |
|
CH7 |
687.5 |
MHz |
CH15 |
695.7 |
MHz |
CH8 |
688.75 |
MHz |
CH16 |
697.1 |
MHz |
EUROPE: |
|
|
|
|
|
CHANNEL |
FREQUENCY |
CH (cont.) |
FREQ (cont.) |
||
CH1 |
854.1 |
MHz |
CH9 |
860.2 |
MHz |
CH2 |
855.75 |
MHz |
CH10 |
861.3 |
MHz |
CH3 |
856.5 |
MHz |
CH11 |
861.65 MHz |
|
CH4 |
857.35 |
MHz |
CH12 |
862.25 MHz |
|
CH5 |
857.9 |
MHz |
CH13 |
863.05 MHz |
|
CH6 |
858.55 |
MHz |
CH14 |
863.6 |
MHz |
CH7 |
859.05 |
MHz |
CH15 |
864.15 MHz |
|
CH8 |
859.75 |
MHz |
CH16 |
864.7 |
MHz |
Features
HAND HELD TRANSMITTER FEATURES
•High sensitivity cardioid capsule for professional use
•Special noise absorption parts inside the barrels eliminating switch shock and handling noise
•Frequency with quartz locked control
10 System Control
Control de sistema • Utilisation • Systemeinstellungen
HEADSET/ LAVALIER COMBO FEATURES
•Convertible lightweight headset
•Detachable lavalier microphone
•Foam wind and pop control inserts
BELT PACK TRANSMITTER FEATURES
•Audio mute switch
•Power on / Battery Low dual mode LED
UHF-116 SINGLE CHANNEL
WIRELESS SYSTEM
The UHF-116 single channel UHF series wireless system is a high quality audio product that provides excellent performance under most operating conditions.
Two different versions are available and operate on different ranges of UHF frequencies between either 682.35 MHz to 697.1 MHz (US version) and 854.1 MHz to 864.7 MHz (EURO version).
THE MODELS AVAILABLE ARE:
UHF-116M - Which comes equipped with a hand held microphone transmitter.
UHF-116HL - Which comes equipped with a belt pack transmitter and Headset/ lavalier combo.
UHF-116 SINGLE CHANNEL RECEIVER OPERATION:
1.Remove all packing materials. Save the box and packing materials to transport the unit and in case the unit ever requires service.
2.Plug the AC/DC adaptor into the rear of the receiver (6). Then plug the adaptor into an appropriate AC Outlet. Push the Power On (2) button to turn the unit on. The power indicator will be illuminated.
3.Extend the antenna fully vertical and point it out into the direction you will be speaking from.
System Control 11
Control de sistema • Utilisation • Systemeinstellungen

4.Insert the 1/4” cable into the jack labeled AF OUT (5) on the rear of the receiver and connect the other end of the cable to your amp, effects or mixer jack.
5.Set the channel selector pins (7) on both the transmitter and receiver to the desired frequency as indicated on the included
Frequency Chart.
6.Adjust the volume using the level control (4) on the front panel.
Note: Effective range between the transmitter and receiver is up to 250 feet.
UHF-216 DUAL CHANNEL
WIRELESS SYSTEM
The UHF-216 dual channel UHF series wireless system is two separate single channel transmitters of different frequencies transmitting to one unit that houses both frequency receivers. There is also individual level control for each channel.
Two different versions are available and operate on different ranges of UHF frequencies between either 682.35 MHz to 697.1 MHz (US version) and 854.1 MHz to 864.7 MHz (EUROPE version).
THE MODELS AVAILABLE ARE:
UHF-216M - Which comes equipped with (2) hand held microphone transmitters.
UHF-216HL -Which comes equipped with (2) belt pack transmitters and (2) Headset/ lavalier combos.
UHF-216 DUAL CHANNEL RECEIVER OPERATION:
1. Remove all packing materials. Save the box and packing materials to transport the unit and in case the unit ever requires service.
2. Plug the AC/DC adaptor into the rear of the receiver (6) and an appropriate AC Outlet. Push the Power On (2) button to turn the unit on. The power indicator will be illuminated.
3. Extend the two antennas fully vertical and point them towards 12 System Control
Control de sistema • Utilisation • Systemeinstellungen
the direction the performer(s) will be speaking from.
4.Insert the 1/4” cable into the jack labeled AUDIO OUT (5) on the rear of the receiver and connect the other end of the cable to your amp, effects or mixer jack.
5.Set the channel selector pins (7) on both the transmitter and receiver to the desired frequency as indicated on the included
Frequency Chart.
6.Adjust the volume using the level control on the front panel.
Note: Effective range between the transmitter and receiver is up to 250 feet.
Transmitter Operation
HAND HELD TRANSMITTER OPERATION
1.Slide the battery cavity (9) to open. Insert two (2) AA batteries into the battery cavity (9) according to the polarity indication marked on the battery housing.
2.Set the channel selector pins (7) on both the transmitter and receiver to the desired frequency as indicated on the included
Frequency Chart.
3.Close the battery cavity (9).
4.Push the power switch (8) to the ON position. The BATT indicator (10) should flash once briefly as you turn on the mic indicating that the mic has sufficient power. If the BATT stays on, it indicates that the battery has insufficient power and should be changed. If the BATT does not light at all and the mic does not work, it indicates the battery is dead and you should change the battery. The microphone can be muted by setting the switch (8) to the mute position. If the microphone is not going to be used for any length of time, push the power switch (8) to OFF and remove the battery.
Do not switch the mic on and off rapidly, because you wont get a true indication from the BATT indicator.
HEADSET/LAVALIER COMBO AND TRANSMITTER OPERATION
1. Slide the battery cavity (9) to open. Insert two 2 AA batter-
System Control 13
Control de sistema • Utilisation • Systemeinstellungen
 Loading...