


User Manual
imagination at work
GE Digital Camera
Power PRO Series: X2600
EN
BEFORE YOU START
Declaration of Conformity
Responsible Party: |
General Imaging Company |
Address: |
1411 W. 190th Street, Suite 550, Gardena, |
|
CA 90248, U.S.A. |
Customer Service Telephone Number:
+1-800-730-6597
(Outside U.S. & Canada: +1-310-755-6857)
For Customers in the U.S.A.
Tested to Comply with FCC Standards FOR HOME OR OFFICE USE
This device complies with part 15 of the FCC Rules. Operation is subject to the following two conditions: (1) This
device may not cause harmful interference, and (2) this device must accept any interference received, including interference that may cause undesired operation.
For Customers in Europe
"CE" mark indicates that this product complies with the European requirements for safety, health, environment and customer protection. "CE" marked cameras are intended for sales in Europe.
This symbol [crossed-out wheel bin WEEE Annex IV] indicates separate collection of electrical waste and electronic equipment in the European countries. Please do not throw the equipment into domestic refuse. Please use the return and collection systems available in your country for proper, safe disposal of this product.
About this Manual
Thank you for purchasing this GE digital camera. Please read this manual carefully and keep it in a safe place for future reference.
General Imaging Company reserves all rights of this document. No part of this published manual may be reproduced, transmitted, transcribed, stored in a retrieval system or translated into any language or computer language, in any form, by any means, without the prior written permission of General Imaging Company.
 All trademarks mentioned in this manual are used for identificationpurposesonlyandarepropertiesoftheir respective owners.
 This manual provides you with instructions on how to use yournewGEdigitalcamera.Everyefforthasbeenmade to ensure that the contents of this manual are accurate, however General Imaging Company reserves the right to make changes without notice.
Throughout this manual, the following symbols are used to help you locate information quickly and easily:
Indicates useful information.
Indicates precautions are to be taken while operating the camera.

SAFETY NOTES
Safety notes for this camera
•Do not drop the camera or allow it to hit solid objects.
•Do not attempt to disassemble the camera.
•To prevent the camera from being damaged by moisture, do not use or store the camera in very humid environments, such as in rain or near bodies of water.
•Do not use or store the camera in dusty places or on a beach to prevent dust or sand from entering the camera, causing possible damage to it.
•Do not use or store the camera in a hot environment or in direct sunlight.
•Do not use or store the camera near powerful magnetic fields,forexamplenearamagnetortransformer.
•Avoid touching the lens of the camera.
•Do not expose the camera to direct sunlight for a long period time.
•Turnthecameraoff,removethebatteryandthememory card, and dry it within 24 hours if water accidentally comes in contact with the camera.
•When you take the camera from a cold place to a warmer environment, condensation may occur. Please wait for a reasonable period of time before you power the camera on.
•When you use the camera, remove the battery if it overheats. Wait until the battery and camera cool down.
•Download your photos and remove the memory card when you are going to store the camera for a long period of time.
•Store the camera in a dry environment and place it on a flatsurfacewhenyouaregoingtostorethecamerafora long period of time.
•Before you remove the battery and memory card, the camerashouldbeturnedoff.
•When you clean the body of the camera, do not use abrasive, alcohol-based or organic cleaner.
•Use the professional lens wiping cloth and dedicated cleaner to wipe and clean the lens.
Safety notes for battery
•To prevent the battery from being damaged, do not drop the battery or allow it to hit solid objects or to be scratched by other objects.
•Do not let the battery come in contact with metal objects (including coins) to avoid short circuiting, discharging, excessive heat or possible leakage.
•Do not attempt to disassemble the battery.
•Do not expose the battery to water. Always keep the battery contacts dry.
•Donotheatthebatteryorthrowitintoafiretoavoida possible explosion.

•Do not store the battery in a hot environment or in direct sunlight.
•Only use the supplied battery.
•If the rechargeable Li-ion battery supplied with the camera needs to be replaced, contact the retailer or the customer service number listed in this manual.
•If the rechargeable Li-ion battery in this camera overheats during charging, stop charging immediately and wait until it cools down to resume charging.
•When the camera is stored for a long period of time, remove the battery and keep it in a dry place that is not accessible to the infants and children.
•In a colder environment, the performance of the battery could be noticeably reduced.
•When you install the battery, install it according to the positive and negative markings on the battery compartment. Never force the battery into the battery compartment.
Safety notes for memory card
•Do not drop the memory card or allow it to hit solid objects to avoid damaging it.
•Do not attempt to disassemble or repair the memory card.
•Do not expose the memory card to water. Always keep it dry.
•Do not remove the memory card when the camera is turned on. Otherwise, the memory card could be damaged.
•Do not directly edit the data on the memory card. Copy the data to your computer before you edit them.
•When the camera is stored for a long period of time, be sure to download your photos and remove the memory card. Store it in a dry environment.
•Format the memory card using the camera before you use itforthefirsttimeorinsertanewone.
•We suggest buying only well-known, name brand memory cards to ensure peak performance.
•Donotmodifythenameofthefilesorfoldersofthe memorycardusingyourcomputer.Modifyingthefile namesmaycausethefilestonotberecognizedonthe camera or a possible error may occur.
•A photo taken with the camera will be stored in the folder that is automatically generated on the SD card. Do not store photos that are not taken using this camera in
thesefoldersasthepicturescannotberecognizedduring playback. 

•When you insert a memory card, make sure the notch of the card matches the markings on the top of the card slot.
Other Safety Notes
•Donotdisconnectthepowerorturnthecameraoffduring the update process. Doing so may cause incorrect data to be written and the camera may not power on later.
•Do not hang the camera or strap around the neck of small children.
•If the rechargeable Li-ion battery is used for the camera, only charge it with the supplied battery charger.
•Ifbatteryfluidleaksinsidethecamera,contactour customer service department immediately.
•Ifbatteryfluidleaksontoyourskin,rinseyourskinwith clean water and seek immediate medical attention.
•Disposal of used batteries should be carried out in accordance with the local (national or regional) regulations.
•When using your camera on an airplane, observe the relevantrulesspecifiedbytheairline.
•Due to the limitations of manufacturing technology, the LCD screen may have a few dead or bright pixels. These pixelsdonoeffectthequalityorperformanceofthe camera, photos or video.
•Do not expose the LCD screen to water. In a humid
environment, wipe it only with a soft and dry cleaning cloth.
•If the LCD screen is damaged and the liquid crystal comes into contact with your skin, wipe your skin with a dry cloth immediately and rinse it with clean water. If liquid crystal comesintocontactwithyoureyes,flushthemwithclean water for at least for 15 minutes and seek immediate medical attention. If you accidentally swallow liquid crystal, rinse your mouth immediately and seek medical attention.

CONTENTS
BEFORE YOU START............................................. |
1 |
SAFETY NOTES...................................................... |
2 |
CONTENTS............................................................ |
5 |
GETTING READY................................................... |
7 |
Accessories Included............................................................... |
7 |
Setting up your camera .................................... |
8 |
Inserting the Batteries............................................................ |
8 |
Storing Pictures on an SD/SDHC Card................................. |
9 |
Turning on the Camera........................................................... |
10 |
Setting the Language, Date/Time........................................ |
11 |
Attaching the Strap................................................................. |
12 |
Taking Pictures and Recording Videos........... |
13 |
Taking Pictures in Smart Capture Mode............................. |
13 |
Changing between Tools View and Clean View................. |
14 |
Monitoring the Battery Level................................................ |
15 |
Recording a Video.................................................................... |
15 |
Using other Picture Modes..................................................... |
16 |
Using the Zoom......................................................................... |
16 |
Using the Flash Button........................................................... |
17 |
Using the Focus Button........................................................... |
17 |
Using the Self-timer/Burst Button....................................... |
18 |
Taking Burst Pictures.............................................................. |
19 |
Using Scene Mode.................................................................... |
20 |
Taking Panoramic Pictures.................................................... |
21 |
Turning on the Date Stamp Feature.................................... |
22 |
Using Program AE and Manual Exposure Modes.............. |
22 |
Using Program AE and Manual Exposure Modes.............. |
23 |
Choosing Focus/Exposure Zone................................... |
24 |
Reviewing Pictures, Videos............................... |
25 |

Reviewing Pictures/Videos............................................................. |
25 |
Understanding the Review Icons.......................................... |
26 |
Playing a Video......................................................................... |
27 |
Deleting Pictures/Videos........................................................ |
27 |
Deleting Pictures/Videos........................................................ |
28 |
Using the Home Icon............................................................... |
29 |
Using Zoom Playback (for still pictures only)..................... |
30 |
Displaying Pictures/Videos on a Television........................ |
31 |
Running a Slideshow............................................................... |
32 |
Tagging Faces and Keywords.......................... |
33 |
Tagging people......................................................................... |
33 |
Manually Adding a Face Tag.................................................. |
34 |
Updating Names/Tags............................................................ |
34 |
Tagging with Keywords.......................................................... |
35 |
Marking Pictures/Videos as Favorites................................. |
35 |
Transferring, Sharing Pictures.................. |
36 |
Transferring Pictures/Videos using a USB Cable.............. |
36 |
Using the Menu Button to Change camera |
|
Settings................................................................. |
37 |
Adjusting Camera Settings.................................................... |
37 |
APPENDICES......................................................... |
39 |
Specifications............................................................................ |
39 |
Prompts and Warning Messages.......................................... |
43 |
Troubleshooting....................................................................... |
47 |
GETTING READY
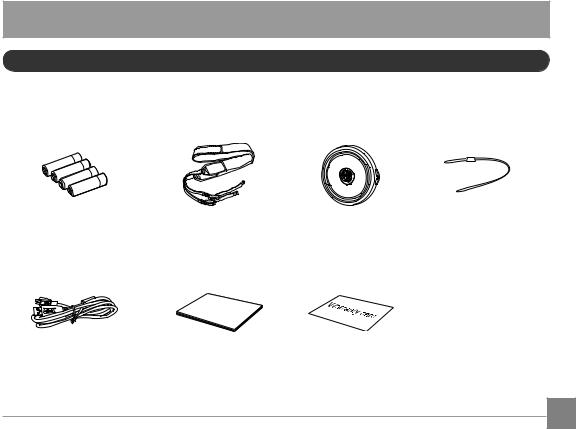
Accessories Included
Your camera box should contain the camera model you purchased along with the following accessories. If anything is missing or appears to be damaged, please contact your retailer.
AA-SizeAlkalineBatteries |
Shoulder Strap |
Lens Cap |
Lens cap strap |
User |
Manual |
|
USB Cable User Manual Warranty Card
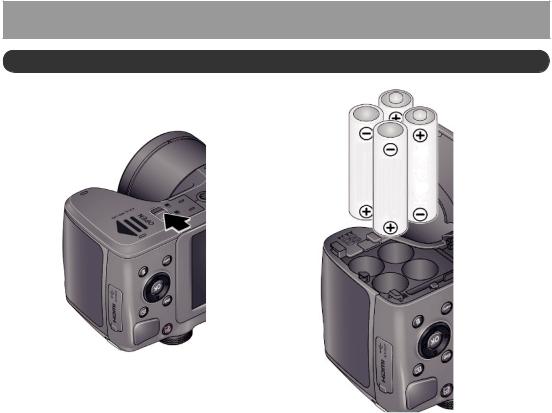
Setting Up Your Camera
Inserting the Batteries
1 Press and hold the door lock while sliding the door open. |
2 |
|
|
|
|
|
|
|
|
|
|
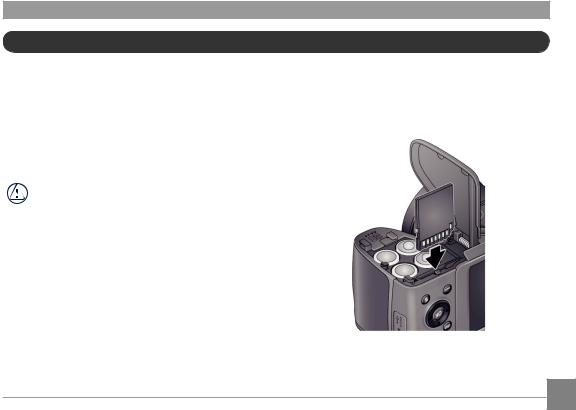
Storing Pictures on an SD/SDHC Card
Your camera has enough internal memory for a couple of test pictures. We highly recommend purchasing a Class 4 or higher SD/SDHC Card (up to 32 GB) to conveniently store more pictures/videos. (Card class is typically shown on the card and/or packaging)
NOTE: Your camera also accepts EYE-FI Cards (type X2). To learnmore,gotowww.eye.fi
A card can only be inserted one way; forcing it in the wrong way may cause damage. Inserting or removing a card while the camera is on may damage the pictures, card, or the camera.
1Whilethecameraisturnedoff,openthebatterycompartment door.
2Insert an SD card into the SD card slot and push it in until it clicks into place. To remove an SD card, press the SD card to release it, and then remove it from the card slot.
IMPORTANT: When you turn on the camera, it checks to see if a card is inserted. If pictures/videos are detected on the internal memory, the camera will prompt you to move them to the SD card. New pictures/ videos will be stored on the SD card.
Turning on the Camera
1If the lens cap is covering the lens, remove it.
2Pull back on the ON/OFF switch, and then release it.
FF
10

Setting the Language, Date/Time
Thefirsttimeyouturnonthecamera,youwillbepromptedto |
Back |
choose your language and set the date/time. |
Choose your language:
1Press  to highlight your desired language.
2Press the OK button.
Set the date and time:
1Press  to change the date format, if desired.
2Press  to highlight the year, month, date, hours, or minutes.
NOTE:Youmayneedtoscrolldowntoseeallfields.
3 Press  to change the value.
4Whenfinishedsettingthedateandtime,press to highlight OK. Then press the camera's OK button.
11
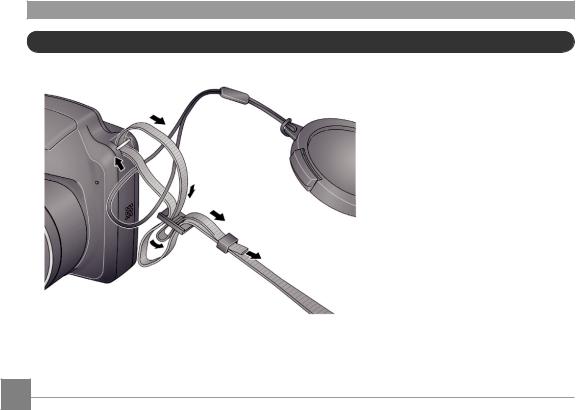
Attaching the Strap
12
Taking Pictures and Recording Videos
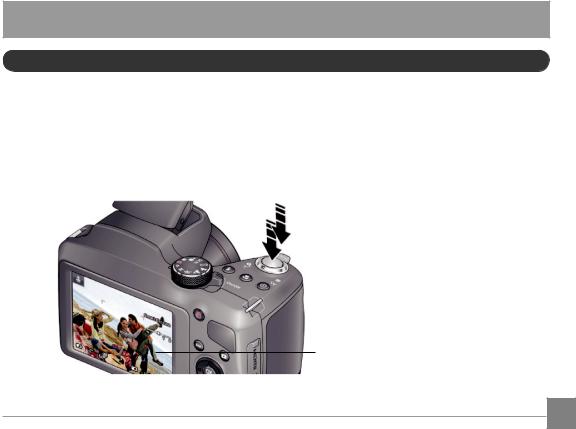
Taking Pictures in Smart Capture Mode
Whenyouturnthecameraonforthefirsttime,themodedialshouldbeinSmartCaptureMode and ready to take pictures.
1Use the LCD to preview the picture.
2Press the Shutter button halfway down to focus and set exposure.
3When the Focus brackets turn green, press the Shutter button completely down.
Press halfway, then all the way down.
Focus brackets
13

Changing Between Tools View and Clean View
Press the Display button  to change between Clean View and Tools View.
Clean View
In “clean” view; no tools appear. (Press the Menu button to change settings)
Tools View
Tools appear at the top of the LCD (Only Available in P and M Modes).
Tools View + Histogram
Tools appear at the top of the LCD. (The LCD can also display a grid and histogram)
Tool Descriptions
Date Stamp |
|
|
|
Aperture |
|
|
Shutter Speed |
Color Mode |
|
Exposure Compensation |
|
|
Flash Compensation |
Contrast |
|
ISO White Balance |
Sharpness |
3.2 |
|
|
More Tools |
Focus/Exp. Zone |
|
Zoom Slider |
||
|
EYE-FI Card (accessory, appears only if inserted)
Pictures/Video time remaining
Flash Setting
Battery Level
3.2 |
3.2 |
|
|
|
|
|
|
|
|
|
|
|
|
|
|
|
|
|
|
|
|
|
|
|
|
|
|
|
|
|
|
|
|
|
|
|
|
|
|
|
|
|
|
|
|
|
|
|
|
|
|
|
|
|
|
|
|
|
|
|
|
|
|
Press |
to choose a Tool, then press OK. |
||||||
14 |
|
||||||||
|
|
|
|
|
|
|
|
|
|
|
|
|
|
|
|
|
|
|
|
|
|
|
|
|
|
|
|
|
|
 Loading...