


– 0 –
Precautions of Use
The quality of communication depends on the location and environment of the base and the handset. The 21880 must be kept away from sources of excessive heat (radiators, direct sunlight, etc.) and protected against vibrations and dust. Never allow your telephone to come into contact with water or other liquids or with aerosols. To reduce the risk of interference and optimize reception, take particular care to keep it away from the immediate vicinity of windows, large metal objects, reinforced concrete, televisions, music centre, halogen lamps or heating devices, fluorescent lighting, burglar alarms, microwave ovens, computers, etc.
To clean the 21880, use a lightly moistened antistatic cloth
Information for DECT product:
The 21880 telephone is compliant with the DECTTM* standard. It is designed to transmit and receive telephone calls and be connected to the public telephone “Country” network.
*DECT is a trademark registered by ETSI.
Safety
In the event of danger, the mains adapter acts as 230V power isolating device. It should therefore, as a precaution, be installed close to the appliance and be easily accessible.
If the mains adapter fails, it must be replaced by an identical model.
If not connected to the mains power or if there is a mains power failure, installations with cordless handsets will no longer work. You will then be unable to make or receive calls in the event of an emergency. This is why we recommend that you also have a conventional telephone as a backup. The appliance is designed for
– 1 –
connection to an analogue telephone line class TRT3 (telecommunications network voltage).
! Do not use your telephone to notify a gas leak when you are in the vicinity of the leak.
It is recommended that you avoid using this device during electrical storms.
ThomsonTelecom hereby declares that the 21880 conforms to the essential requirements and other applicable provisions of European directive 1999/5/CE.
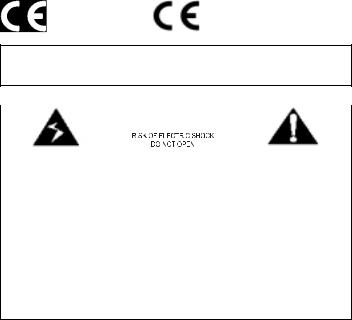
WARNING:
TO PREVENT FIRE OR ELECTRICAL SHOCK HAZARD, DO NOT EXPOSE THIS PROCUCT TO RAIN OR MOISTURE.
|
|
|
|
|
|
|
|
|
|
|
|
|
|
|
|
|
|
|
|
|
|
|
|
|
|
|
|
|
|
|
|
|
|
|
|
|
|
|
|
THE LIGHTING |
|
|
CAUTION: TO |
THE |
|||
FLASH AND |
REDUCE THE RISK OF |
EXCLAMATION |
|||||
ARROW HEAD |
ELECTRICAL SHOCK, |
WITHIN THE |
|||||
WITHIN THE |
|
DO NOT REMOVE |
TRIANGLE IS |
||||
TRIANGLE IS A |
COVER (OR BACK). |
WARNING SIGN |
|||||
WARNING SIGN |
|
|
NO USER |
ALERTING YOU OF |
|||
ALERTING YOU OF |
SERVICEABLE PARTS |
IMPORTANT |
|||||
“DANGEROUS |
|
INSIDE. REFER |
INSTRUCTIONS |
||||
VOLTAGE” |
|
SERVICING TO |
ACCOMPANYING |
||||
INSINDE THE |
QUALIFIED SERVICE |
THE PRODUCT. |
|||||
PRODUCT. |
|
|
PERSONNEL. |
|
|||
SEE MARKING ON BOTTOM / BACK OF PRODUCT
– 2 –

Battery Safety Precautions
Do not burn, disassemble, mutilate, or puncture. Like other batteries of this type, toxic materials could be released which can cause injury.
To reduce the risk of fire or personal injury, use only the battery listed in User’s Guide.
Keep batteries out of children.
Remove batteries if storing over 30 days.
CAUTION:
Danger of explosion if battery is incorrectly replaced. Replace only with GP60AAAHC – NiMH 1.2V 600mAh rechargeable battery or equivalent.
Only use rechargeable batteries with exactly the same specifications as those supplied with the product. Using non-rechargeable or non-conforming batteries can damage the product. The batteries could split or leak if incorrectly inserted, opened or exposed to heat.
Never dispose of batteries in a fire: the cell could explode. Check with local code for possible special disposal instruction.
– 3 –
Installation
Packaging Contents
Model: 21880 |
Solo pack |
Duo pack* |
|
Base stations |
1 |
1 |
|
Handsets |
1 |
2 |
|
Power plugs |
2 |
3 |
|
Telephone line |
1 |
1 |
|
Batteries type |
2 |
4 |
|
AAA, 1.2V, 600mAh |
|||
|
|
||
Charging station |
1 |
2 |
|
Operating instructions |
1+optional |
1+optional |
Please check the contents of the package carefully. If anything is missing or shows signs of transport damage, do NOT put the telephone into service! In such a case, contact either your sales outlet with the purchase receipt.
.
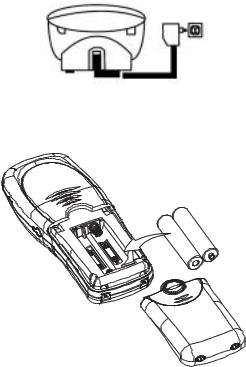
Connecting the Base Station and Power Plug
Connecting the plugs to the corresponding sockets in the base station (they can not be connected incorrectly because the sockets and plugs are designed prevent reverse poling). Plug the telephone line in the telephone connection socket. Insert the power plug at the other end in the power outlet. The base station in now ready to operate.
– 4 –

Only use the connection cable supplied.
AC power outlet |
Phone jack |
|
|
|
|
|
|
|
Corded unit rear side view
CAUTION:
Plug the adapter to the socket outlet that near the equipment and shall be easily accessible. Use only the Thomson Telecom power supply that came with this unit. Using other power supplies may damage the unit.
Connecting the charging station
Insert the power plug in the socket on the rear side of the charging station. Insert the power plug at the other end in the power outlet. The charging station is now ready to operate.
– 5 –
AC power outlet
Getting Started
Install and Charge the Battery Pack
Insert two pieces AAA batteries in the compartment, ensuring correct polarity and close the compartment.
Place the handset in the remote charge unit to charge for 14 hours prior for first use. If you don’t properly charge the phone, battery performance will be compromised.
Warning: The handset does not work and damaged if the wrong batteries are inserted.
– 6 –
If batteries are empty, handset LCD will not has any display and the handset will not response to any key. Handset is then required to put back on Base Station / Charger cradle to charge. Handset cannot be used until handset name and aerial icon appear. If handset does not charged full before use, handset may emit battery low alert tone and battery level indicator shows empty
Features
This cordless telephone is equipped with the following features: Digital cordless telephone complying to DECT standards Operation instruction in 10 languages
Teleconference Call forwarding
Internal, free communication between handsets Prefix dialing
Automatic call answering on/off
Call log function with caller list for 20 numbers or names (network dependent)
DOT MATRIX LCD display
(1-line icon + 1-line 12 dot matrix characters)
Phone book memory with name and call number: 30 memories in handset, 10 memories in base
Extended redialing for 5 call numbers Microphone muting function
Acoustic battery and range warning signals Key lock
Key tone on/off
10 incoming call ringing melodies
Ringing volume control (5 levels and silent) DTMF/Pulse dialing
Operation of up to 4 handsets
Paging function from base station to handset Programmable number barring
Up to 100 hours standby
– 7 –
Up to 10 hours continuous call time
Operation with 2 standard AAA batteries (Ni-MH)
Adjustable flash time
*DECT = Digital Enhanced Cordless Telecommunications
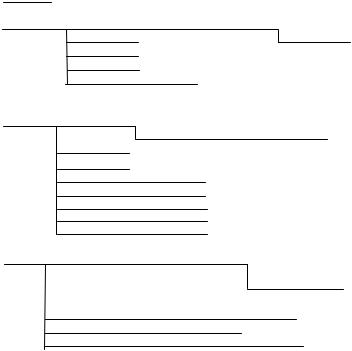
Menu Structure (Handset)
CALL LOG |
|
|
|
|
|
|
PHONE BOOK |
NEW ENTRY |
ENTER NUMBER |
ENTER NAME NORMAL RING |
|||
|
|
LIST ENTRY |
|
|
|
VIP RING 1-10 |
|
|
EDIT ENTRY |
|
|
|
|
|
|
DELETE |
|
|
|
|
|
|
DELETE ALL |
CONFIRM? |
|
|
|
|
|
|
VOLUME |
[- - - - - ] |
||
HANDSET |
|
RINGER |
EXT RING |
MELODY 1-10 |
||
|
|
|
INT RING |
MELODY 1-10 |
||
|
|
HS NAME |
|
|
|
|
|
|
PREFIX MEM |
|
|
|
|
|
|
KEY TONE |
ON/OFF |
|
|
|
|
|
AUTO ANS |
ON/OFF |
|
|
|
|
|
CALL TIMER |
ON/OFF |
|
|
|
|
|
DEFAULT |
CONFIRM? |
|
|
|
|
|
REGISTER |
SEARCHING |
|
|
|
BASE |
BARRING |
ENTER PIN |
HANDSET 1,…. DISABLE |
|||
|
|
|
|
|
|
EXTERNAL |
|
|
|
|
|
|
NUMBER ENTER NO |
|
CHANGE PIN |
ENTER PIN |
NEW PIN |
REPEAT |
||
|
DEFAULT |
ENTER PIN |
CONFIRM? |
|
||
|
DEREGISTER |
ENTER PIN |
HANDSET1,….. |
CONFIRM? |
||
– 8 –

LANGUAGE ENGLISH
DEUTSCH
FRANCAIS
CESKY
TURKCE
POLSKI
E ΛΛHNIKA
PYCCK ИЙ
БЪЛГAPCKИ
MAGYAR
Corded Base Station Set Up
TONE/PULSE Dialing
A Tone / Pulse switch is located at the base bottom. Default is Tone dialing
Flash Time Setting
Flash time 600/300/100ms can be selected by a switch located at the base bottom.
Note: If you don’t know which setting is correct, check with your phone
NOTE: If you don’t know which setting is correct, check with your company.
phone company.
Ringer Switch Setting
Ringer volume level HI /LO/OFF (HIGH/LOW/OFF) can be selected by a switch at the rear side of bass station. Default is HI.
Note: Handset ringer volume level setting refer to section of Handset Settings – Changing the Ringing Volume.
– 9 –

Handset and Base Layouts
/ ▼ |
Menu / down key |
/ * |
CID key / Asterisk key |
INT / OK |
INT / OK key |
C |
Cancel key |
|
Mute key |
|
– 10 – |

/ P /▲ |
Redial / Pause key /Up key |
|
External call key. |
|
Memory key |
R |
Flash key |
# / |
Hash key / lock key |
Handset LCD Display
|
|
|
|
|
|
|
|
|
|
|
|
|
|
|
|
|
|
|
|
|
|
|
|
|
|
|
|
|
|
|
|
|
|
|
|
|
|
|
|
|
|
|
|
|
|
|
|
|
|
|
|
|
|
|
|
|
|
|
|
|
|
|
|
|
|
|
|
|
|
|
|
|
|
|
|
|
|
|
|
|
|
|
|
|
|
|
|
|
|
|
|
|
|
|
|
|
|
|
|
|
|
|
|
|
|
|
|
|
|
|
|
|
|
|
|
|
|
|
|
|
|
|
|
|
|
|
|
|
|
|
|
|
|
|
|
|
|
|
|
|
|
|
|
|
|
|
|
|
|
|
|
|
|
|
|
|
|
|
|
|
|
|
|
|
|
|
|
|
|
|
|
|
|
|
|
|
|
|
|
|
|
|
|
|
|
|
|
|
|
|
|
|
|
|
|
|
|
|
|
|
|
|
|
|
|
|
|
|
|
|
|
|
|
|
|
|
|
|
|
|
|
|
|
|
|
|
|
|
|
|
|
|
|
|
|
|
|
|
|
|
|
|
|
|
|
|
|
|
|
|
|
|
|
|
|
|
|
|
|
|
|
|
|
|
|
|
|
|
|
|
|
|
|
|
|
|
|
|
|
|
|
|
|
|
|
|
|
|
|
|
|
|
|
|
|
|
|
|
|
|
|
|
|
|
|
|
|
|
|
|
|
|
|
|
|
|
|
|
|
|
|
|
|
|
|
|
|
|
|
|
|
|
|
|
|
|
|
|
|
|
|
|
|
|
|
|
|
|
|
|
|
|
|
|
|
Battery icon |
|||||||||||||||||||||||||||||||||||||||||||||||||||||||||||||||||||||||||||||||||||||||||||||||||||
|
|
|
|
|
|
|
|
|
|
|
|
|
|
|
|||||||||||||||||||||||||||||||||||||||||||||||||||||||||||||||||||||||||||||||||||||||||||||||||||
|
|
|
|
|
|
|
|
|
|
|
|
|
|
Phone icon |
|||||||||||||||||||||||||||||||||||||||||||||||||||||||||||||||||||||||||||||||||||||||||||||||||||
|
|
|
|
|
|
|
|
|
|||||||||||||||||||||||||||||||||||||||||||||||||||||||||||||||||||||||||||||||||||||||||||||||||||||||||
EXT |
|
|
|
|
|
|
|
External call icon |
|||||||||||||||||||||||||||||||||||||||||||||||||||||||||||||||||||||||||||||||||||||||||||||||||||||||||
INT |
|
|
|
|
|
|
|
Internal call icon |
|||||||||||||||||||||||||||||||||||||||||||||||||||||||||||||||||||||||||||||||||||||||||||||||||||||||||
|
|
|
|
|
|
|
|
|
|
|
|
|
|
CLI icon |
|||||||||||||||||||||||||||||||||||||||||||||||||||||||||||||||||||||||||||||||||||||||||||||||||||
|
|
|
|
|
|
|
|
|
|
|
|
|
|
No ring icon |
|||||||||||||||||||||||||||||||||||||||||||||||||||||||||||||||||||||||||||||||||||||||||||||||||||
|
|
|
|
|
|
|
|
|
|
|
|
|
|
|
|||||||||||||||||||||||||||||||||||||||||||||||||||||||||||||||||||||||||||||||||||||||||||||||||||
|
|
|
|
|
|
|
|
|
|
|
|
|
|
Mute icon |
|||||||||||||||||||||||||||||||||||||||||||||||||||||||||||||||||||||||||||||||||||||||||||||||||||
|
|
|
|
|
|
|
|
|
|
|
|
|
|
Key lock icon |
|||||||||||||||||||||||||||||||||||||||||||||||||||||||||||||||||||||||||||||||||||||||||||||||||||
|
|
|
|
|
|
|
|
|
|
|
|
|
|
|
|||||||||||||||||||||||||||||||||||||||||||||||||||||||||||||||||||||||||||||||||||||||||||||||||||
|
|
|
|
|
|
|
|
|
|
|
|
|
|
Aerial icon |
|||||||||||||||||||||||||||||||||||||||||||||||||||||||||||||||||||||||||||||||||||||||||||||||||||
▲ / ▼ |
|
|
|
|
|
|
|
Up / Down arrow |
|||||||||||||||||||||||||||||||||||||||||||||||||||||||||||||||||||||||||||||||||||||||||||||||||||||||||
|
|
|
|
|
|
|
|
|
|
|
|
|
|
Voice mail waiting indicator (VMWI icon) |
|||||||||||||||||||||||||||||||||||||||||||||||||||||||||||||||||||||||||||||||||||||||||||||||||||
|
|
|
|
|
|
|
|
|
|
|
|
|
|
|
|
|
|
|
|
|
|
|
|
|
|
|
|
|
|
|
|
|
|
|
|
|
|
|
|
|
|
|
– 11 – |
||||||||||||||||||||||||||||||||||||||||||||||||||||||||||||||||||||||
 Loading...