


FoodFreezers
ge.com
Safety Information . . . . . . . . . . . . 2–4
Operating Instructions
Care and Cleaning . . . . . . . . . . . . . . .10–12
Defrosting Instructions
(for Manual Defrost Models) . . . . . . . . . . .9
Features . . . . . . . . . . . . . . . . . . . . . . . . . . . . . . .8
Starting the Freezer . . . . . . . . . . . . . . . . . . .5
Installation Instructions
Preparing to Install the Freezer . . . . . . 13
Troubleshooting Tips . . . . . . . .14–16
Normal Operating
Characteristics . . . . . . . . . . . . . . . . . . . . . . .14
Consumer Support
Consumer Support . . . . . . . . . Back Cover Production Registration for
Customers in Canada . . . . . . . . . . . . 19, 20 Production Registration for
Customers in the U.S. . . . . . . . . . . . . 17, 18 Warranty . . . . . . . . . . . . . . . . . . . . . . . . . . . . 24
Model number: _____________________
Serial number: _____________________
You can find them on a plate either on the upper left wall inside the freezer (Upright models) or on the left exterior wall (Chest models).
Owner’s Manual &
Installation Instructions
Upright—Manual Defrost
Models:
FUM13, FUM14, FUM17,
FUM21
Upright—No-Frost Models:
FUF12, FUF12S, FUF14,
FUF14S, FUF17, FUF17C,
FUF17S, FUF20, FUF20S,
FUF21, FUF21S
Chest—Manual Defrost Models: FCM5, FCM7, FCM9, FCM15, FCM20, FCM25
Congélateur
d’aliments
Manuel d’utilisation
et d’installation
La section française commence à la page 25
Congelador de alimentos
Manual del propietario
y instalación
La sección en español empieza en la página 43
297252000 162D9627P010 49-60567-1 09-08 JR

Operating Instructions Safety Instructions
Installation |
Instructions |
Consumer Support Troubleshooting Tips
IMPORTANT SAFETY INFORMATION.
READ ALL INSTRUCTIONS BEFORE USING.
 WARNING!
Use this appliance only for its intended purpose as described in this Owner’s Manual.
SAFETY PRECAUTIONS
When using electrical appliances, basic safety precautions should be followed, including the following:
■This freezer must be properly installed and located in accordance with the Installation Instructions before it is used.
■Do not allow children to climb, stand or hang
on the shelves in the freezer. They could damage the freezer and seriously injure themselves.
■After your freezer is in operation, do not touch the cold surfaces, particularly when hands are damp or wet. Skin may stick to these extremely cold surfaces.
■Do not store or use gasoline or other flammable vapors and liquids in the vicinity of this or any other appliance.
■Unplug the freezer before cleaning, making repairs or changing the light bulb.
NOTE: We strongly recommend that any servicing be performed by a qualified individual.
■Turning the control to the OFF position does not remove power to the light circuit on models with interior light.
■Do not refreeze frozen foods which have thawed completely.
■The maximum amount of food your freezer is designed to freeze at one time is approximately
3 pounds (1.5 kg) per cubic foot of freezer capacity. In normal position, your freezer’s temperature control will maintain sufficiently
low temperatures in the freezer to freeze recommended quantities of food.
■Caution should be used when removing the door of a freezer. Particular caution should be used when removing the lid of a Chest freezer, as most Chest freezer lids are under spring tension. Contact the manufacturer’s representative for a method of safe removal.
2
ge.com
 DANGER! RISK OF CHILD ENTRAPMENT
PROPER DISPOSAL OF THE FREEZER
When using electrical appliances, basic safety precautions should be followed, including the following:
Child entrapment and suffocation are not problems |
Refrigerants |
|
of the past. Junked or abandoned refrigerators and |
All refrigeration products contain refrigerants, which |
|
freezers are still dangerous…even if they will sit for |
||
under federal law must be removed prior to product |
||
“just a few days.” If you are getting rid of your old |
||
disposal. If you are getting rid of an old refrigeration |
||
refrigerator or freezer, please follow the instructions |
||
product, check with the company handling the |
||
below to help prevent accidents. |
||
disposal about what to do. |
||
Before You Throw Away Your Old |
||
|
||
Refrigerator or Freezer: |
|
■Take off the doors.
■Leave the shelves in place so that children may not easily climb inside.
USE OF EXTENSION CORDS
Because of potential safety hazards under certain conditions, we strongly recommend against the use of an extension cord.
However, if you must use an extension cord, it is absolutely necessary that it be a UL-listed (in the United States) or a CSA-listed (in Canada), 3-wire grounding type appliance extension cord having a grounding type plug and outlet and that the electrical rating of the cord be 15 amperes (minimum) and 120 volts.
3
Instructions Operating Instructions Safety
Instructions |
Installation |
Support Consumer Tips Troubleshooting
Operating Instructions Safety Instructions
Installation |
Instructions |
Consumer Support Troubleshooting Tips
IMPORTANT SAFETY INFORMATION.
READ ALL INSTRUCTIONS BEFORE USING.
 WARNING!
HOW TO CONNECT ELECTRICITY
Do not, under any circumstances, cut or remove the third (ground) prong from the power cord. For personal safety, this appliance must be properly grounded.
The power cord of this appliance is equipped with a 3-prong (grounding) plug which mates with a
standard 3-prong (grounding) wall outlet to minimize the possibility of electric shock hazard from this appliance.
Have the wall outlet and circuit checked by a qualified electrician to make sure the outlet is properly grounded.
If the outlet is a standard 2-prong wall outlet, it is your personal responsibility and obligation to have it replaced with a properly grounded 3-prong wall outlet.
The freezer should always be plugged into its own individual electrical outlet which has a voltage rating that matches the rating plate.
This provides the best performance and also prevents overloading house wiring circuits which could cause a fire hazard from overheated wires.
Never unplug your freezer by pulling on the power cord. Always grip plug firmly and pull straight out from the outlet.
Repair or replace immediately all power cords that have become frayed or otherwise damaged. Do not use a cord that shows cracks or abrasion damage along its length or at either end.
When moving the freezer away from the wall, be careful not to roll over or damage the power cord.
READ AND FOLLOW THIS SAFETY INFORMATION CAREFULLY.
SAVE THESE INSTRUCTIONS
4
About the operation of your freezer. |
ge.com |
Starting the Freezer
|
|
Clean the inside of the freezer with a mild solution of baking soda and water (see Care and Cleaning). |
|
1 |
|
|
|
Connect cord to power outlet. |
|
2 |
|
|
|
On models with a Temperature Monitor or High-Temp Alarm Switch, set the switch to the OFF position. |
|
3 |
|
|
|
Make sure the temperature control is set at 4. |
|
4 |
|
|
|
Allow freezer to operate for at least four hours before placing food inside. |
|
5 |
|
|
|
On models with a Temperature Monitor or High-Temp Alarm Switch, set the switch to the ON position. |
|
6 |
|
|
|
|
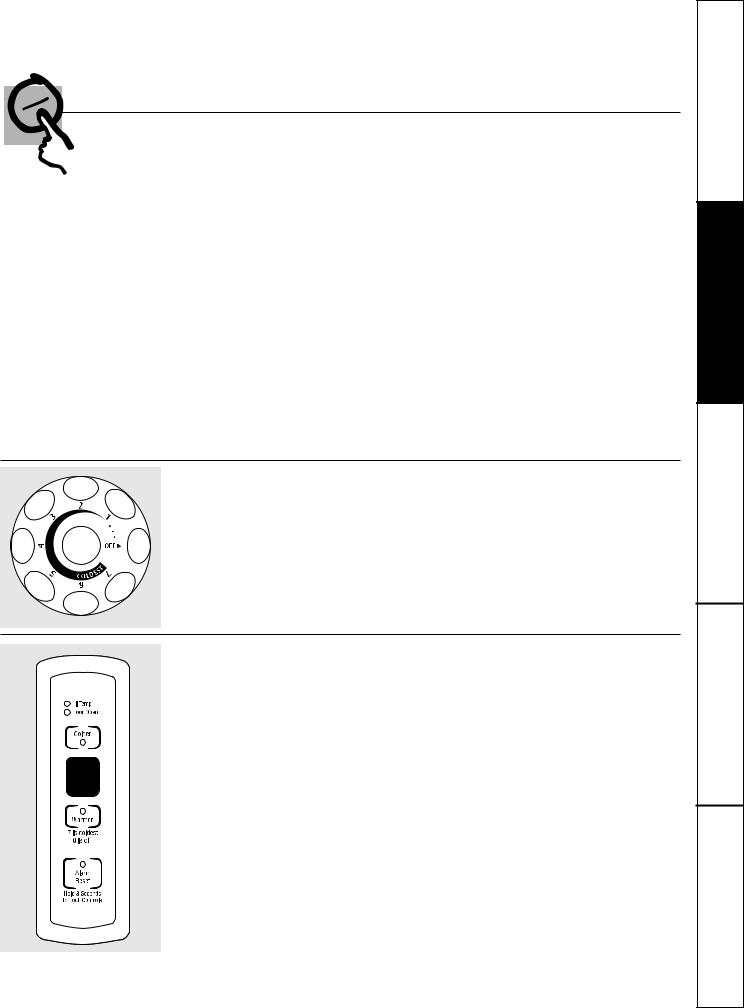
Temperature Control
For safe food storage, allow 4 hours for the freezer to cool down completely. The freezer will run continuously for the first several hours. Foods that are already frozen may be placed in the freezer after the first few hours of operation. Unfrozen food should NOT be placed in the freezer until it has operated for 4 hours. Allow several hours after each onestep adjustment for the freezer temperature to stabilize.
When loading the freezer, freeze only 3 pounds of fresh food per cubic foot of
space at a time. Distribute packages evenly throughout the freezer. It is not necessary to turn the control knob to a colder setting while freezing food.
Turning the control to OFF stops the cooling process but does not shut off power to the freezer.
Electromechanical Temperature Control (Chest and some Upright models)
The electromechanical temperature control |
The electromechanical temperature control is |
is preset to give satisfactory food storage |
on the outside left on the chest models and |
temperatures. It is adjustable to provide a |
inside the freezer on upright models. |
range of temperatures. Allow several hours |
|
for the temperature to stabilize between |
|
adjustments. |
|
Electronic Temperature Control (some Upright Frost-Free models)
This electronic temperature control is located on the front of the freezer door. The temperature is factory-preset to provide satisfactory food storage temperatures. To adjust the temperature setting, press Colder to decrease temperatures and Warmer to increase temperatures. Allow several hours for the temperature to stabilize between adjustments.
To turn the freezer off, press Warmer until the display reads “0.” To turn the freezer on, press Colder until the display shows “4” or the desired setting.
To lock the controls, press Alarm Reset for
3 seconds. The display will read “L.” To unlock the controls, press Alarm Reset for 3 seconds. The display will read “U” and then display the current temperature.
This electronic control has a temperature alarm feature. If the inside temperature exceeds 23°F. An alarm will sound if the freezer temperature reaches unsafe levels. The alarm operates on household electricity. If the power fails, the alarm will not perform.
When the freezer is initially plugged in, the red Hi Temp light will come on and a buzzer will sound. The indicator light will stay on until the freezer temperature reaches 23°F or below. To silence the buzzer, push Alarm Reset. If the temperature in the freezer goes above 23°F for any reason, the Hi Temp light will come on and the buzzer will sound every hour until the temperature is below 23°F. To silence the buzzer, push Alarm Reset.
If an “E” appears on the display, contact your authorized service technician for repair. The freezer will continue to run until serviced.
5
Instructions Operating Instructions Safety
Instructions |
Installation |
Support Consumer Tips Troubleshooting
Operating Instructions Safety Instructions
Installation |
Instructions |
Consumer Support Troubleshooting Tips
About the operation of your freezer.
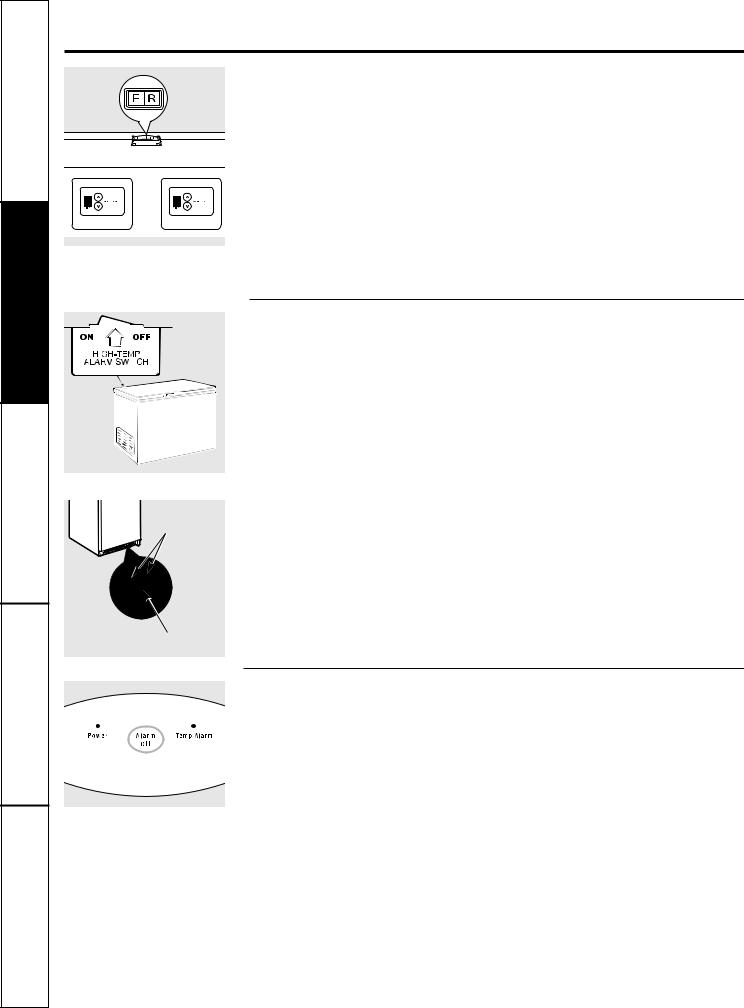
Convertible Freezer/Refrigerator (some Upright Frost-Free models)
The convertible model can operate as either a refrigerator or a freezer. The selection is made using the switch at the back of the unit marked F and R. With the switch in the F position, the freezer controls below this switch and to the left become active. With the switch in the R position, the refrigerator controls below this switch and to the right become active. Placing the switch in the middle position will turn off the unit completely and will disable all cooling functions.
The temperature on this model is preset. To adjust the temperature, push the UP button for warmer and the DOWN button for cooler temperatures. Allow several hours for the temperature to stabilize between adjustments.
When in the refrigerator mode, the Freeze Control Feature maintains proper interior refrigerator temperature even if placed in an area where the temperature is 10°F (-12°C).
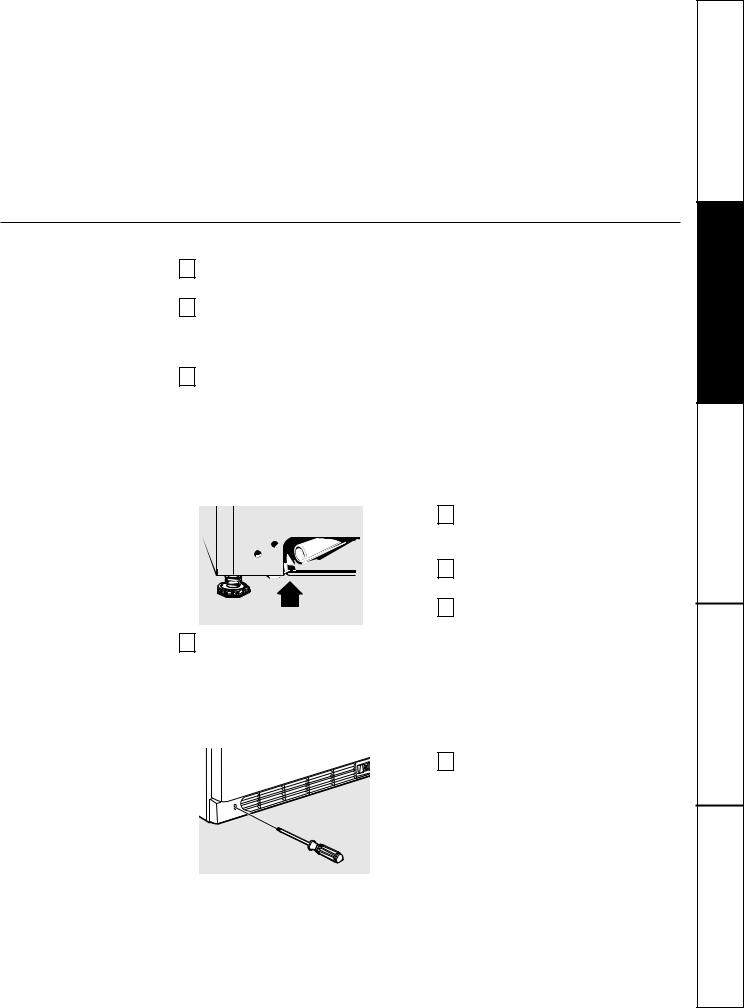
Located on back of lid.
Indicator
Lights
High-Temp Alarm Switch (on some models)
An alarm will sound if the freezer temperature reaches unsafe levels. The alarm operates on household electricity. If the power fails, the alarm will not perform.
An ON/OFF switch allows the temperature alarm to be deactivated if desired. The freezer is shipped with the switch in the OFF position. After the freezer has run long enough to lower the temperature, you may set the switch to the ON position.
CAUTION: Adding more than 3 pounds (1.5 kg) of warm food per cubic foot of freezer capacity can trigger the alarm.
To activate the alarm, set the switch to the
ON position.
To deactivate the alarm, set the switch to the OFF position.
On/Off
Switch
Electronic Temperature Alarm (some Electronic Chest models)
This feature is designed to provide a warning if the inside temperature reaches an unsafe level. The Temp Alarm feature operates on household electricity. It will not function if household electricity is interrupted.
When the freezer is initially plugged in, the red Temp Alarm indicator light blinks. The indicator light will continue to blink until the freezer has reached a safe freezing temperature. If a malfunction causes an unsafe temperature inside the freezer, the
red light will blink and the buzzer will sound. To silence the buzzer, press the ALARM OFF button. The indicator light will continue to blink until a safe freezing temperature is again reached. If the problem is not solved within twelve (12) hours, the buzzer will turn on again. If the ALARM OFF button is not pressed, the buzzer will turn itself off automatically after 48 hours, but the red Temp Alarm light will continue to blink.
6

|
ge.com |
|
Power-On Light (on some models) |
|
|
The Power-On Light indicates that the freezer |
The light glows even when the temperature |
|
is properly connected to the electrical power. |
control is turned off. |
|
|
|
|
Key-Ejecting Lock (on some models) |
|
|
The key for the spring-loaded lock is |
Keep the key out of reach of children and |
|
automatically ejected–key will not remain in |
away from the freezer. |
|
lock in either the open or closed position. |
|
|
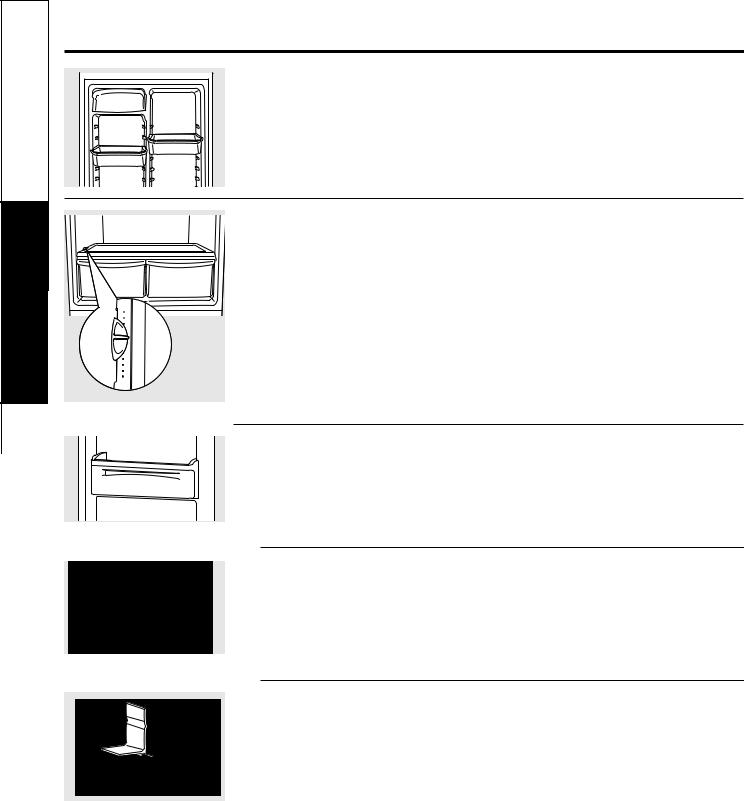
Upright Models
|
|
Wire Shelf |
Placement Holes |
Freezer Shelves (on some models)
The spacers (on some models) are used to |
Small objects are a choke hazard to |
secure the shelves during shipping. Remove |
children. |
and discard the spacers. |
|
|
|
Tilt-Out Shelf (some Upright models) |
|
This shelf is located inside on the freezer door |
|
and provides additional storage space. To |
|
access an item, tilt the top of the “basket” |
|
shelf down. |
|
Slide-Out Basket (some Upright models)
A slide-out basket provides separate storage space for items that are difficult to store on shelves. It is located at the bottom of the freezer. To remove this basket, pull out and lift up.
Interior Light
The interior light comes on when the freezer door is opened. To replace the bulb, set the temperature control to OFF and unplug
the electrical cord. Replace the bulb by unscrewing it from the fixture. Replace with the same size and wattage.
Adjustable Shelves (Upright models)
The adjustable shelves can be moved to different levels within the freezer. To move the shelf, grasp the shelf and push to either the right or the left to disengage the ends of the shelf from placement holes in the freezer. Tilt the shelf to release the other side. To install the shelf, reverse these directions.
Some models will have glass shelves and
some models will have wire shelves. |
Glass Shelf |
Placement Holes |
|
|
7
Instructions Operating Instructions Safety
Instructions |
Installation |
Support Consumer Tips Troubleshooting
Operating Instructions Safety Instructions
Installation |
Instructions |
Consumer Support Troubleshooting Tips
About the operation of your freezer.
Adjustable Door Bins (some Upright models)
The adjustable door bins provide flexible storage space. The number of bins varies by model.
|
Crispers (some Upright models) |
|
|
The crispers are designed for storing fruits, |
|
|
vegetables and other fresh produce. Items |
|
|
should be washed and drained well before |
|
|
placing in the crisper drawers. |
|
Lo |
One of the crisper drawers comes equipped |
|
|
with a Humidity Control. This allows you to |
|
|
control the humidity within that crisper. This |
|
|
can extend the life of fresh vegetables that |
|
|
keep best in high humidity. |
|
H i |
|
|
|
Soft Freeze Zone (some Upright models) |
|
|
The Soft Freeze Zone is specifically for foods |
|
|
such as ice cream. It is designed to maintain |
|
|
a higher temperature than the rest of the |
|
|
freezer. |
|
|
Basket Divider (some Upright models) |
|
|
Organize your freezer basket by using |
divider with the center of the line in the |
|
the basket dividers supplied. To change |
bottom of the basket as shown in the figure. |
|
the location, rotate the divider in a |
Rotate the divider clockwise until it snaps into |
|
counterclockwise direction and pull up until it |
place. |
|
is free from the basket. Align the center of the |
|
Wire Shelf Bookend (some Upright models)
Use these handy bookends to keep various boxed items stored neatly in your freezer. To adjust the location, simply unsnap the bookend from the wire shelf and snap into the next desired location.
8
Defrosting instructions. (for Manual Defrost models) |
ge.com |
In most climates, defrosting will be necessary only about twice a year.
To have your freezer operate most efficiently, do not permit more than 1/2 ″
(13 mm) of frost to accumulate on the shelves.
To remove frost, scrape with a plastic or wood spatula or scraper.
Do not use an ice pick or sharp-edged instrument as it may damage or scratch the freezer.
Do not use any electrical device in defrosting your freezer.
For Complete Defrosting
1 Turn the temperature control to OFF and unplug the freezer.
2 Remove all food and place it in corrugated boxes, insulated bags, picnic coolers, etc. Use towels and newspapers for insulation as needed.
3 With the door/lid open, use pans of hot water to speed loosening of frost. Remove large pieces before they melt.
On models without a defrost drain, place towels or newspapers on the freezer bottom to catch the frost. The frost will loosen and fall. Remove towels and/or newspapers.
Drain Hose
4 a. Some Upright models have a hose adapter and a drain hose behind the base grille which carry the defrost water out from the freezer. Remove the base grille; then remove the drain plug and let the defrost water drain into a pan.
To remove the base grille (on some models), remove the two Phillips-head screws and pull the grille away from the freezer.
b.Some Chest models have a defrost water drain at the front and a hose adapter that is packaged in a bag in the bottom of the freezer. Remove the drain cap on the front of the freezer, insert the hose connector and attach the hose. Remove the drain plug inside the cabinet.
NOTE: Water may drip from the back flange of the lid cover during defrosting. This is normal. Ice builds up in the lid insulation when the lid is open for adding or removing food, and melts during the defrosting operation.
5 Sponge excess water from the bottom of the freezer as it collects to prevent overflowing.
6 After defrosting, clean the inside of the freezer (see Care and Cleaning).
7 a. On Upright models, be sure to replace the drain plug and return the drain tube to its position. Replace the
base grille.
b.On Chest models, replace the drain plug inside the cabinet and the cap on the defrost drain. Fold over and dry the gasket on the hinge side of the lid.
8 Plug in the freezer. Return the temperature control to its previous position and return food to the freezer.
9
Instructions Operating Instructions Safety
Instructions |
Installation |
Support Consumer Tips Troubleshooting

Operating Instructions Safety Instructions
Installation |
Instructions |
Consumer Support Troubleshooting Tips
Care and cleaning of the freezer.
Cleaning Your Freezer
■Outside. Protect the paint finish. The finish on the outside of the freezer is a high quality, baked-on paint finish. With proper care, it will stay new-looking and rust-free for years. Apply a coat of appliance polish wax when the freezer is new and then at least twice a year. Appliance polish wax also works well to remove tape residue from freezer surfaces.
Keep the finish clean. Wipe with a clean cloth lightly dampened with appliance polish wax or mild liquid dishwashing detergent. Dry and polish with a clean, soft cloth. Do not wipe the freezer with a soiled dishwashing cloth or wet towel. Do not use scouring pads, powdered cleaners, bleach, or cleaners containing bleach.
CAUTION: Care should be taken in moving the freezer away from the wall. All types of floor coverings can be damaged, particularly cushioned coverings and those with embossed surfaces.
■Inside. Clean the inside of your freezer at least once a year. We recommend that the freezer be unplugged before cleaning. If this is not practical, wring excess moisture out of sponge or cloth when cleaning in the vicinity of switches, lights or controls.
Use warm water and baking soda solution–about a tablespoon of baking soda to a quart of water. Rinse thoroughly with water and wipe dry. Do not use cleaning powders or other abrasive cleaners. DO NOT wash removable parts in a dishwasher.
An open box of baking soda in the freezer will absorb stale freezer odors. Change the box every three months.
CAUTION: Damp objects stick to cold metal surfaces. DO NOT touch interior metal surfaces with wet or damp hands.
CAUTION: Freezer must be unplugged to avoid electrical hazard from power source when defrosting unit.
Some upright freezers are frost-free and defrost automatically, but should be cleaned occasionally.
No Defrosting (on No-Frost models) |
|
You never have to defrost your new No-Frost |
During defrosting, a slight noise may be |
freezer. It has been pre-set at the factory to |
noticed if the door is opened while the freezer |
defrost itself automatically. |
is in the automatic defrosting cycle. |
Package labels always remain clearly legible, |
|
and packages will remain easy to separate |
|
and remove. |
|
10
ge.com
Plastic Hinge
Cover
Hinge
 Screws
 Top Hinge
(on some models)
To Remove the Freezer Door (on Non-Electronic Control Upright models)
1
2
3
4
Remove the plastic hinge cover by either lifting it off or folding it back (depending on model).
Remove the screws holding the hinge to the top of the cabinet using a
screwdriver, 5/16″ socket driver or wrench (depending on model).
Remove the top hinge from the cabinet and lift the door up and off the lower hinge pin. Set the door aside.
Remove the two screws from the bottom hinge.
To replace the doors, reverse the order of the above instructions.
CAUTION: It is very important that all hinge screws are securely tightened to ensure a secure assembly and prevent hinge slippage.
To Remove the Freezer Door (on Electronic Control Upright models)
The hinge screws are tamperproof. Please have an authorized service technician remove the door.
Lid Removal (on Chest models)
See lid removal instructions on either the back of the cabinet or the hinge label.
11
Instructions Operating Instructions Safety
Instructions |
Installation |
Support Consumer Tips Troubleshooting
Operating Instructions Safety Instructions
Installation |
Instructions |
Consumer Support Troubleshooting Tips
Care and cleaning of the freezer.
In Case of Extended Power Failure
■Keep freezer door/lid closed. Your freezer |
WARNING: Handling of dry ice can cause |
will keep food frozen for 24 hours provided |
freezing of the hands—gloves or other |
warm air is not admitted. |
protection is recommended. |
■If freezer is out of operation for 24 hours or |
■If dry ice is not available, move food to a |
more, add dry ice. Leave ice in large pieces. |
frozen food locker temporarily—until power |
Add more ice as required. |
is restored. |
Preparing to Move
|
Disconnect the power cord plug from the wall |
Be sure freezer stays in upright position |
|
outlet. Remove foods, defrost (on Manual |
during actual moving and in van. The |
|
Defrost models) and clean the freezer. |
freezer must be secured in van to prevent |
|
Secure all loose items such as grille and |
movement. Protect outside of freezer with |
|
blanket. |
|
|
shelves by taping them securely in place |
|
|
|
|
|
to prevent damage. |
|
|
|
|
|
|
|
Preparing for Vacation
To maintain freezer in operation during vacations, be sure your house power is not turned off. For sure protection of freezer contents, you may want to ask a neighbor to check the power supply and freezer operation every 48 hours.
For extended vacations or absences, you may prefer to move your frozen foods to a storage locker temporarily. If your freezer is to be left empty, disconnect power cord plug from wall outlet. To prevent formation of odors, place open box of baking soda in freezer and leave freezer door/lid open.
When the freezer is not operating, it can be left in an unheated house or room without damage to cabinet or mechanism.
■ The freezer should be located in the coolest area of the room, away from heat-producing appliances or heating ducts, and out of direct sunlight.
■Let hot foods cool to room temperature before placing in the freezer. Overloading the freezer forces the compressor to run longer. Foods that freeze too slowly may lose quality or spoil.
■Be sure to wrap foods properly, and wipe containers dry before placing them in the freezer. This cuts down on frost buildup inside the freezer.
■Freezer shelves should not be lined with aluminum foil, wax paper or paper toweling. Liners interfere with cold air circulation, making the freezer less efficient.
■Organize and label food to reduce door openings and extended searches. Remove as many items as needed at one time, and close the door as soon as possible.
12
Preparing to install the freezer. |
ge.com |
Read these instructions completely and carefully.
Freezer Location
Your freezer should be conveniently located for day-to-day use in a dry, well-ventilated room.
Do not install the freezer where the temperature will go below 0°F or above 110°F, because it will not maintain proper temperatures.
Be sure to install your freezer on a floor strong enough to support it when it is fully loaded.
The freezer must be solidly positioned on the floor if it is to function at its best. Shims may be used to accomplish this wherever the floor is too uneven.
If the place selected for the freezer is damp or moist, place 2 X 4’s (51 mm X 102 mm) under its entire length to ensure adequate support.
Clearances
On all models, allow 3″ (76 mm) on top, back and sides for proper air circulation.
Turn right |
Turn left |
to lower |
to raise |
|
|
|
|
|
|
Adjustable Legs (on Upright models)
Legs at the front corners of the freezer should be set so the freezer is firmly positioned on the floor, and the front is raised just enough so the door closes easily when opened about halfway.
Level Freezer
Upright Models:
Discard crate screws and wood base. Use a carpenter’s level to level the freezer from back to front. Adjust the plastic leveling feet in front 1/2 bubble higher so the door closes easily when left open.
Chest Models:
If needed, add metal or wood shims between foot pads and floor.
Unit Loading (on Upright models)
CAUTION: To allow the door to close and seal properly, DO NOT let food packages extend past the front of the shelves.
13
Instructions Operating Instructions Safety
Instructions |
Installation |
|
|
Support Consumer Tips Troubleshooting
Operating Instructions Safety Instructions
Installation |
Instructions |
Consumer Support Troubleshooting Tips
Normal operating characteristics.
These things are normal and
do not indicate a need for service.
■A warm cabinet exterior as the refrigeration system transfers heat from the inside to the outside through the exterior cabinet walls.
■The sound of the high-efficiency compressor motor.
■On No-Frost models, the sound of water dripping as it melts from the evaporator and escapes to the drain pan during defrost cycle.
■On No-Frost models, the sound of the fan circulating air within the interior of the cabinet providing a consistent temperature throughout.
Before you call for service…
Troubleshooting Tips
Save time and money! Review the charts on the following pages first and you may not need to call for service.
Problem |
|
Possible Causes |
What To Do |
|
|
|
|
Freezer does not |
|
Temperature control |
• Move the control to a temperature setting. |
operate or Power-On |
|
in OFF position. |
|
Light is not on |
|
|
|
|
Freezer is unplugged. |
• Push the plug completely into the outlet. |
|
|
|
||
|
|
|
|
|
|
The fuse is blown/circuit |
•Replace fuse or reset the breaker. |
|
|
breaker is tripped. |
|
|
|
|
|
Freezer starts/stops |
|
Door/lid left open. |
• Check to see if package is holding door/lid open. |
too frequently |
|
|
|
|
Too frequent or too long |
|
|
|
|
|
|
|
|
door/lid openings. |
|
|
|
|
|
|
|
Temperature control |
•See About the operation of your freezer. |
|
|
set too cold. |
|
|
|
|
|
Freezer operates |
|
Door/lid left open. |
• Check to see if package is holding door/lid open. |
too long |
|
|
|
|
Too frequent or too long |
|
|
|
|
|
|
|
|
door/lid openings. |
|
|
|
|
|
|
|
Temperature control |
• See About the operation of your freezer. |
|
|
set too cold. |
|
|
|
|
|
|
|
Inadequate air circulation |
•See Preparing to install the freezer. |
|
|
space around cabinet. |
|
|
|
|
|
|
|
Room or outside weather is hot. |
•It’s normal for the freezer to work harder under these |
|
|
|
conditions. |
|
|
|
|
|
|
Freezer has been disconnected |
•It takes 4 hours for the freezer to cool down completely. |
|
|
recently for a period of time. |
|
|
|
|
|
|
|
Large amounts of warm or hot |
•Warm food will cause the freezer to run more until the |
|
|
food have been stored recently. |
desired temperature is reached. |
14

|
|
|
ge.com |
|
|
|
|
Problem |
|
Possible Causes |
What To Do |
|
|
|
|
Noisy operation |
|
Floor may be weak, causing |
• Placing 2 X 4’s (51 mm X 102 mm) under the length of |
or cabinet vibrates |
|
freezer to vibrate when |
the freezer will help support it and may reduce vibration. |
|
|
compressor is on. |
|
|
|
|
|
|
|
Cabinet is not positioned |
•Adjust legs (on Upright models). See Preparing to |
|
|
solidly on floor. |
install the freezer. Or use shims for uneven floor. |
|
|
|
|
|
|
Freezer is touching the wall. |
•Level freezer or move slightly. See Level Freezers. |
|
|
|
|
Freezer temperature |
|
Door/lid left open. |
• Check to see if package is holding door/lid open. |
too warm |
|
|
|
|
Too frequent or too long |
|
|
|
|
|
|
|
|
door/lid openings. |
|
|
|
|
|
|
|
Temperature control is set |
•Turn control to a colder setting. Allow several hours for |
|
|
too warm. |
the temperature to stabilize. |
|
|
|
|
|
|
Large amounts of water or hot food •Wait until the freezer has had a chance to reach its |
|
|
|
may have been stored recently. |
selected temperature. |
|
|
|
|
|
|
Freezer has been disconnected |
•Freezer requires 4 hours to cool down completely. |
|
|
recently. |
|
|
|
|
|
Foods defrosting |
|
Temperature control |
•Move the control to a temperature setting. |
|
|
in OFF position. |
|
|
|
|
|
|
|
Freezer is unplugged. |
• Push the plug completely into the outlet. |
|
|
|
|
|
|
The fuse is blown/circuit |
• Replace fuse or reset the breaker. |
|
|
breaker is tripped. |
|
|
|
|
|
|
|
Door/lid left open. |
• Check to see if package is holding door/lid open. |
|
|
|
|
|
|
Too frequent or too long |
|
|
|
door/lid openings. |
|
|
|
|
|
Freezer temperature |
|
Temperature control |
•See About the operation of your freezer. |
too cold |
|
set too cold. |
|
|
|
|
|
Moisture forms on |
|
Not unusual during |
•Wipe surface dry. |
outside of cabinet |
|
periods of high humidity. |
|
|
|
|
|
|
|
Door may not be seating properly, •See Preparing to install the freezer. |
|
|
|
causing cold air from inside the |
|
|
|
freezer to meet warm moist air |
|
|
|
from the outside. |
|
|
|
|
|
Interior light does |
|
No power at outlet. |
• Replace fuse or reset the breaker. |
not work |
|
|
|
|
Freezer is unplugged. |
• Push the plug completely into the outlet. |
|
(on some models) |
|
||
|
|
|
|
|
|
Light bulb burned out. |
•Replace bulb. |
|
|
|
|
Door/lid won’t fully |
|
Legs need adjusting. |
• See Preparing to install the freezer. |
close by itself |
|
|
|
|
Package holding door/lid open. |
|
|
|
|
|
|
|
|
|
|
Slow starting time |
|
Built-in overload protection. |
|
after being off |
|
|
|
|
|
|
|
Excessive frost |
|
Door/lid left open. |
• Check to see if package is holding door/lid open. |
buildup |
|
|
|
|
Too frequent or too long |
|
|
|
|
|
|
|
|
door/lid openings. |
|
|
|
|
|
|
|
Not unusual during |
|
|
|
periods of high humidity. |
15 |
|
|
|
|
Instructions Operating Instructions Safety
Instructions |
Installation |
Support Consumer Tips Troubleshooting

Operating Instructions Safety Instructions
Installation |
Instructions |
Consumer Support Troubleshooting Tips
Before you call for service…
Problem |
|
Possible Causes |
What To Do |
|
|
|
|
Freezer external surface |
|
The external freezer walls can be •This is normal while the compressor works to transfer |
|
temperature is warm |
|
as much as 30°F warmer than |
heat from inside the freezer cabinet. |
|
|
room temperature. |
|
|
|
|
|
Louder sound levels |
|
Modern freezers have increased •This is normal. When the surrounding noise level is low, |
|
whenever freezer is on |
|
storage capacity and more stable |
you might hear the compressor running while it cools |
|
|
temperatures. They require a |
the interior. |
|
|
high-efficiency compressor. |
|
|
|
|
|
Longer sound levels |
|
Freezer operates at higher |
•This is normal. Sound will level off or disappear as |
when compressor |
|
pressures during the start of |
freezer continues to run. |
comes on |
|
the ON cycle. |
|
|
|
|
|
Popping or cracking sound |
|
Metal parts undergo expansion and •This is normal. Sound will level off or disappear as |
|
when compressor comes on |
|
contraction, as in hot water pipes. |
freezer continues to run. |
|
|
|
|
Bubbling or gurgling |
|
Refrigerant (used to cool freezer) is |
•This is normal. |
sound, like boiling water |
|
circulating throughout the system. |
|
|
|
|
|
Moisture forms on inside |
|
Weather is hot and humid, which |
• This is normal. |
freezer walls |
|
increases internal rate of frost |
|
|
|
buildup. |
|
|
|
|
|
|
|
Door may not be seating properly. •See Preparing to install the freezer. |
|
|
|
|
|
|
|
Door is kept open too long, or is |
•Open the door less often. |
|
|
opened too frequently. |
|
|
|
|
|
Odors in freezer |
|
Interior needs to be cleaned. |
• Clean interior with sponge, warm water and baking soda. |
|
|
|
|
|
|
Foods with strong odors are in |
• Cover the food tightly. |
|
|
the freezer. |
|
|
|
|
|
16

GE Service Protection Plus™
GE, a name recognized worldwide for quality and dependability together with Assurant Solutions, offers you Service Protection Plus™—comprehensive protection on your appliances.*
Benefits Include:
•Prompt, reliable service from GE Authorized Servicers
•Convenient hours designed to suit your busy schedule
•Quality replacement parts
•The dependability of GE, a name recognized and trusted worldwide
•Ask about our interest-free payment plans
With Service Protection Plus you can expect:
•An extended service plan that limits unexpected repair bills
•Service coverage for most major brands
•Unlimited service calls for the length of your contract, or credit toward a replacement product
•Service coverage for covered operating parts and labor on appliances and home electronics that fail during normal single family household use
•Your satisfaction is our goal. We strive to provide you with excellent service in a professional and timely manner.
Place your confidence in GE and call us in the U.S. toll-free at 1.800.626.2224 for more information.
*Most brands covered up to 15 years old in the continental U.S.
SPP is a trademark of General Electric Company.
Cut here
Please place in envelope and mail to:
General Electric Company
Warranty Registration Department
P.O. Box 32150
Louisville, KY 40232-2150
17
Consumer Product Ownership Registration
Dear Customer:
Thank you for purchasing our product and thank you for placing your confidence in us. We are proud to have you as a customer!
Follow these three steps to protect your new appliance investment:
1 |
Complete and mail |
2 |
After mailing the |
3 |
|
your Consumer |
|
registration below, |
|
|
Product Ownership |
|
store this document |
|
|
Registration today. |
|
in a safe place. It |
|
|
Have the peace of |
|
contains information |
|
|
mind of knowing we |
|
you will need should |
|
|
can contact you in |
|
you require service. |
|
|
the unlikely event of a |
|
Our service number is |
|
|
safety modification. |
|
800.GE.CARES |
|
|
|
|
(800.432.2737). |
|
Read your Owner’s Manual carefully. It will help you operate your new appliance properly.
Model Number |
Serial Number |
Important: If you did not get a registration card with your product, detach and return the form below to ensure that your product is registered, or register
online at www.ge.com.
Cut here
Consumer Product Ownership Registration
Important
Today!
Model Number |
Serial Number |
|
Mr. ■ |
Ms. ■ Mrs. ■ |
Miss ■ |
|
|
|
|
|
|
|
|
|
|
|
|
|
|
|
|
|
|
|
|
|
|
|
|
|
||||||
First |
|
|
|
|
|
|
|
|
|
|
|
|
Last |
|
|
|
|
|
|
|
|
|
|
|
|
|
|
|
|
|
|
|
|
|
|
|
|
|
|
|
|
|
|
|
|
|
|
|
|
|
|
|
|
|
|
|
|
|
|
|
|
|
|
|
|
|
|
||
Name |
|
|
|
|
|
|
|
|
|
|
|
Name |
|
|
|
|
|
|
|
|
|
|
|
|
|
|
|
|
|
|
|
|
|
|
Street |
|
|
|
|
|
|
|
|
|
|
|
|
|
|
|
|
|
|
|
|
|
|
|
|
|
|
|
|
|
|
|
|
|
|
|
|
|
|
|
|
|
|
|
|
|
|
|
|
|
|
|
|
|
|
|
|
|
|
|
|
|
|
|
|
|
|
|
|
|
Address |
|
|
|
|
|
|
|
|
|
|
|
|
|
|
|
|
|
|
|
|
|
|
|
|
|
|
|
|
|
|
|
|
|
|
|
|
|
|
|
|
|
|
|
|
|
|
|
|
|
|
|
|
|
|
|
|
|
|
|
|
|
|
|
|
|
|
|
|
|
|
|
|
|
|
|
|
|
|
|
|
|
|
|
|
|
|
|
|
|
|
|
|
|
|
|
|
|
|
|
|
|
|
|
|
Apt. # |
|
|
|
|
|
|
|
|
|
|
|
E-mail Address* |
|
|
|
|
|
|
|
|
|
|
|
|
|
|
|
|
|
|
|
|
||
|
|
|
|
|
|
|
|
|
|
|
|
|
|
|
|
|
|
|
|
|
|
|
|
|
|
|
|
|
|
|||||
City |
|
|
|
|
|
|
|
|
|
|
|
|
|
|
|
|
State |
|
|
|
|
|
Zip |
|
|
|
|
|
|
|
|
|
||
|
|
|
|
|
|
|
|
|
|
|
|
|
|
|
|
|
|
|
|
|
|
|
|
|
|
|
|
|
|
|||||
|
|
|
|
|
|
|
|
|
|
|
|
|
|
|
|
|
|
|
|
|
Code |
|
|
|
|
|
|
|
|
|
||||
Date Placed |
|
|
|
|
|
|
|
|
|
|
|
|
|
Phone |
|
|
|
|
_ |
|
|
|
|
|
|
_ |
|
|
|
|
|
|
||
In Use |
|
|
|
|
|
|
|
|
|
|
|
|
|
|
|
|
|
|
|
|
|
|
|
|
|
|
|
|||||||
Month |
|
|
|
|
Day |
|
|
|
Year |
|
|
|
|
Number |
|
|
|
|
|
|
|
|
|
|
|
|
|
|
|
|
|
|
|
|
|
|
|
|
|
|
|
|
|
|
|
|
|
|
|
|
|
|
|
|
|
|
|
|
|
|
|
|
|
|
|||||
GE Consumer & Industrial
Appliances
General Electric Company Louisville, KY 40225 ge.com
*Please provide your e-mail address to receive, via e-mail, discounts, special offers and other important communications from GE Appliances (GEA).
■ Check here if you do not want to receive communications from GEA’s carefully selected partners.
FAILURE TO COMPLETE AND RETURN THIS CARD DOES NOT DIMINISH YOUR WARRANTY RIGHTS.
For information about GEA’s privacy and data usage policy, go to www.ge.com and click on “Privacy Policy” or call 800.626.2224.
18
 Loading...